7 Best Table of Contents Plugins for WordPress (Expert Pick)

Are you looking for a plugin to add a table of contents to your WordPress website?

A table of contents can improve readability and make it easier for users to digest lengthy content by letting them jump ahead to any section of a post or page. Google will also use your table of contents to index and rank your pages and posts in search results.

In this article, we’ll show you the best table of contents plugins for WordPress.

Best table of content plugins for WordPress

Why Use a Table Content Plugin in WordPress?

Adding a table of contents (ToC) to your WordPress website is a great way to help visitors navigate longer blog posts and pages.

You can easily organize and structure your content so it’s easier for people to scan through the article and jump to any section they’re interested in.

It also helps with your WordPress SEO, since search engines like Google can add jump-to-section links next to your website in the search results. Google can also display your table of contents list in featured snippets.

You can manually add a table of contents in WordPress by writing HTML code and CSS or by using advanced settings in the block editor. However, this is time-consuming and can be tricky for beginners because the slightest mistake would mean your table of contents won’t work.

An easier way to create a table of contents is using a WordPress plugin. You won’t have to edit HTML code, and there are more customization options.

Let’s look at some of the best table of contents plugins for WordPress.

1. All in One SEO (AIOSEO)

All In One SEO - AIOSEO

All in One SEO (AIOSEO) is the best WordPress SEO plugin. It helps you optimize your website for search engines without technical knowledge or having to hiring a professional.

AIOSEO makes it super easy to add a table of contents to your WordPress site. It offers a table of contents block in the WordPress content editor that you can add anywhere in your blog post.

AIOSEO table of content block

The AIOSEO block will automatically generate a table of contents using your heading levels from H1 to H6.

Unlike other automatic table of content plugin though, AIOSEO actually lets you hide an individual heading or even completely customize the title as needed in the table of content. You can also reorder the headings and change the style from bullet format to numbers.

AIOSEO table of content block settings

Aside from that, AIOSEO helps you create XML sitemaps for your site, so search engines can easily discover new content. It also helps add schema markup and increase the visibility of your content in rich snippets.

You can also use the plugin to conduct an SEO audit and see if everything is optimized correctly. AIOSEO will suggest fixing different issues that might stop your site from ranking higher in search results.

AIOSEO premium plans start from $49.60 per year. There is also an AIOSEO Lite version you can try for free.

2. Easy Table of Contents

Easy table of contents

Easy Table of Contents is a popular plugin that you can use to add a table of contents to your blog posts, landing pages, sidebar, and custom post types.

The plugin is user-friendly and automatically generates a listing using content from the headings in the article. It works seamlessly with the WordPress block editor, classic editor, Divi and Elementor page builders, and more.

Using the plugin, you also get an auto-insert functionality for adding the table of contents in different post types.

Plus, you get other customization options like changing the table’s width, editing the font size, choosing a theme, and selecting the number of headings to use when creating a table of contents.

3. LuckyWP Table of Contents

LuckyWP table of content

LuckyWP Table of Contents is the next WordPress ToC plugin on our list. It has multiple customization options to change the look and feel of your table of contents.

For instance, you can pre-built color schemes to match your brand. You also get options to edit the appearance by changing the width, font size, item font size, and colors.

The plugin lets you choose bullets or numbers to show items in the table contents. You can also use decimals and roman numerals in the listing.

Besides that, the plugin offers 3 options to add the table of contents anywhere on your site. For example, you can use a shortcode, widget, or WordPress content editor block.

4. Joli Table Of Contents

Joli table of contents

Joli Table of Contents is an SEO-friendly table of contents plugin for WordPress.

It’s lightweight and doesn’t hinder the performance of your website. The table of contents only loads when it’s supposed to display. Plus, the table is fully responsive, so you don’t have to worry about optimizing it for different devices.

With the Joli Table of Contents plugin, you get many options to customize the appearance of the table of contents. It comes with 2 themes for the table and 4 free icons for the expanding and collapsing buttons.

Besides that, the plugin lets you choose a numbering prefix, change the font size, adjust the table’s width, add a shadow, and more.

5. CM Table Of Contents

CM table of contents

CM Table of Contents by CreativeMindsSolutions is a super easy-to-use plugin for creating a table of contents.

In the plugin, you can choose which post types you’d like the table of contents to appear on, including blog posts, specific pages, sidebar widget areas, and custom pages. You also get to make the table collapse and expand in your content.

The best part about using the CM Table of Contents plugin is that you get different performance settings. This helps you ensure that are no delays when the table of contents loads.

Besides that, there are many styling options for your table of contents. You can change the size, color, weight, and style for each level in the table. The plugin also lets you show the TOC in one or two columns.

6. SimpleTOC – Table of Contents Block

SimpleTOC

SimpleTOC is the basic WordPress table of contents plugin. It’s beginner friendly and offers standard features.

You can easily add TOC to your blog posts using the SimpleTOC block in the WordPress content editor. The plugin doesn’t require additional configuration, and you can control all the settings from the content editor.

SimpleTOC lets you select the maximum and minimum heading levels it should include in the table of contents, show/hide the table’s heading, and more.

On the downside, you don’t get any customization options compared to other plugins on our list, like AIOSEO. To style the table of contents, you’ll need to use the native styling options in the WordPress theme customizer or full site editor.

7. Heroic Table of Contents

Heroic table of contents

Heroic Table of Contents is another table of contents WordPress plugin that you can use to provide better navigation of your blog posts. The best part is that it’s 100% free.

The plugin offers a WordPress block that you can use to add a table of contents to your post and pages. It provides 4 pre-built table styles to choose from, including outlined, rounded, contrasted, and gray.

Additionally, you can show a collapse or expand icon for your TOC, use bullets, numbers, or plain text in the table, and more formats. Heroic Table of Contents is SEO friendly and mobile responsive, so you don’t have to worry about your site’s load time and user experience.

Which is the Best Table of Contents WordPress Plugin?

If you’re looking for the best plugin to help you optimize your content for search engines and easily add a table of contents, then we recommend All in One SEO (AIOSEO).

You can use the AIOSEO block to add a table of contents, customize it, and hide headings inside the WordPress content editor. Besides that, AIOSEO helps you create sitemaps, optimize your content for SEO, and so much more.

On the other hand, if you’re looking for a dedicated table of contents WordPress plugin, then check out Easy Table of Contents. It is beginner friendly and offers multiple customization options.

We hope that this article helped you learn about the best table of contents plugins for WordPress. You may also want to see our guide on how to start a WordPress blog and the best web design software.

If you liked this article, then please subscribe to our YouTube Channel for WordPress video tutorials. You can also find us on Twitter and Facebook.

The post 7 Best Table of Contents Plugins for WordPress (Expert Pick) first appeared on WPBeginner.

How to Create a Table of Contents in WordPress Posts and Pages

Do you want to add a table of contents to your WordPress posts or pages?

A table of contents can make navigating a long article easier and improve your site’s SEO. However, they can be tricky for beginners to create.

In this article, we’ll show you how to create a table of contents in WordPress posts and pages.

How to Create a Table of Contents in WordPress Posts and Pages

Why Add a Table of Contents to Posts and Pages in WordPress?

You may have seen the table of contents on websites like Wikipedia. We also use them on WPBeginner for our long guides such as our ultimate guide to WordPress speed and performance.

You can add a table of contents to posts on your WordPress website to make it easier to jump between the sections of a long article.

Not only do they improve the user experience, but they will also help your WordPress SEO. That’s because Google can use the table of contents to automatically add ‘jump to section’ links in search results.

Google Includes Table of Contents Entries in Search Results

A table of contents can also help your post be listed as a featured snippet at the top of the search engine results page. This will help you get the maximum SEO traffic.

Tables of Contents Are Also Used in Featured Snippets

With that being said, let’s take a look at how to create a table of contents in WordPress posts and pages. We’ll show you how to do it automatically with a plugin and manually using anchor links:

Adding a Table of Contents Automatically in WordPress

AIOSEO, also known as All in One SEO, is the best WordPress SEO plugin and it comes with a built-in table of content block for WordPress.

We recommend this method because it saves you time by automatically generating the table of contents based on your subheadings, while also making it completely customizable with editable links.

The first thing you need to do is install the free All in One SEO Lite plugin. For more details, see our step-by-step guide on how to install a WordPress plugin.

You just need the free version to easily add a table of contents, but AIOSEO Pro offers even more features to help you rank better in search engine results pages.

Upon activation, you will need to configure the plugin using the AIOSEO setup wizard. For detailed instructions, see our guide on how to set up All in One SEO for WordPress correctly.

Adding a Table of Contents with AIOSEO

You’ll need to create or edit the post or page where you wish to add the table of contents. After that, click the blue ‘+ ’ icon and locate the ‘AIOSEO – Table of Contents’ block.

Add an AIOSEO Table of Contents Block to the Post or Page

Simply drag the block onto the post or page where you wish the table of contents to appear.

Note: Once you add a table of contents, you may notice that the ‘AIOSEO – Table of Contents’ block will be grayed out. That’s because you can only have one table of contents per post or page.

The plugin will automatically identify the headings on the page and add them to your table of contents. If you use different heading levels (say H2 and H3), then lower level headings will be indented to show the structure of your content.

If you are still writing the contents of your post or page, then any headings added to the document will be automatically added to the table of contents.

Customizing the Table of Contents with AIOSEO

There are a few ways you can customize the table of contents to suit your needs. For example, you can click on a heading to rename it. This will rename the heading in the table of contents, but not the article.

Customizing Your Table of Contents

AIOSEO will automatically create anchor links for each heading. You can click on the Link icon to edit the anchor text, and this is changed both in the table of contents and at the heading in the post content.

You can also click the eye icon next to any of the headings to hide it. AIOSEO Pro users can reorder the headings in the table of contents block. Doing so will rearrange the headings in the table of contents, but not in the article.

You will also find a setting for the block in the sidebar. Here you can choose a bulleted or numbered list style for your table of contents.

Your Table of Contents Can Be in a Bulleted or Numbered List

Finally, when you have finished customizing your table of contents, you need to click the ‘Done’ button to save your changes.

Now you will be able to see how the table of contents will look to your visitors.

Your Table of Contents is a List of Links to Headings in the Post or Page

It’s a good idea to add a heading or paragraph above the table of contents. This will make it clear to your readers that they are looking at a table of contents.

When your visitors click a link in the table of contents, they will be taken immediately to that heading in the article. This allows users to jump to the section they’re most interested in.

Anchor link preview

The reason why we like AIOSEO’s table of content feature compared to other WordPress table of content plugin is because it lets you customize the headings and selectively hide headings as needed.

This is a critical feature that most other table of content plugins simply don’t have.

Adding a Table of Contents Manually in WordPress

You can also create a table of contents manually using anchor links, without the need for a plugin. However, this will take more time and effort.

You can learn more about anchor links in our guide on how to add anchor links in WordPress.

Typing the Table of Contents

First, you need to add a ‘List’ block where you can add the headings for the table of contents. You can either type the headings into the list or copy and paste them one by one from your article content.

You Need to Type a List of Headings

How to Add Anchor Text to Heading Blocks

Next, you will need to add an anchor attribute to each heading you want to reference in the table of contents. This will let WordPress know where to jump when a visitor clicks the heading in the table of contents.

You should first click on the heading, such as H2 or H3. Then you need to click the ‘Advanced’ arrow in the block settings pane to show the advanced settings.

After that, enter a unique word or phrase without spaces into the ‘HTML anchor’ field. If you like, you can use hyphens to separate each word.

You Need to Create an HTML Anchor Attribute for Each Heading

Then, simply repeat this for all other headings that will be included in the table of contents.

Hint: If you paste the heading into this field, hyphens will be added automatically. This is an easy way to create a unique ID that also clearly represents the heading.

Adding Anchor Links to the Table of Contents

The last step is to link the headings in the table of contents to the HTML anchors you created.

You should highlight the first entry in your List block, and then click the ‘Link’ icon in the toolbar.

Highlight the Heading Text and Click the Link Icon

Next, you should type a hashtag (#), and then type or paste the anchor text for that heading.

The # tells WordPress to jump to that section of the current post. You do not add the domain name or other URL parameters.

Type a Hashtag and Then the Anchor Text

Once that is done, you need to press ‘Enter’ or click the ‘Submit’ icon to create the link.

The anchor link will be added to your table of contents list. When your visitors click this link, they will be immediately taken to that heading in the post or page contents.

An Anchor Link Is Added to the Table of Contents

You can repeat these steps to add anchor links to the other headings in the table of contents.

We hope this tutorial helped you learn how to create a table of contents in WordPress posts and pages. You may also want to learn how to increase your blog traffic, or check out our list of must have plugins to grow your site.

If you liked this article, then please subscribe to our YouTube Channel for WordPress video tutorials. You can also find us on Twitter and Facebook.

The post How to Create a Table of Contents in WordPress Posts and Pages first appeared on WPBeginner.

How to “Easily” Add Anchor Links in WordPress (Step by Step)

We occasionally use anchor links in our longer WordPress posts to help users quickly jump to the section they want to read.

Anchor links are often used in the table of content sections because they help users move up and down a lengthier article without reloading the page. It can also help with SEO as Google may show them below your search listings for easy navigation (more on this later).

In this step by step guide, we will explain what are anchor links and show you how to easily add anchor links in WordPress.

Adding anchor links in WordPress

Ready? Let’s start with a live example of anchor links.

Below is a list of all the topics we will cover in this guide. Go ahead and click on any of these links, and you’ll be taken to that specific section.

An anchor link is a type of link on the page that brings you to a specific place on that same page. It allows users to jump to the section they’re most interested in.

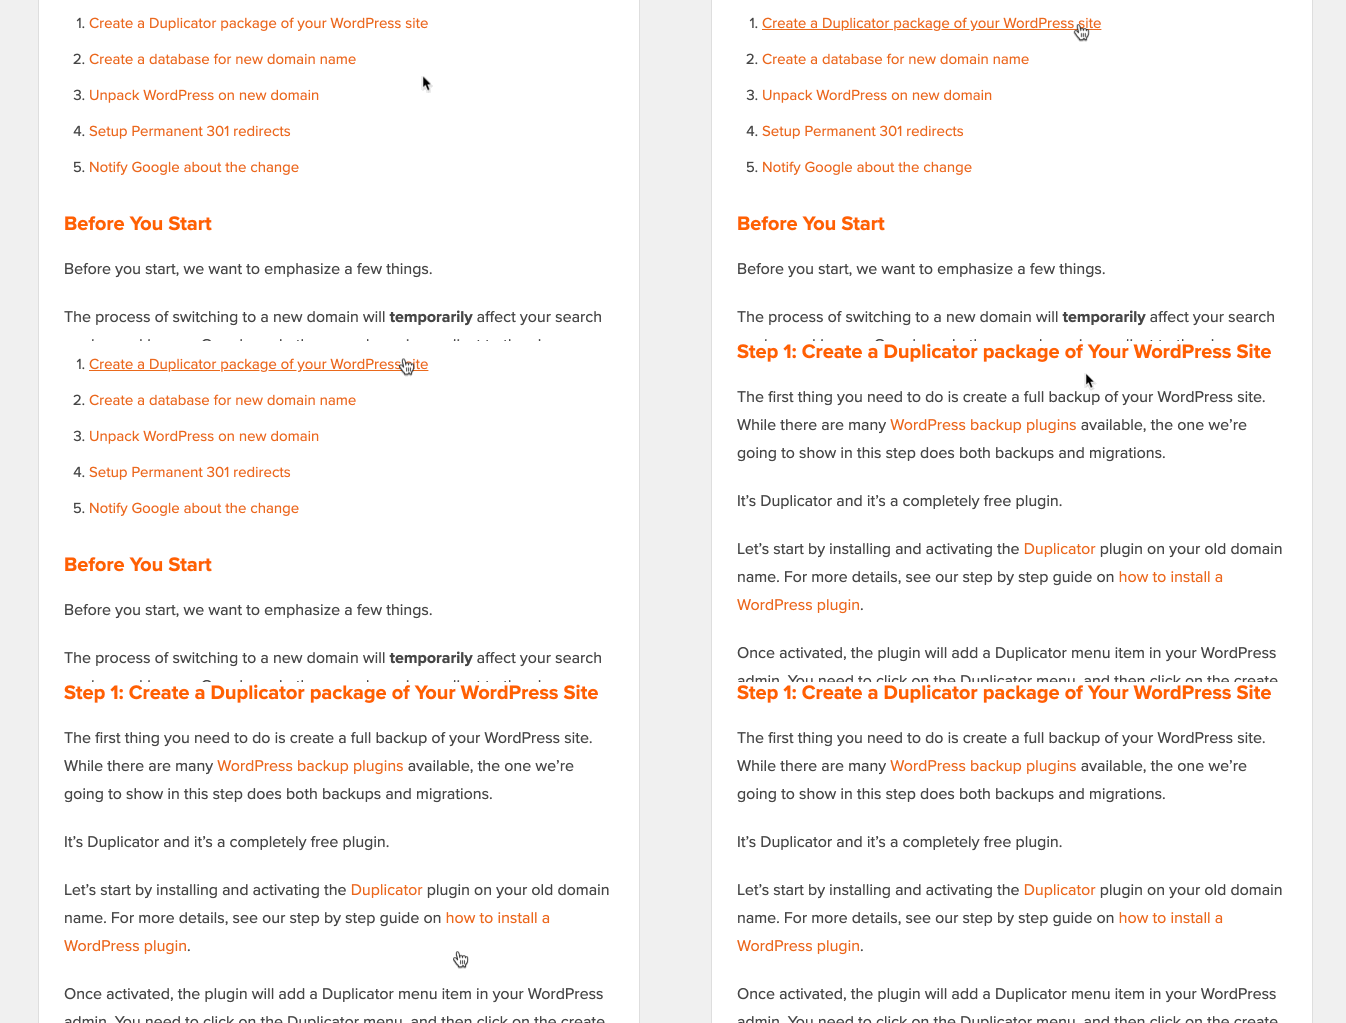
Take a look at the animated screenshot below:

Anchor link preview

As you can see, clicking on the anchor link takes the user to the specific section on the same page.

Anchor links are commonly used in lengthier articles as the table of content which allows users to quickly jump to the sections they want to read.

Why and when you should use anchor links?

An average user spends less than a few seconds before deciding if they want to stay or leave your website. You have just those few seconds to convince users to stay.

The best way to do that is to help them quickly see the information they’re looking for.

Anchor links make this easier by allowing users to skip the rest of the content and jump directly to the part that interests them. This improves user experience and helps you win new customers / readers.

Anchor links are also great for WordPress SEO. Google can display an anchor link in the search results as a “jump to link”.

Jump to link in search results

Sometimes Google can also display several links from that page as jump to links, and this is proven to increase the click-through rate in search results. In other words, you get more traffic to your website.

Multiple jump to links below a search result

Having said that, let’s take a look at how to easily add anchor links in WordPress.

If you just want to add a few anchor links in your article, then you can easily do so manually.

Basically you need to add two things for an anchor text to work as intended.

  1. Create an anchor link with a # sign before the anchor text.
  2. Add the id attribute to the text where you want the user to be taken.

Let’s start with the anchor link part.

Step 1. Creating an anchor link

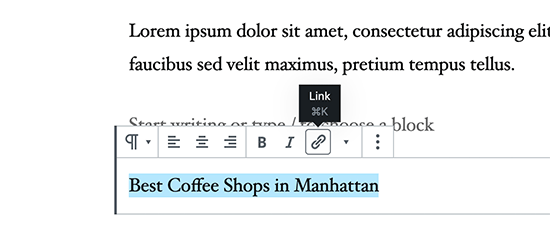
First you need to select the text that you want to link and then click on the insert link button in the WordPress Gutenberg editor.

Add a link in WordPress

This will bring up the insert link popup where you usually add the URL or look for a post or page to link.

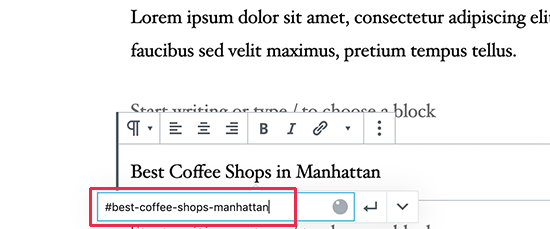
However, for an anchor link, you’ll simply use # as prefix and enter the keywords for the section you want the user to jump to.

Creating anchor link

After that click on the enter button to create the link.

Some helpful tips on choosing what text to use as your anchor # link:

  • Use the keywords related to the section you are linking to.
  • Don’t make your anchor link unnecessarily long or complex.
  • Use hyphens to separate words and make them more readable.
  • You can use capitalization in anchor text to make it more readable. For example: #Best-Coffee-Shops-Manhattan.

Once you add the link, you will be able to see the link you have created in the editor. However, clicking on the link doesn’t do anything.

That’s because the browsers cannot find the anchor link as an ID.

Let’s fix that by pointing browsers to the area, section, or text that you want to show when users click on the anchor link.

Step 2. Add the ID attribute to the linked section

In the content editor, scroll down to the section that you want the user to navigate to when they click on the anchor link. Usually, it is a heading for a new section.

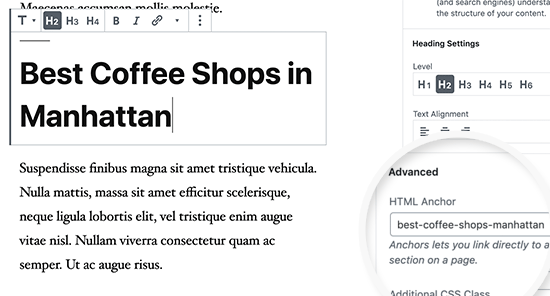
Next, click to select the block and then in the block settings click on the Advanced tab to expand it. You can simply click on the ‘Advanced’ tab under the heading block settings.

HTML Anchor

After that, you need to add the same text that you added as the anchor link under the ‘HTML Anchor’ field. Make sure that you add the text without the # prefix.

You can now save your post and see your anchor link in action by clicking on the preview tab.

What if the section you want to show is not a heading but just a regular paragraph or any other block?

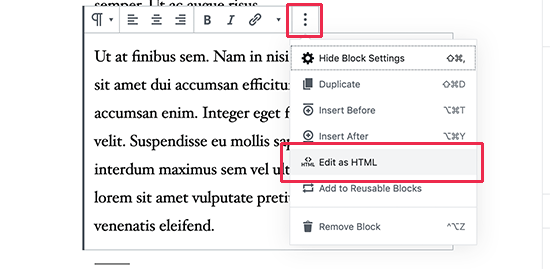
In that case, you need to click on the three-dot menu on the block settings and select ‘Edit as HTML’.

Edit as HTML

This will allow you to edit the HTML code for that particular block. You need to select find the HTML tag for the element you want to point to. For example, <p> if it is a pagraph, or <table> if it is a table block, and so on.

Now, you need to add your anchor as the ID attribute to that tag, like the following code:

<p id="best-coffee-shops-manhattan">

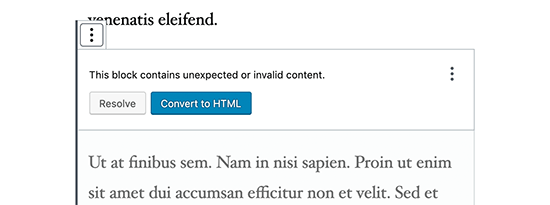
You will now see a notice that this block contains unexpected or invalid content. You need to click on the convert to HTML to preserve the changes you made.

Convert to HTML

How to Manually Add Anchor Link in Classic Editor

If you are still using the older classic editor for WordPress, then here is how you can add the anchor link.

Step 1. Create the anchor link

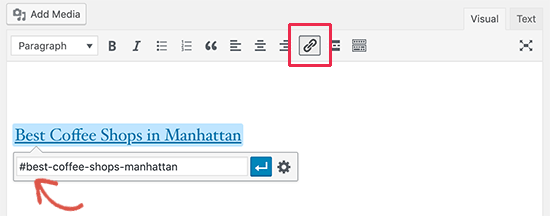
First, select the text that you want to change into the anchor link and then click on the ‘Insert Link’ button.

Adding an anchor link in Classic Editor

After that, you need to add your anchor link with a # sign prefix followed by the slug you want to use for the link.

Step 2. Add the ID attribute to the linked section

The next step is to point the browsers to the section you want to show when users click on your anchor link.

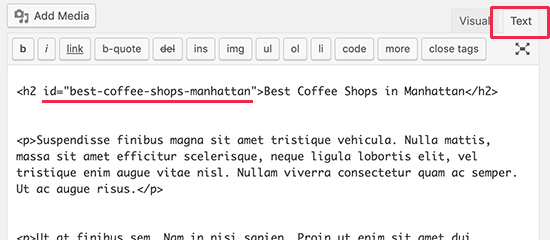
For that, you’ll need to switch to the ‘Text’ mode in the classic editor. After that scroll down to the section that you want to show.

Adding anchor ID in Classic Editor

Now locate the HTML tag you want to target. For example, <h2>, <h3>, <p>, and so on.

You need to add the ID attribute to it with your anchor link’s slug without the # prefix, like this:

<h2 id="best-coffee-shops-manhattan">

You can now save your changes and click on the preview button to see your anchor link in action.

How to Manually Add Anchor Links in HTML

If you are used to writing in the Text mode of the old Classic Editor in WordPress, then here is how you would manually create an anchor link in HTML.

First, you need to create the anchor link with a # prefix using the usual <a href=""> tag, like this:

<a href="#best-coffee-shops-manhattan">Best Coffee Shops in Manhattan</a>

Next, you need to scroll down to the section that you want to show when users click on the link.

Usually, this section is a heading (h2, h3, h4, etc.), but it could be any other HTML element or even a simple paragraph <p> tag.

You need to add the ID attribute to the HTML tag, and then add the anchor link slug without the # prefix.

<h2 id="best-coffee-shops-manhattan">Best Coffee Shops in Manhattan</h4>

You can now save your changes and preview your website to test the anchor link.

This method is suitable for users who regularly publish long-form articles and need to create table of contents with anchor links.

The first thing you need to do is install and activate the Easy Table of Contents plugin. For more details, see our step by step guide on how to install a WordPress plugin.

This plugin allows you to automatically generate a table of contents with anchor links. It uses headings to guess the content sections, and you can customize it fully to meet your needs.

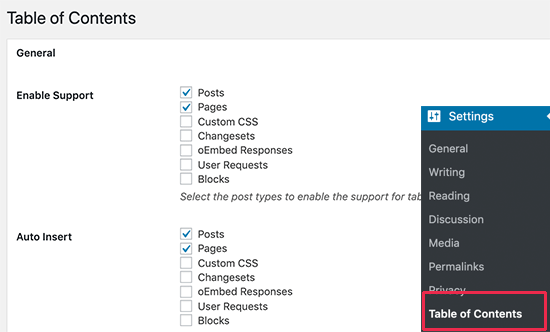
Upon activation, simply go to Settings » Table of Contents page to configure plugin settings.

Easy Table of Contents plugin settings

First, you need to enable it for the post types where you want to add table of contents. By default, the plugin is enabled for pages, but you can also enable it for your posts as well.

You can also enable the auto-insert option. This allows the plugin to automatically generate the table of contents for all articles, including the older articles that match the criteria.

If you only want to automatically generate table of contents for specific articles, then you can leave this option unchecked.

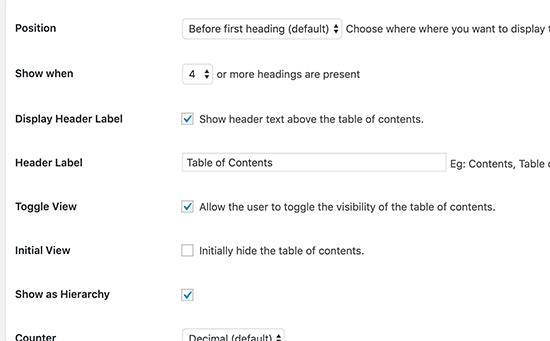
Next, scroll down a little to select where you want to display the table of contents and when you want it to be triggered.

Select where and when to display table of contents

You can review other advanced settings on the page and change them as needed.

Don’t forget to click on the ‘Save Changes’ button to store your settings.

If you enabled the auto-insert option, then you can now view an existing article with the specified number of headings.

You’ll notice that the plugin will automatically display a table of contents before the first heading in the article.

If you wanted to manually generate table of contents for specific articles, then you need to edit the article where you want to display a table of contents with anchor links.

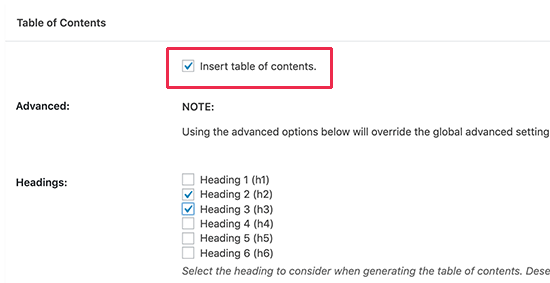
On the post edit screen, scroll down to the ‘Table of Contents’ tab below the editor.

Manually add table of contents with anchor links

From here, you can check the ‘Insert table of contents’ option and select the headings you want to include as anchor links.

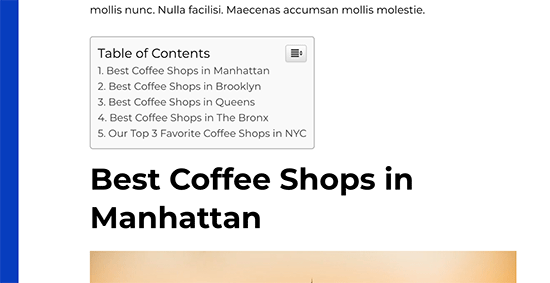
You can now save your changes and preview your article. The plugin will automatically display a list of anchor links as your table of contents.

Table of contents preview

For more detailed instructions, see our article on how to add table of contents in WordPress.

We hope this article helped you learn how to easily add anchor links in WordPress. You may also want to see our tips on how to properly optimize your blog posts for SEO and our pick of the best WordPress page builder plugins.

If you liked this article, then please subscribe to our YouTube Channel for WordPress video tutorials. You can also find us on Twitter and Facebook.

The post How to “Easily” Add Anchor Links in WordPress (Step by Step) appeared first on WPBeginner.