Why (and How) I Write Code With Pencil and Paper

If the thought of handwriting code seems silly, it might surprise you to know that it’s inevitable. If you’re unsure, think about the last job interview you did, and remember how there was no computer around in the interview room — just your interviewers, a blank sheet of paper, and a blue ball-point pen.

For the students among you, it’s even a bigger deal as your grades hang in by the lines of code you had strategically squeezed into the available space in your answer sheet.

And not just that, experienced programmers can point you to the bundle of A4 sheets they had removed from the office copy machine to scribble down a particularly complex algorithm they had been working on.

So whether you’re an exam student, potential job interviewee, or someone wanting to resolve their programming dead ends, I hope this article helps you out when you put your pen to the paper to code.

Although I will focus on the analog aspect of writing code, you can apply these steps to coding in any form or language. So consider this to be also like a generic coding guideline that works specifically for me but can also be very useful to you in your work.

Why write it down?

Before we start, it’s essential to understand that no one expects you to jot down production-ready code in a notebook. It’s not like you can drop that into a code editor and compile it without an error. If producing perfect code was the goal, you would be seated in front of a computer in the interview rooms and exam halls.

The purpose of handwriting code is to work through logic in advance. There’s s desire to “get in the browser” as soon as possible in design, but there is conventional wisdom in sketching designs by hand. A low-fidelity medium encourages quick experimentation and inexpensive mistakes.

White lined paper with cursive handwritten notes on using :nth-child.
The toil of trying to figure out how to affect surrounding items with one click (from my last article)

The same can be true of code, mainly when working out syntax and semantics. That said, getting the correct syntax and semantics is always a plus point, though not the sole focus of the whole handwriting exercise.

Let’s see where we can start when it comes to handwriting code.

Know your question

During my final year in college, I couldn’t do an internship or even attend campus interviews because of health reasons. As a result, my very first job interview was quite literal with high stakes.

When I look back now, the interview was pretty easy. But having never attended one before, I was anxious beyond reason. The first thing the interviewers asked about programming was if I could output an inverted triangle made of asterisks. As I said, it was easy — nothing a for loop can’t handle, right? But like I said, my anxiety was through the roof as well.

I took a deep breath, pressed my palm against the blank sheet of paper they had laid out for me, slid it as slow as possible towards me on the table (buying time, of course), clicked the pen, and then I did something right.

I first drew an inverted triangle made of asterisks. That’s how I found my feet on the ground to start answering their question.

I’ve seen otherwise brilliant developers get something wrong simply because they never fully grasp what it is they are solving.

The questions we work with are not like the questions physicists or mathematicians solve. They get a set of parameters and find the missing ones; our questions are also our results. We are already told what our results are — we have to figure out how to reach them. That’s why it’s imperative to know the question well because you’ll see the result.

Writing down or drawing out what you want to output is one of the best ways to start your coding. I understand that in our fast-paced industry, the expectation is that we have to jump right into the programming by running a “hello world” demo. And that’s great to familiarize yourself with an unfamiliar syntax and shake off your anxiousness about trying something new.

But when someone asks you a question and gives you a result to work up to, wouldn’t it just be better to put that down first? That question/result is not only your starting point but also your point of reference. At any step in your coding, you can look at it to ensure you’re working towards it and that you’re on the right track.

So whether in your answer sheets or in that blank A4 paper you’re about to write in, start by taking a second and writing down what it is you’re trying to output. You can put it in the margins or a corner if you don’t want it to be a part of your answer. Just make sure it’s somewhere where you can keep referencing it.

Outline your code

This step is like a double-edged sword. It can get you a roadmap to your program or waste your time. My job is to make sure it’s the former.

So, first and foremost, I like to say: outlining code is unnecessary if the scope of your problem or question is small. Again, this practice is neither prescriptive nor universal to all projects or situations. Imagine I’m your interviewer, and I ask you to write how to center an element in a web page using CSS in as many ways as possible. You won’t exactly be needing an outline for this. The code snippets are relatively small for each method.

But now, let’s say I assign you to write a web application that captures user signatures via a touchscreen interface and then saves the signature on the server. Not so straightforward, right? You’ve more than one thing to figure out. Perhaps, a little outline can help.

  1. UI for capturing signature — HTML Canvas? WebGL?
  2. Disable pointer events on the rest of the web page when the user is signing
  3. Convert and save the captured image to a PNG file — JS
  4. Then convert it to blob (maybe) and save it to the visitor’s log data table.

I’ve written a rough sequence of actions I think I might have to code. It could’ve been shorter or longer, depending on what I wanted from it.

I highly recommend outlining code for client projects. Write the outline along with your user requirements or on the back of wireframes you’ve printed out.

Your quick snapshot of bullet points gives you a map, a to-do list, and a checklist to verify against when you reach the end of the project — pretty much your whole project’s summary in a low-fidelity list. It can also become a template to start your next similar project.

But like I said before, this step is like a double-edged sword. You’ll have to keep this short for examinees and interviewees when there are time constraints.

If you don’t know where to start, write down just three essential functions you’ll have to code in your application, and if you have got the time, make it five.

But that’s about it. Spend as little time as possible on this, and don’t sweat over the details. The outline is not going to score you extra points. It’s there only to help you make sure you have everything covered. It captures your initial gut reaction and keeps you honest throughout the project’s life.

Longhand vs. shorthand

White lined paper with cursive handwritten notes in black ink.
A quick reference to disable text selection

Time to start coding. So, what do you write? “Bdrs” or “border-radius“; “div -> p” or “<div><p></div></p>“; “pl()” or “println()“; “q()” or “querySelector()“?

If someone else is grading your code, then there’s no choice. Leave out abbreviations, pseudo-codes, Emmet shortcuts, and any other form of shorthand writing. Otherwise, there’s no reason to assume that anyone reading this knows what your abbreviations mean.

It’s really up to you.

If you’ve gotten out of touch with writing by hand — and many of us have — it’s better not to go overboard with the longhand notations, as they get tedious. At the same time, there’s no such thing as being too frugal with your writing. Not if you want to be able to look back on it one day and understand what you’d written down.

I have an open file in my note-taking app and a lined notepad on my desk where I write down code snippets I want to save for later reference. They are unorganized, just a long stream of snippets. That’s why when I browse through older notes, I wouldn’t know what I meant to write if I had not written them down clearly.

I forget syntaxes all the time. For instance, I’ve been using the arrow notation for JavaScript functions since it was introduced (because it’s shorter), and I’m pretty sure if someone suddenly asks me to define a function using the function keyword, I might even misplace the parentheses or the function name, inciting a syntax error.

It’s not unusual for us to forget syntaxes we haven’t used in a while. That’s why it’s better to write your notes clearly when you know you need them for future reference.

The non-sequential flow of code

Unlike the last step, which doesn’t apply to those of you interviewees and test-takers, this one is catered especially to you.

Most programming languages are interpreted, compiled, and executed so that sometimes pre-written code in the source is executed later when called. We do it in JavaScript, for example, with function calling — functions can be defined initially, then executed later. Examinees and interviewees can use this to start working on the critical point of your answer first.

As I’ve said from the very beginning, the purpose of handwriting code is to work through or test the logic of whatever it is you program. It’s best when you focus on resolving that first.

Let’s take a classic textbook example — a program to find the nth Fibonacci number. If I were to write a simple outline for it, it would be something like this:

  1. Get the input.
  2. Calculate the Fibonacci number.
  3. Summarise the output.
  4. Print the output.

All the steps in that outline are essential; however, 1, 3, and 4 are more obligatory. They are necessary but not important enough to focus on right away.

It’s better to start writing down the code to calculate the Fibonacci number rather than to fetch the input. Wrap it in a function, then go ahead and write the code sequentially and write down a line to call that function where appropriate.

Spend your time writing code that focuses on the heart of the problem.

Real professionals can skip ahead. Let’s say I have a client project, and I have to work with some triangle geometry — got two sides, opposite angle, and gotta find the third side’s length. And I’ve decided to scribble on paper to get started rather than opening my IDE.

First, I would draw the triangle, of course (that’s something I’m very experienced with, as you can tell). I would write down some sample lengths and angles. Then I’d write the formula (compliments of online searching, for sure), and then I’d jump right to the code for the function.

There’s no point in me writing down the obligatory steps even though I’ll need them in production-ready code. But it would be different if I had to write that on an answer sheet in an exam. I can’t skip the other steps; however, I can still start with the code for the formula.

Pseudo-code

Chris has already written a handy article on pseudo-code that I highly recommend you give a solid read.

For all those professionals who feel like the whole handwriting code thing doesn’t seem like your cup of tea but still might be curious if it can help you, then pseudo-code might be the balance you’re looking for.

It’s similar to outlining the code, as I mentioned in one of the previous steps. However, it’s briefer and feels more like shorthand coding. It’s sometimes also referred to as “skeleton code.”

Here’s some quick pseudo-code for a CSS grid layout:

Grid
5 60px rows
6 100px columns

There isn’t much to write! So, even though putting a pencil to paper is excellent for this sort of thing, it’s just as effective, fast, and inexpensive to jot some pseudo code into whatever program you’re using.

Space and comments

I believe code is 90% keywords and 10% tabs. Withoutspacesthereadabilityofwordsdecreases. Indentations are necessary for handwritten code as well. However, please don’t use it for every level because the width of the paper will limit you. Use spaces judiciously, but use them.

Yellow unlined paper with code handwritten in cursive in black ink.
Prized OG snippet, written with extra TLC

If you’re writing code for your use, I also believe that if you’ve followed everything I’ve mentioned so far and have already written down your output and an outline on the page, you may not even need to include comments. Comments tell you quickly what its following set of code does. If you have already written and read an outline for the code, then comments are redundant notes.

However, if your judgment says to put down one, then do it. Add it to the right side of the code (since you won’t be able to insert it between already written lines the way you could in, say, VS Code). Use forward slashes, brackets, or arrows to denote that they are comments.

For examinees who are unconfident with a certain syntax, write down comments. This way, at least, you’re letting the person grading your paper know your intention with that incorrectly formatted code. And use only the correct delimiters to denote comments — for example, that would be the forward slashes for JavaScript.

Analog vs. digital

As I mentioned earlier, everything I’m providing here can is generic coding advice. If you don’t want to try this with physical paper, any note-taking application also works.

But if you’re going to try the digital route, my recommendation is to try using something other than a straight note-taking app. Work with more visual digital tools — flow diagrams, mind maps, wireframes, etc. They can help you visualize your result, the outlines, and the code itself.

I am not much of a digital citizen (except for working on the web and recently converting to reading e-books), so I stick to physical notebooks.

My favorite tools for handwriting code

Any pencil and paper will do! But there are lots of options out there, and these are a few choice tools I use:

There is no “write” way to code

I hope, if nothing else, my little way of handwriting code with pencil and paper makes you evaluate the way you already plan and write code. I like knowing how other developers approach their work, and this is my way of giving you a peek into the way I do things.

Again, nothing here is scientific or an exact art. But if you want to give handwritten code planning a try, here’s everything we’ve covered in a nice ordered list:

  1. Start by writing down (with sample data, if needed) the output of your code.
  2. Write an outline for the code. Please keep it to three steps for small projects or ones that are less complex.
  3. Use longhand notations. Developers writing for themselves can use shorthand notations as long as the writing is legible and makes sense to you when you refer to it later.
  4. When under a time constraint, consider writing the code that tackles the heart of the problem first. Later, write down a call to that code at the right place in your sequential code.
  5. If you feel confident, try writing pseudo code addressing the main idea.
  6. Use proper indentations and spaces — and be mindful of the paper’s width.

That’s it! When you’re ready to try writing code by hand, I hope this article makes it easy for you to start. And if you’re sitting down for an exam or an interview, I hope this helps you focus on getting the questions right.


Why (and How) I Write Code With Pencil and Paper originally published on CSS-Tricks, which is part of the DigitalOcean family. You should get the newsletter.

Syntax Highlighting (and More!) With Prism on a Static Site

So, you’ve decided to build a blog with Next.js. Like any dev blogger, you’d like to have code snippets in your posts that are formatted nicely with syntax highlighting. Perhaps you also want to display line numbers in the snippets, and maybe even have the ability to call out certain lines of code.

This post will show you how to get that set up, as well as some tips and tricks for getting these other features working. Some of it is tricker than you might expect.

Prerequisites

We’re using the Next.js blog starter as the base for our project, but the same principles should apply to other frameworks. That repo has clear (and simple) getting started instructions. Scaffold the blog, and let’s go!

Another thing we’re using here is Prism.js, a popular syntax highlighting library that’s even used right here on CSS-Tricks. The Next.js blog starter uses Remark to convert Markdown into markup, so we’ll use the remark-Prism.js plugin for formatting our code snippets.

Basic Prism.js integration

Let’s start by integrating Prism.js into our Next.js starter. Since we already know we’re using the remark-prism plugin, the first thing to do is install it with your favorite package manager:

npm i remark-prism

Now go into the markdownToHtml file, in the /lib folder, and switch on remark-prism:

import remarkPrism from "remark-prism";

// later ...

.use(remarkPrism, { plugins: ["line-numbers"] })

Depending on which version of the remark-html you’re using, you might also need to change its usage to .use(html, { sanitize: false }).

The whole module should now look like this:

import { remark } from "remark";
import html from "remark-html";
import remarkPrism from "remark-prism";

export default async function markdownToHtml(markdown) {
  const result = await remark()
    .use(html, { sanitize: false })
    .use(remarkPrism, { plugins: ["line-numbers"] })
    .process(markdown);

  return result.toString();
}

Adding Prism.js styles and theme

Now let’s import the CSS that Prism.js needs to style the code snippets. In the pages/_app.js file, import the main Prism.js stylesheet, and the stylesheet for whichever theme you’d like to use. I’m using Prism.js’s “Tomorrow Night” theme, so my imports look like this:

import "prismjs/themes/prism-tomorrow.css";
import "prismjs/plugins/line-numbers/prism-line-numbers.css";
import "../styles/prism-overrides.css";

Notice I’ve also started a prism-overrides.css stylesheet where we can tweak some defaults. This will become useful later. For now, it can remain empty.

And with that, we now have some basic styles. The following code in Markdown:

```js
class Shape {
  draw() {
    console.log("Uhhh maybe override me");
  }
}

class Circle {
  draw() {
    console.log("I'm a circle! :D");
  }
}
```

…should format nicely:

Adding line numbers

You might have noticed that the code snippet we generated does not display line numbers even though we imported the plugin that supports it when we imported remark-prism. The solution is hidden in plain sight in the remark-prism README:

Don’t forget to include the appropriate css in your stylesheets.

In other words, we need to force a .line-numbers CSS class onto the generated <pre> tag, which we can do like this:

And with that, we now have line numbers!

Note that, based on the version of Prism.js I have and the “Tomorrow Night” theme I chose, I needed to add this to the prism-overrides.css file we started above:

.line-numbers span.line-numbers-rows {
  margin-top: -1px;
}

You may not need that, but there you have it. We have line numbers!

Highlighting lines

Our next feature will be a bit more work. This is where we want the ability to highlight, or call out certain lines of code in the snippet.

There’s a Prism.js line-highlight plugin; unfortunately, it is not integrated with remark-prism. The plugin works by analyzing the formatted code’s position in the DOM, and manually highlights lines based on that information. That’s impossible with the remark-prism plugin since there is no DOM at the time the plugin runs. This is, after all, static site generation. Next.js is running our Markdown through a build step and generating HTML to render the blog. All of this Prism.js code runs during this static site generation, when there is no DOM.

But fear not! There’s a fun workaround that fits right in with CSS-Tricks: we can use plain CSS (and a dash of JavaScript) to highlight lines of code.

Let me be clear that this is a non-trivial amount of work. If you don’t need line highlighting, then feel free to skip to the next section. But if nothing else, it can be a fun demonstration of what’s possible.

Our base CSS

Let’s start by adding the following CSS to our prism-overrides.css stylesheet:

:root {
  --highlight-background: rgb(0 0 0 / 0);
  --highlight-width: 0;
}

.line-numbers span.line-numbers-rows > span {
  position: relative;
}

.line-numbers span.line-numbers-rows > span::after {
  content: " ";
  background: var(--highlight-background);
  width: var(--highlight-width);
  position: absolute;
  top: 0;
}

We’re defining some CSS custom properties up front: a background color and a highlight width. We’re setting them to empty values for now. Later, though, we’ll set meaningful values in JavaScript for the lines we want highlighted.

We’re then setting the line number <span> to position: relative, so that we can add a ::after pseudo element with absolute positioning. It’s this pseudo element that we’ll use to highlight our lines.

Declaring the highlighted lines

Now, let’s manually add a data attribute to the <pre> tag that’s generated, then read that in code, and use JavaScript to tweak the styles above to highlight specific lines of code. We can do this the same way that we added line numbers before:

This will cause our <pre> element to be rendered with a data-line="3,8-10" attribute, where line 3 and lines 8-10 are highlighted in the code snippet. We can comma-separate line numbers, or provide ranges.

Let’s look at how we can parse that in JavaScript, and get highlighting working.

Reading the highlighted lines

Head over to components/post-body.tsx. If this file is JavaScript for you, feel free to either convert it to TypeScript (.tsx), or just ignore all my typings.

First, we’ll need some imports:

import { useEffect, useRef } from "react";

And we need to add a ref to this component:

const rootRef = useRef<HTMLDivElement>(null);

Then, we apply it to the root element:

<div ref={rootRef} className="max-w-2xl mx-auto">

The next piece of code is a little long, but it’s not doing anything crazy. I’ll show it, then walk through it.

useEffect(() => {
  const allPres = rootRef.current.querySelectorAll("pre");
  const cleanup: (() => void)[] = [];

  for (const pre of allPres) {
    const code = pre.firstElementChild;
    if (!code || !/code/i.test(code.tagName)) {
      continue;
    }

    const highlightRanges = pre.dataset.line;
    const lineNumbersContainer = pre.querySelector(".line-numbers-rows");

    if (!highlightRanges || !lineNumbersContainer) {
      continue;
    }

    const runHighlight = () =>
      highlightCode(pre, highlightRanges, lineNumbersContainer);
    runHighlight();

    const ro = new ResizeObserver(runHighlight);
    ro.observe(pre);

    cleanup.push(() => ro.disconnect());
  }

  return () => cleanup.forEach(f => f());
}, []);

We’re running an effect once, when the content has all been rendered to the screen. We’re using querySelectorAll to grab all the <pre> elements under this root element; in other words, whatever blog post the user is viewing.

For each one, we make sure there’s a <code> element under it, and we check for both the line numbers container and the data-line attribute. That’s what dataset.line checks. See the docs for more info.

If we make it past the second continue, then highlightRanges is the set of highlights we declared earlier which, in our case, is "3,8-10", where lineNumbersContainer is the container with the .line-numbers-rows CSS class.

Lastly, we declare a runHighlight function that calls a highlightCode function that I’m about to show you. Then, we set up a ResizeObserver to run that same function anytime our blog post changes size, i.e., if the user resizes the browser window.

The highlightCode function

Finally, let’s see our highlightCode function:

function highlightCode(pre, highlightRanges, lineNumberRowsContainer) {
  const ranges = highlightRanges.split(",").filter(val => val);
  const preWidth = pre.scrollWidth;

  for (const range of ranges) {
    let [start, end] = range.split("-");
    if (!start || !end) {
      start = range;
      end = range;
    }

    for (let i = +start; i <= +end; i++) {
      const lineNumberSpan: HTMLSpanElement = lineNumberRowsContainer.querySelector(
        `span:nth-child(${i})`
      );
      lineNumberSpan.style.setProperty(
        "--highlight-background",
        "rgb(100 100 100 / 0.5)"
      );
      lineNumberSpan.style.setProperty("--highlight-width", `${preWidth}px`);
    }
  }
}

We get each range and read the width of the <pre> element. Then we loop through each range, find the relevant line number <span>, and set the CSS custom property values for them. We set whatever highlight color we want, and we set the width to the total scrollWidth value of the <pre> element. I kept it simple and used "rgb(100 100 100 / 0.5)" but feel free to use whatever color you think looks best for your blog.

Here’s what it looks like:

Syntax highlighting for a block of Markdown code.

Line highlighting without line numbers

You may have noticed that all of this so far depends on line numbers being present. But what if we want to highlight lines, but without line numbers?

One way to implement this would be to keep everything the same and add a new option to simply hide those line numbers with CSS. First, we’ll add a new CSS class, .hide-numbers:

```js[class="line-numbers"][class="hide-numbers"][data-line="3,8-10"]
class Shape {
  draw() {
    console.log("Uhhh maybe override me");
  }
}

class Circle {
  draw() {
    console.log("I'm a circle! :D");
  }
}
```

Now let’s add CSS rules to hide the line numbers when the .hide-numbers class is applied:

.line-numbers.hide-numbers {
  padding: 1em !important;
}
.hide-numbers .line-numbers-rows {
  width: 0;
}
.hide-numbers .line-numbers-rows > span::before {
  content: " ";
}
.hide-numbers .line-numbers-rows > span {
  padding-left: 2.8em;
}

The first rule undoes the shift to the right from our base code in order to make room for the line numbers. By default, the padding of the Prism.js theme I chose is 1em. The line-numbers plugin increases it to 3.8em, then inserts the line numbers with absolute positioning. What we did reverts the padding back to the 1em default.

The second rule takes the container of line numbers, and squishes it to have no width. The third rule erases all of the line numbers themselves (they’re generated with ::before pseudo elements).

The last rule simply shifts the now-empty line number <span> elements back to where they would have been so that the highlighting can be positioned how we want it. Again, for my theme, the line numbers normally adds 3.8em worth of left padding, which we reverted back to the default 1em. These new styles add the other 2.8em so things are back to where they should be, but with the line numbers hidden. If you’re using different plugins, you might need slightly different values.

Here’s what the result looks like:

Syntax highlighting for a block of Markdown code.

Copy-to-Clipboard feature

Before we wrap up, let’s add one finishing touch: a button allowing our dear reader to copy the code from our snippet. It’s a nice little enhancement that spares people from having to manually select and copy the code snippets.

It’s actually somewhat straightforward. There’s a navigator.clipboard.writeText API for this. We pass that method the text we’d like to copy, and that’s that. We can inject a button next to every one of our <code> elements to send the code’s text to that API call to copy it. We’re already messing with those <code> elements in order to highlight lines, so let’s integrate our copy-to-clipboard button in the same place.

First, from the useEffect code above, let’s add one line:

useEffect(() => {
  const allPres = rootRef.current.querySelectorAll("pre");
  const cleanup: (() => void)[] = [];

  for (const pre of allPres) {
    const code = pre.firstElementChild;
    if (!code || !/code/i.test(code.tagName)) {
      continue;
    }

    pre.appendChild(createCopyButton(code));

Note the last line. We’re going to append our button right into the DOM underneath our <pre> element, which is already position: relative, allowing us to position the button more easily.

Let’s see what the createCopyButton function looks like:

function createCopyButton(codeEl) {
  const button = document.createElement("button");
  button.classList.add("prism-copy-button");
  button.textContent = "Copy";

  button.addEventListener("click", () => {
    if (button.textContent === "Copied") {
      return;
    }
    navigator.clipboard.writeText(codeEl.textContent || "");
    button.textContent = "Copied";
    button.disabled = true;
    setTimeout(() => {
      button.textContent = "Copy";
      button.disabled = false;
    }, 3000);
  });

  return button;
}

Lots of code, but it’s mostly boilerplate. We create our button then give it a CSS class and some text. And then, of course, we create a click handler to do the copying. After the copy is done, we change the button’s text and disable it for a few seconds to help give the user feedback that it worked.

The real work is on this line:

navigator.clipboard.writeText(codeEl.textContent || "");

We’re passing codeEl.textContent rather than innerHTML since we want only the actual text that’s rendered, rather than all the markup Prism.js adds in order to format our code nicely.

Now let’s see how we might style this button. I’m no designer, but this is what I came up with:

.prism-copy-button {
  position: absolute;
  top: 5px;
  right: 5px;
  width: 10ch;
  background-color: rgb(100 100 100 / 0.5);
  border-width: 0;
  color: rgb(0, 0, 0);
  cursor: pointer;
}

.prism-copy-button[disabled] {
  cursor: default;
}

Which looks like this:

Syntax highlighting for a block of Markdown code.

And it works! It copies our code, and even preserves the formatting (i.e. new lines and indentation)!

Wrapping up

I hope this has been useful to you. Prism.js is a wonderful library, but it wasn’t originally written for static sites. This post walked you through some tips and tricks for bridging that gap, and getting it to work well with a Next.js site.


Syntax Highlighting (and More!) With Prism on a Static Site originally published on CSS-Tricks. You should get the newsletter.

34 at 34 for V5.34: Modern Perl Features for Perl’s Birthday

Friday, December 17, 2021, marked the thirty-fourth birthday of the Perl programming language, and, coincidentally, this year saw the release of version 5.34. There are plenty of Perl developers out there who haven’t kept up with recent (and not-so-recent) improvements to the language and its ecosystem, so I thought I might list a batch. You may have seen some of these before in May’s post “Perl can do that now!”

The feature Pragma

Perl v5.10 was released in December 2007, and with it came feature, a way of enabling new syntax without breaking backward compatibility. You can enable individual features by name (e.g., use feature qw(say fc); for the say and fc keywords), or by using a feature bundle based on the Perl version that introduced them. For example, the following:

XPath: Axis Steps, Node Tests, Unabbreviated Syntax

A lot of literature presents XPath as though using it is rather like navigating a filesystem: the tags' identifiers are completely taken for granted, and shorthand like ., .., or // often is introduced early on. This article demonstrates exactly how to use XPath to the exclusion of shorthand: which is to say, solely by means of axis specifiers and node tests, and with the use of identifiers confined to predicates.

The XML we'll work on is simple on its face. As a former bookseller, I've made it personal:

Creating an Editable Textarea That Supports Syntax-Highlighted Code

When I was working on a project that needed an editor component for source code, I really wanted a way to have that editor highlight the syntax its typed. There are projects like this, like CodeMirror, Ace, and Monaco, but they are all heavy-weight, full-featured editors, not just editable textareas with syntax highlighting like I wanted.

It took a little finagling, but I wound up making something that does the job and wanted to share how I did it, because it involves integrating a popular syntax highlighting library with HTML’s editing capabilities, as well as a few interesting edge cases to take into consideration.

Go ahead and give it a spin as we dig in!

The problem

First, I tried using the contenteditable attribute on a div. I typed some source code into the div and ran it through Prism.js, a popular syntax highlighter, on onkeyup via JavaScript. Seems like a decent idea, right? We have an element that can be edited on the front end, and Prism.js applies its syntax styling to what’s typed in the element.

Chris covers how to use Prism.js in this video.

But that was a no-go. Each time the content in the element changes, the DOM is manipulated and the user’s cursor is pushed back to the start of the code, meaning the source code appears backwards, with the last characters at the start, and the first characters at the end.

White monospaced text on a black background that does not spell a coherent word.
Backwards code: not very useful

Next, I tried about using a <textarea> but that also didn’t work, as textareas can only contain plain text. In other words, we’re unable to style the content that’s entered. A textarea seems to be the only way to edit the text without unwanted bugs — it just doesn’t let Prism.js do its thing.

Prism.js works a lot better when the source code is wrapped in a typical <pre><code> tag combo — it’s only missing the editable part of the equation.

So, neither seems to work by themselves. But, I thought, why not both?

The solution

I added both a syntax-highlighted <pre><code> and a textarea to the page, and made the innerText content of <pre><code> change onkeyup, using a JavaScript function. I also added an aria-hidden attribute to the <pre><code> result so that screen readers would only read what is entered into the <textarea> instead of being read aloud twice.

<textarea id="editing" onkeyup="update(this.value);"></textarea>

<pre id="highlighting" aria-hidden="true">
  <code class="language-html" id="highlighting-content"></code>
</pre>
function update(text) {
  let result_element = document.querySelector("#highlighting-content");
  // Update code
  result_element.innerText = text;
  // Syntax Highlight
  Prism.highlightElement(result_element);
}
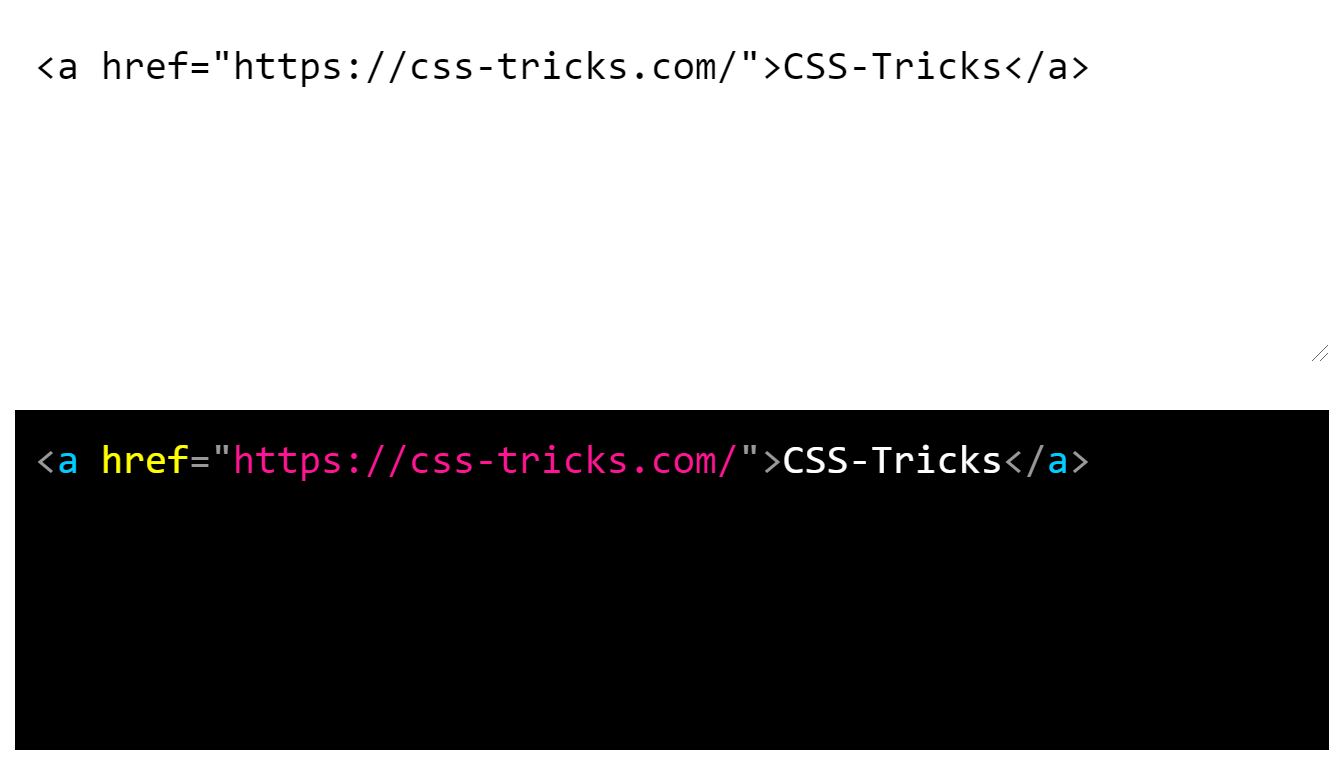
The HTML for a link element pointed to CSS-Tricks is in black monospace on a white background above the same HTML link markup, but syntax-highlighted on a black background.
Now it’s editable and highlighted!

Now, when the textarea is edited — as in, a pressed key on the keyboard comes back up — the syntax-highlighted code changes. There are a few bugs we’ll get to, but I want to focus first on making it look like you are directly editing the syntax-highlighted element, rather than a separate textarea.

Making it “feel” like a code editor

The idea is to visibly merge the elements together so it looks like we’re interacting with one element when there are actually two elements at work. We can add some CSS that basically allows the <textarea> and the <pre><code> elements to be sized and spaced consistently.

#editing, #highlighting {
  /* Both elements need the same text and space styling so they are directly on top of each other */
  margin: 10px;
  padding: 10px;
  border: 0;
  width: calc(100% - 32px);
  height: 150px;
}

#editing, #highlighting, #highlighting * {
  /* Also add text styles to highlighting tokens */
  font-size: 15pt;
  font-family: monospace;
  line-height: 20pt;
}

Then we want to position them right on top of each other:

#editing, #highlighting {
  position: absolute;
  top: 0;
  left: 0;
}

From there, z-index allows the textarea to stack in front the highlighted result:

/* Move the textarea in front of the result */
#editing {
  z-index: 1;
}

#highlighting {
  z-index: 0;
}

If we stop here, we’ll see our first bug. It doesn’t look like Prism.js is highlighting the syntax, but that is only because the textarea is covering up the result.

Where has the highlighting gone? (Clue: It’s hiding in the background.)

We can fix this with CSS! We’ll make the <textarea> completely transparent except the caret (cursor):

/* Make textarea almost completely transparent */
#editing {
  color: transparent;
  background: transparent;
  caret-color: white; /* Or choose your favorite color */
}

Ah, much better!

HTML markup for a link element pointed to CSS tricks in a syntax-highlighted monospace font on a black background.
Where will this link take you? You decide.

More fixing!

Once I got this far, I played around with the editor a bit and was able to find a few more things that needed fixing. The good thing is that all of the issues are quite easy to fix using JavaScript, CSS, or even HTML.

Remove native spell checking

We’re making a code editor, and code has lots of words and attributes that a browser’s native spell checker will think are misspellings.

Showing the basic HTML markup for a link with syntax highlighting on a black background, where the href attribute is underlined in red.

Spell checking isn’t a bad thing; it’s just unhelpful in this situation. Is something marked incorrect because it is incorrectly spelled or because the code is invalid? It’s tough to tell. To fix this, all we need is to set the spellcheck attribute on the <textarea> to false:

<textarea id="editing" spellcheck="false" ...>

Handling new lines

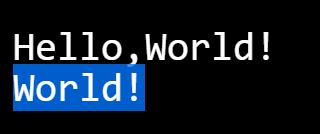
Turns out that innerText doesn’t support newlines (\n).

White monospace text on a black background. The first line says "Hello, World" and the second line says "World" and is highlight in blue.
Even though “World!” should be on a new line, the syntax highlighted section displays it on the same line.

The update function needs to be edited. Instead of using innerText, we can replace the open bracket character (<) with &lt;. This prevents new HTML tags from being created, allowing the actual source code displays instead of the browser attempting to render the code.

result_element.innerHTML = text.replace(new RegExp("<", "g"), "<"); /* Global RegExp */
Showing the basic HTML document boilerplate with syntax highlighting on a black background. The body element contains the markup yo a paragraph that contains a link that says "CSS-Tricks is brilliant!"

Scrolling and resizing

Here’s another thing: the highlighted code cannot scroll while the editing is taking place. And when the textarea is scrolled, the highlighted code does not scroll with it.

First, let’s make sure that both the textarea and result support scrolling:

/* Can be scrolled */
#editing, #highlighting {
  overflow: auto;
}

Then, to make sure that the result scrolls with the textarea, we’ll update the HTML and JavaScript like this:

<textarea id="editing" onkeyup="update(this.value); sync_scroll(this);" onscroll="sync_scroll(this);"></textarea>
function sync_scroll(element) {
  /* Scroll result to scroll coords of event - sync with textarea */
  let result_element = document.querySelector("#highlighting");
  // Get and set x and y
  result_element.scrollTop = element.scrollTop;
  result_element.scrollLeft = element.scrollLeft;
}

Some browsers also allow a textarea to be resized, but this means that the textarea and result could become different sizes. Can CSS fix this? Of course it can. We’ll simply disable resizing:

/* No resize on textarea */
#editing {
  resize: none;
}

Indenting lines

One of the trickier things to adjust is how to handle line indentations in the result. The way the editor is currently set up, indenting lines with spaces works fine. But, if you’re more into tabs than spaces, you may have noticed that those aren’t working as expected.

JavaScript can be used to make the Tab key properly work. I have added comments to make it clear what is happening in the function.

<textarea ... onkeydown="check_tab(this, event);"></textarea>
function check_tab(element, event) {
  let code = element.value;
  if(event.key == "Tab") {
    /* Tab key pressed */
    event.preventDefault(); // stop normal
    let before_tab = code.slice(0, element.selectionStart); // text before tab
    let after_tab = code.slice(element.selectionEnd, element.value.length); // text after tab
    let cursor_pos = element.selectionEnd + 2; // where cursor moves after tab - 2 for 2 spaces
    element.value = before_tab + "  " + after_tab; // add tab char - 2 spaces
    // move cursor
    element.selectionStart = cursor_pos;
    element.selectionEnd = cursor_pos;
  }
}

The final result

Not too crazy, right? All we have are <textarea>, <pre> and <code> elements in the HTML, a new lines of CSS that stack them together, and a syntax highlighting library to format what’s entered. And what I like best about this is that we’re working with normal, semantic HTML elements, leveraging native attributes to get the behavior we want, leaning on CSS to create the illusion that we’re only interacting with one element, then reaching for JavaScript to solve some edge cases.

While I used Prism.js for syntax highlighting, this technique will work with others. It would even work with a syntax highlighter you create yourself, if you want it to. I hope this becomes useful, and can be used in many places, whether it’s a WYSIWYG editor for a CMS, or even a forms where the ability to enter source code is a requirement like a front-end job application or perhaps a quiz. It is a<textarea>, after all, so it’s capable of being used in any form — you can even add a placeholder if you need to!


The post Creating an Editable Textarea That Supports Syntax-Highlighted Code appeared first on CSS-Tricks.

You can support CSS-Tricks by being an MVP Supporter.

Building a Scalable CSS Architecture With BEM and Utility Classes

Maintaining a large-scale CSS project is hard. Over the years, we’ve witnessed different approaches aimed at easing the process of writing scalable CSS. In the end, we all try to meet the following two goals:

  1. Efficiency: we want to reduce the time spent thinking about how things should be done and increase the time doing things.
  2. Consistency: we want to make sure all developers are on the same page.

For the past year and a half, I’ve been working on a component library and a front-end framework called CodyFrame. We currently have 220+ components. These components are not isolated modules: they’re reusable patterns, often merged into each other to create complex templates.

The challenges of this project have forced our team to develop a way of building scalable CSS architectures. This method relies on CSS globals, BEM, and utility classes.

I’m happy to share it! 👇

CSS Globals in 30 seconds

Globals are CSS files containing rules that apply crosswise to all components (e.g., spacing scale, typography scale, colors, etc.). Globals use tokens to keep the design consistent across all components and reduce the size of their CSS.

Here’s an example of typography global rules:

/* Typography | Global */
:root {
  /* body font size */
  --text-base-size: 1em;


  /* type scale */
  --text-scale-ratio: 1.2;
  --text-xs: calc((1em / var(--text-scale-ratio)) / var(--text-scale-ratio));
  --text-sm: calc(var(--text-xs) * var(--text-scale-ratio));
  --text-md: calc(var(--text-sm) * var(--text-scale-ratio) * var(--text-scale-ratio));
  --text-lg: calc(var(--text-md) * var(--text-scale-ratio));
  --text-xl: calc(var(--text-lg) * var(--text-scale-ratio));
  --text-xxl: calc(var(--text-xl) * var(--text-scale-ratio));
}


@media (min-width: 64rem) { /* responsive decision applied to all text elements */
  :root {
    --text-base-size: 1.25em;
    --text-scale-ratio: 1.25;
  }
}


h1, .text-xxl   { font-size: var(--text-xxl, 2.074em); }
h2, .text-xl    { font-size: var(--text-xl, 1.728em); }
h3, .text-lg    { font-size: var(--text-lg, 1.44em); }
h4, .text-md    { font-size: var(--text-md, 1.2em); }
.text-base      { font-size: 1em; }
small, .text-sm { font-size: var(--text-sm, 0.833em); }
.text-xs        { font-size: var(--text-xs, 0.694em); }

BEM in 30 seconds

BEM (Blocks, Elements, Modifiers) is a naming methodology aimed at creating reusable components.

Here’s an example:

<header class="header">
  <a href="#0" class="header__logo"><!-- ... --></a>
  <nav class="header__nav">
    <ul>
      <li><a href="#0" class="header__link header__link--active">Homepage</a></li>
      <li><a href="#0" class="header__link">About</a></li>
      <li><a href="#0" class="header__link">Contact</a></li>
    </ul>
  </nav>
</header>
  • A block is a reusable component
  • An element is a child of the block (e.g., .block__element)
  • A modifier is a variation of a block/element (e.g., .block--modifier, .block__element--modifier).

Utility classes in 30 seconds

A utility class is a CSS class meant to do only one thing. For example:

<section class="padding-md">
  <h1>Title</h1>
  <p>Lorem ipsum dolor sit amet consectetur adipisicing elit.</p>
</section>


<style>
  .padding-sm { padding: 0.75em; }
  .padding-md { padding: 1.25em; }
  .padding-lg { padding: 2em; }
</style>

You can potentially build entire components out of utility classes:

<article class="padding-md bg radius-md shadow-md">
  <h1 class="text-lg color-contrast-higher">Title</h1>
  <p class="text-sm color-contrast-medium">Lorem ipsum dolor sit amet consectetur adipisicing elit.</p>
</article>

You can connect utility classes to CSS globals:

/* Spacing | Global */
:root {
  --space-unit: 1em;
  --space-xs:   calc(0.5 * var(--space-unit));
  --space-sm:   calc(0.75 * var(--space-unit));
  --space-md:   calc(1.25 * var(--space-unit));
  --space-lg:   calc(2 * var(--space-unit));
  --space-xl:   calc(3.25 * var(--space-unit));
}

/* responsive rule affecting all spacing variables */
@media (min-width: 64rem) {
  :root {
    --space-unit:  1.25em; /* 👇 this responsive decision affects all margins and paddings */
  }
}

/* margin and padding util classes - apply spacing variables */
.margin-xs { margin: var(--space-xs); }
.margin-sm { margin: var(--space-sm); }
.margin-md { margin: var(--space-md); }
.margin-lg { margin: var(--space-lg); }
.margin-xl { margin: var(--space-xl); }

.padding-xs { padding: var(--space-xs); }
.padding-sm { padding: var(--space-sm); }
.padding-md { padding: var(--space-md); }
.padding-lg { padding: var(--space-lg); }
.padding-xl { padding: var(--space-xl); }

A real-life example

Explaining a methodology using basic examples doesn’t bring up the real issues nor the advantages of the method itself.

Let’s build something together! 

We’ll create a gallery of card elements. First, we’ll do it using only the BEM approach, and we’ll point out the issues you may face by going BEM only. Next, we’ll see how Globals reduce the size of your CSS. Finally, we’ll make the component customizable introducing utility classes to the mix.

Here’s a look at the final result:

Let’s start this experiment by creating the gallery using only BEM:

<div class="grid">
  <article class="card">
    <a class="card__link" href="#0">
      <figure>
        <img class="card__img" src="/image.jpg" alt="Image description">
      </figure>


      <div class="card__content">
        <h1 class="card__title-wrapper"><span class="card__title">Title of the card</span></h1>


        <p class="card__description">Lorem ipsum dolor sit amet consectetur adipisicing elit. Tempore, totam?</p>
      </div>


      <div class="card__icon-wrapper" aria-hidden="true">
        <svg class="card__icon" viewBox="0 0 24 24"><!-- icon --></svg>
      </div>
    </a>
  </article>


  <article class="card"><!-- card --></article>
  <article class="card"><!-- card --></article>
  <article class="card"><!-- card --></article>
</div>

In this example, we have two components: .grid and .card. The first one is used to create the gallery layout. The second one is the card component.

First of all, let me point out the main advantages of using BEM: low specificity and scope.

/* without BEM */
.grid {}
.card {}
.card > a {}
.card img {}
.card-content {}
.card .title {}
.card .description {}


/* with BEM */
.grid {}
.card {}
.card__link {}
.card__img {}
.card__content {}
.card__title {}
.card__description {}

If you don’t use BEM (or a similar naming method), you end up creating inheritance relationships (.card > a).

/* without BEM */
.card > a.active {} /* high specificity */


/* without BEM, when things go really bad */
div.container main .card.is-featured > a.active {} /* good luck with that 😦 */


/* with BEM */
.card__link--active {} /* low specificity */

Dealing with inheritance and specificity in big projects is painful. That feeling when your CSS doesn’t seem to be working, and you find out it’s been overwritten by another class 😡! BEM, on the other hand, creates some kind of scope for your components and keeps specificity low.

But… there are two main downsides of using only BEM:

  1. Naming too many things is frustrating
  2. Minor customizations are not easy to do or maintain

In our example, to stylize the components, we’ve created the following classes:

.grid {}
.card {}
.card__link {}
.card__img {}
.card__content {}
.card__title-wrapper {}
.card__title {}
.card__description {}
.card__icon-wrapper {}
.card__icon {}

The number of classes is not the issue. The issue is coming up with so many meaningful names (and having all your teammates use the same naming criteria).

For example, imagine you have to modify the card component by including an additional, smaller paragraph:

<div class="card__content">
  <h1 class="card__title-wrapper"><span class="card__title">Title of the card</span></h1>
  <p class="card__description">Lorem ipsum dolor...</p>
  <p class="card__description card__description--small">Lorem ipsum dolor...</p> <!-- 👈 -->
</div>

How do you call it? You could consider it a variation of the .card__description element and go for .card__description .card__description--small. Or, you could create a new element, something like .card__small, .card__small-p, or .card__tag. See where I’m going? No one wants to spend time thinking about class names. BEM is great as long as you don’t have to name too many things.

The second issue is dealing with minor customizations. For example, imagine you have to create a variation of the card component where the text is center-aligned.

You’ll probably do something like this:

<div class="card__content card__content--center"> <!-- 👈 -->
  <h1 class="card__title-wrapper"><span class="card__title">Title of the card</span></h1>
  <p class="card__description">Lorem ipsum dolor sit amet consectetur adipisicing elit. Tempore, totam?</p>
</div>


<style>
  .card__content--center { text-align: center; }
</style>

One of your teammates, working on another component (.banner), is facing the same problem. They create a variation for their component as well:

<div class="banner banner--text-center"></div>


<style>
  .banner--text-center { text-align: center; }
</style>

Now imagine you have to include the banner component into a page. You need the variation where the text is aligned in the center. Without checking the CSS of the banner component, you may instinctively write something like banner banner--center in your HTML, because you always use --center when you create variations where the text is center-aligned. Not working! Your only option is to open the CSS file of the banner component, inspect the code, and find out what class should be applied to align the text in the center.

How long would it take, 5 minutes? Multiply 5 minutes by all the times this happens in a day, to you and all your teammates, and you realize how much time is wasted. Plus, adding new classes that do the same thing contributes to bloating your CSS.

CSS Globals and utility classes to the rescue

The first advantage of setting global styles is having a set of CSS rules that apply to all the components.

For example, if we set responsive rules in the spacing and typography globals, these rules will affect the grid and card components as well. In CodyFrame, we increase the body font size at a specific breakpoint; because we use “em” units for all margins and paddings, the whole spacing system is updated at once generating a cascade effect.

Spacing and typography responsive rules — no media queries on a component level 

As a consequence, in most cases, you won’t need to use media queries to increase the font size or the values of margins and paddings!

/* without globals */
.card { padding: 1em; }


@media (min-width: 48rem) {
  .card { padding: 2em; }
  .card__content { font-size: 1.25em; }
}


/* with globals (responsive rules intrinsically applied) */
.card { padding: var(--space-md); }

Not just that! You can use the globals to store behavioral components that can be combined with all other components. For example, in CodyFrame, we define a .text-component class that is used as a “text wrapper.” It takes care of line height, vertical spacing, basic styling, and other things.

If we go back to our card example, the .card__content element could be replaced with the following:

<!-- without globals -->
<div class="card__content">
  <h1 class="card__title-wrapper"><span class="card__title">Title of the card</span></h1>
  <p class="card__description">Lorem ipsum dolor sit amet consectetur adipisicing elit. Tempore, totam?</p>
</div>


<!-- with globals -->
<div class="text-component">
  <h1 class="text-lg"><span class="card__title">Title of the card</span></h1>
  <p>Lorem ipsum dolor sit amet consectetur adipisicing elit. Tempore, totam?</p>
</div>

The text component will take care of the text formatting, and make it consistent across all the text blocks in your project. Plus, we’ve already eliminated a couple of BEM classes.

Finally, let’s introduce the utility classes to the mix!

Utility classes are particularly useful if you want the ability to customize the component later on without having to check its CSS.

Here’s how the structure of the card component changes if we swap some BEM classes with utility classes:

<article class="card radius-lg">
  <a href="#0" class="block color-inherit text-decoration-none">
    <figure>
      <img class="block width-100%" src="image.jpg" alt="Image description">
    </figure>


    <div class="text-component padding-md">
      <h1 class="text-lg"><span class="card__title">Title of the card</span></h1>
      <p class="color-contrast-medium">Lorem ipsum dolor sit amet consectetur adipisicing elit. Tempore, totam?</p>
    </div>


    <div class="card__icon-wrapper" aria-hidden="true">
      <svg class="icon icon--sm color-white" viewBox="0 0 24 24"><!-- icon --></svg>
    </div>
  </a>
</article>

The number of BEM (component) classes has shrunk from 9 to 3:

.card {}
.card__title {}
.card__icon-wrapper {}

That means you won’t deal much with naming things. That said, we can’t avoid the naming issue entirely: even if you create Vue/React/SomeOtherFramework components out of utility classes, you still have to name the components.

All the other BEM classes have been replaced by utility classes. What if you have to make a card variation with a bigger title? Replace text-lg with text-xl. What if you want to change the icon color? Replace color-white with color-primary. How about aligning the text in the center? Add text-center to the text-component element. Less time thinking, more time doing!

Why don’t we just use utility classes?

Utility classes speed-up the design process and make it easier to customize things. So why don’t we forget about BEM and use only utility classes? Two main reasons:

By using BEM together with utility classes, the HTML is easier to read and customize.

Use BEM for:

  • DRY-ing the HTML from the CSS you don’t plan on customizing (e.g., behavioral CSS-like transitions, positioning, hover/focus effects),
  • advanced animations/effects.

Use utility classes for:

  • the “frequently-customized” properties, often used to create component variations (like padding, margin, text-alignment, etc.),
  • elements that are hard to identify with a new, meaningful class name (e.g., you need a parent element with a position: relative → create <div class="position-relative"><div class="my-component"></div></div>).

Example: 

<!-- use only Utility classes -->
<article class="position-relative overflow-hidden bg radius-lg transition-all duration-300 hover:shadow-md col-6@sm col-4@md">
  <!-- card content -->
</article>


<!-- use BEM + Utility classes -->
<article class="card radius-lg col-6@sm col-4@md">
  <!-- card content -->
</article>

For these reasons, we suggest that you don’t add the !important rule to your utility classes. Using utility classes doesn’t need to be like using a hammer. Do you think it would be beneficial to access and modify a CSS property in the HTML? Use a utility class. Do you need a bunch of rules that won’t need editing? Write them in your CSS. This process doesn’t need to be perfect the first time you do it: you can tweak the component later on if required. It may sound laborious “having to decide” but it’s quite straightforward when you put it to practice.

Utility classes are not your best ally when it comes to creating unique effects/animations.

Think about working with pseudo-elements, or crafting unique motion effects that require custom bezier curves. For those, you still need to open your CSS file.

Consider, for example, the animated background effect of the card we’ve designed. How hard would it be to create such an effect using utility classes?

The same goes for the icon animation, which requires animation keyframes to work:

.card:hover .card__title {
  background-size: 100% 100%;
}


.card:hover .card__icon-wrapper .icon {
  animation: card-icon-animation .3s;
}


.card__title {
  background-image: linear-gradient(transparent 50%, alpha(var(--color-primary), 0.2) 50%);
  background-repeat: no-repeat;
  background-position: left center;
  background-size: 0% 100%;
  transition: background .3s;
}


.card__icon-wrapper {
  position: absolute;
  top: 0;
  right: 0;
  width: 3em;
  height: 3em;
  background-color: alpha(var(--color-black), 0.85);
  border-bottom-left-radius: var(--radius-lg);
  display: flex;
  justify-content: center;
  align-items: center;
}


@keyframes card-icon-animation {
  0%, 100% {
    opacity: 1;
    transform: translateX(0%);
  }
  50% {
    opacity: 0;
    transform: translateX(100%);
  }
  51% {
    opacity: 0;
    transform: translateX(-100%);
  }
}

Final result

Here’s the final version of the cards gallery. It also includes grid utility classes to customize the layout.

File structure

Here’s how the structure of a project built using the method described in this article would look like:

project/
└── main/
    ├── assets/
    │   ├── css/
    │   │   ├── components/
    │   │   │   ├── _card.scss
    │   │   │   ├── _footer.scss
    │   │   │   └── _header.scss
    │   │   ├── globals/
    │   │   │   ├── _accessibility.scss
    │   │   │   ├── _breakpoints.scss
    │   │   │   ├── _buttons.scss
    │   │   │   ├── _colors.scss
    │   │   │   ├── _forms.scss
    │   │   │   ├── _grid-layout.scss
    │   │   │   ├── _icons.scss
    │   │   │   ├── _reset.scss
    │   │   │   ├── _spacing.scss
    │   │   │   ├── _typography.scss
    │   │   │   ├── _util.scss
    │   │   │   ├── _visibility.scss
    │   │   │   └── _z-index.scss
    │   │   ├── _globals.scss
    │   │   ├── style.css
    │   │   └── style.scss
    │   └── js/
    │       ├── components/
    │       │   └── _header.js
    │       └── util.js
    └── index.html

You can store the CSS (or SCSS) of each component into a separate file (and, optionally, use PostCSS plugins to compile each new /component/componentName.css file into style.css). Feel free to organize the globals as you prefer; you could also create a single globals.css file and avoid separating the globals in different files.

Conclusion

Working on large-scale projects requires a solid architecture if you want to open your files months later and don’t get lost. There are many methods out there that tackle this issue (CSS-in-JS, utility-first, atomic design, etc.).

The method I’ve shared with you today relies on creating crosswise rules (globals), using utility classes for rapid development, and BEM for modular (behavioral) classes.

You can learn in more detail about this method on CodyHouse. Any feedback is welcome!

The post Building a Scalable CSS Architecture With BEM and Utility Classes appeared first on CSS-Tricks.

Why JavaScript is Eating HTML

Web development is always changing. One trend in particular has become very popular lately, and it fundamentally goes against the conventional wisdom about how a web page should be made. It is exciting for some but frustrating for others, and the reasons for both are difficult to explain.

A web page is traditionally made up of three separate parts with separate responsibilities: HTML code defines the structure and meaning of the content on a page, CSS code defines its appearance, and JavaScript code defines its behavior. On teams with dedicated designers, HTML/CSS developers and JavaScript developers, this separation of concerns aligns nicely with job roles: Designers determine the visuals and user interactions on a page, HTML and CSS developers reproduce those visuals in a web browser, and JavaScript developers add the user interaction to tie it all together and “make it work.” People can work on one piece without getting involved with all three.

In recent years, JavaScript developers have realized that by defining a page’s structure in JavaScript instead of in HTML (using frameworks such as React), they can simplify the development and maintenance of user interaction code that is otherwise much more complex to build. Of course, when you tell someone that the HTML they wrote needs to be chopped up and mixed in with JavaScript they don’t know anything about, they can (understandably) become frustrated and start asking what the heck we’re getting out of this.

As a JavaScript developer on a cross-functional team, I get this question occasionally and I often have trouble answering it. All of the materials I’ve found on this topic are written for an audience that is already familiar with JavaScript — which is not terribly useful to those who focus on HTML and CSS. But this HTML-in-JS pattern (or something else that provides the same benefits) will likely be around for a while, so I think it’s an important thing that everyone involved in web development should understand.

This article will include code examples for those interested, but my goal is to explain this concept in a way that can be understood without them.

Background: HTML, CSS, and JavaScript

To broaden the audience of this article as much as possible, I want to give a quick background on the types of code involved in creating a web page and their traditional roles. If you have experience with these, you can skip ahead.

HTML is for structure and semantic meaning

HTML (HyperText Markup Language) code defines the structure and meaning of the content on a page. For example, this article's HTML contains the text you're reading right now, the fact that it is in a paragraph, and the fact that it comes after a heading and before a CodePen.

Let’s say we want to build a simple shopping list app. We might start with some HTML like this:

We can save this code in a file, open it in a web browser, and the browser will display the rendered result. As you can see, the HTML code in this example represents a section of a page that contains a heading reading “Shopping List (2 items),” a text input box, a button reading “Add Item,” and a list with two items reading “Eggs” and “Butter.” In a traditional website, a user would navigate to an address in their web browser, then the browser would request this HTML from a server, load it and display it. If there are already items in the list, the server could deliver HTML with the items already in place, like they are in this example.

Try to type something in the input box and click the “Add Item” button. You’ll notice nothing happens. The button isn’t connected to any code that can change the HTML, and the HTML can’t change itself. We’ll get to that in a moment.

CSS is for appearance

CSS (Cascading Style Sheets) code defines the appearance of a page. For example, this article's CSS contains the font, spacing, and color of the text you're reading.

You may have noticed that our shopping list example looks very plain. There is no way for HTML to specify things like spacing, font sizes, and colors. This is where CSS (Cascading Style Sheets) comes in. On the same page as the HTML above, we could add CSS code to style things up a bit:

As you can see, this CSS changed the font sizes and weights and gave the section a nice background color (designers, please don’t @ me; I know this is still ugly). A developer can write style rules like these and they will be applied consistently to any HTML structure: if we add more <section>, <button> or <ul> elements to this page, they will have the same font changes applied.

The button still doesn’t do anything, though: that’s where JavaScript comes in.

JavaScript is for behavior

JavaScript code defines the behavior of interactive or dynamic elements on a page. For example, the embedded CodePen examples in this article are powered by JavaScript.

Without JavaScript, to make the Add Item button in our example work would require us to use special HTML to make it submit data back to the server (<form action="...">, if you’re curious). Then the browser would discard the entire page and reload an updated version of the entire HTML file. If this shopping list was part of a larger page, anything else the user was doing would be lost. Scrolled down? You’re back at the top. Watching a video? It starts over. This is how all web applications worked for a long time: any time a user interacted with a webpage, it was as if they closed their web browser and opened it again. That’s not a big deal for this simple example, but for a large complex page which could take a while to load, it’s not efficient for either the browser or the server.

If we want anything to change on a webpage without reloading the entire page, we need JavaScript (not to be confused with Java, which is an entirely different language… don’t get me started). Let’s try adding some:

Now when we type some text in the box and click the “Add Item” button, our new item is added to the list and the item count at the top is updated! In a real app, we would also add some code to send the new item to the server in the background so that it will still show up the next time we load the page.

Separating JavaScript from the HTML and CSS makes sense in this simple example. Traditionally, even more complicated interactions would be added this way: HTML is loaded and displayed, and JavaScript runs afterwards to add things to it and change it. As things get more complex, however, we start needing to keep better track of things in our JavaScript.

If we were to keep building this shopping list app, next we’d probably add buttons for editing or removing items from the list. Let’s say we write the JavaScript for a button that removes an item, but we forget to add the code that updates the item total at the top of the page. Suddenly we have a bug: after a user removes an item, the total on the page won’t match the list! Once we notice the bug, we fix it by adding that same totalText.innerHTML line from our “Add Item” code to the “Remove Item” code. Now we have the same code duplicated in more than one place. Later on, let’s say we want to change that code so that instead of “(2 items)” at the top of the page it reads “Items: 2.” We’ll have to make sure we update it in all three places: in the HTML, in the JavaScript for the “Add Item” button, and in the JavaScript for the “Remove Item” button. If we don’t, we’ll have another bug where that text abruptly changes after a user interaction.

In this simple example, we can already see how quickly these things can get messy. There are ways to organize our JavaScript to make this kind of problem easier to deal with, but as things continue to get more complex, we’ll need to keep restructuring and rewriting things to keep up. As long as HTML and JavaScript are kept separate, a lot of effort can be required to make sure everything is kept in sync between them. That’s one of the reasons why new JavaScript frameworks, like React, have gained traction: they are designed to show the relationships between things like HTML and JavaScript. To understand how that works, we first need to understand just a teeny bit of computer science.

Two kinds of programming

The key concept to understand here involves the distinction between two common programming styles. (There are other programming styles, of course, but we’re only dealing with two of them here.) Most programming languages lend themselves to one or the other of these, and some can be used in both ways. It's important to grasp both in order to understand the main benefit of HTML-in-JS from a JavaScript developer's perspective.

  • Imperative programming: The word "imperative" here implies commanding a computer to do something. A line of imperative code is a lot like an imperative sentence in English: it gives the computer a specific instruction to follow. In imperative programming, we must tell the computer exactly how to do every little thing we need it to do. In web development, this is starting to be considered "the old way" of doing things and it's what you do with vanilla JavaScript, or libraries like jQuery. The JavaScript in my shopping list example above is imperative code.
    • Imperative: “Do X, then do Y, then do Z”.
    • Example: When the user selects this element, add the .selected class to it; and when the user de-selects it, remove the .selected class from it.
  • Declarative programming: This is a more abstract layer above imperative programming. Instead of giving the computer instructions, we instead "declare" what we want the results to be after the computer does something. Our tools (e.g. React) figure out the how for us automatically. These tools are built with imperative code on the inside that we don't have to pay attention to from the outside.
    • Declarative: “The result should be XYZ. Do whatever you need to do to make that happen.”
    • Example: This element has the .selected class if the user has selected it.

HTML is a declarative language

Forget about JavaScript for a moment. Here's an important fact: HTML on its own is a declarative language. In an HTML file, you can declare something like:

<section>
  <h1>Hello</h1>
  <p>My name is Mike.</p>
</section>

When a web browser reads this HTML, it will figure out these imperative steps for you and execute them:

  1. Create a section element
  2. Create a heading element of level 1
  3. Set the inner text of the heading element to “Hello”
  4. Place the heading element into the section element
  5. Create a paragraph element
  6. Set the inner text of the paragraph element to “My name is Mike”
  7. Place the paragraph element into the section element
  8. Place the section element into the document
  9. Display the document on the screen

As a web developer, the details of how a browser does these things is irrelevant; all that matters is that it does them. This is a perfect example of the difference between these two kinds of programming. In short, HTML is a declarative abstraction wrapped around a web browser's imperative display engine. It takes care of the "how" so you only have to worry about the "what." You can enjoy life writing declarative HTML because the fine people at Mozilla or Google or Apple wrote the imperative code for you when they built your web browser.

JavaScript is an imperative language

We’ve already looked at a simple example of imperative JavaScript in the shopping list example above, and I mentioned how the complexity of an app’s features has ripple effects on the effort required to implement them and the potential for bugs in that implementation. Now let’s look at a slightly more complex feature and see how it can be simplified by using a declarative approach.

Imagine a webpage that contains the following:

  • A list of labelled checkboxes, each row of which changes to a different color when it is selected
  • Text at the bottom like "1 of 4 selected" that should update when the checkboxes change
  • A "Select All" button which should be disabled if all checkboxes are already selected
  • A "Select None" button which should be disabled if no checkboxes are selected

Here’s an implementation of this in plain HTML, CSS and imperative JavaScript:

There isn’t much CSS code here because I’m using the wonderful PatternFly design system, which provides most of the CSS for my example. I imported their CSS file in the CodePen settings.

All the small things

In order to implement this feature with imperative JavaScript, we need to give the browser several granular instructions. This is the English-language equivalent to the code in my example above:

  • In our HTML, we declare the initial structure of the page:
    • There are four row elements, each containing a checkbox. The third box is checked.
    • There is some summary text which reads "1 of 4 selected."
    • There is a "Select All" button which is enabled.
    • There is a "Select None" button which is disabled.
  • In our JavaScript, we write instructions for what to change when each of these events occurs:
    • When a checkbox changes from unchecked to checked:
      • Find the row element containing the checkbox and add the .selected CSS class to it.
      • Find all the checkbox elements in the list and count how many are checked and how many are not checked.
      • Find the summary text element and update it with the checked number and the total number.
      • Find the "Select None" button element and enable it if it was disabled.
      • If all checkboxes are now checked, find the "Select All" button element and disable it.
    • When a checkbox changes from checked to unchecked:
      • Find the row element containing the checkbox and remove the .selected class from it.
      • Find all the checkbox elements in the list and count how many are checked and not checked.
      • Find the summary text element and update it with the checked number and the total number.
      • Find the "Select All" button element and enable it if it was disabled.
      • If all checkboxes are now unchecked, find the "Select None" button element and disable it.
    • When the "Select All" button is clicked:
      • Find all the checkbox elements in the list and check them all.
      • Find all the row elements in the list and add the .selected class to them.
      • Find the summary text element and update it.
      • Find the "Select All" button and disable it.
      • Find the "Select None" button and enable it.
    • When the "Select None" button is clicked:
      • Find all the checkbox elements in the list and uncheck them all.
      • Find all the row elements in the list and remove the .selected class from them.
      • Find the summary text element and update it.
      • Find the "Select All" button and enable it.
      • Find the "Select None" button and disable it.

Wow. That's a lot, right? Well, we better remember to write code for each and every one of those things. If we forget or screw up any of those instructions, we will end up with a bug where the totals don't match the checkboxes, or a button is enabled that doesn't do anything when you click it, or a row ends up with the wrong color, or something else we didn’t think of and won’t find out about until a user complains.

The big problem here is that there is no single source of truth for the state of our app, which in this case is “which checkboxes are checked?” The checkboxes know whether or not they are checked, of course, but, the row styles also have to know, the summary text has to know, and each button has to know. Five copies of this information are stored separately all around the HTML, and when it changes in any of those places the JavaScript developer needs to catch that and write imperative code to keep the others in sync.

This is still only a simple example of one small component of a page. If that sounds like a headache, imagine how complex and fragile an application becomes when you need to write the whole thing this way. For many complex modern web applications, it’s not a scalable solution.

Moving towards a single source of truth

Tools, like React, allow us to use JavaScript in a declarative way. Just as HTML is a declarative abstraction wrapped around the web browser’s display instructions, React is a declarative abstraction wrapped around JavaScript.

Remember how HTML let us focus on the structure of a page and not the details of how the browser displays that structure? Well, when we use React, we can focus on the structure again by defining it based on data stored in a single place. When that source of truth changes, React will update the structure of the page for us automatically. It will take care of the imperative steps behind the scenes, just like the web browser does for HTML. (Although React is used as an example here, this concept is not unique to React and is used by other frameworks, such as Vue.)

Let's go back to our list of checkboxes from the example above. In this case, the truth we care about is simple: which checkboxes are checked? The other details on the page (e.g. what the summary says, the color of the rows, whether or not the buttons are enabled) are effects derived from that same truth. So, why should they need to have their own copy of this information? They should just use the single source of truth for reference, and everything on the page should "just know" which checkboxes are checked and conduct themselves accordingly. You might say that the row elements, summary text, and buttons should all be able to automatically react to a checkbox being checked or unchecked. (See what I did there?)

Tell me what you want (what you really, really want)

In order to implement this page with React, we can replace the list with a few simple declarations of facts:

  • There is a list of true/false values called checkboxValues that represents which boxes are checked.
    • Example:  checkboxValues = [false, false, true, false]
    • This list represents the truth that we have four checkboxes, and that the third one is checked.
  • For each value in checkboxValues, there is a row element which:
    • has a CSS class called .selected if the value is true, and
    • contains a checkbox, which is checked if the value is true.
  • There is a summary text element that contains the text "{x} of {y} selected" where {x} is the number of true values in checkboxValues and {y} is the total number of values in checkboxValues.
  • There is a "Select All" button that is enabled if there are any false values in checkboxValues.
  • There is a "Select None" button that is enabled if there are any true values in checkboxValues.
  • When a checkbox is clicked, its corresponding value changes in checkboxValues.
  • When the "Select All" button is clicked, it sets all values in checkboxValues to true.
  • When the "Select None" button is clicked, it sets all values in checkboxValues to false.

You'll notice that the last three items are still imperative instructions ("When this happens, do that"), but that's the only imperative code we need to write. It's three lines of code, and they all update the single source of truth. The rest of those bullets are declarations ("there is a...") which are now built right into the definition of the page's structure. In order to do this, we write our elements in a special JavaScript syntax provided by React called JSX, which resembles HTML but can contain JavaScript logic. That gives us the ability to mix logic like "if" and "for each" with the HTML structure, so the structure can be different depending on the contents of checkboxValues at any given time.

Here’s the same shopping list example as above, this time implemented with React:

JSX is definitely weird. When I first encountered it, it just felt wrong. My initial reaction was, “What the heck is this? HTML doesn’t belong in JavaScript!” I wasn’t alone. That said, it’s not HTML, but rather JavaScript dressed up to look like HTML. It is also quite powerful.

Remember that list of 20 imperative instructions above? Now we have three. For the price of defining our HTML inside our JavaScript, the rest of them come for free. React just does them for us whenever checkboxValues changes.

With this code, it is now impossible for the summary to not match the checkboxes, or for the color of a row to be wrong, or for a button to be enabled when it should be disabled. There is an entire category of bugs which are now impossible for us to have in our app: sources of truth being out of sync. Everything flows down from the single source of truth, and we developers can write less code and sleep better at night. Well, JavaScript developers can, at least…

It's a trade-off

As web applications become more complex, maintaining the classic separation of concerns between HTML and JavaScript comes at an increasingly painful cost. HTML was originally designed for static documents, and in order to add more complex interactive functionality to those documents, imperative JavaScript has to keep track of more things and become more confusing and fragile.

The upside: predictability, reusability and composition

The ability to use a single source of truth is the most important benefit of this pattern, but the trade-off gives us other benefits, too. Defining elements of our page as JavaScript code means that we can turn chunks of it into reusable components, preventing us from copying and pasting the same HTML in multiple places. If we need to change a component, we can make that change in one place and it will update everywhere in our application (or in many applications, if we’re publishing reusable components to other teams).

We can take these simple components and compose them together like LEGO bricks, creating more complex and useful components, without making them too confusing to work with. And if we’re using components built by others, we can easily update them when they release improvements or fix bugs without having to rewrite our code.

The downside: it’s JavaScript all the way down

All of those benefits do come at a cost. There are good reasons people value keeping HTML and JavaScript separate, and to get these other benefits, we need to combine them into one. As I mentioned before, moving away from simple HTML files complicates the workflow of someone who didn’t need to worry about JavaScript before. It may mean that someone who previously could make changes to an application on their own must now learn additional complex skills to maintain that autonomy.

There can also be technical downsides. For example, some tools like linters and parsers expect regular HTML, and some third-party imperative JavaScript plugins can become harder to work with. Also, JavaScript isn’t the best-designed language; it’s just what we happen to have in our web browsers. Newer tools and features are making it better, but it still has some pitfalls you need to learn about before you can be productive with it.

Another potential problem is that when the semantic structure of a page is broken up into abstract components, it can become easy for developers to stop thinking about what actual HTML elements are being generated at the end. Specific HTML tags like <section> and <aside> have specific semantic meanings that are lost when using generic tags like <div> and <span>, even if they look the same visually on a page. This is especially important for accessibility. For example, these choices will impact how screen reader software behaves for visually impaired users. It might not be the most exciting part, but JavaScript developers should always remember that semantic HTML is the most important part of a web page.

Use it if it helps you, not because it’s “what’s hot right now”

It’s become a trend for developers to reach for frameworks on every single project. Some people are of the mindset that separating HTML and JavaScript is obsolete, but this isn’t true. For a simple static website that doesn’t need much user interaction, it’s not worth the trouble. The more enthusiastic React fans might disagree with me here, but if all your JavaScript is doing is creating a non-interactive webpage, you shouldn’t be using JavaScript. JavaScript doesn’t load as fast as regular HTML, so if you’re not getting a significant developer experience or code reliability improvement, it’s doing more harm than good.

You also don’t have to build your entire website in React! Or Vue! Or Whatever! A lot of people don’t know this because all the tutorials out there show how to use React for the whole thing. If you only have one little complex widget on an otherwise simple website, you can use React for that one component. You don’t always need to worry about webpack or Redux or Gatsby or any of the other crap people will tell you are “best practices” for your React app.

For a sufficiently complex application, declarative programming is absolutely worth the trouble. It is a game changer that has empowered developers the world over to build amazing, robust and reliable software with confidence and without having to sweat the small stuff. Is React in particular the best possible solution to these problems? No. Will it just be replaced by the next thing? Eventually. But declarative programming is not going anywhere, and the next thing will probably just do it better.

What’s this I’ve heard about CSS-in-JS?

I’m not touching that one.

The post Why JavaScript is Eating HTML appeared first on CSS-Tricks.

Two-Value Display Syntax (and Sometimes Three)

You know the single-value syntax: .thing { display: block; }. The value "block" being a single value. There are lots of single values for display. For example, inline-flex, which is like flex in that it becomse a flex container, but behaves like an inline-level element rather than a block-level element. Somewhat intuitive, but much better served by a two-value system that can apply that same concept more broadly and just as intuitively.

For a deep look, you should read Rachel Andrew's blog post The two-value syntax of the CSS Display property. The spec is also a decent read, as is this video from Miriam:

This is how it maps in my brain

Choose block or inline, then choose flow, flow-root, flex, grid, or table. If it's a list-item that's a third thing.

You essentially pick one from each column to describe the layout you want. So the existing values we use all the time map out something like this:

Another way to think about those two columns I have there is "outside" and "inside" display values. Outside, as in, how it flows with other elements around it. Inside, as in, how layout happens inside those elements.

Can you actually use it?

Not really. Firefox 70 is first out of the gate with it, and there are no other signals for support from Chrome-land or Safari-land that I know about. It's a great evolution of CSS, but as far as day-to-day usage, it'll be years out. Something as vital as layout isn't something you wanna let fail just for this somewhat minor descriptive benefit. Nor is it probably worth the trouble to progressively enhance with @supports and such.

Weirdnesses

  • You can't block flow because that doesn't really make sense. It'll be reset to block flow-root.
  • There is implied shorthand. Like if you inline list-item, that's really inline flow list-item whereas list-item is block flow list-item. Looks all fairly intuitive.
  • You still use stuff like table-row and table-header-group. Those are single-value deals, as is contents and none.
  • Column one technically includes run-in too, but as far as I know, no browser has ever supported run-in display.
  • Column two technically includes ruby, but I have never understood what that even is.

How we talk about CSS

I like how Rachel ties this change to a more rational mental and teaching model:

... They properly explain the interaction of boxes with other boxes, in terms of whether they are block or inline, plus the behavior of the children. For understanding what display is and does, I think they make for a very useful clarification. As a result, I’ve started to teach display using these two values to help explain what is going on when you change formatting contexts.

It is always exciting to see new features being implemented, I hope that other browsers will also implement these two-value versions soon. And then, in the not too distant future we’ll be able to write CSS in the same way as we now explain it, clearly demonstrating the relationship between boxes and the behavior of their children.

The post Two-Value Display Syntax (and Sometimes Three) appeared first on CSS-Tricks.

(Why) Some HTML is “optional”

Remy Sharp digs into the history of the web and describes why the <p> tag doesn’t need to be closed like this:

<p>Paragraphs don’t need to be closed
<p>Pretty weird, huh?

Remy writes:

Pre-DOM, pre-browsers, the world's first browser was being written by Sir Tim Berners-Lee. There was no reference implementation and certainly no such thing as a parsing specification. The first browser, the WorldWideWeb.app, parsed HTML character by character applying styles as it went along. As opposed to today's methods whereby a document object model is built up, then rendered.

[...] The paragraph tag (yes, in upper case) was intended to separate paragraphs, not wrap them.

<P>
Paragraph one.
<P>
Paragraph two.
<P>
Paragraph three.

Weird, huh! Remy wrote this in response to Chris’ post the other day about optional HTML and how browsers will close certain tags for us or even insert the right elements in place.

Direct Link to ArticlePermalink

The post (Why) Some HTML is “optional” appeared first on CSS-Tricks.

Some HTML is “Optional”

There is a variety of HTML that you can just leave out of the source HTML and it's still valid markup.

Doesn't this look weird?

<p>Paragraph one.
<p>Paragraph two.
<p>Paragraph three.

It does to me, but the closing </p> tags are optional. The browser will detect it needs them and manifest correctly in the DOM anyway.

This probably happens to HTML you write and you don't even know it. For example...

<table>
  <tr>
    <td></td>
  </tr>
</table>

That looks perfectly fine to me, but the browser will inject a <tbody> in there around that <tr> for you. Optional in HTML, but the DOM will put it in anyway.

Heck, you don't really even need a <body> in the same fashion! Jens Oliver Meiert shares more:

<link rel=stylesheet href=default.css>

Some attributes are "optional" too in the sense that they have defaults you can leave out. For example, a <button> is automatically <button type="submit">.

Jens further argues that these are almost considered optimizations, as it reduces file size and thus network speed.

Me, I don't like looking at HTML like that. Makes me nervous, since there are actual situations that screw up if you don't do it right. Not all file names can be left unquoted. Sometimes, leaving off closing tags means enveloping a sibling element in a way you didn't expect. I'd even sacrifice a tiny smidge of performance for a more resilient site. Sorta like how I know that * {} isn't a particularly efficient selector, but worrying about CSS selector performance is misplaced worry in most cases (the speed difference is negligible).

I actually quite like JSX in how strict it forces you to write "HTML." That strictness helps code formatting (e.g. Prettier) too, as a bonus.

But hey, a perf gain is a perf gain, so I wouldn't say no to tooling that automatically does this stuff to compiled output. That's apparently something HTMLminifier can do.

The post Some HTML is “Optional” appeared first on CSS-Tricks.

Clever code

This week, Chris Ferdinandi examined a clever JavaScript snippet, one that's written creatively with new syntax features, but is perhaps less readable and performant. It's a quick read, but his callout of our industry's fixation on cleverness is worth... calling out:

...we’ve become obsessed as an industry with brevity and clever code, and it results in code that’s sometimes less performant, and typically harder to read and make sense of for most people.

He made a similar argument late last month when he wrote about code readability, noting that brevity might look cool but ultimately leads to all sorts of issues in a codebase:

Often, web developers are obsessed with brevity. There’s this thing were developers will try to write the same function in the fewest number of characters possible.

Personally, I think brevity is pointless. Readability is a lot more important.

I entirely agree with Chris on this point, however, I think there is one important distinction to make and that's the difference between code that's intended as a prototype and code that's intended for production. As Jeremy Keith argued a short while ago:

What’s interesting is that—when it comes to prototyping—our usual front-end priorities can and should go out the window. The priority now is speed. If that means sacrificing semantics or performance, then so be it. If I’m building a prototype and I find myself thinking “now, what’s the right class name for this component?”, then I know I’m in the wrong mindset. That question might be valid for production code, but it’s a waste of time for prototypes.

I agree with Chris that we should be writing code that is easy to read when we’re in production. I also think experimenting with code in this way is a good thing when it comes to prototypes. We shouldn’t ever shy away from playing with code and pushing things a little bit – so long as we’re not doing that in a giant web app with a a team of other developers working alongside us.


I’ve noticed that there are some folks that are doing genuinely ingenious things with Sass. I consistently sit back and think, "Wow, I’ve never seen anything like this before." But when it comes to a production web app that has to be understood by hundreds of people at the same time, I don’t believe that this is the reaction we want when someone looks at the code.

As a result, I’ve been trying to write Sass code that is actually so simple that it almost looks dumb. One easy way to make code a lot simpler is to reduce the amount of nesting:

.element {
  .heading { ... }
}

This looks fine when there’s code inside — and it’s pretty easy to understand — but add a complex bit of design in the mix (say, using pseudo elements and media queries) and you suddenly have a rather complex set of rules in front of you. Creativity and cleverness can be harder to scan and identify one small part of the code that you’re looking for. Plus, in this example, we’ve unnecessarily made our .heading class a little bit more specific which might encourage us to override things in a hacky way elsewhere in the codebase.

We could write the following:

.element { ... }

.element-heading { ... }

I know this looks foolishly simple but the relationship between these two classes is easier to see and easier to extend in the future. Bundling all that code into a single nested class can get out of hand real fast. Even if it happens to look a lot cooler.

(As an aside, Andy Bell's post on using the ampersand in Sass — and the resulting comments — is a great example of the clash between creativity and practicality.)

Anyway, the point I’m trying to make here is that CSS (and JavaScript for that matter) is a strange language because there are no definite rules you can make about it. It all really depends on the codebase and the project. But I think we can safely say that our code ought to be a lot more boring than our prototypes when it moves to production.

Continue to make prototypes that are wild and experimental or impossibly weird! Code quality be damned.

The post Clever code appeared first on CSS-Tricks.