7 Best WordPress CDN Services in 2024 (Compared)

We get thousands of global visitors every day on WPBeginner, so we know how important content delivery networks are for website performance.

A CDN is a service that can significantly speed up your website. It works by caching and serving your website content from the servers nearest to your user’s location, reducing your page load time.

While we use Cloudflare on our own site, we know there are lots of other great options for WordPress users. That’s why we have tested the top options on the market, paying attention to the location and number of data centers, pricing, and user-friendliness.

In this article, we will show you the best WordPress CDN providers to speed up your website.

Best WordPress CDN Services

Expert Tip: Are you looking for more ways to speed up your WordPress website? It might be time to call in the experts.

Our experts will do a full performance audit on your website and then optimize it for lightning-fast loading times. Check out our WPBeginner Site Speed Optimization Service today!

How Does a CDN Help WordPress Sites?

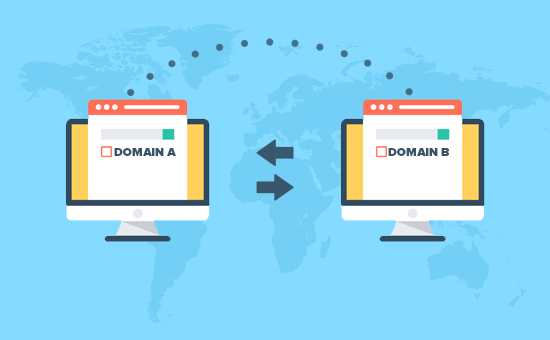
A CDN is a global network of servers that saves your website’s static content, such as HTML, CSS, and JavaScript files, in a cache. When a user visits your site, the CDN will serve the content from the server closest to the user, making it load faster.

With a CDN, your website will be much faster and less likely to crash when the traffic is high. This is because your site will rely on multiple CDN servers (called edge servers) instead of just a single origin server to deliver your content.

Here are some benefits of using a CDN:

  • You get a faster page load speed. CDNs can decrease latency, or the time it takes for a server to deliver content to a browser.
  • Your site will also be more SEO-friendly. This is because Google prioritizes web pages with good user experience, such as how fast your pages load.
  • You get better uptime. CDNs use load balancing, so when one of the edge servers fails, the others can cover for it and keep the site running.
  • You can make your WordPress website more secure against distributed denial of service (DDoS) attacks. The CDN will absorb and route the attack’s traffic to the network of servers to avoid overwhelming the origin server.
  • You can reduce your WordPress hosting’s bandwidth usage, meaning you won’t need to upgrade to a more expensive hosting plan.

For these reasons, many WordPress website owners use CDNs to make their sites faster and more secure. So, let’s take a look at some of the top WordPress CDN services and how they stack up against each other.

Why Trust WPBeginner?

At WPBeginner, we have 16+ years of experience in running WordPress websites, optimizing them for speed, and reaching readers all over the world. We have also thoroughly tested each of the CDN services mentioned in this article.

For more details, just see our editorial process.

1. Bunny.net

Bunny.net CDN service

Out of all the CDN services we have reviewed, Bunny.net is the best WordPress CDN on the market. Their WordPress plugin is easy and fast to set up, so you can start using the CDN right away.

Our team has been using Bunny CDN on OptinMonster because their pricing is very affordable for small businesses. If you are based in North America, then the pricing is just $0.01 per GB.

Not sure how much the total will be? Bunny.net has a handy calculator you can use.

Bunny.net's monthly bill calculator

They also have data centers worldwide, so you can reach users anywhere they are based. Simply select one of its 123 PoP (point of presence) locations across North America, South America, Asia, Africa, the Middle East, and Oceania.

Bunny.net knows that beginner WordPress users may be new to CDN services. That’s why they provide 24/7 customer support through live chat to help their customers, and they typically respond within an average of 5 minutes.

Pros of Bunny.net:

  • User-friendly control panel to manage your CDN features, like activating your free SSL certificate in one click or clearing your cache to keep your content updated.
  • Wide network coverage with its 123 and growing PoP locations.
  • Video CDN to load videos faster.
  • Up to 80% image optimization to reduce the size of your image files.
  • 99.99% global Service Level Agreement, which means if your website is down, you will be eligible for credits to offset any loss caused by the outage.
  • Real-time analytics to help you pinpoint performance issues on your website.

Cons of Bunny.net:

  • There is no free tier, though there is a 14-day free trial.

Why we recommend Bunny.net: This high-performance CDN service is one of the best options for beginner WordPress users. Despite their affordability, Bunny.net has everything you need to make your website faster and offer a better user experience.

2. Cloudflare

Cloudflare CDN's landing page

Cloudflare is known as the best free CDN for small business WordPress websites. With a global network of 310 cities and 120 countries, you can rest assured that your site will always be online.

Setting up Cloudflare CDN in WordPress is easy. All you need to do is sign up for a plan, add your website to Cloudflare, and replace your domain’s nameservers with Cloudflare’s.

Cloudflare’s free plan also includes unmetered DDoS protection. This means Cloudflare will detect and mitigate DDoS attacks without limiting the traffic volume that can be protected.

We actually use Cloudflare for their paid security and CDN services on WPBeginner, and we have been very happy with their fast performance, huge CDN network, and excellent uptime.

For more details, you can see why we switched from Sucuri to Cloudflare.

Pros of Cloudflare:

  • Cloudflare’s global network coverage is vast.
  • The CDN has a built-in web application firewall to protect users against not just DDoS attacks but also other threats, like email spammers.
  • Simple bot mitigation to differentiate legitimate bots, like search engine crawlers, from malicious bots like DDoS attackers or phishing campaigns.
  • Special tools to handle dynamic content caching and delivery to make your site faster.

Cons of Cloudflare:

  • There is no uptime guarantee for Free and Pro plan users.
  • Direct support is only available for paid plan users.

Why we recommend Cloudflare: We use a paid Cloudflare plan on WPBeginner for our security and CDN needs. Overall, we appreciate how fast the Cloudflare CDN is, along with its advanced firewall rules to keep our website safe.

3. Sucuri

Sucuri's CDN landing page

Sucuri is one of the most popular website security companies out there. Besides offering powerful website security features, they provide an easy-to-use CDN that’s optimized for WordPress.

To use Sucuri’s CDN, you need to sign up for one of their website security platform plans, which includes a web application firewall (WAF).

You can then add your site to the WAF, activate the firewall by changing your site’s DNS settings, and choose a CDN caching option. Besides speeding up your site and preventing DDoS attacks, the WAF also blocks spam and malware.

Sucuri’s data centers are vast, with locations in North America, Europe, and Asia. They also have CDN edge servers operating on Amazon Web Services in Australia and Brazil.

Pros of Sucuri:

  • According to Sucuri, they can improve website performance by 60%.
  • Multiple caching options, so you can choose the one that suits your site’s needs best. These include minimal caching, which is great if your site has lots of dynamic content (e.g., personalized text).
  • Automatic SSL certificate installation for your firewall server to protect your data as it is being transmitted.
  • Automatic malware removal, meaning Sucuri will delete any malware that it detects right away.
  • For small business owners, Sucuri offers a basic firewall with CDN plans that start at $9.99 per month.

Cons of Sucuri:

  • You cannot use the CDN alone as you have to purchase it with Sucuri’s main security features.

Why we recommend Sucuri: Sucuri is a great option if you are looking for a combination of WordPress security features and a CDN. It’s also pretty affordable, making it an excellent choice for small businesses.

4. KeyCDN

KeyCDN's homepage

KeyCDN is another good option for a WordPress CDN service. It has a user-friendly CDN Enabler plugin that can automatically rewrite your website URLs to serve them through the CDN.

With the CDN Enabler plugin, you get more control over how your CDN works. For example, you can select what type of files need to be served using the CDN to focus on only the essential elements of your website.

KeyCDN's CDN Enabler plugin

You can also instantly purge your CDN cache right from your admin area. As a result, you can keep your website content up-to-date.

KeyCDN’s network of servers is spread across the Americas, Africa, Europe, Asia Pacific, and Oceanic regions. This way, your site always performs fast no matter where your audience is.

Pros of KeyCDN:

  • High-performance CDN with support for HTTP/2, GZIP compression, IPv6 support, and image processing, all of which are important features that contribute to faster load times.
  • Instant CDN purge right from the CDN Enabler plugin to easily update your website content.
  • Pay-as-you-go pricing with a low minimum charge of $4 per month.
  • Free 14-day trial with no credit card required.

Cons of KeyCDN:

  • Despite the low minimum charge, you must purchase a minimum of $49 worth of credit to use KeyCDN.

Why we recommend KeyCDN: This CDN service’s wide network coverage, easy-to-use plugin, and affordable pricing make it worth recommending for small business owners who are just starting out. Just remember to have at least $49 worth of credit in your account to use it.

5. RocketCDN

Rocket CDN's homepage

RocketCDN is a WordPress CDN service offered by the same team as WP Rocket, one of the most popular WordPress caching plugins. That plugin has powered over 3 million websites, so you know you are in good hands with RocketCDN.

RocketCDN is powered by Bunny.net, which means they also have a global network of over 120 edge locations. However, what makes them different is their respective pricing models.

Instead of a pay-as-you-go scheme, RocketCDN comes in a single plan costing $8.99 per month. This already includes unlimited bandwidth for all regions, so you won’t have to worry about hitting any data caps or slow speeds due to limited resources.

When you activate RocketCDN, they will automatically adjust the settings of your website to ensure that it runs smoothly and quickly. These settings include Gzip compression and serving assets over HTTP/2.

Pros of RocketCDN:

  • Monthly pricing with unlimited bandwidth, which can be a good option if you don’t want the hassle of calculating your own resource usage.
  • Easy WordPress setup, as you only need to install their plugin and activate their API key.
  • Everything is enabled for you once the CDN is active, from Gzip compression, and HTTP/2 support, to serving all images using CDN.
  • Automatic canonical header setup so that search engines know which version of your website to show even though some of your assets are served using a CDN address.

Cons of RocketCDN:

  • Compared to other CDN solutions on the list, RocketCDN’s features may seem too basic.
  • No free trial.

Why we chose RocketCDN: Many WPBeginner users use WP Rocket for their websites, and RocketCDN is one of the best solutions to complement this caching plugin.

6. Imperva

Imperva CDN

Imperva is a cyber security company that offers many website and application protection solutions, including a CDN. They have 62+ data centers with 10 TB per second capacity, which is very high.

If your site receives 1 million visitors per day, and each visitor downloads 1 MB of data, Imperva could handle all that traffic without breaking a sweat.

Additionally, Imperva has self-service customization. This means you can decide how content is cached or traffic is routed based on factors like device type and user location. This feature can help optimize your website’s performance and reduce costs.

Pros of Imperva:

  • Large bandwidth capacity to handle high traffic volume, making it perfect for online businesses.
  • Self-service customization feature to configure how the CDN behaves to optimize performance.
  • 99.999% uptime guarantee with a 3-second mitigation SLA, which means downtime is extremely low, and Imperva promises to fix any issue within 3 seconds.

Cons of Imperva:

  • The self-service customization feature may be too advanced for the average WordPress user.
  • There is no fixed pricing, and you have to contact their team for custom pricing.

Why we chose Imperva: When reviewing Imperva, we were thoroughly impressed by their high-performance CDN and advanced features that not all CDNs provide. We recommend Imperva if you have a growing, multinational business.

7. Amazon CloudFront

Amazon CloudFront's homepage

Last but not least, we have Amazon CloudFront. It’s a powerful WordPress CDN service for people who use Amazon services like Amazon SES and Amazon Web Services (AWS).

That said, despite its name, this WordPress CDN solution works with many other hosting providers, not just AWS.

When you use CloudFront, you will also get the AWS Shield Standard automatically enabled. This technology is like a more comprehensive version of DDoS protection, securing your website against attacks at all network layers.

Amazon CloudFront has 600+ points of presence in 90 cities across 47 countries, so its CDN service has vast coverage. It also offers a free tier that allows you to send 1 TB of data from CloudFront each month at no extra cost.

Pros of Amazon CloudFront:

  • Seamless integration with AWS services, so it’s a great option if you already use them.
  • A global network of servers, with hundreds of points of presence worldwide.
  • Robust security features at the edge servers to protect your content from DDoS attacks, malware, phishing, and other threats at all levels.
  • Generous free tier plan, as 1 TB of data transfer can serve approximately 1 billion web pages.

Cons of Amazon CloudFront:

  • Not the most beginner-friendly setup.

Why we chose Amazon CloudFront: If you run WordPress on AWS, then you already have a great WordPress CDN service at your disposal. The vast network and generous free-tier plan also make CloudFront worth recommending.

Bonus: Use a Hosting Provider With Free CDN

These days, many WordPress hosting providers come with their own custom CDN solutions. This way, you won’t have to pay extra to make your website fast and secure.

Hostinger, for instance, has a built-in CDN available for Business plan users or above. It includes features like WebP image compression, CSS and JavaScript minification, and a handy under-attack mode to fight rapid DDoS attacks.

Hostinger's built-in CDN

SiteGround also has an excellent CDN feature designed specifically for users who receive traffic from multiple countries. The team behind it has reported that loading speeds have increased by 20% on average.

While a free plan is available, they also have a premium plan with unlimited monthly bandwidth.

On the other hand, some hosting providers like Bluehost and WP Engine have integrated third-party CDN services like Cloudflare.

Which Is the Best WordPress CDN Provider for Your Site?

After carefully evaluating all these top WordPress CDN services, we believe that Bunny.net is the best WordPress CDN on the market. It has a wide global network coverage and offers a great set of features at a reasonable price.

For people on a tight budget, Cloudflare’s free CDN plan can do the job. It comes integrated with popular web hosting providers like Bluehost and WP Engine. Plus, you get unmetered DDoS protection.

If you want a CDN focusing on security, then Sucuri is the one for you. Besides multiple caching options, you can get a powerful WAF with automatic malware removal and SSL installation.

WordPress CDN Services: Frequently Asked Questions

Now that we’ve covered the best WordPress CDN services, let’s cover some frequently asked questions about using a CDN.

Which CDN does WordPress use?

The WordPress software does not use any CDN as it is only a content management system that requires a hosting service to run. Instead, the user has the freedom to choose any CDN service they prefer.

How do I choose a CDN for my WordPress website?

To choose a CDN for your WordPress website, you can consider your website needs, your own budget, and the platform’s ease of use.

If you need a beginner-friendly CDN with affordable pricing, then look no further than Bunny.net. On the other hand, if your website handles a lot of sensitive data, then you may want a CDN with a good set of security features, like Sucuri.

Can I use Cloudflare CDN with WordPress, and how does it compare to other CDN services?

Yes, you can use Cloudflare CDN with WordPress. In fact, many hosting providers like Bluehost and WP Engine have Cloudflare integrated into their dashboards, so you can immediately use it.

While Cloudflare CDN is free, it has great unmetered DDoS protection. However, there is no direct support.

Does CDN increase website speed?

Yes, a CDN can increase your website speed and make it faster. It will cache your website content into multiple servers spread worldwide. When users visit your site, the server closest to them will deliver the content.

That said, many factors affect website speed, so we recommend implementing other best speed optimization practices as well. For more information, check out our ultimate guide to boost WordPress speed and performance.

Ultimate Guides to Boost Your WordPress Site Performance

We hope this article helped you find the best WordPress CDN solution for your website. You may also want to see our ultimate WordPress performance guide or our expert pick of the best website speed test tools.

If you liked this article, then please subscribe to our YouTube Channel for WordPress video tutorials. You can also find us on Twitter and Facebook.

The post 7 Best WordPress CDN Services in 2024 (Compared) first appeared on WPBeginner.

5 Best WordPress Caching Plugins to Speed Up Your Website (2024)

Are you looking for the best WordPress caching plugin for your website?

Caching essentially stores a copy of your WordPress site on your server. When users open your website again, the server can simply pull up the copy so that visitors won’t have to reload your site from scratch again.

Since there are so many different WordPress cache plugins, it can feel overwhelming to pick the right option.

To help you pick the best plugin, we tested some of the best options on the market. While testing, we focused on a bunch of factors like ease of use, caching options, and price.

In this guide, we will show you the best WordPress caching plugins to improve your site speed.

Best WordPress Caching Plugins

In a hurry? No worries! Take a look at our top picks so you can quickly choose the right WordPress cache plugin for your site.

RankingPluginBest ForPrice
#1WP RocketOverall performance$59/yearRead more
#2WP Super CacheBeginnersFreeRead more
#3W3 Total CacheMultiple caching optionsFree + paidRead more
#4SucuriFirewall + caching$9.99/monthRead more
#5Cache EnablerSimple cachingFreeRead more

Why Use a WordPress Caching Plugin?

Using a WordPress caching plugin is one of the easiest ways to increase your website speed. When installed, the caching plugin will store parts of your site (like static HTML files, CSS files, JavaScript files, and so on) on your server.

Every time someone visits your site, they are served the cached version of the site instead of having to wait for your server to load the web pages from the beginning.

By storing cached pages of your site, a caching plugin drastically reduces the amount of processing required to serve those pages. Some cache content at the server level and others leverage browser caching. This leads to:

  • A faster website and better WordPress SEO. Search engines give a significant SEO advantage to fast web pages, which helps you rank higher in search results.
  • More power to handle larger amounts of traffic without slowing down your site performance or affecting your uptime. This is important if you run an eCommerce website.

Plus, caching can create a better user experience. Users who visit your site will experience faster page loading times, making it less likely for them to bounce from your site.

The probability of bounce increases 32% as page load time goes from 1 second to 3 seconds.

Think with Google

How We Tested and Reviewed WordPress Caching Plugins

  • We used them on our websites: Throughout the years, we have used different WordPress cache plugins on our websites to improve our site performance.
  • We tested the most popular plugins: We tested some of the most popular caching plugins on the market to see if they are worth the hype. We analyzed those plugins based on the following factors: ease of use, features, types of caching, and pricing.
  • We categorized them based on your needs: Not every website will benefit from the same caching plugin. That’s why we analyzed all the features to help you decide which tool fits your needs.

Why Trust WPBeginner

At WPBeginner, we are a dedicated team of people with over 16 years of experience in WordPress, design, and online marketing. Our WordPress experts extensively review each plugin or tool that is featured here and thoroughly test them on real websites. To learn more, you can see our complete editorial process.

1. WP Rocket

WP Rocket homepage

After trying out different plugins from this list, we found WP Rocket to be the overall best WordPress caching plugin. It is the easiest and most beginner-friendly option, which is a big help if you are new to this topic.

With WP Rocket, WordPress users can instantly cache their website with just one click. Once the plugin is activated, its crawler automatically fetches the WordPress pages to build up the cache.

The plugin then automatically turns on the recommended WordPress caching settings. These include page caching, cache preloading, Gzip compression, browser caching, and mobile device caching.

WP Rocket also offers optional features to configure to improve your website performance further. These include lazy loading images, CDN (content delivery network) support, minification, and more.

Pros of WP Rocket:

  • User-friendly plugin interface for beginners.
  • Essential caching functions are available out of the box, from page caching and browser caching to mobile device caching.
  • Additional optimization features to speed up your website loading time, like options to minify CSS files and enable a CDN integration.
  • Advanced features like database optimization, multisite support, and cache exclusions based on URLs or cookies.
  • Supports caching for dynamic content, including WooCommerce cart items.

Cons of WP Rocket:

  • Unfortunately, there is no free version, but WP Rocket does offer a 14-day money-back guarantee.

Pricing: Starting from $59 per year for one website, product updates, and support.

Why we chose WP Rocket: We have reviewed WP Rocket before at WPBeginner, and we strongly recommend it as the best WordPress caching plugin on the market. While there is no free version, its prices are quite affordable compared to other paid options.

You can also check out our step-by-step guide on how to install and set up WP Rocket in WordPress.

2. WP Super Cache

WP Super Cache plugin banner

WP Super Cache is a popular, free caching plugin created by Automattic, the company that runs WordPress.com.

This WordPress caching plugin has 2 caching settings: Expert and Simple. The first one is a much faster option than the other because it doesn’t execute any PHP scripts, but it does require you to edit your .htaccess file.

The second is a happy medium between fast site loading speed and ease of use. We recommend choosing this method instead if you are not confident editing your own .htaccess file.

Other than that, WP Super Cache includes other speed optimization features like cache preloading. This setting will generate cached files of your pages, posts, categories, and tags that are ready to load as soon as someone accesses the content for the first time.

Pros of WP Super Cache:

  • Completely free of charge.
  • Advanced caching settings are available, such as expert caching that can handle high traffic and custom caching options to control how the plugin works.
  • Cache garbage collection to delete old cache pages and keep your website updated.
  • Basic CDN support that will rewrite your website content URLs so that they are loaded with CDN.

Cons of WP Super Cache:

  • While the interface is pretty user-friendly, it uses technical terms designed for advanced users that may confuse beginners.

Pricing: Free plugin.

Why we chose WP Super Cache: If you are looking for a free caching plugin to speed up your website loading time, then WP Super Cache is a great choice.

For beginners, we recommend taking the time to explore the plugin and understand some of the more technical terms so that you can make the most of it. See our article on how to install and set up WP Super Cache for detailed instructions.

3. W3 Total Cache

W3 Total Cache's homepage

If you want to use a WordPress caching plugin with tons of optimization features, then check out W3 Total Cache.

Firstly, W3 Total Cache offers various types of caching besides page caching and browser caching. It also has object caching and database caching, both of which can speed up the execution of dynamic parts of your site (the ones that change frequently), not just the static ones.

Secondly, it has a Google PageSpeed Insights integration. During our testing, we liked that this feature lets you test your website speed without leaving your WordPress admin area, so it’s very user-friendly.

Other than that, you can find other speed enhancement features like CSS and JS file minification, lazy loading, and an image converter from other formats to WebP for better performance.

Pros of W3 Total Cache:

  • Multiple caching options are available for free: page caching, browser caching, opcode caching, database query caching, and object caching.
  • Google PageSpeed Insights integration to test website speed.
  • Image optimization features like lazy loading and WebP conversion.
  • Pro features in the premium version, like CDN support for the entire website and fragment caching for plugins and themes using the WordPress Transient API.

Cons of W3 Total Cache:

  • The feature set is comprehensive but can seem intimidating for beginners.
  • Unlike other plugins on the list, the preloading feature is not available out of the box.

Pricing: Free plugin available. The premium version’s plans start from $99 per year for one website license.

Why we chose W3 Total Cache: The free version of W3 Total Cache offers many caching options that you may not find in other plugins on the list, especially not in the free versions.

That said, the sheer range of features can feel overwhelming for beginners. For detailed setup instructions, see our article on how to install and set up the W3 Total Cache plugin.

4. Sucuri

Sucuri's CDN landing page

Sucuri is technically a WordPress firewall plugin, but it has built-in caching options to speed up your website in just a few clicks. We used to use Sucuri on WPBeginner, so we are very familiar with this plugin.

If you run an online store or a membership site, Sucuri recommends using Site Caching, which will keep your cache for up to 180 minutes. Meanwhile, blogs or news portals can use Minimal Caching, which will only cache your pages for up to 8 minutes before they are refreshed.

If you make significant changes to your site, then you can clear your old cache in one click. Sucuri also lets you clear the cache for a file or folder instead of the whole site. This allows you to optimize specific parts of your site without affecting its entirety.

Additionally, Sucuri supports Brotli, a data compression algorithm by Google that is faster than Gzip compression. It’s effective for compressing large files and reducing bandwidth usage. This means people with slow internet can visit your website quicker.

Pros of Sucuri:

  • Easy-to-use caching features that can be enabled in a few clicks.
  • User-friendly cache-clearing functions for the entire website and specific files or folders.
  • Support for compression algorithms, like the more popular Gzip, and a newer option like Brotli.
  • Reliable CDN service with worldwide network coverage, a great feature for websites with a global audience.
  • Top-notch security features like a web application firewall, malware removal, and DDoS protection.

Cons of Sucuri:

  • If you are just looking for a plugin with caching functionality, then Sucuri may seem like overkill.

Pricing: Comes in two types of subscription plans: Website Security Platform and Firewall with CDN. The first starts from $199.99 per year and includes the complete Sucuri security kit. The second starts from $9.99 per month and only comes with a firewall and CDN.

Why we chose Sucuri: If you are looking for a security plugin that doubles as an optimization plugin, then Sucuri is the perfect solution. Besides offering user-friendly caching features, you can get great protection without installing other plugins.

5. Cache Enabler by KeyCDN

The Cache Enabler plugin banner

Cache Enabler is a free WordPress caching plugin by KeyCDN, one of the most popular WordPress CDN services.

When we first activated the plugin, the plugin page looked rather simple. In reality, it’s quite powerful on its own. You can customize how long cached files last to suit your website needs instead of choosing a time period that’s been set for you.

There are also many cache-clearing settings that you can enable. For example, you can automatically clear the cache when a post type has been published, updated, or trashed so that your blog content stays up-to-date.

Pros of Cache Enabler:

  • Simple-to-use plugin page interface that’s easy to understand for beginners.
  • Gzip and Brotli compression support to reduce your file sizes.
  • Custom post types support, which is great for portfolios, online stores, membership sites, and so on.
  • A real-time display of your website’s cache size in the WordPress dashboard helps you keep track of how much space your cache is taking on your server.

Cons of Cache Enabler:

  • Compared to other caching plugins on the list, the features of Cache Enabler can seem pretty limited.

Pricing: Free plugin. However, if you choose to get KeyCDN as well, then the prices start from $0.04 per GB per month for the first 10 TB (for North America/Europe region). The cost varies by region, but you can use its pricing calculator to get estimates.

Why we chose Cache Enabler: As a free caching plugin, Cache Enabler is great at being easy to use yet packed with the most essential caching features. It can be a good option if you just need a simple caching solution.

Bonus Tip: Use Built-in Caching Features From Hosting Providers

These days, many WordPress hosting companies offer their own built-in caching solutions.

The benefit of using these built-in caching settings is that you won’t have to find or install a plugin yourself. Plus, the caching functionality is readily optimized for your hosting, so you may experience fewer errors.

The downside is that the feature set widely varies. Some may only include basic page caching, while others may have more advanced options. Depending on your website, you may not be able to rely solely on these built-in options.

That being said, we still think these hosting caching settings are worth talking about because they are very easy to enable. Let’s look at the caching features offered by some of the most popular web hosting providers on the market.

Bluehost

Bluehost is one of the biggest hosting companies in the world and an officially recommended WordPress hosting provider. Their hosting plans include built-in caching that you can enable from your hosting dashboard.

Bluehost's caching options

You can select one of these caching levels:

  • Assets Only – For eCommerce and sites that update frequently or display real-time information, you can use this level to cache your site’s static assets for 5 minutes.
  • Assets & Web Pages – If you have a WordPress blog, an educational site, or a website that updates at least once a week, consider using this level to cache static assets for 6 hours and other web pages for 5 minutes.
  • Assets & Web Pages – Extended – For portfolios or websites that update every month or less frequently, you can choose this option to cache static assets for 1 week and web pages for 5 minutes.

If you compare Bluehost’s caching options to the other plugins on the list, they may seem basic. But they also offer a Cloudflare CDN integration to boost your website performance further.

SiteGround

We use SiteGround to power WPBeginner and have seen many performance improvements since we switched. If you are curious, then you can check out our article on why we switched to SiteGround for more information.

By default, SiteGround offers 3 caching solutions: Nginx Direct Delivery for static content, Dynamic Cache, and Memcached (optional).

The last two are caching modules that not many WordPress hosting offers by default, which is what makes SiteGround so powerful. In fact, they can improve your website speed anywhere from 50% to 500%.

SiteGround's caching settings

For WordPress sites, SiteGround recommends installing their Speed Optimizer plugin to speed up your website by 20%. The plugin can also compress image sizes by up to 85% without losing quality.

Overall, if you use SiteGround, you really won’t need any caching plugins like WP Rocket or others.

Hostinger

Hostinger is one of the fastest-growing WordPress hosting providers in recent years. They are powered by the LiteSpeed Web Server, so their caching settings also come from LiteSpeed.

From the get-go, Hostinger offers two types of caching modules: the LiteSpeed Cache plugin and the Object Cache.

Hostinger's caching settings

The LiteSpeed Cache plugin is included in all plans and offers page caching, cache preloading, and image compression for your website. By default, Hostinger will update your cache every 30 minutes.

Meanwhile, the Object Cache will cache your database queries and is only available for Business plan users or above. It has been said to improve website speed by up to 3 times.

WP Engine

WP Engine is a managed WordPress hosting company, which means they will take care of most of your back-end maintenance tasks as much as possible. As a result, you won’t have to handle them as much.

Since WP Engine is a more premium hosting service, it comes with tons of caching features by default. These include page caching, CDN caching, object caching, and local browser caching.

You can also set exclusion rules for dynamic content, like shopping cart, checkout, or login pages. If you need to clear your cache, then you can just log in to your user portal and click a few buttons.

What Is the Best Cache Plugin for WordPress?

After comparing the different options on the list, we found that the best WordPress caching plugin is hands down WP Rocket. It has a great balance between being beginner-friendly and powerful to elevate your website performance.

If you are looking for a free caching plugin, then we recommend W3 Total Cache. It has plenty of caching features out of the box, from basic to advanced.

We also recommend checking out the caching modules that hosting providers like Bluehost have to offer. These may already be good enough to speed up your website, and they are already customized to suit your hosting needs.

Best WordPress Caching Plugins: FAQs Answered

Now that we’ve covered the list of best WordPress caching plugins, let’s answer some frequently asked questions.

Do I need a caching plugin?

Yes, we strongly recommend installing a WordPress caching plugin, as it can significantly improve your WordPress site’s speed.

Caching can reduce server load, improve the user experience by reducing load times, and potentially boost your site’s SEO rankings due to improved speed.

However, if your hosting provider offers built-in caching solutions like SiteGround, then you might not need to install a separate caching plugin.

Should I use multiple cache plugins in WordPress?

Using multiple caching plugins simultaneously can lead to conflicts and potential issues with your site. We generally recommend using only one caching plugin to avoid these problems.

However, if you need to use multiple caching tools for specific purposes, make sure they can complement each other and do not result in the same action being performed twice.

Which is better: WP Super Cache or W3 Total Cache?

Both WP Super Cache and W3 Total Cache are highly-rated WordPress caching plugins. However, the choice between the two depends on your specific needs and preferences.

WP Super Cache is a free plugin with some basic and advanced caching features. But some settings require some technical knowledge, so we don’t recommend it if you are a complete beginner.

W3 Total Cache is a freemium plugin with a comprehensive set of caching settings. The abundance of features may intimidate beginners, but the ease of use is generally much better than WP Super Cache.

Check Out More Guides to Speed Up WordPress

We hope this article helped you find the WordPress caching plugin to speed up your website. You may also want to see our list of the best WordPress plugins for business websites, and the best WordPress SEO plugins to help you boost your rankings.

If you liked this article, then please subscribe to our YouTube Channel for WordPress video tutorials. You can also find us on Twitter and Facebook.

Disclaimer: We also looked at other WordPress cache plugins and solutions for this article, including WP Fastest Cache, Hummingbird, and WP-Optimize. However, we picked only the very best WordPress caching plugins to help you avoid choice paralysis.

The post 5 Best WordPress Caching Plugins to Speed Up Your Website (2024) first appeared on WPBeginner.

Why Is WordPress So Hard (And How to Make It Easier)

If you’re comparing different website builders, then you may have come across the sentiment that WordPress is hard to use.

WordPress is the world’s most popular website builder powering over 43% of all websites on the internet. However, some people complain that WordPress is more difficult to use than solutions like Squarespace and Wix.

In this article, we’ll address the myth of why WordPress is so hard, and share the tricks, tools, and techniques you can use to harness the full power of WordPress without any difficulties.

Why is WordPress so hard?

Why is WordPress So Hard?

Over 43% of all websites on the internet are built on WordPress. This might make you wonder:

Why are so many people using a difficult platform?

Unlike website builders such as Squarespace, WordPress is completely open source, customizable, and flexible. You can use WordPress in any way you want, which might sound confusing for new users.

This is particularly true if you’ve previously used a website builder like Wix.com. These platforms typically have limited features and control exactly how you use their tools. This might make it seem like that they’re easy to use, but they are also very restrictive.

With the right techniques, tools, and information, WordPress is just as easy as any website builder, but without any of the restrictions.

By choosing WordPress, you’ll get the freedom to use any web host and domain provider, so you can update, customize, and extend your WordPress website in exactly the way you want. 

In the official WordPress repository alone, you’ll find over 60,000 free plugins that can add all sorts of features to your website. Think of plugins like apps in your iPhone except they’re for your websites.

When it comes to designing your site, you can use any free or premium theme, or even use drag & drop page builders to create a completely unique design. 

There are no provider terms and conditions to follow, and you own all the content on your site. 

With that in mind, let’s take a look at why nearly half of all website owners in the world ignore the myth that WordPress is hard to use and choose WordPress as their platform.

WordPress Isn’t Hard (But Here’s How to Make it Even Easier)

At WPBeginner we don’t believe that WordPress is hard. However, if you don’t have the right tools, tricks, and know-how, then WordPress can feel more complex than it actually is.

With that in mind, let’s see how you can make WordPress easier. You can use the links below to jump to any section of the post.

Choose the Right Web Hosting Provider

By choosing the best WordPress hosting, you can set your site up for success. The right host will provide exactly the features you need to build and run a successful WordPress website, even if you have no previous experience.

Some hosts even perform crucial WordPress maintenance tasks such as creating backups, adding security plugins, and installing updates. This will make WordPress feel effortless.

For example, Bluehost is a well-known WordPress hosting provider that automatically installs and set up WordPress for you when you sign up.

The Bluehost web hosting provider

From time to time, you may encounter problems or have questions.

A good host will offer support over email, phone, live chat, and other channels so you’ll have no problems getting your site back on track.

As the world’s most popular CMS, there are lots of companies that offer WordPress hosting. For that reason, we’ve done the research and created a list of the best web hosting companies to help you find the provider that’s right for you.

Here are the top WordPress hosting companies that we recommend:

  1. Bluehost – great for beginners – includes free domain.
  2. Hostinger – growing fast in popularity due to affordable prices, fast speed, includes free domain.
  3. SiteGround – premium WordPress hosting provider, uses Google cloud. Slightly higher prices.
  4. WP Engine – enterprise managed WordPress hosting provider, great for large sites.

Install Must-Have WordPress Plugins

The best part about WordPress is that you can easily add any feature to your site using plugins, without hiring a developer.

There are eCommerce plugins to help you create an online store, plugins that turn WordPress into a membership site so you can sell courses, add smart lead generation forms to grow your business, improve your SEO rankings, and much more.

In fact, there are over 60,000 free plugins in the official WordPress repository alone, so you’ll have no problems finding a plugin that meets your exact needs.

The official WordPress plugin repository

To help you get started, here’s our expert list of the must-have plugins for your WordPress website.

Our top 5 free WordPress plugins that we always recommend include:

  1. WPForms – best drag & drop online form builder for WordPress.
  2. AIOSEO – best WordPress SEO plugin to boost your SEO rankings.
  3. MonsterInsights – easily see your website analytics to make data-driven decisions.
  4. Duplicator – easily create regular backups for your website.
  5. SeedProd – drag & drop page builder to create custom website designs without any code.

Find the Perfect WordPress Theme

WordPress themes control how your site looks and acts. There are themes designed for specific markets like WooCommerce themes and membership site themes, but also multi-purpose themes that you can customize to fit almost any type of site.

Just like plugins, there are countless free themes to choose from. In fact, there are over 10,500 free themes in the official WordPress repository alone.

The WordPress theme repository

You’ll find even more on top WordPress theme providers websites.

This includes Elegant Themes, Astra, StudioPress, and more.

An example of a premium WordPress theme marketplace

It’s important to choose a theme that looks good, has the features you need, and is also high quality. To help you make the right decision, see our guide on how to select the perfect WordPress theme.

If you’re looking for theme recommendations, then check out our expert pick of the most popular and best WordPress themes.

Use a WordPress Page Builder

When building your site, you’ll create posts and pages using the WordPress block editor.

The WordPress block editor

If you’re using a block-enabled theme such as Divi or Astra, then you can also add content using the full-site editor.

This editor allows you to completely change the theme layout and add new sections to your website without writing any code.

The WordPress full site editor (FSE)

This is a great start, but it can be very basic and has a limited number of features.

We still recommend using a page builder plugin such as SeedProd. SeedProd allows you to create completely custom page designs and comes with ready-made blocks that you can drag and drop anywhere on your site.

This includes advanced blocks like countdown timers, contact forms, Google Maps, payment fields, and much more.

Why is WordPress so hard? SeedProd can make it easier

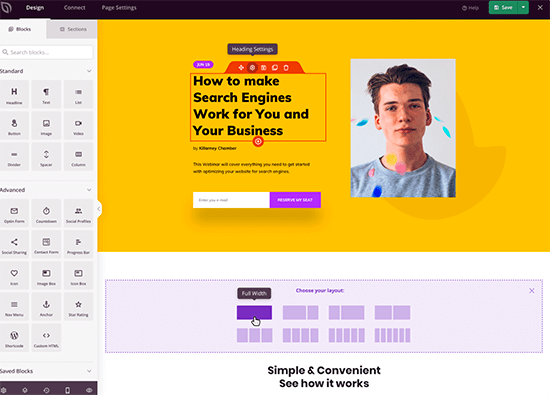
After adding a block to your site, you can customize it using the settings in the left-hand SeedProd menu.

This makes it easy to create custom home pages, landing pages, and more.

Why is WordPress so bad? Page builders can make it easier

For more on this topic, please see our guide on WordPress Block Editor vs Page Builders, as well as our expert tips to master the WordPress content (block) editor.

Use a WordPress SEO Plugin

Most visitors will find your site through search engines like Google. To help search engines show your content to the right people, you’ll need to work on your WordPress SEO.

SEO is a huge topic that often includes technical tasks such as adding rich snippets schema markup to your site.

Thankfully, there’s a WordPress plugin for everything and SEO is no exception. There are lots of different WordPress SEO plugins and tools you can use for individual tasks, but we recommend AIOSEO as it’s the complete SEO toolkit for WordPress.

The AIOSEO SEO WordPress plugin

AIOSEO comes with powerful features including breadcrumb navigation, advanced eCommerce SEO support for WooCommerce, local SEO, an internal link assistant, and much more. This means you don’t have to set up and learn multiple SEO plugins.

AIOSEO also scans your pages and posts as you’re writing them and creates a checklist of ways to improve its SEO.

Why is WordPress so hard? AIOSEO can make it easier

For step-by-step instructions, please see our ultimate guide on how to set up All in One SEO for WordPress correctly.

Use Tools to Improve Site Speed and Performance

To provide a good experience, your website needs to load quickly.

WordPress is already optimized for speed and performance, but there are lots of tricks and tools that can make it run even faster. With that in mind, we’ve created the ultimate guide to boost WordPress speed and performance that has everything you need to know.

Set up an Automated Security Plugin

WordPress is secure software, but hackers are always coming up with new ways to break into sites and steal data. To help new WordPress users keep their sites safe, we’ve created an ultimate WordPress security guide.

We also recommend using Sucuri, which is the best WordPress security plugin.

The Sucuri WordPress security plugin

Sucuri tracks everything that happens on your site, including failed login attempts and any changes to the WordPress files.

It also scans for malware and monitors whether your site appears on any blocklists, as this may mean there’s a problem with your site’s security.

Why is WordPress so bad? Sucuri is one way to make it easier

If it finds an issue, then Sucuri will notify you automatically. In this way, you can protect your site without having to perform any manual checks, or learn complicated security tools.

To learn how we use Sucuri on our own websites, see our complete Sucuri review.

Set up Google Analytics

As a website owner, your goal is to get people to your site and keep them engaged. That’s where Google Analytics comes in.

Analytics allow you to make decisions based on real data. For example, you can track website visitors and see the content that gets the most engagement. You can then create more of this popular content.

An example of Google Analytics data

You can also see how long visitors stay on your site and the bounce rate, which is the percentage of users who exit your site on the first visit. You can use this information to increase pageviews and reduce bounce rate in WordPress.

Google Analytics is an important tool, but it can be complicated to set up. For that reason, we recommend using MonsterInsights.

The MonsterInsights Google Analytics plugin

MonsterInsights is the best analytics solution for WordPress users.

It allows you to easily install Google Analytics on your website and then shows helpful reports directly in the WordPress dashboard.

Why is WordPress so complicated? MonsterInsights can make it easier

To learn more, please see our guide on how to install Google Analytics in WordPress.

Use Comment Filtering and Moderation

All website owners worry about comment spam.

Spambots and malicious third parties can easily flood a site’s comment section with links to malware and low-quality pages. This can hurt your website’s reputation and may even affect its SEO.

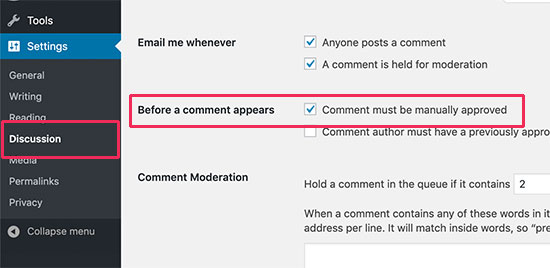
You can moderate comments in WordPress directly from the dashboard, including manually approving and blocking comments, or even deleting them completely.

Moderating comments manually can make WordPress more hard

However, moderating every single comment can be time-consuming, especially as your site grows and attracts more visitors.

Thankfully, there are lots of tools to combat comment spam in WordPress. This includes Akismet, which automatically filters all comments through a global spam database.

Moderating comments automatically using Akismet

To learn more, please see our guide to Akismet and why you should start using it right away.

Never Edit Your Theme Files Directly

WordPress is open-source software so anyone can see and edit its code, or even add their own PHP, JavaScript, CSS, and HTML. It may sound complicated, but there are lots of reasons to add custom code to WordPress.

For example, you might use a code snippet to completely disable comments, or remove the WordPress version number. Typically, it doesn’t make sense to install a plugin for these small tasks, so WordPress gives you the option to use code instead.

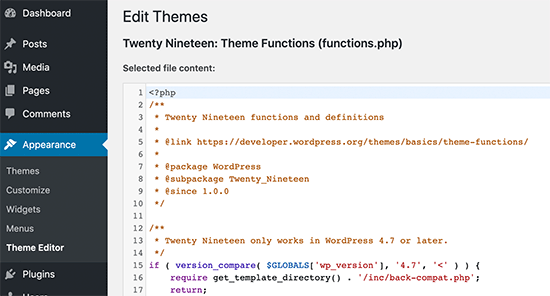
Many WordPress tutorials will provide a snippet and then ask you to edit your theme’s functions.php file.

The problem is that even a typo or small mistake in the code can cause errors or even break your site completely. You also won’t be able to update your WordPress theme without losing the customization.

This leads many people to think that WordPress is hard, when really the problem lies with their custom code.

That’s why we recommend using WPCode.

The WPCode code snippets plugin for WordPress

WPCode is the best code snippets plugin for WordPress and allows you to add custom PHP, JavaScript, CSS, and HTML without editing any theme files.

WPCode also has a built-in library of snippets that you can add to a site with just a few clicks. Even if you’re a beginner with no coding experience, WPCode makes it easy to add custom code in WordPress in a safe way.

Why is WordPress so complicated? WPCode can make it easier

Keep Your WordPress Site Up-To-Date

It’s important to keep your themes, plugins, and core WordPress software up-to-date. Hackers try to exploit known errors and vulnerabilities in outdated software, so if you fall behind then your site could become an easy target.

Some updates even add features that make WordPress easier to use. For this reason, it’s important to update WordPress core, update your WordPress plugins, and install the latest version of your theme.

Some web hosts will install these updates for you automatically, especially if you’re using a managed hosting provider.

Another option is to enable automatic updates for WordPress and enable automatic updates for plugins and themes. With that done, you’ll always have access to the latest WordPress features and fixes.

Why is WordPress so complicated? Automatic updates can make it easier

Automate Your WordPress Backups

WordPress is secure and reliable software, but it’s still a good idea to create regular backups.

Accidents and mistakes happen, such as deleting important content or editing the wrong page. Malicious third parties may also try to break into your site and delete your content.

By creating regular backups, you can always recover a working and error-free version of your website. Even if the worst happens and you lose all your data, you can simply restore your WordPress website from its latest backup.

They may be important, but many website owners overlook backups until it’s too late.

The good news is there are many free and paid WordPress backup plugins that can do the hard work for you. We recommend using a premium plugin like Duplicator Pro as it can create backups automatically.

For added security, Duplicator Pro will save your backups to popular online storage solutions like Dropbox, OneDrive, or Amazon S3. This means you can log into these services from any location, and get access to a working copy of your website.

Learn WordPress

The right plugins, themes, and techniques will help you run a successful WordPress website with ease. In some cases, you can even completely automate important tasks such as making a WordPress database backup or performing a security audit.

For this reason, many website owners don’t take the time to learn more about WordPress. We think this is a big mistake.

By continuing to learn you can often make WordPress even easier to use. With that in mind, here are just some of the free resources you’ll find on WPBeginner:

  • WPBeginner Blog. This is where we publish our WordPress tutorials, how-tos, and step-by-step guides. We have a huge library of free content, and we’re publishing new information all the time.
  • WPBeginner Dictionary. Complicated terms and technical jargon can make WordPress seem a lot harder than it is. For that reason, we’ve created a directory that covers all the WordPress lingo.
  • WPBeginner Videos. Our step-by-step WordPress 101 video tutorials have everything you need to get started with WordPress.
  • WPBeginner on YouTube. Enjoyed our WordPress 101 series and want to learn more? You’ll find over 900 more videos on our YouTube channel covering everything from SEO, to common WordPress errors and how to fix them, how to embed dynamic social media feeds on your site, and much more.
  • WPBeginner Engage Group. The largest and fastest-growing WordPress group for non-techies and beginners on Facebook. Here, you can connect with over 91,000 WordPress users, ask questions, and get support from the community.

Consider Hiring a WordPress Maintenance Service

The tips and tricks in this guide will make WordPress feel effortless, even if you’ve never created a website before.

However, if you’re looking for the ultimate hassle-free experience then you can always hire a maintenance service to take care of WordPress for you. This includes creating backups, installing updates, performing SEO audits, upgrading your site’s security, finding and fixing broken links, and more.

These services are perfect for first-time WordPress users or anyone who finds that day-to-day website maintenance takes too much time. If you want to hire a WordPress expert, then see our pick of the best WordPress website maintenance services.

We hope this article helped you see why WordPress is not hard, and there’s a good reason that nearly half of all websites on the internet use WordPress. You may also want to see our guide on how much it really costs to build a WordPress website or see the most important reasons to use WordPress.

If you liked this article, then please subscribe to our YouTube Channel for WordPress video tutorials. You can also find us on Twitter and Facebook.

The post Why Is WordPress So Hard (And How to Make It Easier) first appeared on WPBeginner.

How to Speed Up Your eCommerce Website (14 Proven Tips)

Do you want to speed up your eCommerce website?

Speed is crucial for the success of an eCommerce site. It not only improves customer experience, but it directly impacts conversions and sales.

In this guide, we’ll show you how to easily speed up your eCommerce store to improve performance and conversions.

Improving eCommerce website speed

Why Speed Matters for Your eCommerce Store

Speed is extremely important when it comes to user experience. No one likes a slow website, a slow computer, or a slow app.

But for online stores, a slow website can actually costs you business.

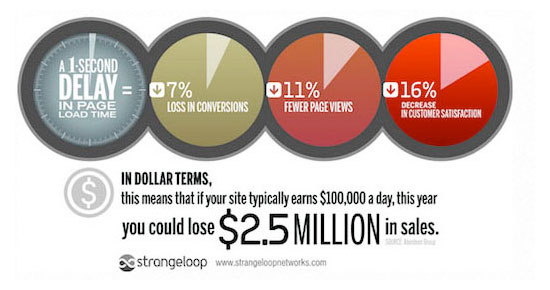
For instance, a study found that a single-second delay in page load time results in 7% loss in conversions, 11% fewer page views, and 16% decrease in customer satisfaction.

StrangeLoop study

In simpler words, slow websites can lead to lower sales.

Now apart from user experience and sales, eCommerce site speed also affects your SEO rankings. Search engines like Google consider speed as an important user experience indicator and ranking factor.

In fact, Google’s page experience search update is solely focused on user experience metrics like bounce rate and website speed. A faster eCommerce website will help you bring more free traffic from search engines.

That being said, let’s take a look at how to easily bump up your eCommerce store speed and performance.

Here is a quick overview of the topics we’ll cover in this guide.

1. Choose a Better Ecommerce Hosting Provider

All eCommerce performance optimization you make to your website will have little impact if you don’t have a good eCommerce hosting provider.

Not all WordPress hosting companies are the same. For better performance, you need to choose an eCommerce hosting provider that does the following:

  • Provides a stable and up-to-date platform to host your eCommerce store.
  • It is optimized for WordPress, WooCommerce, or any other eCommerce plugin that you may want to use
  • Their servers are optimized for speed and performance. This means built-in caching, security, and other features to improve performance

We recommend using SiteGround. They are one of the officially recommended WordPress hosting providers.

SiteGround servers run on Google Cloud Platform which is known for high performance. They have built-in caching and even have their own optimization plugin that automatically implements many of the performance tips that we’ll recommend later in this article.

If you are looking for alternatives, then check out our list of best WooCommerce hosting providers.

After setting up your eCommerce store on a good hosting service, you can implement the following optimization tips to boost performance.

2. Install a WordPress Caching Plugin

WooCommerce is a dynamic eCommerce platform. This means all your product data is stored in a database and product pages are generated when a user visits your website.

To do this, WordPress needs to run the same process each time. If more people visit your eCommerce store at the same time, then it will slow down and may even crash.

A caching plugin, helps you fix that issue.

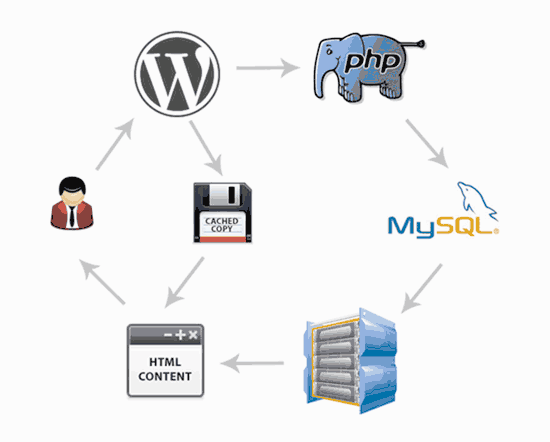
Instead of generating pages each time, a caching plugin shows user a cached version of the HTML page. This frees up your server resources and allows it to run more efficiently thus improving website loading time.

How caching works in WordPress

There are some great WordPress caching plugins available, and popular WordPress hosting companies like SiteGround and Bluehost offer their own caching systems.

We recommend using WP Rocket. It is the best WordPress caching plugin on the market with the most beginner-friendly settings.

Unlike other WordPress caching solutions, WP Rocket doesn’t wait for users to visit a page to generate a cached version. Instead, it automatically prepares a cache of your website and keeps it up to date.

With the right WP Rocket settings, you can easily get near perfect scores in speed test tools like Pingdom, GTMetrix, Google Pagespeed Insights, and more.

For details and instructions, see our article on how to install and set up WP Rocket in WordPress.

Top WordPress hosting companies, like SiteGround and Bluehost offer their own caching solutions too.

SiteGround SG Optimizer

SiteGround allows you to easily turn on caching on your eCommerce store by using their SG Optimizer plugin.

This all-in-one performance tool includes caching, performance tweaks, WebP image conversion in WordPress, database optimization, CSS minification, GZIP compression, and more.

Simply install and activate the SG Optimizer plugin in WordPress. For more details, see our step by step guide on how to install a WordPress plugin.

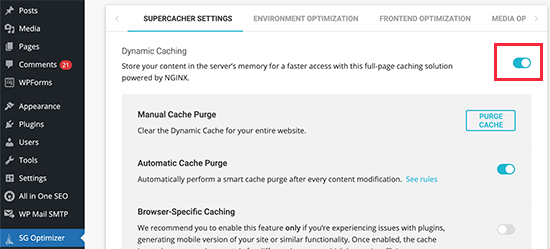
Upon activation, click on the SG Optimizer menu in your WordPress admin sidebar to access plugin settings. From here, you need to turn on the Dynamic Caching option.

Turn on caching in SiteGround

Turn on Caching on Bluehost

Similarly, Bluehost also allows you to use its built-in caching system for optimizing WooCommerce. Simply login to your Bluehost dashboard and go to My Sites page. If you have multiple sites, then select your site and then switch to the Performance tab.

Bluehost caching levels

From here you can select a caching level for your website. For instance, you can choose eCommerce but if your website still remains slow then you can come back here and increase the caching level.

3. Use Latest PHP Version

WordPress and WooCommerce are both mainly written in the PHP programming language.

With each new version, PHP improves in performance and becomes faster. It also fixes bugs and patches security issues that may compromise your website’s stability and speed.

This is why you should always use the latest PHP version.

You can find out your eCommerce store’s PHP version by visiting Tools » Site Health in your WordPress dashboard and switching to the ‘Info’ tab.

Site Health in WordPress

From here, you need to click on the ‘Server’ section to expand it, and you’ll be able to see the PHP version used by your server.

PHP version in WordPress site health

If your website is running on a PHP version lower than 8.0, then you should reach out to your hosting provider and ask them to update it for you.

For more details, see our article on how PHP updates impact your website.

Note: Some managed WordPress hosting companies like SiteGround have built their own Ultrafast PHP to improve overall server response time. Others are using PHP FastCGI to help customers improve eCommerce speed.

4. Latest Version of WordPress & WooCommerce

WordPress and WooCommerce developers spend a significant amount of time on improving performance during each development cycle. This makes both apps run more efficiently and use fewer server-side resources.

Each new version also fixes bugs and strengthens security which is crucial for an eCommerce business.

As the store owner, it is your responsibility to make sure that you are using the latest version of WordPress, WooCommerce, other plugins, and your WordPress theme.

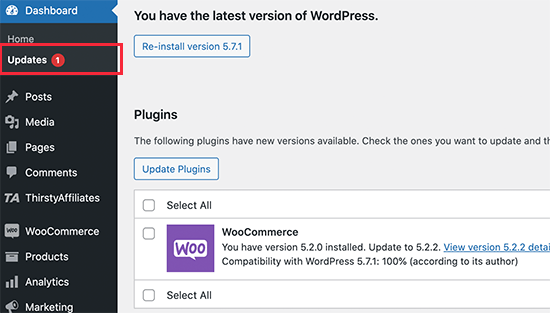
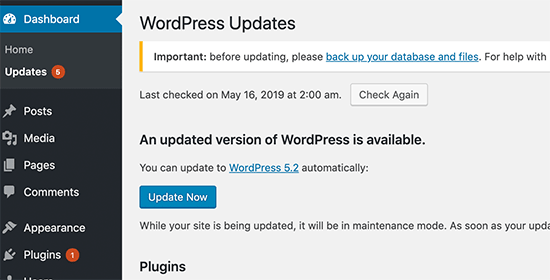
Simply go to Dashboard » Updates page to install all available updates.

Installing updates

5. Optimize Product Images for Performance

Product images are one of the most visually important things for an online store. Better product images keep customers engaged and can help boost sales conversion.

This is why it’s important to add high-quality product images. However, you need to make sure that large image file sizes are properly optimized.

There are two ways to optimize product images for the web without losing quality.

First, you can optimize each product image on your computer before uploading it to your website. This requires image editing software like Adobe Photoshop, Affinity, Gimp, etc.

Most of them have an option to export an image for the web. You can also adjust the quality of the image before saving it for upload.

Export for web in Adobe Photoshop

Alternately, you can use an image compression plugin for WordPress. These plugins automatically optimize your product image size for better site performance.

Aside from image compression, the image file type you choose can also help. For example, JPEG images are better for images that have a lot of color, whereas png images are better for transparent images.

6. Use a DNS Level Website Firewall

Brute force and DDoS attacks are common internet nuisances. Basically, hackers try to overload your server to break in, steal data or install malware.

Most hosting companies have basic safeguards that protect your websites from such attacks. However, one downside of these attacks is that they make your website loads extremely slow.

This is where you need a Website Application Firewall (WAF).

Now, common WordPress firewall plugins run on your own webserver. This makes them a little less efficient as they cannot block suspicious attacks until they reach your server.

On the other hand, a DNS-level firewall is able to filter your traffic on the cloud and block suspicious attacks even before they reach your website.

Website firewall

We recommend using Sucuri. It is the best WordPress firewall plugin with a comprehensive security suite.

Sucuri also comes with a powerful CDN (content delivery network). A CDN serves your website’s static content (images, stylesheets, JavaScript) from a global network of servers. This further reduces your server load and improves overall site load time.

If you are looking for a free option, then Cloudflare free CDN gives you basic level DNS firewall protection.

7. Choose a Better WordPress Theme

Choose better eCommerce theme

WordPress themes control the appearance of your eCommerce store. However, not all of them are optimized for performance and often add too much clutter which makes your website slower.

When choosing a WordPress theme for an eCommerce store, you need to find the balance between functionality and speed. Theme features like sliders, carousels, web fonts and icon fonts can slow down your website.

We recommend going for a simple theme and then use plugins to add the features you need. This gives you better control over both the performance and appearance of your online store.

WordPress themes by StudioPress, Elegant Themes, and Astra are all optimized for performance. For more individual theme recommendations, see our expert pick of the best WooCommerce themes for WordPress.

8. Use Better WordPress Plugins

One of the most often asked questions by WordPress beginners is that how many plugins they can use on their store without affecting performance?

The answer is as many as you like.

The total number of plugins does not affect the performance of your online store. It’s the quality of code that does.

A single poorly coded WordPress plugin may load too many scripts or stylesheets that could affect page load speed.

On the other hand, a well coded plugin would use standard best practices to minimize the performance impact. We recommend testing your plugins for performance impact before and after installing them.

We also maintain a list of must have WooCommerce plugins where we hand-picked essential WooCommerce plugins used by most online stores.

For example, the SeedProd drag & drop landing page builder helps you build blazing fast eCommerce landing pages without writing any code.

SeedProd Page Builder

For more on this topic, see our guide on how to choose the best WordPress plugins. It has a step by step process on how to evaluate WordPress plugins and picking the right one for your online store.

9. Reduce External HTTP Requests

A typical eCommerce page contains several components. For instance images, CSS and JavaScript files, video embeds, and more.

Each such component is separately loaded by users’ browsers by making an HTTP request to your server. More HTTP requests mean longer page load times.

Your server may also be fetching things from third-party tools and services like Google Analytics, social media retargeting, and other services. These are called external HTTP requests. These can take even longer to finish on a typical web page load.

It is ok to have these scripts on your WordPress website, but if they are affecting your website’s performance, then you need to consider reducing them.

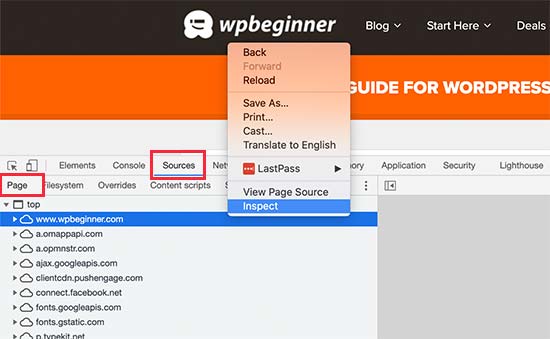
You can view external HTTP requests by visiting your website and opening the Inspect tool in your browser. From here, switch to the Sources » Page tab to view all external HTTP requests.

External HTTP requests

10. Reduce Database Requests

WordPress and WooCommerce use database to store a lot of content and settings. Your WordPress theme and plugins also make database queries to fetch and display that information on screen.

Database queries are extremely fast, and your website can run hundreds of those in mere milliseconds. However, if your website is handling a traffic spike, then these queries can slow down your page load time.

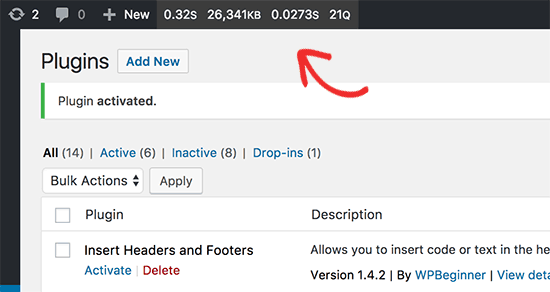
You can check the database calls by using a plugin like Query Monitor in WordPress. Upon activation, the plugin will add the query monitor menu into your WordPress admin bar.

Query monitor menu

However, minimizing these requests may not be possible for beginner-level users. For instance, you may need to modify your WordPress theme to reduce database calls.

If you are comfortable editing your WordPress theme files or debug code, then you can look for database calls that can be avoided.

Other users, can try finding a better WordPress theme and alternate plugins to reduce database calls if needed.

11. Optimize WordPress Database

Over a period of time, your WordPress database may get bloated with information that you may not need anymore.

This clutter can potentially slow down database queries, backup processes, and overall WordPress performance. From time to time, it’s important to optimize your WordPress database to declutter unnecessary information.

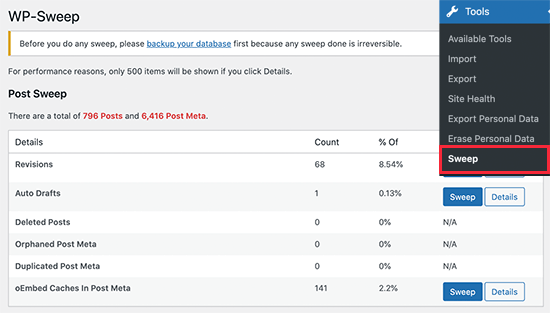
Simply install and activate the WP Sweep plugin. Upon activation, simply go to Tools » Sweep to clean up your WordPress database.

WordPress database optimization

For more on this topic, see our article on how to optimize WordPress database for speed and performance.

12. Use Staging Sites to Track Performance Issues

Making changes to a live eCommerce store can cause issues. For instance, a customer may loose their order, or your site may go down during a sale event.

A staging site helps you easily try out performance optimization tips, new plugins, or a theme without affecting your live store.

Basically, a staging site is a clone of your live website that is used for testing changes before making them live.

Many popular WordPress hosting companies offer 1-click staging site set up. Once set up, you can try your changes and track your page load speed and performance.

Once you are ready to implement those changes, you can simply deploy staging site to the live version.

For step by step instructions, see our tutorial on how to create a staging site for WordPress.

13. Offload Ecommerce Emails

Offload eCommerce emails

Emails play a very important role on an eCommerce store. They are used to deliver order confirmations, invoices, password reset emails, sales and marketing messages, and more.

However, many beginners don’t realize this and use their hosting provider’s limited email functionality for eCommerce emails.

Most hosting companies don’t support the default WordPress mail function. Some even disable it to prevent spam and abuse.

This is why you need to use a dedicated SMTP email service provider along with the WP Mail SMTP plugin. These companies specialize in sending mass emails and ensure higher deliverability, which means your emails don’t end up in the spam folder.

We recommend using SMTP.com as one of the best SMTP service provider for transactional emails.

It is easy to set up and works with WooCommerce and all top WordPress contact form plugins. Plus, they offer a 30-day free trial with up to 50,000 emails.

If you want to look at others, then do check out Sendinblue or Mailgun.

14. Use Better Conversion Rate Optimization Tools

When it comes to eCommerce website, conversion rate optimization (CRO) is important for increasing sales.

A typical online store has many dynamic elements to increase conversions such as free shipping bar on homepage, black friday sale countdown timer in website header, exit-intent popup on checkout pages, or even spin a wheel gamification on mobile site to reduce abandonment.

Free shipping bar example

Often store owners and retailers use a combination of tools and plugins to add these dynamic elements. The challenge is that not all of them are properly optimized for speed.

This is why it’s important to choose conversion optimization tools that offer a suite of features in one platform, so you’re not loading multiple external scripts.

Below is a list of popular conversion optimization tools that we use on our eCommerce websites:

  • OptinMonster – it’s the most powerful conversion optimization toolkit that lets you create personalized popups, gamification campaigns, floating bars, and more.
  • LiveChat.com – it’s the best live chat software. They also offer ChatBot automation software as well that works for both WooCommerce and Shopify.
  • TrustPulse – it’s the best social proof software in the market that’s optimized for speed. You can use it to show real-time user activity without slowing down your site.

When it comes to analytics and A/B testing tools, we recommend only using what’s absolutely needed.

For example, if you’re launching a new landing page or website design, it’s important to run heatmap analytics. However after a short period of analysis, we recommend disabling heatmaps so it doesn’t slow down your website speed.

Similarly for A/B testing tools, you don’t need to run those scripts on every page of your website. You can selectively load A/B testing scripts on specific pages, and when you’re done with the test, don’t forget to remove the script.

We hope this article helped you speed up your eCommerce website. You may also want to see our WordPress security handbook or check out our WooCommerce SEO guide to get free traffic from search engines to your online store.

If you liked this article, then please subscribe to our YouTube Channel for WordPress video tutorials. You can also find us on Twitter and Facebook.

The post How to Speed Up Your eCommerce Website (14 Proven Tips) appeared first on WPBeginner.

How to Add HTTP Security Headers in WordPress (Beginner’s Guide)

Do you want to add HTTP security headers in WordPress?

HTTP security headers allow you to add an extra layer of security to your WordPress website. They can help block common malicious activity from affecting your site’s performance.

In this beginner’s guide, we will show you how to add HTTP security headers in WordPress.

How to Add HTTP Security Headers in WordPress (Beginner's Guide)

What Are HTTP Security Headers?

HTTP security headers are a security measure that allows your website’s server to prevent some common security threats before they can affect your website.

When a user visits your WordPress website, your web server sends an HTTP header response to their browser. This response tells browsers about error codes, cache control, and other statuses.

The normal header response issues a status called HTTP 200. After this, your website loads in the user’s browser. However, if your website is having difficulty, then your web server may send a different HTTP header.

For example, it may send a 500 internal server error or a not found 404 error code.

HTTP security headers are a subset of these headers. They are used to protect websites from common threats like click-jacking, cross-site scripting, brute force attacks, and more.

Let’s have a quick look at some HTTP security headers and how they protect your website:

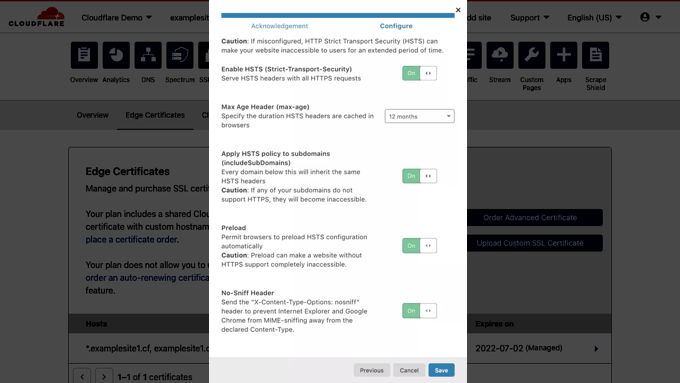
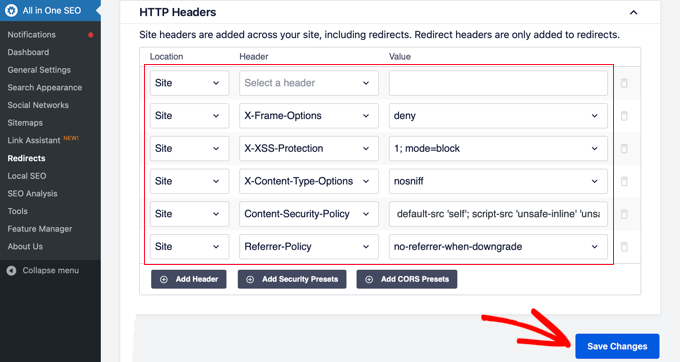
  • HTTP Strict Transport Security (HSTS) tells web browsers that your website uses HTTPS and should not be loaded using an insecure protocol like HTTP.
  • X-XSS Protection allows you to block cross-site scripting from loading.
  • X-Frame-Options prevents cross-domain iframes or click-jacking.
  • X-Content-Type-Options X-Content-Type-Options blocks content mime-type sniffing.

HTTP security headers work best when they are set at the web server level, which means your WordPress hosting account. This allows them to be triggered early on during a typical HTTP request and provide maximum benefit.

They work even better if you are using a DNS-level website application firewall like Sucuri or Cloudflare.

That being said, let’s take a look at how to easily add HTTP security headers in WordPress. Here are quick links to different methods so that you can jump to the one that suits you:

1. Adding HTTP Security Headers in WordPress Using Sucuri

Sucuri is one of the best WordPress security plugins on the market. If you are using their website firewall service, then you can set HTTP security headers without writing any code.

First, you will need to sign up for a Sucuri account. It is a paid service that comes with a server-level website firewall, security plugin, CDN, and malware removal guarantee.

During sign-up, you will need to answer simple questions, and Sucuri documentation will help you set up the website application firewall on your website.

After signing up, you must install and activate the free Sucuri plugin. For more details, see our step-by-step guide on how to install a WordPress plugin.

Upon activation, you need to go to Sucuri Security » Firewall (WAF) and enter your Firewall API key. You can find this information under your account on the Sucuri website.

Sucuri WAF API key

After that, you will need to click the green ‘Save’ button to store your changes.

Next, you must switch to your Sucuri account dashboard. From here, click on the ‘Settings’ menu on top and then switch to the ‘Security’ tab.

Setting HTTP security headers in Sucuri

From here, you can choose three sets of rules. The default protection will work well for most websites.

If you have a Professional or Business plan, then you also have options for HSTS and HSTS Full. You can see which HTTP security headers will be applied for each set of rules.

You need to click the ‘Save Changes in the Additional Headers’ button to apply your changes.

Sucuri will now add your selected HTTP security headers in WordPress. Since it is a DNS-level WAF, your website traffic is protected from hackers even before they reach your website.

2. Adding HTTP Security Headers in WordPress Using Cloudflare

Cloudflare offers a basic free website firewall and CDN service. It lacks advanced security features in its free plan, so you will need to upgrade to its Pro plan, which is more expensive.

You can learn how to add Cloudflare to your website by following our tutorial on how to set up the Cloudflare free CDN in WordPress.

Once Cloudflare is active on your website, you must go to the SSL/TLS page in your Cloudflare account dashboard and then switch to the ‘Edge Certificates’ tab.

Setting up HTTPS security headers in Cloudflare

Now, scroll down to the ‘HTTP Strict Transport Security (HSTS)’ section.

Once you find it, you need to click on the ‘Enable HSTS’ button.

Click the Enable HSTS Button

This will bring up a popup with instructions telling you that you must have HTTPS enabled on your website before using this feature.

If your WordPress blog already has a secure HTTPS connection, then you can click on the ‘Next’ button to continue. You will see the options to add HTTP security headers.

Enable HTTPS security headers in Cloudflare

From here, you can enable HSTS, apply HSTS to subdomains (if the subdomains are using HTTPS), preload HSTS, and enable no-sniff header.

This method provides basic protection using HTTP security headers. However, it does not let you add X-Frame-Options, and Cloudflare doesn’t have a user interface to do that.

You can still do that by creating a script using the Cloudflare Workers feature. However, we don’t recommend this because creating an HTTPS security header script may cause unexpected issues for beginners.

3. Adding HTTP Security Headers in WordPress Using .htaccess

This method allows you to set the HTTP security headers in WordPress at the server level.

It requires editing the .htaccess file on your website. This server configuration file is used by the most commonly used Apache webserver software.

Note: Before making any changes to files on your website, we recommend making a backup.

Next, simply connect to your website using an FTP client or the file manager in your hosting control panel. In the root folder of your website, you need to find the .htaccess file and edit it.

View of Edit the .htaccess File Using an FTP Client

This will open the file in a plain text editor. At the bottom of the file, you can add some code to add HTTPS security headers to your WordPress website.

You can use the following sample code as a starting point. It sets the most commonly used HTTP security headers with optimal settings:

<ifModule mod_headers.c>
Header set Strict-Transport-Security "max-age=31536000" env=HTTPS
Header set X-XSS-Protection "1; mode=block"
Header set X-Content-Type-Options nosniff
Header set X-Frame-Options DENY
Header set Referrer-Policy: no-referrer-when-downgrade
</ifModule>

Don’t forget to save your changes and visit your website to make sure that everything is working as expected.

Note: Take care when editing code on your website. Incorrect headers or conflicts in the .htaccess file may trigger the 500 Internal Server Error.

4. Adding HTTP Security Headers in WordPress Using AIOSEO

All in One SEO (AIOSEO) is the best SEO tool for WordPress and is trusted by over 3 million businesses. The premium plugin lets you easily add HTTP security headers to your website.

The first thing you will need to do is install and activate the AIOSEO plugin on your website. You can learn more in our step-by-step guide on how to set up All in One SEO for WordPress.

You then need to head over to the All in One SEO » Redirects page to add the HTTP security headers. First, you will need to click the ‘Activate Redirects’ button to enable the feature.

Activating Redirects in All in One SEO

Once redirects are enabled, you need to click on the ‘Full Site Redirect’ tab and then scroll down to the ‘Canonical Settings’ section.

Simply enable the ‘Canonical Settings’ toggle and then click the ‘Add Security Presets’ button.

Add Security Presets in AIOSEO

You will see a preset list of HTTP security headers appear in the table.

These headers are optimized for security. You can review and change them if needed.

Security Headers are Added in AIOSEO

Make sure to click the ‘Save Changes’ button at the top or bottom of the screen to store the security headers.

You can now visit your website to make sure that everything is working fine.

How to Check HTTP Security Headers for a Website

Now that you have added HTTP Security headers to your website, you can test your configuration using the free Security Headers tool.

Simply enter your website URL and click on the ‘Scan’ button.

Checking a Website's HTTP Security Headers

It will then check HTTP security headers for your website and show you a report. The tool will also generate a so-called grade label, which you can ignore as most websites will get a B or C score without affecting user experience.

It will show you which HTTP security headers are sent by your website and which ones are not included. If the security headers that you wanted to set up are listed there, then you are done.

We hope this article helped you learn how to add HTTP security headers in WordPress. You may also want to see our complete WordPress security guide and our expert picks for the best WordPress plugins for business websites.

If you liked this article, then please subscribe to our YouTube Channel for WordPress video tutorials. You can also find us on Twitter and Facebook.

The post How to Add HTTP Security Headers in WordPress (Beginner’s Guide) first appeared on WPBeginner.

How to Create a Secure Contact Form in WordPress

Do you want to create a secure form in WordPress?

Forms allow users to submit information on your website. However, they can also be used by hackers to steal information, attack websites, and install malicious code.

In this article, we will show you how to create a secure contact form in WordPress. We’ll explain how to ensure secure WordPress form submissions on your site.

Creating a secure contact form in WordPress

Here is a summary of what we’ll cover in this article.

What You Need to Secure WordPress Forms?

To make your WordPress contact form secure, you need two things.

  • A secure WordPress contact form plugin
  • A secure WordPress hosting environment

Let’s start with the form plugin.

1. Choosing a Secure Contact Form Plugin

A secure contact form plugin allows you to save form entries securely on your website. It also allows you to use secure email methods to deliver your form notifications.

We recommend using WPForms, which is the best WordPress contact form plugin on the market.

It comes with a tons of powerful features to secure WordPress forms and protect your website from spam, hacking, and data theft.

There is also a free version available called WPForms Lite. It is equally secure but has limited features.

2. Choosing a Secure Hosting Platform

Choosing the right WordPress hosting is crucial for the security of your website and your contact forms.

We recommend using Bluehost. They are one of the largest hosting companies in the world and officially recommended WordPress hosting provider.

More importantly, they are offering WPBeginner users free domain and SSL certificate (you’ll need it for better WordPress form security).

You can also use other popular WordPress hosting companies like SiteGround, WP Engine, HostGator, etc because they all offer free SSL.

What is SSL? And why do you need it to secure WordPress forms?

SSL stands for Secure Sockets Layer. It switches your WordPress site from HTTP to HTTPs (secure HTTP). You’ll notice a padlock icon next to your website indicating that it is using SSL protocol to transfer data.

Padlock icon indicating a website using SSL HTTPs protocol

SSL protects your information by encrypting the data transfer between a user’s browser and the website. This adds WordPress form encryption support which makes it harder for hackers to steal data.

For more details, see our article on how to get a free SSL certificate for your website.

That being said, now let’s take a look at how to create a secure contact form in WordPress.

Creating a Secure Contact Form in WordPress

Creating a secure WordPress contact form is easy if you already checked the above-mentioned requirements. See our tutorial on how to quickly add a contact form in WordPress if you haven’t already done so.

Next, is to add more security layers to your WordPress contact form. This helps you keep form data safe and also helps you reduce spam and improve your website performance.

Securing contact form emails

The following are some of the most common ways someone can steal information or abuse your WordPress forms.

First, they can sniff the information as it is submitted by a form. You can address this by using a secure WordPress hosting platform and enabling SSL encryption on your website.

The next part is when your WordPress form sends notification emails. Business email services are not part of WordPress, and if you are not properly sending those emails, then they can be insecure.

Lastly, your WordPress forms can be abused to send spam messages and DDoS attacks. If you are using a custom WordPress login form, then hackers can use brute force attacks to login to your WordPress site.

Now let’s address each one of them to make your WordPress forms more secure.

Securing WordPress Contact Form Email Notifications

As we mentioned earlier, insecure emails can be spied upon and are unsafe. There are two ways you can handle form notification emails.

1. Don’t send form data via email notifications

The first thing you would want to consider is not sending form data via emails.

For instance, when someone submits your contact form, you only get an email alert that someone has submitted form and not the form data itself.

WPForms comes with a built-in entry management system that stores your form data in your WordPress database. You can simply go to WPForms » Entries page to view all form submissions.

Form entries

Note: You’ll need to upgrade to the paid version of WPForms for entry management features.

2. Send secure WordPress form notification emails

For some users, sending form notification emails is necessary for their business.

For instance, if you have an online order form, a donations form, or a payment form, then you may need to send email notifications to your users.

For this, you need to set up a proper SMTP service to securely send emails.

SMTP stands for Secure Mail Transfer Protocol. It is the industry standard to securely send emails on the internet.

We recommend using G Suite which allows you to create a professional business email address. Powered by Google, it allows you to use the familiar Gmail interface to send and receive emails.

However, if you’ll be sending a lot of emails, then we recommend using Sendinblue, Amazon SES, or any of the reliable SMTP service providers.

Next, you need to connect your email service to WordPress so that all your WordPress form notifications are sent using your secure email connection.

To do that, you need to install and activate the WP Mail SMTP plugin. It works with any SMTP email service and allows you to easily send WordPress emails securely.

WP Mail SMTP

For detailed instructions, see our guide on how to set up WP Mail SMTP in WordPress.

Securing WordPress Forms Against Spam and DDoS Attacks

Your website forms are publicly accessible. This means anyone can access and fill them. We’ll cover restricting form access to specific users in the next step, but for this step we will address public forms.

When your form is accessible by anyone on the internet, it can become a target for spammers and hackers. While spammers try to use your form for fraudulent activities, hackers may try to use it to gain access to your website or even bring it down.

Luckily, WPForms comes with several spam-prevention features. It also automatically enables honeypot anti-spam technique on all forms.

Honeypot anti-spam technique enabled by default

Honeypot basically obscures form fields from automated spambots. However, it is not the most effective way to protect online forms.

If you suspect that your forms are abused or under attack, then you can deploy the following spam protection tools.

1. Enable Google reCAPTCHA in Your Forms

WPForms comes with Google reCAPTCHA support. Simply go to WPForms » Settings page and click on the reCAPTCHA tab.

Adding reCAPTCHA to your contact form

Google offers three types of reCAPTCHA tools. We recommend using checkbox reCAPTCHA v2 because it is more user-friendly.

You’ll need site key and secret key to enable reCAPTCHA on your site. Simply go to the reCAPTCHA website and click on the ‘Admin Console’ button at the top.

reCAPTCHA admin console

Next, you can go ahead and your website details. Provide a label for your site and then choose reCAPTCHA v2 with ‘I am not a robot’ checkbox.

reCAPTCHA settings

Click on the Submit button to continue and you’ll see the API keys.

API keys

Go ahead and copy these keys and paste them in WPForms settings page. Don’t forget to click on the ‘Save Settings’ button to store your changes.

You can now edit your form and add the reCAPTCHA field to your form.

Adding recaptcha field to your form

You’ll see a notification that reCAPTCHA is now enabled for your form. You can go ahead and save your form.

If you haven’t already added form to your website, then you can simply edit the post or page where you want to display the form and add the WPForms block to the content area.

Adding a WPForms block to your page

Simply select your form in the drop down menu and WPForms will load a preview of your form. You can now save your post or page and visit it in a new browser tab to see your form with the reCAPTCHA field in action.

Contact form preview

2. Enable Custom Captcha for Your WordPress Forms

If you don’t want to use Google reCAPTCHA, then you can use your own math quiz or questions with WPForms Custom Captcha addon.

Note: You’ll need pro version of the plugin to access custom captcha addon.

Simply head over to WPForms » Addons page to install and activate the Custom Captcha addon.

Install custom captcha addon

After that, you can edit your contact form and add the Captcha field to your form.

Custom captcha field

By default, it adds a random math question. You can change that to add your own custom captcha by changing the captcha type to text.

Captcha type

You can now save your form, and it to a post or page using the WPForms block.

Adding a WPForms block to your page

You can now visit your post or page to see the custom captcha in action.

Restricting WordPress Forms Access to Certain Users

Another way to protect your WordPress forms is to restrict access to logged-in members, or through a unique form password.

WPForms comes with a Form Locker addon that lets you enable various form permissions and access control rules.

With form locker you can:

  • Password Protect Forms – this requires users to enter a password to submit the form. This added protection helps decrease the number of unwanted form submission.
  • Close Form Submissions After Specific Date / Time – this is great for any kind of application forms or other time-sensitive forms.
  • Limit the number of total submissions – this is great for contests or giveaways. Once the max number of entries are in, the WPForms will automatically close the form.
  • Limit one entry per person – if you want to avoid duplicate submissions, then you will love this option. This is very useful for scholarship applications, giveaways, etc.
  • Restrict Forms to Members Only – you can restrict your forms to logged-in users of your WordPress site. This is great for membership sites or businesses who want to restrict support to paid customers only.

You can access the Form Locker settings inside the Form Builder Settings panel:

Enabling password protecting using Form Locker

Keeping Your WordPress Site Secure

The security of your WordPress forms depends on the security of your entire WordPress website. With some simple steps, you can strengthen your WordPress website security.

We recommend using Sucuri, as the best WordPress security plugin on the market. It comes with a website firewall that blocks any suspicious activity even before it reaches your website.

For more practical tips, see our complete WordPress security guide for beginners.

We hope this article helped you create a secure contact form in WordPress. You may also want to see our guide on how to create an email newsletter and our list of must have WordPress plugins.

If you liked this article, then please subscribe to our YouTube Channel for WordPress video tutorials. You can also find us on Twitter and Facebook.

The post How to Create a Secure Contact Form in WordPress appeared first on WPBeginner.

Beginners Guide: 26 Most Common WordPress Mistakes to Avoid

When creating a WordPress website, everyone make mistakes. However each mistake is a learning opportunity that helps you grow.

Over the years, we have helped thousands of WordPress users start their websites and blogs. In setting up our own websites as well as helping others, we have learned to avoid some common WordPress mistakes.

It has helped us save time, money, and grow our business more effectively.

In this article, we will share those experiences with you, so you can avoid these common WordPress mistakes.

The goal is to help you learn from other people’s mistakes when making your own websites.

Common WordPress mistakes to avoid

1. Choosing The Wrong Platform

Choosing the right WordPress

The biggest mistake people make when starting out is choosing the wrong blogging platform. Basically, there are two types of WordPress. First, there is WordPress.com which is a blog hosting service, and then there is WordPress.org also which is the famous self-hosted WordPress platform that everyone loves.

You need to start with self-hosted WordPress.org because it gives you access to all the features you need out of the box.

To learn more see our article on WordPress.com vs WordPress.org with a side by side comparison of the two platforms.

2. Buying More than What You Need

To get started with a WordPress website, you need a domain name and WordPress hosting.

The challenge is that a lot of domain registrars try to upsell other services. This confuses the small business owners who are just starting out.

The add-on services may include privacy protection, extra email accounts, security services, and more.

Upselling services

You can skip all of these things and save money to spend on growing your business. If you later decide that you need those services, then you can always purchase them from your hosting company.

You also need to choose the right hosting plan for your website. For 90% of websites that are just starting out, a shared hosting account is quite enough to get you going.

We recommend using Bluehost. They are one of the biggest hosting companies in the world and officially recommended by WordPress.

They are offering WPBeginner users a discount on hosting + free domain and SSL certificate. Basically, you can get started for $2.75 per month.

→ Click Here to Claim This Exclusive Bluehost Offer ←

As your business grows, you can choose to upgrade your hosting plan or move to a managed WordPress hosting company.

For more details, see our guide on the cost of a WordPress website and how to save money when building your website.

3. Not Setting up Automated Backups

Automated backups

Each year billions of dollars worth of damages are caused by data loss. Almost every website on the internet is prone to accidents, theft, hacking attempts, and other disasters.

Your most powerful line of defense against these threats is automated backups. Without a backup, you could lose all your WordPress data, and it would be very difficult to recover it (sometimes even impossible).

We have seen many people lose their entire websites just because they didn’t have an up to date backup.

Setting up backups is extremely easy, and there are excellent WordPress backup plugins available in the market. Once you set up one of these backup plugins, they would automatically create backups for you.

The second part of this mistake is not storing backup files on a remote location. A lot of folks store their WordPress backups on their web hosting server. If they lose their website data, then they also lose the backups.
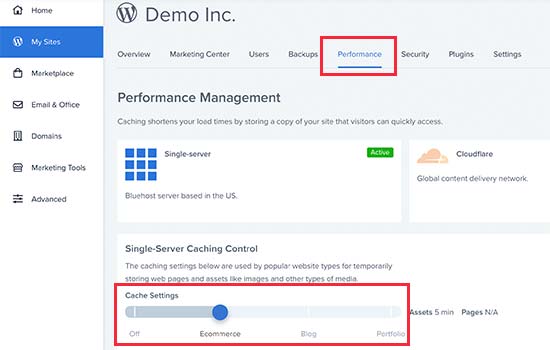
Make sure that you store your backups on cloud storage service like Google Drive, Dropbox, etc. Backup plugins like UpdraftPlus can automatically do that for you.

4. Not Setting up Google Analytics

Google Analytics

If you want to grow your business with confidence, then you need to know how people find and use your website. That’s where Google Analytics can help.

We recommend using MonsterInsights, the most popular Google Analytics plugin for WordPress. It saves you time during setup, and shows you the stats that matter, right inside your WordPress dashboard.

If you don’t want MonsterInsights Pro, then there’s also a free version of MonsterInsights available that you can get started with.

5. Not Setting up a Contact Form

Contact page

Not setting up a contact form is another easily avoidable mistake that many beginners make. Without a contact form, your website visitors will not be able to contact you, and this can cause you to lose significant opportunities.

You will see a contact page on almost every popular website. It is one of the most important pages every website need to have.

WordPress does not come with a built-in contact form, but there are a lot of great WordPress contact form plugins available that you can use.

We recommend using WPForms Lite which is the free version of the popular WPForms plugin that’s being used by over 2 million websites.

You can see our detailed instructions on how to create a contact form in WordPress.

6. Not Building an Email List

Email list

Did you know that more than 70% of people who visit your website will never come back again?

If you are not building your email list, then you are basically losing money with every website visitor that leaves your site. Converting website visitors into email subscribers allows you to bring back those users to your website.

To learn more about this topic, see our article on why building an email list is important.

You will need an email marketing service to set up your email list. We recommend using Constant Contact because they are one of the best email marketing companies on the market with a very beginner friendly platform.

For step by step instructions, see our complete tutorial on how to start an email newsletter.
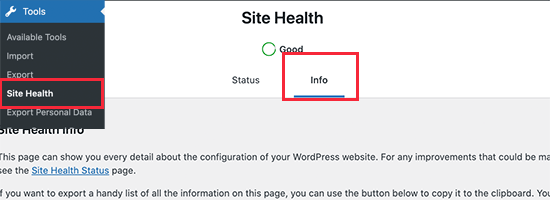
7. Not Choosing The Right WordPress Theme
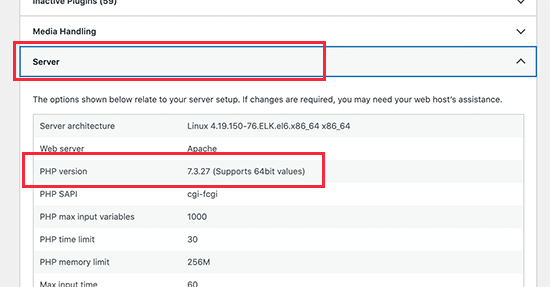
WordPress themes

One of the biggest challenges WordPress beginners face is choosing the right design for their website.

With thousands of WordPress themes out there, an average beginner tries multiple themes before settling for the right one, and this process can even lead the user to rebuild their website multiple times.

To avoid this, we recommend choosing the right WordPress theme from the start and then stick to it.

This allows your website visitors to become familiar with your website, your brand, and its unique style. Consistency and continuity of your design makes a big impact on brand recognition and awareness.

We are often asked by readers, how to choose a theme that just works?

Well, when it comes to design we prefer simplicity over glitter. It has worked really well not just for us, but many successful online businesses.
You need to choose a great looking but simple WordPress theme that pays attention to the following items:

  • It must look equally good on all devices (desktop, mobile, and tablets).
  • It should be easy to customize and flexible to adapt to your needs.
  • It should work with popular plugins and WordPress page builders.
  • It should be optimized for performance and speed.

Now we understand that as a non-techy user, you may not be able to check all those things on your own. In that case, we recommend choosing a theme from a top commercial WordPress theme shop like StudioPress, Themify, or Astra Theme.

If you need more recommendations, then check out these theme showcases where we hand-picked the best WordPress themes in different categories.

8. Ignoring WordPress Updates

Ignoring WordPress updates

We have seen many beginners and even experienced WordPress users who don’t install updates on their site. Many of them believe that doing so will cause errors and could break their site.

That’s not true.

You can easily and safely update WordPress without breaking your website. By not updating WordPress, you leave your website vulnerable to security breaches while using outdated software.

It’s not just WordPress, your WordPress theme and plugins also regularly release updates for bug fixes, security patches, and new features.

For more details, see our guide on how to safely update WordPress

9. Not Optimizing Your Website for SEO

Optimize WordPress SEO

A lot of WordPress users rely on their best guesses when it comes to promoting their websites. Some completely ignore SEO, while some do it half-heartedly.

SEO (Search Engine Optimization) helps you rank higher in search engines, so more users can find your website.

Search engines are the biggest source of traffic for most websites. SEO is crucial for the success of your online business.

We have a complete step by step WordPress SEO guide for beginners which will help you properly optimize your website for SEO.

10. Not Using Categories and Tags Properly

Categories vs Tags

Another big mistake is not using categories and tags properly. Some users end up using categories where they should have used tags and vice-versa.

We have seen websites with dozens of categories and no tags at all. We have seen websites using hundreds of tags and no categories at all.

Basically, categories are your website’s table of contents. If your website was a file cabinet, categories would be its drawers.

On the other hand, tags are like the index page. If your website was a file cabinet, tags would be the labels on individual file folders.

For a more detailed explanation, see our guide on categories vs tags and how to use them properly in WordPress for maximum SEO advantage.

11. Not Using Posts and Pages Properly

Posts vs Pages - What's the difference?

Sometimes beginner WordPress users end up using posts to create important website pages. Similarly, some users end up using pages for articles when they should have used posts instead.

A lot of users realize their mistake after a while when their website becomes difficult to manage.

Basically, pages are for static pages that don’t change very often like about, contact, privacy policy, etc.

On the other hand, posts are for time-based content like news, updates, articles, and blogs.

Take a look at our complete guide about the difference between posts vs pages and what you can do with them.

12. Not Choosing The Right URL Structure (Permalinks)

Choosing the right permalinks structure

Selecting the right URL settings (permalink structure) for your website is really important. Changing your URL structure later is not easy, and it can have a significant impact on your website traffic.

We recommend going to the Settings » Permalinks page in your WordPress admin area and choosing a URL structure with that shows your post name in the URL.

13. Ignoring Website Speed and Performance

Website speed and performance

Human attention span is dropping rapidly, and users want instant gratification. With faster internet connections, your users would find a few extra seconds of page load time to be extremely slow.

And it’s not just users, even search engines rank faster websites higher in their results. By ignoring website speed and performance you risk user experience as well as search rankings.

Which is why you need to make sure that your website loads fast. We have a step by step guide that will help you improve WordPress speed and performance without going too deep into the technical stuff.

14. Not Choosing The Right Plugins

WordPress plugins

The real power of WordPress comes with its plugins. There are thousands of free WordPress plugins that you can install with a few clicks.

However, not all plugins are good. In fact, some plugins are bad and could affect your website’s performance and security. Often users end up downloading plugins from unreliable sources that distribute hidden malware.

Here are a few things you need to keep in mind when choosing plugins:

  • Only install plugins from WordPress.org or WordPress companies with good reputation.
  • Look for plugin reviews and support forums because they are a good indicator of a plugin’s quality
  • Check trusted WordPress resources like WPBeginner for plugin recommendations

If you want some recommendations right now, then check out our list of must have WordPress plugins for all websites.

For more information, check out our guide on how to choose the best WordPress plugins for your website.

15. Ignoring WordPress Security Best Practices

WordPress security

Many users do not take any security measures to harden WordPress security. Some believe that their website is too small, and it will not be targeted by hackers.

Hackers target websites indiscriminately. For example, they could use your website to distribute malware, brute force attacks, steal data, and more.

By not securing your website, you can lose search rankings, your website data, and/or customer information. This could cost you a lot of money and headache.

You need to follow the security best practices and build layers of security around your WordPress site. It does not take too much time, and you don’t need any special skills to do that.

Simply follow our complete WordPress security guide with step by step instructions to protect your website.

16. Changing Website URL and Losing All Traffic

Changing domain names

How many of you hated the first domain you registered and wanted to switch away from it when you got serious about blogging? Yup, it happens to all of us.

While you can change the website URL or domain name, it does have a significant SEO impact. What makes matters even worse is when you switch URLs without taking proper steps.

You need to set up proper redirects, inform Google about the change, and add the new domain to Google Search Console.

We have described all the steps in our guide on how to properly move WordPress to new domain.

17. Not Removing WordPress Demo Content

Remove demo content

A lot of people don’t delete the default demo content added by a new WordPress install. This includes a sample page, a post titled ‘Hello World’, and a default comment.

Not removing this content allows search engines to crawl and index them. Now if you search for the text in demo content on Google, you’ll find hundreds of thousands of pages. That’s duplicate content and search engines penalize duplicate content as low-quality pages.

Similarly, many people don’t change the default WordPress tag line that says ‘Just another WordPress site’.

You need to delete all default content and the tag line, as they look unprofessional and create a bad impression.

18. Not Setting up Comment Moderation

Moderating comments

Comment spam is annoying and can make your brand look bad. Many beginners have their blogs set up to automatically publish all new comments without moderation.

This means spam comments with links to malware and low-quality sites can go live on your website without your knowledge. This could damage your search rankings and your website’s reputation.

You need to always keep comment moderation turned on for all your WordPress sites. Simply go to Settings » Discussion page and check the box next to ‘A comment must be manually approved’ option.

Manually approve comments

After that, you need to make it part of your routine to check and approve comments on your website. For more tips, see our article on how to combat comment spam in WordPress.

19. Not Optimizing Your Images for Web

Compress images

Images are essential in the making of a highly engaging website. However, they are also heavier in filesize than plain text.

If you are adding images to your website without optimizing them, then this would affect your website speed.

You need to make it a habit of saving your images as optimized for the web. You can use Photoshop, GIMP (free), or other online tools to reduce the image file size before uploading it.

For instructions, see our tutorial on how to save images optimized for the web.

20. Saving Unnecessary Code in Theme’s Functions File

Code snippets

Another common mistake that we often come across is when folks add too many code snippets in their theme’s functions.php file.

Functions file is designed to behave like a plugin, but it is not the ideal place for all types of code snippets. You will lose these modifications when you switch the theme. You may even forget that you added some code in there after a while.

We recommend only adding code in your theme’s functions file if the code is related to changing something with that particular theme.

For all other custom code, it is better to use a site-specific plugin or the code snippets plugin.

21. Getting Locked Out by Editing Functions File in WordPress Admin Area

Theme editor in WordPress

Another annoying mistake that is quite common is when folks edit functions file inside the WordPress admin area.

By default, WordPress comes with a built-in code editor to edit theme and plugin files inside WordPress. Often beginners end up breaking their website when adding or removing code using those editors.

Even though WordPress added functionality to catch fatal errors and not save them. You could still lock yourself out and make your website inaccessible.

We recommend disabling theme and plugin editor in WordPress and use FTP to edit files in WordPress.

22. Not Setting Up Google Search Console

Google Search Console

Data is really important when planning a strategy to grow your business and website. Many users make the mistake of not adding their WordPress site to Google Search Console for a long time.

This means they miss out important search data that could help them grow their website.

Google Search Console is a free tool provided by Google. It allows you to see how your website appears in search results and fix any search indexing problems quickly.

See our complete Google Search Console guide to see how you can use it to improve search rankings and grow your business.

23. Using Uncategorized as Default Category

Uncategorized category

A lot of folks leave Uncategorized as their default category. WordPress requires all posts to be filed under a category and when no category is selected, it automatically adds the post under default category.

Many times users forget to select a category for their post and hit the publish button which publishes that post in Uncategorized.

This mistakes can be easily avoided by choosing a proper default category in WordPress settings.

24. Not Using a Professional Branded Email Address

Free business email address

We have seen many folks sending us emails from their Gmail or Hotmail accounts while pitching for a business that already has a website.

Now, how do we know for sure that they are officially representing that company or website?

Similarly if you have a business, and you are still sending people business emails from a free email account, then people will have a hard time taking you seriously.

People do not have the time or skills to verify that you are the actual owner of that website or business.

This mistake is also easily avoidable. See our guide on how to easily get a professional business email address for free.

25. Leaving a Site Public While Working on It

Maintenance mode

People often leave under construction websites publicly accessible. This is not very professional and can harm your business.

A publicly accessible website can be automatically crawled and indexed by search engines anytime. Your competitors can find it and steal your ideas. Your customers can find it and see the unfinished website.

There is an easier solution to avoid this mistake. Simply put your website in maintenance mode and add a coming soon page to build anticipation.

26. Not Learning WordPress

Learn WordPress

WordPress is very easy to use even for non-technical users. This allows many users to keep running their websites without learning more about WordPress.

By doing so, you miss the opportunity to explore the incredibly helpful features of WordPress. Things that are very simple to implement but could transform your business.

Learning WordPress is quite easy, particularly when you already have a running WordPress site. Explore different sections of WordPress, try out new plugins, learn more about SEO, and email marketing.

WPBeginner is the largest free WordPress resource site for beginners with tons of awesome resources, videos, how-tos, step-by-step tutorials, and more.

Following are just some of the helpful resources you’ll find on WPBeginner (all of them are completely free).

  • WPBeginner Dictionary – The best place for beginners to start and familiarize themselves with the WordPress lingo
  • WPBeginner Videos – New to WordPress? Watch these 23 videos to master WordPress.
  • WPBeginner Blog – The central place for all our WordPress tutorials.

You can also subscribe to our YouTube Channel where we regularly share video tutorials to help you learn WordPress.

We hope this article helped you learn about common WordPress mistakes and how to easily avoid them. You may also want to see our tips on effective ways to increase your website traffic without spending too much money.

If you liked this article, then please subscribe to our YouTube Channel for WordPress video tutorials. You can also find us on Twitter and Facebook.

The post Beginners Guide: 26 Most Common WordPress Mistakes to Avoid appeared first on WPBeginner.