How to Add Stripe QR Code Payment in WordPress

Are you looking for a way to add a QR code for Stripe payments on your WordPress website?

QR codes, or Quick Response Codes, are a type of barcode that users can scan using their mobile phones. You can show a Stripe payment form using QR codes and help customers easily purchase a product or service.

In this article, we will show you how to add Stripe QR code payment in WordPress.

How to add Stripe payment QR code payment in WordPress

Why Add Stripe QR Code Payment in WordPress?

Stripe is a popular payment gateway that lets you accept online payments on your WordPress site or eCommerce store. It makes it very easy for customers to pay using their credit cards.

The best part is that customers don’t have to go through a lengthy signup process. They can simply enter their credit card on the website to make a purchase.

Adding Stripe QR code payments to your site gives customers the flexibility to complete a purchase quickly. Customers can simply scan the code to open the payment link.

This makes the checkout process very simple and fast. It helps people to easily buy a product and service on your online store. As a result, you’ll see a boost in conversions and reduced cart abandonments.

That said, let’s look at how you can add a Stripe QR code payment to your WordPress website.

Create a Stripe Payment Form in WordPress

First, you’ll need to add a Stripe payment form on your website to accept online payments from customers.

The best way to do that is using WPForms. It is the best contact form plugin for WordPress that’s super easy to use and easily integrates with Stripe. There are many form templates to choose from, and you can customize them using the drag-and-drop builder.

For this tutorial, you’ll need the WPForms Pro license because it includes the Stripe addon. There’s also a WPForms Lite version that you can use for free. It allows you to accept Stripe payments, but there’s a 3% transaction fee for payments made through your forms.

To start, you’ll need to download and install the WPForms plugin. If you need help, then please see our guide on how to install a WordPress plugin.

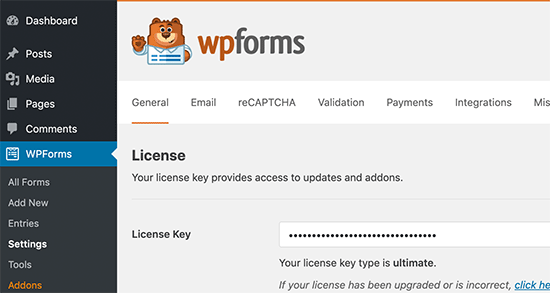
Upon activation, you can go to WPForms » Settings from your WordPress dashboard and enter the license key. You can find the key in your account area on the WPForms website.

Adding a license key to the WPForms form builder plugin

Simply enter the key and click the ‘Verify Key’ button.

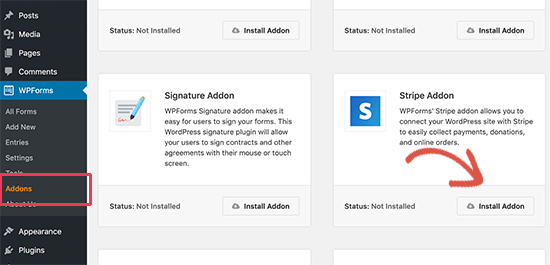
Once that’s done, you’ll need to go to the WPForms » Addons page and install the Stripe addon.

Installing the Stripe addon

Go ahead and click the ‘Install Addon’ button, and WPForms will automatically install and activate it.

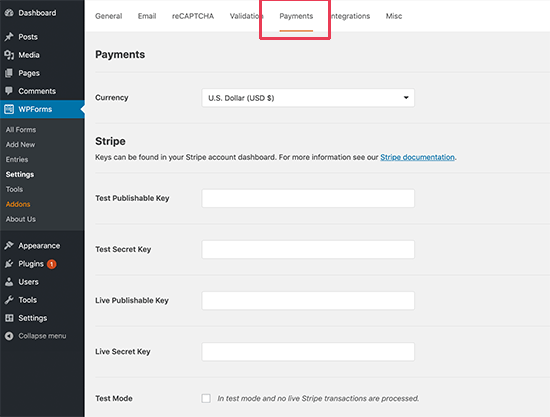
From here, you can head to WPForms » Settings from the WordPress admin panel and go to the ‘ Payments’ tab.

Next, simply click the ‘Connect with Stripe’ button and follow the onscreen instructions to connect your account with WPForms.

Click the connect with Stripe button

Once Stripe is connected, you can go to WPForms » Add New to create a new form.

WPForms offers lots of form templates to choose from. You can select a simple contact form, an order form, or a Stripe payment form and customize it.

Stripe payment form

For this tutorial, we will use the ‘Stripe Payment Form’ template.

Next, you can customize your form using the drag-and-drop form builder. By default, you’ll see different form fields in the template.

However, WPForms lets you add more form fields to the template, like a dropdown, checkboxes, email, phone, address, website, and more.

Customize Stripe payment form

You can also click any form field on the template to customize it further.

For instance, we changed the text for each item on your demo form and enabled the option to show prices after the item label.

Customize form field in stripe payment form

Once you’re done editing the form, simply switch to the ‘Payments’ tab and select ‘Stripe’ from the menu on the left.

From here, ensure the ‘Enable Stripe payments’ option is enabled.

Enable Stripe payments

Next, you can switch to the Settings tab. Here, you’ll see options to change the notification and confirmation settings.

For instance, you can select what action should take place once a user submits a form. WPForms lets you show a message or a page or even redirect users to a URL.

Confirmation settings form

You’re now ready to display your Stripe payment form on your website.

Simply click the ‘Save’ button to store your changes and then click the ‘Embed’ button at the top.

Save and embed your form

Next, WPForms will show a popup where you can choose an existing page or create a new one to embed your form.

We will choose the ‘Select Existing Page’ option for this tutorial.

Embed a form in page

Next, you’ll need to enter a name for your new page.

Once that’s done, simply click the ‘Let’s Go’ button.

Enter name for your new page

After that, you’ll see a preview of your Stripe payment form in the WordPress content editor.

You can go ahead and publish the page and visit the website to see it in action.

Stripe payment form preview

Now go ahead and copy the link of your payment form page, as you’ll need it to create a QR code.

Alternative Method: You can also create a Stripe payment form using WP Simple Pay. It is the best Stripe payment plugin for WordPress and helps you collect online payments without setting up a shopping cart.

WP Simple Pay is a more straightforward option compared to WPForms. It is perfect if you’re just looking to create a basic form to accept credit card payments.

However, if you’re looking for more customization options and form templates, then we recommend using WPForms.

For more details, you can see our detailed guide on how to accept payments with Stripe in WordPress.

Add QR Code for Stripe Payments in WordPress

Now that your Stripe payment form is ready, you can create a QR code for it and display it anywhere on your site.

There are 2 ways you can add a QR code to your site. You can use the Google Chrome browser’s feature or use a WordPress plugin.

1. Create QR Codes using Google Chrome

If you’re using the Google Chrome browser, then you can use it to share a webpage via a QR code.

First, you’ll need to open the Stripe payment form page in a new tab or window.

Next, you can click the share icon in the top right corner of the site address bar. From here, simply select the ‘Create QR Code’ option.

Click the share icon in chrome

After that, Google Chrome will generate a QR code for your Stripe payment form page.

You can go ahead and download the QR code as an image.

Download the QR code

Next, simply place the image anywhere on your site.

For example, you can show the QR code on product pages, so customers can quickly scan them and open the form to make a purchase.

Add QR code to product page

2. Create a Stripe Payment QR Code using a WordPress Plugin

You can also add QR codes to your site using a WordPress plugin like Shortcodes Ultimate. It is a free plugin that lets you create over 50 different types of shortcodes, including QR codes.

First, you’ll need to install and activate the Shortcodes Ultimate plugin. If you need help, then please see our guide on how to install a WordPress plugin.

Upon activation, you will see the Shortcode Ultimate welcome screen.

Shortcode ultimate welcome screen

Next, you’ll need to edit a page or post to add your QR code.

Once you’re in the content editor, simply add a shortcode block.

How to add a shortcode block to WordPress

After that, you should see an ‘Insert shortcode’ option.

You can simply click the double brackets icon to add your QR code.

Click the select shortcode icon

Next, the plugin will display different shortcode options for your site.

Go ahead and select the ‘QR Code’ option.

Select QR code shortcode

After that, you’ll see options to enter details for your QR code.

In the Data field, you can enter the URL of your Stripe payment form that you created earlier.

Besides that, there is an option to enter a title for the code, which acts as an alt-text. You can also adjust the size of your QR code.

Enter QR code details

If you scroll down, then you’ll see more options to customize your QR code. For instance, you can change the primary color, background color, and more.

Once you’re done, simply click the ‘Insert shortcode’ button.

Click insert shortcode

The plugin also lets you see a live preview of the code on your blog post or landing page.

Go ahead and publish your page to see the Stripe payment form QR code in action.

QR code live preview

We hope this article helped you learn how to add Stripe QR code payment in WordPress. You may also want to see our guide on WooCommerce made simple and how to accept recurring payments in WordPress.

If you liked this article, then please subscribe to our YouTube Channel for WordPress video tutorials. You can also find us on Twitter and Facebook.

The post How to Add Stripe QR Code Payment in WordPress first appeared on WPBeginner.

How to Prevent Fraud and Fake Orders in WooCommerce

Do you want to prevent fraud and fake orders on your WooCommerce store?

Fraud and fake orders can cause serious losses for an online store. Luckily, there are effective tools to prevent spam and block fraudulent orders.

In this article, we’ll show you how to easily prevent fraud and fake orders in WooCommerce.

blocking fake and fraudulent orders in WooCommerce

Why Do You need to Prevent Fraud and Fake Orders in WooCommerce?

Fraudulent and fake orders can cause serious financial losses to a business. This is why you need to monitor your online store and prevent fraud and fake orders.

Last year, online stores lost more than $20 billion in revenue due to fraudulent payments, chargebacks, and fake orders.

For some eCommerce stores, the total fraudulent order costs were higher than 4% of total revenue.

A large number of fake orders are usually spam that can be easily prevented. Some orders are more malicious and are placed just to annoy or harass an online business.

The rest of the fraudulent orders are scammers trying to make a few quick bucks.

That being said, let’s take a look at how to prevent fraud and fake orders in WooCommerce.

Here is a quick overview of all the tips we’ll cover in this guide.

1. Use a WooCommerce Fraud Prevention Plugin

The easiest way to prevent fraudulent and fake orders in WooCommerce is by using an anti-fraud plugin.

First, you need to install and activate the WooCommerce Anti-Fraud plugin. For more details, see our step-by-step guide on how to install a WordPress plugin.

Upon activation, you need to visit WooCommerce » Settings page and switch to the Anti-Fraud tab.

Anti-Fraud settings

From here, you can set a minimum and high-risk threshold score.

Below that, you can change the order status based on the risk score. For instance, you can set the score when an order will be automatically canceled and set a score to put an order on hold.

Change order status score

Don’t forget to click on the ‘Save Changes’ button to store your settings.

Next, you need to switch to the Rules tab. From here, you can configure the rules and assign them a risk score.

For instance, you can set a 5-point score for a customer who is placing their first order.

Rules to calculate risk score

You can set scores for suspicious IP addresses, emails, unsafe countries, matching IP addresses to geographic locations, and more.

Carefully review the rules and their assigned scores and make changes if necessary. If you are unsure, then default settings would work for most eCommerce websites.

If you are using PayPal as a payment option on your store, then you can switch to the PayPal tab. From here, you can require users to verify their PayPal email addresses.

Ask users to veriify their PayPal email

The plugin also allows you to connect with third-party fraud detection service Maxmind.

This paid service uses a global database to collect data about suspicious payment details, emails, IP addresses, and more.

You can then add this score to your plugin risk score and choose what to do when this score is higher.

MinFraud settings

Once you are satisfied with your settings, don’t forget to click on the ‘Save Changes’ button to store them.

Viewing Fraud Detection Activity

The plugin comes with an easier dashboard where you can see plugin activity in an easy-to-understand format.

Simply click on the Anti Fraud menu item in your WordPress admin sidebar. From here, you can see statistics about all your orders.

View fraud detection activity on your store

The anti-fraud plugin will help you catch most of the fake and fraudulent orders on your WooCommerce store.

However, if you need more strict measures then continue reading for additional WooCommerce fraud prevention tips.

2. Use Stripe Radar and 3D Secure to Automatically Block Fraud

Stripe is the most popular online payment solution in the world. There is a WooCommerce Stripe gateway by FunnelKit that helps you properly connect WooCommerce with Stripe, so you can take advantage of SCA as well as 3D Secure payments option by default.

This method would require you to use Stripe as your main payment gateway in WooCommerce. First you’ll need to install and activate the Stripe for WooCommerce plugin by FunnelKit. Once that’s configured, it will guide you to set up Apple Pay, Google Pay, and other settings to help you protect against fraud transactions.

Aside from that, Stripe also offers a feature called Stripe Radar to help fight against fraudulent transactions. This is a powerful set of algorithm that reduces chargeback risks for your business.

Basically Stripe uses machine learning to block orders. Their machine learning is trained on data across millions of companies worldwide that use Stripe.

We use Stripe Radar on our own eCommerce websites to help reduce fake and fraudulent orders.

Aside from their machine learning algorithm, you can also set custom rules with allow and block lists, and more.

Stripe Radar Rules

Unfortunately not all WooCommerce gateways have these robust features. If you’re looking to switch to Stripe, then we recommend talking with FunnelKit team as they’re WooCommerce experts who can help.

3. Using the Cash on Delivery Payment Option Carefully

In many countries, ‘Cash on Delivery’ is a popular payment option. However, these stores find themselves more vulnerable to fake and fraudulent orders.

Users are able to place an order with a fake address, refuse to accept the order, or cancel an order that is already shipped.

Once you have shipped an order, you will pay out of pocket for shipping and return of that package.

We recommend not using the ‘Cash on Delivery’ option when possible, as that can lower the number of fake orders you may get.

Try to offer alternate payment options for users to pay before you can ship the order.

4. Sell in Specific Countries

WooCommerce allows you to easily restrict orders from specific countries. This helps you prevent fake orders from countries where you don’t sell or ship to.

Simply go to the WooCommerce » Settings page and select the countries you want to sell / ship to under the General tab.

WooCommerce sell in countries

You can also restrict certain WooCommerce products to specific countries in WooCommerce as well.

Note: Geographical restrictions may reduce fake orders but users can simply use VPN to change their location and provide fake information to place an order.

5. Require Users to Create an Account

Another useful trick to slow down and prevent fake orders is by requiring users to create an account before they can checkout.

Simply go to WooCommerce » Settings page and switch to the Account and Privacy tab. From here, you need to uncheck the box next to the ‘Allow customers to place orders without an account’ option.

Require users to create an account

Below that, you can check options that allow users to create an account during checkout or from the My Account page.

Asking users to create an account also allows you to easily block customers who placed fraudulent or fake orders.

6. Use a Web Application Firewall and Custom Rules

Many scammers use disposable email addresses, fake IP addresses, and dummy data to place spam or fake orders.

A WordPress firewall helps you block this before it even reaches your website.

We recommend using either Sucuri or Cloudflare, both are among the best WordPress firewall plugin on the market. They comes with powerful security features, CDN servers, and a malware removal service.

How website firewall blocks attacks

In Cloudflare, you can also setup custom page rules to trigger CAPTCHA, or even automatically block users with suspicious activity. We use Cloudflare enterprise on our larger eCommerce stores which comes with all bots anomaly detection and threat response.

If you’re running a large eCommerce store, then it’s worthwhile exploring Cloudflare Enterprise tools.

7. Require Customers to Verify Their Email Addresses

Another way to reduce fake orders and fraudulent activity is by requiring new customers to create an account and then require them to verify their email addresses.

Simply install and activate the Email Verification for WooCommerce plugin. For more details, see our step-by-step guide on how to install a WordPress plugin.

Upon activation, you need to visit the WooCommerce » Settings page and switch to the Email Verification tab.

Require email verification

From here, you can configure the plugin settings to your own requirements.

For instance, you can switch to the Email tab and delay the default WooCommerce new user email until the user verifies their account.

Delay welcome email

Don’t forget to click on the ‘Save Changes’ button to store your settings.

The plugin will now send a verification email to new WooCommerce customers to verify their email addresses.

Verify your email address

It’s important to make sure that if you’re setting up email verification that your WooCommerce store actually have reliable email deliverability. Otherwise this can block real customers from purchasing your products.

We recommend using WP Mail SMTP along with SendLayer to improve your WooCommerce email delivery rates. Over 3 million websites use the WP Mail SMTP plugin to fix WooCommerce not sending email issue.

There’s also a free version of WP Mail SMTP that you can use as well.

We hope this article helped you prevent fraud and fake orders in WooCommerce. You may also want to see our complete WordPress security guide to make your online store more secure or take a look at our expert pick of the best WooCommerce plugins to grow your store.

If you liked this article, then please subscribe to our YouTube Channel for WordPress video tutorials. You can also find us on Twitter and Facebook.

The post How to Prevent Fraud and Fake Orders in WooCommerce first appeared on WPBeginner.

How to Add a Buy Now Button in WordPress (3 Methods)

Do you want to add a buy now button in WordPress?

Whether you’re selling a service, subscription, or a physical product, having a quick buy now button helps improve the buying journey and leads to more sales.

In this article, we will show you 3 different ways on how you can add a buy now button in WordPress, step by step.

How to add a buy now button in WordPress

Why Add a Buy Now Button in WordPress?

A buy now button is a great way to reduce your cart abandonment rates. Every step in the purchasing process is another opportunity for the customer to change their mind and abandon their cart.

By taking them straight to the checkout, shoppers have less time to change their minds and give up on their purchases.

Since they speed up the purchasing process, buy now buttons can also improve the customer experience. When the buyer’s journey feels easy, customers are more likely to keep coming back to your store.

You’ll often see buy now buttons on product pages but they’re also sometimes used on landing and sales pages.

In this way, buy now buttons allow customers to kickstart the purchasing process without ever visiting the product page, which may increase the conversion rates for your marketing and advertising campaigns.

With that being said, let’s see how you can add a buy now button in WordPress. Simply use the quick links below to jump to the method you want to use.

Method 1. Adding a Buy Now Button With WP Simple Pay (No eCommerce Plugins Required)

You can add a simple buy now button to any page, post, or widget-ready area using WP Simple Pay.

This is a great option for service based business, non-profits, or anyone who’s looking for a quick buy now button option for WordPress.

WP Simple Pay is the best Stripe payment plugin for WordPress that lets you accept credit card payments, Apple Pay, Google Pay, ACH bank debit, and more without any eCommerce plugins or shopping carts. This makes WP Simple Pay the perfect choice if you want to add a buy now button to a sales page without having to install anything special.

For this guide, we will be using the free version of WP Simple Pay.

If you want to accept payments using ACH direct debit, recurring payments, do automatic tax calculations, or you want to add a buy now pay later plan to WordPress, then you’ll need to upgrade to the pro version.

First, you’ll need to install and activate the WP Simple Pay plugin. If you need help, then please see our guide on how to install a WordPress plugin.

Upon activation, the plugin will automatically launch the setup wizard. Go ahead and click the ‘Let’s Get Started’ button.

The WP Simple Pay WordPress payment plugin

In the next step, you’ll need to connect a Stripe account to WP Simple Pay. Stripe is a beginner friendly payment processor for website owners.

To get started, click on the ‘Connect with Stripe’ button.

How to connect WP Simple Pay to Stripe

On the next screen, you can either log into an existing Stripe account or create a new one.

If you already have a Stripe account, then simply type in the email address and password for that account.

Connecting Stripe to your WordPress website

WP Simple Pay will now show you how to connect your Stripe account to WordPress.

If you’re not already registered with Stripe, then type in your email address and then follow the onscreen instructions to create a Stripe account. Once you’re logged into your Stripe account, click on the ‘Create a Payment Form’ button.

If you’ve clicked away from this screen by accident, then don’t panic. You can reach the same screen by going to WP Simple Pay » Add New.

Adding a buy now button using WP Simple Pay

The free WP Simple Pay plugin has a few different templates that can help you create a payment form, fast. You can unlock extra templates by upgrading to WP Simple Pay Pro, including a template that adds a Stripe donate button in WordPress.

Since we want to create a buy now button, hover over the ‘Payment Button’ template and then click on ‘Create Payment Button’ when it appears.

Create a payment button

In the ‘Title’ field, type in a name for your buy now button.

This title is just for your reference so you can use anything you want.

Adding a title to your buy now button in WordPress

You can also use the ‘Description’ field to add some information about your button. Again, WordPress won’t show this to your site’s visitors but it can be useful for your own reference or for anyone else who shares your WordPress dashboard.

After that, click on the ‘Payment’ tab.

By default, WP Simple Pay will create your button in test mode, meaning you can’t accept real payments yet.

We recommend leaving the ‘Global Settings (Test Mode)’ radio button selected so you can test your buy now button before you start accepting payments.

Creating a buy now button in test mode

If you want to start collecting payments straight away then you can select the ‘Live Mode’ button instead.

Next, you can decide how much the button will charge the customer. Go ahead and type this number into the ‘One-Time Amount’ field.

Collecting a one-time payment using WP Simple Pay

Note: WP Simple Pay uses the dollar currency by default. If you want to accept payments in a different currency, then head over to WP Simple Pay » Settings. You can then select the ‘Currency’ tab and choose a new currency.

Once you’ve done that, select the ‘Form Fields’ tab.

WP Simple Pay's form field settings

By default, your button will have the label ‘Pay Now’, but you can change this to anything you want by typing into the ‘Button Text’ field.

You can also change the ‘Button Processing Text,’ which is the message that WP Simple Pay will show to shoppers while it’s processing their payment.

Customizing the buy now button in WordPress

By default, WP Simple Pay will use the same button style as your WordPress theme.

It also has a ‘Stripe blue’ style that you can use, as you can see in the following image. If you want to use this button style, then simply select the ‘Stripe blue’ radio button in the ‘Payment Button’ section.

The Stripe blue button style

​Next, select the Stripe Checkout tab and choose the information that WP Simple Pay will collect from visitors at checkout.

For example, if you’re selling a physical product then you can get the customer’s shipping address by checking the ‘Collect Shipping Address’ box.

Configuring the Stripe checkout page

If you think that customers may want to buy multiple products, then make sure you check the ‘Allow quantity adjustment’ box.

This adds a dropdown to the Stripe checkout page which allows customers to change how many products they’re buying.

Changing the product quantity at checkout

When you’re happy with how the buy now button is set up, it’s time to make it live by clicking on the ‘Publish’ button.

You can now add this buy now button to any WordPress page, post, or widget-ready area using the ‘Form Shortcode.’

Adding a buy now button using shortcode

For more details on how to place the shortcode, you can see our guide on how to add a shortcode in WordPress.

If you’ve published your button in test mode, then the Stripe dashboard won’t show any payments you get during this time, which makes it difficult to test your buy now button.

To see your transactions, you’ll need to enable test mode in Stripe by logging in to your Stripe dashboard and clicking on the ‘Payments’ tab.

The Stripe payment dashboard

After that, just click on the ‘Developers’ toggle in the upper right corner.

As soon as you’ve done that, you can test your buy now button and the payments will appear in the Stripe dashboard.

Testing credit card payments with Stripe and WordPress

Once you’ve finished testing your button, you can start accepting payments by going to WP Simple Pay » Payment Forms.

Here, just hover your mouse over the buy now button, and click on the ‘Edit’ link.

Editing your buy now button

You can now go ahead and select the ‘Payment’ tab, and then click on the radio button next to ‘Live Mode.’

Finally, click on ‘Update.’ Your buy now button is now live, and you’re ready to start accepting payments from your visitors.

Putting your buy now button into live mode

Method 2: How to Add a Buy Now Button to Your Digital Downloads

WP Simple Pay lets you add a straightforward buy now button to any WordPress blog or website. However, if you want to sell digital downloads on WordPress, then you’ll need an eCommerce plugin that has a buy now feature.

Easy Digital Downloads is the best platform to easily sell digital products. In fact, we use this plugin ourselves to sell many of our premium WordPress plugins.

Easy Digital Downloads gives you a few ways to add a buy now button in WordPress.

By default, Easy Digital Downloads will show an ‘Add to Cart’ button on all its product pages. However, you can replace that with a buy now button instead.

A buy now button, created using Easy Digital Downloads

When the customer clicks on the button that you can see in the image above, they’ll see a popup where they can type in their email address and credit card details.

After that, they just need to click on ‘Purchase’ to go ahead and buy the product.

An Easy Digital Downloads popup

Easy Digital Downloads also comes with an ‘EDD Buy Button’ block that you can add to any page, post, or widget-ready area.

You can connect this block to any of your downloadable products. The visitor can then simply click on this button to add the product to their basket and go straight to checkout.

The EDD Buy Block

With that in mind, let’s look at both methods.

How to Add a Buy Now Button to Any Product Page

To start, you may want to add a buy now button to your product pages. This gives the customer less time to change their mind and abandon their purchase.

If you use SiteGround as your hosting provider, then Easy Digital Downloads comes pre-installed so you can start using the plugin straight away.

If not, you can check out SiteGround EDD hosting and get started for as little as $2.99 a month!

If you’re using any other hosting provider, then you’ll need to install and activate the Easy Digital Downloads plugin. For more details, see our step by step guide on how to install a WordPress plugin.

In this guide, we’ll be using the free Easy Digital Downloads plugin as it has everything you need to create a simple buy now button. There’s also a pro version that has more advanced features including wishlists, purchase rewards, fraud monitoring, and more.

Before you can create a buy now button, you need to set up Stripe or PayPal. To configure your payment gateway, go to Downloads » Settings and then click on the ‘Payments’ tab.

Configuring payment gateways in Easy Digital Downloads

You can now check the box next to ‘PayPal’ or ‘Stripe’ depending on the payment gateway you want to use.

If you add multiple payment gateways, then you won’t be able to create a buy now button, so it’s important to only choose one gateway.

After making your decision, click on ‘Save Changes’ to store your settings.

Configuring the Stripe payment gateway for EDD

If you want to use PayPal, then click on the ‘PayPal’ tab.

You can then select the ‘Connect with PayPal in live mode’ button.

Configuring the PayPal payment gateway

This opens a popup where you can type in the email address and password for the PayPal account where you want to receive payments.

To set up Stripe instead, click on the ‘Stripe’ tab and then select ‘Connect with Stripe.’

Configuring Stripe for EDD

This opens a setup wizard, which will help you connect your website to Stripe.

After configuring your payment gateway, don’t forget to click on the ‘Save Changes’ button. You can now add a buy now button to any Easy Digital Downloads product page.

To create your first digital product, go to Downloads » Downloads. Then, click on the ‘Add New’ button.

Adding a new digital download product

You can now add a title and a description for the product, upload an image, add categories and tags, and more.

Note: By default, Easy Digital Downloads will set your product as a free download. It’s important to scroll to the ‘Product Options’ section and type in the real price for the product.

The product options settings

The next step is uploading the product. This might be an ebook download, video training, a PDF guide, digital art and graphics, or any other file that WordPress supports.

Pro Tip: If you want to sell a file type that WordPress doesn’t support, such as SVG images, PSD files, or others, then see our guide on how to allow additional file types in WordPress.

To add your downloadable file, scroll to the ‘Download Files’ section.

In the ‘File Name’ field, type in a name for the downloadable file. Once you’ve done that, click on the ‘Upload a file’ button.

Uploading a downloadable product

This will launch the WordPress media library. Here you can choose the file that you want to sell as a digital download.

When you’re happy with how your product is set up, it’s time to add a buy now button.

In the right-hand menu, find the ‘Button Options’ section. Here, click on the ‘Purchase Button Behavior’ dropdown and choose ‘Buy Now.’

Creating a buy now button using Easy Digital Downloads

You can now make the product live by clicking on ‘Publish.’ Now, if you visit this product page you’ll see the buy now button.

You can add a buy now button to any product page simply by following the same process described above.

How to Add a Buy Now Button to Any Page or Post

Sometimes you may want to use buy now buttons on other parts of your online store.

For example, if you have a landing page that promotes a particular product, then you might allow customers to start the checkout process directly from that landing page.

This can get you more sales by encouraging impulse purchases, while also removing multiple steps from the buyer’s journey.

You can do this easily using the ‘EDD Buy Button’ block. To use this block, you first need to set up a payment gateway and create at least one product following the same process described above.

After that, simply open the page or post where you want to add your buy now button in the content editor. Then, click on the ‘+’ icon and start typing ‘EDD Buy Button.’

The EDD Buy Button block

When the right block appears, click to add it to your layout.

You can now open the ‘Select a Download’ dropdown and choose the product that will be added to the customer’s cart.

Configuring the EDD Buy Button block

By default, Easy Digital Downloads will show the product’s price on the buy now button.

If you want to hide the price, then click to disable the ‘Show Price’ toggle.

Adding and remove the price from a buy now button

You can now publish or update the page to make it live. Now, if you visit your WordPress website you’ll see the buy now button in action.

Method 3. Add a Buy Now Button to Your WooCommerce Store

If you run a WooCommerce store, then you may want to add a buy now button to your product pages. This allows customers to start the checkout process directly from the product page, which often reduces cart abandonment rates.

The easiest way to add a buy now button to your online store is by using the Buy Now Button for WooCommerce. This is a simple plugin that requires no configuration, and adds a buy now button to every single one of your product pages.

A buy now button, created for a WooCommerce online store

First, you’ll need to install and activate the plugin. If you need help, then please see our guide on how to install a WordPress plugin.

Since the plugin doesn’t have any settings, simply head over to any product page on your online store. You will now see a ‘Buy Now’ button next to the standard ‘Add to Cart’ button.

We hope this article helped you learn how to add a buy now button in WordPress. You can also go through our guide on the best email marketing services and how to get a free SSL certificate for your WordPress website.

If you liked this article, then please subscribe to our YouTube Channel for WordPress video tutorials. You can also find us on Twitter and Facebook.

The post How to Add a Buy Now Button in WordPress (3 Methods) first appeared on WPBeginner.

How to Add Klarna Payments to WordPress (2 Easy Ways)

Are you looking for a way to offer Klarna payments on your website or eCommerce store?

Klarna allows you to add financing and installment plans to your website. You can use it to offer a ‘Buy Now, Pay Later’ option and encourage customers to purchase products.

In this article, we’ll show you how to add Klarna payments to WordPress.

How to add Klarna payments to WordPress

What is Klarna & Why Add It to WordPress?

Klarna is a Swedish fintech company offering online payment methods for website and online store owners.

Adding Klarna to your online store can help boost conversions and average order value. It makes it convenient for customers to purchase an expensive product or luxury items they want and pay over time.

Klarna offers 4 ways customers can buy now and pay later for a product:

  • split the purchase amount into 4 interest-free payments
  • use a debit or credit card to pay the total amount
  • purchase a product now and pay in 30 days
  • get financing for your purchase and pay installments over 6 to 24 months.

However, an important thing to remember is that Klarna’s payment options depend on your customer’s location. For example, in the United States, customers can get installment and financing options, but not the ability to pay in 30 days or fully pay using a credit card.

That said, let’s see how you can add Klarna payments in WordPress. We’ll show you 2 methods, including WP Simple Pay and WooCommerce. You can click the links below to jump ahead to your preferred section.

Method 1: Add Klarna Payments Using WP Simple Pay

The easiest way of adding Klarna payments in WordPress is by using WP Simple Pay. It is the best Stripe payment plugin for WordPress and allows you to easily collect online payments using Klarna, with no need to set up a shopping cart.

For this tutorial, we’ll use the WP Simple Pay Pro plan because it includes the Klarna payment forms and ‘Buy Now, Pay Later’ option. There is also a free version of WP Simple Pay you can use.

The first thing you need to do is install and activate the WP Simple Pay plugin. If you need help, then please see our guide on how to install a WordPress plugin.

Upon activation, the plugin will launch the setup wizard. You can simply click the ‘Let’s Get Started’ button to continue.

The WP Simple Pay Setup Wizard Will Start Automatically

On the next screen, you’ll need to enter the license key. You can find the license key in your WP Simple Pay account area.

After that, go ahead and click on the ‘Activate and Continue’ button.

You’ll Be Asked to Enter Your WP Simple Pay License Key

Next, the plugin will ask you to connect your Stripe account. Stripe is a payment gateway that lets you accept online payments with ease.

Simply click the ‘Connect with Stripe’ button.

You Need to Connect WP Simple Pay to Stripe

You can now log in to your Stripe account and follow the onscreen instructions to connect the payment gateway with WP Simple Pay.

If you don’t have a Stripe account, then you can create one. Anyone with a legitimate business can set up a Stripe account. In addition, you’ll need to have SSL encryption on your site. For more details, please see our guide on how to get free SSL certification for a WordPress website.

Once you’ve connected Stripe with WP Simple Pay, you’ll be redirected to the setup wizard.

In the next step, the plugin will ask you to configure emails. For example, you can enable options to send payment receipts to customers, notify them about upcoming invoices, and get payment notifications.

Configure Your WP Simple Pay Emails

Go ahead and enter your email address in the ‘Send to’ field and then click the ‘Save and Continue’ button.

After that, you’ll see the last step in the setup wizard. Go ahead and click the ‘Create a Payment Form’ button.

WP Simple Pay Setup Is Complete

Create a Klarna Payment Form in WP Simple Pay

You can also create new payment forms by going to WP Simple Pay » Add New from your WordPress dashboard.

The plugin offers multiple pre-built form templates. To add Klarna, go ahead and select the ‘Klarna (Buy Now, Pay Later) Form’ template.

Select Klarna form template

Next, you can customize your payment form.

For instance, under the ‘General’ tab, you get options to rename the form, add a description, and select a form type.

Edit the payment form general settings

After that, you can switch to the ‘Payment’ tab.

Here, you’ll find payment mode settings and price options. The plugin lets you add multiple prices, the cost of the product, the currency that will appear in the form, and whether you’d want a one-time payment or a recurring subscription.

Change payment form details

Next, you can scroll down and choose different payment methods.

Ensure that the ‘Klarna’ option is selected. You can also add more options like credit card and ACH Direct Debit.

Select Klarna payment method

From here, switch to the ‘Form Fields’ tab and choose which fields to add.

You can also change the order of existing fields by simply dragging and dropping them. Plus, there are more form fields to add from the dropdown menu at the top.

Add form fields

After editing the form fields, head to the ‘Payment Page’ tab. WP Simple Pay allows you to create a dedicated payment page for your Klarna form.

Just make sure to click the ‘Enable a dedicated payment page’ checkbox.

Add a dedicated page

You can change the permalink for the page, select a color scheme, add the form title and description, add a logo, and change the text in the footer.

When you’ve made the changes, go ahead and publish your Klarna form. Now, visit the dedicated page to see the Klarna form in action.

Klarna payment form dedicated page preview

Alternatively, you can embed the payment anywhere on your website using the WP Simple Pay block.

Simply edit a page or add a new one. Once you’re in the content editor, click the ‘+’ button, and then add the ‘WP Simple Pay’ block. Next, you just select your form from the dropdown menu.

Add a WP simple pay block

After that, go ahead and publish your page.

You can now visit your WordPress website to see the Klarna payment form in action.

Klarna payment form preview

Method 2: Add Klarna Payments in WooCommerce

You can also add Klarna payments in WordPress using the WooCommerce plugin. WooCommerce is the most popular eCommerce platform in the world, and it’s built on top of WordPress.

It has built-in payment options, but you can add a free Klarna Payments extension for your online store.

Before you can use Klarna in WooCommerce, first you need to make sure that you have setup an online store using WooCommerce.

After that, you’ll need to install and activate Klarna Payments for WooCommerce. For more details, please see our guide on how to install a WordPress plugin.

Upon activation, you can go to WooCommerce » Settings from your WordPress dashboard and click on the ‘Payments’ tab.

Set up Klarna payments in WooCommerce

Here, you will have different payment options offered by WooCommerce, including Klarna Payments. Simply click the ‘Set up’ button in front of Klarna Payments.

Next, you can check the ‘Enable Klarna Payments’ to activate the payment service in WooCommerce.

Besides that, there are also options for changing the title, enabling test mode, showing your customers a link to what is Klarna, and more.

Configure Klarna settings

When you’re done, don’t forget to save your changes.

Next, you can go to your WooCommerce store and visit the checkout page to see Klarna as a payment option.

View Klarna payment method at checkout

It’s important to note that Klarna Payments work with merchant accounts and is only available in Australia, Austria, Belgium, Canada, Denmark, Germany, Finland, France, Italy, Netherlands, Norway, New Zealand, Sweden, Spain, Switzerland, United Kingdom, and the United States.

We hope this article helped you learn how to add Klarna payments to WordPress. You may also want to see our ultimate guide to WordPress SEO and our beginner’s guide on how to start an email newsletter.

If you liked this article, then please subscribe to our YouTube Channel for WordPress video tutorials. You can also find us on Twitter and Facebook.

The post How to Add Klarna Payments to WordPress (2 Easy Ways) first appeared on WPBeginner.

How to Accept ACH Payments in WordPress

Do you want to accept ACH payments on your WordPress website?

ACH (Automated Clearing House) payments are a bank-to-bank payment method in the United States. ACH payments help save transaction fees for business owners since they are a lot lower than a credit card or digital wallet transaction fees.

In this article, we’ll show you how to accept ACH payments in WordPress.

How to accept ACH payments in WordPress

Why Accept ACH Payments in WordPress?

If your business is located in the United States, then you can lower your transaction fees by a lot when you accept ACH payments on your WordPress site. It’s a perfect payment method if you regularly accept large amounts of money from customers.

For example, the Stripe fee for accepting ACH payments is just 0.8% per transaction, with a maximum cap of $5.

On the other hand, a typical credit card or digital wallet payment fee is 2.9% + USD 0.30 per transaction. Even newer methods like Apple Pay charge a 1.5% fee, nearly double ACH.

Keeping these fees in mind, let’s say a customer pays $100. Through ACH payments, the transaction fee would be roughly $0.80. At the same time, the transaction fee for the same amount through a credit card or digital wallet would be $3.20.

Similarly, on an $800 payment amount, the transaction fee through ACH would be $6.40, and through cards or digital wallets would be $23.50. What this means is that the higher the transaction amount, the more you’ll save in transaction costs.

Another advantage of using ACH payments is getting higher customer retention and reducing the churn rate. Credit and debit cards expire after a certain period, which means that customers will stop doing business until their cards are renewed. With ACH payments, you can overcome this issue and reduce involuntary churn.

That said, let’s look at how you can accept ACH payments in WordPress.

Accepting ACH Payments in WordPress

The best way to allow ACH payments in WordPress is by using the WP Simple Pay plugin. It’s the best Stripe plugin for WordPress and will let you set up one-time payments or recurring payments without setting up a shopping cart.

We’ll use the WP Simple Pay Pro version for this tutorial because it includes ACH payments, on-site payment forms, and other features. There is also a free version of the plugin, but it doesn’t have an ACH payment option.

First, you’ll need to install and activate the WP Simple Pay plugin. If you need help, then please see our detailed guide on how to install a WordPress plugin.

Once the plugin is active, it will automatically launch the setup wizard. Go ahead and click the ‘Let’s Get Started’ button.

The WP Simple Pay Setup Wizard Will Start Automatically

On the next screen, you’ll need to enter the license key. You can easily find the license key in your WP Simple Pay account area.

After entering the key, you can click the ‘Activate and Continue’ button.

You’ll Be Asked to Enter Your WP Simple Pay License Key

Next, you’ll need to connect WP Simple Pay with Stripe.

Stripe is a popular payment gateway that allows you to collect ACH payments on your WordPress site.

Go ahead and click the ‘Connect with Stripe’ button.

Connecting WP Simple Pay to Stripe

After that, you can log in to your Stripe account and connect it with WP Simple Pay.

Just a note that Stripe requires websites to have HTTPS encryption. If you don’t already have an SSL certificate for your website, then please see our step-by-step guide on how to get a free SSL certificate for WordPress.

Once your Stripe account is connected, WP Simple Pay will show different email options to configure. You can enable emails for payment receipts, upcoming invoices, and payment notifications.

Configure Your WP Simple Pay Emails

Next, enter your business email address where you’d like to receive these emails, and then click the ‘Save and Continue’ button.

After that, you’ll arrive at the last step in the setup wizard, where you’ll need to create a payment form. Simply click on the ‘Create a Payment Form’ button.

WP Simple Pay Setup Is Complete

Setting Up a WP Simple Pay Payment Form

You can also create a payment form in WP Simple Pay by going to WP Simple Pay » Add New from your WordPress dashboard.

You will see a number of payment form templates. You need to hover over the ‘ACH Direct Debit Form’ template and then click the ‘Use Template’ button that appears.

Select the ACH Direct Debit Form Template

You’ll find yourself on the ‘General’ tab of the payment form editor. If you like, you can rename the form and give it a description.

We’ll leave the other settings with their default values.

If You Like, Rename Your Form and Give It a Description

Next, go to the ‘Payment’ tab in the payment form and enter the price amount and label.

You should also set up whether it is a one-time payment or a recurring subscription.

Enter payment details

After that, head down to the ‘Form Field’ tab.

Under the Payment Method section, you’ll notice that the ‘ACH Direct Debit’ and ‘Card’ payment options have already been selected for you. If you like, you can also select any other payment methods that you’d like to use.

ACH and Credit Card Payment Options Have Already Been Set Up for You

Next, you can preview your ACH payment form and then publish it.

To do that, simply click the ‘Publish’ button in WP Simple Pay.

Publish your ACH form

You can now add your ACH payment form anywhere on your WordPress website.

To start, go ahead and add a new page or edit an existing one. Once you’re in the content editor, simply add a WP Simple Pay block. After that, you should select your ACH form from the dropdown menu.

Add WP Simple Pay Block

Once that’s done, you can preview your page and publish it.

Now you can visit your website to see the ACH payment form in action. Here’s a preview of what it looks like on our demo site.

ACH Payment Form Preview

Final Thoughts on Adding ACH Payments in WordPress

The above method is the simplest way to accept ACH payment in WordPress without using a shopping cart.

However, if you’re using WordPress for your online store or to sell digital downloads, then most of those eCommerce plugins also support ACH payments.

For example, you can use Easy Digital Downloads to sell digital downloads like eBooks, software, music, etc, and it lets you accept ACH payments.

Alternatively, WooCommerce will allow you to sell physical goods and accept ACH payments.

We hope that this article helped you learn how to accept ACH payments in WordPress. You can also see our guide on how much it costs to build a website and the best WordPress plugins.

If you liked this article, then please subscribe to our YouTube Channel for WordPress video tutorials. You can also find us on Twitter and Facebook.

The post How to Accept ACH Payments in WordPress first appeared on WPBeginner.

How to Add “Buy Now Pay Later” Payment Plans to WordPress

Do you want to offer users a buy now, pay later payment method on your WordPress website?

‘Buy now, pay later’ offers customers flexibility as they can purchase goods and pay in installments over a specified time period. At the same time, your business gets instant payments for the full amount creating a win-win scenario.

In this article, we’ll show you how to add “buy now pay later” payment plans to WordPress.

How to add buy now pay later payment plans to WordPress

Why Offer Buy Now Pay Later Payment Plans?

Buy now pay later helps improve conversions and average order value on your online store because it’s easier for your customers to make a purchase.

With the buy now pay later payment method, the customer has the ability to either pay nothing at the time of their online purchase or pay a very small amount upfront and then pay the remaining amount over time.

There are different types of buy now pay later models that you can use. For instance, customers can break the total amount into 3 or 4 installments, or they could pay the entire amount after a certain number of days. Some payment providers even offer to finance high-value or luxury goods.

The best part about offering a buy now pay later payment option is that your business receives the full payment up front and is protected from fraud. On the other hand, the customer gets the flexibility to purchase their preferred items and pay when it’s suitable for them.

That said, let’s see how you can offer a buy now pay later payment plan in WordPress.

Adding a Buy Now Pay Later Payment Plan in WordPress

The best way to offer a pay later payment option in WordPress is by using WP Simple Pay. It’s the best Stripe payment plugin for WordPress and lets you accept online payments without the need to set up a shopping cart.

The plugin comes with a payment form builder, and you can easily accept one-time or recurring payments on your website. With WP Simple Pay, you can add Klarna or Afterpay to accept buy now pay later payments.

Just a note, you’ll need the WP Simple Pay Pro plan because it includes the buy now pay later payment methods. There is also a free version of the plugin that you can try.

First, you’ll need to install and activate the WP Simple Pay plugin. If you need help, then please see our guide on how to install a WordPress plugin.

Upon activation, the plugin will automatically launch the setup wizard. Go ahead and click the ‘Let’s Get Started’ button.

The WP Simple Pay Setup Wizard Will Start Automatically

After that, you’ll need to enter the license key. You can easily find the license key in the WP Simple Pay account area.

Simply copy the license key and paste it into the setup wizard. Once that’s done, click the ‘Activate and Continue’ button.

You’ll Be Asked to Enter Your WP Simple Pay License Key

In the next step, you’ll need to connect your Stripe account with WP Simple Pay. Stipe is one of the most popular payment gateways, and anyone with a legitimate business can create a Stripe account to accept online payments.

Next, click the ‘Connect with Stripe’ button to continue.

Connecting WP Simple Pay to Stripe

Now log in to your Stripe account or create a new one and follow the onscreen instructions to connect it with WP Simple Pay.

An important thing to remember is that Stripe requires sites to have SSL encryption. Most WordPress hosting comes with free SSL certificate these days. If you don’t have an SSL certificate, then please see our guide on how to move your website from HTTP to HTTPS.

After connecting WP Simple Pay with Stripe, the setup wizard will ask you to configure the emails. You can enable options to receive email notifications for payment receipts, upcoming invoices, and payment notifications, and enter the email address to send them to.

Note: If you’re not receiving the notifications, then your should check out our guide on how to fix WordPress not sending emails since this can be a common problem.

Configure Your WP Simple Pay Emails

Simply click the ‘Save and Continue’ button when you’re done.

The last step in the setup wizard is to create a payment form. Go ahead and click the ‘Create a Payment Form’ button.

WP Simple Pay Setup Is Complete

Creating a Buy Now Pay Later Payment Form

WP Simple Pay offers 2 payment methods through which you can accept buy now pay later payments, including Klarna and Afterpay/Clearpay.

The choice between the two methods depends on where you’re located and which method best suits the type of products you’re selling. That’s because Klarna and Afterpay work in selected regions and allow you to sell certain products.

Let’s take a closer look and create payment forms for both the buy now pay later payment methods.

Creating a Klarna Buy Now Pay Later Payment Form

Klarna offers 4 ways customers can buy now and pay later. They can pay in 3 or 4 interest-free installments, pay later after 14, 21, or 30 days, pay the full amount immediately using a credit card, or get financing and spread the total amount over multiple months.

The type of buy now pay later model available to your customers will depend on which country they’re located in.

Klarna is available if you’re located in Austria, Belgium, Denmark, Estonia, Finland, France, Germany, Greece, Ireland, Italy, Latvia, Lithuania, Netherlands, Norway, Slovakia, Slovenia, Spain, Sweden, United Kingdom, and the United States.

Note that you cannot use Klarna for charities and political organizations, parties, or initiatives.

To create a payment form, you can click the ‘Create a Payment Form’ button in the setup wizard or go to the WP Simple Pay » Add New page from your WordPress admin panel.

Now, simply select the ‘Klarna (Buy Now, Pay Later) Form’ template.

Select Klarna form template

After that, head over to the ‘Payment’ tab to add prices.

Here you can enter the amount, change the label, and choose whether to accept one-time or subscription-based payments.

Enter payment details

Next, you can go to the ‘Form Fields’ tab and add any additional fields you’d like to add to the form.

Under the ‘Payment Methods’ section, you’ll see that the Klarna option will be enabled. You can also add more payment methods to your form if you want.

Choose Klarna payment method and publish the form

Next, you can preview and publish your payment form.

After that, simply add the form to any landing page or blog post on your website.

To do that, simply go to the WordPress content editor and add a ‘WP Simple Pay’ block. Then select your Klarna buy now pay later payment form from the dropdown menu.

Add a WP Simple Pay block

Next, you can preview the form and publish it.

Simply visit your website to see the buy now pay later payment form in action.

klarna payment form preview

Creating an Afterpay/Clearpay Buy Now Pay Later Payment Form

Afterpay/Clearpay is another payment method through which you can accept buy now pay later payments.

Afterpay is available in Australia, Canada, France, Italy, New Zealand, Spain, the United Kingdom, and the United States.

Unlike Klarna, Aftrepay only allows customers to pay in 4 installments. Plus, you cannot use the payment method to sell alcohol, digital games and apps, donation, electronics, flash sales, pre-orders, and travel.

To create an Afterpay payment form, you can head to the WP Simple Pay » Add New page from your WordPress admin panel and select the ‘Afterpay/Clearpay (Buy Now, Pay Later) Form’ template.

Select Afterpay form template

Next, you can navigate to the ‘Payment’ tab and set up your prices.

The plugin allows you to choose a payment mode, enter a label, choose payment amount, and select one-time or subscription-based payment.

Enter payment details

After that, you can head over to the ‘Form Fields’ tab to add more form fields.

You can also check that the Afterpay payment option is enabled under the ‘Payment Methods’ section and add more payment options to your form.

Choose Afterpay payment method and publish the form

Now, go ahead and preview your payment. If everything looks good, then simply click the ‘Publish’ button.

Next, you can add the Afterpay buy now pay later form to any post or page. In the WordPress content editor, add a ‘WP Simple Pay’ block and choose your form from the dropdown menu.

Add a WP Simple Pay block

After that, you can preview your page and publish it.

Now visit your website to see the Afterpay buy now pay later payment form in action.

Afterpay payment form preview

We hope that this article helped you learn how to add “buy now pay later” payment plans to WordPress. You can also check out our guide on how to create an email newsletter and the best auto dialer software for small business.

If you liked this article, then please subscribe to our YouTube Channel for WordPress video tutorials. You can also find us on Twitter and Facebook.

The post How to Add “Buy Now Pay Later” Payment Plans to WordPress first appeared on WPBeginner.

Coding Live Stream: The Transparent Software Developer 1 [Video]

Wouldn't it be cool to have a look over someone's shoulder while he or she is professionally building and deploying software? What about building a credit card payment form that lets you accept real $$$ payments on a website?

From creating the Spring Boot project from scratch and integrating with Stripe, to discussing workflow, IDE usage, and coding decisions, to deploying the software live.

Stripe Acquires Paystack for $200M+

The big news in the world of e-commerce today is Stripe’s acquisition of Paystack, a Nigeria-based payments system that is widely used throughout African markets. The company, which became informally known as “the Stripe of Africa” picked up $8 million in Series A funding in 2018, led by Stripe, Y Combinator, and Tencent. Paystack has grown to power more than 60,000 businesses, including FedEx, UPS, MTN, the Lagos Internal Revenue Service, and AXA Mansar.

Stripe’s acquisition of the company is rumored to be more than $200M, a small price to pay for a foothold in emerging African markets. In the company’s announcement, Stripe noted that African online commerce is growing 21% year-over-year, 75% faster than the global average. Paystack dominates among payment systems, accounting for more than half of all online transactions in Nigeria.

“In just five years, Paystack has done what many companies could not achieve in decades,” Stripe EMEA business lead Matt Henderson said. “Their tech-first approach, values, and ambition greatly align with our own. This acquisition will give Paystack resources to develop new products, support more businesses and consolidate the hyper-fragmented African payments market.”

Long term, Stripe plans to embed Paystack’s capabilities in its Global Payments and Treasury Network (GPTN), the company’s programmable infrastructure for global money movement.

“Paystack merchants and partners can look forward to more payment channels, more tools, accelerated geographic expansion, and deeper integrations with global platforms,” Paystack CEO and co-founder Shola Akinlade said. He also assured customers that there’s no need to make any changes to their technical integrations, as Paystack will continue expanding and operating independently in Africa.

Paystack is used as a payment gateway for thousands of WordPress-powered stores through plugins for WooCommerce, Easy Digital Downloads, Paid Membership Pro, Give, Contact Form 7, and an assortment of booking plugins. The company has an official WordPress plugin, Payment Forms for Paystack, which is active on more than 6,000 sites, but most users come through the Paystack WooCommerce Payment Gateway (20,000+ active installations).

Stripe’s acquisition was a bit of positive news during what is currently a turbulent time in Nigeria, as citizens are actively engaged in peaceful protests to end police brutality. Paystack’s journey is an encouraging example of the flourishing Nigerian tech ecosystem and the possibilities available for smaller e-commerce companies that are solving problems and removing barriers for businesses in emerging markets.

Let’s Build a JAMstack E-Commerce Store with Netlify Functions

A lot of people are confused about what JAMstack is. The acronym stands for JavaScript, APIs, and Markup, but truly, JAMstack doesn’t have to include all three. What defines JAMstack is that it’s served without web servers. If you consider the history of computing, this type of abstraction isn’t unnatural; rather it’s the inevitable progression this industry has been moving towards.

So, if JAMstack tends to be static by definition, it can’t have dynamic functionality, server-side events, or use a JavaScript framework, right? Thankfully, not so. In this tutorial, we’ll set up a JAMstack e-commerce app and add some serverless functionality with Netlify Functions (which abstract AWS Lambda, and are super dope in my opinion).

I'll show more directly how the Nuxt/Vue part was set up in a follow-up post, but for now we're going to focus on the Stripe serverless function. I'll show you how I set this one up, and we'll even talk about how to connect to other static site generators such as Gatsby.

This site and repo should get you started if you’d like to set something like this up yourself:

Scaffold our app

The very first step is to set up our app. This one is built with Nuxt to create a Vue app, but you can replace these commands with your tech stack of choice:

yarn create nuxt-app

hub create

git add -A
git commit -m “initial commit”

git push -u origin master

I am using yarn, hub (which allows me to create repos from the command line) and Nuxt. You may need to install these tools locally or globally before proceeding.

With these few commands, following the prompts, we can set up an entirely new Nuxt project as well as the repo.

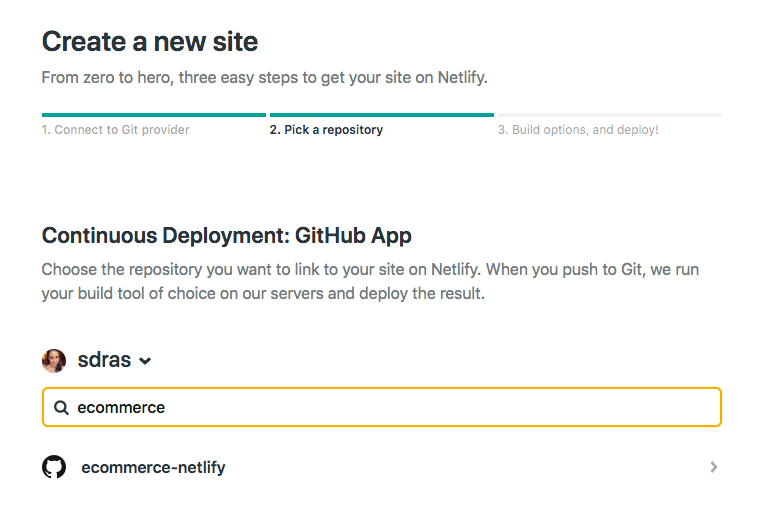
If we log into Netlify and authenticate, it will ask us to pick a repo:

choose a repo in netlify

I'll use yarn generate to create the project. With that, I can add in the site settings for Nuxt in the dist directory and hit feploy! That's all it takes to set up CI/CD and deploy the site! Now every time I push to the master branch, not only will I deploy, but I'll be given a unique link for that particular deploy as well. So awesome.

A basic serverless function with Netlify

So here's the exciting part, because the setup for this kind of functionality is so quick! If you’re unfamiliar with Serverless, you can think of it like the same JavaScript functions you know and love, but executed on the server. Serverless functions are event-driven logic and their pricing is extremely low (not just on Netlify, but industry-wide) and scales with your usage. And yes, we have to add the qualifier here: serverless still uses servers, but babysitting them is no longer your job. Let’s get started.

Our very basic function looks like this. I stored mine in a folder named functions, and just called it index.js. You can truly call the folder and function what you want.

// functions/index.js
exports.handler = async (event, context) => {
  return {
    statusCode: 200,
    body: JSON.stringify({
      message: "Hi there Tacos",
      event
    })
  }
}

We’ll also need to create a netlify.toml file at the root of the project and let it know which directory to find the function in, which in this case, is "functions."

// netlify.toml
[build]
  functions = "functions"

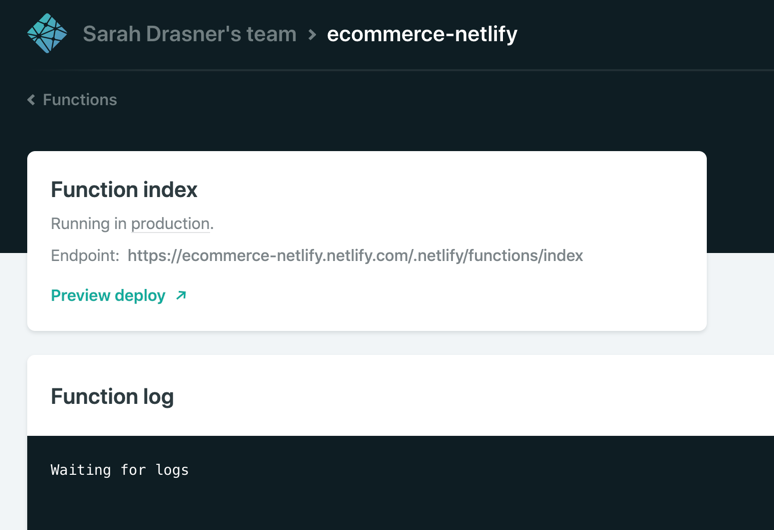
If we push to master and go into the dashboard, you can see it pick up the function!

netlify function in the dashboard

If you look at the endpoint listed above it’s stored here:
https://ecommerce-netlify.netlify.com/.netlify/functions/index

Really, for any site you give it, the URL will follow this pattern:
https:/<yoursiteurlhere>/.netlify/functions/<functionname>

When we hit that endpoint, it provides us with the message we passed in, as well as all the event data we logged as well:

the function event in the browser

I love how few steps that is! This small bit of code gives us infinite power and capabilities for rich, dynamic functionality on our sites.

Hook up Stripe

Pairing with Stripe is extremely fun because it's easy to use, sophisticated, has great docs, and works well with serverless functions. I have other tutorials where I used Stripe because I enjoy using their service so much.

Here’s a bird’s eye view of the app we’ll be building:

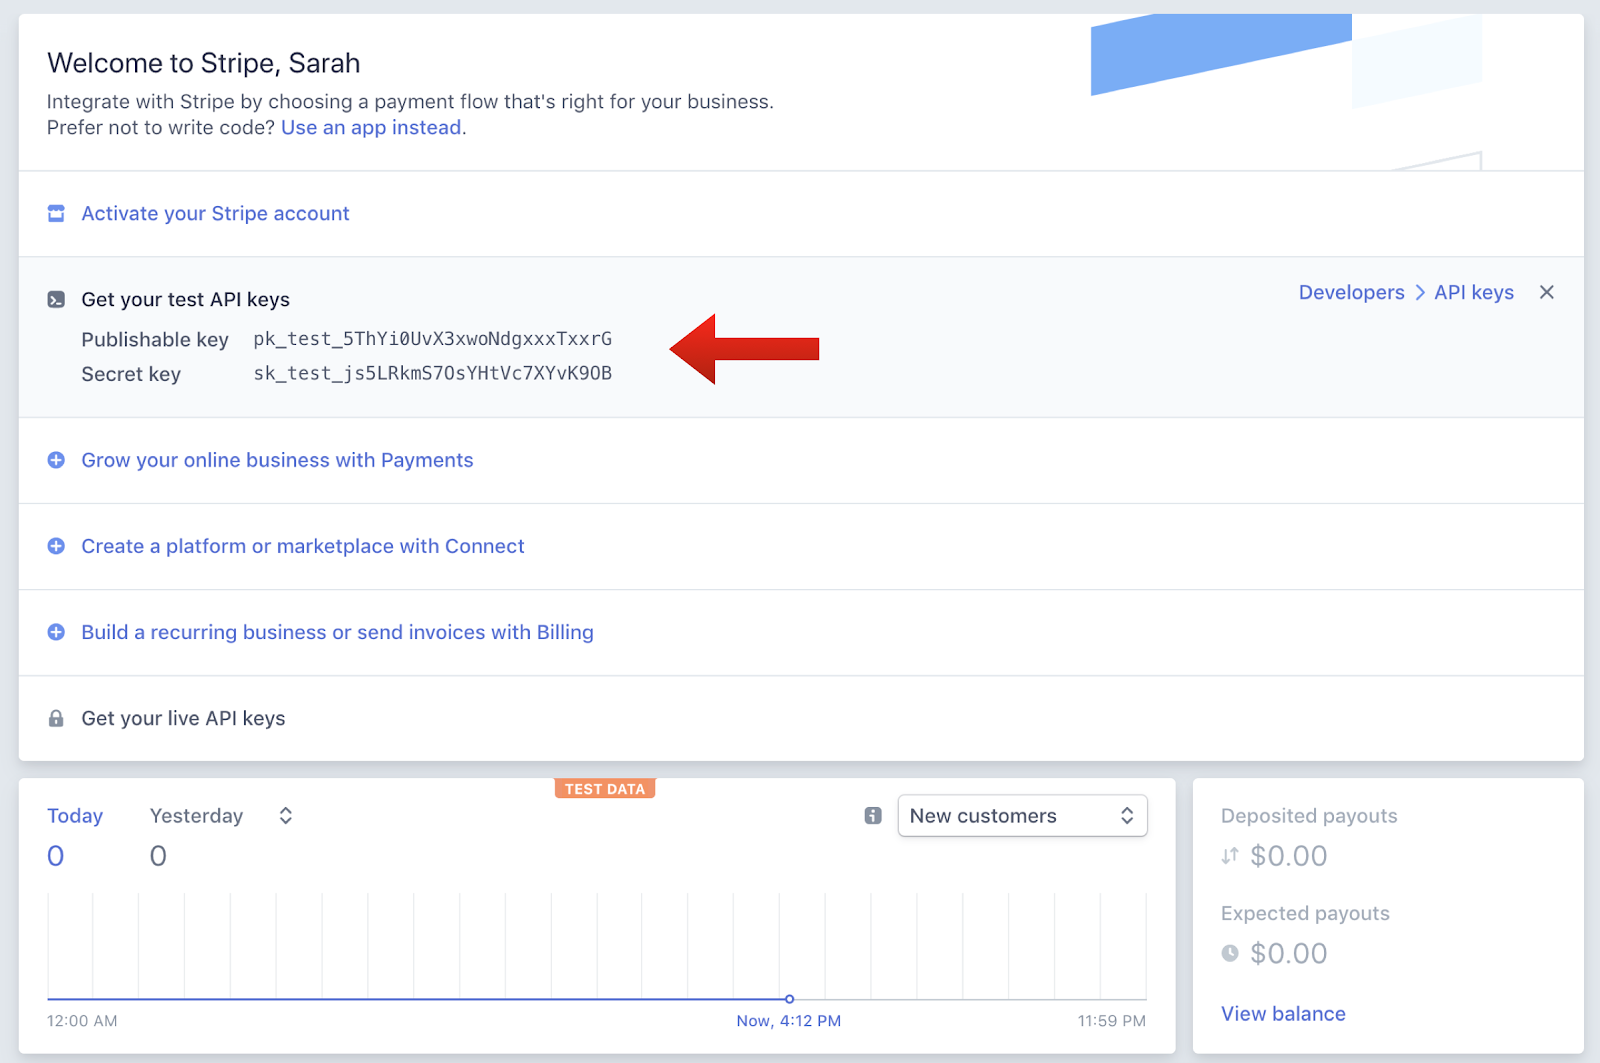
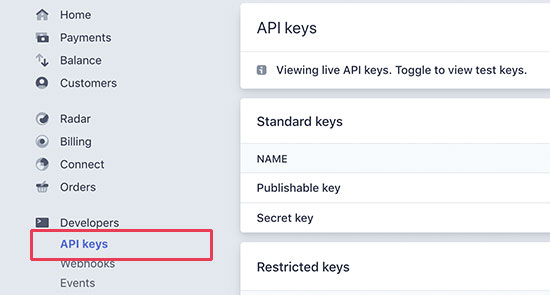
First we’ll go to the Stripe dashboard and get our keys. For anyone totally scandalized right now, it's OK, these are testing keys. You can use them, too, but you’ll learn more if you set them up on your own. (It’s two clicks and I promise it’s not hard to follow along from here.)

testing keys in the stripe dashboard

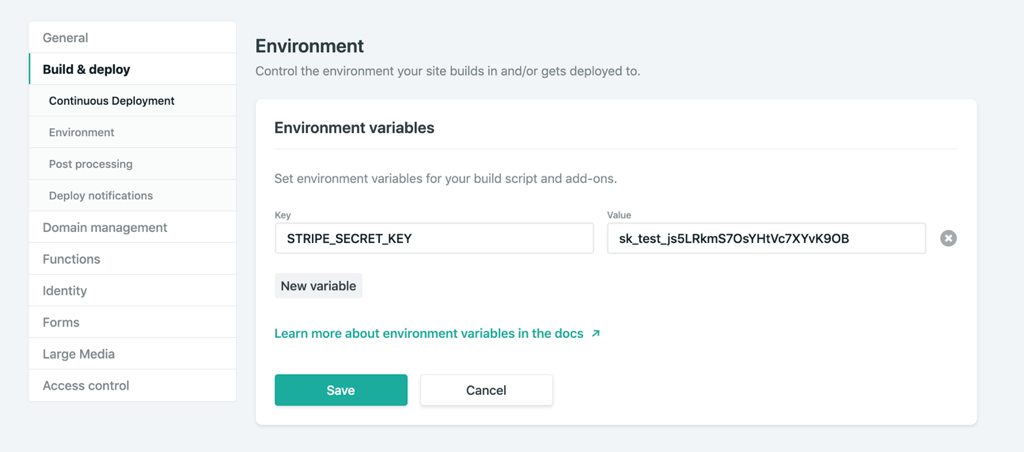
We’ll install a package called dotenv which will help us store our key and test it locally. Then, we’ll store our Stripe secret key to a Stripe variable. (You can call it anything, but here I’ve called it STRIPE_SECRET_KEY, and that’s pretty much industry standard.)

yarn add dotenv
require("dotenv").config()

const stripe = require("stripe")(process.env.STRIPE_SECRET_KEY)

In the Netlify dashboard, we’ll go to "Build & deploy," then "Environment" to add in Environment variables, where the STRIPE_SECRET_KEY is key, and the value will be the key that starts with sk.

We’ll also add in some headers so we don’t run into CORS issues. We’ll use these headers throughout the function we’re going to build.

const headers = {
  "Access-Control-Allow-Origin": "*",
  "Access-Control-Allow-Headers": "Content-Type"
}

So, now we’ll create the functionality for talking to Stripe. We’ll make sure we’ll handle the cases that it’s not the HTTP method we’re expecting, and also that we’re getting the information we expect.

You can already see here, what data we’re going to be needing to send to stripe by what we check for. We’ll need the token, the total amount, and an idempotency key.

If you're unfamiliar with idempotency keys, they are unique values that are generated by a client and sent to an API along with a request in case the connection is disrupted. If the server receives a call that it realizes is a duplicate, it ignores the request and responds with a successful status code. Oh, and it's an impossible word to pronounce.

exports.handler = async (event, context) => {
  if (!event.body || event.httpMethod !== "POST") {
    return {
      statusCode: 400,
      headers,
      body: JSON.stringify({
        status: "invalid http method"
      })
    }
  }

  const data = JSON.parse(event.body)

  if (!data.stripeToken || !data.stripeAmt || !data.stripeIdempotency) {
    console.error("Required information is missing.")

    return {
      statusCode: 400,
      headers,
      body: JSON.stringify({
        status: "missing information"
      })
    }
  }

Now, we’ll kick off the Stripe payment processing! We’ll create a Stripe customer using the email and token, do a little logging, and then create the Stripe charge. We’ll specify the currency, amount, email, customer ID, and give a description while we're at it. Finally, we’ll provide the idempotency key (pronounced eye-dem-po-ten-see), and log that it was successful.

(While it's not shown here, we’ll also do some error handling.)

// stripe payment processing begins here
try {
  await stripe.customers
    .create({
      email: data.stripeEmail,
      source: data.stripeToken
    })
    .then(customer => {
      console.log(
        `starting the charges, amt: ${data.stripeAmt}, email: ${data.stripeEmail}`
      )
      return stripe.charges
        .create(
          {
            currency: "usd",
            amount: data.stripeAmt,
            receipt_email: data.stripeEmail,
            customer: customer.id,
            description: "Sample Charge"
          },
          {
            idempotency_key: data.stripeIdempotency
          }
        )
        .then(result => {
          console.log(`Charge created: ${result}`)
        })
    })

Hook it up to Nuxt

If we look back at our application, you can see we have pages and components that live inside the pages. The Vuex store is like the brain of our application. It will hold the state of the app, and that's what will communicate with Stripe. However, we still need to communicate with our user via the client. We'll collect the credit card data in a component called AppCard.vue that will live on the cart page.

First, we'll install a package called vue-stripe-elements-plus, that gives us some Stripe form elements that allow us to collect credit card data, and even sets us up with a pay method that allows us to create tokens for stripe payment processing. We'll also add a library called uuid that will allow us to generate unique keys, which we'll use for the idempotency key.

yarn add vue-stripe-elements-plus uuid

The default setup they give us to work with vue-stripe-elements-plus looks like this:

<template>
  <div id='app'>
    <h1>Please give us your payment details:</h1>
    <card class='stripe-card'
      :class='{ complete }'
      stripe='pk_test_XXXXXXXXXXXXXXXXXXXXXXXX'
      :options='stripeOptions'
      @change='complete = $event.complete'
    />
    <button class='pay-with-stripe' @click='pay' :disabled='!complete'>Pay with credit card</button>
  </div>
</template>
<script>
import { stripeKey, stripeOptions } from './stripeConfig.json'
import { Card, createToken } from 'vue-stripe-elements-plus'

export default {
  data () {
    return {
      complete: false,
      stripeOptions: {
        // see https://stripe.com/docs/stripe.js#element-options for details
      }
    }
  },

  components: { Card },

  methods: {
    pay () {
      // createToken returns a Promise which resolves in a result object with
      // either a token or an error key.
      // See https://stripe.com/docs/api#tokens for the token object.
      // See https://stripe.com/docs/api#errors for the error object.
      // More general https://stripe.com/docs/stripe.js#stripe-create-token.
      createToken().then(data => console.log(data.token))
    }
  }
}
</script>

So here's what we're going to do. We're going to update the form to store the customer email, and update the pay method to send that and the token or error key to the Vuex store. We'll dispatch an action to do so.

data() {
    return {
      ...
      stripeEmail: ""
    };
  },
  methods: {
    pay() {
      createToken().then(data => {
        const stripeData = { data, stripeEmail: this.stripeEmail };
        this.$store.dispatch("postStripeFunction", stripeData);
      });
    },
 ...

That postStripeFunction action we dispatched looks like this:

// Vuex store
export const actions = {
  async postStripeFunction({ getters, commit }, payload) {
    commit("updateCartUI", "loading")

    try {
      await axios
        .post(
          "https://ecommerce-netlify.netlify.com/.netlify/functions/index",
          {
            stripeEmail: payload.stripeEmail,
            stripeAmt: Math.floor(getters.cartTotal * 100), //it expects the price in cents                        
            stripeToken: "tok_visa", //testing token, later we would use payload.data.token
            stripeIdempotency: uuidv1() //we use this library to create a unique id
          },
          {
            headers: {
              "Content-Type": "application/json"
            }
          }
        )
        .then(res => {
          if (res.status === 200) {
            commit("updateCartUI", "success")
            setTimeout(() => commit("clearCart"), 3000)
            …

We're going to update the UI state to loading while we're processing. Then we'll use axios to post to our function endpoint (the URL you saw earlier in the post when we set up our function). We'll send over the email, the amt, the token and the unique key that we built the function to expect.

Then if it was successful, we'll update the UI state to reflect that.

One last note I'll give is that I store the UI state in a string, rather than a boolean. I usually start it with something like "idle" and, in this case, I'll also have "loading," "success," and "failure." I don't use boolean states because I've rarely encountered a situation where UI state only has two states. When you work with booleans for this purpose, you tend to need to break it out into more and more states, and checking for all of them can get increasingly complicated.

As it stands, I can reflect changes in the UI on the cart page with legible conditionals, like this:

<section v-if="cartUIStatus === 'idle'">
  <app-cart-display />
</section>

<section v-else-if="cartUIStatus === 'loading'" class="loader">
  <app-loader />
</section>

<section v-else-if="cartUIStatus === 'success'" class="success">
  <h2>Success!</h2>
  <p>Thank you for your purchase. You'll be receiving your items in 4 business days.</p>
  <p>Forgot something?</p>

  <button class="pay-with-stripe">
    <nuxt-link exact to="/">Back to Home</nuxt-link>
  </button>
</section>

<section v-else-if="cartUIStatus === 'failure'">
  <p>Oops, something went wrong. Redirecting you to your cart to try again.</p>
</section>

And there you have it! We’re all set up and running to accept payments with stripe on a Nuxt, Vue site with a Netlify function, and it wasn’t even that complicated to set up!

Gatsby Applications

We used Nuxt in this instance but if you wanted to set up the same kind of functionality with something that uses React such as Gatsby, there's a plugin for that. (Everything is plugin in Gatsby. ☺️)

You would install it with this command:

yarn add gatsby-plugin-netlify-functions

...and add the plugin to your application like this:

plugins: [
  {
    resolve: `gatsby-plugin-netlify-functions`,
    options: {
      functionsSrc: `${__dirname}/src/functions`,
      functionsOutput: `${__dirname}/functions`,
    },
  },
]

The serverless function used in this demo is straight up JavaScript, so it's also portable to React applications. There's a plugin to add the Stripe script to your Gatsby app (again, everything is a plugin). Fair warning: this adds the script to every page on the site. To collect the credit card information on the client, you would use React Stripe Elements, which is similar to the Vue one we used above.

Just make sure that you're collecting from the client and passing all the information the function is expecting:

  • The user email
  • The total amount, in cents
  • The token
  • The idempotency key

With such a low barrier to entry, you can see how you can make really dynamic experiences with JAMstack applications. It's amazing how much you can accomplish without any maintenance costs from servers. Stripe and Netlify Functions make setting up payment processing in a static application such a smooth developer experience!

The post Let’s Build a JAMstack E-Commerce Store with Netlify Functions appeared first on CSS-Tricks.

How to Build Order Forms with Payments for Free in WordPress

You lose 100% of the sales you don’t ask for, and the same holds true for having a clunky checkout experience. Order forms help you to collect order information and process payments efficiently, thereby increasing your conversion rates significantly.

Forminator makes it easier than ever to build an order form and accept payments on WordPress. Oh ya…and the best part is, it’s completely free! And that includes PayPal and Stripe payment gateways!

Whether you’re planning to sell merchandise, collect donations or get rooms booked, Forminator does them all without skipping a beat. His simple drag-and-drop interface means that you don’t need to know any coding whatsoever. It’s truly the one form maker plugin to rule them all!

**Long live Forminator!**

In this post, I’ll show you step-by-step how to use Forminator to build an order form from scratch and have set it up to collect payments effortlessly with Stripe and/or PayPal.

Introducing the Fantastic Forminator

Forminator is a powerhouse of a form plugin. He supports conditional logic, stores all the form entries in an easily accessible database, sends emails to both the user and the admin, and does it all without reloading the page.

To supercharge your forms, Forminator integrates with popular third-party tools such as Mailchimp, AWeber, ActiveCampaign, Google Sheets, Zapier, and Slack. Here’s an integration guide to automate your form workflow with Zapier.

He’s also GDPR compliant and works seamlessly with WordPress’ new Gutenberg block editor. If you can think of a form, Forminator can almost certainly get it done.

Let’s Build an Order Form

For this demo, we’ll build a simple order form, like the one below, to sell a custom notebook. We’ll make it so that the users can enter their personal information (such as name, address, email and phone number), and then at the very end, place an order by completing the payment.

Screenshot of the order form we'll be building

Follow the steps below and/or enjoy the video we’ve put together to accompany this post:


Step 1: Install Forminator

To install Forminator, just go to your WordPress Dashboard, and under Plugins, choose Add New and search for Forminator. Click the Install Now button and Activate the plugin after installation.

If you’re a WPMU DEV Member, you can also install and activate Forminator Pro directly from the WPMU DEV Dashboard. If you’re not a member yet, what are you waiting for? Try it free for 30 days!

Using the free WordPress.org version of Forminator is totally cool too. This tutorial works perfectly fine with either version.

Step 2: Access the Forminator Dashboard

Go to Forminator’s Dashboard. This will give you a quick overview of all your forms, quizzes, and polls.

Forminator’s minimalist yet easy-to-use Dashboard.

You won’t see any data here now, but as you start creating forms and collecting user entries, the dashboard will start populating with views, submissions, conversion rates, and other interesting data.

Step 3: Let’s Create a Form

Go to Forminator > Forms and click either of the blue Create buttons to begin making your new form. You can also do the same directly from Forminator’s dashboard.

A popup will appear where you need to enter your new form’s name. Keep the form name unique and memorable so that you can recall it easily. Click the blue Create button after entering your form name.

By default, every form in Forminator comes with the following predefined fields: First Name, Email Address, Phone Number, and Message.

The default form fields can be edited or deleted, and with the option of adding many other fields, you have unlimited customization possibilities.

Note: The fields marked with a red asterisk (*) at the end are Required fields. The form won’t submit until the user fills them up.

Step 4: Adding the Order Form Fields

We’ll keep the First Name, Email Address and Phone Number fields, and delete the Message field which we don’t need for this form.

In the First Name field, click on the gear icon and select Duplicate. This is a faster way to insert multiple fields of the same type without accessing the Insert Fields menu repeatedly.

Rename the duplicated field as Last Name.

Drag the Last Name field to the same row as the First Name, to its right, so that they appear side by side in the form.

And just like that, you have a two-column row in your form.

All Forminator fields can be dragged and dropped into rows and columns, so you have maximum flexibility in designing your forms just the way you want them.

Next, click on the purple Insert Fields button. It should open a popup with all the field options you can add to the form. There’s also another Insert Fields link at the bottom of the form.

Select the Address option from the popup window, and click the Insert Fields button.

Once inserted, click on the Address row to open its field settings. In the Labels tab, you can activate or deactivate the different address subfields (they’re all enabled by default).

Underneath the Settings tab, mark all the address subfields as required since they’re essential to ship the product.

Finally, click on the gear icon of Message field and hit Delete.

You can retain the Message field if you want to give users an option to add a comment or preference.

Step 5: Adding the Stripe Payment Button and Integration

Click on the purple Insert Fields button and select the Stripe option.

Stripe enables you to supercharge your online sales with its hassle-free and secure payment gateway.

Note: You need an activated Stripe account to configure the Stripe field. Otherwise, it won’t let you edit it. If you need help to set it up, use Forminator’s documentation as a cheatsheet.

You can configure Stripe by going to Settings > Payments > Stripe under Forminator.

Once Stripe is configured, under the Stripe field settings, we need to set the payment amount. Since this is a single product with an all-inclusive price and no variations, we’ll select the Fixed payment option.

When user inputs affect the price (ex. different sized t-shirts or customization options), or if there is a calculation such as tax or shipping that will be added to the original price, the Variable option should be used instead.

Select Fixed in the Stripe field settings and enter the amount.

Also, note the Test and Live mode options mentioned on the top here. We’ll be using the Test mode for now.

Don’t forget to set your brand logo, company name and product description under the Checkout tab. It’s great to have a self-branded payment gateway popup.

The below image shows how the self-branded popup will look like. Cool, isn’t it?

Next, change the Submit button label from Send Message to Order Now.

Preview the form and ensure it’s working as you intend. You can edit the default placeholders in the form if they’re not to your liking.

The order form is good to go!

Step 6: Let’s Jazz It Up

Forminator lets you make basic style changes to the form easily. The Appearance section helps you set your form’s Design Style, Colors, Fonts, Padding, Borders, Spacing, etc.

Click on the Appearance button to move on to its settings.

You can choose your preferred style here. I like the look of the Flat style more than the Default one, however this choice is up to you. It also offers you a way to add Custom CSS for your form.

As for the Colors and Fonts, I prefer the theme defaults and will leave them as is. Save your form draft after making your changes.

Step 7: Form Submitted. Next What?

Forminator is like a cool and casual professor. He’s fun and intelligent, but he also makes sure that the forms behave properly.

In the Behavior settings, you can define how the form will behave after the user successfully submits the form, or in this case, places an order.

By default, the form will show an inline message that will close automatically within 5 seconds. Change the message here to better reflect an order form.

You also have the option of redirecting the user to a new page or hiding the form altogether.

If you’re collecting payments, it’s highly recommended that you have the “Require SSL certificate to submit this form” option checked. It’ll enable your form to collect payments securely.

The rest of the Behavior settings can be left as is.

Step 8: Email Me Please, and to the User Too

After finishing up with setting the Behavior, move to the Email Notifications settings.

By default, every form will send you (the admin) an email with details of all the form fields entered.

You can change it and/or add multiple recipients too. You also have the option of adding Cc and Bcc fields to the email.

It’s good practice to send an automatic order confirmation email to the user. This option can be enabled in the Email Notifications settings.

Make sure that the recipient here is set to Email Address, which is the label for the email address entered by a user in the form. For example, if a user enters username@gmail.com as their email address in the form, the order confirmation email will be sent to that address automatically.

Forminator also lets you set Integrations with various third-party apps, and change the overall form settings. For this order form, we won’t be adding any Integrations, and will stick to the default settings.

Step 9: Hit the Publish Button

Preview the form one last time before pressing the Publish button.

Hey, give yourself a pat on the back. You just created your first order form!

After hitting the Publish button, a popup will present you with the form’s shortcode. Copy and place this shortcode anywhere in your site to display it to users.

You can also copy the shortcode later from Forminator’s Dashboard.

Step 10: Add the Order Form to Your Sales Page

Create a sales page if you don’t have one yet. It should contain all the important product details such as name, image, description, price, etc.

If you’re using the Classic Editor plugin, you can copy and paste the shortcode to add the form to your post/page. For sites that are using the default Block Editor, adding a form is much simpler.

To place the order form at the bottom of your sales page, in your WordPress post/page editor, click the Plus icon and add a Form block.

Next, select your order form from here to add it to the page.

Publish or Update your sales page after you’ve added the order form to it.

Visitors to your website can now use this form to place an order. It’s that simple!

Important Note: The Stripe field in your order form is still set to Test mode. This is to help you make test payments and make sure that everything is working fine. Before accepting actual orders, you need to change it from Test to Live.

Once an order has been placed, you’ll be notified of it via mail. Forminator also stores all the form submissions in a database so that it’s easier for you to sort through them later.

To view all of a form’s submissions, visit Forminator > Forms in your dashboard. Click on the gear icon and select View Submissions.

You can click on any individual submission row to get its complete details. You can also push the Export button to download all the submissions as a .csv file.

Reach > Engage > Convert

Running an online business comes with a lot of challenges. Anything that helps you engage with your potential customers and get paid easier is a welcome addition, and that’s exactly what Forminator does.

What we’ve built here is the simplest of order forms that you can make with Forminator. With its support for conditional logic, it can do much more! You can set taxes, shipping rates, product variations, and then have the form calculate the final order amount automatically.

You can check out a few of the order form and payment demos here and see how versatile Forminator really is.

Start creating!

How to Add Stripe Donate Button in WordPress (with Recurring Option)

Do you want to add a Stripe donate button to your WordPress site? Stripe is one of the best online payment processors in the world because it allows anyone to easily accept online payments on their website including donations.

In the past, you had to use an eCommerce plugin to accept payments, but that’s not needed anymore specially if you want to collect donations or sell a few products. You can use a simple payment form to do the job.

In this article, we will show you how to easily add a Stripe donate button in WordPress.

Adding a Stripe donate button in WordPress posts and pages

What You Need to Accept Stripe Donations on Your Website

You’ll need to create a Stripe account. You can create an account for free and will only be charged for transactions.

You’ll also need a WordPress website with SSL enabled. SSL adds a security layer to your website making it safe for accepting payments. To learn more, see our guide on how to get a free SSL certificate for your website.

Lastly, you’ll need a WordPress extension to connect your Stripe account. We’ll be using WPForms, which is the best WordPress form plugin.

It comes with a Stripe addon that allows you to accept donations, one-time payments, and even subscription payments on your website. You’ll need at least their PRO plan to access the Stripe add-on.

That being said, let’s take a look at how to add a Stripe donate button in WordPress.

Adding The Stripe Donate Button in WordPress

First thing you need to do is install and activate the WPForms plugin. For more details, see our step by step guide on how to install a WordPress plugin.

Upon activation, you need to visit WPForms » Settings page to enter your license key. You can find this information, under your account on WPForms website.

Add WPForms license key

Next, you need to visit WPForms » Addons page and click on the ‘Install Addon’ button next to the Stripe addon.

Install Stripe addon

WPForms will now install and activate the Stripe add-on for you.

Now let’s connect WPForms to your Stripe account to receive payments. To do that you need to visit WPForms » Settings page and click on the Payments tab.

Stripe payment settings

You will be asked to enter your Stripe API keys, which you can find under your Stripe dashboard.

Simply log in to your Stripe account dashboard and from the left menu select Developers » API Keys.

Stripe API keys

You need two pairs of keys for the published website and for testing.

First, you’ll see the publishable keys on the screen. Copy and paste the public key and then click on ‘Reveal key token’ to copy and paste the publishable secret key.

Stripe publishable keys

Next, you need to add the test keys. Click on the ‘View test data’ toggle and then copy and paste the test API keys.

Test api keys

Now that you have pasted the API keys, you can optionally enable the test mode from payment settings.

This will allow you to test Stripe integration without actual payments. However, you must uncheck this option when your website is ready for accepting donations on your website.

Stripe keys in WPForms

Don’t forget to click on the ‘Save settings’ button to store your changes.

Now that you have set up the payments, it is time to create a Stripe donate form for your website.

Making a Stripe Donation Form in WordPress

First, you need to visit the WPForms » Add New page to create a new form. You will be asked to provide a title for your form and choose a template. You need to select the ‘Donation Form’ template.

Create a donation form

This will launch the WordPress forms builder interface with your selected donations form template. This template will already have the common fields required to create a donation form like name, email, donation amount, and message.

Editing the donation form in WPForms

This is a drag and drop form builder. You can edit form fields by clicking on them, rearrange them, or add new fields from the left column.

Since you are creating a Stripe payments form, you need to add a credit card field to your form. You’ll find it under ‘Payments Fields’ section on the left column.

Adding Stripe credit card field to your form

Simply click to add the field to your form and then drag and drop to rearrange its position in the form.

Once you are satisfied with the form, click on the Payments tab in the left corner to edit the payment settings. From here you need to select Stripe as your payment method and then check the box next to ‘Enable Stripe Payments’ option.

Enable payment option

You can provide a description for the payment and select the email field if you want to send the donors a receipt of the payment.

WPForms also supports recurring payments. You can use this option to set up recurring donations or subscriptions.

The next step is to setup confirmation settings. This is what your users will see after they fill the form.

Click on the Settings tab and then select the confirmation option.

Set up confirmation

From here you can select different types of confirmation options. For example, you can thank users with a simple message, or redirect them to a thank you page or any other URL.

Once done, click on the save button and exit the form builder.

Adding The Stripe Donation Form in WordPress

WPForms makes it super easy to add your forms anywhere on your website.

Simply edit the post or page where you want to add the donation form. Next, add the WPForms block to your content and select the donation form you created earlier.

Add donation form to your WordPress post or page

WPForms will now fetch and embed the form for you. You can now visit your website to see it in action.

Stripe donation form preview

You can also add the donation form to your blog’s sidebar or any other widget ready area. Head over to Appearance » Widgets page and add WPForms widget to a sidebar.

Adding a donation form to sidebar

Next, you need to select your Stripe donation form in the widget settings. Don’t forget to click on the Save button to store your widget settings.

We hope this article helped you easily add a Stripe donate button to your WordPress site. You may also want to see our guide on the must have WordPress plugins for every website.

If you liked this article, then please subscribe to our YouTube Channel for WordPress video tutorials. You can also find us on Twitter and Facebook.

The post How to Add Stripe Donate Button in WordPress (with Recurring Option) appeared first on WPBeginner.

Build a Basic Ticket Sales App With ASP.NET Core, Angular, and Stripe

Internet shopping is about more than just Amazon. It's become a daily activity for most Americans, and e-commerce is a required feature for many projects a developer may encounter. In this tutorial, you'll learn how to build an e-commerce site to sell tickets using an Angular 6 single page app (SPA) and an ASP.NET Core 2.1 backend API. You’ll build both the Angular and ASP.NET Core applications and run them from within VS Code. Let’s get to it!

Upgrade to Angular 6

I love to use the latest and greatest when starting a new project. But when you use a project generator (like Angular-CLI, or the DotNetCLI), you may be at the mercy of the latest version the authors of those libraries have added. Right now, the DotNet CLI generates an Angular application with dotnet new angular gives you an Angular app at about version 4.5, which is about two versions behind the latest. Let me show you how to upgrade the templates and the generated application so that you’re using Angular 6, which is the latest as of the time of this article.