How to Preview Your WordPress Website Before Going Live

Do you want to preview your WordPress website before going live?

Previewing your website before publishing it allows you to catch any errors, design issues, missing items, and spelling or grammar mistakes.

In this article, we’ll show you how to preview your website before going live and without hurting the user experience.

Preview your WordPress website including theme, posts, pages, and more

Here is a quick overview of the topics we’ll cover in this guide. Feel free to use the links below to jump to specific sections.

Ready? Let’s get started.

Preview WordPress Site Before Launch with Coming Soon Mode

If you are creating a new WordPress website, then it’s always recommended to enable a coming soon mode while you work on your site.

This allows you to display a proper coming soon page to website visitors. You’ll still be able to login to the WordPress admin area and work on your website, but your visitors won’t be able to see it.

The best part is that you’ll be able to preview your website and do all the necessary testing before making it live.

To do this, you’ll need SeedProd. It is the best WordPress website builder on the market and allows you to easily show a beautiful coming soon page.

In this tutorial, we’ll be using the pro version of SeedProd, so we can use all the templates and advanced features, but there’s also a free version that you can use to easily create simple coming soon pages.

First, you need to install and activate the SeedProd plugin. For more details, see our step by step guide on how to install a WordPress plugin.

Upon activation, you need to visit the SeedProd » Settings page to enter your license key. You can find this information under your account on the SeedProd website.

SeedProd license key

Next, you need to visit SeedProd » Landing Pages.

From here, simply click on the ‘Set up a Coming Soon page’ button.

Set up coming soon page

After that, the plugin will ask you to choose a template for your coming soon page.

SeedProd comes with several beautiful coming soon templates that are professionally designed to increase conversions.

Choose template

Choosing a template will launch the SeedProd’s page builder interface.

The page builder is an intuitive design tool where you can simply point and click to edit any item or drag and drop new items to your layout.

Page builder interface

You can add an email signup form and social media buttons to your coming soon page, so your users can follow your brand even before launch.

Once you’re finished with the page design, you need to switch to the connect tab. From here, you can integrate with your email marketing service to grow your list and notify people when your site goes live.

Connect email marketing service

Once you are finished, you can click on the Save button to store your changes.

Then, select Publish to make your coming soon page ready to use. Don’t worry, it’s not active on your website yet. We’ll do that in the next step.

Publish your coming soon page

You can now close the page builder interface which will take you back to the SeedProd » Landing Pages page.

From here, you need to click on the Toggle below coming soon page box to Active. This will make sure that all your website visitors will see your new coming soon page instead of your actual website.

Turn on coming soon mode

You can now log out of WordPress admin area or visit your website in Incognito mode.

You’ll see your coming soon page live on your website.

Coming soon mode

You can still login to your WordPress admin area and continue working on your website.

You’ll also be able to preview your live website when logged in.

Preview your website

Once you are finished working on your website, you can simply go to the SeedProd » Landing Pages page to turn off your coming soon page.

Simply click the ‘Active’ slider to set it back to inactive.

Turn off coming soon page

SeedProd also allows you to easily put your website under maintenance mode while working on your website with live preview.

Allow Clients to Preview WordPress Site Before Going Live

If you are working on client websites, then there are several ways to easily allow clients to preview changes on a WordPress website before going live.

However, the easiest way is by using a Coming Soon Page created with SeedProd as we just showed above.

Once you have turned on Coming Soon Mode to active, you need to click the ‘Edit Page’ button.

Edit coming soon page

On the page builder screen you need to switch to the Page Settings tab.

Then, click on the Access Control section.

Allowing clients to preview a website

From here, you can create a Bypass URL and choose the URL expiration duration. Don’t forget to Save your changes.

Your clients can now use the secret URL to bypass the coming soon page and preview the website.

If your website is already live, and you want to share changes with your clients before going live, then we’ll cover that in the next step.

Create a WordPress Staging Website to Preview Changes

It is standard best practice among web professionals to create staging website, so you can test and preview any changes before applying them to a live website.

A staging website is a private clone of your website. It is hidden from the main public, so it gives you the advantage of testing and previewing your changes on your live server.

Many of the top WordPress hosting companies offer a 1-click staging website. You can simply click a button to create a staging website and easily sync any changes you make with your live site.

For the sake of this article, we’ll show you how to create a staging website on Bluehost.

Bluehost is one of the largest hosting companies in the world and an officially recommended WordPress hosting provider. They offer 1-click staging sites feature to all their WordPress customers.

First, you need to make sure you have the Bluehost plugin installed and activated on your website. If it is already activated, then you’ll see a Bluehost menu item at the top of the WordPress admin menu.

Bluehost plugin installed

If you cannot see the Bluehost menu, then you can log in to your Bluehost hosting account control panel and click on the Manage Site button.

Under the site management area, simply switch to the Plugins tab and activate The Bluehost Plugin.

Turn on Bluehost plugin

Once you’ve made sure you have the Bluehost plugin installed, you’re ready to create your staging site.

From the WordPress admin area, go to the Bluehost » Staging page and click on the Create Staging Site button.

Create staging website

The plugin will then generate your staging website.

Once finished, you can simply click on your staging site to switch to it and start working on it.

Switch to staging website

You can now work on your staging website and see your changes on a live preview of your website.

To help you tell the difference from your live site, you’ll see a red ‘Staging Environment’ notice in the WordPress admin bar.

Working on staging environment

Once you are finished previewing your changes on staging website, you can go to Bluehost » Staging page on the staging site.

From here, you need to click on the Deploy All Changes button.

Deploy all changes

For more details and instructions for other hosting environments, see our detailed guide on how to create a staging site for WordPress.

Preview WordPress Posts and Pages Before Publishing

WordPress uses an intuitive block editor that automatically uses your theme’s styling to show a live preview of your posts and pages.

Block editor preview

However, it may not give you a clear idea of how a post or page may look on your website with your headers, sidebars, and everything else on the page.

Luckily, the block editor also allows you to preview a post or page without publishing it.

Simply click on the Preview button in the top-right corner.

Preview options for post and pages

You can choose between Desktop, Tablet, and Mobile preview options, but these will only show you the preview inside the content editor.

After choosing a device type, you need to click on the ‘Preview in the new tab’ option to view the full preview on your website.

WordPress will then show you a preview of your post or page before going live.

If you want to allow someone else an exclusive access to preview one of your unpublished posts, then see our guide on how to allow public post preview in WordPress.

Preview a WordPress Theme Before Switching

Normally, if you activate a WordPress theme, then it immediately goes live on your website.

If you are not using a staging website, then your users will see the new theme without any customizations.

Wouldn’t it be nice if you could preview a WordPress theme before activating it on your website?

Luckily, WordPress allows you to preview a theme before activating it.

Simply install the WordPress theme that you want to preview. For more details, see our guide on how to install a WordPress theme.

After installing the theme, you simply need to click on the Live Preview link.

Live preview option after installing a theme

Alternately, you can go to Appearance » Themes page and take your mouse over a installed theme.

You’ll see a button to launch the Live Preview.

Live preview theme

WordPress will then launch Theme Customizer.

Here you’ll see a live preview of the theme with your current content.

Live preview WordPress theme

The theme customizer will use your existing content and navigation menu. You can try out different theme settings from the left panel.

You can exit the theme customizer without activating the theme. However, it won’t save any of your customizations.

If you are satisfied with how the theme looks, then you can go ahead and activate it by clicking on the ‘Activate & Publish’ button at the top of the menu.

Need help switching themes? See our tutorial on how to properly switch your WordPress theme.

Preview WordPress Theme Customizations

Want to make changes to your WordPress theme but not sure how they would look on your live site?

WordPress comes with different ways to preview your WordPress theme before applying those changes.

For most WordPress themes, you can preview your changes by using the theme customizer. Simply go to the Appearance » Customize page to launch the theme customizer.

Customize theme preview

From here you can try different theme options, change menus, customize widgets, add custom CSS, and more.

This allows you to preview theme changes without actually applying them to your website.

Once you are satisfied with the changes you made, you can click on the Publish button to apply those changes. Optionally, you can also click the gear icon to save your changes as a draft, schedule your changes, and share a preview link with clients.

Save and publish your changes

Now, this method may not be available for some newer WordPress themes using the Full Site Editor.

If you’re using a full site editor theme, then you’ll be able to launch the editor by visiting the Appearance » Editor menu.

Full site editor preview

The full site editor allows you to edit your WordPress theme using blocks. You can edit individual template files with a live preview of your website.

However, unlike the Theme Customizer you will not be able to save your changes as a draft. These changes will go live when you save your changes, or be lost if you exit without saving.

Preview Your Custom WordPress Theme

Do you want to create a completely custom WordPress theme with a live preview?

SeedProd is the best WordPress site builder that allows you to create a custom WordPress theme using a drag and drop interface with live preview.

First, you need to install and activate SeedProd plugin. For more details, see our step by step guide on how to install a WordPress plugin.

Upon activation, you need to visit SeedProd » Settings to enter your license key. You can find this information under your account on the SeedProd website.

SeedProd license key

Next, you need to visit SeedProd » Theme Builder page.

From here, click on the Themes button.

Theme builder

This will bring up a popup where you can choose a theme to use as a starting point.

SeedProd comes with a bunch of beautiful themes that you can customize.

Choose a starter theme

Simply click to select a theme and SeedProd will generate all the theme template files for you.

You can now click on any of these theme files to edit them in the theme builder.

Theme templates

SeedProd comes with an intuitive drag and drop builder that uses blocks and sections to create beautiful layouts.

You can add blocks to your design from the left column. To your right, you’ll see a live editable preview of your theme template.

Build your theme with live preview

SeedProd also comes with full support for WooCommerce.

That means you can design and preview your online store, including product pages, checkout page, and more.

WooCommerce store preview

Want to preview your theme for mobile devices?

Simply click on the mobile icon at the bottom bar, and SeedProd will show the mobile preview of your theme.

Mobile preview of your theme

Once you are finished editing your theme, you can click on the Save button at the top-right and exit the builder. You can then edit other templates if necessary.

When you are ready to deploy your custom theme, simply turn on the ‘Enable SeedProd Theme’ toggle on the theme builder page.

Enable custom theme

Your custom theme will now go live. That means it will replace your existing WordPress theme.

To learn more about the SeedProd custom theme builder, see our tutorial on how to create a custom WordPress theme without writing any code.

Preview WordPress Landing Pages Before Launch

Landing pages are specialized pages used in marketing campaigns. These pages are highly optimized for conversions and sales.

Some WordPress themes come with landing page templates that you can customize using the block editor.

However, if you need more design options, then you’ll need SeedProd. It is the best WordPress landing page builder and allows you to easily create beautiful landing pages for your website.

SeedProd comes with dozens of professionally designed landing page templates to get you started. Plus, your landing pages will look equally great on all screen sizes.

First, you need to install and activate the SeedProd plugin. Upon activation, you need to visit SeedProd » Settings page to enter your license key. You can find this information under your account on SeedProd website.

SeedProd license key

Next, head over to the SeedProd » Landing Pages page.

To get started designing your page, click on the Add New Landing Page button.

Add new landing page

Next, you need to choose a template.

There are several highly optimized templates that you can use as a starting point, or you can start with a blank template.

Choose landing page template

This will bring up a popup where you need to enter a name for your landing page and choose a URL slug.

Then click on the ‘Save and Start Editing the Page’ button to continue.

Landing page name

This will launch the page builder interface.

It is a drag and drop design tool where you can design your page with a live preview.

Landing page preview

Once you are done editing your landing page, you can click on the Save button and select publish to make it live on your website.

To learn more, see our tutorial on how to create landing pages in WordPress.

We hope this article helped you learn how to preview your WordPress website before going live. You may also want to see our guide on using using WordPress block patterns or see our complete WordPress SEO guide to promote your website.

If you liked this article, then please subscribe to our YouTube Channel for WordPress video tutorials. You can also find us on Twitter and Facebook.

The post How to Preview Your WordPress Website Before Going Live first appeared on WPBeginner.

How to Easily Create a Staging Site for WordPress (Step by Step)

Are you looking to create a staging site for WordPress but not sure where to start?

A WordPress staging site is a test site that you can use to “safely” make plugin updates and other changes before going live.

In the past, it used to be very difficult to setup a WordPress staging site, but now that has changed so even a non-technical person can do it.

In this step by step guide, we will show you how to easily create a staging environment for your WordPress site. We will cover several different methods and most of them only require a few clicks.

How to create a staging site for WordPress

What is a Staging Site?

A staging site is a clone of your live website that is used for testing changes before making them live. Staging sites help you catch errors, so you don’t end up breaking your live website.

A lot of users install WordPress locally on their Windows or Mac computers to test changes. Once they’re done with the updates, they simply upload those changes from localhost to live server

The biggest problem with this approach is what if something that worked on your localhost does not work on the live server?

Often localhost and live WordPress hosting servers are not running the same environment.

Since the staging site lives on your web hosting server, you can easily prevent all those errors because it runs the same server configuration as your live site.

With that said, let’s take a look at how to setup a staging site for WordPress.

How to Easily Create a WordPress Staging Site

There are multiple ways to create a staging site for WordPress. The easiest of them is to use your hosting provider’s built-in staging site feature.

Some of the best WordPress hosting companies already offer 1-click staging websites. If your website is hosted with one of them, then you can easily create a staging site without any hassle.

If you’re not with one of these popular hosting solutions, then we also have a solution to help you create a WordPress staging site using a plugin (and even manually).

For faster browsing, you can use the navigation below to jump to the section that’s most applicable to you:

Creating A Staging Site on Bluehost

Bluehost is one of the best WordPress hosting companies. They offer a quick 1-click staging site solution which comes with all their plans.

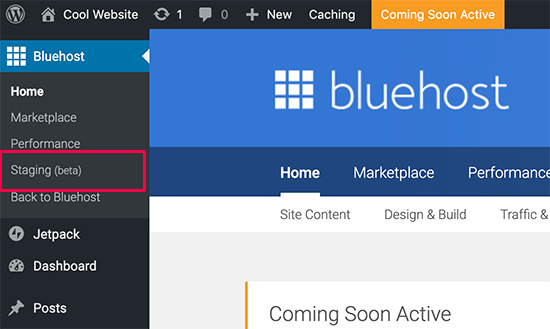
First, you need to login to your WordPress site’s admin area and go to Bluehost » Staging page.

Staging site option on Bluehost

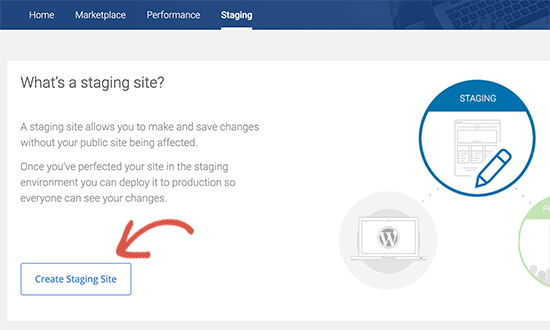
This will bring you to the Bluehost’s staging site wizard. Next, you need to click on the ‘Create Staging Site’ button to continue.

Create staging site on Bluehost

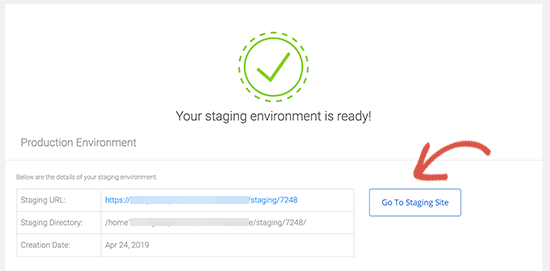
Bluehost will now prepare the staging environment for your website. Once finished, you will see a success message with a link to visit your staging site.

Go to your staging site

Now, you can click on the ‘Go to staging site’ button to continue.

You will reach the admin area of your staging WordPress site. You will see a red button on top of the admin bar to indicate that you are working in the staging environment.

You can go ahead and work on your website without worrying about it affecting your live site.

Deploying changes from staging to live site on Bluehost

Once you are ready to push changes from staging to the live site, simply go to Bluehost » Staging page.

Deploy staging to live website on Bluehost

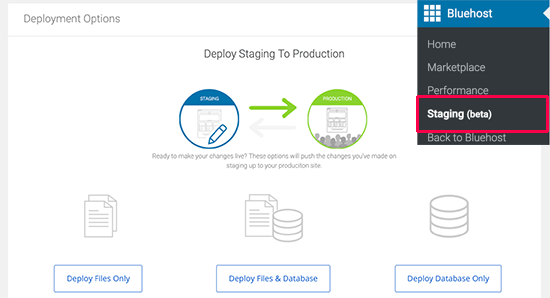
Scroll to the Deployment Options section. You will see three options for deployment. You can deploy only the files, only the database, or both files and database.

If you’re not sure, then click on the Deploy Files and Database button to deploy all changes from the staging environment.

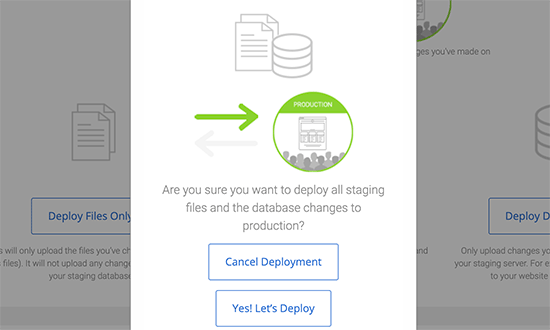
This will bring up a popup where you will be asked to confirm that you want to deploy the staging site to the production site. Click on ‘Yes, Let’s Deploy’ button to continue.

Confirm deploy

Bluehost will now start deploying your staging site to the live site. Depending on the size of your website, this may take a while.

The pop up will automatically disappear when deployment is over. You can now visit your live website to see the changes applied to your production site.
Creating a Staging Site on SiteGround

SiteGround is another top WordPress hosting company offering 1-click staging feature with their GrowBig and GoGeek plans. If your website is hosted with SiteGround, then this is how you would set up a staging website.

First, you need to login to your SiteGround cPanel dashboard. Next, scroll down to the ‘WordPress Tools’ section and then click on the Staging icon.

Staging icon in SiteGround cPanel

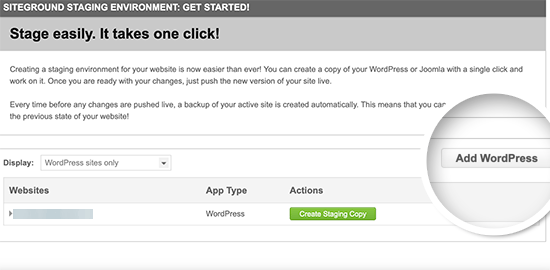
This will bring you to the staging sites page. From here, you need to add your website to the staging site manager. Once you’re done, click on the ‘Add WordPress’ button to continue.
Add site to staging manager

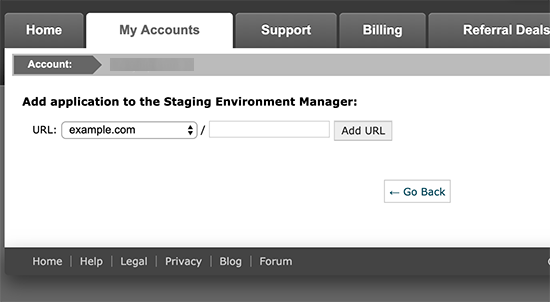
On the next screen, you need to select the URL where your website is installed. If your WordPress site is installed in a sub-directory, then you can add that in the field next to it and click on the Add URL button to move forward.

Select URL

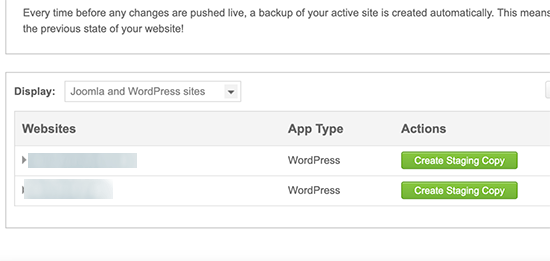
The staging site manager will detect your website and add it to the page. You can now click on the ‘Create Staging Copy’ button to continue.

Create staging site copy

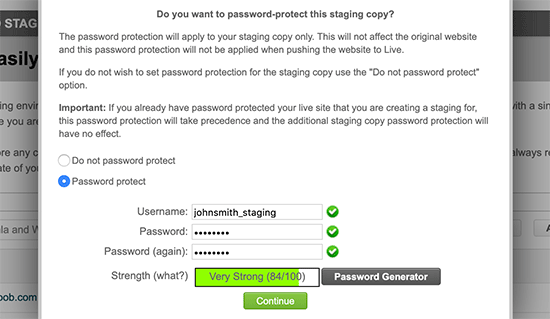
You will see a popup that allows you to password protect your staging site. This is a good idea because it prevents others from accessing your site. It also prevents Google from indexing duplicate content.

Go ahead and provide a username / password and then click ‘Continue’.

Password protect staging site

SiteGround will now create the staging environment for your WordPress website.

Once it’s done, you will see the staging site manager with links to the admin area of your staging site. Go ahead and start working on your WordPress staging site.

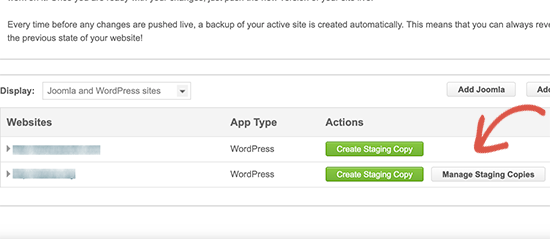
After you are done making changes to your website, you can push it live by going to the staging page in cPanel. You need to click on the ‘Manage Staging Copies’ button next to your website.

Manage staging copies

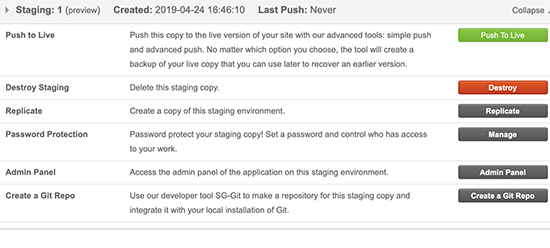
On the next page, you can click on the ‘Push to live’ button to push changes from staging to your live website.

Deploy staging to live

Creating a Staging Site on WP Engine

WP Engine is the best WordPress managed hosting company in the world. Managed WordPress hosting is a concierge service for your WordPress site where the hosting provider takes care of updates, backups, security and performance.

WP Engine offers one-click staging solution with all their plans. If you are using WP Engine to host your website, then this is how you would set up a staging environment for your site.

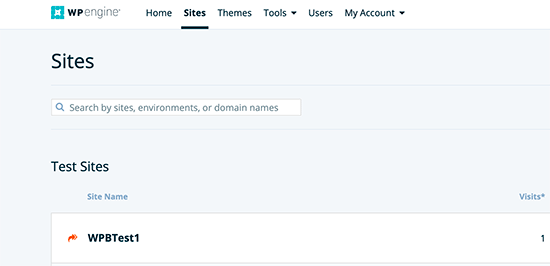
First, you need to login to your WP Engine dashboard. Next, go to the Sites page and select your website by clicking on it.

Sites WP Engine

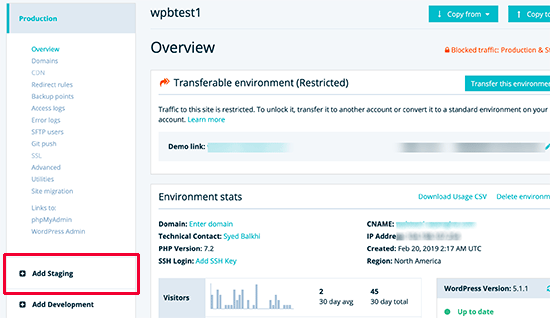
This will bring you to your website dashboard. Now, you need to click on the Add Staging link from the left column.

Add staging site in WP Engine

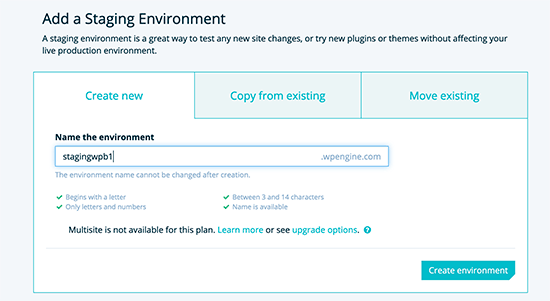
On the next screen, you need to enter a name for your staging site under the ‘Create New’ tab. This name will also be the subdomain of your staging site.

Create new staging site

Click on the Create Environment button to continue.

WP Engine will now create a staging site for you. However, this staging environment is just an empty WordPress site that does not have any content of your live website.

Let’s change this.

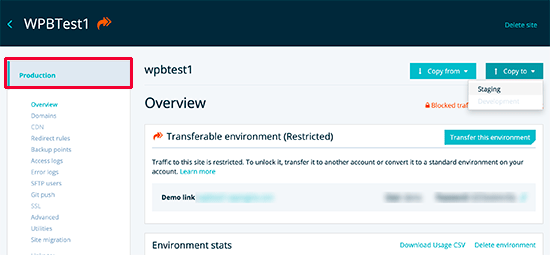
Switch to your production environment by clicking on production from the left column. On the next screen, click on the Copy to button at the top right corner of the screen.

Copy to staging

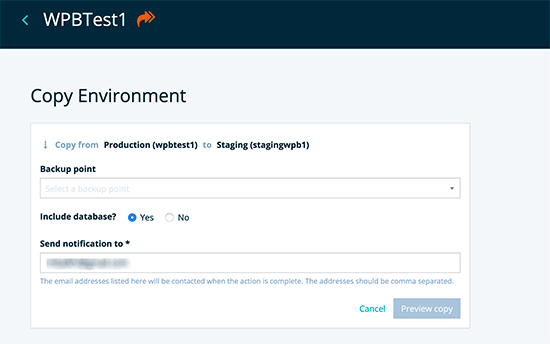
Next, you will be asked to select the backup point you want to use for your staging site. If unsure, select the most recent back up of your website.

Select back up point

Click on the preview copy button to continue.

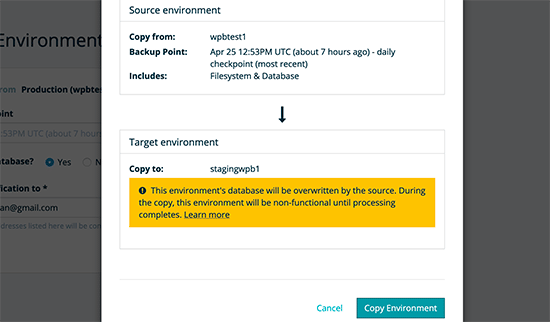
You will see a warning popup informing you that you are copying the source website to the staging environment. Click on the Copy Environment button to proceed.

Copy website warning

WP Engine will now copy your live website to the staging environment. You will recieve an email notification when it is done.

After that, you can login to your staging website using the same admin username and password as your live website.

Deploying Staging to Live Website on WP Engine

When you are ready to push the changes from your WordPress staging site to live site, first you will need to create a backup point for your staging site.

A backup point is just like saving your progress in a game. You need to create one before deploying your staging site’s changes to the live site.

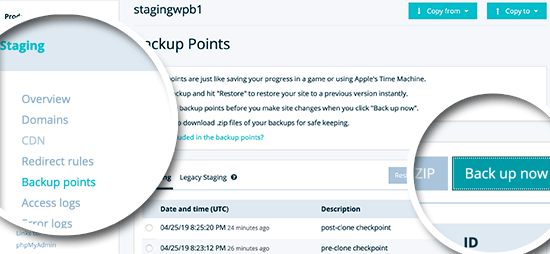
Simply head over to WP Engine dashboard and click on Staging » Backup Points menu from the left column.

Create a backup point for your staging website

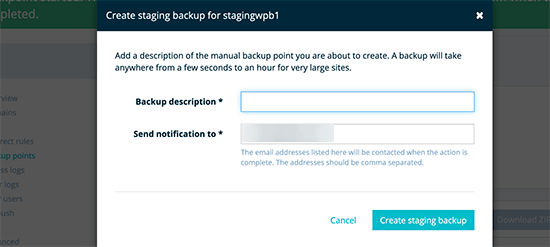
Next, provide a description for your backup so you can remember the changes later, and then click on ‘Create staging backup’ button.

Create backup of your staging site

WP Engine will now create a backup point for your website. You will receive an email notification when your backup is complete.

You are now ready to deploy your staging site.

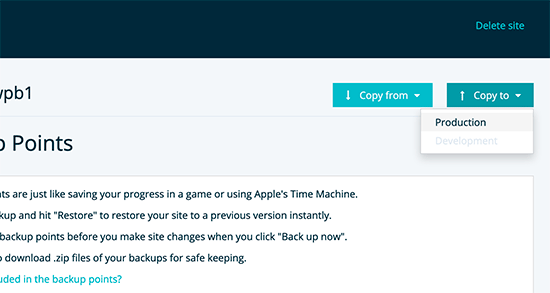
Simply click on the ‘Copy to’ button at the top right corner of the screen and select ‘Production’.

Copy to production

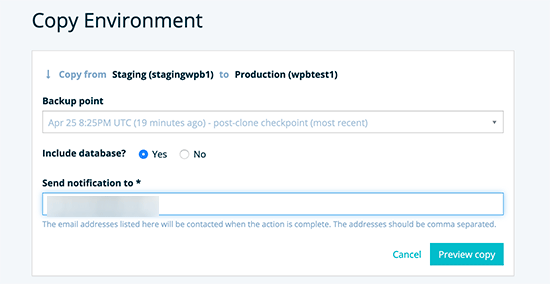
Next, you will be asked to select a backup point. This time select the backup you created earlier and click on the preview button.

Select back up point

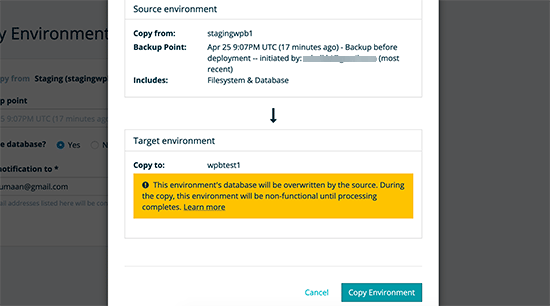
You will see a warning message, but go ahead and click on the ‘Copy Environment’ button to proceed.

Copying environment

WP Engine will now copy your staging environment to your live website. You will recieve an email notification when it is complete.

After that, you can log in to your live website to ensure everything is working fine, and it should because you tested all your changes on staging.

Creating A Staging Site using WordPress Plugin

If your WordPress hosting company does not provide a staging site feature, then you can still create a staging website using a WordPress plugin.

There are some disadvantages to using this method.

First, a plugin would have limited control on your hosting server. This is why it may not always give the best results.

Secondly, the plugin we will be using will store your staging site on their own servers. If you are concerned about privacy and data protection, then this may not be the ideal situation for you.

That being said, let’s see how to create a staging WordPress site using a WordPress plugin.

The first thing that you need to do is install and activate the WP Stagecoach plugin. For more details, see our step by step guide on how to install a WordPress plugin.

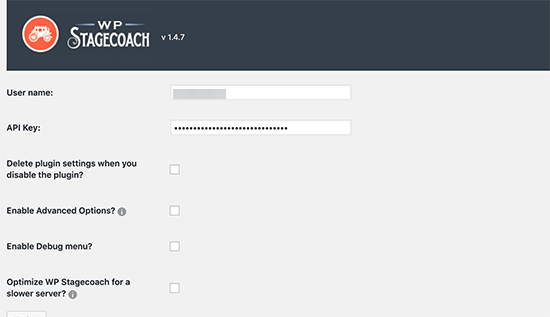
Upon activation, the plugin will add a new menu item labeled WP Stagecoach to your admin bar. Clicking on it will take you to plugin’s settings page.

WP Stagecoach settings

You will need to enter your WP Stagecoach username and the API key which you can find under your account on the plugin website.

After that, you will be able to create your staging website.

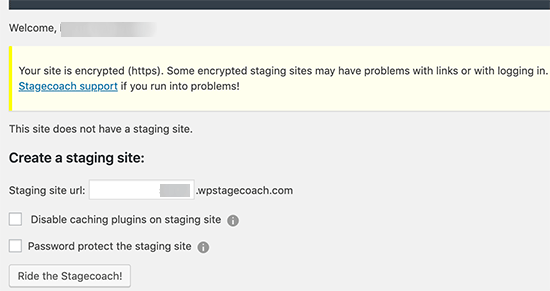
You need to provide a name for your staging site. This name will also be used as the subdomain of your WordPress staging website.

Don’t forget to check the box next to ‘Password protect the staging site’ option. It will protect your staging website from public view and search engines.

Create staging site using WP Stagecoach

Next, click on the ‘Ride The Stagecoach’ button to continue.

The plugin will now create a backup of your WordPress files and database to export them for your staging site. Once finished, you will see the link to your staging site, and its admin area.

You can click the link to visit your staging site and start working on it.

Deploying Staging Site to Live Using WP Stagecoach

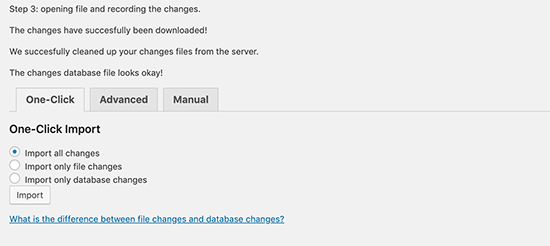
Once you are ready to import changes to your live site, head over to WP Stagecoach » Import Changes page and click on the check for changes button.

The plugin will now check for changes on your staging site and then show you options to import them.

Impoting changes from staging

You can select to import only file changes, only database changes, or all changes. Next, click on the import button to continue.

The plugin will show you the progress of the import and will notify you when it is done. You can now test your live site to see if all changes were successfully imported.

Create a Staging Site for WordPress Manually

This method requires you to manually create a staging site for your WordPress install. It is for advanced users and requires more work than other methods described above.

Another disadvantage of this method is that your website will be temporarily unavailable when deploying changes back from staging to live server.

That being said, let’s see how to manually create a staging environment for your WordPress site.

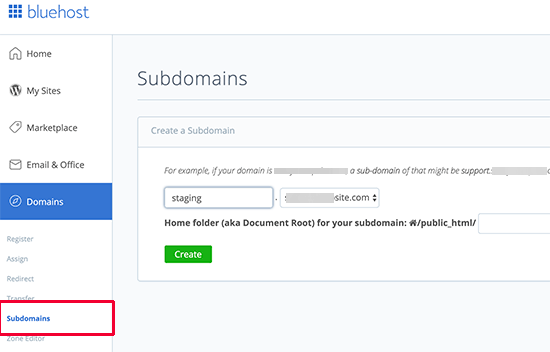
First, you need to create a subdomain for your staging website. Go to your hosting account’s dashboard and click on the Subdomains link located under the domains section.

Create subdomain for your staging site

Note: We’re using Bluehost in our example screenshot, so your screen may look different.

Provide a name for your subdomain (for example, staging) and then click on the create button.

Your hosting control panel will now add your subdomain, which you can use to import your live WordPress site.

Next, you need to install and activate the Duplicator plugin on your live site.

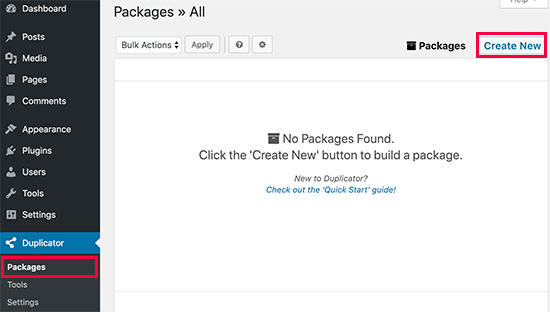
Upon activation, you need to click on the Duplicator menu in your WordPress admin sidebar and click on the create new button.

Create Duplicator package

After that, you will be asked to click on the Next button to continue.

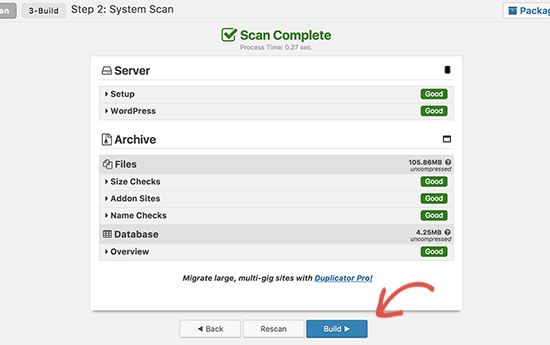
Duplicator will now run the website duplicator wizard. First, it will run some tests to see if everything is in order. If all items are marked ‘Good’, then click on the ‘Build’ button.

Build package

The plugin will now start creating a duplicator package of your WordPress site. This process may take a few minutes depending on the size of your website.

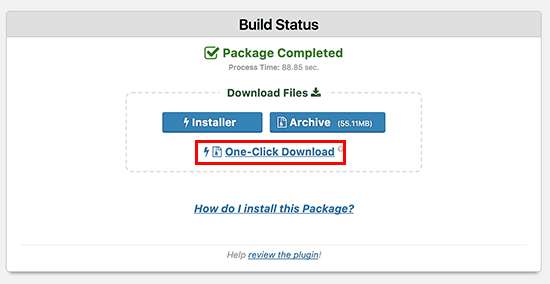
Once finished, you’ll see download options for Installer and the Archive package. You need to click on the ‘One click download’ link to download both files on your computer.

Download and package and installer files

Your new staging WordPress site will need a new database. Let’s create one.

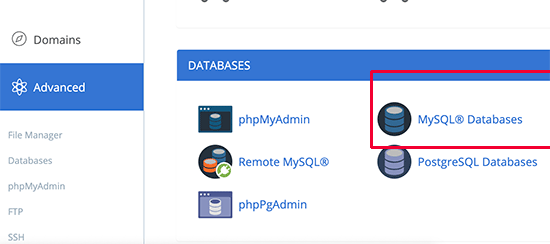
Head over to your WordPress hosting account’s control panel and click on MySQL Databases icon located under the Databases section.

MySQL Database

On the next screen, provide a name for your database and then click on the create database button.

Create database

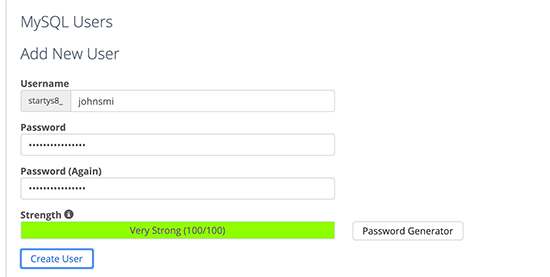
Next, you need to create a MySQL user for your database. Scroll down to the MySQL Users section and provide a username and password for your new database user.

Create MySQL user

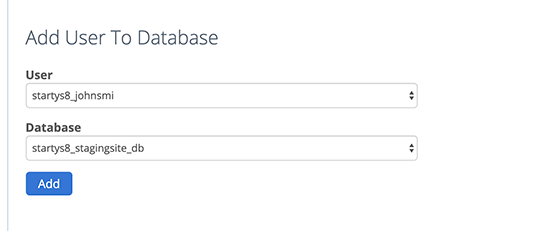
Now you need to give this user permissions to access and modify the database you created earlier. Simply scroll down to the ‘Add user to database’ section and select your database and the user you just created.

Add user to database

After that, click on the ‘Add’ button to continue.

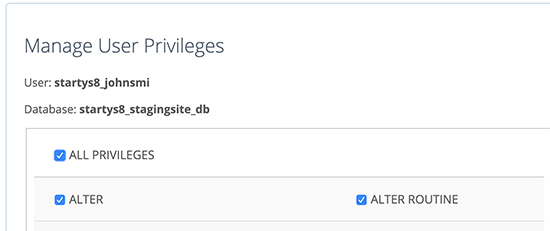
You will be asked to select privileges for the user. Go ahead and select ‘All Privileges’ checkbox and then click on the ‘Make changes’ button.

Grant privileges

Now your database is ready to be used for your staging website.

Next, you need to open a new browser tab and visit enter the subdomain of your staging site like this:

https://yoursubdomain.example.com/installer.php

Don’t forget to replace yoursubdomain with the actual subdomain and example.com with your own domain name.

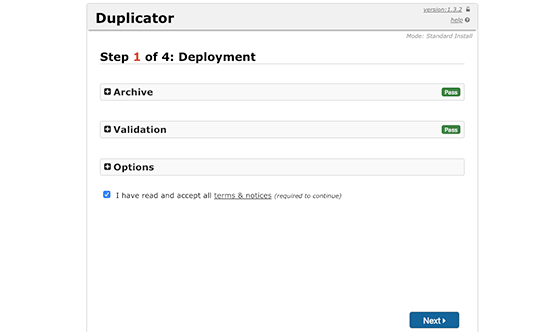
This will launch the Duplicator installer wizard.

Duplicator installer wizard

The installer will look for the archive file. You need to check the terms and conditions checkbox and click on the next button to continue.

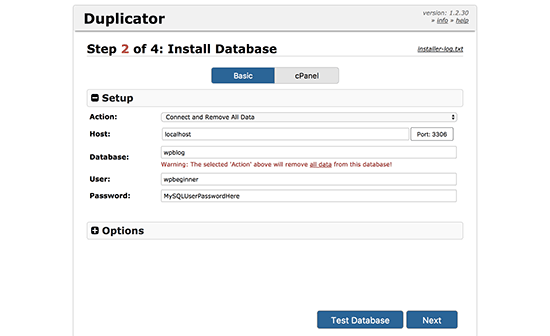
Now, the installer will ask you to enter your WordPress database information.

Your host will likely be localhost. After that, you will enter the details of the database you created for your new domain name in the earlier step.

Connect database

Once done, click on the next button to continue.

Duplicator will now unpack your WordPress database backup from the archive into your new database.

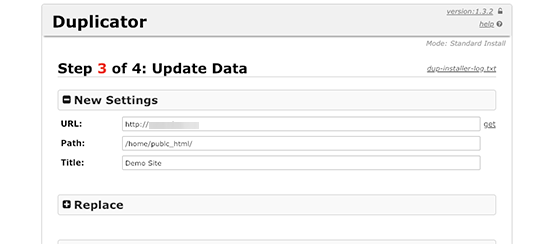
Next, it will ask you to update the site URL or Path. You shouldn’t have to change anything since it automatically detects the URL of your new subdomain and its path.

If it doesn’t, then you can change the URL to your new subdomain. After that, click on the next button to continue.

Update URLs if needed

Duplicator will now finish the migration.

You can click on the ‘Admin Login’ button to enter the WordPress admin area of your website on the new staging site.

Now you have your staging site set up. Let’s protect it by adding password protection to your subdomain.

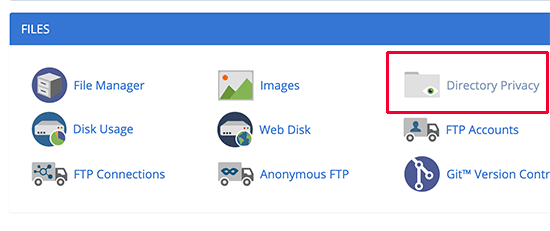
Head over to your hosting account’s cPanel dashboard and click on the directory privacy icon.

Directory privacy

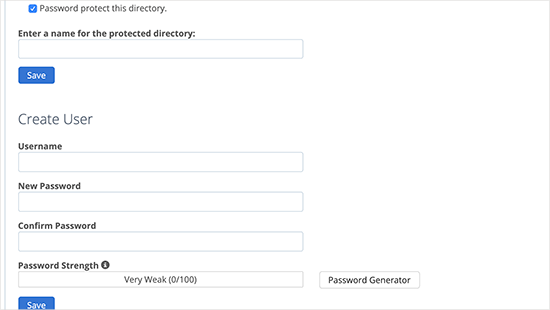
Next, you need to select your subdomain folder and then select the option to ‘password protect this directory’ checkbox. You will be asked to provide a name for this setting, and then enter a username and password.

Password protect your staging site

Click on the save button to store your settings. Your staging site will now be hidden behind the password protection.

You can now work on your staging site and make any changes you want.

Manually Deploy Staging Site to Live

After you are ready to deploy changes from your staging site to the live server, you will follow the same steps described above.

Simply create a new Duplicator package on your staging site and download the Installer and Archive files to your computer.

Next, you need to head over to your live site and create a complete WordPress backup (you can use Duplicator to create a complete backup as well).

Once you are done, you will need to delete all WordPress files and folders from your live website. This means your WordPress site will be down for a while.

Finally, follow the instructions above to run the Duplicator installer wizard to import staging site to live server.

As you can see, the last method is not the best method at all. You should avoid this at all costs. We recommend using a reliable hosting provider like Bluehost, SiteGround, or WP Engine that offers built-in staging site features.

We hope this article helped you learn how to easily create a staging environment for your WordPress site. If you run into any issues, check out our ultimate guide to fixing the most common WordPress errors.

If you liked this article, then please subscribe to our YouTube Channel for WordPress video tutorials. You can also find us on Twitter and Facebook.

The post How to Easily Create a Staging Site for WordPress (Step by Step) appeared first on WPBeginner.