How to convert any website into fully editable Figma designs

We’ve all been there: Manually recreating website designs in Figma, desktops cluttered with screenshots for benchmarking, improving web copy without design context…

But what if there was a way to import a full webpage into Figma in just a few clicks? What if you could then edit the imported webpage; changing everything from text, to colors, to layout?

Look no further than html.to.design!

What is html.to.design?

html.to.design is a powerful Figma plugin that converts any website into fully editable Figma designs. Import full webpages into Figma to leverage an existing website and kickstart design work, saving you hours of time that would otherwise be spent manually recreating each element from scratch.

How does it work?

1. Once you have a website to import…

Copy-paste the URL of the webpage(s) you want to import. You can stick to just the landing page or import all pages in bulk for the full site.

2. Before clicking “Import”…

Select the viewport and theme you need. Desktop in light mode? Mobile in dark? Import the same webpage with different setting combinations for a full overview of the range of designs.

3. You now have your webpage in Figma!

But the magic doesn’t stop there. The webpage is fully editable, so you can change copy, colors, and move sections around. Plus, text and color styles are automatically grabbed and created as local styles in Figma, so you have them readily available for future designs.

4. If you need to import a private page…

Use the html.to.design browser extension! Log in to the webpage you need, then click on the html.to.design extension icon. It will immediately start downloading an .h2d file which you can drag-and-drop into the Figma plugin.

What can I use html.to.design for?

html.to.design can help by automating tasks that are manual and time-consuming for designers, developers, UX writers and anyone using Figma. Here are just a few use cases:

  • Redesign an old website and import all its elements as your base.
  • Experiment with different copy and see exactly how it’ll appear on the site.
  • Import missing design assets for ongoing projects.
  • Get inspired by other websites and create benchmarks without a single screen capture.
  • Check your website’s visual accessibility in Figma.

What are the benefits of html.to.design?

Save time

The number one benefit of using html.to.design as part of your design workflow is the amount of time it saves. Recreating a site or building design elements from scratch can take hours. html.to.design allows you to use any website as a base, importing everything as fully editable layers that you can turn into components, rearrange and redesign into something else. This means that you save time to focus on other important aspects of your design project, such as improving the user experience or perfecting the layout.

No design skills required

html.to.design is also great for anyone who is just starting out with Figma, or developers who need design assets from an existing site. The simplicity of the plugin means you don’t need to be an experienced product designer to use it. Anyone can import a webpage to use as a base, or even as an aid when learning how to use Figma.

Great for collaboration

html.to.design is also great for collaboration and brainstorming sessions. When working on a redesign project, for example, you and your team can use the plugin to import the website you’re working on, to then take advantage of Figma’s collaboration features. It’s much easier to work on the old website in an editable format, so your design team can change or move elements around and collaborate in real time.

Get design assets easily

Even if you don’t need the full website, html.to.design can still be helpful. The plugin also allows you to extract design assets from any website, such as images and fonts. html.to.design will even create local Figma styles for you, automatically! Instead of manually downloading each asset, you can easily extract them in just a few clicks, bringing all the design assets you need directly into Figma. This makes it easier for you to access them when working on future designs.

Ready to give it a try?

So, if you’re looking for a powerful tool to help streamline your design workflow, look no further than html.to.design. It’s already loved by over 360,000 people worldwide!

In just a few clicks you’ll have the fully editable Figma layers you need to redesign an old website or kickstart a new one. Try it out with 12 free imports per month, and see for yourself the difference it can make in your design workflow.

The Easiest Way to Inspect and Copy CSS Code From Websites

Do you ever get frustrated using Dev Tools when working on a website project? Having to go back and forth between the web page you’re working on and the inspector to view CSS and make adjustments can often be a bit of a challenge. Thankfully, there is a browser extension that streamlines that process: CSS Scan. In this article, we are going to look at how this exciting tool could quite possibly change your life as a web developer, or at the very least, speed up your workflow.

CSS Scan website

Easy Installation & Lifetime License

It’s pretty simple to get started with CSS Scan, since it’s a browser extension/add-on. Whatever your preferred browser, CSS Scan can be installed on Chrome, Firefox, Safari, and Edge. Since this is a premium extension, you have to buy a license first, but it’s a lifetime license so it’s a one-time purchase that can then be used on 3 browsers or devices simultaneously.

Considering all of that and what you get with this license, the regular one-time purchase price of $120 is a steal! Even better, CSS Scan is often on sale for a discount, so you can get started for even less cost to you. You can even try it out on the website before you buy to make sure it’s as great as we say it is.

Getting Started

Once the extension is installed, all you have to do is right click on a web page and select “Inspect with CSS Scan” from the menu. A toolbar will appear at the top right of the window (you can also move it to the bottom if you prefer).

CSS Scan toolbar

Here you can set up your preferred options, such as what happens when you click, whether or not to copy CSS of child elements or HTML code, what to show on the screen, and more. It’s very handy to be able to customize and adjust your experience and usage.

Once you’re ready, simply hover over any element on the page to view its CSS.

CSS Scan demo

As opposed to browser Dev Tools, you don’t have to scroll through countless CSS rules. Everything related to the specified element is displayed and simple to copy with just a single click. View and copy all child elements, pseudo-classes and media queries in one place!

To edit the CSS in place, you just hit the spacebar and the CSS Scan window gets pinned to the screen. Then you can edit to your heart’s content, right there on the page you’re working on. You can also view the CSS of parent elements by holding control and clicking on the element or using the up and down arrow keys.

Export to Codepen

Taking it even further, you can easily extract and export the HTML and CSS of elements and all its child elements as whole components to Codepen. Just hover over the element you want to export, hit the spacebar to pin it to the screen, and then click the “Export to Codepen” button. Voila! Your element is now in your Codepen account! Now that element is available for you to use in future projects or experiment with however you want.

Should You Get CSS Scan?

We can answer that question with a resounding “Yes!” CSS Scan has a price tag that is very reasonable for everything you get, and it will immediately change your workflow, with a quick and easy adjustment period away from Dev Tools. About the only thing missing we could find is the ability to adjust the window size for responsive testing. We had to do this in Dev Tools and then use CSS Scan from there, which still works but seems like an extra step. However, CSS Scan does show and copy all related media queries for an element at once, so this is handier than only seeing the active media query for the current window size, as done in Dev Tools. Chalk this up to getting used to doing things differently than what we’re used to doing in the past.

All in all, after trying CSS Scan out, we can confidently and highly recommend it!

When, why, and how should you use a WYSIWYG editor on your WordPress site?

Have you ever felt perplexed about how to use WYSIWYG editors in WordPress? We’ll guide you through what WYSIWYG editors are, give you tips on using them, and show you an alternative to the built-in WYSIWYG editor for WordPress.

What is a WYSIWYG editor?

WYSIWYG stands for “what you see is what you get”. This means that whatever content is entered into the editor is shown exactly the way it will be displayed when it is published. It is similar to desktop publishing tools such as Microsoft Word, having similar formatting tools displayed on the toolbar at the top. WYSIWYG editors are usually integrated into various apps and websites. They can be used for content management, website building, messaging, and other different features. However they’re used, these special editors significantly save development time, reduce maintenance and manpower costs, and provide the ideal user interface and experience.

WordPress WYSIWYG

When should you use a WYSIWYG editor on WordPress?

In WordPress, the WYSIWYG editor is the primary input field for post and page content. Thus, whenever you create and edit content on WordPress, you use a WYSIWYG editor.

What are the benefits of using a WYSIWYG editor?

By using WYSIWYG editors, users won’t have to know much about HTML to manage and format their content. They’ll be able to write, insert images and other files, and perform rich text editing (and more) just by using the several buttons on the toolbar.

A modified version of TinyMCE, an open-source WYSIWYG editor, is built into WordPress. Its extensibility allows WordPress plugin and theme developers to add custom buttons to the visual editor’s toolbar . However, using a built-in editor often won’t be enough. There will be times when you will need faster and more sophisticated editors. As we will explain below, you can greatly improve upon the built-in editor by setting up an alternative. You can read more about how easy it is to do here.

How to extend the built-in WYSIWYG editor in WordPress

To display the full TinyMCE text editor so you have access to all of the advanced features available, add the following code to your functions.php file, enabling the hidden buttons:

function enable_more_buttons($buttons) {
 
$buttons[] = 'fontselect';
$buttons[] = 'fontsizeselect';
$buttons[] = 'styleselect';
$buttons[] = 'backcolor';
$buttons[] = 'newdocument';
$buttons[] = 'cut';
$buttons[] = 'copy';
$buttons[] = 'charmap';
$buttons[] = 'hr';
$buttons[] = 'visualaid';
 
return $buttons;
}
add_filter("mce_buttons_3", "enable_more_buttons");

An alternative WYSIWYG Editor

If the default editor is too limited for your project, it is possible to integrate an alternative WYSIWYG editor to allow for more complex editing for your users. One of the top alternatives is this beautiful JavaScript web editor from Froala that has a lot to offer for developers and users alike. Its easy integration, rich features, customizability, and informative yet organized documentation let developers have an easier production time. Moreover, it gives users a better editing experience because of its cleanliness, speed, and intuitiveness. With a flat interface, SVG icons, buttons, dropdowns, and popups, every detail of its design is amazing. It has full mobile support, with popup formatting controls that appear the same on both mobile devices and desktops and image and video resizing.

Froala is easy to customize, fully scalable, and fast, loading in less than 40 milliseconds. Compared to TinyMCE’s 15 integration guides, Froala provides 17 framework libraries and is the first editor to provide SDK libraries for 6 different servers. Its intuitive interface also accommodates 100+ features without overwhelming users with a complex and complicated GUI. In addition, Froala has easy-to-follow documentation and easily integrates with your products.

Migrating to Froala

It only takes a few steps to replace your standard WordPress WYSIWYG with the robust Froala:

  1. Download or clone the wordpress-froala-wysiwyg-master plugin.
  2. Under the plugins folder of your WordPress installation, make a new folder and paste the contents of the downloaded file there.
  3. In your WordPress admin area, go to plugins and click “add new”. Search for “Froala WYSIWYG Editor” and follow the automated process.
  4. On the plugins page of your admin area, activate the Froala plugin. This will now replace WordPress’ default editor.

Once you’ve completed these steps, you’re all set to use a powerful, faster, and cleaner editor. To learn more about integrating and using Froala with WordPress, check this page out.

If your project requires more extensive features than what the built-in WordPress editor offers, Froala is definitely a great option to explore. Read more about Froala here.

Will you upgrade or extend your current WordPress WYSIWYG editor?

Based on the information we’ve covered in this article, it is obvious that you can do so much more with your WordPress WYSIWYG editor than how it comes out of the box, so to speak. For instance, you may choose to extend the TinyMCE editor to give your users even more control over the formatting of their content. Better yet, you can choose to go even further and upgrade your WYSIWYG editor to a more powerful one altogether. If you follow what we’ve discussed in this article, you will definitely take WordPress content entry and editing to a better place for your users.

Provide Your Customers With Accurate Nutrition Data via Edaman’s Nutrition Analysis API

Now more than ever, engaging in a healthy lifestyle is important to people across the planet. But it’s easier said than done. In the past, finding accurate nutrition data simply wasn’t possible. The good news is that there are modern solutions. 

Nowadays, when it comes to generating food recipes with detailed nutritional information, there’s no one you can trust more than Edamam – the leading provider of nutrition data and analytics. Whether you’re a food blogger, restaurateur, or web developer who can make a pretty yummy ratatouille; Edamam’s Nutrition Analysis API can provide you with nutritional facts in under a second! 

So, if you’re looking for an API that is capable of full recipe nutrition analysis and has a robust natural language processing engine that allows entity extraction combined with food database search; you’re in the right place! 

edamam screenshot

3 Key Features of Edamam’s Nutrition Analysis API

  • Full Recipe Nutrition Analysis
  • Text Analysis
  • Structured Data and Nutrition Data Output

Full Recipe Nutrition Analysis in Less Than a Second!

When users submit the full text of their favorite recipes or any list of ingredients, Edamam’s Nutrition Analysis API extracts the complete nutrition and ingredient data from the text. With its ability to process recipes in under a second, Edamam saves users hours of entering recipes line by line!

Why is this important, you ask? Well, think about it for a moment. If users have hundreds or thousands of recipes to analyze, Edamam’s Nutrition Analysis API can help establish an efficient and productive workflow that uses a fraction of the time as manual entry methods. 


Whether the end-user is a developer using Edamam’s API to submit recipes on behalf of a food blog or food-based e-commerce site or a nonprofit organization that needs accurate health, diet, and allergy labeling; Edamam can help!


Text Analysis

Edamam’s natural language processing engine is robust – not to mention it is incredibly effective. Built with nutrition analysis in mind, this API allows users to extract food-named entities from text with ease. And, it gets better! Edamam also allows combined entity extraction with a food database search to get users the best results possible. Not clear what we mean by that? Let us explain.

In a nutshell, when text is submitted by users and entities are extracted, Edamam searches its database for additional food matches to the extracted entities – leave no stone or scone left unturned! 


Structured Data and Nutrition Data Output

When users input data, Edamam returns detailed information for each ingredient line. For food items such as flour, sesame seeds, eggs, guavas, milk, etc; Edamam returns caloric information as well as data about carbohydrates, protein, sodium levels, etc – reporting a total of 28 macro and micronutrients to users. 


Additionally, all food nutrient data includes diet, allergy, and health labeling that Edamam calculates based on a recipe’s ingredients. Dietary labels such as vegan, paleo, gluten-free and dairy-free are among the 90+ health labels that Edamam can generate automatically. 

edamam api demo


Pricing:

Edamam is an affordable solution for those who need to aggregate large amounts of data on food and nutrition. With accessibility in mind, Edamam provides free recipe nutrition analysis and text analysis with its basic plan geared towards developers, startups, and non-profit organizations. This free-of-charge Developer tier includes food and quantity extraction, as well as the ability to analyze up to 400 recipes per month and submit 10 recipes per minute. However, there are limitations on data caching and reduced text analysis hits compared to Edamam’s Enterprise Core tier. 

For Enterprise Core users, there is a subscription fee of $49 per month, which includes data caching for four nutrients (protein, net carbs, total fat, kcal), the ability to analyze up to 50,000 recipes monthly, and 150 recipe submissions per minute. Want more than that? You got it! Edamam’s Enterprise Core tier even offers 100,000 text analysis hits a month and shopping aisle food labeling. 

Need to take it a step further? Want data caching for more than four nutrients? What about unlimited recipe analysis, text analysis, and recipe submissions? For those who want complete access to all that Edamam offers, the Enterprise Unlimited tier is for you!

The key difference between the Enterprise Core and Enterprise Unlimited plans is that the latter has no restrictions. It is truly unlimited and tailored to the user’s needs. For those who wish to unlock an all-access pass to Edamam – get in touch with their team to customize your API experience. 


Conclusion:

No matter which Edamam Nutrition Analysis API plan you select, all users can enjoy the benefits of natural language processing, food and quantity extraction, health, diet, allergy labeling, commercial use, and support from the team at Edamam. So, if you’re looking for a solution to providing accurate nutritional information to your customers, Edamam is the best choice! Access it today from APILayer, a hassle-free API marketplace. 


A Simple Guide To Quickly Adding File Uploads To Your App With Filestack

Do you need to give your users the ability to upload files in your application? Are you looking for a simple and quick way to dramatically improve the user experience for file uploading, allowing users to not only upload directly from their hard drive but also integrated with the most popular social networks like Facebook or Instagram, commonly used storage solutions like Dropbox or Google Drive, and stock image providers like Unsplash? If so, Filestack is the ultimate solution for you!

In  this post, we will take a look at what Filestack can do to make file uploading work for your users in the best possible ways and how easy it is for you to set up in less than an hour.

Why is file upload important?

File uploads are essential for user productivity and many business services and applications, such as content management systems, healthcare portals, insurance websites, and messaging applications. Especially in this day and age of remote and distanced working, it is increasingly critical to ensure the security and ease of file uploads in order to provide the best user experience as well as protect against malicious actors.

For example, consider community-driven platforms such as social media websites and apps, where content is primarily user-generated. In these applications it is crucial to be able to manage the large numbers of uploads that users will be producing.

Another example would be for businesses that use internal collaboration systems for their employees. In this case, employees often need to support the uploading, sharing, and downloading of files. The easier the upload system is to use, the less training and help the employees will need to accomplish their work throughout the day, saving time and resources.

In all instances, files that are uploaded need to be analyzed for potential viruses or other malicious programs. So the method through which files are uploaded is extremely important!

What makes Filestack special?

Filestack provides users an “all-in-one” experience for uploading files anywhere and easily with a 99.99% success rate. Utilizing their powerful yet simple-to-use API, uploads, URL ingestion, and device integration are all made fast and easy. With as little as two lines of code, you can dramatically improve the look and performance of your file uploader, using the same upload technology that the internet giants use without the struggle of having to maintain it.

In a nutshell, here are some of the standout features of Filestack:

  • Filestack provides a beautiful and customizable file uploader UI that make a file upload from any source painless and intuitive.
  • The UI allows your users to upload files using drag and drop, copy and paste, or searching the computer’s hard drive.
  • Users can connect to a multitude of popular services such as Facebook, Instagram, Google Drive, Dropbox, and more, to upload files directly.
  • Users can also connect to their device cameras to instantly upload photos, videos, and audio files.
  • Custom connections and integrations can also be created to broaden your users’ options even more.
  • Once the file is selected, Filestack automatically generates a preview for the user to review.
  • Filestack’s advanced infrastructure uploads files as much as almost four times faster than standard interfaces.

How to add file uploads to your app!

Filestack’s documentation is extensive yet easy to navigate, understand, and implement. Here, we will give a brief rundown of how easy it is to get started.

Sign up for an account

You can start with a free plan to try it out, which allows 500 uploads, 1GB of storage, and 1GB of bandwidth per month. From there, pricing plans range from $59 to $359 per month.

Create an application and API keys

Once your account is created, access your Developer portal and create an application. Each application is given a public and a secret API key, each of which is used to authenticate and authorize operations on your resources. Each application has configuration settings that apply only to it, allowing you to assign specific settings for each of your use cases.

Set up the File Picker

Start by including the JavaScript SDK UMD module in your code:

<script src="//static.filestackapi.com/filestack-js/3.x.x/filestack.min.js"></script>

Configure the client with your API key:

const client = filestack.init(YOUR_API_KEY);
client.picker().open();

That’s it! It’s that simple! Of course, there are a variety of configurations you can add to your setup, but the default settings are quick and easy. For further information you can check out the documentation here.

Using the SDK with different languages

Filestack has client-side and server side SDKs, so you can use your language and application of choice. Choose from client-side apps such as JavaScript, React, Angular, Adaptive, and Swift, as well as server side languages such as Python, Ruby, Ruby on Rails, Go, PHP, and Java. More information can be found here.

Try Filestack in your next project

As you can see, it’s obvious why Filestack is the #1 developer service for file uploads. Not only is it the best service available, but Filestack will upgrade your user experience, security, and more, all in a quick, affordable, and easy to set up solution. While we can not recommend it enough, only you can decide what will work best for you and your projects, so be sure to check it out here next time you are working on a project that requires file uploads.

Backlight: Where Designers & Developers Build Design Systems at Scale

Is your team struggling to create seamless synchronization between Designers and Developers? Do you wish project hand-offs were less time-consuming? Are you ready to streamline your team’s workflow? A simpler and more efficient design process is achievable with Backlight – the collaborative platform, used by front-end development teams.

Backlight is an all-in-one development tool that can be used to collaboratively build, ship, and scale efficient design systems. Created with developers and designers in mind, Backlight uses standard web development technology and can publish NPM packages on demand.

backlight product feature

Key Features: How Backlight Helps Build Design Systems

  • Components are visually organized
  • Live documentation is editable
  • Documentation support for Markdown, MDX, MD Vue, and Nunjunk
  • Design integration that supports Sketch, Figma, and Adobe XD
  • Integration with GitHub and Gitlab
  • Built-in test runner and reporter
  • Ejectable design systems that use 100% standard web development technologies

Pricing: How Much Backlight Costs

Backlight pricing starts with a free plan that includes up to three editors, two design systems, unlimited viewers, Github integration, Gitlab integration, community support, and the ability to publish NPM packages. If you’re interested in learning more about the ins and outs of Backlight, the free tier is an excellent way to test this platform without spending a penny.

The next tier is the Pro plan, which starts at $149/month. This plan includes all the features of the free plan plus, five design systems, unlimited users, and email support from Backlight.

Lastly, Backlight offers an Enterprise tier for companies that need advanced features and premium support. The pricing for this plan starts at $499. The Enterprise tier includes all of the pro features and unlimited design systems – making it Backlight’s most robust option yet.

Conclusion

Backlight is a Design System platform built for collaboration. Large teams will benefit from simplified workflows and increased productivity. Smaller teams will leverage Backlight, equally, to build their Design System without needing a dedicated team.

IPWHOIS: A Fast and Accurate IP Geolocation API

Are you interested in dramatically improving your users’ experience on your website with customized features based on their location? You can do this by incorporating a fast and accurate IP geolocation API into your site, using it to adapt your content in location-specific ways for every visitor. IPWHOIS is used by thousands of developers for just such a scenario, so we want to take a closer look at what all they have to offer and how it can help you in your projects.

IPWHOIS: A Fast and Accurate IP Geolocation API

IPWHOIS can be used to determine the correct language, time, currency, advertising targets, and more for each person that lands on a website. It can filter traffic, customize content, help autocomplete forms, and more based on your website needs.

IP data is updated in real time using a a self-learning neural network with a multi-channel integration structure including RIPE, APNIC, ARIN, AFRINIC, and others with an average server response time of 90 milliseconds in most locations around the world. IPWHOIS servers are distributed worldwide for speed, reliability, and security. All data sent to and processed by their servers (excluding the free rate) is secured via 256-bit SSL encryption (HTTPS).

Key Features

  • Helps in providing accurate geolocation data
  • City or country relevant data
  • Threat intelligence data
  • ISP access
  • Browsable company information
  • Time zones
  • International data like currencies

IPWHOIS: A Fast and Accurate IP Geolocation API

Pricing

IPWHOIS pricing starts with a free plan that includes up to 10,000 requests per month for non-commercial use. This would be a good way to test the service before investing in a paid plan. All paid plans include SSL access, Geo DNS, Anycast-enabled servers, and technical support, with pricing based on the number of requests per month.

The cheapest (Pro) plan is $10.99 per month for 250,000 requests per month. Next tier is the Business plan at $29.99 per month for up to 2,000,000 monthly requests, followed by the Platinum plan at $79.99 per month for up to 10 million requests. You can select which option you think is best for your project and then upgrade or downgrade at any time based on your usage.

IPWHOIS example

Conclusion

Based on the overwhelmingly positive customer reviews, it is obvious that IPWHOIS is an outstanding service for utilizing location data to upgrade your visitors’ experience on your website or mobile app. By personalizing content based on the visitor’s location, you can improve behavioral factors by up to 70%. This is somewhat of a no-brainer – give IPWHOIS a try and see how it will improve your next project.

Web Design Trends for Business Websites in 2022

Are you looking toward updating or upgrading your business website in the new year? Then it’s a great idea to dig into the latest and upcoming trends in web design, not necessarily so you can simply follow the trends, but also so you can see what else is out there as well as draw inspiration and come up with the best decisions for your own business website. In this article, we’ve gathered some of the most relevant web design trends for business websites coming in 2022, along with some examples, including some from the premiere business website design service IONOS.

Vibrant Color Schemes

In the past, business websites tended to skew towards using muted blues and greens, but more recently the trend has been to utilize bright, vibrant colors from across the rainbow. Bright colors grab the visitors’ interest immediately upon arrival, and they can communicate the company culture and make it stand out. Creativity through color will give a business a leg up on the competition.

Web Design Trends for Business Websites in 2022

Web Design Trends for Business Websites in 2022

Large Typographic Hero Images

While not necessarily new in web design, corporate websites are new to this trend. Full screen hero images with large-scale typography is another way to grab the user’s attention and immediately give them an overview of the business with a catchy tag line, a call to action, or anything else needed to get them to investigate further.

Web Design Trends for Business Websites in 2022

Web Design Trends for Business Websites in 2022

Web Design Trends for Business Websites in 2022

Button Gradients

Adding gradients to buttons can increase conversions because they can potentially stand out more significantly than single-color buttons. Paired with a vibrant color scheme, as mentioned above, while utilizing colors that contrast with and stand out from the rest of the site’s colors, gradient buttons can draw the user’s eye to the CTA. Again, this trend is not necessarily new, but it is one that business websites are just recently beginning to adapt.

Button Gradients

Button Gradients

Oversized Fonts

Similar to large typography in a hero image, using oversized fonts for headings throughout the rest of the pages is a trend that can direct and guide the user’s attention while making it simpler to communicate the more important messages. In this age of attention deficits, where people tend to read less and skim more, oversized fonts can capture the user long enough for them to read what may otherwise be skipped past.

Oversized Fonts

Oversized Fonts

Oversized Fonts

Accessibility

Website accessibility for the disabled is all the rage these days, and corporate websites are no different. While any solid business website should already be making sure their website is accessible, those that aren’t will be moving in that direction in 2022. The Web Content Accessibility Guidelines (WCAG) were created to provide the standard for what is considered accessible and compliant. These guidelines can also inform larger design decisions as well.

Micro-interactions

Micro-interactions are things that happen when a user performs an action, like clicking a button. The button may animate when clicked, for instance. Think about what happens when you click to like a post on social media. The human tendency to expect feedback through a micro-interaction has been fueled by their constant use in mobile apps and now websites. Business websites can improve their user experience by employing micro-interactions that help the site visitor feel comfortable once they use them.

Sencha GRUI Delivers Rich and High Performance Grids For React Applications

Sencha GRUI is a perfect modern enterprise solution for React UI that comes with 100+ data grid features. With GRUI, Sencha has re-built the Ext JS grid from the ground up to use modern JavaScript, and a whole new architecture that will deliver all the same great features and even better performance in an easy to use React API.

Here is a quick overview of some of the features:

  • Ability to handle millions of records.
  • Large feature set (filtering, grouping, infinite scrolling, and more).
  • Full customization control.
  • Data Export capabilities (csv, tsv, html, pdf, xls).
  • Pre-tested across a wide range of platforms and browsers.
  • Easy UI component integration to the grid.

With incredibly fast data processing, massive amounts of data is never a problem. Utilizing client and server side buffered store, the Sencha Data Grid is able to load and manipulate large data sets within milliseconds!

Key Features

Virtual Columns

  • Virtual rendering of rows AND columns
  • Rendering of visible columns even when configuring an unlimited number of columns
  • Huge performance increase for large numbers of columns

Infinite Scrolling

  • Refreshes the viewed rows from the page cache as needed

Slider Paging Toolbar

  • The paging toolbar allows you to paginate forwards and backwards in the record sets with the slider buttons and input field

Column Drag and Drop

  • Reorder columns with the intuitive drag and drop interface

Column Editors

  • Each column can be edited, and you can create custom editors using React components

Sencha GRUI has robust documentation to help you get started quickly, and it is built with Sencha GRUI as an interactive demo so you can see how it works while you learn how to use it.

Pricing

The pricing for Sencha GRUI is simple and transparent, on a per developer basis. $499 per developer gives you a perpetual license, unlimited end users and products, and a year of updates and technical support. There is also a Free plan that offers all of the same features and benefits, but it requires an attribution watermark. However, you can sign up for a free 30-day trial to see if Sencha GRUI will work for you and your projects, so that makes it very easy to get to know the product and determine the route you will take.

Conclusion

Mission critical apps rely on the performance of their data grid components. With custom layouts and simple integration with React, GRUI by Sencha renders unparalleled performance to enterprise applications. The extensive documentation should make this easy to get acquainted with and utilize in your projects, and the pricing – especially the free trial – makes it a no-brainer to give it a try. We recommend you give Sencha GRUI a run and let us know what you think!

countrylayer – The Must-Have API for Any Website

If you have ever worked on a project that deals with geographic information of any type – which, let’s face it, most websites and applications do these days – then you have likely had to come up with a solution for providing or accessing information about one if not more countries. Whether it’s population, location, currencies, languages, or any other information about a country you need, it can be challenging to find a way to dynamically bring those details into your project.

There are tools available to help you solve this problem, but all too often there are obstacles such as programming language, ease of use, complexity of integration, pricing, and other hurdles that you may encounter.

Until now.

countrylayer is a JSON API that is compatible with all programming languages, provides extensive and accurate data from almost 200 different countries, is simple and easy to integrate, and is affordable to use – starting at free!

In this article, we’re taking a look at what countrylayer has to offer and how you can start using it in your projects.

What Is countrylayer?

countrylayer is a service brought to you by apilayer that provides common information about countries via a REST API. With this API, users will be able to get detailed information about countries in the world. Because they can filter by name of a country, language, code, currency, the capital city, calling code, region, or regional bloc.

Using your project’s API key, you can access country data that is returned in a standard JSON format, which can then be easily parsed in any programming language.

Here is an example of an API response. Check out all of the information it provides:

[
  {
        "name": "Germany",
        "topLevelDomain": [
            ".de"
        ],
        "alpha2Code": "DE",
        "alpha3Code": "DEU",
        "callingCodes": [
            "49"
        ],
        "capital": "Berlin",
        "altSpellings": [
            "DE",
            "Federal Republic of Germany",
            "Bundesrepublik Deutschland"
        ],
        "region": "Europe",
        "subregion": "Western Europe",
        "population": 81770900,
        "latlng": [
             51,
             9
        ],
         "demonym": "German",
         "area": 357114,
         "gini":  28.3,
         "timezones": [
             "UTC+01:00"
        ],
        "borders": [
            "AUT",
            "BEL",
            "CZE",
            "DNK",
            "FRA",
            "LUX",
            "NLD",
            "POL",
            "CHE"
        ],
        "nativeName": "Deutschland",
        "numericCode": "276",
        "currencies": [
            {
                "code": "EUR",
                "name": "Euro",
                "symbol": "€"
            }
        ],
        "languages": [
            {
                "iso639_1": "de",
                "iso639_2": "deu",
                "name": "German",
                "nativeName": "Deutsch"
            }
        ],
        "translations": {
            "br": "Alemanha",
            "de": "Deutschland",
            "es": "Alemania",
            "fa": "آلمان",
            "fr": "Allemagne",
            "hr": "Njemačka",
            "it": "Germania",
            "ja": "ドイツ",
            "nl": "Duitsland",
            "pt": "Alemanha"
        },
        "flag": "https://restcountries.eu/data/deu.svg",
        "regionalBlocs": [
            {
                "acronym": "EU",
                "name": "European Union"
            }
        ],
        "cioc": "GER"
    },
    {…}
]

Available API Endpoints

The countrylayer API comes with a number of endpoints, each providing different functionality. You can customize the request output data to get only the fields you need. This causes the request to execute faster, and reduces the response size.

  • Endpoint for all countries
    GET https://api.countrylayer.com/v2/all
        ? access_key = API_KEY
    
  • Endpoint for country search by name
    GET https://api.countrylayer.com/v2/name/{name}
        ? access_key = API_KEY & FullText=
    
  • Endpoint for country search by capital
    GET https://api.countrylayer.com/v2/capital/{capital}
        ? access_key = API_KEY
    
  • Endpoint for country search by language
    GET https://api.countrylayer.com/v2/language/{language}
        ? access_key = API_KEY
    
  • Endpoint for country search by currency
    GET https://api.countrylayer.com/v2/currency/{currency}
        ? access_key = API_KEY
    
  • Endpoint for country search by region
    GET https://api.countrylayer.com/v2/region/{region}
        ? access_key = API_KEY
    
  • Endpoint for country search by region block
    GET https://api.countrylayer.com/v2/regionalbloc/{regionalbloc}
        ? access_key = API_KEY
    
  • Endpoint for country search by calling code
    GET https://api.countrylayer.com/v2/callingcode/{callingcode}
        ? access_key = API_KEY
    
  • Endpoint for country search by alpha code
    GET https://api.countrylayer.com/v2/alpha/{code}
        ? access_key = API_KEY
    

As you can see, these endpoints can be very useful for you to be able to access and utilize the country information needed for your project in a variety of manners, and helps to streamline and speed up your requests for the fastest execution possible.

You can learn more about how to integrate the countrylayer API into your projects by reading their extensive (yet surprisingly succinct and simple) documentation.

How Much Does Using The countrylayer API Cost?

You can get started for free with 100 searches per month and a rate limit of 1 per second. From there, pricing goes up from $9.99 per month for up to 5,000 searches, all the way to $149.99 per month for 250,000 searches. Enterprise pricing is also available on request. It’s important to note that SSL encryption is only available with paid subscription plans.

How Will You Use The countrylayer API In Your Projects?

As you can see, countrylayer is a relatively simple yet robust solution that can be used in a multitude of ways in your current and future projects. It is easy to integrate, provides accurate and extensive data, and is very affordable. We encourage you to give it a try – especially since you can get started for free! When you do, be sure to let us know what you think by reaching out on any of our social channels.

Anatomy of High Converting Mobile Web Pages: Learn What Makes or Breaks a Responsive Design!

In 2020, smartphone sales were 1.57 billion units worldwide, an increase from 1.52 billion units in 2019. Such impressive figures continue when we look at the world’s tablet shipments and deliveries. In the third quarter of 2020, Apple alone shipped 13.9 million units of tablets. These figures, as surprising as they are, make us think about the impact on mobile websites and website owners. The demand for smartphones and other mobile devices have been responsible for connecting 4.66 billion people with the internet. This number has gone up by 7.3 per cent since last year. Out of this, mobile internet traffic has been more than half of all the internet traffic all around the world. As a website owner whose website is not mobile-friendly, this is a matter of great concern and something to help shape our website in the correct direction.

It is now time that website owners understand that mobile users are top priority and should be taken seriously. If you are still backing on the desktop website with a bunch of media queries and letting luck shape your revenue, I will help you decode the importance of responsive design and how to make a high converting mobile web pages.

Responsiveness and Conversion Rates

A lot of the people take the responsiveness and conversion rates as a cause and solution pair in the website world. But converting a mobile web page is a much more complex process than just making your website responsive or mobile-friendly. Sure, responsiveness is an important aspect of conversion and is the first step in the website development but it alone cannot increase your CTR. In 2015, Google started giving more preference to responsive and mobile-friendly websites. Improving for a better experience for their users, Google does not want people to keep searching for that one perfect website which is rendered proportionately on the device. This move gave the website owners a wake-up call to focus on the user experience and mobile-friendliness as much as possible.

So how can we improve our conversion rates once we have the responsive website built? To be fair, responsiveness is more concerned towards scaling your website up and down. If my images are scaled in the proper ratio on a 5.5-inch device, I have got a responsive website. But the user is never concerned about responsiveness. Instead of praising the scalable elements, the user is more concerned about how fast those elements rendered on to the device? My user is more concerned about their own preferences and benefits.

Nearly 8 out of 10 users bounce back when the content is not properly visible on the mobile device. Such anomalies on the mobile website bring down conversion rates and affect the business. In the subsequent sections, we will focus on things that are responsive in nature (no doubt!) but is not enough that can make the user click that CTA of yours or purchase a product from your website. Soon we will realise that responsiveness has much more than what meets the eye. Let’s see how we can put ourselves up to the user’s expectations.

PS – We have used LambdaTest LT Browser to show website view in various device viewports. Know more here – https://www.lambdatest.com/lt-browser

Do you need all the content on the mobile?

The first thing to ask in developing a website for mobile is the content you are about to show on the device. A device’s screen is small, which means you have to show less but relevant content on the small space provided to you. The content should be able to communicate to the user without using too many words. A user is not going to read everything just to find if he gets anything pleasing for himself. That is your job to show him what he needs to see. The content analysis can be boiled down to three major categories: the headline, the font size and the content.

What’s a perfect headline?

A web page starts with a headline which is probably the first thing a user sees. This is your chance, the moment that decides whether the user will increase the session duration or will bounce back. The following two website ranks on the first page of Google for “real estate solutions”:

Anatomy of High Converting Mobile Web Pages - 1

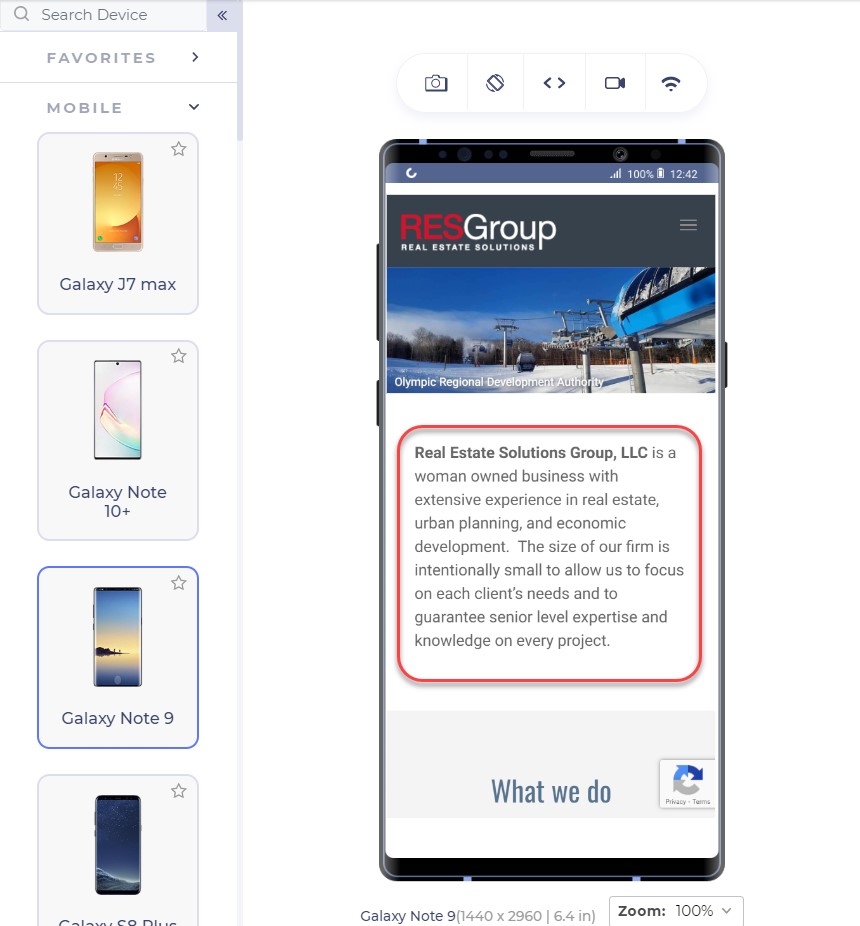
The above landing page is from RESGroup while the below screenshot is from Getrealestatesolution.

Anatomy of High Converting Mobile Web Pages - 2

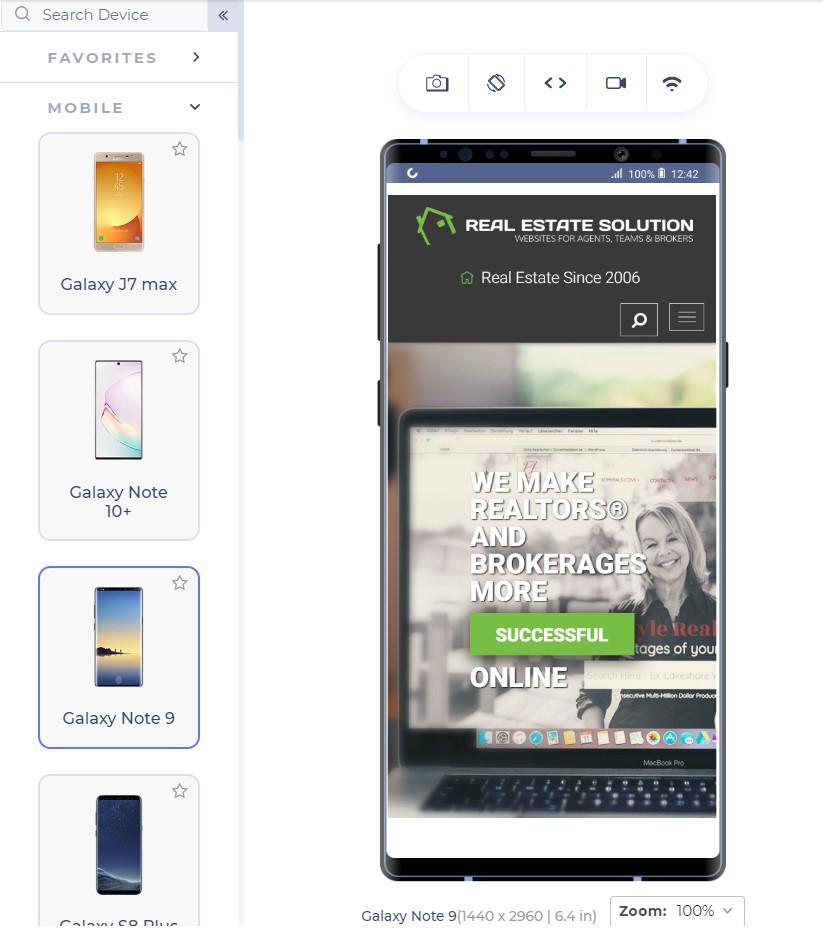
Apart from a weird header which is taking 25% of your valuable screen space, the headline is concise and easy to read. The RESGroup have focussed on a long heading (if that what it is) and forces users to scroll the entire page to find something meaningful for them. A good point to note is that although building up trust on the user is important by embellishing the web page with your achievements, a user needs to find something which they can use. They rarely care about what you have to offer but more about how they can be benefitted. Remember, a user makes up his mind about the website in just 50 milliseconds.

Scrolling from up to bottom and reading about your achievements will result in an increased bounce rate. Getrealestatesolution is building up trust and showing their achievement both cleverly into a single line: “We make realtors and brokers more successful”. This more or less would translate to “We are capable enough to make you successful” and “You will be successful if you join us”.

Font-Size: Should my user zoom in?

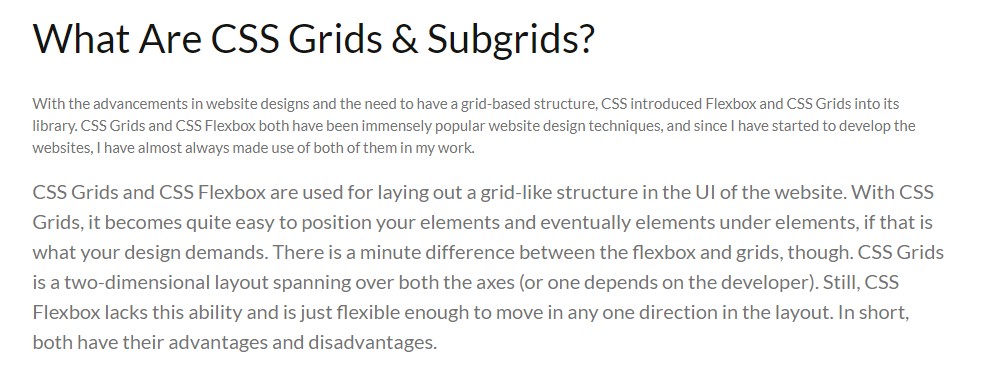
Font-size is an extremely important part of a landing page (or any other page) to determine the conversion rate of your website. A font-size of 16 px or 1 em is considered perfect for good readability of the content. Although one might argue that they can still read properly on 14 px, there are a large percentage of visually impaired people to be taken into account. The main target audience of the majority of businesses lies in the range of 15-49 years which is 28% visually impaired, as per WHO data. The following screenshot shows a blog on CSS Subgrids with 12 px font and the original font below it.

Anatomy of High Converting Mobile Web Pages - 3

Although text can be enlarged by zooming into the mobile device, it moves the content out of the screen and makes the screen scrollable which is not liked by the users.

The relevance of Keywords- Which words to choose?

The final thing to remember while presenting content to the user is to use specific keywords which are relevant to the user. Mobile screens are very small with 5.5 inches being the most popular among the users as per a 2019 study. With a little time and smaller space in our hands, we want to gain a user’s trust as soon as possible so that he sticks on the website and does not bounce back.

The specific keywords process first starts by eliminating all the redundancy and loose words. Words such as “very”, “extremely”, “best” etc are considered fillers in the content. “We are very professional and provide the best services” could be transformed to “We are professional in providing real-estate services”. The second sentence is more effective and uses 1 less word than the first.

After elimination comes the relevant keywords to pitch to help you convert through the web page. These keywords will work as something your user can trust upon. At least, the user should be well convinced that you are the best and believe me, writing “best” does no charm in conversions. So, instead of being verbose and explicitly pitching your projects, choose minimal but effective words that show your confidence, experience and professionalism. In my analysis, I found two interior design services websites that portray this point quite clearly.

This is the landing page of Woodenstreet

Anatomy of High Converting Mobile Web Pages - 4

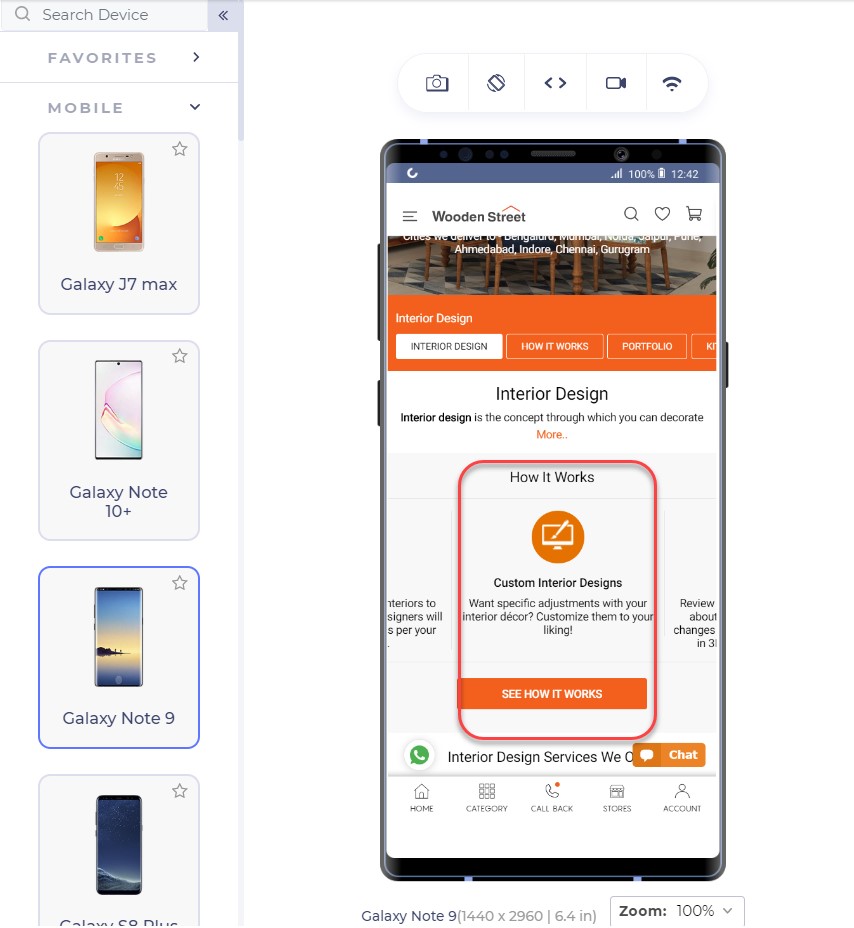
In addition to proving our point of small font-size, the only effective sentence in this segment is “Customize them to your liking!” which makes me feel the fact that I will have control over customizations but not a strong one. The words are loose to build trust over to the service company.

Another competitor of this website is Livespace. The same section on their website looks like this:

Anatomy of High Converting Mobile Web Pages - 5

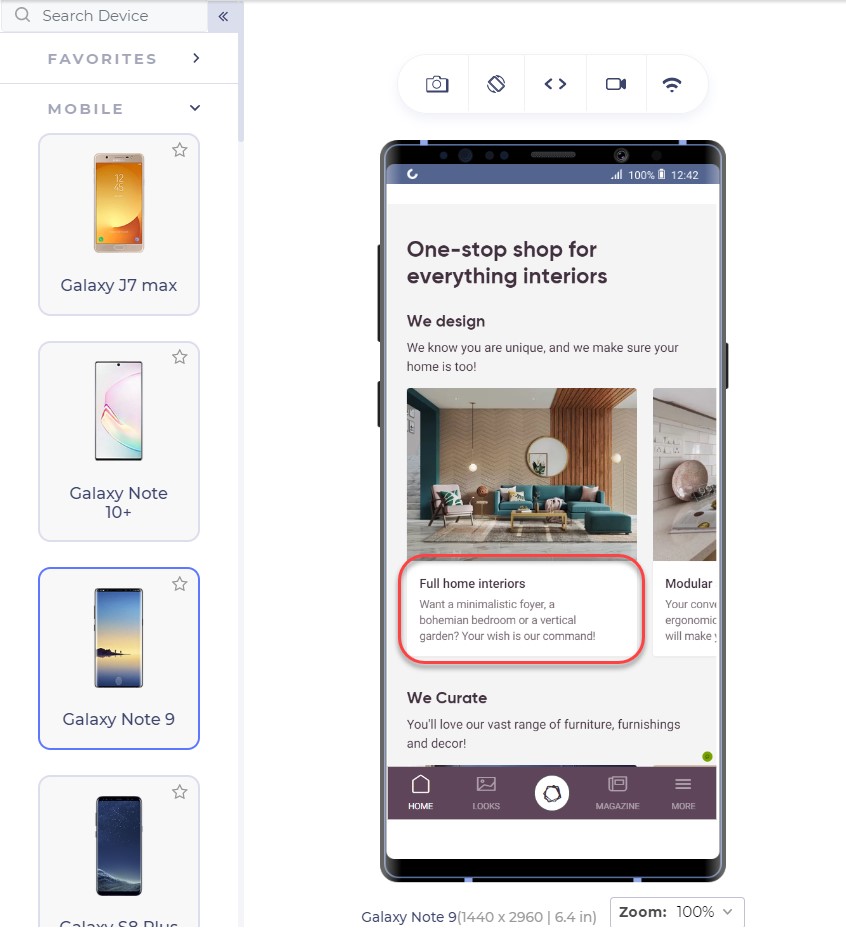
The segment focuses on keywords and experience by the lines of sophisticated keywords that will lure the user. I too want someone who knows a bohemian bedroom!! (Just Kidding!)

Also, notice the transformation of the same sentence in these two websites. Where Woodenstreet says, “Customize them to your liking!”, Livespace says, “Your wish is our command!”.

Which one do you think has more weight to convert your page?

For the enhancements of the content, you do not need to remove the white spaces and fill every gap on the web page. White spaces are good! They let the elements breath in the congested space and every element can get proper attention from the user. For larger content, you can also use bullets that can deliver more information in lesser sentences.

To ensure yourselves of the appearance of your website on mobile devices, you can use tools which can help you emulate the experience. A developer-friendly browser such as LT browser is also a great choice since it provides a complete solution with loads of features (including a debugger) and performance reports to analyze. LT browser can show you your website on any mobile device of your choice in a couple of clicks.

Test Responsiveness on LT Browser

Emulators and simulators have been long used to test the website on different devices. But today, for a specific tester’s need, we can take advantage of a mobile-specific testing browser that provides a complete environment for the tester. A developer-oriented browser such as LT browser can provide additional features highlights of which are given below:

  • A large list of in-built tools: A list of 40+ in-built screens can render the website in a couple of clicks.
  • Comparison Grid: A comparison grid shows two mobile devices side by side for the testers to compare. The tester can also use scroll-sync to mirror his actions on both the devices simultaneously.
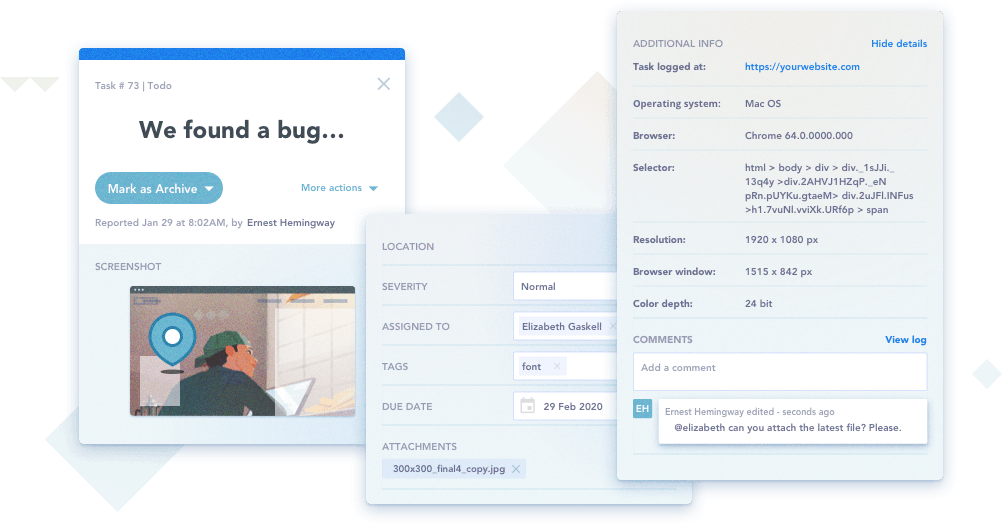
  • Screenshot capture and Session recording: The tester can take screenshots of the device screen and mark a bug and send the video/image to the team.
  • Third-Party Integrations: The third-party integrations allow the developer to share the bugs or issues with their teammates with a single click.
  • Network Throttling: A very important feature to check user experience is how the website performs under various network bandwidth. This can be achieved with network throttling in LT browser.
  • Local Testing: Local testing allows the developer to test their website even before publishing it on a domain service. With the local tunnel, they can view the website on any device from the local system.
  • Performance Report: To analyse the final performance, developers and testers can view the performance report and share it or save it for future use.

The thumb zone and its importance in conversion

The thumb zone has been a conclusive argument for some time now and a strong foundation to many pieces of research in mobile designs and mobile web implementation. The thumb zone is the area on the mobile screen determining how hard or easy it is for our thumb to reach a certain point. A research study by Hoober concluded that 49% of people operate their mobile phones with one hand and only a 15% with two hands. Among those who do, 67% are operating through their right thumb with two major positions:

Anatomy of High Converting Mobile Web Pages - 6

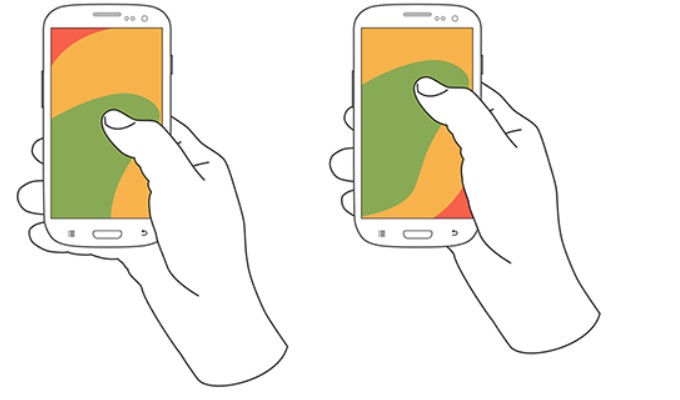
Note: The second image is placed slightly above as compared to the first image.

The color that you see in the above image: is our thumb zone. A thumb zone in general for a person using their phone with one-hand can be magnified as follows:

Anatomy of High Converting Mobile Web Pages - 7

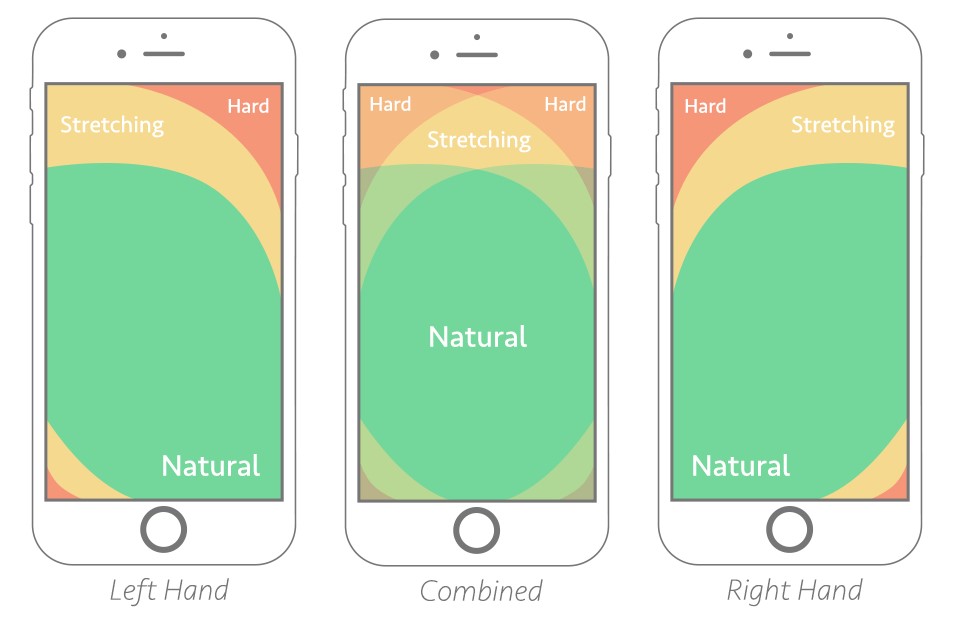
The green zone is the easiest to achieve: hence the most important for our conversion goals. The yellow zone is a bit hard to reach but manageable: something we can put less important things in such as headings and other content, things which are not clickable. Finally, the red zone is the toughest to reach and is the worst place to put our CTA.

Another worst position to put our CTA is at the bottom of the page or deep down below. No user would want to scroll down 4 5 times and search your CTA on the webpage. A lot of them probably don’t even know about CTA buttons and if it exists on that website or not.

The best way is to put CTA in the thumb zone and on above-fold in the first web page view. Amazon has put similar thought into their CTA and the following is their landing page:

The Sign In button is exactly where our green zone lies with the width being enough that we do not touch anything accidentally.

From the above page, we observe two interesting things: first the Sign In is also available at the top right (the hardest) position too and our green zone has another CTA “Create Account”.

Having two sign-in options reminds the user about signing in two times. You would see the button anyway even if you do not click that. LiveSpace uses the same approach on its website in a little different way:

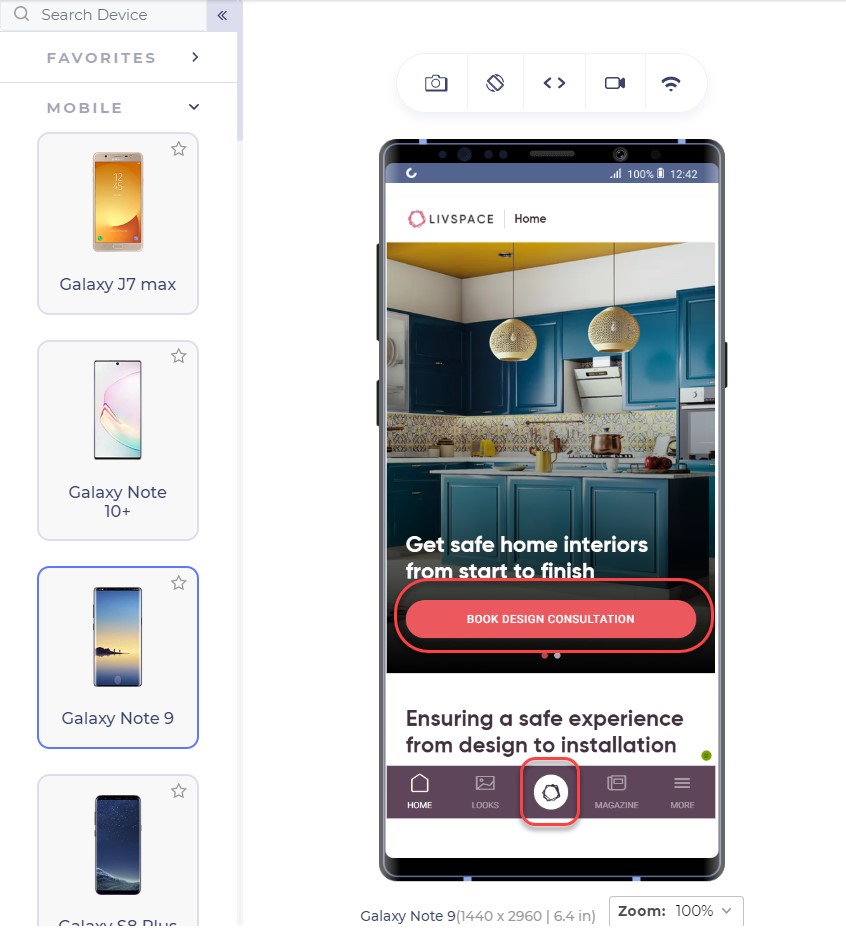
The bottom button is fixed and is a constant reminder to “book design consultation”. The second approach is interesting. There are two possibilities of an unknown user: either he signs in (given that he has already registered) or he creates a new account.

Deciding among the two is important for an owner to come to a final conclusion of primary CTA and secondary CTA. Having two CTAs is generally not considered a good approach as it confuses the user but even if you do, one of them should stand out in comparison to another, as in Amazon.

What CTA to use?

As a website owner, you might have a lot of services to provide: a consultation booking form, you want to showcase your cheap pricing too! And you want them to call you by a single click from the home page itself!! A CTA can increase your revenue with high conversions but a CTA cannot be the developer’s wish. It has to be what the audience wants. To increase your mobile conversions through CTAs, you need to analyse what your visitors are more interested in.

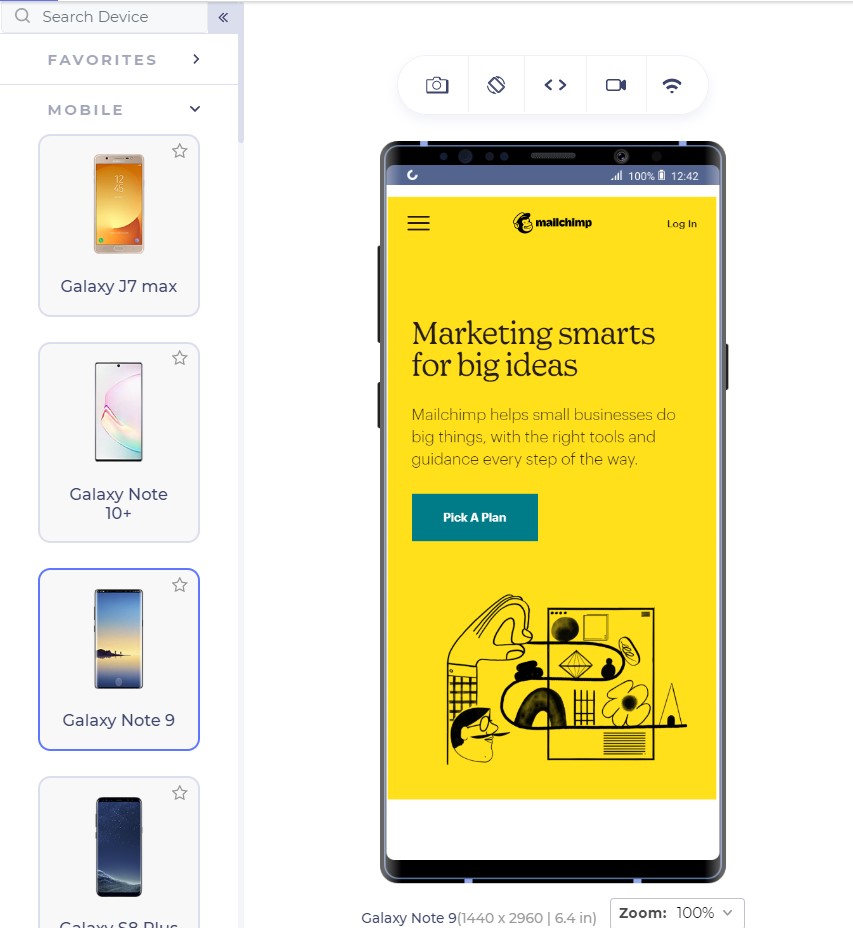
Google Analytics is a great way to start here. Google Analytics provides the keywords your visitor is most interested in. Mailchimp has a lot of good features which can be used as CTAs for example, “Start Campaign”. But their website on mobile uses the CTA linked to pricing:

CTAs are something to ponder upon and it is also a good idea to include a good input from the marketing and sales team which can suggest to you the user’s inclination quite well.

With keywords in hand, the next step is to think about the CTA text that can bring out more conversions through a responsive mobile web design. In the above screenshot, Mailchimp could have used, “See pricing” but they went with “Pick a plan” even though the page links to the pricing page.

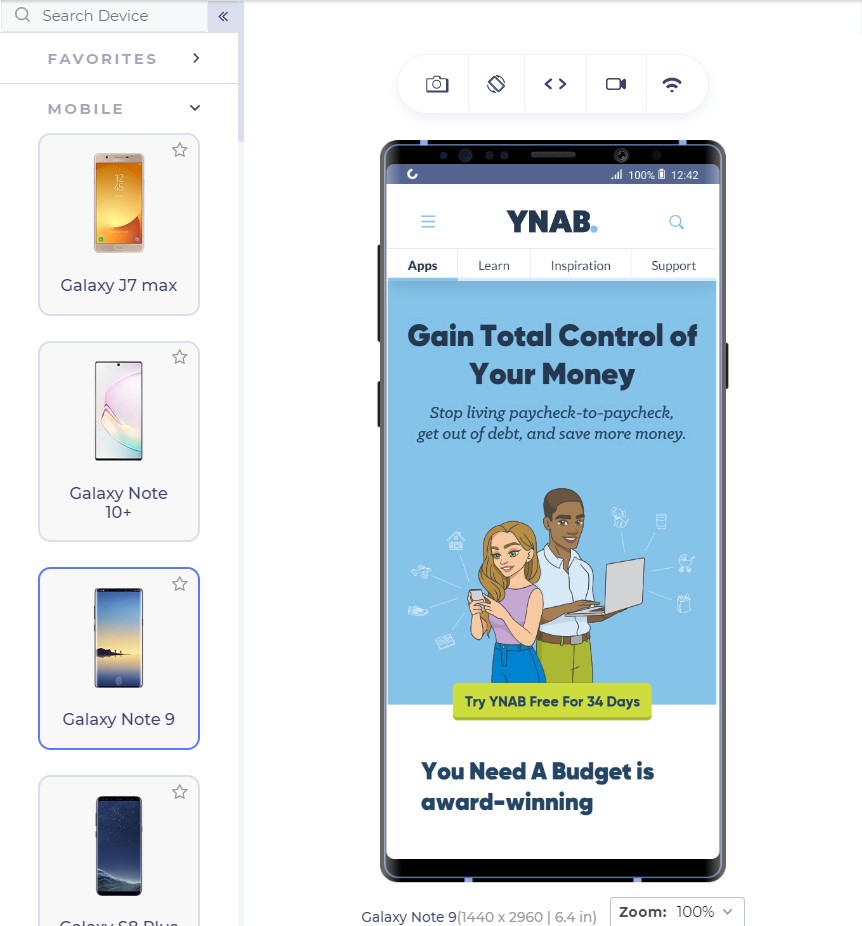
Similarly, Youneedabudget provides the user with “Try YNAB Free For 34 Days” instead of Sign Up or Try YNAB Free.

Research these words and find out why your user visits your website. Show them exactly what they are looking for through the CTAs and the conversion rates would see an increase.

The CTA should also look like a “CTA” and work like one. If the CTA gets blended into the background and looks like a ghost button, it loses its purpose. CTAs should be a contrast in colour speaking out loud and demanding attention from the user; that is what they are there for.

Mailchimp does that perfectly with a little darker shade of yellow in the background and CTA with blue; a complete contrast.

For business providers looking for direct leads, forms work as fine as a button since they cannot provide all the information in concise segments and users have a lot of other doubts. For example, interior designing. Interior designing has different requirements for different users and personal contact is necessary. A responsive form works as a great CTA here:

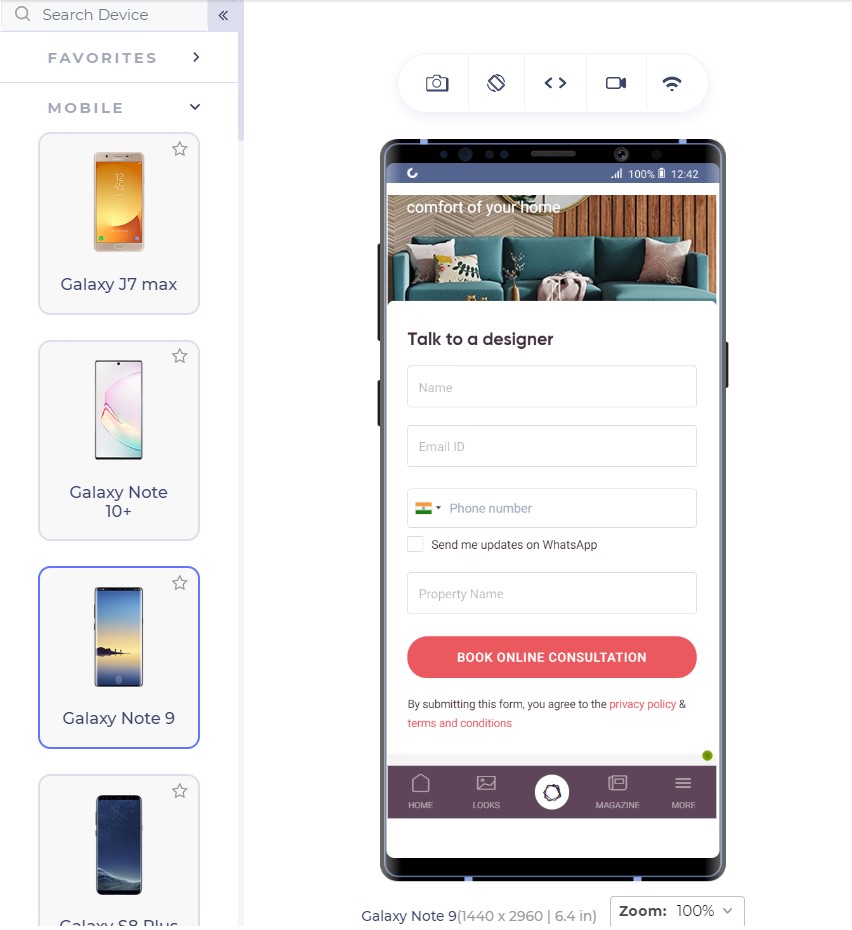
The number of fields is important to understand the conversion rates. A user is not interested in filling too many fields and will bounce back too easily. Quicksprout shows how the number of fields leads to a lower conversion rate on the mobile:

More than 5 fields in a form is intimidating for the user and the user is unlikely to complete the form. If you cannot manage to lower down the fields below 6 or 7, use the autocomplete feature of the browser in your HTML code so that the user can quickly fill out the form in one tap. Autocomplete is available in major browsers today and is helpful for the user.

If your CTA is a call button, it should be a one-click button instead of plain text. Do not expect your user to take the burden of copying the number and moving onto his dial pad, paste it and then call you.

Remember the 2-second rule!

Google aims at 0.5 second load time when it comes to loading any Google’s product. But don’t worry, we still have not touched such a high-performance statistic practically although we have come a long way in the last decade. Google states that 2 second is the user’s “acceptability” for the website load time. So how is it affecting our conversion rates?

As it turns out, the bounce rate depends heavily on the website loading time:

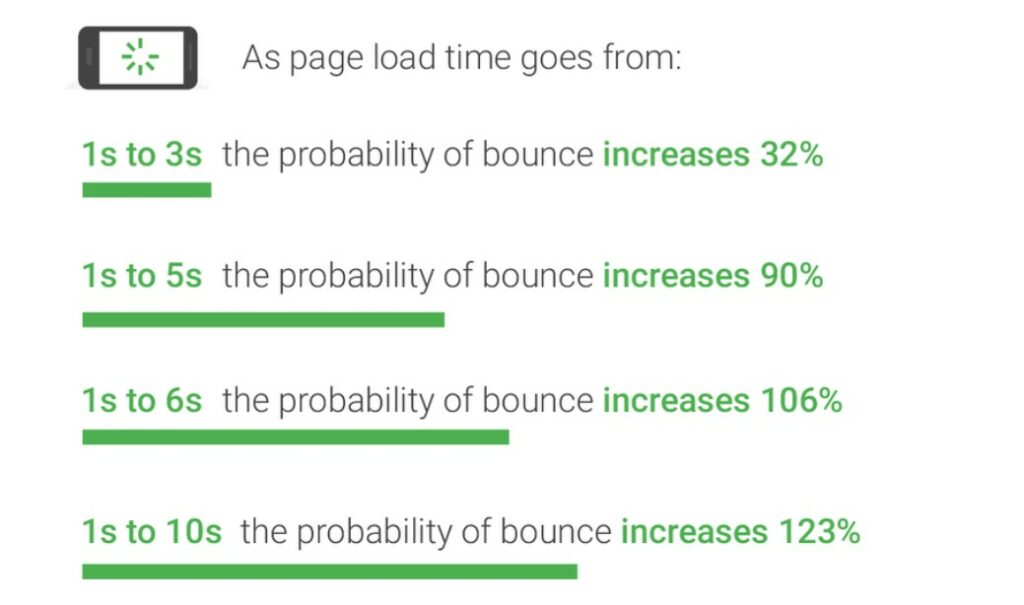
Gone are the days of 2G connection when people could wait a hundred seconds for the website to load. With the increase in elements on the website leading to a lower load time, the conversion rate drops by a whopping 95%!!

What can we do to increase loading speed?

The question drops to the mind as to what we can do as web developers to decrease the web page load time when the network plays a vital role which we have no idea about. As a developer, we can follow a series of checks on our responsive mobile design to ensure higher conversion rate and simultaneously lower bounce rates:

Content Display Improvement

A good way to start is to code the web page to display something (if not all) to the user as early as possible. For example, AJAX queries are a great way to show a partial content to the user on the first view.

Server Improvement

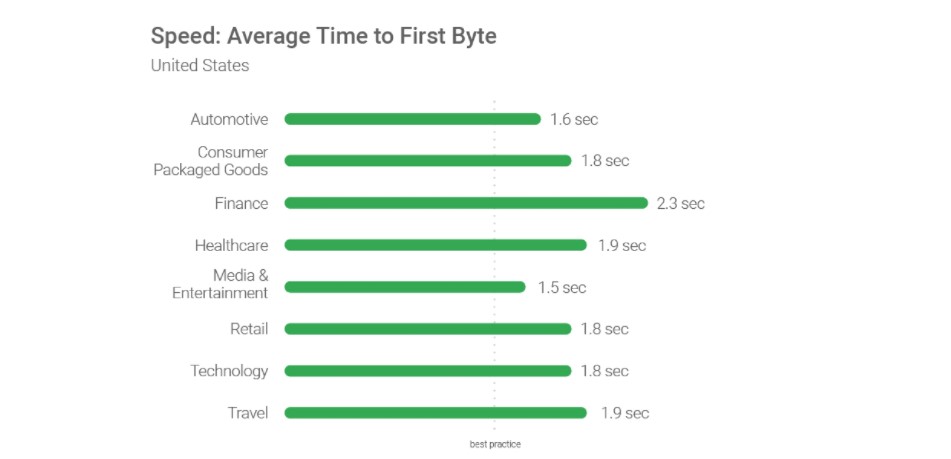
Use a good server!! Servers play an important role as they are responsible for not only communicating with requests but also sending the first byte to the user. Google recommends a time of 1.3 seconds for the mobile server to communicate with the first byte. The lower the better.

The figure shows recommended average response time of the mobile server in various categories:

Request Count Optimization

Lowering the number of requests to the server also decreases the overall page load time. The lesser number of requests would generally mean lesser elements to fetch. While Google recommends less than 50, today’s average lies somewhere between 120-170.

Weight of Elements

An extremely important factor in determining the loading speed of the website is the weight of elements present in the mobile web page. The study found out that websites use too many elements in order to lure the users which slows down the loading speed even on the 4G connection (which is the most popular). 70% of the pages took 5 seconds for any visual element to first appear on the web page. This has made the average loading time to 15 seconds as compared to the recommended 2 seconds.

The main culprit; images. Providing an extremely high-quality image will just decrease the conversion rates especially the ones which are nowhere related to the product such as background or achievement thumbnails. Applying very high-quality images without compression can load up the page to as high as 4MB which is more than the average.

The analysis is done in the study also found an image worth 16 MB of size on a web page which is a simple blunder, an invitation to decrease the conversion rates. What can we do? Compress these images and use proper image formats.

By simply compressing the images on the web page, the developers can save up to 250 KB of size on as high as 25% of the website analysed. Image format can help you in decreasing the load time too. Out of all the mobile-friendly websites, 46% use JPEG and 28% use PNG. The reason behind the success of JPEG is that it is a lossy compression losing bits in the process. JPEG is a great format to use when too much focus is not on the extreme detail of the image like nature images, landscapes or background color shades etc. PNG on the other hand is lossless and saves the bits in the process. PNG images are great when sharpness, details and observations are required in the image.

The following image is a JPEG image:

This image is of a natural scene and hence does not demand very small details for the user. Your user will not zoom into the Taj dome to check out the colour shade. This image makes about 127 KB in size.

The same image in PNG consumes 714 KB of the web page which is extremely unnecessary.

To determine your website’s performance, you can use a trusted tool PageSpeedInsights by Google.

To increase the speed of the landing page, developers can also make use of CDN or Cache that web service providers such as Amazon offer. These are very fast and help store data according to the geographic locations.

A/B Testing and you are done!

When Google launched ads on Gmail, they were not sure which blue colour to use. In their experiment, they decided to provide different shades of blue to different users and see their response. With 1% of users getting one shade and another 1% getting another, Google ended up testing among 40 shades of blue to 40 different groups. The final blue selected in this experiment earned them an additional $200 million in revenue.

This is termed as A/B testing. A/B testing is a process of comparing two different versions of a web page by giving them to different groups and recording their response. A/B testing has been used extensively today to finalize the colour, location or size of the CTA button. An experiment between green and red CTA buttons showed that the red CTA button performed 21% better on 2000 page visits. The 21% increase in the conversion rates points towards how important A/B testing is today.

This does not mean every red CTA button will outperform green ones. Performing A/B testing will provide conclusive results by which you can increase the conversions and they are different for different websites.

Not only CTAs, as a developer you can also test the headlines, buttons and other important content to decrease the bounce rate which eventually does result in increased conversions. You can use Heatmap tools for A/B testing.

Conclusion

If you ever believed that responsiveness is everything there is to increase the CTR, you are not alone. The researches and studies have brought out a lot more about the behavioural aspect of a user than we knew before. From colour to the font-size, conversion rates on a mobile device is like a house on wooden pillars. All of them together increases the CTR to its capabilities and give your revenue a boost up.

Apart from the points discussed in this post, as a developer, you can also perform certain enhancements on the website for better conversions. User experience always matters on a mobile website. Whether it is conversions, word of mouth or any other target, you will always be rewarded for a better user experience. Enhancements such as not losing the sessions when the back button is pressed, providing cart support on multiple devices or shutting up the navigation bar in a hamburger menu. These enhancements are always noticed by the user and the easier it is for him, the better are the chances of conversions. So the next time you are busy developing your website, make a checklist and boost up that conversion rate from mobile web pages.

Justinmind 9 is here! UI Design and Prototyping Come Together

In case you are unaware, Justinmind is an all-in-one UI design, wireframing and prototyping platform for web and mobile apps. It lets you preview ideas on various screens, including web browsers, Android and iOS. The drag-and-drop interface makes it easier for beginners to get started using templates and customize them according to their own requirements. The platform comes with UI Kits preloaded that enable you to design beautiful interfaces with clickable regions and functional UI prototypes. Transitions, gestures, animations, effects and more are also covered, while data tables, smart forms and dynamic behavior ensure realistic simulation of your ideas.

Now version 9 of Justinmind has been released with a revamped UI, frictionless developer handoff, 10x speed increase, and dozens of new design features. In this article, we are going to take a look at the improvements in this latest version so you can see why you should give Justinmind a try, if you aren’t already using it.

Revamped Workspace UI

The latest release emphasizes your user experience, so that everything appears where you need it, when you need it. With a new toolbar design that contains a multitude of shortcuts, repetitive tasks can be performed at a fraction of previous speeds. For example, by simply dragging and pressing the CMD key for Mac or the CTRL button for Windows, you can insert dynamic panels and other containers onto the canvas quickly and easily.

Align tools, with screen and template guides, allow you to align elements even if there is only a single element on the canvas. Resizing is also easier using the new aspect ratio constraint feature.

Justinmind - toolbar

10 Times Faster – Even With Huge Prototypes!

In this new version of Justinmind, the platform’s performance has been dramatically increased to make it 10 times faster than before. This speed increase will greatly improve your production time, which translates to increased revenue.

Justinmind - 10 times faster

Enhanced Handoff From Designers To Developers

In today’s collaborative work environments, it’s important to provide frictionless handoffs from designers to developers. Justinmind 9 does just that, with a web-based element where developers can inspect a prototype’s assets, inspect CSS styles, red line, and get other general information. The developers do not even have to have the software installed or download prototypes!

Justinmind - developer handoff

New Design Features

No more switching back and forth between design and prototyping tools – you can do it all in Justinmind 9! Check out some of the new features listed below:

  • Direct Selection Tool – select single elements that are inside containers or grouped together.
  • Pixel Perfect Text Editing – Text editing now matches 100% with text visualization. You can also preview all your fonts by using the fonts selector.
  • Enhanced Zooming – newly tweaked super-fast precision zoom feature.
  • Widget Preview – preview UI widgets in their libraries before dragging them on to the canvas for editing.
  • Redesigned Color Palette – new much more varied and seasoned color palette, with increased transparency in gradients.

Justinmind - design features

Many More New Features Make Justinmind 9 A Must To Try

Whether you are already using Justinmind, or you’ve never tried it before, these new developments in the latest release make it a must to try out as a tool in your design and prototyping arsenal. Best of all, it’s absolutely free to download and give a thorough run through, with an affordable price starting at $19 USD per user per month. There is even a completely free version with limitations after the 15-day full-featured trial runs out. So give it a try and start improving your design and prototyping efficiency today!

How To Use Mailchimp’s New Creative Assistant To Brand Your Campaigns Automatically

If you’re not already familiar with Mailchimp, you should be! Mailchimp is one of the top online marketing platforms around – we use it here at 1WD to send out our newsletters every other week. There are many other ways you can use Mailchimp to market your business, and now they have made it even easier with their new AI-powered design tool: Creative Assistant.

Mailchimp's Creative Assistant

In this article we’re going to show you what the new Creative Assistant is, what it does, and how easy it is to use it. Let’s get started!

What Is Mailchimp’s Creative Assistant?

Creative Assistant is the first AI-powered design tool in a major online marketing platform that makes beautiful multichannel designs for you. By simply entering your website’s URL, the AI gets to know your brand and then creates a Brand Kit along with unique, branded designs so you can build better marketing and grow your sales. It uses design best practices and AI to ensure your designs help drive engagement and are professional, beautiful and consistent across channels  —  but you still have the final say to easily make adjustments before publishing. It also resizes the designs based on the marketing channel you plan to use them on. In short, it’s pretty sweet!

How Does The Creative Assistant Work?

To show you how simple it is to start using the Creative Assistant, we decided to give it a try in our own Mailchimp account. Here’s how easy it was to get up and running.

First, we signed into our Mailchimp account, navigated to the Content Studio, entered our URL and clicked the button labeled “Show Me Designs”.

Mailchimp's Creative Assistant - Step 1

After a minute or two, this screen showed up:

Mailchimp's Creative Assistant - Designs

As you can see, the AI grabbed our logo, Google fonts, brand colors, and an excerpt from one of our latest posts. It even managed to take our logo and create a white version for darker backgrounds (this setting can be tweaked in the Brand Kit that is also created). The stock image was pulled by the AI from Unsplash.

This was an impressive start, but we wanted to take this up a notch, so we clicked on the “Content” button in the top right and quickly changed out the text and images to get this:

Mailchimp's Creative Assistant - Results Edited

Wow! That was quick! Now we have ready-made, professional designs that we can use across our marketing channels to promote this post. By clicking the dropdown next to the size we’re viewing, we could see the designs in various sizes, automatically generated for a number of marketing channels at the correct sizes. Check out some of the Instagram posts that were generated:

Mailchimp's Creative Assistant - Instagram Post Designs

Color us impressed! There are also a variety of other sizes that the Creative Assistant can generate for Facebook posts and ads, Twitter, Linkedin, and much more. So instead of having to open up your favorite design software and create your own marketing assets for each platform every time, it can all be done quickly and easily for you all in one place. This can save us so much time!

Of course, you can also edit the style and designs of each of the assets created, and do the same with the Brand Kit that was generated. Here’s a look at the Brand Kit it created for us:

Mailchimp's Creative Assistant - Brand Kit

By clicking on any of the above assets we were able to edit them to our liking, changing colors, contexts, setting primary logo, and setting the Brand Personality. The changes we make are then used throughout our account in design assets and campaigns.

The Creative Assistant can also be used in other ways and other areas throughout Mailchimp. For instance, it can be used while editing a newsletter’s design. Look how, by simply clicking the Creative Assistant button within the newsletter editing page, the first screenshot was replaced by the second.

Before:

Newsletter Before

After:

Newsletter After

Start Using This New Tool Today!

Obviously, the results of our experience with Mailchimp’s new Creative Assistant were beyond impressive. We will definitely be using it from now on and learning how our marketing efforts can benefit even more than this brief look has shown us. The Creative Assistant is currently in beta, but that doesn’t mean you can’t start using it today. As you’ve seen, it is already an important, time-saving, and unique tool to add to your marketing arsenal. If you’re already using Mailchimp, you must give this new feature a try. And if you’re not a current Mailchimp account holder, we strongly encourage you to get signed up – their pricing plans are inexpensive and they even have a free plan. So head on over and get started with Mailchimp’s Creative Assistant now!

Here’s What You Need To Know About Prime Day 2020

This hasn’t been a normal year in the least. We missed out on the typical Prime Day window over the summer because of the pandemic, but we’re looking to make up for lost time. At long last, Amazon has a massive two-day sale planned for October 13th and 14th, and we’re ready to go.

To celebrate the belated extravaganza, we’ll be sifting through the very best deals across Amazon, and highlighting our favorites here for you on both days.

In the meantime, we’ve rounded up some top tips so that you can squeeze every drop out of Prime Day. Now, let’s get ready to save.

Get Amazon Prime

From free shipping to Twitch gaming bonuses to the hefty library of streaming video, Amazon Prime is worth every penny. If you’re not already a member, there’s never been a better time to start a free trial.

Are you a student? Well, you might be eligible for six-month trial of Prime with a lower monthly cost after that’s finished. And if you’re using EBT or Medicaid, you can probably save big on the monthly cost.

Prime Day 2020 - Big Ticket Deals

Keep Up To Date On Deals

Those in the know keep an eye on Amazon’s dedicated page for their daily deals. It gets fairly long, and it’s not necessarily comprehensive, but it’s a good place to quickly check for highlighted bargains.

Prime Day 2020 - Daily Deals

Give Amazon Prime

Do you have a loved one who doesn’t already enjoy the benefits of Amazon Prime? Gifting a membership is a snap, and it’ll truly make their day. And since Black Friday and Cyber Monday are right around the corner, it’ll come in handy.

Prime Day 2020 - Give Amazon Prime

Ask Alexa

In years past, we’ve found that Amazon’s voice assistant has had a head start on some sweet bargains. If you have a device like an Echo, you can always try asking it if there are any Prime Day deals for you.

Prime Day 2020 - Ask Alexa

Bookmark This Page

When Prime Day goes live, we’ll be updating this page with the very best deals Amazon has on offer. If you don’t want to miss out, drag this link to your bookmarks bar: 1WD Prime Day Picks.

Digg Picks

Keep Up To Date With Digg Picks

Our friends at Digg stay on top of sales, new gear and must-see oddities year-round. If you want recommendations before, during and after Prime Day, Digg has you covered. And if you want the best picks of the week in your inbox every week, you can sign up for their newsletter.

The Easiest Way To Collect and Manage Website Feedback

Whether you work for an agency or you are a freelance web designer, developer or both, you are undoubtedly familiar with the common nightmare of getting feedback and tracking bugs and issues on your projects, especially from clients who do not possess technical skills. There are various ways that we try to get input from clients while we work on their projects, but most of them – like support tickets, long email chains, spreadsheets, or an even more frustrating combination of all of the above – do not provide the tools or centralization we need to have an effective, streamlined way to collect website feedback. In those instances we usually end up with important information we need quick access to stored in numerous different places where it can get lost, overlooked, or forgotten.

So how can we save time, money, and anxiety when we’re working on client projects and need their input? Fortunately there is a tool that is made for just such a solution! BugHerd takes care of all of these issues and puts them in one, simple, easy-to-access place, where you and your clients can comment on and resolve issues right on top of your website project. As they say, it’s like sticky notes on a website. What could be more intuitive?

In this article we’ll take a look at some of the key features BugHerd has to offer, what it takes to set up, and how you can start using BugHerd today. Best of all, Bugherd offers a FREE 14-day trial with no credit card required upfront, so you can take it for a test run and decide for yourself without any risk. Let’s take a look!

Bugherd - Turn this website feedback into this

Flexible setup. Install in minutes.

You can use BugHerd as a browser extension or a JavaScript snippet or both together for maximum flexibility. The browser extension takes 2 minutes to install, and you can simply copy the JS snippet into your website’s code to make it work across all browsers on desktop and mobile. Once installed, BugHerd acts like a transparent layer on your website that only your team, and your clients, can see. Website feedback and tasks are pinned directly on the page to an element, complete with metadata like screenshots, CSS selector data, Operating System & Browser Data. Users can also annotate screenshots with design feedback if they wish, and only those who have been invited to give feedback can see the BugHerd sidebar when visiting the website.

How It Works

Simply point & click on any element to report an issue or provide website feedback, then it is “pinned” directly to the website issue. Designers and developers can then access the issue and its details directly on the site, so you’re not having to dig through emails or spreadsheets to find any outstanding tasks.

Bugherd noise - easiest website feedback tool

Tasks and the technical details are also sent to a Task Board (a kanban board with a customizable workflow) where they can be assigned to team members and tracked to completion. This makes BugHerd perfect for using with remote teams and clients to ensure everyone is on the same page.

Imagine eliminating those emails back and forth where the client is giving website feedback and requests a change, describing where they want it on the page in such a way that you have to send them a screenshot with arrows asking, “Is this what you were talking about?” Instead, the client (or your team) “pins” their website feedback directly on the page in the exact location they want to discuss! No more back and forth, and no more digging through spreadsheets or other tools trying to find something.

Bugherd technical feedback - easiest website feedback tool

Additional Features

  • Automatically attach screenshots with every bug report.
  • 3rd-Party integrations with services like Zapier, GitHub, Slack, Basecamp and more.
  • Version control sync that lets you update tasks with commit messages.
  • Unlimited projects.
  • Inline tagging.
  • Upload additional files like specs, logs or mockups and attach them to website feedback and issues.
  • Real-time comment feed.
  • Permission management lets you control who has access to what.

Looking For The Easiest Tool To Collect and Manage Website Feedback? Give BugHerd a try!

BugHerd is a must-have tool for web designers and developers, with a variety of affordable pricing plans that make it an invaluable tool to add to your team’s arsenal. You get contextualized website feedback directly on your project’s pages. Your tasks can easily be delegated, prioritized, tracked, and stay organized both on the project itself and on the taskboard, which is easy to sort, search, and filter through to find what you need. Your productivity will be increased dramatically, as you will be spending far less time on miscommunications with clients. And finally, it’s quick, easy, and FREE to set up and try it out for yourself! So give BugHerd a try – we’re confident you will thank us later.

New ActiveCollab is Here!

After months of development, New ActiveCollab, a pioneer of project management software with over a decade of experience, is finally here – the perfect start to 2019.

ActiveCollab is a project management software that serves as a central hub for team communication, collaboration, and project planning. It enables complete management of projects by breaking them down into more actionable tasks. When tasks are assigned to team members and a date with automatic reminders is set, it ensures that missed deadlines will be a thing of the past – since everyone knows exactly what they are working on and when it needs to be done. The option to track time is invaluable in dealing with clients – they will be able to see precisely how much time was spent working on their projects, and those tracked time reports can be used to issue custom invoices.

Their mission – to eliminate busywork and to help make Real Work happen.

New ActiveCollab is a product that immeasurable love and care have been poured into, with every change, tweak, upgrade, new feature and addition being the result of careful planning and communication with customers.

ActiveCollab Logo

It is the collaborative success of dozens of people – developers, designers, marketers, customer care, etc. – each contributing their unique perspectives and special skills. Because of this, we can safely say that New ActiveCollab is not just the best-looking, most powerful version yet, but also – the most personal.

Apart from the fresh, sleek, redesigned look, there are many other substantial improvements and changes all across the board. Here is a list of the most significant ones:

A Brand New Look & Feel

In new ActiveCollab, dozens of refinements that fix and improve the design were added – making the software much smoother and more enjoyable to use. There are also several new themes to choose from.

ActiveCollab Themes

This is much more than just a simple visual redesign – it is an evolution of ActiveCollab. A sleek, fluid tool that’s wonderful to behold and a joy to use.

Task Dependencies With Automatic Rescheduling

The biggest and most important – as well as most requested – New ActiveCollab feature. Using Task Dependencies, child tasks that are dependent on parent tasks can be set. This allows for greater control over tasks – in which order and when they will be completed, and it opens up a range of advanced management options in every step of the work process.

Task Dependencies Demonstration

This addition will eliminate confusion over the exact turn in which tasks have to be finished, since they will no longer be done out of sequence. Everyone has had work experiences when the projects worked on would slow down because people couldn’t work on their own tasks until another segment was done. Automatic rescheduling means that when a parent task is moved around, their child tasks will automatically adjust their dates as well, and they also take weekends and days off into account.

Since Your Last Visit

All the projects and tasks we are involved in continue to make progress even in our absence. Which means that a lot of time catching up on everything that happened is required. This feature highlights all the comments that were made since the last time the software was visited.

Wasting time sorting new information from the old will no longer be an issue, and Project Managers will be able to devote their time to other more pressing concerns, instead of helping everyone catch up to speed.

Reactions

Communication is vital to collaboration, and a single thumbs up is often all you really need to do to get the conversation moving. We took a cue from to-the-point communication of social media, where you can express so much with an emoticon. So now, one of seven reactions can be used instead of typing out an entire lengthy reply. They are: thumbs up, thumbs down, smiley face, clapping hands, heart, party popper, and thinking face.

ActiveCollab Reactions

Live Comments

New ActiveCollab is now entirely in real time. Often, more than one user would comment a task at the same time, and they would have to refresh the page to see those other comments.

ActiveCollab Live Comments Demonstration

But now, all the comments – and the user(s) writing them – are visible in real time, meaning that confusion and the busywork of manually refreshing a page to see those new comments are a thing of the past.

Improved Attachment Navigation

A small change, but one that saves a lot of time, especially for designers, or those that have to deal with a lot of attachments. Before, the attachments would have to be navigated individually, one by one – by leaving and reentering the navigation window every time.

Attachment in ActiveCollab

Now, all the attachments can be comfortably scrolled through with the left and right arrow keys, or by clicking the left and right icon buttons. The attachments are sorted according to the time they were added, so the newest file will be shown first.

Experience Real Work With New ActiveCollab

Regardless if you’re a project management pro, or are completely new to it, New ActiveCollab is the way to go. With so many new and exciting additions, ActiveCollab is now more powerful and versatile than ever before, and is so much more than just another Project Management Tool – it’s the proper way to do your Real Work.

Try out New ActiveCollab for a completely free 14-day trial to make Real Work happen.