How to Do A/B Split Testing in WordPress (Step by Step)

Do you want to run A/B split tests on your WordPress site to improve conversions?

Split testing helps you understand how small changes in content and design affect user behavior. You can create different versions of a landing page and see which one converts the best.

In this article, we will show you how to easily do A/B split testing in WordPress.

How to do A/B split testing in WordPress

What Is A/B Split Testing?

A/B split testing is a technique that allows you to compare two versions of the same web page against each other so that you can determine which one performs better and produces the best results.

Marketers often use A/B split testing for their landing pages to find out which one gets them more conversions and sales.

Split testing can be used to test any element on the page, including call-to-action buttons, color schemes, layout changes, marketing text, images, and more.

Basically, you show different variations of a page to your audience. After that, you track user engagement and conversions to find out which variation gives you the best results.

Split testing explained

How to Do A/B Split Testing in WordPress

Before we move forward, there are a few things you will need for this tutorial.

Previously, Google Optimize was a free tool that many people used for split testing. However, Google Optimize sunsetted on September 30, 2023. Google announced that it would be investing in A/B testing in Google Analytics 4, which is the latest version of the famous analytics platform.

This means that if you were using Google Optimize before, then you can no longer access your experiments, personalizations, and historical data. When you open your account, you will see a message at the top showing that the tool is now sunset.

Fortunately, there are some other simple ways of A/B testing in WordPress. These are great Google Optimize alternatives, as they are easier to use and help you conduct experiments in WordPress. Simply click the links below to jump ahead to your preferred method:

Method 1: A/B Testing in WordPress Using Thrive Optimize

Thrive Optimize is part of the Thrive Theme suite and lets you run experiments and split tests in WordPress.

Since Google Optimize is no longer available, Thrive Optimize is a great alternative to conduct A/B tests. It offers more features, and you don’t need to enter a code to run a split test. Plus, it will keep your experiment data safe.

Just keep in mind that you will only be able to use Thrive Optimize if you are also using the Thrive Architect page builder plugin.

First, you’ll need to visit the Thrive Themes website and sign up for an account.

Thrive Theme

After creating an account, you can download the Thrive Product Manager plugin from your account area.

Next, you’ll need to install and activate the Thrive Product Manager plugin. For more details, please see our guide on how to install a WordPress plugin.

From here, you can go to the Product Manager page from your WordPress dashboard and click the ‘Log into my account’ button.

Go to Thrive product manager

On the next screen, you’ll see different Thrive Theme products.

From here, you’ll need to install Thrive Optimize and Thrive Architect. Simply check the ‘Install Product’ options and click the ‘Install selected products’ button at the bottom.

Install thrive optimize and thrive architect

If the products don’t automatically activate, then you will need to head back to the Product Manager page from your WordPress dashboard and activate Thrive Architect and Thrive Optimize.

You should now see a success message once the plugin is installed.

View success message

Next, you’ll need to head to Thrive Dashboard » Thrive Optimize from your WordPress admin panel.

After that, you can add a new page by going to Pages » Add New from your WordPress admin panel. Once you are in the content editor, simply click the ‘Launch Thrive Architect’ button.

Edit with Thrive Architect

Next, Thrive Architect will ask you what type of page you would like to create.

You can create a normal page, a blank page with a header and footer, a completely blank page, or select a pre-built landing page. For this tutorial, we will select the ‘Pre-built Landing Page’ option.

Select the type of page you want to create

There are many pre-built landing page templates to choose from. Simply select one and edit your page.

For more details on how to edit your page with Thrive Architect, you can see our guide on how to design landing pages in WordPress.

Select landing page template

In the Thrive Architect page builder, you will see an A/B testing option in the right panel.

Go ahead and click the ‘A/B’ icon.

Click split testing icon

Next, you can create different variants for your page for split testing.

We recommend clicking the ‘Duplicate this variation’ button for your control page. This will create a clone of your main page so you won’t have to create the landing page all over again from scratch.

Create a duplicate variation

You will now see a duplicate variant of your landing page.

Go ahead and click the ‘Edit Variation’ button to make changes.

Edit your variation

Next, you can edit the landing page to split-test different elements.

For example, we will change the color of the call to action (CTA) button. Once you are done, just click the ‘Save Work’ button at the bottom.

Make changes to variation

Now, you can click the ‘A/B’ button from the panel on the left to go back to the A/B testing dashboard.

Next, Thrive Architect also lets you split traffic for each variation. Simply use the toggles at the bottom to allocate the amount of traffic to each page.

Once you are done, go ahead and click the ‘Set Up & Start A/B Test’ option.

Set up and start A/B test

A popup window will now open.

Go ahead and enter a name for your split test and a short description. You can also toggle on the ‘Enable Automatic Winner Settings’ option and set conditions to pick a clear winner, as well as the duration that Thrive Optimize will run the A/B test.

Starting your A/B test

After that, simply click the ‘Next’ button.

Now, you can select a goal for your test. There are 3 options, which include revenue, visit goal page, and subscription. After picking a goal, you can click the ‘Start A/B Test’ button.

Select a goal for the test

For this tutorial, we will select the ‘Subscription’ goal for our test.

Next, you’ll be redirected to the WordPress content editor. You can scroll down to the ‘Thrive Optimize – A/B Test Overview’ meta box and see the 2 variations.

You don’t have to do anything else. The plugin will now test both variations and show the winner.

View Thrive Optimize metabox

To view how the variations are performing, you can click the ‘View Test Details’ option in the meta box.

Here, you can see the conversions over time for each variant and also see which is the control variant. There is also an option to stop the test and choose a winner.

View split test results

Method 2: A/B Testing in WordPress Using Nelio AB Testing (Free)

If you are looking for a free solution for running A/B tests on your WordPress site, then you can use Nelio AB Testing.

While the free version isn’t as powerful as Thrive Optimize, you will get basic features to conduct experiments on your website. For example, you can test headlines, create two different versions of a page to test them, and more.

However, if you are looking for a visual builder and additional options like assigning weights to each variant in the experiment, then we recommend using the first method instead.

To start, you’ll need to install and activate the Nelio AB Testing plugin. If you need help, then please see our guide on how to install a WordPress plugin.

Upon activation, you can head to Nelio A/B Testing from your WordPress dashboard. From here, click the checkbox to accept the terms of service and privacy policy of the plugin, and then click the ‘Continue’ button.

Accept Nelio testing terms of service

After that, you’ll be taken to the Neilo A/B Testing » Tests page in the WordPress admin panel.

Go ahead and click the ‘Add Test’ button.

Add a new test

Next, you’ll see options to test on your website. For example, the plugin lets you split test pages, posts, headlines, widgets, menus, themes, JavaScript, CSS, and more.

For the sake of this tutorial, we will select the ‘Headline’ option and split-test some titles for a blog post.

Choose test type

After that, you can enter a title for your test at the top.

From here, you will see the Control Version and Variants section. First, you can click the dropdown menu and choose a post title. This will be the control version (labeled A).

Enter test title and select post

Next, you can scroll down and enter details of a variant (labeled B).

This will be the new headline you will be testing against the one that’s already live.

Enter variant details for testing

After that, you can scroll down to the Conversion Goals and Actions section. You will notice that the plugin will use the default goal for this experiment type. In this case, it will measure views for your page with a new headline.

However, you can define your own goals for other experiment types. For example, if you want to test a page, then you can select whether you’d like to measure page views, clicks, clicks on external links, YouTube video playback, or choose a custom event.

Select conversion goal and action

The plugin also lets you create segmentation and narrow your test audience. However, this feature is only available for premium users, and you’d need to subscribe to a paid plan.

After setting your conversion goals, you can click the ‘Start’ button at the top to start A/B testing.

Select goal and start the test

Nelio A/B Testing plugin will now conduct the experiment.

To stop the experiment, you can go to the Nelio A/B Testing » Tests page and then click the ‘Stop’ link under the test.

Stop your test

You can also click the ‘View Results’ option to see which variant is performing the best.

The plugin will help you select a winner and show conversions for each variant.

View test results

Bonus Tips for Running A/B Tests in WordPress

When it comes to doing split tests on your website, here are some tips for running your experiments the right way:

  • Decide on a Goal – You’ll need to first decide which feature you want to test and what the end goal is. A good place to start is by studying your audience and their needs. You can also get feedback from users to understand what they are looking for and then split test elements on your site to boost conversions.
  • Keep Your Experiments Simple – It’s generally a good idea to just create 2 versions of your landing pages, ads, text, and other elements. This makes it easier to compare which variant is performing the best.
  • Document Your Split Test Results – After you’ve successfully conducted an experiment, you should document the results. This way, you’ll have valuable data for future reference and easily see what worked on your site.

We hope this article helped you learn how to do A/B split testing in WordPress. You may also want to see our guide to WordPress conversion tracking made simple and how to create an email newsletter the right way.

The post How to Do A/B Split Testing in WordPress (Step by Step) first appeared on WPBeginner.

9 Best Google Optimize Alternatives (Free and Paid)

Recently one of our readers asked us for our suggestion on the best Google Optimize alternative?

Google Optimize is a tool that lets you conduct experiments on your website. However, Google recently announced that the Optimize tool will be sunset in September 2023, and your experiments will stop after this date.

This has left many business owners and marketers scrambling to quickly find a Google Optimize alternative for their A/B testing needs.

In this article, we will share the best Google Optimize alternatives, so you can choose the solution that works for your needs. We will also share what we’re going to be switching to as well.

Best Google Optimize alternatives

What is Google Optimize and Why Use an Alternative?

Google Optimize is a free tool by Google that allows you to split test pages on your WordPress website and improve user experience.

You can set up conversion experiments using the tool and see if making changes to a landing page increases conversions. For example, you can A/B split-test two versions of a sales page, use different headlines, or change the color of the call to action (CTA) buttons to see which one works the best.

However, Google announced that they will sunset Google Optimize on September 30, 2023. After this date, the tool will no longer be available, and all your experiments and personalizations will end on that date. Besides that, you won’t be able to access data after the sunset date.

You can use a Google Optimize alternative to continue experimenting and testing your site. There are many tools in the market that let you conduct A/B tests with ease, require no coding to set up, and offer powerful features.

Let’s look at the best Google Optimize alternatives especially the ones that works seamlessly with WordPress websites, but several of these Google Optimize competitors will work on all website platforms.

1. Thrive Optimize

Thrive Optimize

Thrive Optimize is the best Google Optimize alternative for WordPress that is super easy to use. It is part of the Thrive Theme suite, which includes an ecosystem of WordPress plugins focused on boosting conversions on your site.

With Thrive Optimize, you can conduct experiments and A/B test landing pages without editing code. Unlike Google Optimize, the plugin is beginner friendly, as there is no need to add code snippets to your site.

You can get started in no time. Simply create a landing page using the visual builder and then create a variant. After that, pick a conversion goal, which includes page visits, opt-in form submissions, and revenue. Once that’s done, go ahead and run the test.

Thrive Optimize Visual Split Testing for WordPress

The best part is that you don’t have to switch between tabs or windows to view the results of your experiments. If you’re using Google Optimize, then you’d have to jump back and forth between tabs to see the results.

Instead, Thrive Optimize shows a report inside your WordPress dashboard. You can quickly view which variant is converting the best. Besides that, you can create as many variations of a landing page for testing as you want. The plugin also picks a winner and shows the best variant.

Pricing: Thrive Optimize is part of the Thrive Themes suite which costs $299 per year and includes 9 other powerful conversion tools. You can also purchase Thrive Optimize bundle for $199 / year.

2. OptinMonster

OptinMonster

OptinMonster is the best WordPress popup plugin and lead generation software in the market. You can create campaigns like floating bars, welcome screen mats, and popups to grow your email list, increase conversions, and get more leads.

OptinMonster offers an A/B testing tool that lets you test different popup and modal campaigns. It makes a great Google Optimize alternative because it’s very easy to use. You can customize and create different variants using the drag-and-drop campaign builder.

Once you’ve created a split test, OptinMonster will randomly show the variations to your visitors and pick a clear winner. You can then see in-depth stats about conversions inside your WordPress dashboard and find out which campaign performs the best.

Pricing: You will need the OptinMonster Plus or higher plan to use the A/B testing feature, with prices starting from $19 per month.

3. VWO Testing

VWO testing

VWO Testing is a popular A/B testing tool and a great alternative to Google Optimize. You get more features than Google Optimize, as it allows you to run multiple experiments on your website, products, apps, and server side.

It comes with a visual builder to change different elements on your webpage, like text, images, shapes, backgrounds, and more. After making the changes, you can run split tests and see which variant performs the best.

VWO Testing offers an AI-power copywriting tool. This way, you can automatically select different headlines, CTA copies, and product descriptions to test.

It also lets you run tests based on user segments and behavior. For instance, you can select a target audience based on time spent on a page, scroll depth, exit intent, and when someone clicks on elements.

Pricing: VWO offers a free plan that you can use for up to 50 thousand users per month. If you have more users, then you can upgrade to their premium plans.

4. FunnelKit

FunnelKit

FunnelKit, formerly known as WooFunnels, is the best WordPress and WooCommerce sales funnel plugin. You can use the plugin to create funnels to generate leads, offer seamless checkouts, 1-click upsells, and more.

FunnelKit is another Google Optimize alternative that comes with an A/B testing feature specially for WooCommerce. You can split-test your product prices, page layouts, messages, designs, and funnels without editing code.

The plugin is beginner friendly and helps you set up experiments within minutes. You can test headings, images, prices, product descriptions, and every other component on a page. FunnelKit also helps declare a winner once there’s enough data to see which funnel converts the best.

Besides that, FunnelKit also offers other features. For example, it offers FunnelKit Automation which allows you to set up automated emails and SMS campaigns.

Pricing: FunnelKit offers multiple pricing plans. To use the A/B Testing feature, you’ll need the Plus plan. It will cost you $179.5 per year.

5. Convert.com

Convert.com

Convert.com is a proven A/B testing tool to help you boost conversions. It provides fast & flicker free A/B testing experience and is known for their speed.

They are a perfect Google Optimize alternative because it gives you access to all the features you’re accustomed to with Google Optimize and then some more.

Convert also let you seamlessly integrate your tests with Google Analytics as well as other tools like Hotjar, Heap, Segment, HubSpot, and more.

Their onboarding is a bit slow, but once you’re up and running, you can create unlimited tests and quickly deploy changes.

Pricing: Convert.com prices start from $99 per month, and you get a 14-day free trial.

6. Crazy Egg

Crazy Egg

Crazy Egg is a popular heatmap tool in the market. You can use heatmaps to see how users behave on your website, where they click, and how they move the mouse cursor and scroll through pages.

Crazy Egg offers an A/B testing tool that you can use to run experiments on your website and boost conversions. What makes it a great Google Optimize alternative is the features it offers along with A/B testing.

You get heatmaps, recordings of visitors using your website, error tracking, surveys, and traffic analytics. Plus, you can configure it without editing code, which isn’t possible if you’re Google Optimize.

Crazy Egg offers a multivariate engine where all you need to do is choose the elements you want to test and add your ideas. The engine then does the heavy lifting and conducts the test for you.

The best part is that it is easily integrated with website builders, including WordPress, Shopify, Squarespace, Wix, and more.

Pricing: Crazy Egg offers different pricing plans starting from $29 per month. You get unlimited A/B tests in each pricing plan, and there is also a 30-day free trial to get started.

7. Adobe Target

Adobe Target

Adobe Target is an enterprise-level solution to run split tests on their website and is part of Adobe Marketing Cloud. It is more powerful than Google Optimize and offers an omnichannel approach to the A/B test.

What this means is that instead of running isolated experiments, Adobe Target lets you run tests on every channel. This way, you get to see how users behave with different variants coming from other channels, like social media, organic traffic, paid search, and more.

The software is easy to use and set up. Plus, its AI-powered automation helps you test multiple experiences and then personalize them for each visitor.

On the downside, Adobe Analytics is only available for users that have Adobe Analytics. If you’re looking for a complete marketing solution with an A/B testing feature, then you can use Thrive Optimize instead.

Pricing: You will need to request a quote and get Adobe Target pricing according to your business needs.

8. Optimizely

Optimizely

Optimizely is one of the most popular Google Optimize alternatives in the market. Their digital experience platform allows you to create every kind of A/B testing experiment for your website.

You can use their visual editor along with advanced targeting features to optimize your A/B testing campaigns. Optimizely works on all website platforms and is a platform of choice by many large brands.

We have used Optimizely in the past when they had a free plan, and it’s an extremely powerful tool for what it does, however the prices are no longer small business friendly.

Pricing: Optimizely does not reveal it’s prices anymore and require that you submit a form to request a quote.

9. Kameleoon

Kameleoon

Kameleoon is the next Google Optimize alternative on our list. It offers powerful solutions and lets you conduct different types of experiments.

For starters, you can run web experiments and A/B test your website and mobile apps. You can assign a business goal to your tests and see which variant is increasing conversions, retention, or engagement.

Kameleoon also offers A/B testing features to advanced users and developers. You can run server-side experiments to improve your product. It easily works in different development languages and frameworks, like PHP, Java, Ruby, Flutter, and more.

Besides that, it offers AI-power personalization. You can provide unique experiences to each visitor, target different segments for testing, and comply with privacy laws like GDPR and CCPA.

Pricing: You will need to request a demo and get a quote for Kameleoon pricing.

Which is the Best Google Optimize Alternative (Expert Pick)

The best Google Optimize alternatives are Thrive Optimize, VWO Testing, and FunnelKit.

If you’re looking for a WordPress A/B testing tool, then Thrive Optimize is our first pick. It gives you all the powerful features, and it’s very affordable. Since it’s part of the Thrive Suite, you also get other solutions like a quiz builder, popup form builder, WordPress page builder, and more.

If you’re looking for an all-around SaaS alternative for Google Optimize that works on all platforms, then we recommend using VWO Testing. They have a generous free plan that should work for most small business owners.

And if you are an eCommerce store owner looking for the best Google Optimize alternative for WooCommerce, then we recommend using FunnelKit. They have deep integration with WooCommerce and allow you to customize every step of the funnel including adding custom 1-click upsells, order bumps, and more to help boost your average order value.

We hope this article helped you find the best Google Optimize alternative. You may also want to see our ultimate WordPress SEO guide to improve your SEO ranking, and see our comparison of the best push notification software with A/B testing features to boost your traffic.

If you liked this article, then please subscribe to our YouTube Channel for WordPress video tutorials. You can also find us on Twitter and Facebook.

The post 9 Best Google Optimize Alternatives (Free and Paid) first appeared on WPBeginner.

How to Add Google Optimize in WordPress (2 Easy Methods)

Are you looking to add Google Optimize on your WordPress site?

Google Optimize is a free tool by Google that helps website owners optimize their sites by running A/B split tests. This allows you to compare two versions of a page and see which one converts better (i.e is more successful).

In this article, we’ll show you how to easily add Google Optimize in WordPress, so you can start running split tests.

How to add Google Optimize in WordPress

What is Google Optimize?

Google Optimize is a free tool that lets you split test your pages and personalize them for your customers. You can link it to both Google Analytics and Google Tag Manager.

Using Google Optimize, you can set up experiments to see if making changes to a page increases your conversion rate.

For instance, you might run an A/B split test where you have two versions of a sales page to see which one performs better.

You might have a different headline on each page or a different product image on your online store. By split testing, you can gradually optimize your page to get the highest conversion rate.

Google Optimize lets you create these split-tests with a drag & drop editor. After that it shows each variation to your visitors at random, so you can gather data about what works best.

What Will You Need to Use Google Optimize?

You need a Google Analytics account in order to use Google Optimize on your WordPress site. You’ll also need to have placed the Google Analytics tracking code on your site.

If you don’t already have an account, or if you haven’t put the tracking code on your site, then see our guide on how to install Google Analytics in WordPress for step by step instructions.

You’ll also need MonsterInsights, which is the best Google Analytics plugin for WordPress.

It comes with a Google Optimize addon which makes it super easy to run Google Optimize tests on your website.

MonsterInsights is a paid plugin, and you’ll need their Pro plan to access the Google Optimize addon. If you don’t want to purchase MonsterInsights, then we also have a method on how to setup Google Optimize manually using a free plugin as well.

That being said, let’s see how to add Google Optimize in WordPress like a pro.

Setting Up Your Google Optimize Account

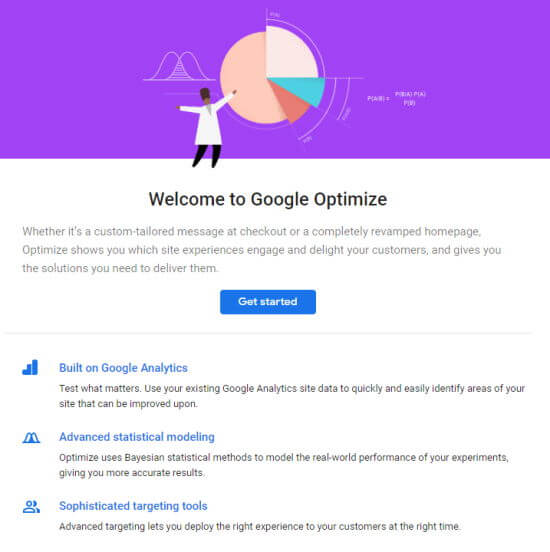
First, you need to go to the Google Optimize website and click on the Get Started button.

The Welcome page for Google Optimize, with Get Started button

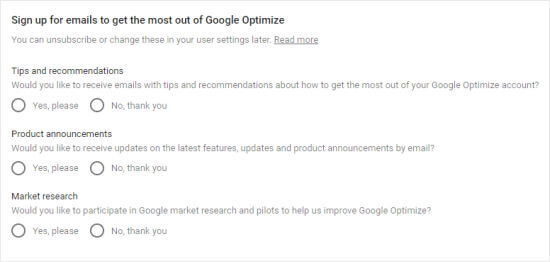
You’ll be prompted to decide whether or not you want to receive Google’s emails. After that, you need to click the options you want, and then click the Next button at the bottom of this screen.

Choose which emails you want to receive from Google

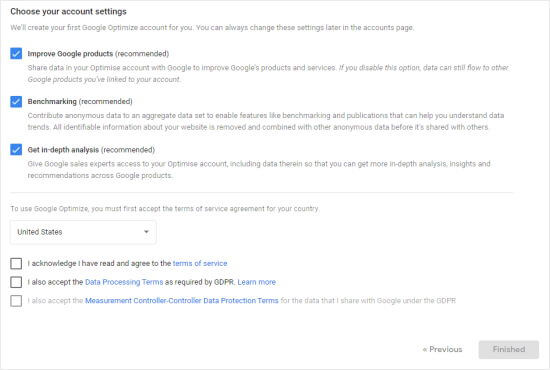
You can now choose specific settings for your account. We suggest simply using the Recommended settings.

Make sure you select your country from the dropdown menu, so you can see the correct terms of service agreement. When you click on these to read them, they’ll open in a new tab, so you won’t lose your place during setup.

The checkboxes may also change depending on what country you select.

Choose your Google Optimize account settings

Next, you need to check the boxes once you’re ready, and then the Finished button will turn blue. Click on it, then Google will set up your Google Optimize account.

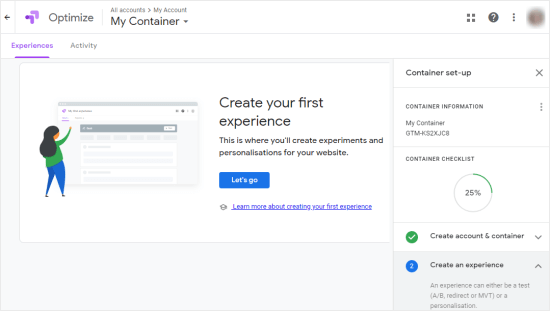
As part of this, Google has created your first container. This will contain your experiments (tests and personalizations), and it needs to be connected to your website.

Your Google Optimize account, with step by step instructions on the right

Although you’re prompted here to create your first experiment, we suggest instead that you link Google Analytics to Google Optimize at this point.

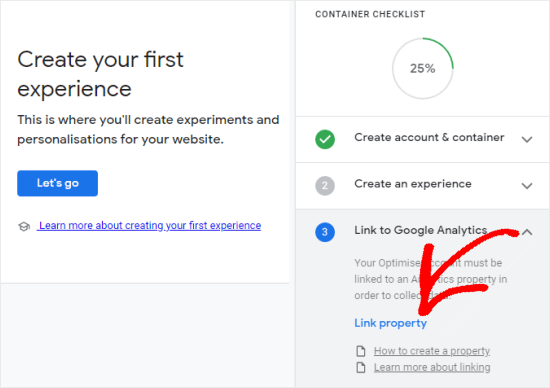
Linking Google Optimize and Google Analytics

On the right-hand side of your screen, you’ll see the Link to Google Analytics step. Click the downwards arrow here and then click Link property.

Linking Google Optimize to your website (click Link property)

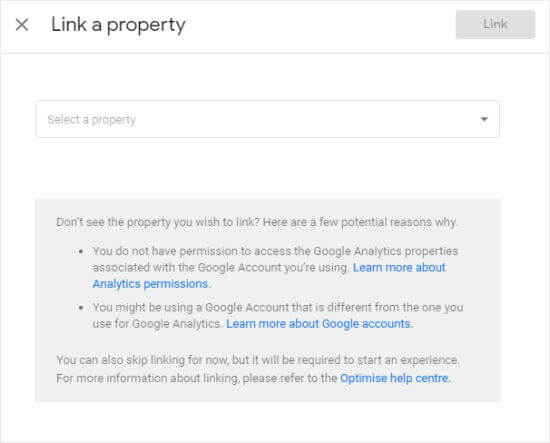
On the next screen, select the website you want to link with. If you can’t see your website here, then that could be because you’ve not finished setting it up in Google Analytics.

Select your website from the dropdown menu

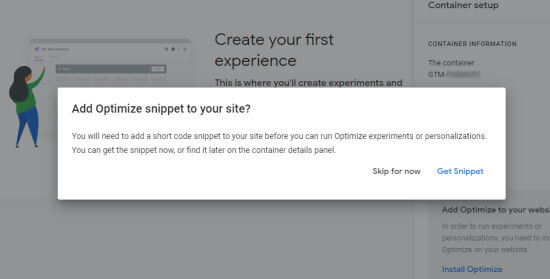
Once you’ve clicked Link, you’ll see this pop up:

The Google Optimize snippet popup

If you’re going to use MonsterInsights to add Google Optimize to your site, which is what we recommend, you can simply click Skip for now. Otherwise, you may want to view and copy the code now as you’ll need to use a line of it later on.

Add Google Optimize to Your WordPress Site (Easy Way)

The easiest way to add Google Optimize to WordPress is by using MonsterInsights. It is the best Google Analytics plugin on the market. Note: you’ll need to have a Pro subscription to the plugin in order to use the Google Optimize addon.

Installing MonsterInsights

First, you need to install and activate the MonsterInsights plugin. For more details, see our step by step guide on how to install a WordPress plugin.

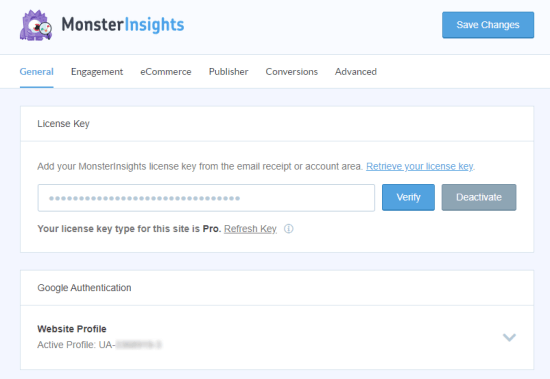
Upon activation, you need to visit the Insights » Settings page and enter your license key here. You can find this information under your account on the MonsterInsights website.

Enter your MonsterInsights license key on the Settings page

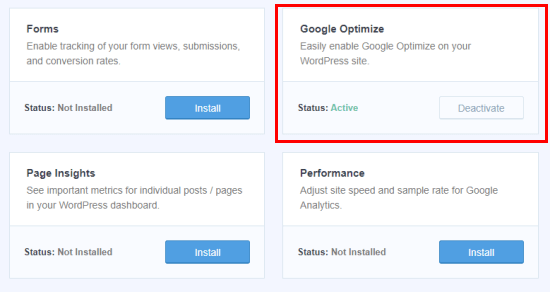
Next, you need to visit the Insights » Addons page and find the Google Optimize addon. Simply click the Install button next to Google Optimize addon, and it should automatically activate.

Installing the MonsterInsights Google Optimize addon

Once that addon is active, you can go to Insights » Settings » Conversions page to configure the settings.

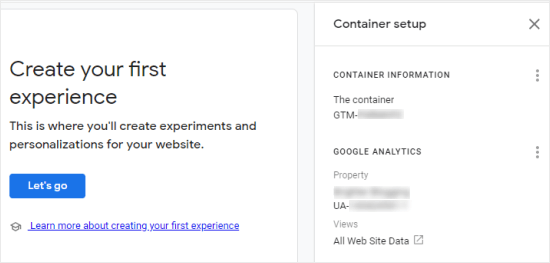
You’ll need to enter your Google Optimize Container ID here. You can find this listed against your container under the My Account section of your Google Optimize dashboard. You can also easily find it in the Container setup panel when you’re in the process of setting up your container.

Finding your Google Optimize container ID

Simply enter this in MonsterInsights, and your site will be connected to Google Optimize.

You can also enable “Google Optimize’s Async Page Hide” here. This may improve users’ experience on your website, especially if they’re on a slow connection.

It hides the page for a small amount of time, so the variation you’ve created during your experiment can load. Otherwise, your regular content could load before it’s actually modified which will make the page “flicker” from your users’ perspective.

Now that you’ve connected Google Optimize to your website, you’ll want to start running some A/B tests.

Manually Add Google Optimize to Your WordPress Site

You can also add Google Optimize to your WordPress site manually. This method is not recommended for beginners as you’ll have to manually modify your Google Analytics code.

There are different ways to do this depending on how exactly you’ve added your Google Analytics code to your website.

In a moment, we are going to cover the process for adding Google Optimize to an analytics.js tag, as this is what many people will have used to set up Google Analytics.

If you set up Analytics quite recently, you might instead be using Global Site Tag (gtag.js) to deploy Google Analytics. In this case, you can find instructions for this within Google Optimize itself. Just click the blue ‘Install Optimize’ link to get the instructions and code.

If you’re using Google Tag Manager (GTM), see Google’s instructions on installing Optimize with Google Tag Manager.

Assuming that you’re using the analytics.js tag, let’s cover the installation process.

First, you need to find your Google Analytics code in your WordPress dashboard.

Note that this code must be in the header part of your pages in order for the Optimize code to work. If you’re using a plugin or theme that places Google Analytics in the footer, then you’ll need to move your code to be in the header instead.

Next, add the line ga(‘require’, ‘GTM-XXXXXXX’); to your Google Analytics code as follows, replacing GTM-XXXXXXX with your Optimize Container ID.


<!-- Google Analytics -->

<script>
(function(i,s,o,g,r,a,m){i['GoogleAnalyticsObject']=r;i[r]=i[r]||function(){
(i[r].q=i[r].q||[]).push(arguments)},i[r].l=1*new Date();a=s.createElement(o),
m=s.getElementsByTagName(o)[0];a.async=1;a.src=g;m.parentNode.insertBefore(a,m)
})(window,document,'script','https://www.google-analytics.com/analytics.js','ga');

ga('create', 'UA-XXXXXXXXXX-1', 'auto');
ga('require', 'GTM-XXXXXXX');
ga('send', 'pageview');
</script>

<!-- End Google Analytics -->

Note that UA-XXXXXXXXX-1, in your code, will show your Google Analytics property ID.

Once you are done, please make sure to save your changes.

Tip: If you’re not sure where to find and edit your Google Analytics code, then you may want to see whether you have a plugin like Insert Headers and Footers installed.

If you’re using a premium WordPress theme, then there may be a place within it where you’ve put your Google Analytics code. You can check the theme’s documentation or contact their support team for help.

If you’re using this method, then you’ll need to also manually add the anti-flicker snippet code to your site if you want to use it. You can’t just click a button to do this, like you can when using MonsterInsights.

Once you have setup Google Optimize, you’re ready to setup split tests. You can follow our guide on how to do A/B split testing in WordPress using Google Optimize.

We hope this article helped you learn how to add Google Optimize in WordPress. You may also to see our proven tips on how to increase your blog traffic, and how to create an email newsletter for your website.

If you liked this article, then please subscribe to our YouTube Channel for WordPress video tutorials. You can also find us on Twitter and Facebook.

The post How to Add Google Optimize in WordPress (2 Easy Methods) appeared first on WPBeginner.