Check Internet Speed With Apple Network Responsiveness

There are umpteen tools available to check the internet speed. SpeedTest, Speed from Cloudflare, Netflix's Fast, or if you use Google search, you can test the internet speed and its analytics. In macOS Monterey, Apple has released a command-line tool called networkQuality. In this blog article, we will deep dive into network quality and its usage.

Launching networkQuality

The only prerequisite to launch networkQuality is macOS Monterey. Launch the terminal from the Finder. In the terminal, type networkQuality and hit enter.

How to Save Time While Debugging

In this article from our small series for junior developers, we will focus on how to save time while debugging and what are the best practices of senior developers when fixing the errors.

The Stripe’s study from 2018 says that developers spend over 41% of their time on maintaining and debugging the code. Imagine, out of 20 working days in a month, a week and a half of time does not add value to the business. Let us give you some advice on how to lower this large chunk of time that could be spent on creating new features.

5 Essential Test Metrics Every Company Can Use

Test metrics are essential in creating reports that accurately measure the success of your testing initiatives. With 23% or more of IT budgets being spent on testing, it is critical to know that your test suites are giving you what you think they are. Because of this, most companies have put some sort of test tracking in place, however, most companies struggle to find the right test metrics to ensure executive buy-in.

Before diving into what test metrics organizations should consider tracking to benchmark their testing efforts, it’s best to give thought to the overall test reporting strategy. Some basic questions to be answered should include:

OpenJDK: More Speed, Less Haste

lights flashing on road
A fast release cadence provides the ability to add features without casting them in stone, making them part of the Java SE standard.

It's now over two years since the release of JDK 9, and with it, the switch to a time-based rather than feature-based release schedule. It seems incredible that it took very nearly eleven years to get from JDK 6 to JDK 9, yet in just over two years, we've gone from JDK 9 to JDK 13.

Each release under this new strategy provides a smaller set of features than we had in the old major release approach. What we're seeing, though, is the overall rate of change is faster than it's ever been, which is a significant advantage for keeping Java vibrant and attractive to developers.

How to Optimize Images for Web Performance without Losing Quality

Did you know that optimizing your images before uploading to WordPress can have a huge impact on your website speed?

When starting a new blog, many beginners simply upload images without optimizing them for the web. These large image files make your website slower.

You can fix this by using image optimization best practices as part of your regular blogging routine.

In this article, we will show you how to optimize your images for faster web performance without losing quality. We will also share automatic image optimization plugins for WordPress that can make your life easy.

How to Easily Optimize Images for the Web (Without Losing Quality)

Since this is a comprehensive guide on image optimization for the web, we have created an easy-to-follow table of content:

What Is Image Optimization?

Image optimization is a process of saving and delivering images in the smallest possible file size without reducing the overall image quality.

While the process sounds complex, it’s actually quite easy these days. You can use one of the many image optimization plugins and tools to automatically compress images by up to 80% without any visible loss in image quality.

Here’s an example of an optimized vs unoptimized image:

Optimized vs Unoptimized Images in WordPress

As you can see, when optimized properly the same image can be up to 80% smaller than the original without any loss in quality. In this example, the image is 52% smaller.

How Does Image Optimization Work?

In simple terms, image optimization works by using compression technology.

Compression can be ‘lossy’ or ‘lossless’.

Lossless compression reduces the overall file size with absolutely no loss of image quality. With lossy compression, there may be a minor loss in quality, but ideally, it won’t be noticeable to your visitors.

What Does It Mean to Optimize Images?

You may have received a recommendation to optimize images from your WordPress hosting support or a speed test tool and wonder what you need to do.

You will need to reduce the file size of your images by optimizing them for the web. We’ll show you how to do that step-by-step.

What Are the Benefits of Image Optimization?

While there are many benefits to optimizing your images, here are the top ones that you should know:

  • Faster website speed
  • Improved SEO rankings
  • Higher overall conversion rate for sales and leads
  • Less storage and bandwidth (which can reduce hosting and CDN costs)
  • Faster website backups (which can reduce the cost of backup storage)

Images are the second heaviest item on a web page after video. According to the HTTP archive, images make up 21% of an average webpage’s total weight.

Since we know fast websites rank higher in search engines (SEO) and have better conversions, image optimization is something that every business website must do if they want to succeed online.

Now you might be wondering how big a difference image optimization can really make.

According to a Strangeloop study, a one-second delay in website load time can cost you 7% of sales, 11% fewer pageviews, and a 16% decrease in customer satisfaction.

Strangeloop case study

If these aren’t enough reasons to speed up your website, then you should know that search engines like Google also give preferential SEO treatment to faster-loading websites.

This means that by optimizing your images for the web, you can both improve website speed and boost WordPress SEO rankings.

Video Tutorial

If you’d prefer written instructions, then just keep reading.

How to Save and Optimize Images for Web Performance

The key to successful image optimization for web performance is to find the perfect balance between the lowest file size and acceptable image quality.

The three things that play a huge role in image optimization are:

  • Image file format (JPEG vs PNG vs GIF)
  • Compression (higher compression = smaller file size)
  • Image dimensions (height and width)

By choosing the right combination of the three, you can reduce your image size by up to 80%.

Let’s take a look at each of these in more detail.

1. Image File Format

For most website owners, the only three image file formats that really matter are JPEG, PNG, and GIF. Choosing the right file type plays an important role in image optimization.

To keep things simple, you want to use JPEGs for photos or images with lots of colors, PNGs for simple images or when you need transparent images, and GIFs for animated images only.

For those who don’t know the difference between each file type, the PNG image format is uncompressed which means it is a higher-quality image. The downside is that file sizes are much larger.

On the other hand, JPEG is a compressed file format that slightly reduces image quality in order to provide a significantly smaller file size.

Whereas GIF only uses 256 colors along with lossless compression which makes it the best choice for animated images.

On WPBeginner, we use all three image formats based on the type of image.

2. Compression

The next thing is image compression which plays a huge role in image optimization.

There are different types and levels of image compression available. The settings for each will vary depending on the image compression tool you use.

Most image editing tools like Adobe Photoshop, ON1 Photo, GIMP, Affinity Photo, and others come with built-in image compression features.

You can also save images normally and then use a web tool like TinyPNG or JPEGmini for easier image compression.

Although they require some manual effort, these two methods allow you to compress images before uploading them to WordPress, and this is what we do on WPBeginner.

There are also several popular WordPress plugins like Optimole and EWWW Image Optimizer that can automatically compress images when you first upload them. This is convenient, and many beginners and even large corporations prefer to use these image optimization plugins.

We will share more about using WordPress plugins later in the article.

3. Image Dimensions

Normally, when you import a photo from your phone or a digital camera, it has a very high resolution and large file dimensions (height and width).

Typically, these photos have a resolution of 300 DPI and dimensions starting from 2000 pixels and more. While high-quality photos are well-suited for print or desktop publishing, their large size makes them unsuitable for websites.

Reducing the image dimensions to something more reasonable can significantly decrease image file size. You can simply resize images using image editing software on your computer.

For example, we optimized a photo with a resolution of 300 DPI and image dimensions of 4900×3200 pixels. The original file size was 1.8 MB.

We chose the JPEG format for higher compression and changed the dimensions to 1200×795 pixels. The file size was reduced to just 103 KB. That’s 94% smaller than the original file size.

Now that you know the three important factors in image optimization, let’s take a look at various image optimization tools for website owners.

Best Image Optimization Tools and Programs

As we mentioned earlier, most image editing software comes with image optimization and compression settings.

Outside of the image editing software, there are also several powerful free image optimization tools that you can use to optimize images for the web (with just a few clicks).

We recommend using these tools to optimize images before you upload them to WordPress, especially if you are a perfectionist.

This method helps you save disk space on your WordPress hosting account, and it guarantees the fastest image with the best quality since you manually review each image.

Adobe Photoshop

Adobe Photoshop is a premium image editing application that lets you export images with a smaller file size for the web.

Export image for the web

Using the export dialog, you can choose an image file format (JPG, PNG, GIF) that gives you the smallest file size.

You can also reduce image quality, colors, and other options to further decrease file size.

Optimize image before saving

GIMP

GIMP is a free and open-source alternative to Adobe Photoshop. It can be used to optimize your images for the web. The downside is that it is not as easy to use as some other solutions on this list.

First, you need to open your image in GIMP and then select the File » Export As… option. This will bring up the Export Image dialog box where you can give your file a new name. Next, you need to click the ‘Export’ button.

You will now see the image export options. For JPEG files, you can use the ‘Quality’ slider to select the compression level and reduce file size.

Exporting an Image in GIMP

Finally, you should click on the ‘Export’ button to save the optimized image file.

TinyPNG

TinyPNG is a free web app that uses a smart lossy compression technique to reduce the size of your PNG and JPEG files. All you have to do is go to their website and upload your images using simple drag and drop.

Optimize Your Images

They will compress the image and give you a download link.

They also have an extension for Adobe Photoshop which is what we use as part of our image editing process because it lets you access TinyPNG from inside Photoshop.

For developers, they have an API to convert images automatically, and for beginners, they have a WordPress plugin that will do it for you. More on this later.

JPEGmini

JPEGmini uses a lossless compression technology that significantly reduces the size of images without affecting their perceptual quality. You can also compare the quality of your original image and the compressed image.

JPEGMini online image compression tool

You can use their web version for free, or purchase the program for your computer. They also have a paid API to automate the process for your server.

ImageOptim

ImageOptim is a Mac utility that allows you to compress images without losing any quality by finding the best compression parameters and removing unnecessary color profiles.

Optimizing Images Using ImageOptim

A Windows alternative to this is Trimage.

Best Image Optimization Plugins for WordPress

We believe that the best way to optimize your images is by doing it before uploading them to WordPress. However, if you run a multi-author site or need an automated solution, then you can try a WordPress image compression plugin.

Here is our list of the best WordPress image compression plugins:

  1. Optimole, a popular plugin by the team behind ThemeIsle
  2. EWWW Image Optimizer
  3. JPEG, PNG & WebP Image Compression, a plugin by the TinyPNG team mentioned above
  4. Imagify, a plugin by the popular WP Rocket team
  5. ShortPixel Image Optimizer
  6. Smush
  7. reSmush.it

These WordPress image optimization plugins will help you speed up your website.

Final Thoughts and Best Practices for Image Optimization

If you’re not saving images optimized for the web, then you need to start doing so now. It will make a huge difference in your site speed, and your users will thank you for it.

Not to mention, faster websites are great for SEO, and you will likely see an increase in your search engine rankings.

Outside of image optimization, the two things that will significantly help you speed up your website are using a WordPress caching plugin and using a WordPress CDN.

Alternatively, you can use a managed WordPress hosting company because they often offer both caching and CDN as part of the platform.

We hope this article helped you learn how to optimize your images in WordPress. You may also want to see our guide on how to improve your WordPress security and the best WordPress plugins for business websites.

If you liked this article, then please subscribe to our YouTube Channel for WordPress video tutorials. You can also find us on Twitter and Facebook.

The post How to Optimize Images for Web Performance without Losing Quality first appeared on WPBeginner.

The Definitive Free WordPress Plugins List (2019)

Ever wondered if you can make your car fly? Perhaps, all you need is a set of wings, a new engine, a control stick, and air safety features. While I can’t guarantee that your car will fly after those upgrades, the right set of plugins can definitely skyrocket your WordPress site to new heights.

There are 54,000+ plugins available on WordPress.org repo alone. And they’re all either free or follow a freemium model. Either way, they’re free for you to use.

If you’re new to WordPress, this makes it extremely tough for you to find the perfect plugins for your website. Heck, I’m an experienced WordPress developer and even I struggle to find the right one sometimes!

To help with this, I’ve scoured the depths of WP.org’s repository to find these golden set of free WordPress plugins. And I’ve tested them all to make sure that they work as advertised and are updated constantly.

These plugins are arranged by category (rather than listed randomly) so that it’s easier for you to go through them. Some plugins may have overlapping features, but that’s fine. I trust you to use better judgement.

Your goal should be to install as few plugins on your website as possible. This ensures that your site’s performance isn’t affected by too many plugins. With that being said, let’s begin.

Form Plugins

Forminator

Forminator is the only free form maker plugin that allows you to create forms AND polls, submissions, quizzes, and order forms. Its drag-and-drop interface is a breeze to build the form exactly as you envision it. You can also submit blog posts from a form if you want.

Its powerful API can also be accessed for free to build your own custom extensions.

Forminator supports integrations with third-party apps such as Zapier, Google Sheets, Mailchimp, and many other email marketing apps. You can even collect payments with Stripe or PayPal through it.

There’s no free form plugin for WordPress that has these many features available for free. You really need to try it to believe it.

Get Forminator Here

SEO Plugins

SmartCrawl SEO

SmartCrawl boosts your site’s search engine optimization (SEO) with its one-click setup, automatic sitemaps, improved social sharing, a real-time keyword and content analyzer, scans, reports, and much more.

It is designed to increase your site’s traffic without making it hard for you. This gives you more time for concentrating on other areas of your website. As your website grows, SmartCrawl’s autopilot features help it grow along with you, making sure that it always has your back.

Get SmartCrawl SEO Here

Yoast SEO

The OG WordPress SEO plugin since 2008. It’s still going strong after a decade, having 5+ million active installations as of this writing. Though many worthy competitors have emerged recently, it’s still the go-to choice of many WordPress developers and designers.

Yoast SEO tries hard to do everything, and it succeeds in many ways to please both search engine spiders (bots) and visitors. As of now, it’s the #1 rated SEO plugin on WordPress.org’s repository.

It’s huge popularity has a downside though. With so many users out there, it’s hard for their team to give dedicated 24/7 support to all of them.

Get Yoast SEO Here

Speed & Optimization Plugins

Hummingbird

Google recommends that your site should load within about two seconds. Hummingbird makes sure that it does. Hummingbird scans your site and provides one-click fixes to speed it up. It does this through various performance-boosting techniques such as caching, minification, compression and merging.

With Hummingbird, you can see the overall score for your site’s speed, and if it’s lacking in some areas, it suggests you the most appropriate fixes for them. In no time your site will be running as fast as a Hummingbird flaps its wings. Faster load times mean higher search rankings and happier visitors, which further means even higher search rankings, and so on.

Get Hummingbird Here 

WP-Optimize

WP-Optimize is an all-in-one site optimization plugin that cleans your database, compresses your images, and caches your site. It’s simple, popular and highly effective to keep your website fast and thoroughly optimized.

Its minimal setup is easy for beginners to get used to, but if you’re looking for more features down the line, it’ll be a hassle to install a new plugin and set it up. Overall, WP-Optimize brings most optimization features together in a single lean and efficient plugin.

Get WP-Optimize Here

W3 Total Cache

Trusted by over 1+ million websites, W3 Total Cache improves the performance and user experience of your site by reducing load times. It uses features like caching, minification, CDN integration, and the latest best practices to get it done. And it does it all without you having to change your core files, theme, plugins, or how you produce your content.

W3 Total Cache is a web host agnostic Web Performance Optimization (WPO) framework for WordPress, which means that it works on all types of WordPress hosting setups. It’s no wonder that it’s trusted by millions of website owners and developers worldwide.

Get W3 Total Cache Here

WP Super Cache

WP Super Cache generates static HTML files from your dynamic WordPress site. After an HTML file is created, your web host will serve that file instead of processing the comparatively heavier WordPress PHP scripts.

As most of your visitors will be served static HTML files, this will decrease the load on your server. Thus, your users get to experience faster load times and performance. Its simple mode is easy to set up and makes your website load pretty fast. However, if you’re looking for more, there’s also an expert mode which gives you more options at the cost of complexity.

Get WP Super Cache Here

Media, Gallery & Slider Plugins

Smush

Smush is an award-winning image compression plugin. It has been benchmarked and tested to be the leader for speed and quality. Smush is the most popular image optimization plugin for WordPress, and also the most popular WPMU DEV plugin. I’m not exaggerating when I say that you need to add this to your must-have WordPress plugins list!

It not only compresses your images, but also meticulously scans every image you upload – and the ones you’ve already added to your library. Thus, all the unnecessary data is eliminated even before you even see it on your site. Your user’s data plan will also thank you for its exemplary service.

Get Smush Here

Photo Gallery by 10Web

Photo Gallery is a popular plugin for building beautiful, mobile-friendly galleries. Its simple interface makes it possible to create them in just a few minutes. Photo Gallery comes packed with amazing layout options, gallery and album views, multiple widgets, and a bunch of other extensions that.

It’s a great choice for photography and media-heavy blogs. If you have a site that needs robust image galleries with easy navigation, give Photo Gallery a try.

Get Photo Gallery by 10Web Here

Smart Slider 3

“Smart Slider 3 is a gift from the gods.” I heard one of our developers remark that in the chat recently, and they couldn’t be further from the truth. It’s the most powerful and intuitive slider plugin for WordPress. Its intuitive live slide editor makes creating slides fast, easy and efficient.

The sliders you create with it are fully responsive, SEO optimized, and work with almost any WordPress theme. Creating beautiful slides to tell your stories has never been this easier.

Get Smart Slider 3 Here

SVG Support

SVGs are the bomb! Scalable Vector Graphics (SVG) are becoming a rage in modern web design, but WordPress doesn’t support this file format out of the box yet. That’s where this plugin comes in.

SVGs allow you to embed vector images with small file sizes that are scalable to any size. And without losing quality. Apart from enabling SVG support, this plugin also adds features that allow you to add styling and animation to your SVG elements.

Get SVG Support Here

Security Plugins

Defender

Defender is layered security for WordPress. And it’s amazingly easy to setup. Defender scans your server and files, and then it adds all the hardening and security tweaks your site needs in just a matter of minutes, if not less. It’s highly efficient at blocking brute-force attacks without any noticeable impact on your website

It’s also one of the few free security plugins that support 2-Factor Authentication. The 2FA is also very simple to set up. Defender’s 2FA keeps you and your sites better protected than any simple IP blacklisting security plugin.

Get Defender Here

WordFence

With over 3 million active installs, WordFence is the most popular firewall and security scanner plugin for WordPress. Its firewall and malware scanner is built from the ground up to protect WordPress.

Wordfence constantly updates itself with the newest firewall rules, malware signatures, and malicious IP addresses. This keeps your website safe at all times. It’s perhaps the most comprehensive free WordPress security solution available.

Get Defender Here

iThemes Security

iThemes Security gives you 30+ ways to secure and protect your WordPress site. It works round the clock to lock down attacks on your WordPress site, fix common holes, stop automated attacks, and strengthen user credentials.

Experienced users also have access to advanced features which  they can use to harden their WordPress sites even better.

Get iThemes Security Here

Marketing Plugins

(Newsletter Signups, Popups, CRM, etc.)

HubSpot All-in-One Marketing

HubSpot’s All-in-One Marketing plugin is essentially a form and pop-up builder with an intuitive drag-and-drop interface. It also includes live chat and an integrated free contact database (CRM). This helps you can capture your visitors’ information easily.

HubSpot will collect submissions off any form you have on your WordPress website (even if it’s built with our free Forminator or Hustle plugins). It then automatically adds those new leads into your CRM.

You can also segment your contact database into lists and personalize your emails using any CRM property. And all of this for free! It then generates a report on your email’s overall success and let’s you see how each contact interacted with your email campaigns, all thanks to its built-in analytics.

Get HubSpot All-in-One Marketing Here

Hustle

Hustle is the ultimate marketing plugin to grow your business. It lets you easily grow your mailing list or display targeted ads across your site with pop-ups, slide-ins, lead generation forms, social media share bars, widgets, and shortcodes.

Since it’s made by the same awesome developers here at WPMU DEV, it integrates perfectly with the equally amazing form builder plugin Forminator. Thus, you can embed your forms, polls, and quizzes into popups and slide-ins for interactive lead generation. Grow your following faster and capture more leads with Hustle.

Get Hustle Here

Mailchimp for WordPress

This plugin does one thing better, and that’s it. It helps you grow your Mailchimp lists and write better newsletters. MailChimp for WordPress also allows you to create good looking opt-in forms easily.

It integrates with any existing forms on your site, including those created by Forminator. The developer has also made it easy to modify and extend its default features with various filter & action hooks.

Get Mailchimp for WordPress Here

Analytics Plugins

Google Tag Manager for WordPress

Google Tag Manager (GTM) is Google’s free tool for everyone to manage and deploy analytics and marketing tags. Currently, GTM is Google’s recommended method to add Google Analytics tag to your websites. This plugin helps you place the GTM container code snippets onto your wordpress website easily.

You can also insert multiple GTM containers with this plugin. It complements your GTM setup by pushing page meta data and user information to your DOM’s data layer. It also lets you add your Google Optimize container with the recommended code.

Get Google Tag Manager for WordPress Here

Google Analytics Dashboard by MonsterInsights

With 2+ million active installs, MonsterInsights is without a doubt the most popular Google Analytics plugin for WordPress. It’s the simplest way to properly connect your WordPress site with Google Analytics. MonsterInsights also allow you to enable all advanced Google analytics tracking features.

But the best part of MonsterInsights is its Google Analytics Dashboard widget for WordPress. It shows you actionable analytics reports right inside your dashboard. Thus, you can see exactly what’s working, what’s not, and take immediate action. No more juggling around!

Get Google Analytics Dashboard Here

Social Media Plugins

Social Media Share Buttons & Social Sharing Icons

This plugin lets you add share buttons and icons for over 200+ social media platforms. Some of the popular ones include RSS, Email, Facebook, Twitter, LinkedIn, Pinterest, Instagram, Youtube, and ‘Share. You can even upload custom share icons of your choice.

You can pick from several design options and make your icons ‘float’ or ‘sticky’. The plugin also scours the respective social media platform’s APIs to display the proper like/share numbers beside your social media buttons.

Get Social Media Share Buttons and Social Sharing Icons Here

Comment & Spam Reduction Plugins

Akismet Anti-Spam

I have just two words for you: get this! Akismet comes standard with most WordPress installations, and it’s for a reason. It checks your comments and contact form submissions against a global database of spam to prevent your site from publishing malicious content.

If any spam is detected, it’s sent to the review section under Comments in your dashboard. The more you help clear spam or identify false positives, the better Akismet gets at what it does best. Say no to spam!

Get Akismet Anti-Spam here

Disqus Conditional Load

Disqus is a great commenting system platform, but there’s one major drawback with it: it’s super bloated, especially so on WordPress.

Disqus Conditional Load is an advanced version of Disqus Commenting System, which boosts your page loading speed. This free plugin adds advanced features like lazy loading, shortcodes, comment widgets, script disabling, and more to your Disqus-powered website. And the best part, it uses pure JavaScript.

Get Disqus Conditional Load Here

Backup & Migration Plugins

UpDraftPlus

I can’t stress enough the importance of setting up automated backups of your website. Thankfully, we have free plugins like UpdraftPlus that make automatic site backups and restoration a child’s play. With 2+ million active installs, it’s the most popular scheduled backup plugin for WordPress.

With UpdraftPlus, you can backup your files and database into the cloud. You can also restore the backups with a single click. It supports backing up to popular cloud storage solutions like Dropbox, Google Drive, and Amazon S3.

Get UpdraftPlus Here

Duplicator

Duplicator enables you to move, migrate or clone your WordPress site between domains or hosts. And with zero downtime. It can also clone a live site to your localhost setup for development.

The most useful feature of Duplicator is to transfer a WordPress site from one host to another. You can perform a full WordPress migration without any messy import/export sql scripts.

If you’re planning to bundle up an entire WordPress site for easy reuse/distribution/backup, Duplicator also supports that.

Get Duplicator Here

All-in-One WP Migration

All-in-One WP Migration does what it suggests. It exports all the things in your WordPress website, including the plugins, database, media files, themes, and everything else.

Once exported, you can then upload it to a different WordPress installation. Do note that there’s a limit on the file size in the free version. If your site is more than 512MB, you need to look elsewhere. For smaller WP sites though, this plugin is perfect!

Get All-in-One WP Migration Here

Admin Management Plugins

User Role Editor

User Role Editor allows you to change user roles and their capabilities easily. Just select a user role and turn on/off the capabilities you wish to, and then update to save your changes. That’s it, no need to mess around with complex PHP scripts anymore!

You can also add new roles and customize its permissions according to your needs. Unnecessary roles with no users assigned can be deleted to keep things simple. The best part, Multi-site support is provided for free with this plugin.

Get User Role Editor Here

WP Reset

Ever messed around with your WordPress site so much that you wished you could reset it all and start over? That’s exactly what WP Reset does. It quickly resets your site’s database to the default installation values, without modifying any files.

If you’re testing out different plugins and themes, WP Reset is extremely helpful. It speeds up your testing and debugging greatly. WordPress developers will appreciate this plugin very much.

Get WP Reset Here

Duplicate Post

There are some plugins which you think you don’t need until you’ve used them. Duplicate Post is one of them.

It allows you to clone posts of any type quickly, or copy them to new drafts for further editing. That’s pretty much it. Give it a try, I’m sure you’ll love it!

Get Duplicate Post Here

Regenerate Thumbnails

This plugin helps you regenerate all thumbnail sizes for images in your Media Library. This is extremely useful if you’ve changed your theme or have added a new feature on your website which uses a different image size.

Regenerate Thumbnails also allows you to delete old, unused thumbnails to free up server space.

Get Regenerate Thumbnails Here

DIY Page Builder Plugins

Elementor

Elementor is the most popular free page builder for WordPress. As of now, it has 3+ million active installations and mostly 5-star reviews.

So, what makes it unique? It’s a live page builder that lets you create high-end page designs and advanced capabilities like never before, without touching a single line of code. You had to be a web developer or designer before to get these effects on your website: Box Shadows, Background Overlays, Hover Effects, Animations, Gradient Backgrounds, etc.

Not anymore. Elementor makes it easy for everyone to build websites. Yes, for everyone!

Get Elementor Here

Beaver Builder

Beaver Builder is like a mature, elder brother (or sister?) of Elementor. Likewise, it’s a flexible drag-and-drop page builder that works on your WordPress site’s front end. Beaver Builder grants you complete design freedom with no coding involved, and it is all fully responsive as well.

The best part of Beaver Builder is that it doesn’t output any confusing shortcodes or bloated HTML. With Beaver Builder, building beautiful, professional WordPress pages is as easy as connecting LEGOs. However, you should note that its free version isn’t as feature-rich as Elementor’s.

Get Beaver Builder Here

Bonus: Here’s a detailed list of the top page builders for WordPress.

Theme Customization Plugins

Custom Sidebars – Dynamic Widget Area Manager

Custom Sidebars plugin is a flexible widget area manager for WordPress. It allows you to dynamically display custom widgets on any page, post, post type, category, or archive page.

It is light and integrates well with any WordPress theme. Thus, Custom Sidebars plugin grants you tons of possibilities to customize your website even futher.

Get Custom Sidebars Here

Simple Custom CSS and JS

Adding custom CSS and JS code to your WordPress site is no more hassle with this plugin. These changes stay even if you update or change your theme.

Simple Custom CSS and JS features a text editor with syntax highlighting. Also, you can add your custom CSS or JS code to the frontend or the admin side, and you can add as many codes as you want.

Get Simple Custom CSS and JS Here

Ecommerce Plugins

WooCommerce

WooCommerce is a flexible, open-source eCommerce plugin for WordPress. If you want an eCommerce store on your WordPress website, look no further. It’s made by the same good folks who make WordPress.

Whether you’re launching a business, taking an old retail store online, or designing a site for your client, WooCommerce can help you build exactly the store you want.

Get WooCommerce Here

Booster for WooCommerce

WooCommerce is an amazing eCommerce plugin for WordPress and there’s no denying that. You can get most of the features you want in your online store with it.  However, it still misses the mark when it comes to some essential features. That’s what Booster for WooCommerce rectifies.

It supercharges your WooCommerce store with awesome powerful features (100+ modules) like PDF Invoicing, Bulk Price Converter, Wholesale Price, Crowdfunding, Upsells, Custom Payment Gateways, and a lot more.

Get Booster for WooCommerce Here

Easy Digital Downloads

If you’re looking to sell only digital goods on your WordPress site, Easy Digital Downloads is a better eCommerce solution for you. It provides a complete system for effortlessly selling your digital products.

Selling software, photos, ebooks, songs, videos, graphics, or any other digital file for that matter, is a breeze with this plugin. The core plugin supports PayPal Standard and Amazon Payments gateways, but almost all major payment gateways are supported through 3rd-party developers or premium extensions.

Get Easy Digital Downloads Here

Live Chat Plugins

LiveChat

Want to add live chat support to your WordPress website quickly and easily? LiveChat is the solution you’re looking for. It allows for instant communication with your site’s visitors and enables swift resolution to their questions and/or concerns.

You can use its built-in ticketing system to provide 24/7 customer service to your customers. Increase your sales and build better relationships with your customers with this fully functional live chat plugin.

Get LiveChat Here

Tawk.To

Tawk.To is a free live chat app for WordPress used by 250,000+ companies worldwide. You can use it to provide real time support and service to your customers.

With tawk.to, you never have to lose another lead or sale again. It lets you monitor and chat with your site’s visitors from anywhere, even your mobile. The best part is that its developer promises that “it’s truly free and always will be.”

Get Tawk.To Here

Membership & Forums Plugins

Go here for an extensive in-depth analysis of all the popular (and free) membership plugins.

bbPress

bbPress is a lean, mean, and feature-rich forum or bulletin board plugin for WordPress. It is focused on easy integration, simplicity, strict adherence to web standards, and speed.

It’s one of the first plugins which showcased the versatility of WordPress, and it’s still going strong! That’s quite an achievement. With bbPress installed, you can use WordPress to run an efficient and professional forum.

Get bbPress Here

BuddyPres

BuddyPress helps you set up a modern, robust, and sophisticated social network on your WordPress site. What WooCommerce did to setting up an eCommerce store on WordPress, BuddyPress does the same with setting up a social network or community-based forum.

Members can register and create user profiles, have private conversations with each other, create and participate in groups, and much more. It also works perfectly along with Akismet and bbPress. If you’re looking to build an online home for your school, company, a sports team, or any other niche community, BuddyPress is perfect for you.

Get BuddyPress Here

Jetpack

Sometimes, I ask myself, What exactly is Jetpack? It’s a security, performance, and site management plugin, all rolled into one. And it’s maintained by the same folks who lead WordPress.org’s development. They also happen to be the owners of WordPress.com platform, from where it picks up most of its features.

It has a lot of impressive functionality built in, like site stats, a high-speed CDN for images, showing related posts, downtime monitoring, brute-force attack protection, automated sharing to social media, sidebar customization, and so much more.

Jetpack has so many things going on that many consider it to be bloated, and for a good reason. If you could give up almost every plugin listed here and only make do with Jetpack, perhaps that would justify its use. It does however let you turn on or off its modules as per your requirements.

Get Jetpack Here

Free as in Freedom

WordPress’ main goal is to give you the freedom to build anything you want, and these free plugins are an extension of that goal. From hobby blogs to some of the biggest brands in the world, WordPress and its free plugins are used by everyone.

At WPMU DEV, we’re driven by the same philosophy. We build beautifully coded free and premium WordPress plugins that’ll make your WordPress sites fly.

Fasten your seatbelts. It’s now time for your site to take off!

How to Manage and Delete Transients in WordPress

WordPress plugin and theme developers often use transients API to store timely information in your WordPress database.

This allows them to reuse this information and make their plugins function faster. While this is an incredible performance technique, sometimes it may affect your website during testing or development.

For example, you may realize that certain elements like popular posts or Twitter widgets are not changing despite emptying WordPress cache.

That’s usually because the transient for that particular feature is not working as expected. To fix the issue, your options are to wait until transients expire or manually fix it.

In this article, we will show you how to easily manage and delete transients in WordPress.

How to easily manage transients in WordPress

What is Transients?

The Transients API in WordPress allows developers to store information in your WordPress database with an expiration time. This helps improve WordPress performance and speed up your website while reducing overall server load.

For example, many WordPress social media plugins use transients to retrieve and store share counts for posts.

If they didn’t use transients, then your server will need to connect with all social networks on each page load which will slow down your site significantly.

Example of data stored in transients by a plugin

That’s why transients are awesome.

Now you may be wondering, why would you ever want to manage or delete transients?

Well, things can go wrong sometimes. Let’s say a connection between Facebook and your site didn’t go so well, and now it’s showing a count of 0. You can wait 30 minutes or sometimes longer for a transient to expire, or you can clear out the transient cache and get the most accurate count.

It also helps when testing a plugin to make sure that it’s really working like it is supposed to.

Last but not least, you may want to delete expired transients to clear out your database. This comes in handy when you are moving a staging site to live WordPress hosting server.

Are WordPress transients like cookies?

WordPress transients are like cookies but only in the sense that they both allow developers to store temporary information. However, transients are much more powerful.

For example, cookies are stored in the user’s browser and have several limitations. They are also less secure and not as programable.

Transients, on the other hand, are stored in the WordPress database, can store different types of data, more secure, and easily programmable with the transients API.

That being said, let’s take a look at how to easily manage transients in WordPress and delete them when needed.

Managing Transients in WordPress

First thing you need to do is install and activate the Transients Manager. For more details, see our step by step guide on how to install a WordPress plugin.

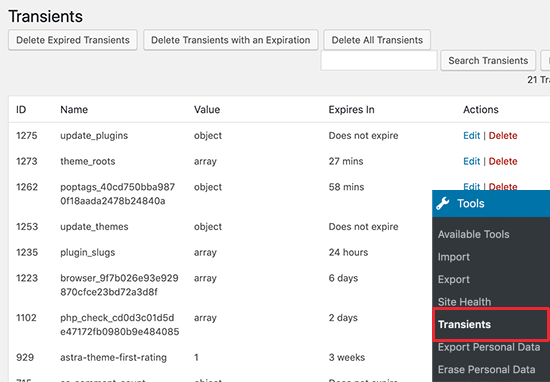
Upon activation, you need to visit Tools » Transients page to view and manage transients used by your WordPress site.

Managing transients in WordPress

From here you will see a list of transients stored in your WordPress database.

This page lets you perform the following bulk actions:

  • Delete expired transients
  • Delete all transients with an expiry date
  • Delete all transients

You can also look at transients listed below to edit or delete individual transients as needed. You can identify a transient by looking at its name.

Most trusted WordPress theme and plugin developers will use the product name in the transient to make it easily identifiable.

Right next to the name column, you’ll see the value for each particular transient. The transients value could be an object, array, number or alphanumeric string as the value.

You’ll also see an expiration time for each transient. Some of them may not have an expiration time set and will be displayed as ‘Does not expire’.

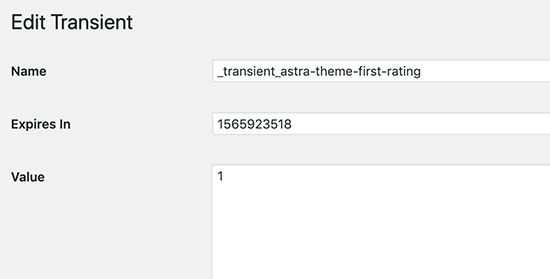
You can delete any of these transients or click on the Edit button to change their value.

Editing a single transient in WordPress

This feature comes in handy when you are testing a theme or plugin and want to check it with different transient values.

We hope this article helped you learn how to easily manage and delete transients in WordPress. You may also want to see our list of most useful WordPress tips, tricks, and hacks for more neat ideas to use WordPress like a pro.

If you liked this article, then please subscribe to our YouTube Channel for WordPress video tutorials. You can also find us on Twitter and Facebook.

The post How to Manage and Delete Transients in WordPress appeared first on WPBeginner.

Changes in Cybersecurity (Part 2)

We're excited to announce Trend Reports by DZone beginning with Application Security! Everyone involved in building applications — from developers to CTOs — should think about security ramifications. This Trend Report will explore what developers feel are the most prominent threats, where corporate priorities lie, and how secure coding practices are being implemented. Keep an eye on your inbox and our homepage on July 22nd to learn more.

To understand the current and future state of the cybersecurity landscape we spoke to, and received written responses from, 50 security professionals. We asked them, "How do you see the cybersecurity landscape changing?"

Keys to Database Success

To learn about the current and future state of databases, we spoke with and received insights from 19 IT professionals. We asked, "What are the keys to a successful database strategy?" Here’s what they shared with us:

Secure

  • Keys to a successful database strategy are definitely in security and data management. “All” data should always be treated as highly sensitive and private at all times. Data should be protected at rest and during transport. Take whatever measures necessary to ensure data is secured. Along with data security and management, it is important to pay attention to data access and high availability. If you have secured data but you’re unable to access it, especially when needed, then data is not very useful.  
  • 1) When moving to the cloud one of the obstacles is paranoia about putting data into a public cloud and losing control. However, you’re already doing this when you put it in a private data center. You need the same security checks regardless of where you host. 2) Determine the database solution that’s best for your use case. Moving from commercial to open source is a fair amount of work. If it’s just data, it’s easier than if you have logic since most databases have proprietary logic for storage.  Comes down to your comfort level and background.

Performance

  • Speed and performance are key for our clients. Scalability is key for tomorrow’s data volumes. Extensibility is key so we provide a programming language as part of our database. Allows developers to embed new analytics, write new libraries, build applications on top of the database very, very quickly. Ingest data and query in real-time and then do clever things with that data.
  • Our clients are always looking for performance. Financial services are moving from on-prem to cloud-native, so security is a concern followed by availability and scale depending on the use case.
  • We recommend beginning with a data platform. There are use cases for databases themselves. Don’t compromise on the fundamental requirements of speed, performance, and scale. In almost every system, you will need to compromise on data consistency. Bring in mission-critical data with consistency, durability, high availability, security, consistent latency at any scale. For customers moving into microservices, building modular processing integrated with streaming, multi-tenancy is super critical. You need to be able to build hundreds or thousands of applications in the same cluster. Don’t manage 4,000 database instances. Everything in the same cluster adds to efficiency. Know what to expect on databases know what they’re good at. Type of applications people want to build is pretty broad. The database needs to be able to support transaction application, NoSQL applications, analytic applications, flexible query capabilities, indexes, analytics, and Spark integrations.

Image title

The Curious Case of False Positives in Application Security

Over the past year, data breaches, through web, business, and mobile application exploitation, have continued to run rampant. In 2018, major household names like Ticketmaster, the United States Postal Service (USPS), Air Canada, and British Airways were hit by application-based exploits. To minimize vulnerabilities — and identify existing ones before they can do this level of damage — application security solutions need to be fast, provide good coverage for capturing all classes of vulnerabilities, and more importantly, they need to be highly accurate, to be useful to DevOps application development teams. Providing results fast but less accurately is counter-productive to an efficient and successful application security program. Time wasted by engineers to triage the false positives far outweighs the speedier results provided.

Most automated application security testing solutions have the ability to scan thousands of applications containing millions of lines of code and can produce results containing millions of attack vectors. But every application is different — different functionality, different code, different size, and different complexity —resulting in significantly different security findings with different accuracy. More so, selecting any single scanned application with the best accuracy from many and claiming accuracy is misleading. Even taking averages would be misleading, because it would be a measure of only the limited set of applications that the vendor’s solution scanned, and hence, incomparable to the accuracy of other solutions.

Up to Speed: Can Your Website Keep Up?

Site speed has always been a major concern in SEO circles, with slow sites bumped down in the rankings so that they perform poorly in searches. Unlike a few years ago, though, a slow site no longer lags behind its competitors by a few seconds. Rather, slow sites are typically only a few milliseconds slower because, as a site’s load time increases from 1 second to 3 seconds, bounce rate probabilities increase to 32 percent; by 5 seconds, the probability is 90 percent. In terms of ranking and engagement, even the smallest increase in speed can make a big difference.

Why Speed Matters

Obviously, slow sites have higher bounce rates than their speedier counterparts, but beyond our trained impatience, does speed really matter? According to Google, it’s a key factor, particularly for those using mobile devices, and it certainly plays a role in their ranking program. That’s why the website building company Wix recently introduced a program called Wix Turbo, which provides users with speed-focused optimization services. This includes improved server-side CSS layout optimization and changes to Wix’s data center system. Like other optimization programs, this system is designed to improve users’ Google rankings and put them on that first page.

Mobile DevOps Metrics that Matter

Creating a secure DevOps culture helps companies accelerate mobile app release cycles and securely deliver the new features and capabilities that users crave. Automating the continuous integration/continuous delivery (CD/CD) pipeline speeds time to market to meet the demands of the business.

But app store ratings and reviews aren't the only important measures of performance. As more NowSecure customers embark on the journey to DevOps, they increasingly focus on a few key performance indicators.

How to Paginate Comments in WordPress (Step by Step)

Have you noticed that your blog posts with a lot of comments load slower than other posts? That’s because loading so many comments increase server load which increases your average page load time.

Having a lot of comments is a good thing because it means that your users are engaged with your content. Your most commented posts are usually the most popular posts on your blog.

However if a lot of comments are slowing down your website, then it can hurt your SEO rankings. That’s when pagination for WordPress comments comes handy.

In this article, we will show you how to paginate comments in WordPress to speed up your post load time. The best part is that it comes as a default feature in WordPress, and it is very easy.

Paginate comments in WordPress

Why You Should Paginate Comments in WordPress

Comment pagination helps you improve your website speed which is an important factor in your website SEO rankings.

Many of our users have reported that sometimes posts with a lot of comments can cause their readers to see white screen of death because it exhausts their server’s memory.

Even when it doesn’t cause ‘white screen of death’, posts with a lot of comments tend to be really really slow.

Comment pagination reduces server load for your most commented posts by splitting comments into multiple pages.

Another reason to paginate your WordPress comments is to maintain the keyword density of your articles. Comments add a lot of content to your post’s page, and they may not always include your target keywords in a sufficient amount.

When keyword ratio to content decreases, search engines fail to index your post for the right keywords.

Comment pagination can also have a negative SEO impact if it is not used correctly. Basically, WordPress generates URLs for each new page of comments. Search engines may consider this as ‘duplicate content’.

This issue can be easily fixed by using the Yoast SEO plugin, which points search engines to the canonical URL of your article.

Now that we have discussed the pros and cons of comment pagination, let’s take a look at how to easily paginate comments in WordPress.

Paginating WordPress Comments in Two Steps

The first thing you need to do is login to your WordPress admin area and go to Settings » Discussions page.

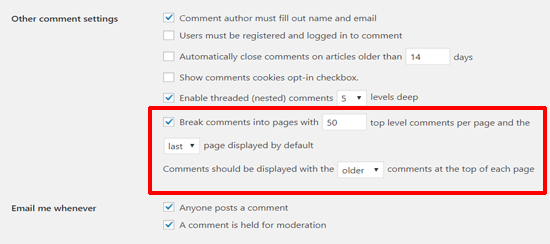
Next, look for the ‘Break comments into pages’ option. From here you need to enter the number of comments you want on each page, and how you want to display them.

Break Comments into Pages in WordPress Posts

Don’t forget to click on the ‘Save Changes’ button to store your settings.

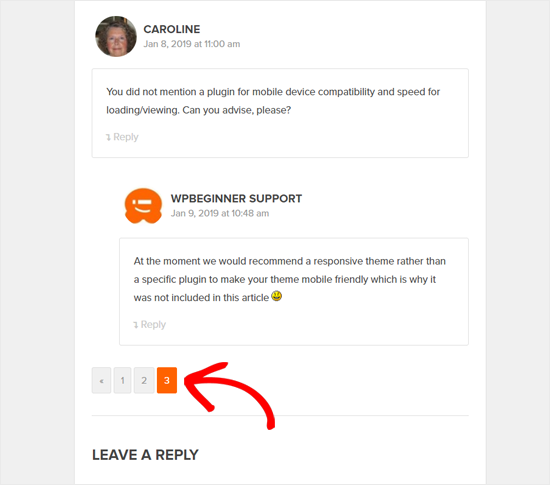
You can now visit any popular post on your website that has a lot of comments. You will notice the pagination links below the comments.

Depending on your theme’s styling, you will either see numeric pagination or ‘Previous / Next’ comment links.

Here is how comment pagination looks on our article 24 “Must Have” WordPress Plugins.

WordPress Comments Pagination in WPBeginner

Note: Just like comments, you can also paginate WordPress posts by splitting a long post into multiple pages.

We hope that this tutorial helped you paginate comments in WordPress. You might also want to see our guide on how to combat comment spam in WordPress.

If you liked this article, then please subscribe to our YouTube Channel for WordPress video tutorials. You can also find us on Twitter and Facebook.

The post How to Paginate Comments in WordPress (Step by Step) appeared first on WPBeginner.

Traffic Management With Istio (2): Grayscale Release of Applications by Istio Management

In the process of project iteration, you will inevitably need to go online. Going online means deploying or re-deploying; deploying means modifying; and modifying means risk.

Gray is between black and white. Grayscale release refers to a release process involving a smooth transition. Grayscale release can ensure overall system stability. You can find problems and make adjustments at the initial gray scale to minimize the degree of impact. What we often call AB testing or canary release are other forms of grayscale release.

Why Is Edge Computing Gaining Popularity Today?

In this modern era where everything is moving towards digitization, edge computing has left no stone unturned in making its way into businesses and industries. Its popularity is growing due to the huge computing demands of cloud users and massive data explosion through IoT. Business associates are finding it the best way to streamline IoT traffic and facilitate real-time, local data analysis. IIoT has paved way to move data processing closer to its source, which involves actual industrial machines. A survey says that edge computing will reach peak productivity in the very near future.

The growing innovations in AI and IoT indicate that edge computing is likely to gain maturity as well. The growing popularity of edge computing doesn’t mean cloud computing is a history. Both are equally important to the IT infrastructure. They don’t compete with each other because they are here to live forever, side by side. Michael Dell gave a statement recently on edge computing, saying, “it will be everything and everywhere, i.e. the Internet of Things, which means that ultimately it will be the Internet of Everything.” A recent report predicted that, by 2025, edge computing will capture $3.24 billion of the market globally. Industries like oil and gas, power utilities, aerospace, and automotive will benefit from edge computing when it comes to optimizing operations.

Delivering the Least Scope

One common misconception of Agile is that it simply allows you to get everything done faster. This is simply not true. Agile allows us to plan a much smaller scope of work, delivering iteratively and incrementally to deliver the least amount scope needed to solve the problem/capture the opportunity. The speed comes from only delivering what the customer needed. This is in contrast to how we used to scope a release when we delivered everything we thought they might want.

Focus on being skeptical and delivering the minimal instead of trying to deliver everything in the release.

This is stakeholder debt. I define stakeholder debt as the difference between everything they scoped for the release, minus what the customer uses.

Increasing Dev Velocity and Customer Experience Through Bug Dives

Debugging can lead engineers into the dark corners of a codebase, giving them time to gain a deep understanding of some section of code, but this vital information — the bug and the fix — often stays in the brain of the engineer who worked on the issue. 

What happens if a similar bug appears in the future? Do you task another engineer with shipping a fix or is it best to pull the original engineer away from their existing work? In this blog, we’ll dive into best practices for sharing knowledge within the engineering organization for startups.