Hip new frameworks like Astro, Qwik, and Elder.js are touting their MPA [multi-page application] with “0kB JavaScript by default.” Blog posts are making the rounds listing all the challenges with SPAs: history, focus management, scroll restoration, Cmd/Ctrl-click, memory leaks, etc. Gleeful potshots are being taken against SPAs.
I think what’s less discussed, though, is how the context has changed in recent years to give MPAs more of an upper hand against SPAs.
It seems a number of folks really clung to that first part because Nolan published a follow-up to clarify that SPAs are far from doomed:
[T]he point of my post wasn’t to bury SPAs and dance on their grave. I think SPAs are great, I’ve worked on many of them, and I think they have a bright future ahead of them. My main point was: if the only reason you’re using an SPA is because “it makes navigations faster,” then maybe it’s time to re-evaluate that.
And there’s good reason he says that. In fact, the first article specifically points to work being done on Shared Element Transitions. If they move forward, we’ll have an API for animating/transitioning/sizing/positioning elements on page entrance and exist. Jake Archibald demonstrated how it works at Google I/O 2022 and the video is a gem.
If you’re wondering how one page can transition into another, the browser takes screenshots of the outgoing page and the incoming page, then transitions between those. So, it’s not so much one page becoming another as much as it is the browser holding onto two images so it can animate one in while the other animates out. Jake says what’s happening behind the scene is a DOM structure is created out of pseudo-elements containing the page images:
It’s also proof in the pudding of just how much HTML, CSS, and JavaScript continue to evolve and improve. So much so that Jeremy Keith suggests it’s high time we re-evaluate our past judgment of some technologies:
If you weren’t aware of changes over the past few years, it would be easy to still think that single page apps offer some unique advantages that in fact no longer hold true. […] But developers remain suspicious, still prefering to trust third-party libraries over native browser features. They made a decision about those libraries in the past. They evaluated the state of browser support in the past. I wish they would re-evaluate those decisions.
The ingredients for SPAs specifically:
In recent years in particular it feels like the web has come on in leaps and bounds: service workers, native JavaScript APIs, and an astonishing boost in what you can do with CSS. Most important of all, the interoperability between browsers is getting better and better. Universal support for new web standards arrives at a faster rate than ever before.
HTML, CSS, and JavaScript: it’s still the best cocktail in town. Even if it takes a minute for it to catch up.
In this tutorial, you'll create a single-page application (SPA) with a Spring Boot resource server and a Vue front-end client. You'll learn how to utilize JSON Web Tokens (JWTs) for authentication and authorization, using Spring Boot to configure the JWTs, with Okta as your OAuth 2.0 and OpenID Connect (OIDC) provider. You'll also learn how to use the Vue CLI to bootstrap a Vue client app and how to secure it using the Okta Sign-In Widget.
Okta is a computer security service provider with helpful information for safeguarding online applications. The Okta Sign-In Widget provides protection for front-end apps by letting you quickly add a secure login form that can be configured for single sign-on and social sign-on with external providers like Google, Facebook, and LinkedIn. It includes a PKCE implementation of the OAuth 2.0 authorization code flow (Proof Key for Code Exchange).
A big heaping 19-minute bowl of not-too-hot, not-too-cold baby bear porridge website building from Rich Harris.
I’ve certainly overheard more than my fair share of arguments about Single Page Apps (SPAs) vs Multi-Page Apps (MPAs). Although it’s only recently that I’ve heard people put an acronym to MPA, and it feels weird.
My guess is that most folks actually hold appropriately-nuanced opinions about what site-building architectures are appropriate for the sites they are building. But it’s fun to pit hardline-opinioned caricatures of developers against each other and extract the best points from each side.
The irony is that the way the industry is going, picking SPA or MPA isn’t an all-in choice. You can literally have aspects of both on one site. And while technologies, like SvelteKit and Astro, are helping it along directly (seems like Next 12 and server-rendered components are part of this shift too somehow), I’m sure there are lots of sites out there already doing it by virtue of being a hodgepodge of technology smushed together to make business happen over long spans of years. (I may or may not be talking about my own experience on CodePen.)
I quite like how some very newfangled stuff is awesome and worth picking up and taking advantage of, while some old stuff has really stood the test of time and is just as useful today as ever.
Single-Page-Apps can be fantastic. Most teams will mess them up because most teams operate in dysfunctional organisations. Multi-Page-Apps can also be fantastic, both in highly functional organisations that can apply them when and where they are appropriate and in dysfunctional ones, as they enforce a limit to project scope.
Both approaches can be good and bad. Baldur makes the point that management plays the biggest role in ensuring either outcome.
Another truth: there are an awful lot of projects out there that aren’t all-in on either approach, but are a mixture. I feel that. I also feel like there is a strong desire to declare a winner or have a simple checklist to decide which approach to go for, and that just ain’t gonna happen because the landscape is too shifty and there are just too many factors. Technology: it’s complicated.
Web application architecture is a high-level structure that determines the way your product and business will operate, perform and scale. These days, the stage of choosing web app architecture is often where you get lost in a variety of options available on the software development market. The more new names and trends appear, the harder it becomes to decide. Isomorph, Progressive Web app, SPA, or SSR – what’s the best modern web app architecture for you, and which criteria to use for evaluation? In this article, we cover the major front-end architecture types available for the Web and explain the peculiarities of their implementation.
What Is a Web App vs Website?
First, let’s define a web app. It’s a client-server application, where there’s a browser (a client) and a web server. The logic of a web application is distributed among the server and the client, there’s a channel for information exchange, and data storage located locally or in the cloud.
I’m afraid I have to start this with a whole backstory, as the journey here is the point, not so much the theme.
A fella wrote to me a while back outlining a situation he was in. His company has a bunch of WordPress sites for public radio, many of which are essentially homes for podcasts. There is one specific bit of functionality he thought would be ideal for them all: to have a “pinned” audio player. Like you could play a podcast, then continue navigating around the site without that podcast stopping.
This is somewhat tricky to pull off in WordPress, because WordPress does full page reloads like any other regular website not doing anything special with link handling or history manipulation. When a page reloads, any audio on the page stops playing. That’s just how the web works.
So how would you pull it off on a WordPress site? Well, you could make it a headless WordPress site and rebuild the entire front-end as a Single Page App. Sounds fun to me, but I’d be hesitant to make that call just for this one thing.
What else could you do? You could find a way to make the page never reload. I remember doing this on a little static site 10 years ago, but that wasn’t a full blown WordPress site and I didn’t even bother updating the URL back then.
What if you did this…
Intercept internal link clicks
Ajax’d the content from that URL
Replaced the content on the page with that new content
That’s not far off from being literally functional. You’d wanna watch for a popstate event to deal with the back button, but that’s only a few more lines.
In this hypothetical world, you’d lay out the site like:
So all that <main> content gets swapped out, the URL changes, but your <audio> player is left alone to keep playing in peace. You’d write more JavaScript to give people a way to update what podcast is playing and such.
Turns out there is more to think about here though. Are any inline scripts on the content going to run? What about updating the <title> too? There are enough edge concerns you probably will get annoyed dealing with it.
I wanted to have a play with this stuff, so I tossed together a WordPress theme and reached for Turbo instead of hand-writing something. Turbo (the new version of Turbolinks) is designed just for this. It’s a JavaScript library you drop on the page (no build process, no config) and it just works. It intercepts internal link clicks, Ajax’s for new content, etc. But it has this interesting feature where if you put a data-turbo-permanent attribute on an HTML element, it will persist it across that reload. So I did that for the audio player here.
Here’s the thing though.
I just don’t have time to finish this project properly. It was fun to have a play, but my interest in it has kinda petered out. So I’ll leave it alone for now:
It almost works, minus one glaring bug that the audio stops playing on the first navigation, then works after that. I’m sure it’s fixable, but I just don’t have much skin in this game. I figure I’ll just bow out and leave this code around for someone to pick up if it’s useful for them.
Another thing at play here is that Turbo is from Basecamp, and Basecamp has rather imploded recently making it not feel great to be using their software. Exacerbated by the fact that Sam Stephenson wrote 75% of Turbo and has said he won’t be touching it (or other related projects) unless the software is moved to its own foundation. Turbo was already in a shaky place since it seemed buggy compared to Turbolinks, and now is on very gnarly ground.
Want to take your beauty salon, shop, or spa to the next level and launch a website? – You made the right decision. But, if you are wondering how to make it stand out from...
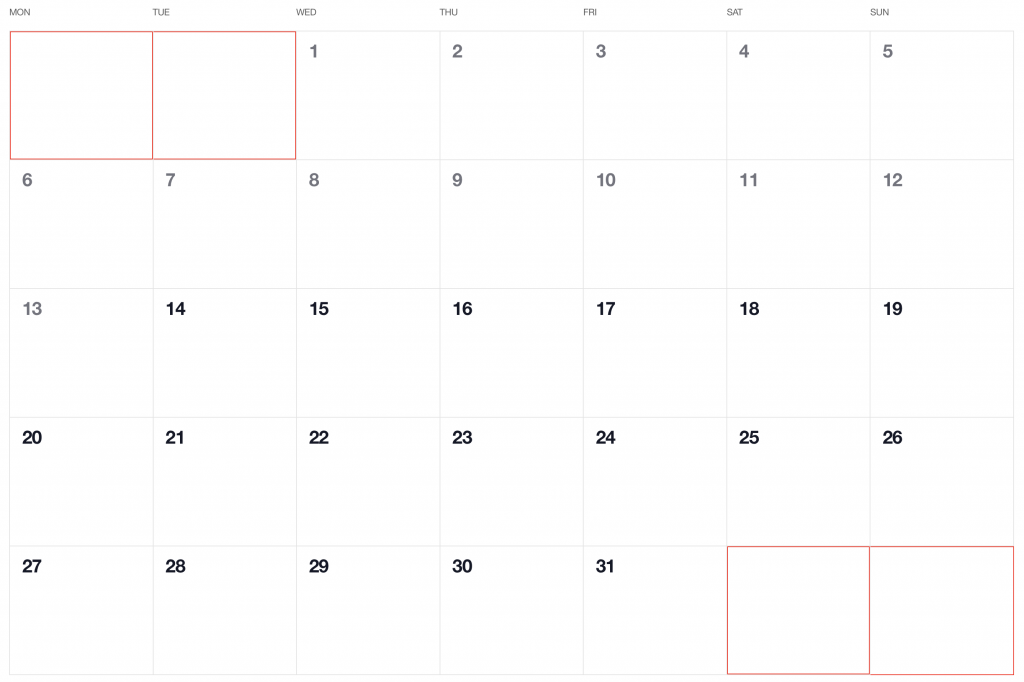
Have you ever seen a calendar on a webpage and thought, how the heck did they did that? For something like that, it might be natural to reach for a plugin, or even an embedded Google Calendar, but it’s actually a lot more straightforward to make one than you might think and only requires the trifecta of HTML, CSS and JavaScript. Let’s make one together!
I’ve set up a demo over at CodeSandbox so you can see what we’re aiming for.
Let’s first identify some requirements for what the calendar should do. It should:
Display a month grid for a given month
Display dates from the previous and next months to so the grid is always full
Indicate current date
Show the name of the currently selected month
Navigate to the previous and next month
Allow the user to navigate back to current month with a single click
Oh, and we’ll build this as a single page application that fetches calendar dates from Day.js, a super light utility library.
We’re going to shy away from choosing a specific framework to keep things easy. For this setup, I’m using Parcel for package management so I can write in Babel, bundle things up, and manage the one and only dependency for the project. Check out the package.json file over at CodeSandbox for specifics.
Step 1: Start with the basic markup and styles
Let’s start with creating a basic template for our calendar. This doesn’t need to be anything fancy. But it also should be done without resorting to tables.
We can outline our markup as three layers where we have:
A section for the calendar header. This will show the currently selected month and the elements responsible for paginating between months.
A section for the calendar grid header. Again, we’re not reaching form tables, but this would be sort of like a table header that holds a list containing the days of the week, starting with Monday.
The calendar grid. You know, each day in the current month, represented as a square in the grid.
Let’s write this up in a file called index.js. This can go inside a src folder in the project folder. We will indeed have an index.html file in the project root that imports our work, but the primary markup will live in the JavaScript file.
Let’s go ahead and import this file into that index.html file that lives in the root directory of the project. Nothing special happening here. It’s merely HTML boilerplate with an element that’s targeted by our app and registers our index.js file.
Now that we have some markup to work with, let’s style it up a bit so we have a good visual to start with. Specifically, we’re going to:
Position the elements using flexbox
Create a calendar frame using CSS grid
Position the labels within the cells
First up, let’s create a new styles.css file in the same src folder where we have index.js and drop this in:
body {
  --grey-100: #e4e9f0;
  --grey-200: #cfd7e3;
  --grey-300: #b5c0cd;
  --grey-800: #3e4e63;
  --grid-gap: 1px;
  --day-label-size: 20px;
}

.calendar-month {
  position: relative;
  /* Color of the day cell borders */
  background-color: var(--grey-200);
  border: solid 1px var(--grey-200);
}


/* Month indicator and selectors positioning */
.calendar-month-header {
  display: flex;
  justify-content: space-between;
  background-color: #fff;
  padding: 10px;
}


/* Month indicator */
.calendar-month-header-selected-month {
  font-size: 24px;
  font-weight: 600;
}


/* Month selectors positioning */
.calendar-month-header-selectors {
  display: flex;
  align-items: center;
  justify-content: space-between;
  width: 80px;
}


.calendar-month-header-selectors > * {
  cursor: pointer;
}


/* | Mon | Tue | Wed | Thu | Fri | Sat | Sun | */
.day-of-week {
  color: var(--grey-800);
  font-size: 18px;
  background-color: #fff;
  padding-bottom: 5px;
  padding-top: 10px;
}


.day-of-week,
.days-grid {
  /* 7 equal columns for weekdays and days cells */
  display: grid;
  grid-template-columns: repeat(7, 1fr);
}


.day-of-week > * {
  /* Position the weekday label within the cell */
  text-align: right;
  padding-right: 5px;
}


.days-grid {
  height: 100%;
  position: relative;
  /* Show border between the days */
  grid-column-gap: var(--grid-gap);
  grid-row-gap: var(--grid-gap);
  border-top: solid 1px var(--grey-200);
}


.calendar-day {
  position: relative;
  min-height: 100px;
  font-size: 16px;
  background-color: #fff;
  color: var(--grey-800);
  padding: 5px;
}


/* Position the day label within the day cell */
.calendar-day > span {
  display: flex;
  justify-content: center;
  align-items: center;
  position: absolute;
  right: 2px;
  width: var(--day-label-size);
  height: var(--day-label-size);
}
The key part that sets up our grid is this:
.day-of-week,
.days-grid {
  /* 7 equal columns for weekdays and days cells */
  display: grid;
  grid-template-columns: repeat(7, 1fr);
}
Notice that both the calendar grid header and the calendar grid itself are using CSS grid to lay things out. We know there will always be seven days in a week, so that allows us to use the repeat() function to create seven columns that are proportional to one another. We’re also declaring a min-height of 100px on each date of the calendar to make sure the rows are consistent.
We need to hook these styles up with the markup, so let’s add this to the top of our index.js file:
import "./styles.css";
This is a good spot to stop and see what we have so far.
As you probably noticed, the template only contains static data at the moment. The month is hardcoded as July and the day numbers are hardcoded as well. That’s where Day.js comes into play. It provides all the data we need to properly place dates on the correct days of the week for a given month using real calendar data. It allows us to get and set anything from the start date of a month to all the date formatting options we need to display the data.
We will:
Get the current month
Calculate where the days should be placed (weekdays)
Calculate the days for displaying dates from the previous and next months
Put all of the days together in a single array
First, we need to import Day.js and remove all static HTML (selected month, weekdays and days). We’ll do that by adding this to our index.js file right above where we imported the styles:
import dayjs from "dayjs";
We’re also going to lean on a couple of Day.js plugins for help. WeekDay helps us set the first day of the week. Some prefer Sunday as the first day of the week. Other prefer Monday. Heck, in some cases, it makes sense to start with Friday. We’re going to start with Monday.
The weekOfYear plugin returns the numeric value for the current week out of all weeks in the year. There are 52 weeks in a year, so we’d say that the week starting January 1 is the the first week of the year, and so on.
So here what we put into index.js right after our import statements:
Then, we want to fetch the current year and set in in YYYY format:
const INITIAL_YEAR = dayjs().format("YYYY");
And we want to set the current month as the starting point when initially loading the calendar, where M formats the month as a numeric value (e.g. January equals 1):
const INITIAL_MONTH = dayjs().format("M");
Let’s go and populate our calendar grid header with the days of the week. First we grab the proper element (#days-of-week), then we iterate through our WEEKDAYS array, creating a list item element for each item in the array while setting the name for each one:
// Select the calendar grid header element
const daysOfWeekElement = document.getElementById("days-of-week");


// Loop through the array of weekdays
WEEKDAYS.forEach(weekday => {
  // For each item in the array, make a list item element
  const weekDayElement = document.createElement("li");
  // Append a child element inside the list item...
  daysOfWeekElement.appendChild(weekDayElement);
  /// ...that contains the value in the array
  weekDayElement.innerText = weekday;
});
Step 3: Creating the calendar grid
That was pretty straightforward but now the real fun starts as we will now play with the calendar grid. Let’s stop for a second a think what we really need to do to get that right.
First, we want the date numbers to fall in the correct weekday columns. For example, July 1, 2020 is on a Wednesday. That’s where the date numbering should start.
If the first of the month falls on Wednesday, then that means we’ll have empty grid items for Monday and Tuesday in the first week. The last day of the month is July 31, which falls on a Friday. That means Saturday and Sunday will be empty in the last week of the grid. We went to fill those with the trailing and leading dates of the previous and next months, respectively, so that the calendar grid is always full.
Create days for the current month
To add the days for the current month to the grid, we need to know how many days exist in the current month. We can get that using the daysInMonth method provided by Day.js. Let’s create a helper method for that.
function getNumberOfDaysInMonth(year, month) {
  return dayjs(`${year}-${month}-01`).daysInMonth()
}
When we know that, we create an empty array with a length that’s equal to number of days in the current month. Then we map() that array and create a day object for each one. The object we create has an arbitrary structure, so you can add other properties if you need them.
In this example, though, we need a date property that will be used to check if a particular date is the current day. We’ll also return a dayOfMonth property that acts as the label (e.g. 1, 2, 3 and so on). isCurrentMonth checks whether the date is in the current month or outside of it. If it is outside the current month, we will style those so folks know they are outside the range of the current month.
Add dates from the previous month to the calendar grid
To get dates from the previous month to display in the current month, we need to check what is the weekday of the first day in selected month. That’s where we can use the WeekDay plugin for Day.js. Let’s create a helper method for that.
function getWeekday(date) {
  return dayjs(date).weekday()
}
Then, based on that, we need to check which day was the last Monday in the previous month. We need that value to know how many days from the previous month should be visible in the current month view. We can get that by subtracting the weekday value from the first day of the current month. For example, if first day of the month is Wednesday, we need to subtract 3 days to get last Monday of the previous month. Having that value allows us to create an array of day objects starting from the last Monday of the previous month through the end of that month.
function createDaysForPreviousMonth(year, month) {
  const firstDayOfTheMonthWeekday = getWeekday(currentMonthDays[0].date);


  const previousMonth = dayjs(`${year}-${month}-01`).subtract(1, "month");

  const previousMonthLastMondayDayOfMonth = dayjs(
    currentMonthDays[0].date
  ).subtract(firstDayOfTheMonthWeekday - 1, "day").date();


  // Account for first day of the month on  a Sunday (firstDayOfTheMonthWeekday === 0)
  const visibleNumberOfDaysFromPreviousMonth = firstDayOfTheMonthWeekday ? firstDayOfTheMonthWeekday - 1 : 6


  return [...Array(visibleNumberOfDaysFromPreviousMonth)].map((day, index) => {
    return {
      date: dayjs(
        `${previousMonth.year()}-${previousMonth.month() + 1}-${previousMonthLastMondayDayOfMonth + index}`
      ).format("YYYY-MM-DD"),
      dayOfMonth: previousMonthLastMondayDayOfMonth + index,
      isCurrentMonth: false
    };
  });
}
Add dates from the next month to the calendar grid
Now, let’s do the reverse and calculate which days we need from the next month to fill in the grid for the current month. Fortunately, we can use the same helper we just created for the previous month calculation. The difference is that we will calculate how many days from the next month should be visible by subtracting that weekday numeric value from 7.
So, for example, if the last day of the month is Saturday, we need to subtract 1 day from 7 to construct an array of dates needed from next month (Sunday).
OK, we know how to create all days we need, let’s use the methods we just created and then merge all days into a single array of all the days we want to show in the current month, including filler dates from the previous and next months.
let currentMonthDays = createDaysForCurrentMonth(INITIAL_YEAR, INITIAL_MONTH)
let previousMonthDays = createDaysForPreviousMonth(INITIAL_YEAR, INITIAL_MONTH, currentMonthDays[0])
let nextMonthDays = createDaysForNextMonth(INITIAL_YEAR, INITIAL_MONTH)


let days = [...this.previousMonthDays, ...this.currentMonthDays, ...this.nextMonthDays]
Here’s everything we just covered put together in index.js:
OK, so we have the basic markup for our calendar, the data we need to display dates from the current month, plus dates from the previous and next month to fill in empty grid items. Now we need to append the dates to the calendar!
We already have a container for the calendar grid, #calendar-days. Let’s grab that element.
Now, let’s create a function that will append a day to our calendar view.
function appendDay(day, calendarDaysElement) {
  const dayElement = document.createElement("li");
  const dayElementClassList = dayElement.classList;


  // Generic calendar day class
  dayElementClassList.add("calendar-day");


  // Container for day of month number
  const dayOfMonthElement = document.createElement("span");


  // Content
  dayOfMonthElement.innerText = day.dayOfMonth;


  // Add an extra class to differentiate current month days from prev/next month days
  if (!day.isCurrentMonth) {
    dayElementClassList.add("calendar-day--not-current");
  }


  // Append the element to the container element
  dayElement.appendChild(dayOfMonthElement);
  calendarDaysElement.appendChild(dayElement);
}
Notice that we’re tossing in a check for the dates that are coming from the previous and next months so that we can add a class to style them differently from the dates in the current month:
What we have so far is pretty nice, but we want the user to be able to paginate from month-to-month forwards and backwards in time, starting from the current month. We have most of the logic in place, so all we really need to do is to add a click listener to the pagination buttons that re-runs the days calculation and re-draws the calendar with updated data.
Before we begin, let’s define variables for dates that are in the current month, previous month, and next month so we can reference them throughout the code.
let currentMonthDays;
let previousMonthDays;
let nextMonthDays;
Now, let’s create a method that will be responsible for re-calculating the calendar days and re-rendering the calendar when paginating to another month. We will call that function createCalendar. This method will accept two attributes — year and month — and based on that, the calendar will re-render with new data and without a new page load.
The method will replace the header content to always show the selected month label.
function createCalendar(year = INITIAL_YEAR, month = INITIAL_MONTH) {
  document.getElementById("selected-month").innerText = dayjs(
    new Date(year, month - 1)
  ).format("MMMM YYYY");


  // ...
Then it will grab the calendar days container and remove all existing days.
There is one piece of logic still missing: a removeAllDayElements method that clears the existing calendar. This method takes the first calendar day element, removes it, and replaces it with another one. From there, it will run the logic in a loop until all of the elements are removed.
function removeAllDayElements(calendarDaysElement) {
  let first = calendarDaysElement.firstElementChild;


  while (first) {
    first.remove();
    first = calendarDaysElement.firstElementChild;
  }
}
Now we can reuse that logic when we want to change the month. Recall the first step when we created a static template for our component. We added these elements:
These are the controls for paginating between months. To change it, we need to store the currently selected month. Let’s create a variable to keep track of what that is and set its initial value to the present month.
let selectedMonth = dayjs(new Date(INITIAL_YEAR, INITIAL_MONTH - 1, 1));
Now, to make the selectors work, we need a bit of JavaScript. To make it more readable, we will create another method called initMonthSelectors and we will keep the logic there. This method will add event listeners to the selector elements. It will listen for click events and update the value of selectedMonth to the name of the newly selected month before running the createCalendar method with proper year and month values.
That’s it! Our calendar is ready. While that’s great and all, it would be even nicer if we could mark the current date so it stands out from the rest. That shouldn’t be very hard. We are already styling days that are not in the selected month, so let’s do similar thing to that.
We’ll create a variable that’s set for today:
const TODAY = dayjs().format("YYYY-MM-DD");
Then, in the appendDay method where we apply a class for dates outside the current month, we have to add another check to see if the element is today’s date. If it is, we’ll add a class to that element:
function appendDay(day, calendarDaysElement) {
  // ...
  if (day.date === TODAY) {
    dayElementClassList.add("calendar-day--today");
  }
}
Vue.JS is a JavaScript library that has taken the world of frontend developers by storm. Even for one of the latest libraries on JavaScript, Vue stands a stiff competition for the existing leaders like React and Angular.
As for recent stats, here is a comparison between the popularity of these three JavaScript frameworks:
When I see something new and controversial like this, I always want to try it out myself to see what all of the hype is about and also so I can form my own opinions about the subject.
This led me down the path to creating a micro-frontend application that rendered two separate React applications, along with a single Vue application.
In most applications, there is a field while registering to enter a valid password, which should contain at least a number and one special symbol. In this article, we are going to learn how to create a password strength bar that will detail the strength of a given password.
Prerequisite
Basic knowledge of Angular.
Visual Studio Code must be installed.
Angular CLI must be installed.
Node must be installed.
Step 1
Let's create a new Angular project, using the following npm command.
There are many instances where a user fills some input in a form, edits that input, and then might attempt to leave the page that they're on. However, often, we'll want to secure the form in such a way that if someone navigates away or closes the browser tab, they should be prompted to confirm that they really want to leave the form with unsaved data.
Whenever these kinds of instances occur, you will see an alert appear on the top of your browser like this:
With the imminent release of Vue 3, this is a great time to build an app with the new Vue 3 Composition API. While this change in how you can build components is one of Vue 3’s biggest features, here are some other key benefits of this version:
Smaller and faster.
Improved TypeScript support.
Exposes lower-level APIs.
Apps will be more maintainable.
Let’s get back to the Composition API by building a simple TODO application. Look at the blocks below for a high-level difference between a component written with the Composition API, and the older Options API. We’ll dive into additional details as we build the application.
PWA technology is software that enables users to create websites that behave like mobile apps. Built on the lines of intelligent caching, PWA stores HTML, CSS, and image files in a browser's cache, which allows for efficient page-load speed. PWA development enhances user experience, as it facilitates offline website access, background data synchronization, push notifications, etc.
Frameworks like React, Angular, Vue.js, etc. can be used to write PWAs.
Chart.js is a powerful open source data visualization library. This helps to visualize or represent a data inside a web application using JavaScipt. It helps to plot the data into 8 different types of chart like bars, lines, pies, etc. This Chart.js graphs are highly customizable and used in web application development to build a responsive and beautiful graph.
Prerequisites
We should have a basic knowledge of Angular and Web API.
In React Native (and also in React) you can create custom components and use them easily as much as you want in your app. You may give custom styles and values to these components by passing different values in the props of these components. However, you can not change the child components of your custom components since they are already defined.
In some cases, you may want to have containers that look alike but also have different content and differ in style. At this point, custom container components come in.
In one of the latest freelance projects of mine, my client prefers Vue.js, which is recently super popular on the frontend side. So, I dove into Vue. I can say that it is very practical and effective. Besides, when we compare it with other predominant competitors like Angular and Aurelia, we can easily notice Vue has a very small learning curve.
However, it didn't take long for me to have a feeling that my code was getting unmanageable. This wasn't a big surprise to me because this is often the trade-off with dynamically-typed languages.


 In one of the latest freelance projects of mine, my client prefers