QR codes are funny, right? We love them, then hate them, then love them again. Anyways, they’ve lately been popping up again and it got me thinking about how they’re made. There are like a gazillion QR code generators out there, but say it’s something you need to do on your own website. This package can do that. But it’s also weighs in at a hefty 180 KB for everything it needs to generate stuff. You wouldn’t want to serve all that along with the rest of your scripts.
Now, I’m relatively new to the concept of cloud functions, but I hear that’s the bee’s knees for something just like this. That way, the function lives somewhere on a server that can be called when it’s needed. Sorta like a little API to run the function.
DigitalOcean has a CLI that with a command that’ll scaffold things for us, so cd wherever you want to set things up and run:
doctl serverless init --language js qr-generator
Notice the language is explicitly declared. DigitalOcean functions also support PHP and Python.
We get a nice clean project called qr-generator with a /packages folder that holds all the project’s functions. There’s a sample function in there, but we can overlook it for now and create a qr folder right next to it:
That folder is where both the qrcode package and our qr.js function are going to live. So, let’s cd into packages/sample/qr and install the package:
npm install --save qrcode
Now we can write the function in a new qr.js file:
All that’s doing is requiring the the qrcode package and exporting a function that basically generates an <img> tag with the a base64 PNG for the source. We can even test it out in the terminal:
There is one extra step we need here. When the project was scaffolded, we got this little project.yml file and it configures the function with some information about it. This is what’s in there by default:
See those highlighted lines? The packages: name property is where in the packages folder the function lives, which is a folder called sample in this case. The actions/ name property is the name of the function itself, which is the name of the file. It’s hello by default when we spin up the project, but we named ours qr.js, so we oughta change that line from hello to qr before moving on.
Deploy the function
We can do it straight from the command line! First, we connect to the DigitalOcean sandbox environment so we have a live URL for testing:
## You will need an DO API key handy
doctl sandbox connect
Now we can deploy the function:
doctl sandbox deploy qr-generator
Once deployed, we can access the function at a URL. What’s the URL? There’s a command for that:
doctl sbx fn get sample/qr --url
https://faas-nyc1-2ef2e6cc.doserverless.co/api/v1/web/fn-10a937cb-1f12-427b-aadd-f43d0b08d64a/sample/qr
Heck yeah! No more need to ship that entire package with the rest of the scripts! We can hit that URL and generate the QR code from there.
Demo
We fetch the API and that’s really all there is to it!
Modern apps place high demands on front-end developers. Web apps require complex functionality, and the lion’s share of that work is falling to front-end devs:
building modern, accessible user interfaces
creating interactive elements and complex animations
managing complex application state
meta-programming: build scripts, transpilers, bundlers, linters, etc.
reading from REST, GraphQL, and other APIs
middle-tier programming: proxies, redirects, routing, middleware, auth, etc.
This list is daunting on its own, but it gets really rough if your tech stack doesn’t optimize for simplicity. A complex infrastructure introduces hidden responsibilities that introduce risk, slowdowns, and frustration.
Depending on the infrastructure we choose, we may also inadvertently add server configuration, release management, and other DevOps duties to a front-end developer’s plate.
The sneaky middle tier — where front-end tasks can balloon in complexity
Let’s look at a task I’ve seen assigned to multiple front-end teams: create a simple REST API to combine data from a few services into a single request for the frontend. If you just yelled at your computer, “But that’s not a frontend task!” — I agree! But who am I to let facts hinder the backlog?
An API that’s only needed by the frontend falls into middle-tier programming. For example, if the front end combines the data from several backend services and derives a few additional fields, a common approach is to add a proxy API so the frontend isn’t making multiple API calls and doing a bunch of business logic on the client side.
There’s not a clear line to which back-end team should own an API like this. Getting it onto another team’s backlog — and getting updates made in the future — can be a bureaucratic nightmare, so the front-end team ends up with the responsibility.
This is a story that ends differently depending on the architectural choices we make. Let’s look at two common approaches to handling this task:
Build an Express app on Node to create the REST API
Use serverless functions to create the REST API
Express + Node comes with a surprising amount of hidden complexity and overhead. Serverless lets front-end developers deploy and scale the API quickly so they can get back to their other front-end tasks.
Solution 1: Build and deploy the API using Node and Express (and Docker and Kubernetes)
Earlier in my career, the standard operating procedure was to use Node and Express to stand up a REST API. On the surface, this seems relatively straightforward. We can create the whole REST API in a file called server.js:
const express = require('express');

const PORT = 8080;
const HOST = '0.0.0.0';

const app = express();

app.use(express.static('site'));

// simple REST API to load movies by slug
const movies = require('./data.json');

app.get('/api/movies/:slug', (req, res) => {
  const { slug } = req.params;
  const movie = movies.find((m) => m.slug === slug);

  res.json(movie);
});

app.listen(PORT, HOST, () => {
  console.log(`app running on http://${HOST}:${PORT}`);
});
This code isn’t too far removed from front-end JavaScript. There’s a decent amount of boilerplate in here that will trip up a front-end dev if they’ve never seen it before, but it’s manageable.
If we run node server.js, we can visit http://localhost:8080/api/movies/some-movie and see a JSON object with details for the movie with the slug some-movie (assuming you’ve defined that in data.json).
Deployment introduces a ton of extra overhead
Building the API is only the beginning, however. We need to get this API deployed in a way that can handle a decent amount of traffic without falling down. Suddenly, things get a lot more complicated.
We need several more tools:
somewhere to deploy this (e.g. DigitalOcean, Google Cloud Platform, AWS)
a container to keep local dev and production consistent (i.e. Docker)
a way to make sure the deployment stays live and can handle traffic spikes (i.e. Kubernetes)
At this point, we’re way outside front-end territory. I’ve done this kind of work before, but my solution was to copy-paste from a tutorial or Stack Overflow answer.
The Docker config is somewhat comprehensible, but I have no idea if it’s secure or optimized:
FROM node:14
WORKDIR /usr/src/app
COPY package*.json ./
RUN npm install
COPY . .
EXPOSE 8080
CMD [ "node", "server.js" ]
Next, we need to figure out how to deploy the Docker container into Kubernetes. Why? I’m not really sure, but that’s what the back end teams at the company use, so we should follow best practices.
Our initial task of “stand up a quick Node API” has ballooned into a suite of tasks that don’t line up with our core skill set. The first time I got handed a task like this, I lost several days getting things configured and waiting on feedback from the backend teams to make sure I wasn’t causing more problems than I was solving.
Some companies have a DevOps team to check this work and make sure it doesn’t do anything terrible. Others end up trusting the hivemind of Stack Overflow and hoping for the best.
With this approach, things start out manageable with some Node code, but quickly spiral out into multiple layers of config spanning areas of expertise that are well beyond what we should expect a frontend developer to know.
Solution 2: Build the same REST API using serverless functions
If we choose serverless functions, the story can be dramatically different. Serverless is a great companion to Jamstack web apps that provides front-end developers with the ability to handle middle tier programming without the unnecessary complexity of figuring out how to deploy and scale a server.
There are multiple frameworks and platforms that make deploying serverless functions painless. My preferred solution is to use Netlify since it enables automated continuous delivery of both the front end and serverless functions. For this example, we’ll use Netlify Functions to manage our serverless API.
Using Functions as a Service (a fancy way of describing platforms that handle the infrastructure and scaling for serverless functions) means that we can focus only on the business logic and know that our middle tier service can handle huge amounts of traffic without falling down. We don’t need to deal with Docker containers or Kubernetes or even the boilerplate of a Node server — it Just Works™ so we can ship a solution and move on to our next task.
First, we can define our REST API in a serverless function at netlify/functions/movie-by-slug.js:
To add the proper routing, we can create a netlify.toml at the root of the project:
[[redirects]]
  from = "/api/movies/*"
  to = "/.netlify/functions/movie-by-slug"
  status = 200
This is significantly less configuration than we’d need for the Node/Express approach. What I prefer about this approach is that the config here is stripped down to only what we care about: the specific paths our API should handle. The rest — build commands, ports, and so on — is handled for us with good defaults.
If we have the Netlify CLI installed, we can run this locally right away with the command ntl dev, which knows to look for serverless functions in the netlify/functions directory.
Visiting http://localhost:888/api/movies/booper will show a JSON object containing details about the “booper” movie.
So far, this doesn’t feel too different from the Node and Express setup. However, when we go to deploy, the difference is huge. Here’s what it takes to deploy this site to production:
Commit the serverless function and netlify.toml to repo and push it up on GitHub, Bitbucket, or GitLab
Use the Netlify CLI to create a new site connected to your git repo: ntl init
That’s it! The API is now deployed and capable of scaling on demand to millions of hits. Changes will be automatically deployed whenever they’re pushed to the main repo branch.
Using serverless functions allows front-end developers to complete middle-tier programming tasks without taking on the additional boilerplate and DevOps overhead that creates risk and decreases productivity.
If our goal is to empower frontend teams to quickly and confidently ship software, choosing serverless functions bakes productivity into the infrastructure. Since adopting this approach as my default Jamstack starter, I’ve been able to ship faster than ever, whether I’m working alone, with other front-end devs, or cross-functionally with teams across a company.
The best way to learn is to build. Let’s learn about this hot new buzzword, Jamstack, by building a site with React, Netlify (Serverless) Functions, and Airtable. One of the ingredients of Jamstack is static hosting, but that doesn’t mean everything on the site has to be static. In fact, we’re going to build an app with full-on CRUD capability, just like a tutorial for any web technology with more traditional server-side access might.
Why these technologies, you ask?
You might already know this, but the “JAM” in Jamstack stands for JavaScript, APIs, and Markup. These technologies individually are not new, so the Jamstack is really just a new and creative way to combine them. You can read more about it over at the Jamstack site.
One of the most important benefits of Jamstack is ease of deployment and hosting, which heavily influence the technologies we are using. By incorporating Netlify Functions (for backend CRUD operations with Airtable), we will be able to deploy our full-stack application to Netlify. The simplicity of this process is the beauty of the Jamstack.
As far as the database, I chose Airtable because I wanted something that was easy to get started with. I also didn’t want to get bogged down in technical database details, so Airtable fits perfectly. Here’s a few of the benefits of Airtable:
You don’t have to deploy or host a database yourself
It comes with an Excel-like GUI for viewing and editing data
There’s a nice JavaScript SDK
What we’re building
For context going forward, we are going to build an app where you can use to track online courses that you want to take. Personally, I take lots of online courses, and sometimes it’s hard to keep up with the ones in my backlog. This app will let track those courses, similar to a Netflix queue.
One of the reasons I take lots of online courses is because I make courses. In fact, I have a new one available where you can learn how to build secure and production-ready Jamstack applications using React and Netlify (Serverless) Functions. We’ll cover authentication, data storage in Airtable, Styled Components, Continuous Integration with Netlify, and more! Check it out →
Airtable setup
Let me start by clarifying that Airtable calls their databases “bases.” So, to get started with Airtable, we’ll need to do a couple of things.
Next, let’s create a new database. We’ll log into Airtable, click on “Add a Base” and choose the “Start From Scratch” option. I named my new base “JAMstack Demos” so that I can use it for different projects in the future.
Next, let’s click on the base to open it.
You’ll notice that this looks very similar to an Excel or Google Sheets document. This is really nice for being able tower with data right inside of the dashboard. There are few columns already created, but we add our own. Here are the columns we need and their types:
name (single line text)
link (single line text)
tags (multiple select)
purchased (checkbox)
We should add a few tags to the tags column while we’re at it. I added “node,” “react,” “jamstack,” and “javascript” as a start. Feel free to add any tags that make sense for the types of classes you might be interested in.
I also added a few rows of data in the name column based on my favorite online courses:
The last thing to do is rename the table itself. It’s called “Table 1” by default. I renamed it to “courses” instead.
Locating Airtable credentials
Before we get into writing code, there are a couple of pieces of information we need to get from Airtable. The first is your API Key. The easiest way to get this is to go your account page and look in the “Overview” section.
Next, we need the ID of the base we just created. I would recommend heading to the Airtable API page because you’ll see a list of your bases. Click on the base you just created, and you should see the base ID listed. The documentation for the Airtable API is really handy and has more detailed instructions for find the ID of a base.
Lastly, we need the table’s name. Again, I named mine “courses” but use whatever you named yours if it’s different.
Project setup
To help speed things along, I’ve created a starter project for us in the main repository. You’ll need to do a few things to follow along from here:
Check out the starter branch with git checkout starter
There are lots of files already there. The majority of the files come from a standard create-react-app application with a few exceptions. There is also a functions directory which will host all of our serverless functions. Lastly, there’s a netlify.toml configuration file that tells Netlify where our serverless functions live. Also in this config is a redirect that simplifies the path we use to call our functions. More on this soon.
The last piece of the setup is to incorporate environment variables that we can use in our serverless functions. To do this install the dotenv package.
npm install dotenv
Then, create a .env file in the root of the repository with the following. Make sure to use your own API key, base ID, and table name that you found earlier.
To create serverless functions with Netlify, we need to create a JavaScript file inside of our /functions directory. There are already some files included in this starter directory. Let’s look in the courses.js file first.
The core part of a serverless function is the exports.handler function. This is where we handle the incoming request and respond to it. In this case, we are accepting an event parameter which we will use in just a moment.
We are returning a call inside the handler to the formattedReturn function, which makes it a bit simpler to return a status and body data. Here’s what that function looks like for reference.
Notice also that we are importing several helper functions to handle the interaction with Airtable. We can decide which one of these to call based on the HTTP method of the incoming request.
HTTP GET → getCourses
HTTP POST → createCourse
HTTP PUT → updateCourse
HTTP DELETE → deleteCourse
Let’s update this function to call the appropriate helper function based on the HTTP method in the event parameter. If the request doesn’t match one of the methods we are expecting, we can return a 405 status code (method not allowed).
Since we are going to be interacting with Airtable in each of the different helper files, let’s configure it once and reuse it. Open the airtable.js file.
In this file, we want to get a reference to the courses table we created earlier. To do that, we create a reference to our Airtable base using the API key and the base ID. Then, we use the base to get a reference to the table and export it.
require('dotenv').config();
var Airtable = require('airtable');
var base = new Airtable({ apiKey: process.env.AIRTABLE_API_KEY }).base(
  process.env.AIRTABLE_BASE_ID
);
const table = base(process.env.AIRTABLE_TABLE_NAME);
module.exports = { table };
Getting courses
With the Airtable config in place, we can now open up the getCourses.js file and retrieve courses from our table by calling table.select().firstPage(). The Airtable API uses pagination so, in this case, we are specifying that we want the first page of records (which is 20 records by default).
Airtable returns back a lot of extra information in its records. I prefer to simplify these records with only the record ID and the values for each of the table columns we created above. These values are found in the fields property. To do this, I used the an Array map to format the data the way I want.
How do we test this out? Well, the netlify-cli provides us a netlify dev command to run our serverless functions (and our front-end) locally. First, install the CLI:
npm install -g netlify-cli
Then, run the netlify dev command inside of the directory.
This beautiful command does a few things for us:
Runs the serverless functions
Runs a web server for your site
Creates a proxy for front end and serverless functions to talk to each other on Port 8888.
Let’s open up the following URL to see if this works:
We are able to use /api/* for our API because of the redirect configuration in the netlify.toml file.
If successful, we should see our data displayed in the browser.
Creating courses
Let’s add the functionality to create a course by opening up the createCourse.js file. We need to grab the properties from the incoming POST body and use them to create a new record by calling table.create().
The incoming event.body comes in a regular string which means we need to parse it to get a JavaScript object.
const fields = JSON.parse(event.body);
Then, we use those fields to create a new course. Notice that the create() function accepts an array which allows us to create multiple records at once.
Since we can’t perform a POST, PUT, or DELETE directly in the browser web address (like we did for the GET), we need to use a separate tool for testing our endpoints from now on. I prefer Postman, but I’ve heard good things about Insomnia as well.
Inside of Postman, I need the following configuration.
url: localhost:8888/api/courses
method: POST
body: JSON object with name, link, and tags
After running the request, we should see the new course record is returned.
We can also check the Airtable GUI to see the new record.
Tip: Copy and paste the ID from the new record to use in the next two functions.
Updating courses
Now, let’s turn to updating an existing course. From the incoming request body, we need the id of the record as well as the other field values.
We can specifically grab the id value using object destructuring, like so:
const {id} = JSON.parse(event.body);
Then, we can use the spread operator to grab the rest of the values and assign it to a variable called fields:
const {id, ...fields} = JSON.parse(event.body);
From there, we call the update() function which takes an array of objects (each with an id and fields property) to be updated:
To test this out, we’ll turn back to Postman for the PUT request:
url: localhost:8888/api/courses
method: PUT
body: JSON object with id (the id from the course we just created) and the fields we want to update (name, link, and tags)
I decided to append “Updated!!!” to the name of a course once it’s been updated.
We can also see the change in the Airtable GUI.
Deleting courses
Lastly, we need to add delete functionality. Open the deleteCourse.js file. We will need to get the id from the request body and use it to call the destroy() function.
Here’s the configuration for the Delete request in Postman.
url: localhost:8888/api/courses
method: PUT
body: JSON object with an id (the same id from the course we just updated)
And, of course, we can double-check that the record was removed by looking at the Airtable GUI.
Displaying a list of courses in React
Whew, we have built our entire back end! Now, let’s move on to the front end. The majority of the code is already written. We just need to write the parts that interact with our serverless functions. Let’s start by displaying a list of courses.
Open the App.js file and find the loadCourses function. Inside, we need to make a call to our serverless function to retrieve the list of courses. For this app, we are going to make an HTTP request using fetch, which is built right in.
Thanks to the netlify dev command, we can make our request using a relative path to the endpoint. The beautiful thing is that this means we don’t need to make any changes after deploying our application!
const res = await fetch('/api/courses');
const courses = await res.json();
Then, store the list of courses in the courses state variable.
Open up localhost:8888 in the browser and we should our list of courses.
Adding courses in React
Now that we have the ability to view our courses, we need the functionality to create new courses. Open up the CourseForm.js file and look for the submitCourse function. Here, we’ll need to make a POST request to the API and send the inputs from the form in the body.
The JavaScript Fetch API makes GET requests by default, so to send a POST, we need to pass a configuration object with the request. This options object will have these two properties.
Test this out in the browser. Fill in the form and submit it.
After submitting the form, the form should be reset, and the list of courses should update with the newly added course.
Updating purchased courses in React
The list of courses is split into two different sections: one with courses that have been purchased and one with courses that haven’t been purchased. We can add the functionality to mark a course “purchased” so it appears in the right section. To do this, we’ll send a PUT request to the API.
Open the Course.js file and look for the markCoursePurchased function. In here, we’ll make the PUT request and include both the id of the course as well as the properties of the course with the purchased property set to true. We can do this by passing in all of the properties of the course with the spread operator and then overriding the purchased property to be true.
To test this out, click the button to mark one of the courses as purchased and the list of courses should update to display the course in the purchased section.
Deleting courses in React
And, following with our CRUD model, we will add the ability to delete courses. To do this, locate the deleteCourse function in the Course.js file we just edited. We will need to make a DELETE request to the API and pass along the id of the course we want to delete.
To test this out, click the “Delete” button next to the course and the course should disappear from the list. We can also verify it is gone completely by checking the Airtable dashboard.
Deploying to Netlify
Now, that we have all of the CRUD functionality we need on the front and back end, it’s time to deploy this thing to Netlify. Hopefully, you’re as excited as I am about now easy this is. Just make sure everything is pushed up to GitHub before we move into deployment.
If you don’t have a Netlify, account, you’ll need to create one (like Airtable, it’s free). Then, in the dashboard, click the “New site from Git” option. Select GitHub, authenticate it, then select the project repo.
Next, we need to tell Netlify which branch to deploy from. We have two options here.
Use the starter branch that we’ve been working in
Choose the master branch with the final version of the code
For now, I would choose the starter branch to ensure that the code works. Then, we need to choose a command that builds the app and the publish directory that serves it.
Build command: npm run build
Publish directory: build
Netlify recently shipped an update that treats React warnings as errors during the build proces. which may cause the build to fail. I have updated the build command to CI = npm run build to account for this.
Lastly, click on the “Show Advanced” button, and add the environment variables. These should be exactly as they were in the local .env that we created.
The site should automatically start building.
We can click on the “Deploys” tab in Netlify tab and track the build progress, although it does go pretty fast. When it is complete, our shiny new app is deployed for the world can see!
Welcome to the Jamstack!
The Jamstack is a fun new place to be. I love it because it makes building and hosting fully-functional, full-stack applications like this pretty trivial. I love that Jamstack makes us mighty, all-powerful front-end developers!
I hope you see the same power and ease with the combination of technology we used here. Again, Jamstack doesn’t require that we use Airtable, React or Netlify, but we can, and they’re all freely available and easy to set up. Check out Chris’ serverless site for a whole slew of other services, resources, and ideas for working in the Jamstack. And feel free to drop questions and feedback in the comments here!
Many developers are at least marginally familiar with AWS Lambda functions. They’re reasonably straightforward to set up, but the vast AWS landscape can make it hard to see the big picture. With so many different pieces it can be daunting, and frustratingly hard to see how they fit seamlessly into a normal web application.
The Serverless framework is a huge help here. It streamlines the creation, deployment, and most significantly, the integration of Lambda functions into a web app. To be clear, it does much, much more than that, but these are the pieces I’ll be focusing on. Hopefully, this post strikes your interest and encourages you to check out the many other things Serverless supports. If you’re completely new to Lambda you might first want to check out this AWS intro.
There’s no way I can cover the initial installation and setup better than the quick start guide, so start there to get up and running. Assuming you already have an AWS account, you might be up and running in 5–10 minutes; and if you don’t, the guide covers that as well.
Your first Serverless service
Before we get to cool things like file uploads and S3 buckets, let’s create a basic Lambda function, connect it to an HTTP endpoint, and call it from an existing web app. The Lambda won’t do anything useful or interesting, but this will give us a nice opportunity to see how pleasant it is to work with Serverless.
First, let’s create our service. Open any new, or existing web app you might have (create-react-app is a great way to quickly spin up a new one) and find a place to create our services. For me, it’s my lambda folder. Whatever directory you choose, cd into it from terminal and run the following command:
sls create -t aws-nodejs --path hello-world
That creates a new directory called hello-world. Let’s crack it open and see what’s in there.
If you look in handler.js, you should see an async function that returns a message. We could hit sls deploy in our terminal right now, and deploy that Lambda function, which could then be invoked. But before we do that, let’s make it callable over the web.
Working with AWS manually, we’d normally need to go into the AWS API Gateway, create an endpoint, then create a stage, and tell it to proxy to our Lambda. With serverless, all we need is a little bit of config.
Still in the hello-world directory? Open the serverless.yaml file that was created in there.
The config file actually comes with boilerplate for the most common setups. Let’s uncomment the http entries, and add a more sensible path. Something like this:
functions:
  hello:
    handler: handler.hello
#   The following are a few example events you can configure
#   NOTE: Please make sure to change your handler code to work with those events
#   Check the event documentation for details
    events:
      - http:
        path: msg
        method: get
That’s it. Serverless does all the grunt work described above.
CORS configuration
Ideally, we want to call this from front-end JavaScript code with the Fetch API, but that unfortunately means we need CORS to be configured. This section will walk you through that.
Below the configuration above, add cors: true, like this
That’s the section! CORS is now configured on our API endpoint, allowing cross-origin communication.
CORS Lambda tweak
While our HTTP endpoint is configured for CORS, it’s up to our Lambda to return the right headers. That’s just how CORS works. Let’s automate that by heading back into handler.js, and adding this function:
Before returning from the Lambda, we’ll send the return value through that function. Here’s the entirety of handler.js with everything we’ve done up to this point:
Let’s run it. Type sls deploy into your terminal from the hello-world folder.
When that runs, we’ll have deployed our Lambda function to an HTTP endpoint that we can call via Fetch. But… where is it? We could crack open our AWS console, find the gateway API that serverless created for us, then find the Invoke URL. It would look something like this.
Fortunately, there is an easier way, which is to type sls info into our terminal:
Just like that, we can see that our Lambda function is available at the following path:
Now that we’ve gotten our feet wet, let’s repeat this process. This time, though, let’s make a more interesting, useful service. Specifically, let’s make the canonical “resize an image” Lambda, but instead of being triggered by a new S3 bucket upload, let’s let the user upload an image directly to our Lambda. That’ll remove the need to bundle any kind of aws-sdk resources in our client-side bundle.
Building a useful Lambda
OK, from the start! This particular Lambda will take an image, resize it, then upload it to an S3 bucket. First, let’s create a new service. I’m calling it cover-art but it could certainly be anything else.
sls create -t aws-nodejs --path cover-art
As before, we’ll add a path to our HTTP endpoint (which in this case will be a POST, instead of GET, since we’re sending the file instead of receiving it) and enable CORS:
// Same as before
  events:
    - http:
      path: upload
      method: post
      cors: true
Next, let’s grant our Lambda access to whatever S3 buckets we’re going to use for the upload. Look in your YAML file — there should be a iamRoleStatements section that contains boilerplate code that’s been commented out. We can leverage some of that by uncommenting it. Here’s the config we’ll use to enable the S3 buckets we want:
Note the /* on the end. We don’t list specific bucket names in isolation, but rather paths to resources; in this case, that’s any resources that happen to exist inside your-bucket-name.
Since we want to upload files directly to our Lambda, we need to make one more tweak. Specifically, we need to configure the API endpoint to accept multipart/form-data as a binary media type. Locate the provider section in the YAML file:
For good measure, let’s give our function an intelligent name. Replace handler: handler.hello with handler: handler.upload, then change module.exports.hello to module.exports.upload in handler.js.
Now we get to write some code
First, let’s grab some helpers.
npm i jimp uuid lambda-multipart-parser
Wait, what’s Jimp? It’s the library I’m using to resize uploaded images. uuid will be for creating new, unique file names of the sized resources, before uploading to S3. Oh, and lambda-multipart-parser? That’s for parsing the file info inside our Lambda.
Next, let’s make a convenience helper for S3 uploading:
Lastly, we’ll plug in some code that reads the upload files, resizes them with Jimp (if needed) and uploads the result to S3. The final result is below.
I’m sorry to dump so much code on you but — this being a post about Amazon Lambda and serverless — I’d rather not belabor the grunt work within the serverless function. Of course, yours might look completely different if you’re using an image library other than Jimp.
Let’s run it by uploading a file from our client. I’m using the react-dropzone library, so my JSX looks like this:
<Dropzone
  onDrop={files => onDrop(files)}
  multiple={false}
>
  <div>Click or drag to upload a new cover</div>
</Dropzone>
The onDrop function looks like this:
const onDrop = files => {
  let request = new FormData();
  request.append("fileUploaded", files[0]);


  fetch("https://yb1ihnzpy8.execute-api.us-east-1.amazonaws.com/dev/upload", {
    method: "POST",
    mode: "cors",
    body: request
    })
  .then(resp => resp.json())
  .then(res => {
    if (res.error) {
      // handle errors
    } else {
      // success - woo hoo - update state as needed
    }
  });
};
And just like that, we can upload a file and see it appear in our S3 bucket!
An optional detour: bundling
There’s one optional enhancement we could make to our setup. Right now, when we deploy our service, Serverless is zipping up the entire services folder and sending all of it to our Lambda. The content currently weighs in at 10MB, since all of our node_modules are getting dragged along for the ride. We can use a bundler to drastically reduce that size. Not only that, but a bundler will cut deploy time, data usage, cold start performance, etc. In other words, it’s a nice thing to have.
Fortunately for us, there’s a plugin that easily integrates webpack into the serverless build process. Let’s install it with:
npm i serverless-webpack --save-dev
…and add it via our YAML config file. We can drop this in at the very end:
// Same as before
plugins:
  - serverless-webpack
Naturally, we need a webpack.config.js file, so let’s add that to the mix:
Notice that we’re setting target: node so Node-specific assets are treated properly. Also note that you may need to set the output filename to handler.js. I’m also adding aws-sdk to the externals array so webpack doesn’t bundle it at all; instead, it’ll leave the call to const AWS = require("aws-sdk"); alone, allowing it to be handled by our Lamdba, at runtime. This is OK since Lambdas already have the aws-sdk available implicitly, meaning there’s no need for us to send it over the wire. Finally, the mainFields: ["main"] is to tell webpack to ignore any ESM module fields. This is necessary to fix some issues with the Jimp library.
Now let’s re-deploy, and hopefully we’ll see webpack running.
Now our code is bundled nicely into a single file that’s 935K, which zips down further to a mere 337K. That’s a lot of savings!
Odds and ends
If you’re wondering how you’d send other data to the Lambda, you’d add what you want to the request object, of type FormData, from before. For example:
request.append("xyz", "Hi there");
…and then read formPayload.xyz in the Lambda. This can be useful if you need to send a security token, or other file info.
If you’re wondering how you might configure env variables for your Lambda, you might have guessed by now that it’s as simple as adding some fields to your serverless.yaml file. It even supports reading the values from an external file (presumably not committed to git). This blog post by Philipp Müns covers it well.
Wrapping up
Serverless is an incredible framework. I promise, we’ve barely scratched the surface. Hopefully this post has shown you its potential, and motivated you to check it out even further.
If you’re interested in learning more, I’d recommend the learning materials from David Wells, an engineer at Netlify, and former member of the serverless team, as well as the Serverless Handbook by Swizec Teller
Hey, let's create a functional calendar app with the JAMstack
I’ve always wondered how dynamic scheduling worked so I decided to do extensive research, learn new things, and write about the technical part of the journey. It’s only fair to warn you: everything I cover here is three weeks of research condensed into a single article. Even though it’s beginner-friendly, it’s a healthy amount of reading. So, please, pull up a chair, sit down and let’s have an adventure.
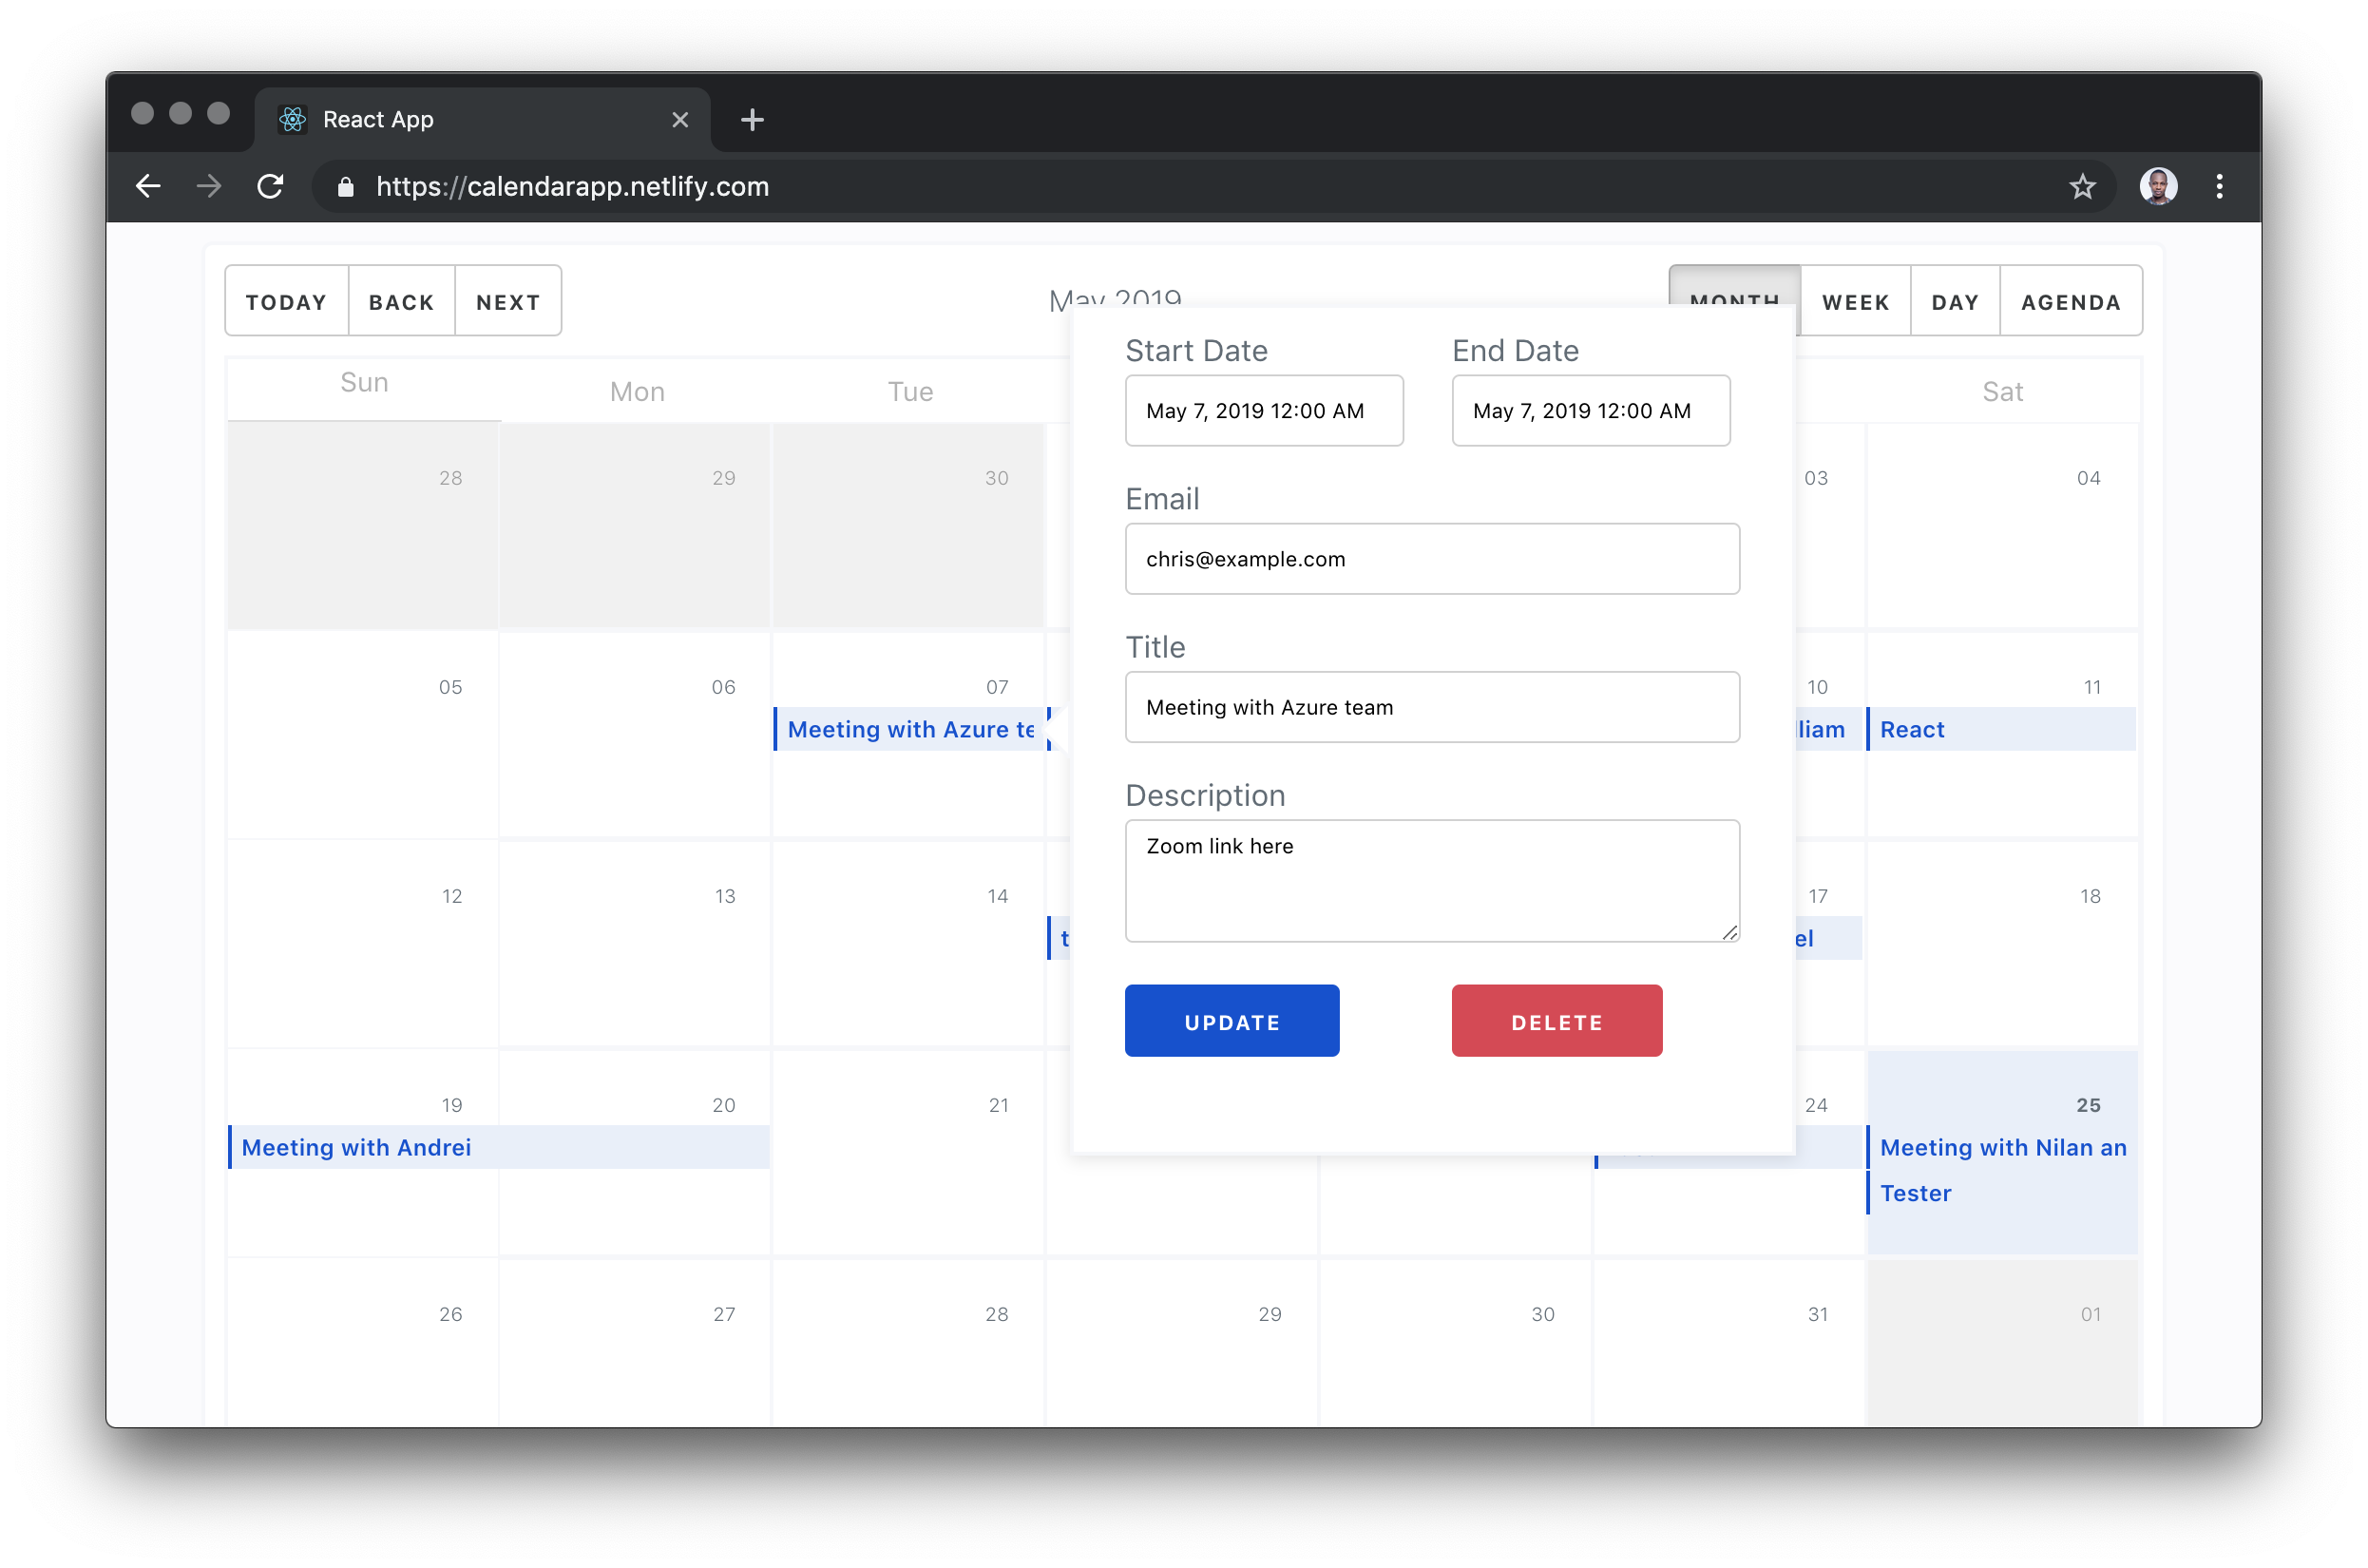
My plan was to build something that looked like Google Calendar but only demonstrate three core features:
List all existing events on a calendar
Create new events
Schedule and email notification based on the date chosen during creation. The schedule should run some code to email the user when the time is right.
Pretty, right? Make it to the end of the article, because this is what we’ll make.
The only knowledge I had about asking my code to run at a later or deferred time was CRON jobs. The easiest way to use a CRON job is to statically define a job in your code. This is ad hoc — statically means that I cannot simply schedule an event like Google Calendar and easily have it update my CRON code. If you are experienced with writing CRON triggers, you feel my pain. If you’re not, you are lucky you might never have to use CRON this way.
To elaborate more on my frustration, I needed to trigger a schedule based on a payload of HTTP requests. The dates and information about this schedule would be passed in through the HTTP request. This means there’s no way to know things like the scheduled date beforehand.
We (my colleagues and I) figured out a way to make this work and — with the help of Sarah Drasner’s article on Durable Functions — I understood what I needed learn (and unlearn for that matter). You will learn about everything I worked in this article, from event creation to email scheduling to calendar listings. Here is a video of the app in action:
You might notice the subtle delay. This has nothing to do with the execution timing of the schedule or running the code. I am testing with a free SendGrid account which I suspect have some form of latency. You can confirm this by testing the serverless function responsible without sending emails. You would notice that the code runs at exactly the scheduled time.
Tools and architecture
Here are the three fundamental units of this project:
React Frontend: Calendar UI, including the UI to create, update or delete events.
8Base GraphQL: A back-end database layer for the app. This is where we will store, read and update our date from. The fun part is you won’t write any code for this back end.
Durable Functions: Durable functions are kind of Serverless Functions that have the power of remembering their state from previous executions. This is what replaces CRON jobs and solves the ad hoc problem we described earlier.
The rest of this post will have three major sections based on the three units we saw above. We will take them one after the other, build them out, test them, and even deploy the work. Before we get on with that, let’s setup using a starter project I made to get us started.
You can set up this project in different ways — either as a full-stack project with the three units in one project or as a standalone project with each unit living in it's own root. Well, I went with the first because it’s more concise, easier to teach, and manageable since it’s one project.
The app will be a create-react-app project and I made a starter for us to lower the barrier to set up. It comes with supplementary code and logic that we don’t need to explain since they are out of the scope of the article. The following are set up for us:
Calendar component
Modal and popover components for presenting event forms
Event form component
Some GraphQL logic to query and mutate data
A Durable Serverless Function scaffold where we will write the schedulers
Tip: Each existing file that we care about has a comment block at the top of the document. The comment block tells you what is currently happening in the code file and a to-do section that describes what we are required to do next.
Install the npm dependencies described in the root package.json file as well as the serverless package.json:
npm install
Orchestrated Durable Functions for scheduling
There are two words we need to get out of the way first before we can understand what this term is — orchestration and durable.
Orchestration was originally used to describe an assembly of well-coordinated events, actions, etc. It is heavily borrowed in computing to describe a smooth coordination of computer systems. The key word is coordinate. We need to put two or more units of a system together in a coordinated way.
Durable is used to describe anything that has the outstanding feature of lasting longer.
Put system coordination and long lasting together, and you get Durable Functions. This is the most powerful feature if Azure’s Serverless Function. Durable Functions based in what we now know have these two features:
They can be used to assemble the execution of two or more functions and coordinate them so race conditions do not occur (orchestration).
Durable Functions remember things. This is what makes it so powerful. It breaks the number one rule of HTTP: stateless. Durable functions keep their state intact no matter how long they have to wait. Create a schedule for 1,000,000 years into the future and a durable function will execute after one million years while remembering the parameters that were passed to it on the day of trigger. That means Durable Functions are stateful.
These durability features unlock a new realm of opportunities for serverless functions and that is why we are exploring one of those features today. I highly recommend Sarah’s article one more time for a visualized version of some of the possible use cases of Durable Functions.
I also made a visual representation of the behavior of the Durable Functions we will be writing today. Take this as an animated architectural diagram:
A data mutation from an external system (8Base) triggers the orchestration by calling the HTTP Trigger. The trigger then calls the orchestration function which schedules an event. When the time for execution is due, the orchestration function is called again but this time skips the orchestration and calls the activity function. The activity function is the action performer. This is the actual thing that happens e.g. "send email notification".
Create orchestrated Durable Functions
Let me walk you through creating functions using VS Code. You need two things:
Once you have both setup, you need to tie them together. You can do this using a VS Code extension and a Node CLI tool. Start with installing the CLItool:
npm install -g azure-functions-core-tools

# OR

brew tap azure/functions
brew install azure-functions-core-tools
Now that you have all the setup done, let’s get into creating these functions. The functions we will be creating will map to the following folders.
Folder
Function
schedule
Durable HTTP Trigger
scheduleOrchestrator
Durable Orchestration
sendEmail
Durable Activity
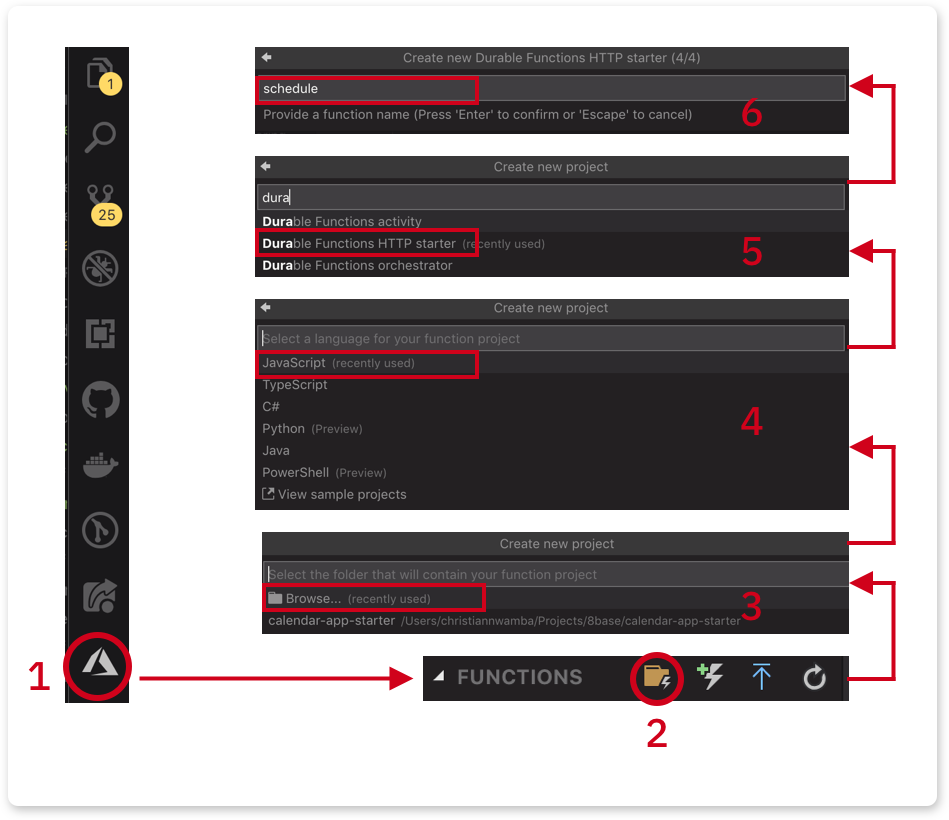
Start with the trigger.
Click on the Azure extension icon and follow the image below to create the schedule function
Since this is the first function, we chose the folder icon to create a function project. The icon after that creates a single function (not a project).
Click Browse and create a serverless folder inside the project. Select the new serverless folder.
Select JavaScript as the language. If TypeScript (or any other language) is your jam, please feel free.
Select Durable Functions HTTP starter. This is the trigger.
Name the first function as schedule
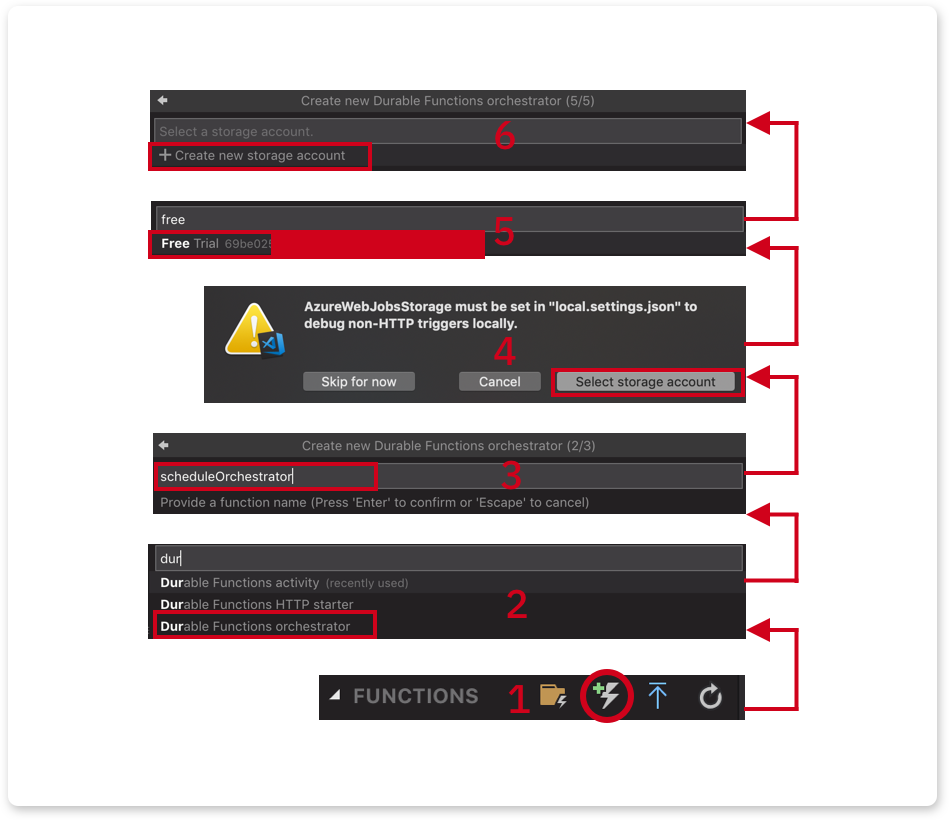
Next, create the orchestrator. Instead of creating a function project, create a function instead.
Click on the function icon:
Select Durable Functions orchestrator.
Give it a name, scheduleOrchestrator and hit Enter.
You will be asked to select a storage account. Orchestrator uses storage to preserve the state of a function-in-process.
Select a subscription in your Azure account. In my case, I chose the free trial subscription.
Follow the few remaining steps to create a storage account.
Finally, repeat the previous step to create an Activity. This time, the following should be different:
Select Durable Functions activity.
Name it sendEmail.
No storage account will be needed.
Scheduling with a durable HTTP trigger
The code in serverless/schedule/index.js does not need to be touched. This is what it looks like originally when the function is scaffolded using VS Code or the CLI tool.
We’re creating a durable function on the client side that is based on the context of the request.
We’re calling the orchestrator using the client's startNew() function. The orchestrator function name is passed as the first argument to startNew() via the params object. A req.body is also passed to startNew() as third argument which is forwarded to the orchestrator.
Finally, we return a set of data that can be used to check the status of the orchestrator function, or even cancel the process before it's complete.
The URL to call the above function would look like this:
It’s also good to know that you can change how this URL looks.
Orchestrating with a Durable Orchestrator
The HTTP trigger startNew call calls a function based on the name we pass to it. That name corresponds to the name of the function and folder that holds the orchestration logic. The serverless/scheduleOrchestrator/index.js file exports a Durable Function. Replace the content with the following:
What this line does use the Durable Function to create a timer based on the date passed in from the request body via the HTTP trigger.
When this function executes and gets here, it will trigger the timer and bail temporarily. When the schedule is due, it will come back, skip this line and call the following line which you should use in place of TODO -- 2.
When a schedule is due, the orchestrator comes back to call the activity. The activity file lives in serverless/sendEmail/index.js. Replace what’s in there with the following:
It currently imports SendGrid’s mailer and sets the API key. You can get an API Key by following these instructions.
I am setting the key in an environmental variable to keep my credentials safe. You can safely store yours the same way by creating a SENDGRID_API_KEY key in serverless/local.settings.json with your SendGrid key as the value:
This pulls out the event information from the input from the orchestrator function. The input is attached to context.bindings. payload can be anything you name it so go to serverless/sendEmail/function.json and change the name value to payload:
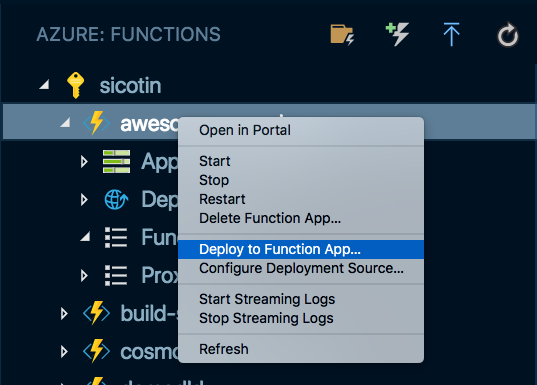
Deploying functions to Azure is easy. It’s merely a click away from the VS Code editor. Click on the circled icon to deploy and get a deploy URL:
Still with me this far in? You’re making great progress! It’s totally OK to take a break here, nap, stretch or get some rest. I definitely did while writing this post.
Data and GraphQL layer with 8Base
My easiest description and understanding of 8Base is "Firebase for GraphQL." 8Base is a database layer for any kind of app you can think of and the most interesting aspect of it is that it’s based on GraphQL.
The best way to describe where 8Base fits in your stack is to paint a picture of a scenario.
Imagine you are a freelance developer with a small-to-medium scale contract to build an e-commerce store for a client. Your core skills are on the web so you are not very comfortable on the back end. though you can write a bit of Node.
Unfortunately, e-commerce requires managing inventories, order management, managing purchases, managing authentication and identity, etc. "Manage" at a fundamental level just means data CRUD and data access.
Instead of the redundant and boring process of creating, reading, updating, deleting, and managing access for entities in our backend code, what if we could describe these business requirements in a UI? What if we can create tables that allow us to configure CRUD operations, auth and access? What if we had such help and only focus on building frontend code and writing queries? Everything we just described is tackled by 8Base
Here is an architecture of a back-end-less app that relies on 8Base as it’s data layer:
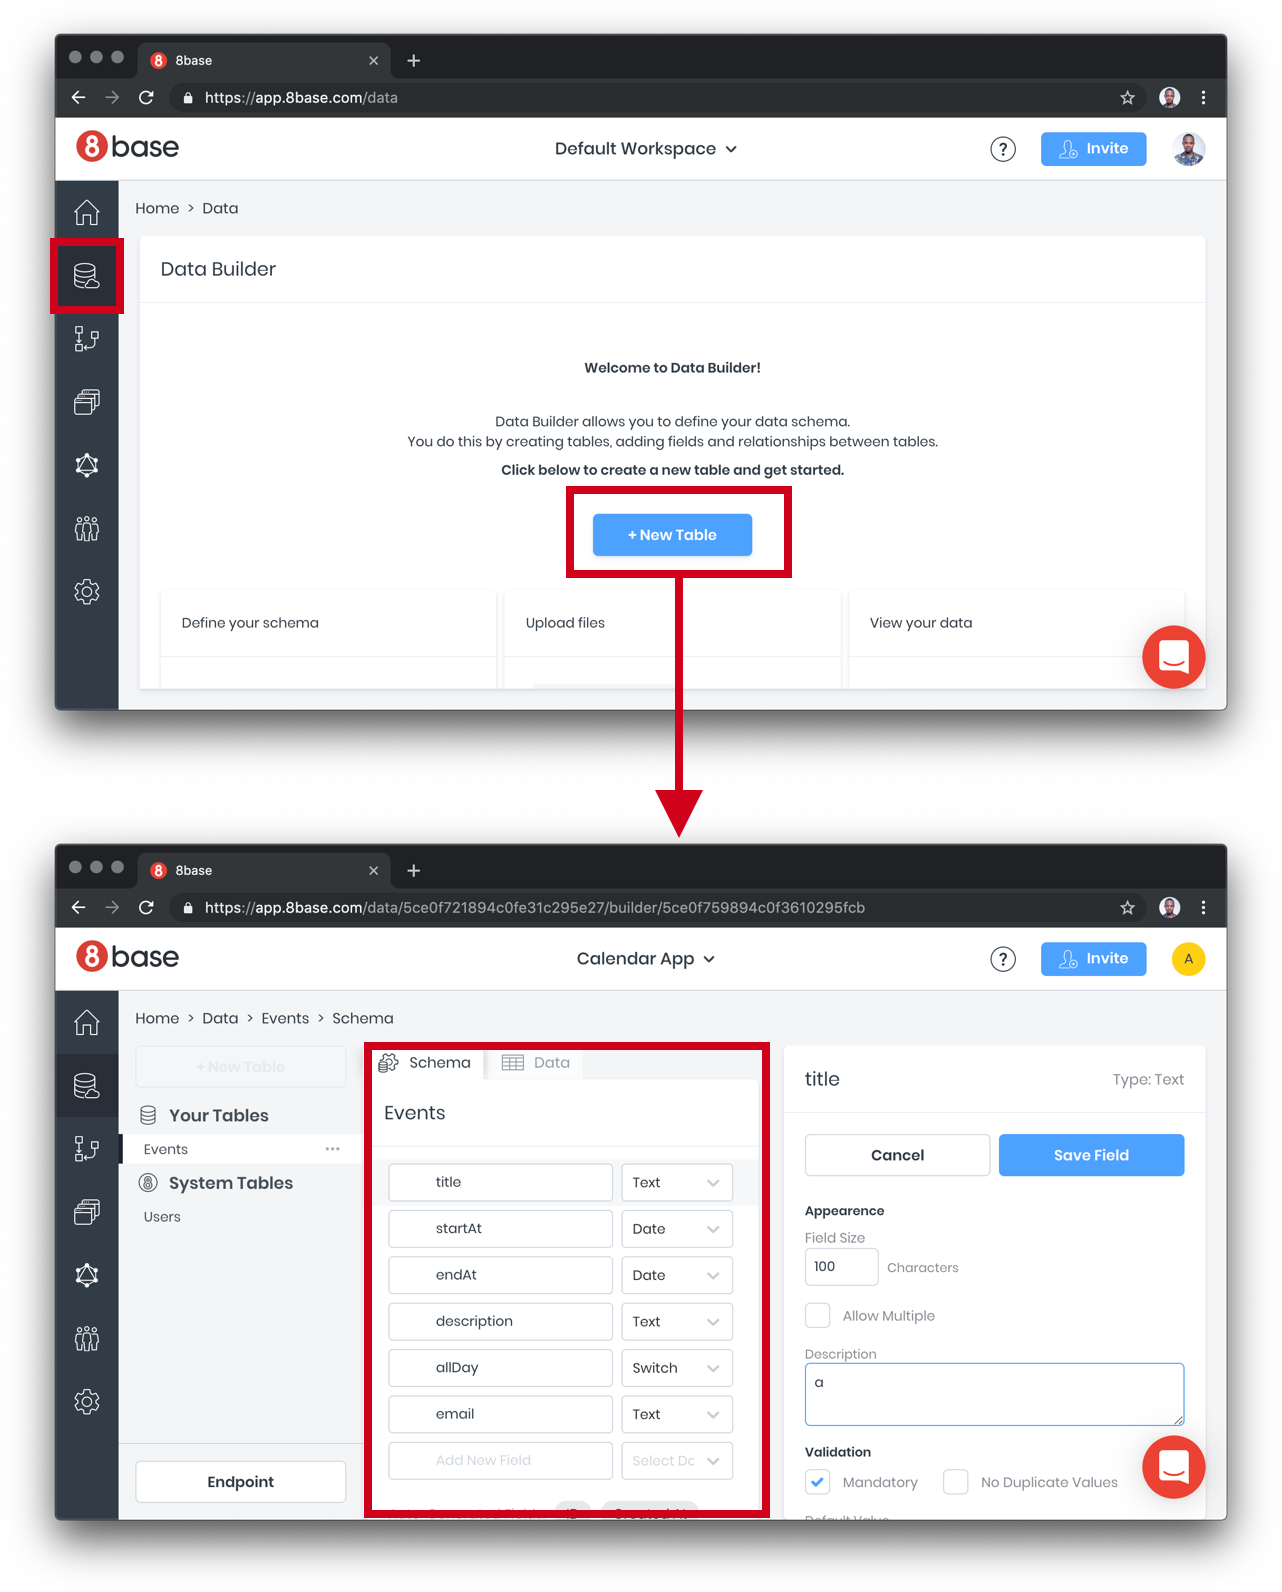
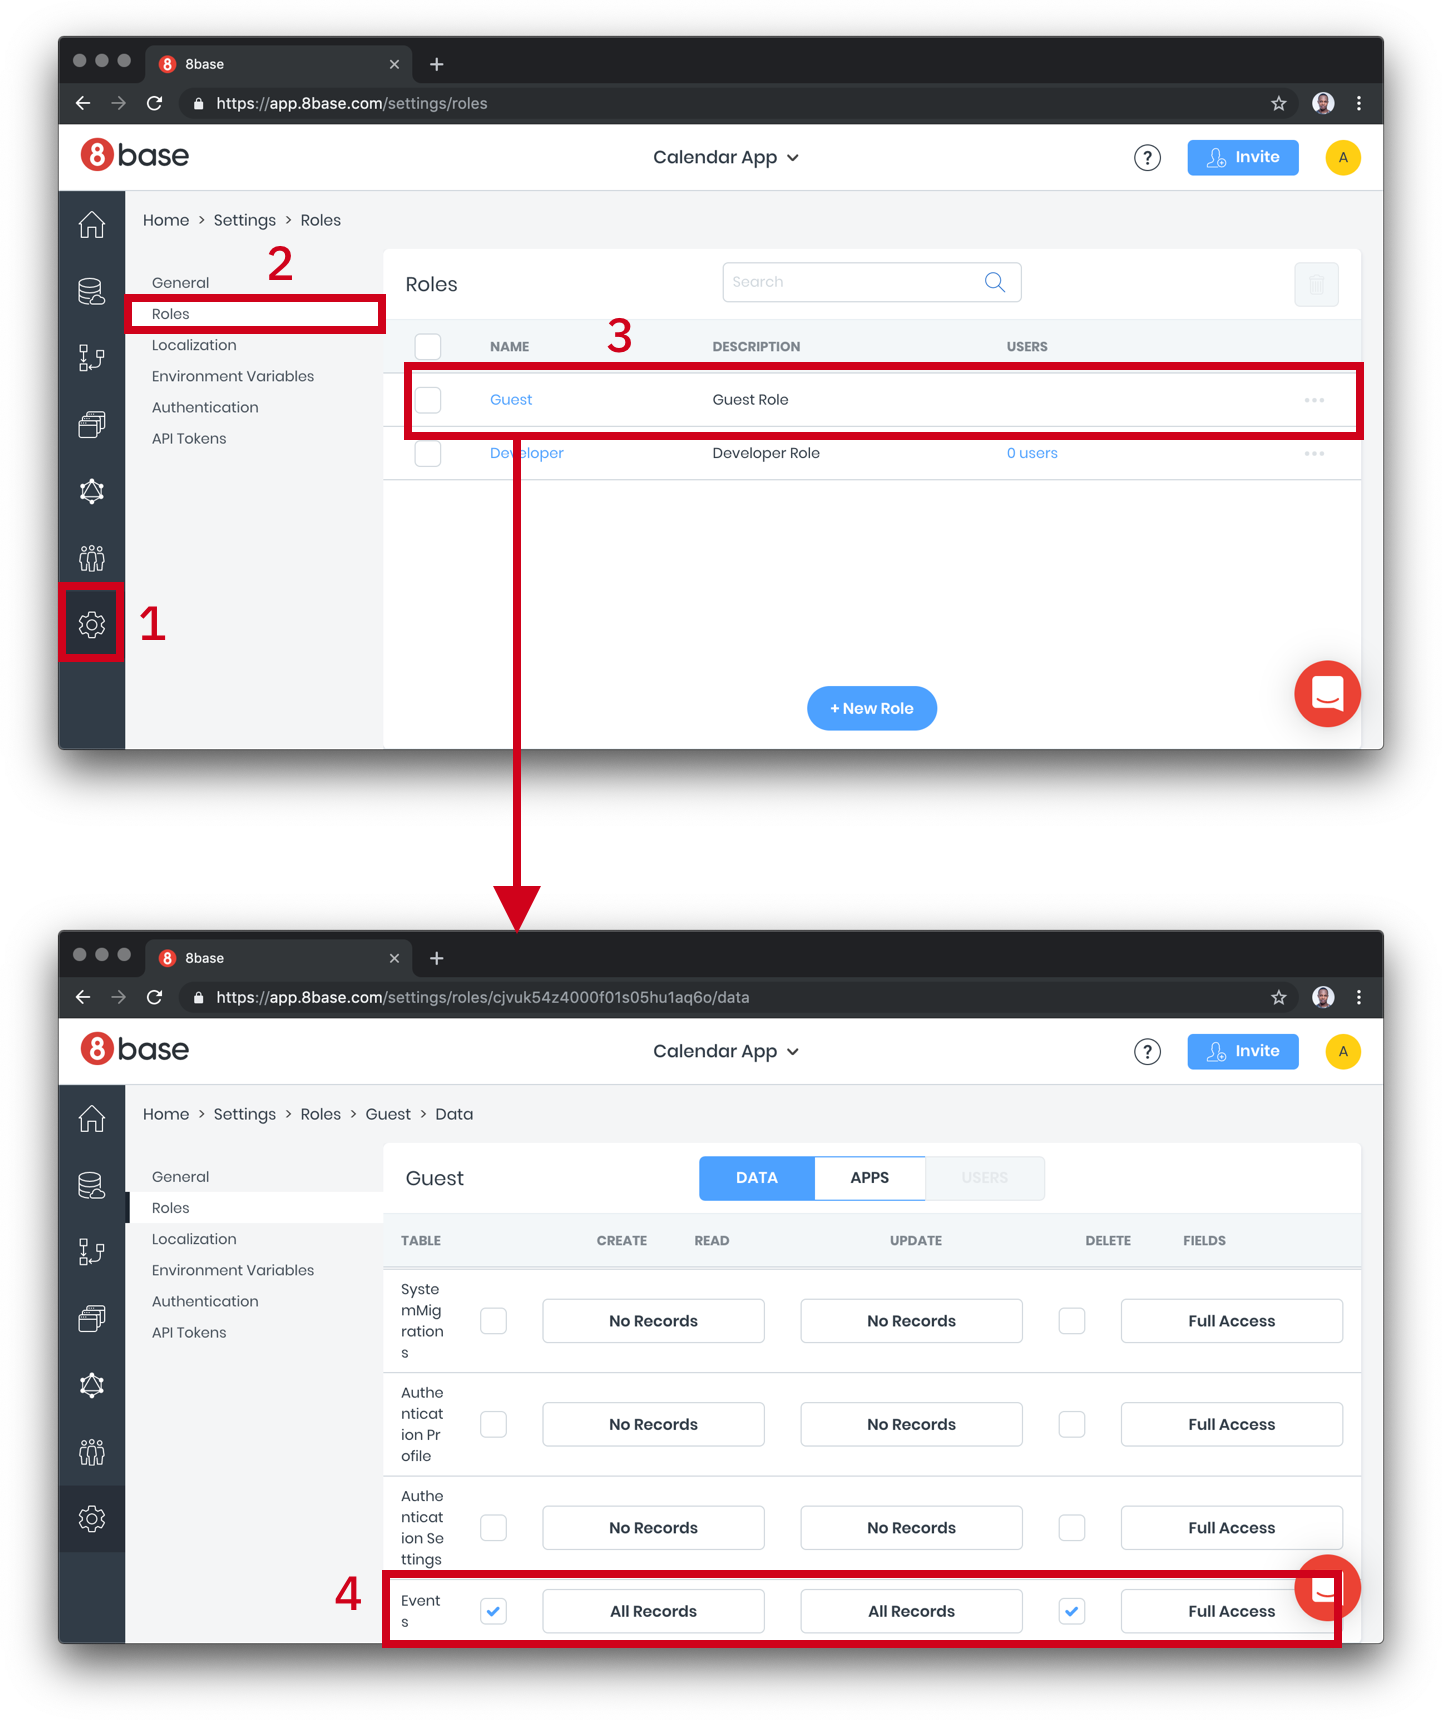
Create an 8Base table for events storage and retrieval
The first thing we need to do before creating a table is to create an account. Once you have an account, create a workspace that holds all the tables and logic for a given project.
Next, create a table, name the table Events and fill out the table fields.
We need to configure access levels. Right now, there’s nothing to hide from each user, so we can just turn on all access to the Events table we created:
Setting up Auth is super simple with 8base because it integrates with Auth0. If you have entities that need to be protected or want to extend our example to use auth, please go wild.
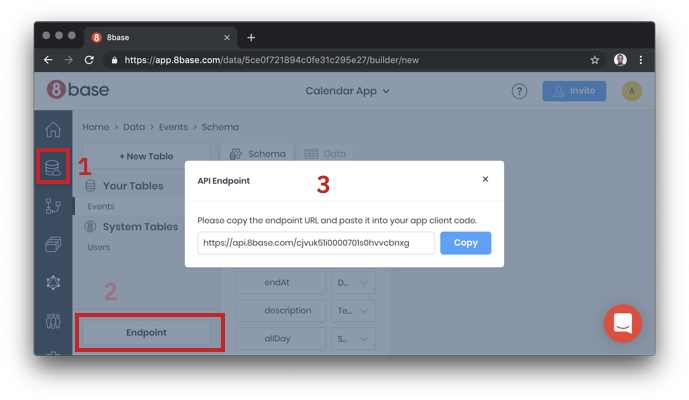
Finally, grab your endpoint URL for use in the React app:
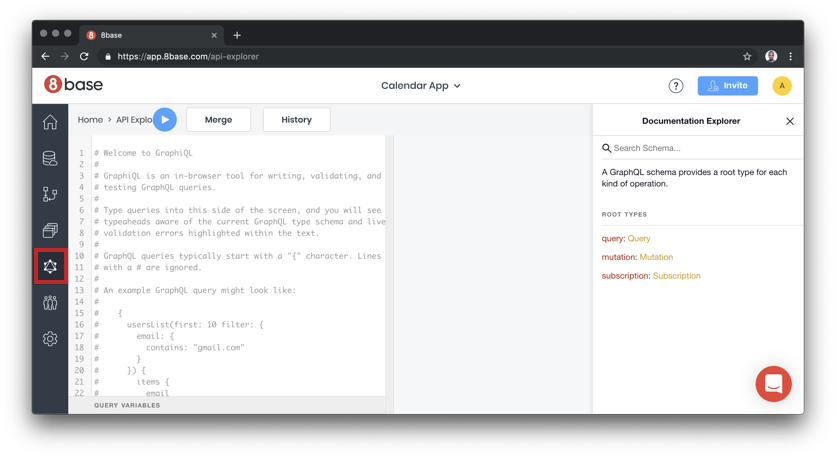
Testing GraphQL Queries and mutation in the playground
Just to be sure that we are ready to take the URL to the wild and start building the client, let’s first test the API with a GraphQL playground and see if the setup is fine. Click on the explorer.
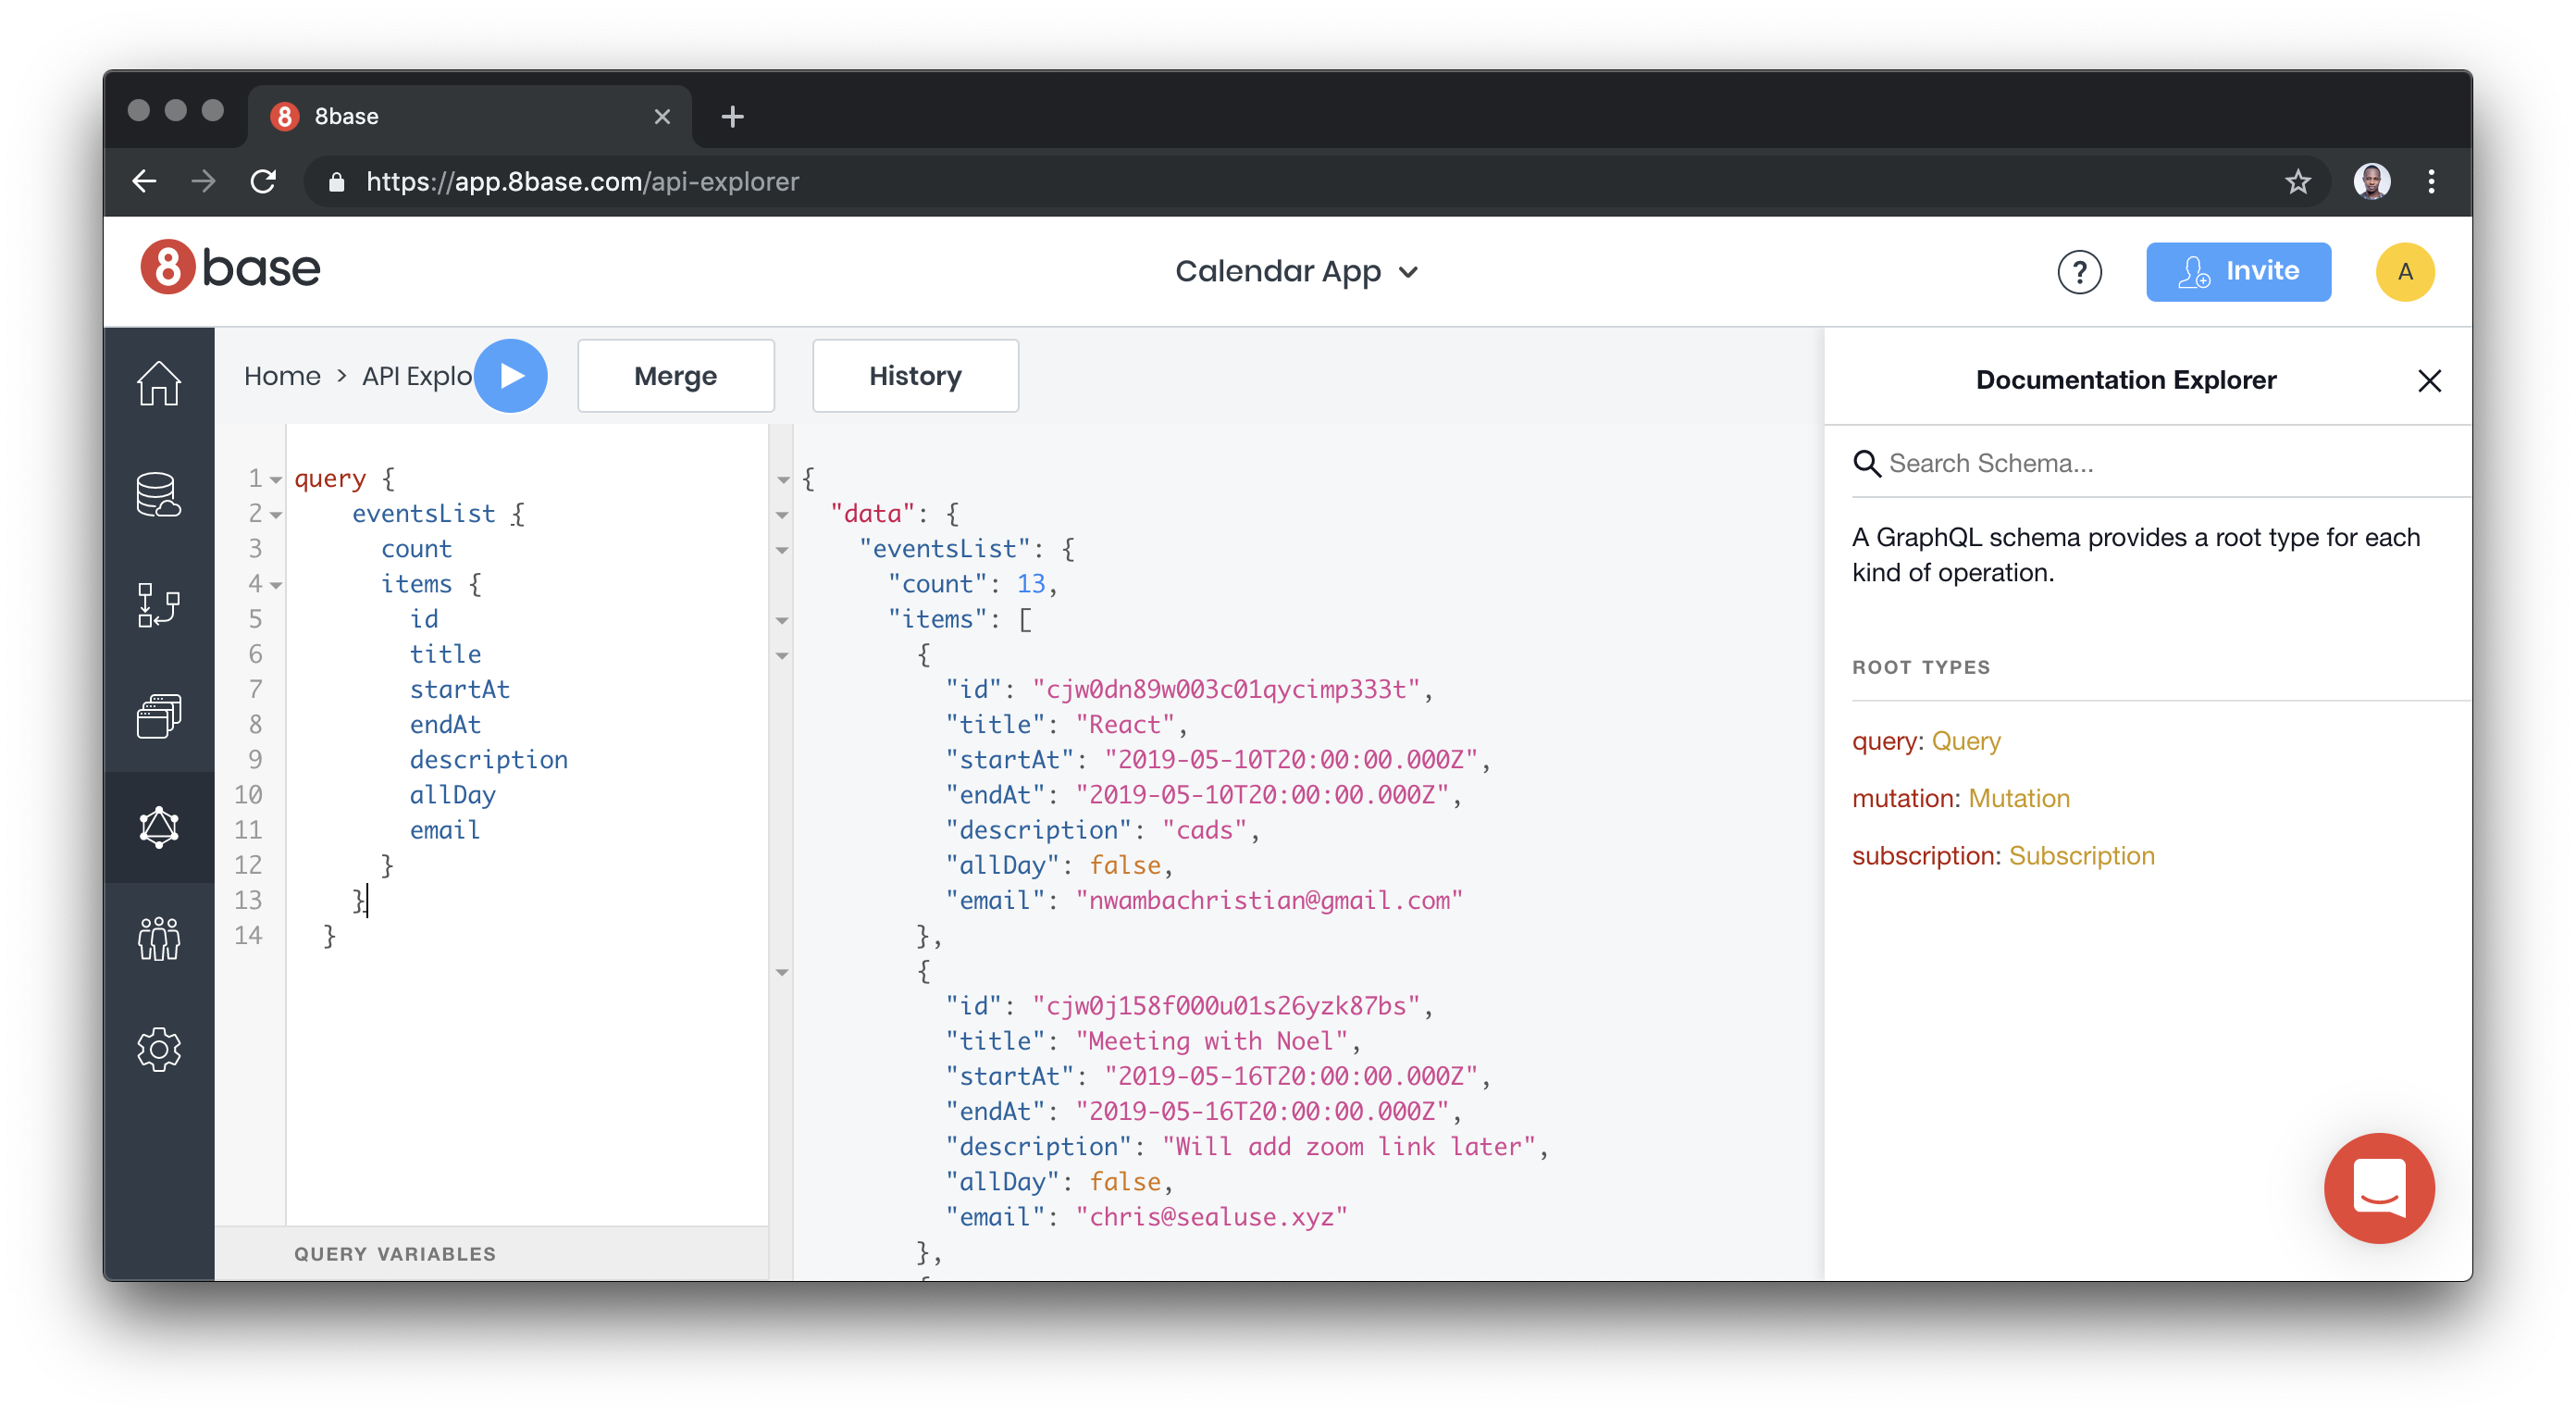
Paste the following query in the editor.
query {
  eventsList {
    count
    items {
      id
      title
      startAt
      endAt
      description
      allDay
      email
    }
  }
}
I created some test data through the 8base UI and I get the result back when I run they query:
You can explore the entire database using the schema document on the right end of the explore page.
Calendar and event form interface
The third (and last) unit of our project is the React App which builds the user interfaces. There are four major components making up the UI and they include:
Calendar: A calendar UI that lists all the existing events
Event Modal: A React modal that renders EventForm component to create a component
Event Popover: Popover UI to read a single event, update event using EventForm or delete event
Event Form: HTML form for creating new event
Before we dive right into the calendar component, we need to setup React Apollo client. The React Apollo provider empowers you with tools to query a GraphQL data source using React patterns. The original provider allows you to use higher order components or render props to query and mutate data. We will be using a wrapper to the original provider that allows you query and mutate using React Hooks.
In src/index.js, import the React Apollo Hooks and the 8base client in TODO -- 1:
import { ApolloProvider } from 'react-apollo-hooks';
import { EightBaseApolloClient } from '@8base/apollo-client';
At TODO -- 2, configure the client with the endpoint URL we got in the 8base setup stage:
const URI = 'https://api.8base.com/cjvuk51i0000701s0hvvcbnxg';

const apolloClient = new EightBaseApolloClient({
  uri: URI,
  withAuth: false
});
Use this client to wrap the entire App tree with the provider on TODO -- 3:
Let’s add a simple error and loading handler on TODO -- 2:
if (error) return console.log(error);
  if (loading)
    return (
      <div className="calendar">
        <p>Loading...</p>
      </div>
    );
Notice that the Calendar component uses the EventPopover component to render a custom event. You can also observe that the Calendar component file renders EventModal as well. Both components have been setup for you, and their only responsibility is to render EventForm.
Create, update and delete events with the event form component
The component in src/components/Event/EventForm.js renders a form. The form is used to create, edit or delete an event. At TODO -- 1, import useCreateUpdateMutation and useDeleteMutation:
import {useCreateUpdateMutation, useDeleteMutation} from './eventMutationHooks'
useCreateUpdateMutation: This mutation either creates or updates an event depending on whether the event already existed.
useDeleteMutation: This mutation deletes an existing event.
A call to any of these functions returns another function. The function returned can then serve as an even handler.
Now, go ahead and replace TODO -- 2 with a call to both functions:
These are custom hooks I wrote to wrap the useMutation exposed by React Apollo Hooks. Each hook creates a mutation and passes mutation variable to the useMutation query. The blocks that look like the following in src/components/Event/eventMutationHooks.js are the most important parts:
We have spent quite some time in building the serverless structure, data storage and UI layers of our calendar app. To recap, the UI sends data to 8base for storage, 8base saves data and triggers the Durable Function HTTP trigger, the HTTP trigger kicks in orchestration and the rest is history. Currently, we are saving data with mutation but we are not calling the serverless function anywhere in 8base.
8base allows you to write custom logic which is what makes it very powerful and extensible. Custom logic are simple functions that are called based on actions performed on the 8base database. For example, we can set up a logic to be called every time a mutation occurs on a table. Let’s create one that is called when an event is created.
Start by installing the 8base CLI:
npm install -g 8base
On the calendar app project run the following command to create a starter logic:
8base init 8base
8base init command creates a new 8base logic project. You can pass it a directory name which in this case we are naming the 8base logic folder, 8base — don’t get it twisted.
Trigger scheduling logic
Delete everything in 8base/src and create a triggerSchedule.js file in the src folder. Once you have done that, drop in the following into the file:
The information about the GraphQL mutation is available on the event object as data.
Replace <HTTP Trigger URL> with the URL you got after deploying your function. You can get the URL by going to the function in your Azure URL and click "Copy URL."
You also need to install the node-fetch module, which will grab the data from the API:
npm install --save node-fetch
8base logic configuration
The next thing to do is tell 8base what exact mutation or query that needs to trigger this logic. In our case, a create mutation on the Events table. You can describe this information in the 8base.yml file:
In a sense, this is saying, when a create mutation happens on the Events table, please call src/triggerSchedule.js after the mutation has occurred.
We want to deploy all the things
Before anything can be deployed, we need to login into the 8Base account, which we can do via command line:
8base login
Then, let’s run the deploy command to send and set up the app logic in your workspace instance.
8base deploy
Testing the entire flow
To see the app in all its glory, click on one of the days of the calendar. You should get the event modal containing the form. Fill that out and put a future start date so we trigger a notification. Try a date more than 2-5 mins from the current time because I haven’t been able to trigger a notification any faster than that.
Yay, go check your email! The email should have arrived thanks to SendGrid. Now we have an app that allows us to create events and get notified with the details of the event submission.
I want you to take a second and think about Twitter, and think about it in terms of scale. Twitter has 326 million users. Collectively, we create ~6,000 tweets every second. Every minute, that’s 360,000 tweets created. That sums up to nearly 200 billion tweets a year. Now, what if the creators of Twitter had been paralyzed by how to scale and they didn’t even begin?
That’s me on every single startup idea I’ve ever had, which is why I love serverless so much: it handles the issues of scaling leaving me to build the next Twitter!
Live metrics with Application Insights
As you can see in the above, we scaled from one to seven servers in a matter of seconds, as more user requests come in. You can scale that easily, too.
So let's build an API that will scale instantly as more and more users come in and our workload increases. We’re going to do that is by answering the following questions:
With every new technology, we need to figure out what tools are available for us and how we can integrate them into our existing tool set. When getting started with serverless, we have a few options to consider.
First, we can use the good old browser to create, write and test functions. It’s powerful, and it enables us to code wherever we are; all we need is a computer and a browser running. The browser is a good starting point for writing our very first serverless function.
Serverless in the browser
Next, as you get more accustomed to the new concepts and become more productive, you might want to use your local environment to continue with your development. Typically you’ll want support for a few things:
Writing code in your editor of choice
Tools that do the heavy lifting and generate the boilerplate code for you
Run and debug code locally
Support for quickly deploying your code
Microsoft is my employer and I’ve mostly built serverless applications using Azure Functions so for the rest of this article I’ll continue using them as an example. With Azure Functions, you’ll have support for all these features when working with the Azure Functions Core Tools which you can install from npm.
npm install -g azure-functions-core-tools
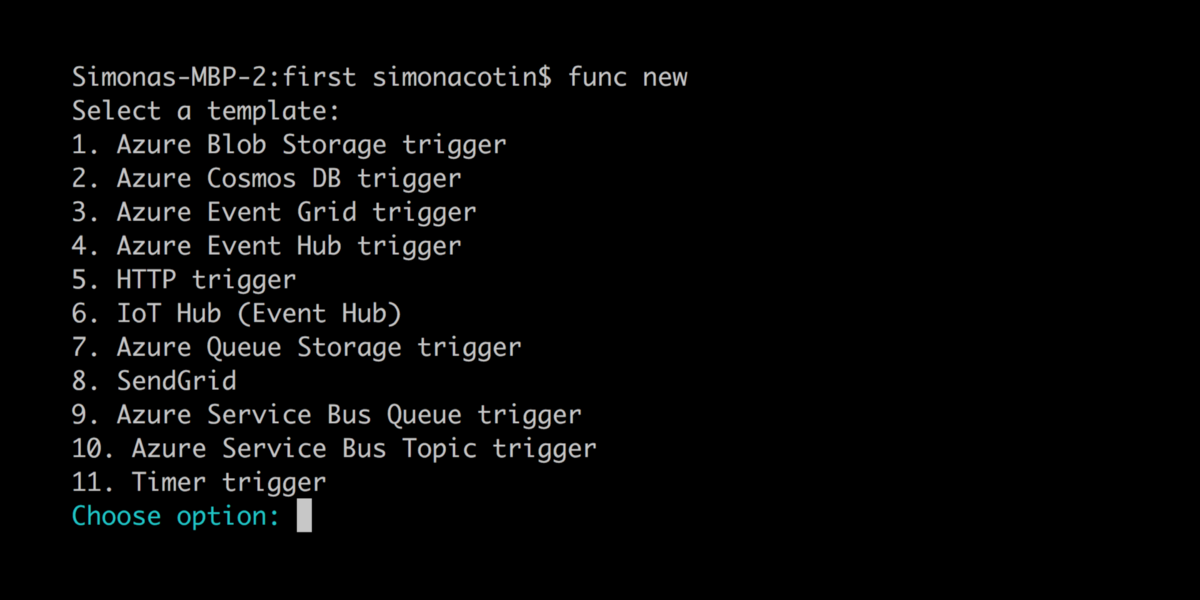
Next, we can initialize a new project and create new functions using the interactive CLI:
func CLI
If your editor of choice happens to be VS Code, then you can use it to write serverless code too. There's actually a great extension for it.
Once installed, a new icon will be added to the left-hand sidebar — this is where we can access all our Azure-related extensions! All related functions can to be grouped under the same project (also known as a function app). This is like a folder for grouping functions that should scale together and that we want to manage and monitor at the same time. To initialize a new project using VS Code, click on the Azure icon and then the folder icon.
Create new Azure Functions project
This will generate a few files that help us with global settings. Let's go over those now.
host.json
We can configure global options for all functions in the project directly in the host.json file.
In it, our function app is configured to use the latest version of the serverless runtime (currently 2.0). We also configure functions to timeout after ten minutes by setting the functionTimeout property to 00:10:00 — the default value for that is currently five minutes (00:05:00).
In some cases, we might want to control the route prefix for our URLs or even tweak settings, like the number of concurrent requests. Azure Functions even allows us to customize other features like logging, healthMonitor and different types of extensions.
Here's an example of how I've configured the file:
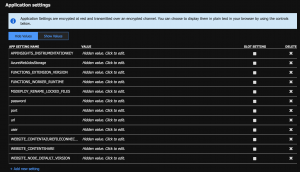
Application settings are global settings for managing runtime, language and version, connection strings, read/write access, and ZIP deployment, among others. Some are settings that are required by the platform, like FUNCTIONS_WORKER_RUNTIME, but we can also define custom settings that we’ll use in our application code, like DB_CONN which we can use to connect to a database instance.
While developing locally, we define these settings in a file named local.settings.json and we access them like any other environment variable.
Again, here's an example snippet that connects these points:
Azure Functions Proxies are implemented in the proxies.json file, and they enable us to expose multiple function apps under the same API, as well as modify requests and responses. In the code below we’re publishing two different endpoints under the same URL.
Create a new function by clicking the thunder icon in the extension.
Create a new Azure Function
The extension will use predefined templates to generate code, based on the selections we made — language, function type, and authorization level.
We use function.json to configure what type of events our function listens to and optionally to bind to specific data sources. Our code runs in response to specific triggers which can be of type HTTP when we react to HTTP requests — when we run code in response to a file being uploaded to a storage account. Other commonly used triggers can be of type queue, to process a message uploaded on a queue or time triggers to run code at specified time intervals. Function bindings are used to read and write data to data sources or services like databases or send emails.
Here, we can see that our function is listening to HTTP requests and we get access to the actual request through the object named req.
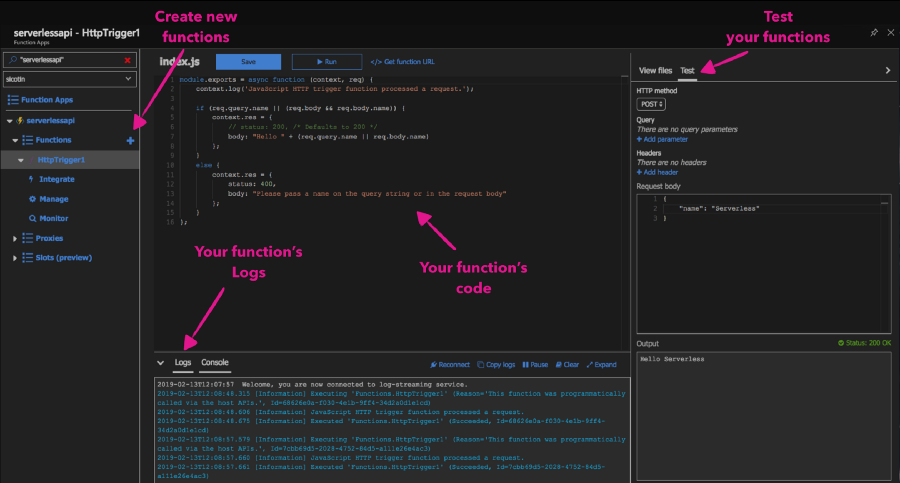
index.js is where we implement the code for our function. We have access to the context object, which we use to communicate to the serverless runtime. We can do things like log information, set the response for our function as well as read and write data from the bindings object. Sometimes, our function app will have multiple functions that depend on the same code (i.e. database connections) and it’s good practice to extract that code into a separate file to reduce code duplication.
//Index.js
module.exports = async function (context, req) {
  context.log('JavaScript HTTP trigger function processed a request.');

  if (req.query.name || (req.body && req.body.name)) {
      context.res = {
          // status: 200, /* Defaults to 200 */
          body: "Hello " + (req.query.name || req.body.name)
      };
  }
  else {
      context.res = {
          status: 400,
          body: "Please pass a name on the query string or in the request body"
      };
  }
};
Who’s excited to give this a run?
How do I run and debug Serverless functions locally?
When using VS Code, the Azure Functions extension gives us a lot of the setup that we need to run and debug serverless functions locally. When we created a new project using it, a .vscode folder was automatically created for us, and this is where all the debugging configuration is contained. To debug our new function, we can use the Command Palette (Ctrl+Shift+P) by filtering on Debug: Select and Start Debugging, or typing debug.
Debugging Serverless Functions
One of the reasons why this is possible is because the Azure Functions runtime is open-source and installed locally on our machine when installing the azure-core-tools package.
How do I install dependencies?
Chances are you already know the answer to this, if you’ve worked with Node.js. Like in any other Node.js project, we first need to create a package.json file in the root folder of the project. That can done by running npm init -y — the -y will initialize the file with default configuration.
Then we install dependencies using npm as we would normally do in any other project. For this project, let’s go ahead and install the MongoDB package from npm by running:
npm i mongodb
The package will now be available to import in all the functions in the function app.
How do I connect to third-party services?
Serverless functions are quite powerful, enabling us to write custom code that reacts to events. But code on its own doesn’t help much when building complex applications. The real power comes from easy integration with third-party services and tools.
So, how do we connect and read data from a database? Using the MongoDB client, we’ll read data from an Azure Cosmos DB instance I have created in Azure, but you can do this with any other MongoDB database.
//Index.js
const MongoClient = require('mongodb').MongoClient;

// Initialize authentication details required for database connection
const auth = {
  user: process.env.user,
  password: process.env.password
};

// Initialize global variable to store database connection for reuse in future calls
let db = null;
const loadDB = async () => {
  // If database client exists, reuse it
  if (db) {
    return db;
  }
  // Otherwise, create new connection
  const client = await MongoClient.connect(
    process.env.url,
    {
      auth: auth
    }
  );
  // Select tacos database
  db = client.db('tacos');
  return db;
};

module.exports = async function(context, req) {
  try {
    // Get database connection
    const database = await loadDB();
    // Retrieve all items in the Recipes collection
    let recipes = await database
      .collection('Recipes')
      .find()
      .toArray();
    // Return a JSON object with the array of recipes
    context.res = {
      body: { items: recipes }
    };
  } catch (error) {
    context.log(`Error code: ${error.code} message: ${error.message}`);
    // Return an error message and Internal Server Error status code
    context.res = {
      status: 500,
      body: { message: 'An error has occurred, please try again later.' }
    };
  }
};
One thing to note here is that we’re reusing our database connection rather than creating a new one for each subsequent call to our function. This shaves off ~300ms of every subsequent function call. I call that a win!
Where can I save connection strings?
When developing locally, we can store our environment variables, connection strings, and really anything that’s secret into the local.settings.json file, then access it all in the usual manner, using process.env.yourVariableName.
In production, we can configure the application settings on the function’s page in the Azure portal.
However, another neat way to do this is through the VS Code extension. Without leaving your IDE, we can add new settings, delete existing ones or upload/download them to the cloud.
Debugging Serverless Functions
How do I customize the URL path?
With the REST API, there are a couple of best practices around the format of the URL itself. The one I settled on for our Recipes API is:
GET /recipes: Retrieves a list of recipes
GET /recipes/1: Retrieves a specific recipe
POST /recipes: Creates a new recipe
PUT /recipes/1: Updates recipe with ID 1
DELETE /recipes/1: Deletes recipe with ID 1
The URL that is made available by default when creating a new function is of the form http://host:port/api/function-name. To customize the URL path and the method that we listen to, we need to configure them in our function.json file:
Moreover, we can add parameters to our function’s route by using curly braces: route: recipes/{id}. We can then read the ID parameter in our code from the req object:
const recipeId = req.params.id;
How can I deploy to the cloud?
Congratulations, you’ve made it to the last step! 🎉 Time to push this goodness to the cloud. As always, the VS Code extension has your back. All it really takes is a single right-click we’re pretty much done.
Deployment using VS Code
The extension will ZIP up the code with the Node modules and push them all to the cloud.
While this option is great when testing our own code or maybe when working on a small project, it’s easy to overwrite someone else’s changes by accident — or even worse, your own.
Don’t let friends right-click deploy!
— every DevOps engineer out there
A much healthier option is setting up on GitHub deployment which can be done in a couple of steps in the Azure portal, via the Deployment Center tab.
Github deployment
Are you ready to make Serverless APIs?
This has been a thorough introduction to the world of Servless APIs. However, there's much, much more than what we've covered here. Serverless enables us to solve problems creatively and at a fraction of the cost we usually pay for using traditional platforms.
Chris has mentioned it in other posts here on CSS-Tricks, but he created this excellent website where you can learn more about serverless and find both ideas and resources for things you can build with it. Definitely check it out and let me know if you have other tips or advice scaling with serverless.