Using Web Components With Next (or Any SSR Framework)

In my previous post we looked at Shoelace, which is a component library with a full suite of UX components that are beautiful, accessible, and — perhaps unexpectedly — built with Web Components. This means they can be used with any JavaScript framework. While React’s Web Component interoperability is, at present, less than ideal, there are workarounds.

But one serious shortcoming of Web Components is their current lack of support for server-side rendering (SSR). There is something called the Declarative Shadow DOM (DSD) in the works, but current support for it is pretty minimal, and it actually requires buy-in from your web server to emit special markup for the DSD. There’s currently work being done for Next.js that I look forward to seeing. But for this post, we’ll look at how to manage Web Components from any SSR framework, like Next.js, today.

We’ll wind up doing a non-trivial amount of manual work, and slightly hurting our page’s startup performance in the process. We’ll then look at how to minimize these performance costs. But make no mistake: this solution is not without tradeoffs, so don’t expect otherwise. Always measure and profile.

The problem

Before we dive in, let’s take a moment and actually explain the problem. Why don’t Web Components work well with server-side rendering?

Application frameworks like Next.js take React code and run it through an API to essentially “stringify” it, meaning it turns your components into plain HTML. So the React component tree will render on the server hosting the web app, and that HTML will be sent down with the rest of the web app’s HTML document to your user’s browser. Along with this HTML are some <script> tags that load React, along with the code for all your React components. When a browser processes these <script> tags, React will re-render the component tree, and match things up with the SSR’d HTML that was sent down. At this point, all of the effects will start running, the event handlers will wire up, and the state will actually… contain state. It’s at this point that the web app becomes interactive. The process of re-processing your component tree on the client, and wiring everything up is called hydration.

So, what does this have to do with Web Components? Well, when you render something, say the same Shoelace <sl-tab-group> component we visited last time:

<sl-tab-group ref="{tabsRef}">
  <sl-tab slot="nav" panel="general"> General </sl-tab>
  <sl-tab slot="nav" panel="custom"> Custom </sl-tab>
  <sl-tab slot="nav" panel="advanced"> Advanced </sl-tab>
  <sl-tab slot="nav" panel="disabled" disabled> Disabled </sl-tab>

  <sl-tab-panel name="general">This is the general tab panel.</sl-tab-panel>
  <sl-tab-panel name="custom">This is the custom tab panel.</sl-tab-panel>
  <sl-tab-panel name="advanced">This is the advanced tab panel.</sl-tab-panel>
  <sl-tab-panel name="disabled">This is a disabled tab panel.</sl-tab-panel>
</sl-tab-group>

…React (or honestly any JavaScript framework) will see those tags and simply pass them along. React (or Svelte, or Solid) are not responsible for turning those tags into nicely-formatted tabs. The code for that is tucked away inside of whatever code you have that defines those Web Components. In our case, that code is in the Shoelace library, but the code can be anywhere. What’s important is when the code runs.

Normally, the code registering these Web Components will be pulled into your application’s normal code via a JavaScript import. That means this code will wind up in your JavaScript bundle and execute during hydration which means that, between your user first seeing the SSR’d HTML and hydration happening, these tabs (or any Web Component for that matter) will not render the correct content. Then, when hydration happens, the proper content will display, likely causing the content around these Web Components to move around and fit the properly formatted content. This is known as a flash of unstyled content, or FOUC. In theory, you could stick markup in between all of those <sl-tab-xyz> tags to match the finished output, but this is all but impossible in practice, especially for a third-party component library like Shoelace.

Moving our Web Component registration code

So the problem is that the code to make Web Components do what they need to do won’t actually run until hydration occurs. For this post, we’ll look at running that code sooner; immediately, in fact. We’ll look at custom bundling our Web Component code, and manually adding a script directly to our document’s <head> so it runs immediately, and blocks the rest of the document until it does. This is normally a terrible thing to do. The whole point of server-side rendering is to not block our page from processing until our JavaScript has processed. But once done, it means that, as the document is initially rendering our HTML from the server, the Web Components will be registered and will both immediately and synchronously emit the right content.

In our case, we’re just looking to run our Web Component registration code in a blocking script. This code isn’t huge, and we’ll look to significantly lessen the performance hit by adding some cache headers to help with subsequent visits. This isn’t a perfect solution. The first time a user browses your page will always block while that script file is loaded. Subsequent visits will cache nicely, but this tradeoff might not be feasible for you — e-commerce, anyone? Anyway, profile, measure, and make the right decision for your app. Besides, in the future it’s entirely possible Next.js will fully support DSD and Web Components.

Getting started

All of the code we’ll be looking at is in this GitHub repo and deployed here with Vercel. The web app renders some Shoelace components along with text that changes color and content upon hydration. You should be able to see the text change to “Hydrated,” with the Shoelace components already rendering properly.

Custom bundling Web Component code

Our first step is to create a single JavaScript module that imports all of our Web Component definitions. For the Shoelace components I’m using, my code looks like this:

import { setDefaultAnimation } from "@shoelace-style/shoelace/dist/utilities/animation-registry";

import "@shoelace-style/shoelace/dist/components/tab/tab.js";
import "@shoelace-style/shoelace/dist/components/tab-panel/tab-panel.js";
import "@shoelace-style/shoelace/dist/components/tab-group/tab-group.js";

import "@shoelace-style/shoelace/dist/components/dialog/dialog.js";

setDefaultAnimation("dialog.show", {
  keyframes: [
    { opacity: 0, transform: "translate3d(0px, -20px, 0px)" },
    { opacity: 1, transform: "translate3d(0px, 0px, 0px)" },
  ],
  options: { duration: 250, easing: "cubic-bezier(0.785, 0.135, 0.150, 0.860)" },
});
setDefaultAnimation("dialog.hide", {
  keyframes: [
    { opacity: 1, transform: "translate3d(0px, 0px, 0px)" },
    { opacity: 0, transform: "translate3d(0px, 20px, 0px)" },
  ],
  options: { duration: 250, easing: "cubic-bezier(0.785, 0.135, 0.150, 0.860)" },
});

It loads the definitions for the <sl-tab-group> and <sl-dialog> components, and overrides some default animations for the dialog. Simple enough. But the interesting piece here is getting this code into our application. We cannot simply import this module. If we did that, it’d get bundled into our normal JavaScript bundles and run during hydration. This would cause the FOUC we’re trying to avoid.

While Next.js does have a number of webpack hooks to custom bundle things, I’ll use Vite instead. First, install it with npm i vite and then create a vite.config.js file. Mine looks like this:

import { defineConfig } from "vite";
import path from "path";

export default defineConfig({
  build: {
    outDir: path.join(__dirname, "./shoelace-dir"),
    lib: {
      name: "shoelace",
      entry: "./src/shoelace-bundle.js",
      formats: ["umd"],
      fileName: () => "shoelace-bundle.js",
    },
    rollupOptions: {
      output: {
        entryFileNames: `[name]-[hash].js`,
      },
    },
  },
});

This will build a bundle file with our Web Component definitions in the shoelace-dir folder. Let’s move it over to the public folder so that Next.js will serve it. And we should also keep track of the exact name of the file, with the hash on the end of it. Here’s a Node script that moves the file and writes a JavaScript module that exports a simple constant with the name of the bundle file (this will come in handy shortly):

const fs = require("fs");
const path = require("path");

const shoelaceOutputPath = path.join(process.cwd(), "shoelace-dir");
const publicShoelacePath = path.join(process.cwd(), "public", "shoelace");

const files = fs.readdirSync(shoelaceOutputPath);

const shoelaceBundleFile = files.find(name => /^shoelace-bundle/.test(name));

fs.rmSync(publicShoelacePath, { force: true, recursive: true });

fs.mkdirSync(publicShoelacePath, { recursive: true });
fs.renameSync(path.join(shoelaceOutputPath, shoelaceBundleFile), path.join(publicShoelacePath, shoelaceBundleFile));
fs.rmSync(shoelaceOutputPath, { force: true, recursive: true });

fs.writeFileSync(path.join(process.cwd(), "util", "shoelace-bundle-info.js"), `export const shoelacePath = "/shoelace/${shoelaceBundleFile}";`);

Here’s a companion npm script:

"bundle-shoelace": "vite build && node util/process-shoelace-bundle",

That should work. For me, util/shoelace-bundle-info.js now exists, and looks like this:

export const shoelacePath = "/shoelace/shoelace-bundle-a6f19317.js";

Loading the script

Let’s go into the Next.js \_document.js file and pull in the name of our Web Component bundle file:

import { shoelacePath } from "../util/shoelace-bundle-info";

Then we manually render a <script> tag in the <head>. Here’s what my entire _document.js file looks like:

import { Html, Head, Main, NextScript } from "next/document";
import { shoelacePath } from "../util/shoelace-bundle-info";

export default function Document() {
  return (
    <Html>
      <Head>
        <script src={shoelacePath}></script>
      </Head>
      <body>
        <Main />
        <NextScript />
      </body>
    </Html>
  );
}

And that should work! Our Shoelace registration will load in a blocking script and be available immediately as our page processes the initial HTML.

Improving performance

We could leave things as they are but let’s add caching for our Shoelace bundle. We’ll tell Next.js to make these Shoelace bundles cacheable by adding the following entry to our Next.js config file:

async headers() {
  return [
    {
      source: "/shoelace/shoelace-bundle-:hash.js",
      headers: [
        {
          key: "Cache-Control",
          value: "public,max-age=31536000,immutable",
        },
      ],
    },
  ];
}

Now, on subsequent browses to our site, we see the Shoelace bundle caching nicely!

DevTools Sources panel open and showing the loaded Shoelace bundle.

If our Shoelace bundle ever changes, the file name will change (via the :hash portion from the source property above), the browser will find that it does not have that file cached, and will simply request it fresh from the network.

Wrapping up

This may have seemed like a lot of manual work; and it was. It’s unfortunate Web Components don’t offer better out-of-the-box support for server-side rendering.

But we shouldn’t forget the benefits they provide: it’s nice being able to use quality UX components that aren’t tied to a specific framework. It’s aldo nice being able to experiment with brand new frameworks, like Solid, without needing to find (or hack together) some sort of tab, modal, autocomplete, or whatever component.


Using Web Components With Next (or Any SSR Framework) originally published on CSS-Tricks, which is part of the DigitalOcean family. You should get the newsletter.

What to Expect From Zero-Bundle-Size React Server Components

Initially, React was mainly a frontend framework that focused on the client-side. And now it is interesting to watch how the Facebook team is developing React server-side.

In December 2020, the React team announced a new feature called React Server Components, which is still in development but you can try the demo. Since then, the React community has been actively discussing this new way of building React applications. Most of the feedback is positive, so I decided to try it myself. 

Components: Server-Side vs. Client-Side

Building a website in 2021? I’m guessing you’re going to take a component-driven approach. It’s all the chatter these days. React and Vue are everywhere (is Angular still a thing?), while other emerging frameworks continue to attempt a push into the spotlight.

Over the last decade or so we’ve seen an explosion of frameworks and tools that help us build sites systematically using components. Early frameworks like AngularJS helped shape the generic concept of web components. Web components are also reusable bits of HTML code that are written in JavaScript and made functional by the browser. They are client-side components.

But components, in a more generic sense, have actually been around much longer. In fact, they go back to the early days of the web. They just haven’t typically been called components, though they still function as such. Server components are also reusable bits of code, but are compiled into HTML before the browser sees them. They are server-side components, and they are still very much a thing today.

Even in a world in which all it seems like we hear is “React, React, React,” both types of components are still relevant and can help us build super awesome websites. Let’s explore how client and server components differ from one another. That will give us a clearer picture of where we came from. And then we’ll have the information we need to dream about the future.

Rendering

Perhaps the biggest difference between client-side and server-side components is what makes them what they are. That is the thing that is responsible for rendering them.

Server components are rendered by — you guessed it! — the server. They aren’t typically referred to as components. They’re often called partials, includes, snippets, or templates, depending on the framework in which they are used.

Server components can take two flavors. The first is the classic approach, which is to render components in real-time based on a request from the client. See here:

Illustrated diagram of a browser making a request to an app server that requests components, which compile to a page and are returned to the app server to go back to the browser.
Server-side rendered components

The second flavor is the Jamstack approach. In this case, the entire site is compiled during a build a process, and static HTML is already available when requested by the client. See here:

An illustrated diagram showing the browser requests a page that has already been created, which consists of components that have gone through a build process from the server, then returns to the browser.
Server components on a Jamstack site have already been compiled into HTML.

In both cases, the client (i.e. your browser) never sees the distinction between your components. It simply receives a bunch of HTML from the server.

Client components, on the other hand, are rendered by — you are two-for-two and on a ROLL! — the client. They are written in JavaScript and rendered by the client (your browser). Because the server is the server and it knows all, it can know about your client components, but whether it cares enough to do anything with them depends on the framework you’re using.

Like server components, there are also two flavors of client components. The first is the more official web component, which makes use of the shadow DOM. The shadow DOM helps with encapsulating styles and other functionality (we’ll talk more about this later). Frameworks like Polymer and Stencil make use of the shadow DOM.

The more popular frameworks, like React and Vue, represent the second flavor of component, which handles DOM manipulation and scoping on their own.

Interactivity

Because server components are just HTML when they are sent to the client, if they are to be interactive on the front end, the application must load JavaScript code separately.

Consider a countdown timer. Its presentation is determined by HTML and CSS (we‘ll come back to the CSS part). But if it is to do its thing (count), it also needs some JavaScript. That means not just bringing in that JavaScript, but also having a means by which the JavaScript can attach itself to the countdown’s HTML element(s), which must either be done manually or with (yet) another framework.

An illustrated diagram showing the browser requesting both a JavaScript bundler containing the JavaScript for the component, and a page with the component's markup that both are returned to the browser.
A component’s HTML and JavaScript are separated in SSR components.

Though this may feel unnecessarily tedious (especially if you’ve been around long enough to have been forced into this approach), there are benefits to it. It is a clear separation of concerns, where server-side code lives in one place, while the functionality lives in another. And it brings only the code it needs for the interactivity (theoretically), which can lessen the burden on the browser.

With client components, the markup and interactivity tend to be tightly coupled, often in the same file or directory. While this can quickly become a mess if you’re not diligent about staying organized, one major benefit to client components is that they already have access to the client. And because they are written in JavaScript, their functionality can ship right alongside their markup (and styles).

A diagram showing the same flow as before, but both the component markup and JavaScript are included in the bundler, which then renders on the page.
Client-side components are all wrapped up in JavaScript code.

Performance

In a one-to-one comparison, server-side components tend to perform better. When the page that a browser receives contains everything it needs for presentation, it’s going to be able to deliver that presentation to the user much quicker.

Diagram showing the browser asking for a page of HTML in a single request.
Technically all you need when rendering SSR components is a single request.

Because client-side components require JavaScript, the browser must download or process additional information (often in separate files) to be able to render the component.

Same diagram as before, but a bundler is requested by the browser along with the page.
Client component often require more code and requests.

That said, client-side components are often used within the context of a larger framework. React has Gatsby and Next, while Vue has Nuxt. These frameworks have mechanisms for creating a superior in-app experience. What I mean is that, while they may be slower to load the first page you visit on a site, they can then focus their energy on delivering subsequent views extremely fast — often faster than a server-side rendered site can deliver its content.

If you’re thinking, Yeah but what about pre-rendering and…

Yes, you’re right. We’ll get there. Also, no more spoilers, please. The rest of us are along for the ride.

Languages

Server components can be written in (almost) any server-side language. This enables you to write your templates in the same language as your application’s logic. For example, applications written with Ruby on Rails use ERB templating by default, which is a form of Ruby. Thus, Rails apps use the same language for the application itself as it does for its components.

The reason client components are written in JavaScript is because that’s the language browsers parse for interactivity on a website. However, JavaScript also has server-based runtimes, the most popular of which is Node.js. That means code for client components could be written in the same language as the application, as long as the application is written with Node (or similar).

Styling (CSS)

When it comes to styling components, server-side components run into the same trouble they face with JavaScript. The styles are typically detached from the components, and require a bit of extra effort to tie styles to the elements on the page.

However, there are frameworks like Tailwind CSS that are working to make this process less painful.

Many client-side component libraries come with CSS support (or at least a pattern for styling) right out of the box. That often means including the styles in the same file as the markup and logic, which can get messy. But typically, with a little effort, you can adjust that approach to your liking.

Welcome to the (hybrid) future

Neither type of component is the answer by itself. Server-side components require additional effort in styling and interactivity that feels unnecessary when we look at the offerings of client components. But then client components have a tendency to take away from performance on the front end. And because the success of a website often depends on user engagement, a lack of performance can hurt the end result and be enough not to want to use client components.

What does that mean for a future that demands both performance and a good developer experience? More than likely, a hybrid approach.

Components are going to have to be rendered on the server side. They just are. That‘s how we optimize performance, and good performance is going to continue to be an attribute of successful websites. But, now that we’ve seen the ease of front-end logic and interactivity using frameworks, again, like React and Vue, those frameworks are here to stay (at least for awhile).

So where are we going?

I think we’re going to see these components come together in three ways in the very near future.

1. Advancement of JavaScript framework frameworks

Remember when you thought up that spoiler about pre-rendering? Well, let’s talk about it now.

Frameworks like Gatsby, Next, and Nuxt act as front-end engines built on top of component frameworks, like React and Vue. They bring together tooling to build a comprehensive front-end experience using their preferred framework. One such feature is pre-rendering, which means these engines will introspect components and then write static HTML on the page while the site is being built. Then, when users view that page, it‘s actually already there. They don’t need JavaScript to view it.

However, JavaScript comes into play through a process called hydration. After the page loads and your user sees all the (static) content, that’s when JavaScript goes to work. It takes over the components to make them interactive. This provides the opportunity to build a client-side, component-based website with some of the benefits of the server, namely performance and SEO.

These tools have gotten super popular because of this approach, and I suspect we’ll see them continue to advance.

2. Baked-in client-side pre-rendering

That’s a lot of compound words.

What I‘ve been thinking about a lot the last couple years is: Why doesn’t React (or Vue) take on server-side rendering? They do, it’s just not super easy to understand or implement without another framework to help.

On one hand, I understand the single-responsibility principle, and that these component frameworks are just ways to build client-side components. But it felt like a huge miss to delegate server-side rendering to bigger, more complex tools like Gatsby and Next (among others).

Well, React has started moving that way. Vue is already there. And Svelte has made this approach a priority from the beginning.

I think we‘re going to see a lot more development while these traditionally client-side-focused tools solve for server-side rendering. I suspect that also means we‘ll hear a little more from Svelte in the future, which seems like it’s ahead of the game in this regard.

That may also lead to the development of more competitors to bulkier tools like Gatsby and Next. For example, look at what Netlify is doing with their website. It‘s an Eleventy project that pulls in Vue components and renders them for use on the server. What it’s missing is the hydration and interactivity piece. I expect that to come together in the very near future.

3. Server-side component interactivity

And still, we can‘t discount the continued use of server-side components. The one side effect of both of the other two advancements is that they’re still using JavaScript frameworks that can feel unnecessary when you only need just a little interactivity.

There must be a simpler way to add just a little JavaScript to make a server-side component that are written in a server-side language more interactive.

Solving that problem seems to be the approach from the folks at Basecamp, who just released Hotwire, which is a means to bring some of the gains of client components to the server, using (almost) any server-side language.

I don‘t know if that means we‘re going to see competition to Hotwire emerge right away. But I do think Hotwire is going to get some attention. And that might just bring folks back to working with full-stack monolithic frameworks like Rails. (Personally, I love that Rails hasn’t become obsolete in this JavaScript-focused world. The more competition we have, the better the web gets.)

Where do you think all this component business is going? Let’s talk about it.


The post Components: Server-Side vs. Client-Side appeared first on CSS-Tricks.

You can support CSS-Tricks by being an MVP Supporter.

Servers: Cool Once Again

There were jokes coming back from the holiday break that JavaScript decided to go all server-side. I think it was rooted in:

  • The Basecamp gang releasing Hotwire, which looks like marketing panache around a combination of technologies. “HTML over the wire,” they say, meaning it makes the server generate and serve HTML, and leaves client-side JavaScript to things only client-side JavaScript can do.
  • The React gang Introducing Zero-Bundle-Size React Server Components, which I believe is the first step of the core project toward server-side anything.

I’m all about some marketing hype, but it’s worth noting that these are just fresh takes on already solid (dare I say old) ideas.

Turbo (“The heart of Hotwire”) is an evolution of Turbolinks, which is a terrifically simple base idea: intercept clicks on internal links. Rather than the browser doing a full page refresh, fetch the contents of the new page, plop it in place, and History.pushState() the URL. Now you’ve got a Single Page App feel, but you didn’t have to build a SPA. That’s mighty convenient if you’ve already built your app in Rails with ERB templates.

But is that actually efficient? Well, it hasn’t been particularly popular so far. The thinking has been that the network is the bottleneck, so let’s send as little as possible over the network. “As little as possible” typically translates into JSON, typically. If you get JSON on the client, now you need a templating system on the client to turn that into usable DOM. With that technique, you’re paying two costs: 1) loading a client-side library 2) data-to-DOM processing. If you sent “HTML over the wire,” you pay neither of those costs (faster), but theoretically are sending beefier payloads across the network (slower), which assumes that HTML is heavier than JSON, which is… questionable.

So… it depends. It depends on how big the payloads are and what is expected to be done with them.

You’d expect the React opinion would be: definitely use the client. But that’s not true with the new preview of server side components. The video is abundantly clear: “rendering” the components on the server is faster, particularly in nested component situations where many of the components are responsible for fetching their own data. So what comes across the network then? Is it DOM-ready HTML? Not here. From a peek at the video, it looks like the network response is some proprietary format that describes a React component. That seems important because it means the client-side JavaScript bundle doesn’t contain that component at all, and state can be passed back and forth. Lauren Tan is also clear in the video: this is kinda SSR but distinct from how something, like Next.js, does SSR today. And the point is to make the Next.js of tomorrow far better.

So: servers. They are just good at doing certain things (says the guy typing into his WordPress blog). There does seem to be some momentum toward doing less on the client, which I think most of us would agree has been taking on a bit much lately, which asset sizes doing nothing but growing and growing.

Let’s push those servers to the edge while we’re at it.


The post Servers: Cool Once Again appeared first on CSS-Tricks.

You can support CSS-Tricks by being an MVP Supporter.

Rendering Spectrum

Here are the big categories of rendering websites:

  • Client: ship a <div id="root"></div> and let a JavaScript template render all of it.
  • Static: pre-render the HTML.
  • Server: let a live server process requests and generate the HTML response.

They are not mutually exclusive.

  • A website could statically pre-render 75% of it’s pages (say, blog posts), but the other 25% have a server respond to (say, forums).
  • A website could statically pre-render all the pages, but have a couple of empty <div>s in there that have client-side rendered content in them (e.g. a dynamically generated menu based on the logged-in user).
  • A website could be primarily server-rendered, but has caching in front of it such that it behaves statically.
  • A website could render statically, but then “hydrate” itself into an entirely client-rendered site.
  • A website could be a mix of server and static rendering, but have dynamic parts similar to client-side rendering, but actually happen in an edge function, so it ends up more like server-side rendering.

Next.js is interesting in that it can do all three. Here’s Tim Neutkens in a recent interview:

Next.js allows you to pre-render pages. It creates HTML on a server at build time with static site generation or uses run-time rendering on the server side. Next allows you to do a hybrid of those. Unlike most other frameworks, you are not bound by, oh, I’m going to build my app completely statically generated. Instead, you’re allowed to have some pages be server-side rendered and some pages be statically generated.

In the new release we make it possible to update these statically generated pages without having to run a new build, rebuilding your whole app.

Cool. Love to see that happening at the framework level. Seems like having to go all-in on one rendering style isn’t practical for a lot of sites.

Client rendering is the most flexible, but comes with all these serious downsides like worse performance, worse reliability, more strain on devices, bad SEO, etc. Static pre-rendering is the most robust, speedy, and secure, but is the most limited. Edge functions on top of static is starting to open doors, but server-rendering is the classic mix of flexibility and speed that has dominated the web for good reason.

Client rendering also opens the door for that “SPA” (Single Page App) feel. I still like that, personally. I like the no-page-refresh feel. It’s makes a site feel snappy and opens the door for page transitions. Gatsby is famous for popularizing hydration, where you get the pre-rendered static bonus, but then the upgrade into SPA as the JavaScript downloads.

I’d love to see the web get to the point where we get all that “good feel” bonus of an SPA without actually having to build an SPA. It’s notable when frameworks provide SPA feels without having to manage much of that yourself, but still, something is managing it and that something is a bunch of JavaScript.

Tom MacWright wrote about that recently in his “If not SPAs, What?” post. Some of today’s alternatives:

Turbolinks … what is the bare minimum you need to do to get the SPA experience without any cooperation from your application?

Turbolinks is like… click link, click is intercepted, Ajax request for new page is made, JavaScript flops out the content on the page with the new content. Super easy to implement, but it’s still JavaScript, and not particularly intelligent about sending less data across the wire.

barba.js and instant.page are alternative approaches to the same sort of problem.

Barba is all about getting page transitions going (more detail on that concept). instant.page is all about pre-loading/rendering pages right before you click then, so even though you get a page refresh, it feels less intrusive (particularly with paint holding). Both are cool, but not quite one-to-one replacements for an SPA. (Even with paint holding, pre-rendering, and lightweight pages, I still don’t think the experience is quite a smooth as an SPA. For example, you still get the page loading spinner.)

So… is the anything else cooking? Kinda. There is <portal>. Possibly too simplified, but here goes: portals are like iframes. They can even be visually displayed just like an iframe. That means the rendering of the URL in the portal is already done. Then you can “promote” the portal to be the active page, and even animate the portal itself while doing so.

I don’t hate it. I can imagine someone building a turbolinks-like library on portals so they are “easy to use” and make a site more SPA-like.

Still, animating a rectangle into position isn’t often what is desired from animated page transitions. Just look at Sarah’s “Native-Like Animations for Page Transitions on the Web” article. That’s what the people want (at least the possibility of it). That’s why Jeremy said not portals the other day when he cheekily said that “[m]ost single page apps are just giant carousels.” He also points to Jake’s navigation-transitions proposal from a few years back.

I love this proposal. It focuses on user needs. It also asks why people reach for JavaScript frameworks instead of using what browsers provide. People reach for JavaScript frameworks because browsers don’t yet provide some functionality: components like tabs or accordions; DOM diffing; control over styling complex form elements; navigation transitions. The problems that JavaScript frameworks are solving today should be seen as the R&D departments for web standards of tomorrow. (And conversely, I strongly believe that the aim of any good JavaScript framework should be to make itself redundant.)

So what’s the best rendering method? Whatever works best for you, but perhaps a hierarchy like this makes some general sense:

  1. Static HTML as much as you can
  2. Edge functions over static HTML so you can do whatever dynamic things
  3. Server generated HTML what you have to after that
  4. Client-side render only what you absolutely have to

The post Rendering Spectrum appeared first on CSS-Tricks.

You can support CSS-Tricks by being an MVP Supporter.

How I Used Brotli to Get Even Smaller CSS and JavaScript Files at CDN Scale

The HBO sitcom Silicon Valley hilariously followed Pied Piper, a team of developers with startup dreams to create a compression algorithm so powerful that high-quality streaming and file storage concerns would become a thing of the past.

In the show, Google is portrayed by the fictional company Hooli, which is after Pied Piper’s intellectual property. The funny thing is that, while being far from a startup, Google does indeed have a powerful compression engine in real life called Brotli

This article is about my experience using Brotli at production scale. Despite being really expensive and a truly unfeasible method for on-the-fly compression, Brotli is actually very economical and saves cost on many fronts, especially when compared with gzip or lower compression levels of Brotli (which we’ll get into).

Brotli’s beginning…

In 2015, Google published a blog post announcing Brotli and released its source code on GitHub. The pair of developers who created Brotli also created Google’s Zopfli compression two years earlier. But where Zopfli leveraged existing compression techniques, Brotli was written from the ground-up and squarely focused on text compression to benefit static web assets, like HTML, CSS, JavaScript and even web fonts.

At that time, I was working as a freelance website performance consultant. I was really excited for the 20-26% improvement Brotli promised over Zopfli. Zopfli in itself is a dense implementation of the deflate compressor compared with zlib’s standard implementation, so the claim of up to 26% was quite impressive. And what’s zlib? It’s essentially the same as gzip.

So what we’re looking at is the next generation of Zopfli, which is an offshoot of zlib, which is essentially gzip.

A story of disappointment

It took a few months for major CDN players to support Brotli, but meanwhile it was seeing widespread adoption in tools, services, browsers and servers. However, the 26% dense compression that Brotli promised was never reflected in production. Some CDNs set a lower compression level internally while others supported Brotli at origin so that they only support it if it was enabled manually at the origin.

Server support for Brotli was pretty good, but to achieve high compression levels, it required rolling your own pre-compression code or using a server module to do it for you — which is not always an option, especially in the case of shared hosting services.

This was really disappointing for me. I wanted to compress every last possible byte for my clients’ websites in a drive to make them faster, but using pre-compression and allowing clients to update files on demand simultaneously was not always easy.

Taking matters into my own hands

I started building my own performance optimization service for my clients.

I had several tricks that could significantly speed up websites. The service categorized all the optimizations in three groups consisting of several “Content,” “Delivery,” and “Cache” optimizations. I had Brotli in mind for the content optimization part of the service for compressible resources.

Like other compression formats, Brotli comes in different levels of power. Brotli’s max level is exactly like the max volume of the guitar amps in This is Spinal Tap: it goes to 11.

Brotli:11, or Brotli compression level 11, can offer significant reduction in the size of compressible files, but has a substantial trade-off: it is painfully slow and not feasible for on demand compression the same way gzip is capable of doing it. It costs significantly more in terms of CPU time.

In my benchmarks, Brotli:11 takes several hundred milliseconds to compress a single minified jQuery file. So, the only way to offer Brotli:11 to my clients was to use it for pre-compression, leaving me to figure out a way to cache files at the server level. Luckily we already had that in place. The only problem was the fear that Brotli could kill all our processing resources.

Maybe that’s why Pied Piper had to continue rigging its servers for more power.

I put my fears aside and built Brotli:11 as a configurable server option. This way, clients could decide whether enabling it was worth the computing cost.

It’s slow, but gradually pays off

Among several other optimizations, the service for my clients also offers geographic content delivery; in other words, it has a built-in CDN.

Of the several tricks I tried when taking matters into my own hands, one was to combine public CDN (or open-source CDN) and private CDN on a single host so that websites can enjoy the benefits of shared browser cache of public resources without incurring separate DNS lookup and connection cost for that public host. I wanted to avoid this extra connection cost because it has significant impact for mobile users. Also, combining more and more resources on a single host can help get the most of HTTP/2 features, like multiplexing.

I enabled the public CDN and turned on Brotli:11 pre-compression for all compressible resources, including CSS, JavaScript, SVG, and TTF, among other types of files. The overhead of compression did indeed increase on first request of each resource — but after that, everything seemed to run smoothly. Brotli has over 90% browser support and pretty much all the requests hitting my service now use Brotli.

I was happy. Clients were happy. But I didn’t have numbers. I started analyzing the impact of enabling this high density compression on public resources. For this, I recorded file transfer sizes of several popular libraries — including jQuery, Bootstrap, React, and other frameworks — that used common compression methods implemented by other CDNs and found that Brotli:11 compression was saving around 21% compared to other compression formats.

It’s important to note that some of the other public CDNs I compared were already using Brotli, but at lower compression levels. So, the 21% extra compression was really satisfying for me. This number is based on a very small subset of libraries but is not incorrect by a big margin as I was seeing this much gain on all of the websites that I tested.

Here is a graphical representation of the savings.

Vertical bar chart. Compares jQuery, Bootstrap, D3.js, Ant Design, Senamtic UI, Font Awesome, React, Three.js, Bulma and Vue before and after Brotli compression. Brotli compression is always smaller.

You can see the raw data below..Note that the savings for CSS is much more prominent than what JavaScript gets.

LibraryOriginalAvg. of Common Compression (A)Brotli:11 (B)(A) / (B) – 1
Ant Design1,938.99 KB438.24 KB362.82 KB20.79%
Bootstrap152.11 KB24.20 KB17.30 KB39.88%
Bulma186.13 KB23.40 KB19.30 KB21.24%
D3.js236.82 KB74.51 KB65.75 KB13.32%
Font Awesome1,104.04 KB422.56 KB331.12 KB27.62%
jQuery86.08 KB30.31 KB27.65 KB9.62%
React105.47 KB33.33 KB30.28 KB10.07%
Semantic UI613.78 KB91.93 KB78.25 KB17.48%
three.js562.75 KB134.01 KB114.44 KB17.10%
Vue.js91.48 KB33.17 KB30.58 KB8.47%

The results are great, which is what I expected. But what about the overall impact of using Brotli:11 at scale? Turns out that using Brotli:11 for all public resources reduces cost all around:

  • The smaller file sizes are expected to result in lower TLS overhead. That said, it is not easily measurable, nor is it significant for my service because modern CPUs are very fast at encryption. Still, I believe there is some tiny and repeated saving on account of encryption for every request as smaller files encrypt faster.
  • It reduces the bandwidth cost. The 21% savings I got across the board is the case in point. And, remember, savings are not a one-time thing. Each request counts as cost, so the 21% savings is repeated time and again, creating a snowball savings for the cost of bandwidth. 
  • We only cache hot files in memory at edge servers. Due to the widespread browser support for Brotli, these hot files are mostly encoded by Brotli and their small size lets us fit more of them in available memory.
  • Visitors, especially those on mobile devices, enjoy reduced data transfer. This results in less battery use and savings on data charges. That’s a huge win that gets passed on to the users of our clients!

This is all so good. The cost we save per request is not significant, but considering we have a near zero cache miss rate for public resources, we can easily amortize the initial high cost of compression in next several hundred requests. After that,  we’re looking at a lifetime benefit of reduced overhead.

It doesn’t end there

With the mix of public and private CDNs that we introduced as part of our performance optimization service, we wanted to make sure that clients could set lower compression levels for resources that frequently change over time (like custom CSS and JavaScript) on the private CDN and automatically switch to the public CDN for open-source resources that change less often and have pre-configured Brotli:11. This way, our clients can still get a high compression ratio on resources that change less often while still enjoying good compression ratios with instant purge and updates for compressible resources.

This all is done smoothly and seamlessly using our integration tools. The added benefit of this approach for clients is that the bandwidth on the public CDN is totally free with unprecedented performance levels.

Try it yourself!

Testing on a common website, using aggressive compression can easily shave around 50 KB off the page load. If you want to play with the free public CDN and enjoy smaller CSS and JavaScript, you are welcome to use our PageCDN service. Here are some of the most used libraries for your use:

<!-- jQuery 3.5.0 -->
<script src="https://pagecdn.io/lib/jquery/3.5.0/jquery.min.js" crossorigin="anonymous" integrity="sha256-xNzN2a4ltkB44Mc/Jz3pT4iU1cmeR0FkXs4pru/JxaQ=" ></script>


<!-- FontAwesome 5.13.0 -->
<link href="https://pagecdn.io/lib/font-awesome/5.13.0/css/all.min.css" rel="stylesheet" crossorigin="anonymous" integrity="sha256-h20CPZ0QyXlBuAw7A+KluUYx/3pK+c7lYEpqLTlxjYQ=" >


<!-- Ionicons 4.6.3 -->
<link href="https://pagecdn.io/lib/ionicons/4.6.3/css/ionicons.min.css" rel="stylesheet" crossorigin="anonymous" integrity="sha256-UUDuVsOnvDZHzqNIznkKeDGtWZ/Bw9ZlW+26xqKLV7c=" >


<!-- Bootstrap 4.4.1 -->
<link href="https://pagecdn.io/lib/bootstrap/4.4.1/css/bootstrap.min.css" rel="stylesheet" crossorigin="anonymous" integrity="sha256-L/W5Wfqfa0sdBNIKN9cG6QA5F2qx4qICmU2VgLruv9Y=" >


<!-- React 16.13.1 -->
<script src="https://pagecdn.io/lib/react/16.13.1/umd/react.production.min.js" crossorigin="anonymous" integrity="sha256-yUhvEmYVhZ/GGshIQKArLvySDSh6cdmdcIx0spR3UP4=" ></script>


<!-- Vue 2.6.11 -->
<script src="https://pagecdn.io/lib/vue/2.6.11/vue.min.js" crossorigin="anonymous" integrity="sha256-ngFW3UnAN0Tnm76mDuu7uUtYEcG3G5H1+zioJw3t+68=" ></script>

Our PHP library automatic switches between private and public CDN if you need it to. The same feature is implemented seamlessly in our WordPress plugin that automatically loads public resources over Public CDN. Both of these tools allow full access to the free public CDN. Libraries for JavaScript, Python. and Ruby are not yet available. If you contribute any such library to our Public CDN, I will be happy to list it in our docs.

Additionally, you can use our search tool to immediately find a corresponding resource on the public CDN by supplying a URL of a resource on your website. If none of these tools work for you, then you can check the relevant library page and pick the URLs you want.

Looking toward the future

We started by hosting only the most popular libraries in order to prevent malware spread. However, things are changing rapidly and we add new libraries as our users suggest them to us. You are welcome to suggest your favorite ones, too. If you still want to link to a public or private Github repo that is not yet available on our public CDN, you can use our private CDN to connect to a repo and import all new releases as they appear on GitHub and then apply your own aggressive optimizations before delivery.

What do you think?

Everything we covered here is solely based on my personal experience working with Brotli compression at CDN scale. It just happens to be an introduction to my public CDN as well. We are still a small service and our client websites are only in the hundreds. Still, at this scale the aggressive compression seems to pay off.

I achieved high quality results for my clients and now you can use this free service for your websites as well. And, if you like it, please leave feedback at my email and recommend it to others.

The post How I Used Brotli to Get Even Smaller CSS and JavaScript Files at CDN Scale appeared first on CSS-Tricks.

Server-Side Rendering With Laravel and Vue.js 2.5

Server-side rendering is a great way to increase the perception of loading speed in your full-stack app. Users get a complete page with visible content when they load your site, as opposed to an empty page that doesn't get populated until JavaScript runs.

One of the downsides of using Laravel as a backend for Vue.js was the inability to server render your code. Was. The release of Vue.js 2.5.0 has brought server-side rendering support to non-Node.js environments including PHP, Python, Ruby, etc.

In this tutorial, I'll take you through the setup steps for Laravel and demonstrate a simple server-rendered app. Get the code for this here on GitHub.

Filtering Lists Dynamically With Vue on the Server Side is Easier Than You’d Think

I recently attended the ARTIFACT conference in Austin, TX, and was inspired by a few talks about accessibility through the lens of site performance. It became clear to me that there is this tendency to rely on big JavaScript frameworks to handle the work — like React, Vue, and Angular — but that can be overkill in some cases. That is, negatively affecting site performance, and thus accessibility. At the same time, these frameworks can make development easier and more efficient for developers. My big takeaway from the conference was to see how a fast, performant experience can be balanced with my own development process.

This was on my mind as I was building a list-filtering feature on a project a few days after the conference. Pretty standard stuff: I needed a list of posts and some category filtering. I was using CraftCMS for front-end routes and templating as well as some Vue components here and there for some added JavaScript juiciness. Not a full-on “single page app” but more like a sprinkle of Vue.

The typical way one might approach this is to:

  1. render the page with an empty div using Craft/Twig
  2. mount a Vue component to that div
  3. make an Ajax call from the Vue component to an API to gather the posts as JSON
  4. render the posts and tie in the filtering.

Since the posts are held as an array within Vue, dynamic list rendering is a pretty cut and dry task.

Simple. Done, right? Well… that extra Ajax request means the user is presented with no content on the initial load depending on the user’s network, which might take some time. We could add a loading indicator, but maybe we can do better?

Preferably, the posts are rendered on the initial page request from the CMS.

But how do we get the static HTML “hooked up” with Vue for the filtering?

After taking a step back to rethink the problem, I realized I could use v-if directives to achieve the same thing with some inline JavaScript from Twig (“in the loop”). Below, I’ll show how I went about it.

My original project used CraftCMS, but I’m going to do the demos below in WordPress. This is just a concept. It can be applied to CraftCMS/Twig or any other CMS/templating engine combo.

First we need a filtering UI. This will likely go above the start of the loop in an archive template.

<?php $terms = get_terms( [
  'taxonomy' => 'post_tag', // I used tags in this example, but any taxonomy would do
  'hide_empty' => true,
  'fields' => 'names'
] );

if(!empty($terms)): ?>
  <div>
    Filter: 
    <ul class="filters">
      <li class="filters__item"><button class="filters__button" :class="{'filters__button--active': tag === ''}" @click="tag = ''">All</button></li>
      <?php foreach($terms as $term): ?>
      <li class="filters__item">
        <button class="filters__button" :class="{'filters__button--active': tag === '<?php echo $term; ?>'}" @click="tag = '<?php echo $term; ?>'"><?php echo $term; ?></button>
      </li>
      <?php endforeach; ?>
    </ul>
    <p aria-live="polite">Showing posts tagged {{ tag ? tag : 'all' }}.</p>
  </div>
<?php endif; ?>

Following along with the code, we get some tags from WordPress with get_terms() and output them in a foreach loop. You’ll notice the button for each tag has some Vue directives we’ll use later.

We have our loop!

    <div class="posts">
      <?php
      // Start the Loop.
      while ( have_posts() ) : the_post();
    
        <article id="post-<?php the_ID(); ?>"
          <?php post_class(); ?>
          v-if='<?php echo json_encode(wp_get_post_tags(get_the_ID(),  ['fields' => 'names'])); ?>.includes(tag) || tag === ""'
        >
          <header class="entry-header">
            <h2><?php the_title(); ?></h2>
          </header>
    
          <div class="entry-content">
            <?php the_excerpt(); ?>
          </div>
        </article>
    
      // End the loop.
      endwhile; ?>
    </div>

This is a pretty standard WordPress loop for posts. You’ll notice some Vue directives that make use of PHP outputting CMS content.

Aside from some styling, all that’s left is the Vue “app.” Are you ready for it? Here it is:

new Vue({
  el: '#filterablePosts',
  data: {
    'tag': ''
  }
});

Yes, really, that’s all that’s needed in the JavaScript file to get this to work!

So, what’s going on here?

Well, instead of some JSON array of posts that gets fed into Vue, we output the posts on the initial page load with WordPress. The trick is to use PHP to output what’s needed in the Vue directives: v-if and :class.

What’s happening on the filter buttons is an onclick event handler (@click) that sets the Vue variable “tag” to the value of the WordPress post tag.

@click="tag = '<?php echo $term; ?>'"

Also, if that Vue variable equals the value of the button (in the :class directive), it adds an active class for the button. This is just for styling.

:class="{'filters__button--active': tag === '<?php echo $term; ?>'}"

For the list of articles, we conditionally display them based on the value of the Vue “tag” variable:

v-if='<?php echo json_encode(wp_get_post_tags(get_the_ID(),  ['fields' => 'names'])); ?>.includes(tag) || tag === ""'

The PHP function json_encode allows us to output an array of post tags as JavaScript, which means we can use .includes() to see if the Vue “tag” variable is in that array. We also want to show the article if no tag is selected.

Here it is put together using the Twenty Nineteen theme template archive.php as a base:

<?php get_header(); ?>
  <section id="primary" class="content-area">
    <main id="main" class="site-main">
      <?php if ( have_posts() ) : ?>
        <header class="page-header">
          <?php the_archive_title( '<h1 class="page-title">', '</h1>' ); ?>
        </header>

        <div class="postArchive" id="filterablePosts">
          <?php $terms = get_terms( [
              'taxonomy' => 'post_tag',
              'hide_empty' => true,
              'fields' => 'names'
          ] );

          if(!empty($terms)): ?>
            <div class="postArchive__filters">
              Filter: 
              <ul class="postArchive__filterList filters">
                <li class="filters__item"><button class="filters__button" :class="{'filters__button--active': tag === ''}" @click="tag = ''" aria-controls="postArchive__posts">All</button></li>
  
                <?php foreach($terms as $term): ?>
                  <li class="filters__item">
                    <button class="filters__button" :class="{'filters__button--active': tag === '<?php echo $term; ?>'}" @click="tag = '<?php echo $term; ?>'" aria-controls="postArchive__posts"><?php echo $term; ?></button>
                  </li>
                <?php endforeach; ?>
  
              </ul>
  
              <p aria-live="polite">Showing {{ postCount }} posts tagged {{ tag ? tag : 'all' }}.</p>
            </div>
          <?php endif; ?>

            <div class="postArchive__posts">
              <?php
              // Start the Loop.
              while ( have_posts() ) : the_post(); ?>
                <article
                  id="post-<?php the_ID(); ?>"
                  <?php post_class(); ?>
                  v-if='<?php echo json_encode(wp_get_post_tags(get_the_ID(), ['fields' => 'names'])); ?>.includes(tag) || tag === ""'
                >
                  <header class="entry-header">
                    <h2><?php the_title(); ?></h2>
                  </header>
        
                  <div class="entry-content">
                      <?php the_excerpt(); ?>
                  </div>

                </article>
              <?php endwhile; // End the loop. ?>
          </div>
        </div> 
      
      <?php
      // If no content, include the "No posts found" template.
      else :
        get_template_part( 'template-parts/content/content', 'none' );
      endif; ?>
    </main>
  </section>

<?php
get_footer();

Here’s a working example on CodePen

See the Pen
Dynamic List Filtering in Vue using Server-side data fetching
by Dan Brellis (@danbrellis)
on CodePen.

Bonus time!

You may have noticed that I added in an aria-live="polite" notifier below the filter button list to let assistive tech users know the content has changed.

<p aria-live="polite">Showing {{ postCount }} posts tagged {{ tag ? tag : 'all' }}.</p>

To get the postCount Vue variable, we add some extra JavaScript to our Vue component:

new Vue({
  el: '#filterablePosts',
  data: {
    'tag': '',
    'postCount': ''
},
  methods: {
    getCount: function(){
      let posts = this.$el.getElementsByTagName('article');
      return posts.length;
  }
  },
  beforeMount: function(){
    this.postCount = this.getCount();
  },
  updated: function(){
    this.postCount = this.getCount();
  }
});</p>

The new method getCount is used to select the article elements in our component div and return the length. Before the Vue component mounts we get the count to add to our new Vue postCount variable. Then, when the component updates after the user selects a tag, we get the count again and update our variable.

Weekly Platform News: Apple Deploys Web Components, Progressive HTML Rendering, Self-Hosting Critical Resources

In this week's roundup, Apple gets into web components, how Instagram is insta-loading scripts, and some food for thought for self-hosting critical resources.

Apple deploys web components built using Stencil

The new Apple Music web app (beta) uses a JavaScript framework (Ember.js) but also standard web components such as <apple-music-video-player> that are built using Stencil, a web component compiler.

Stencil is a build-time tool that generates standard web components with minimal overhead, while providing core features such as templating, state management, and routing, as well as performance features such as code-splitting and lazy-loading.

Apple just deployed into production nearly 50 web components powering a major app they have a significant amount of revenue and strategic value riding on. You can’t say that “no one uses web components” or they are “solving problems that don‘t exist or have been solved better in user land” with a straight face anymore.

(via Max Lynch)

Instagram makes use of chunked transfer encoding and progressive HTML rendering

Instagram’s website uses HTTP chunked transfer encoding to stream the contents of the HTML document to the browser as each part of the page is generated on the server.

We can flush the HTML <head> to the browser almost immediately ... This allows the browser to start downloading scripts and stylesheets while the server is busy generating the dynamic data in the rest of the page.

They also use this technique to flush JSON data to the page in <script> elements. The client script waits for this data (using Promise) instead of requesting it via XHR.

(via Glenn Conner)

Consider self-hosting your critical resources

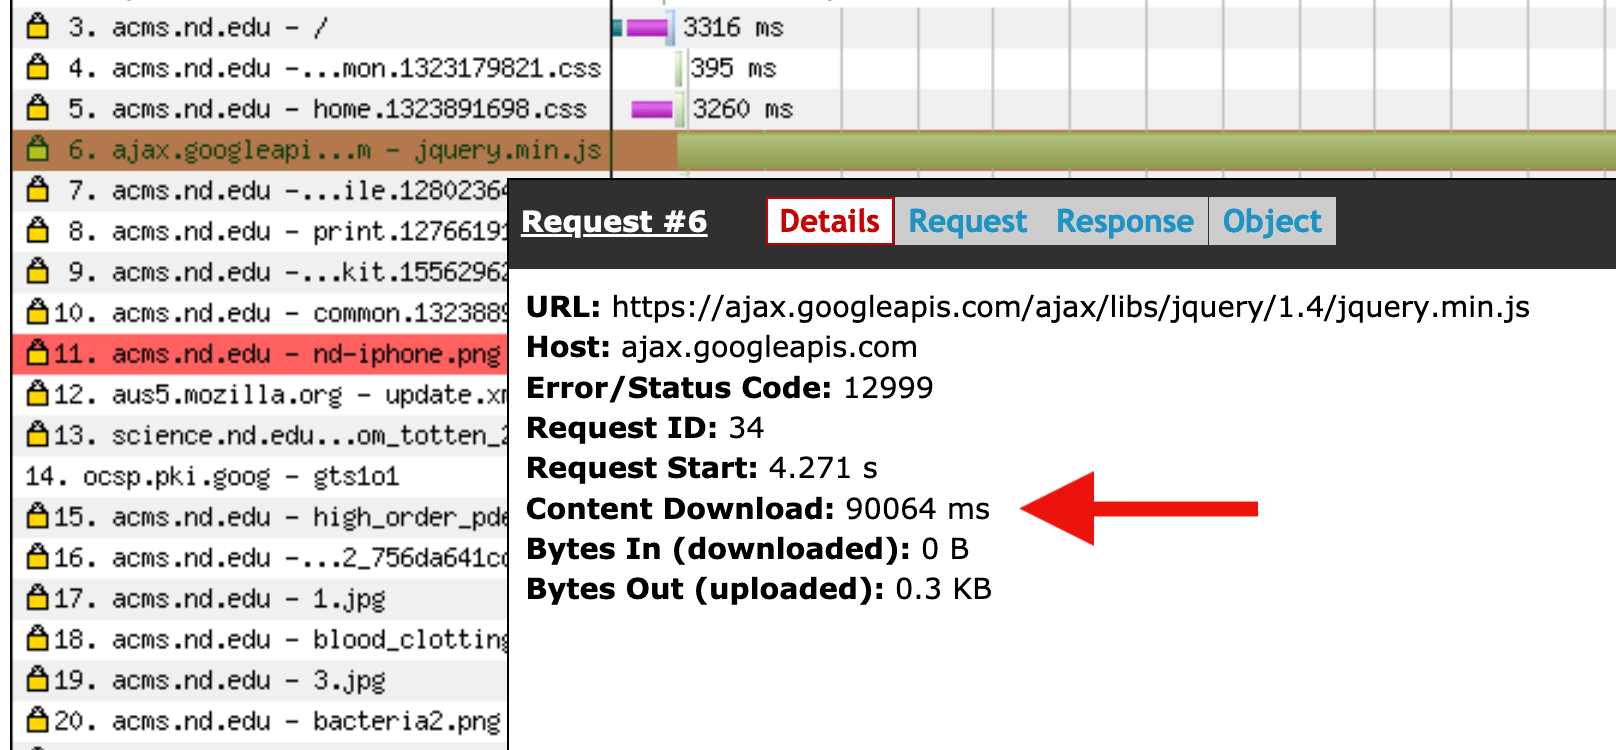
One section of University of Notre Dame’s website used to load jQuery from Google’s CDN, which could result in very long loading times (100+ seconds) when visiting the site from China. They’ve resolved the issue by self-hosting jQuery instead.

(via Erik Runyon)


Read even more news in my weekly Sunday issue. Visit webplatform.news for more information.

The post Weekly Platform News: Apple Deploys Web Components, Progressive HTML Rendering, Self-Hosting Critical Resources appeared first on CSS-Tricks.

Evergreen Googlebot

I've heard people say that the #1 most exciting and important thing that came out of Google I/O this year was the evergreen Googlebot:

Today, we are happy to announce that Googlebot now runs the latest Chromium rendering engine (74 at the time of this post) when rendering pages for Search. Moving forward, Googlebot will regularly update its rendering engine to ensure support for latest web platform features.

Before this, I guess I never even thought about it.

I guess part of it is that some people did already know that the old version didn't support some newfangled JavaScript stuff, and thus literally packaged their app with old JavaScript to be more SEO-friendly.

A bunch of people were apparently shipping older code simply for the sake of Googlebot, and now they don't have to. Sure, I'll call that a win.

Don't read this news as "don't worry about your JavaScript-rendered pages and SEO" though, because Google Webmasters is still telling us that pages with content that requires JavaScript to render are put into a special slower queue for both initial crawling and for updates. Not necessarily a penalty, but certainly a delay. I'm sure that's enough to make server-side rendering a priority for sites where SEO is the whole ballgame.

Direct Link to ArticlePermalink

The post Evergreen Googlebot appeared first on CSS-Tricks.

The Client/Server Rendering Spectrum

I've definitely been guilty of thinking about rendering on the web as a two-horse race. There is Server-Side Rendering (SSR, like this WordPress site is doing) and Client-Side Rendering (CSR, like a typical React app). Both are full of advantages and disadvantages. But, of course, the conversation is more nuanced. Just because an app is SSR doesn't mean it doesn't do dynamic JavaScript-powered things. And just because an app is CSR doesn't mean it can't leverage any SSR at all.

It's a spectrum! Jason Miller and Addy Osmani paint that picture nicely in Rendering on the Web.

My favorite part of the article is the infographic table they post at the end of it. Unfortunately, it's a PNG. So I took a few minutes and <table>-ized it, in case that's useful to anyone.

See the Pen
The Client/Server Rendering Spectrum
by Chris Coyier (@chriscoyier)
on CodePen.

Direct Link to ArticlePermalink

The post The Client/Server Rendering Spectrum appeared first on CSS-Tricks.