Do you want to remove the ‘powered by WordPress’ footer links on your site?
By default, most WordPress themes have a disclaimer in the footer, but this can make your site look unprofessional. It also leaves less space for your own links, copyright notice, and other content.
In this article, we will show you how to remove the powered by WordPress footer links.

Why Remove the WordPress Footer Credits?
The default WordPress themes use the footer area to show a ‘Proudly powered by WordPress’ disclaimer, which links to the official WordPress.org website.

Many theme developers take this further and add their own credits to the footer.
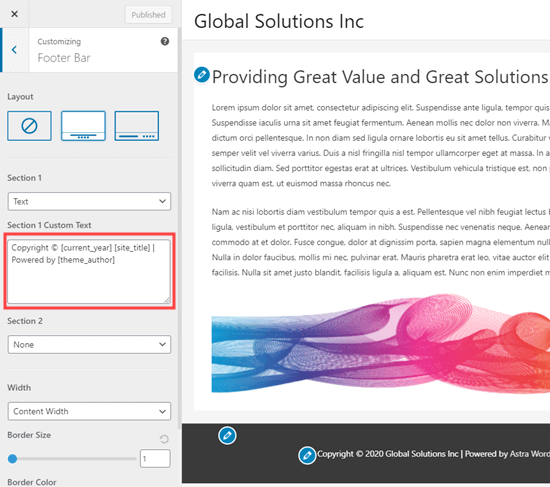
In the following image, you can see the disclaimer added by the Astra WordPress Theme.

While great for the software developers, this ‘Powered by….’ footer can make your site seem less professional, especially if you’re running a business website.
It also lets hackers know that you’re using WordPress, which could help them break into your site.
For example, if you’re not using a custom login URL, then hackers can simply add /wp-admin to your site’s address and get to your login page.
This disclaimer also links to an external site, so it encourages people to leave your website. This can have a negative impact on your pageviews and bounce rate.
Is it legal to remove WordPress footer credit links?
It is perfectly legal to remove the footer credits link on your site because WordPress is free, and it is released under the GPL license.
Basically, this license gives you the freedom to use, modify, and even distribute WordPress to other people.
Any WordPress plugin or theme that you download from the official WordPress directory is released under the same GPL license. In fact, even most commercial plugins and themes are released under GPL.
This means you’re free to customize WordPress in any way you want, including removing the footer credits from your business website, online store, or blog.
With that in mind, let’s see how you can remove the powered by WordPress footer links.
Video Tutorial
If you don’t want the video or need more instructions, then simply use the quick links below to jump straight to the method you want to use.
- Method 1. Removing the ‘Powered by’ Link Using the Theme Settings
- Method 2. Removing the ‘Powered by’ Credit Using Full Site Editing
- Method 3. How To Remove the ‘Powered by’ Disclaimer Using a Page Builder
- Method 4. Removing the WordPress Disclaimer Using Code
- Warning! Avoid the CSS Method at All Costs!
Method 1. Removing the ‘Powered by’ Link Using the Theme Settings
Most good theme authors know that users want to be able to edit the footer and remove the credit links, so many include it in their theme settings.
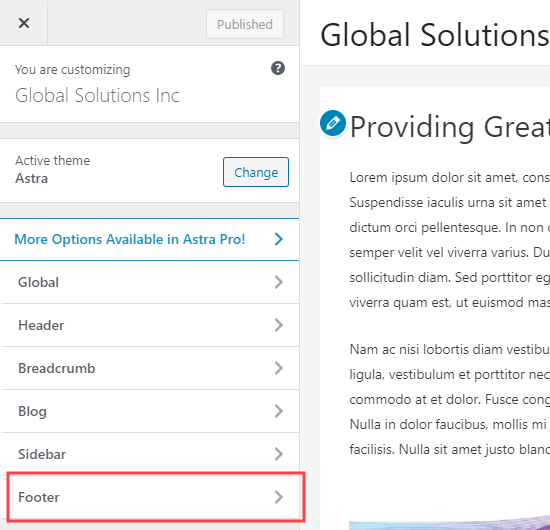
To see whether your theme has this option, go to Appearance » Customize in your WordPress admin dashboard.

You can now look for any settings that let you customize your site’s footer, and then click on that option.
For example, the Astra theme has a section called ‘Footer Builder.’

If you’re using this theme, then simply click on the ‘Footer’ section and select ‘Copyright.’
Doing so will open a small editor where you can change the footer text, or even delete it completely.

No matter how you remove the footer disclaimer, don’t forget to click on ‘Publish’ to make the change live on your site.
Method 2. Removing the ‘Powered by’ Credit Using Full Site Editing
If you’re using a block theme, then you can remove the footer disclaimer using Full Site Editing (FSE) and the block editor.
This is a quick and easy way to remove the ‘Powered by’ credit across your entire site, although it won’t work with all themes.
To launch the editor, go to Appearance » Editor.

Then, scroll to your website’s footer and click to select the ‘Powered by’ disclaimer.
You can now replace it with your own content, or you can even delete the disclaimer completely.

When you’re happy with how the footer looks, simply click on ‘Save.’ Now if you visit your site, you’ll see the change live.
Method 3. How To Remove the ‘Powered by’ Disclaimer Using a Page Builder
Many WordPress websites use the footer to communicate important information, such as their email address or phone number. In fact, visitors might scroll to the bottom of your site looking specifically for this content.
With that in mind, you may want to go one step further and replace the ‘Powered by’ text with a custom footer. This footer could contain links to your social media profiles, links to your affiliate partners, a list of your products, or other important information and links.
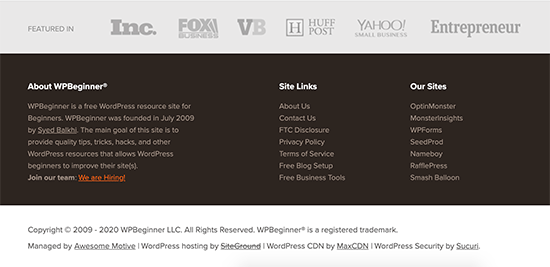
You can see the WPBeginner footer in the following image:

The best way to create a custom footer is by using SeedProd. It is the best page builder plugin and comes with over 180 professionally-designed templates, sections, and blocks that can help you customize every part of your WordPress blog or website.
It also has settings that allow you to create a global footer, sidebar, header, and more.
First, you need to install and activate SeedProd. For more details, see our step-by-step guide on how to install a WordPress plugin.
Note: There’s also a free version of SeedProd that allows you to create all kinds of pages using the drag-and-drop editor. However, we’ll be using the premium version of SeedProd since it comes with the advanced Theme Builder.
After activating the plugin, SeedProd will ask for your license key.

You can find this information under your account on the SeedProd website. After entering the key, click on the ‘Verify Key’ button.
Once you’ve done that, go to SeedProd » Theme Builder. Here, click on the ‘Add New Theme Template’ button.

In the popup, type in a name for the new theme template.
Once you’ve done that, open the ‘Type’ dropdown and choose ‘Footer.’

SeedProd will show the new footer template across your entire site by default. However, you can limit it to specific pages or posts using the ‘Conditions’ settings.
For example, you may want to exclude the new footer from your landing pages, so it doesn’t distract from your main call to action.
When you’re happy with the information you’ve entered, click on ‘Save.’
This will load the SeedProd page builder interface.
At first, your template will show a blank screen on the right and your settings on the left. To start, click on the ‘Add Columns’ icon.

You can now choose the layout that you want to use for your footer. This allows you to organize your content into different columns.
You can use any layout you want, but for this guide, we’re using a three-column layout.

Next, you can edit the footer’s background so that it matches your WordPress theme, company branding, or logo.
To change the background color, simply click on the section next to ‘Background Color’ and then use the controls to choose a new color.

Another option is to upload a background image.
To do this, either click on ‘Use Your Own Image’ and then choose an image from the WordPress media library, or click on ‘Use a stock image.’

When you’re happy with the background, it’s time to add some content to the footer.
Simply drag any block from the left-hand menu and drop it onto your footer.

After adding a block, click to select that block in the main editor.
The left-hand menu will now show all of the settings for customizing the block.

Simply keep repeating these steps to add more blocks to your footer.
You can also change where each block appears by dragging them around your layout.

When you’re happy with your design, click on the ‘Save’ button.
Then, you can select ‘Publish’ to complete your design.

For your new footer to show up on your website, you’ll need to finish building your WordPress theme with SeedProd.
After building your theme, go to SeedProd » Theme Builder. Then, click on the ‘Enable SeedProd Theme’ switch.
Now, if you visit your website you’ll see the new footer live.

For a step-by-step guide, please see our guide on how to create a custom WordPress theme.
Method 4. Removing the WordPress Disclaimer Using Code
If you can’t see any way to remove or modify the footer credits in the WordPress customizer, then another option is to edit the footer.php code.
This isn’t the most beginner-friendly method, but it will let you remove the credit from any WordPress theme.
Before making changes to your website’s code, we recommend creating a backup so you can restore your site in case anything goes wrong.
Keep in mind that if you edit your WordPress theme files directly, then those changes will disappear when you update the theme. With that being said, we recommend creating a child theme as this allows you to update your WordPress theme without losing customization.
First, you need to connect to your WordPress site using an FTP client such as FileZilla, or you can use a file manager provided by your WordPress hosting company.
If this is your first time using FTP, then you can see our complete guide on how to connect to your site using FTP.
Once you’ve connected to your site, go to /wp-content/themes/ and then open the folder for your current theme or child theme.

Inside this folder, find the footer.php file and open it in a text editor such as Notepad.
In the text editor, look for a section of code that includes the ‘powered by’ text. For example, in the Twenty Twenty-One theme for WordPress, the code looks like this:
<div class="powered-by">
				<?php
				printf(
					/* translators: %s: WordPress. */
					esc_html__( 'Proudly powered by %s.', 'twentytwentyone' ),
					'<a href="' . esc_attr__( 'https://wordpress.org/', 'twentytwentyone' ) . '">WordPress</a>'
				);
				?>
			</div><!-- .powered-by -->
You can either delete this code entirely or customize it to suit your needs. For example, you may want to replace the ‘Proudly powered…’ disclaimer with your own copyright notice.

After making your changes, save the file and upload it to your server. If you check your site, then the footer credit will have disappeared.
Warning! Avoid the CSS Method at All Costs!
Some WordPress tutorial sites may show you a CSS method that uses display: none to hide the footer credit links.
While it looks simple, it’s very bad for your WordPress SEO.
Many spammers use this exact technique to hide links from visitors while still showing them to Google, in the hopes of getting higher rankings.
If you do hide the footer credit with CSS, then Google may flag you as a spammer and your site will lose search engine rankings. In the worst-case scenario, Google may even delete you from their index so you never appear in search results.
Instead, we strongly recommend using one of the four methods we showed above. If you can’t use any of these methods, then another option is hiring a WordPress developer to remove the footer credit for you, or you might change your WordPress theme.
We hope this article helped you remove the powered by WordPress footer links. You may also want to check out our expert pick of the best contact form plugins and proven ways to make money online blogging with WordPress.
If you liked this article, then please subscribe to our YouTube Channel for WordPress video tutorials. You can also find us on Twitter and Facebook.
The post How to Remove the Powered by WordPress Footer Links first appeared on WPBeginner.


