How to Require Terms of Service Agreement in WordPress

Do you want to require a terms of service agreement in WordPress?

Requiring users to agree to your terms of service can help protect your website while still offering a good user experience.

In this article, we’ll show you how to add a terms of service agreement to your WordPress website.

How to require terms of service agreement in WordPress

What is a Terms of Service Agreement and Why Add to WordPress?

A terms of service (TOS) agreement is a set of conditions users must agree to in order to use your website, submit a form, request a quote, order products, join your email list, and more.

By adding a terms of service agreement to WordPress, you can help to prevent spam, limit your liability, and have users agree to specific website policies.

With that said, let’s show you how to require a terms of service agreement on your WordPress site.

Create a Terms of Service Agreement in WordPress

If you don’t have a terms of service agreement yet, then you’ll need to create one and add it to WordPress.

There are multiple ways to create a TOS agreement. For example, you can use an online generator, copy the text from another site, hire a lawyer, or use a TOS plugin to generate one for you.

Editor’s Note: We recommend consulting a professional lawyer to create your website’s term of service. The automatic term of service generator plugin below can work, but it cannot guarantee compliance.

For this tutorial, we’ll be using the WP AutoTerms plugin to generate a generic terms of service, but you can use the method that works best for you.

First, you need to install and activate the plugin. For more details, see our step by step guide on how to install a WordPress plugin.

After that, navigate to WP AutoTerms » Add Legal Pages in your WordPress admin panel.

Then, click the ‘Create’ button in the ‘Terms and Conditions’ area.

Create terms of service

Next, you need to give information about your business.

This includes your WordPress website URL, company name, location, and more.

Enter business information for tos

You also need to answer the questions that will help to create a terms and service best for your website.

Once you’re done, click the ‘Create’ button.

Answer terms of service questions

This brings you to a page where you can view your terms of service agreement.

If you’re satisfied with the page, then click the ‘Publish’ button.

Publish terms of service

Next, you want to copy the terms of service text to add to your WordPress form below.

Simply select the text, right click, and then click the ‘Copy’ option.

Copy terms of service text

Add Your Terms of Service Agreement to WordPress Forms

Once you’ve created your TOS agreement, you can require users to agree in order to take specific actions on your site. In this case, we’ll add the TOS agreement to a WordPress form.

To do this, we recommend using the WPForms plugin. It’s the best WordPress form plugin in the market used by over 5 million sites.

WPForms

You can quickly build out any kind of WordPress form using the drag and drop builder including online order forms, simple contact forms, donation forms, and much more.

Note: We’ll be using the free version of the plugin to create a terms of service contact form, but you can also use the pro version that gives you access to additional features, form templates, and more.

First thing you need to do is install and activate the plugin. For more details, see our beginner’s guide on how to install a WordPress plugin.

Once you’ve activated your plugin, go to WPForms » Add New to create a new WordPress form.

First, you need to choose a form template. Simply hover over a template and click the ‘Use Template’ button.

For this tutorial, we’ll select the ‘Terms of Service Contact Form’ template, since it has a TOS checkbox built in.

Select WPForms terms of service template

This will bring you to the form editor screen.

The form can be completely customized. You can drag fields from the left hand menu to your form on the right.

Terms of service contact form editor screen

To edit individual form fields simply click on them.

This brings up an options menu that lets you customize each individual field.

Customize individual form fields

Once you’re finished customizing your form, click on the ‘Terms of Service’ form field.

This brings up an options panel where you can change the terms of service ‘Label’, checkbox description, and paste your terms of service text that you copied earlier.

Then, make sure the ‘Required’ toggle is selected.

Change terms of service text

Next, click on the ‘Advanced’ tab.

Here, you can click the ‘Hide Label’ toggle if you want to hide the terms of service label.

Optional hide label toggle

Once you’re happy with how your form looks, you can click ‘Save’ and exit the form builder.

Now, you need to add the form to your WordPress website. Simply open up a page, or create a new one, then click the ‘Plus’ add block icon and select the ‘WPForms’ block.

Add WPForms block

Next, select the name of your form from the drop down list.

This will automatically load a preview of your form in the page editor.

Select TOS form from drop down

Then, click the ‘Update’ or ‘Publish’ button to make your form live.

Now, you can visit your form page to see your terms of service agreement form in action.

Terms of service form example

Adding Digital Signature Agreement to WordPress Forms

On top of requiring users to agree to your TOS, you might want to give users the option to digitally sign your form as well.

This works great for applications, contracts, volunteer forms, and more.

With WPForms creating a contract agreement form is simple. There’s a signature field addon that makes it easy to add digital signatures to your WordPress forms.

WPForms signature form addon

For more details, see our guide on how to create a contract agreement form with digital signatures in WordPress.

We hope this article helped you learn how to require terms of service agreement in WordPress. You may also want to see our guide on how to choose the best web design software and our expert picks of the best free website hosting.

If you liked this article, then please subscribe to our YouTube Channel for WordPress video tutorials. You can also find us on Twitter and Facebook.

The post How to Require Terms of Service Agreement in WordPress first appeared on WPBeginner.

How to Add a Privacy Policy in WordPress

Do you want to add a privacy policy on your WordPress site?

A privacy policy page is a document required by law that discloses the information you collect about visitors on your website.

It is recommended to add a privacy policy page to your website whether you are a blogger, freelancer, or a business owner.

Now, the problem is most beginners don’t know how to create a legitimate privacy policy, and then display it on their website.

In this article, we will show you how to easily add a privacy policy in WordPress. We will also explain the various elements you must include in your privacy policy page.

How to add a privacy policy page in WordPress

What is Privacy Policy and Do You Need it on Your Website?

All websites collect information about their visitors in different ways.

In many countries (including the United States), websites are required by law to disclose the information they collect about their visitors, and how this information is used.

Here are some of the ways in which a typical WordPress site collects user information.

All websites on the internet should have a privacy policy page. It protects your business from legal issues and also helps build consumer trust.

You also need to add a privacy policy page to comply with the General Data Protection Regulation (GDPR).

For those who don’t know, GDPR is a European Union (EU) law that gives its citizens control over their personal data.

This law applies to every business (including WordPress blogs) around the world, even if you are not from the EU countries.

For more details, you may read our ultimate guide on GDPR and understand its impact on your WordPress site.

What should you include in a Privacy Policy?

The basic requirements for a privacy policy are quite simple. You need to list all the ways you collect or intend to collect user information on your website.

A simple privacy policy page should contain the following information:

  • Information you collect about users visiting your website.
  • Methods used to collect information, e.g. cookies and web beacons, sign up, registration, comment forms, etc.
  • Mention all third-party advertisers collecting user information on your website like Google Adsense.
  • Include links to the privacy policy of each advertising program you participate in.
  • How users can block cookies and opt-out of third party advertisements.
  • Your contact information so that users can reach out if they have questions.

There are many websites on the internet that allow you to automatically generate text for your privacy policy or terms of service pages.

WordPress itself comes with a basic privacy policy generator that you can use.

You can also take a look at WPBeginner’s privacy policy page as an starting point. Simply replace all references to WPBeginner and our parent company with the name of your website or business.

Adding a Privacy Policy Page in WordPress

WordPress makes it super easy to generate a privacy policy page for your website. It also gives you a generic privacy policy template to use with instructions on how to add content to it.

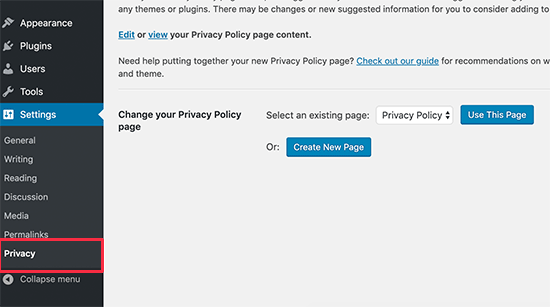
First, you need to visit Settings » Privacy page. You’ll notice that WordPress has already created a Privacy Policy page draft for you.

Privacy policy generator in WordPress

You can click on the ‘Use this draft’ button to save this page as your privacy policy.

You can also click on the create new page button to generate a new Privacy Policy page. WordPress will automatically create a new page and open it for you to make changes.

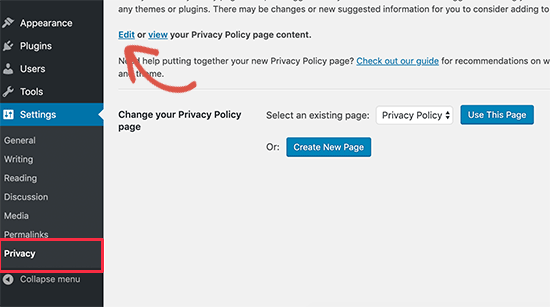
If you are using the default draft, then you need to click on the Edit link to make changes and publish it.

Edit privacy policy page

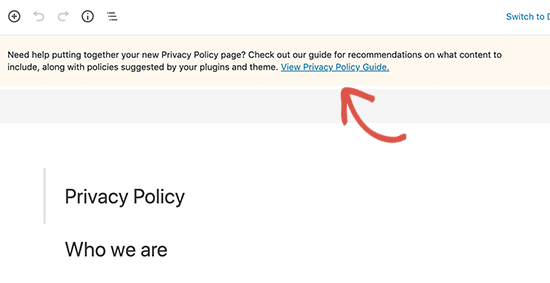
Once you open the privacy policy page for editing, you will see a notification on top with a link to the default WordPress privacy policy page guide.

View WordPress privacy policy guide for tips

The content of the privacy policy also contains instructions on how to edit and change each sections.

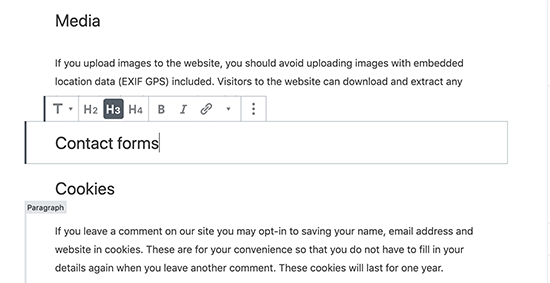
You will notice that it has sections for different ways a WordPress website may collect personal information. For example, comments, login cookies, embeds, and more.

Edit privacy policy sections

It will also have sections with no information below them. For example, contact form and analytics.

As for contact forms, you can mention the information you collect and what it used for.

If you are using WPForms plugin to create contact form, then you can already create GDPR compliant contact forms.

For Google Analytics, you can follow this complete Google Analytics and GDPR compliance guide.

After reviewing the privacy policy page thoroughly, you can click on the Publish button to save your changes.

Adding Link to Privacy Policy Page in WordPress

Most websites display a link to their privacy policy page in the footer area of their website. This way the link appears on every page but does not take space in your main navigation menu.

There are multiple ways to do this.

Let’s start with the easiest one.

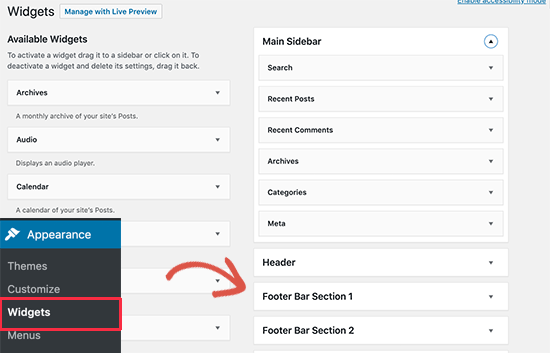
Many WordPress themes come with widget-ready areas in the footer also called Footer sidebar. You can go to Appearance » Widgets page to confirm if your theme has a footer widget area.

Footer widget area

If your theme has one, then you can use the navigation menu widget to display a list of links to your informational pages including the privacy policy.

First, you will need to create a new custom navigation menu.

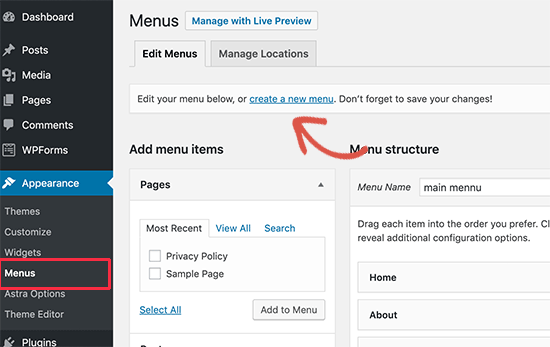
Simply visit Appearance » Menus page to create a new custom menu. You will need to click on the ‘Create new menu’ link on the top.

Creating a new menu in WordPress

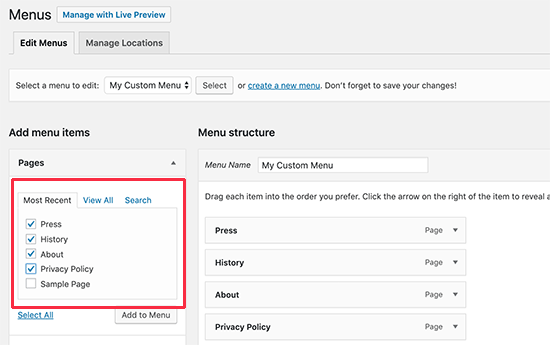
Next, you need to provide a name for your navigation menu. After that, select pages from the left column and then click on the Add to menu button.

Add to menu

You would notice your selected pages appear under your newly created menu. You can now arrange menu items by simply moving them up or down.

Once you are done, don’t forget to click on the Save menu button to store your changes.

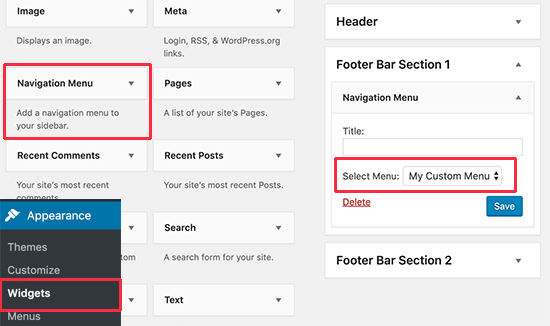
Now go to Appearance » Widgets page and add the ‘Navigation Menu’ widget to your footer widget area.

Navigation menu widget

Now select the custom menu you created earlier in the widget settings and click on the save button to store your changes.

You can now visit your website to see the privacy policy links in footer area of your website.

Privacy policy link

Manually Add a Link to Privacy Policy Page in WordPress

If your theme does not come with a footer widget area or a footer navigation menu, then you can manually add link to your privacy policy page using HTML code.

You’ll need to edit the footer.php file for your theme. If you haven’t done this before, then take a look at our guide on how to copy / paste code in WordPress..

In your footer.php file add the following HTML to an appropriate location just before the </body> tag.

<a href="http://example.com/privacy-policy">Privacy Policy</a>

Don’t forget to replace the href value with the URL of your privacy policy page. You can now save your changes and preview your site to see the link in action.

That’s all! You have successfully added a privacy policy page to your WordPress site.

We hope this article helped you learn how to add a privacy policy in WordPress. You may also want to see our step by step WordPress SEO guide for beginners.

If you liked this article, then please subscribe to our YouTube Channel for WordPress video tutorials. You can also find us on Twitter and Facebook.

The post How to Add a Privacy Policy in WordPress appeared first on WPBeginner.