Do you want to save time by automatically tagging your WordPress posts?
Tags help websites visitors easily find the content on your website. However, making sure all your content is properly tagged can be time-consuming, especially if you’ve already published lots of content without adding tags.
In this article, we will show you how you can automatically tag your WordPress posts.

Why Automatically Tag Your WordPress Posts?
Tags are one of the easiest ways to organize posts on your WordPress website.
While categories are meant to group your posts broadly, you can use tags to describe the specific details of a post.
For example, your WordPress blog might have a ‘Sports’ category. You can add detailed tags such as ‘football,’ ‘UEFA Champions League,’ and ‘European cup’ to help users find specific topics in that category.
To learn more, see our in-depth comparison of categories vs tags.
Adding tags to your posts can take a lot of time, especially if you use lots of different tags on your website.
You may also miss opportunities to add a relevant tag, which can stop visitors from finding what they’re looking for on your site.
With that in mind, let’s see how you can tag your posts automatically.
How to Automatically Tag Your WordPress Posts and Save Time
The easiest way to tag your WordPress posts automatically is by using TaxoPress.
If a word or phrase in a new blog post’s title or content matches one of your tags, TaxoPress will add that tag to the post.
Let’s look at an example. On your website, imagine you have several tags including recipe, chocolate, and pasta.
If you publish a new post with the title ‘Best Chocolate Cake Recipe,’ then TaxoPress will see two matches in the title and automatically add the tags ‘recipe’ and ‘chocolate.’
To get started with automatically tagging your posts, you’ll need to install and activate the TaxoPress plugin. If you need more help, then please see our guide on how to install a WordPress plugin for more details.
In this tutorial, we’re using the free version of TaxoPress which limits you to a single rule for tagging posts. This is enough to automatically tag all your WordPress posts. However, if you want to create multiple rules to use in different ways, then you’ll need to upgrade to TaxoPress Pro.
With that said, your first task upon activation is to create a rule that will automatically tag your WordPress posts. This rule is called an ‘Auto Term.’
To get started, go to TaxoPress » Auto Terms in your WordPress admin area. After that, you need to click on the ‘Add New Auto Terms’ button.

Next, you will need to type in a title for the new auto term.
The title is just for your reference, so you can use anything you want.

TaxoPress can automatically tag more than just posts. It can also tag images and pages.
For this article, we will only automatically tag WordPress posts, so just check the ‘Posts’ box.
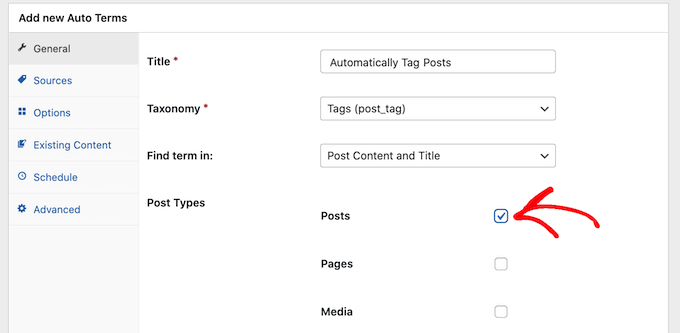
Next, you can open the ‘Taxonomy’ dropdown.
In the list that appears, click on ‘Tags (post_tag).’

When searching for content to tag, TaxoPress will scan a post’s title and content by default. You can change that in the ‘Find term in:’ dropdown and select ‘Post Content’ or ‘Post Title’ only.
Once you’re done selecting options, go ahead and click on the ‘Sources’ tab.
This is where we’ll select the tags that we want to use in this auto term.

By default, TaxoPress will pull from every tag you’ve ever created on your site. For some sites, that will be way too many.
You can set which ones the plugin has access to by checking the ‘Use only some terms in the selected taxonomy’ box.

Now, in the ‘Choose the terms to use’ field, start typing in the name of a tag.
When the right tag shows up, click on it. Repeat this for all the tags you want to include in this auto term.

Once you’ve done all that, click on the ‘Options’ tab.
This screen is where you can fine-tune the automatic tagging process.

By default, TaxoPress will add tags for partial matches. This means that if you have a post on your food blog called ‘The best chocolate cake recipes’, then the ‘recipe’ tag will be added even though ‘recipes’ is not an exact match.
If you only want TaxoPress to add tags when there’s an exact match, go ahead and check the ‘Whole words’ box.

When you’re happy with the settings, click on the ‘Save Auto Terms’ button.
Now, every time you publish a new post in WordPress, TaxoPress will check the post’s content and title. If it finds a match, then it will add one or more tags to the post automatically.

How to Automatically Tag Your Published WordPress Posts
By default, TaxoPress will tag new posts as you publish them. Additionally, the plugin will try to add missing tags when you update an existing post.
TaxoPress can also tag posts that you’ve already published on your site, using the same auto terms you’ve created using the process above.
To get started, go to TaxoPress » Auto Terms. You can then click on the auto term we created earlier.

Once you’ve done that, click on the ‘Existing Content’ tab.
You will now see all of the settings and rules that you previously created.

If you have lots of content on your site, then it may take TaxoPress a long time to process it all. While the plugin is tagging existing posts, your site may run slower.
To speed up WordPress performance, it’s a good idea to configure TaxoPress to scan your posts in smaller batches with a longer interval between them.
By default, TaxoPress will scan your content in batches of 20 posts every 10 seconds. You can decrease the number of posts in a batch by simply typing a lower number into the ‘Limit per batches’ field.

You can then increase the time between batches by typing a higher number into the ‘Batches wait time’ field.
Another option is to only scan posts that were published within a certain timeframe.
For example, to only tag posts that were published within the last 6 months, simply open the ‘Limit Auto Terms, based on published date’ dropdown and select ‘6 months ago.’
When you’re happy with these settings, you’re ready to scan the content that’s already live on your website.
To start the process, simply click on the ‘Add Auto Terms to existing content’ button.

Once the plugin has finished automatically tagging existing content, you’ll see an ‘All done’ message onscreen. Below that, TaxoPress will show how many posts it checked and how many tags it added to your WordPress posts.
We hope this article helped you learn how to automatically tag your WordPress posts and save time. You can also go through our guide on the best contact form plugins for WordPress and how to create automated workflows with Uncanny Automator.
If you liked this article, then please subscribe to our YouTube Channel for WordPress video tutorials. You can also find us on Twitter and Facebook.
The post How to Automatically Tag Your WordPress Posts and Save Time first appeared on WPBeginner.