How to Set a Default Featured Image in WordPress (Easy Way)

Do you want to set a default featured image in WordPress?

Many themes use featured images (a.k.a post thumbnails) to make your content look more appealing and attention-grabbing. But finding the right featured image for each post can be time-consuming, and if you forget to add a featured image, then your posts might look incomplete.

In this article, we will show you how to fix that by setting a default featured image in WordPress.

How to set a default featured image in WordPress using a plugin

Why Set a Default Featured Image in WordPress?

Featured images, sometimes known as thumbnail images, are the primary image for your WordPress posts and pages.

All popular WordPress themes come with built-in support for featured images.

However, you may sometimes forget to upload a featured image to your posts. If you have other authors posting on your site, then they may not realize the importance and skip over adding a featured image.

WordPress themes typically use featured images in multiple different areas. If you forget to add a featured image, then you may end up with lots of gaps in your website’s design including in important places like your blog archive or homepage.

For example, in the following image you can see that OptinMonster shows featured images on their blog index.

The OptinMonster blog index

People also find images more engaging than plain text. Posts that don’t have a featured image may get less traffic and lower conversion rates.

With that in mind, it’s a good idea to set a default featured image in WordPress. This gives your site something to show when no featured image is available.

To make it easy for you, we have created quick jump links for the sections:

The easiest way to set a default featured image is by using the Default Featured Image plugin. This plugin adds a new setting to the WordPress Media page where you can upload a fallback featured image.

First, you’ll need to install and activate the Default Featured Image plugin. If you need help, then please see our step by step guide on how to install a WordPress plugin.

Upon activation, head over to Settings » Media. Once you’ve done that, just click on the ‘Select default featured image’ button.

The WordPress Media Library

You can now either choose an image from the WordPress media library or upload a new file.

After choosing your fallback, scroll to the bottom of the screen and click on ‘Save Changes.’

How to set a WordPress default featured image

WordPress will now use the image that you selected as your default thumbnail for any posts or pages where you don’t provide a featured image.

You can change the default image at any point by repeating the same process above.

If you no longer want to use a default featured image, then simply go to Settings » Media. Then just click on the ‘Don’t use a default featured image’ button.

Removing the default featured image using a plugin

Don’t forget to click on ‘Save Changes’ when you’re done.

How to Set a Default Featured Image for Social Media

Social media platforms are a great place to reach new readers, build a following, and get more people to visit your site. To do this, you’ll need to post interesting and engaging content to your social media accounts.

The featured image that’s shared alongside your post can also encourage more people to visit your site.

However, social media sites don’t automatically display your featured image when you share your content. Sometimes they’ll even show the wrong thumbnail, here’s how to fix the incorrect thumbnail issue in WordPress.

With that in mind, you may also want to set a default featured image for the different social media platforms. These platforms will then use this fallback for any posts that are shared without a unique featured image.

To do this, we recommend using All in One SEO (AIOSEO) plugin.

AIOSEO

AIOSEO is the best SEO plugin for WordPress in the market used by over 3 million websites including WPBeginner. It offers the most beginner friendly and comprehensive SEO toolkit to help you fine-tune your WordPress blog or website for the search engines.

For this post, we’ll be using the free version of AIOSEO.

First, you’ll need to install and activate the AIOSEO plugin in WordPress. For more details, please see our tutorial on how to install a WordPress plugin.

Upon activation, the plugin will launch the setup wizard. To configure the plugin, simply click the ‘Let’s Get Started’ button and follow the onscreen instructions. If you need help, then please refer to our guide on how to properly set up All in One SEO in WordPress.

Once you’ve done that, go to All in One SEO » Social Networks.

The AIOSEO SEO plugin for WordPress

You will now see tabs for Facebook, Twitter, and Pinterest. You can use these tabs to set a unique default image for these different platforms.

As an example, let’s see how you can set a default featured image for Facebook. To get started, click on the ‘Facebook’ tab.

Adding a default featured image using AIOSEO

After that, open the ‘Default Post Image Source’ dropdown.

You can then choose ‘Default Image (Set Below).’

AIOSEO's social network settings

Next find the ‘Default Post Facebook Image’ section.

Here you’ll see some tips on how to make sure your image looks great when people share it on Facebook.

Optimizing your default featured image with AIOSEO

For more information, please see our complete social media cheat sheet for WordPress.

To set your default featured image, click on the ‘Upload or Select Image’ button.

Uploading a default featured image for Facebook

This opens the WordPress media library. You can now either choose an image from your media library, or upload a new file.

Finally, click on the ‘Save Changes’ button. After completing this step, Facebook will use this image whenever there’s no featured image available.

To set a default image for Twitter or Pinterest, simply click on the ‘Twitter’ or ‘Pinterest’ tab. You can then choose a fallback image following the same process described above.

AIOSEO's Twitter and Pinterest tabs

We hope this article helped you learn how to set a default featured image in WordPress using a plugin. You may also want to check out our guide on how to choose the best web design software and the best drag and drop WordPress page builders compared.

If you liked this article, then please subscribe to our YouTube Channel for WordPress video tutorials. You can also find us on Twitter and Facebook.

The post How to Set a Default Featured Image in WordPress (Easy Way) first appeared on WPBeginner.

How to Add Featured Images or Post Thumbnails in WordPress

Featured images also known as post thumbnails are a well-known WordPress feature supported by most themes.

They are the primary image for your blog posts, and they often appear next to the heading on your home page and social media. All popular WordPress themes come with built-in support for featured images.

In this article, we’ll show you how to easily add featured images or post thumbnails in WordPress.

Adding featured images in WordPress

Beginners Guide to Featured Images in WordPress

Featured images are a WordPress theme feature. Almost all WordPress themes come with built-in support for featured images and display them beautifully across different areas of your WordPress website.

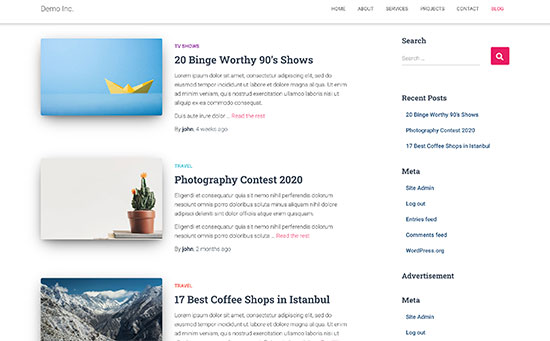
Featured images preview on a typical WordPress blog

As humans, we find visual elements more engaging than plain text. Featured images help you make your blog pages look more appealing.

They also help you build user engagement and increase page views. Search engines and social media websites may also use these images and display them in search results and social media news feed.

Mostly featured images are used for blog posts, but you can also set featured images for pages and custom post types.

Note: Featured images are not the same as cover image. See the difference between cover image vs featured image in WordPress.

That being said, let’s take a look a how to easily add featured images in WordPress.

Adding Post Thumbnail or Featured Image in WordPress

To add a featured image in a WordPress post, simply edit or create a new blog post.

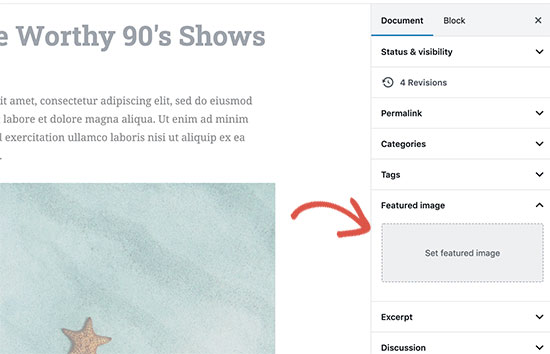
In the content editor, you’ll find the featured image tab in the right column.

Featured image section on post edit screen

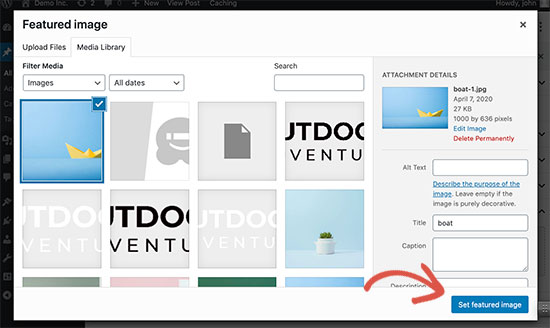
You need to click on the ‘Set Featured Image’ area, and this will bring up the WordPress media uploader popup.

From here, you can upload an image from your computer or use an existing image from your media library. Once you select the image, simply click on the Set Featured Image button.

Setting a featured image

WordPress will now show a preview of the featured image in the right column. However, the actual featured image would look different depending on your WordPress theme.

You can now save or publish your post and preview it to see how the featured image will appear on your live website.

Depending on settings defined by your theme developer, your featured image will automatically appear with your posts.

How to Find and Effectively Use Featured Images?

Now, the next big question that most beginners come across is where to find images to use as featured images?

You cannot just use Google image search and use any image from the internet. Those images are protected by copyright laws and using them without proper permission can cause legal trouble.

Luckily, there are several resources available that you can use to find free images for your blog posts.

Our top favorites are:

  • Shutterstock – They have a few free images, but the real value comes from their paid plans which give you access to tons of high quality photos, illustrations, drawings, videos, and more. This is what we use for WPBeginner site.
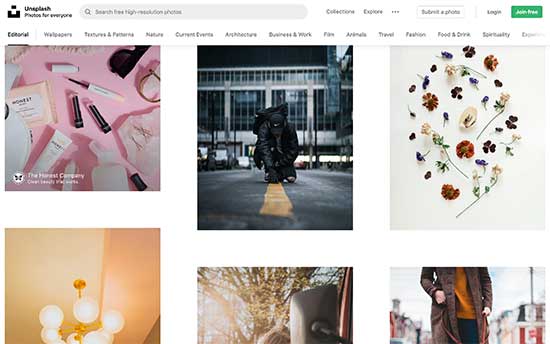
  • Unsplash – A popular online resource publishing high-resolution images that you can use on your website and other projects.
  • Negative Space – A well-organized collection of copyright-free images.
  • New Old Stock – A collection of vintage photographs from public archives.
  • Unsplash is a popular free image resource for bloggers

    Note: All these sources provide high-resolution images, which means they are large in filesize and dimensions. You’ll need to optimize images for the web before using them as featured images.

    Featured images are handled by your WordPress theme. In order to change how your theme displays featured images, you’ll need some basic CSS or WordPress coding skills.

    If you are comfortable with coding, then continue reading for more tips.

    Theme Developers Guide to Featured Image and Post Thumbnails in WordPress

    The featured image is a popular feature supported by almost all WordPress themes. In rare situations, you may come across a theme that does not support featured images, or you may not like how they handle feature images.

    In that case, you can add featured image support to your theme or change how it appears.

    If you are comfortable editing WordPress theme files and know your way around a little custom CSS, then you can do it yourself.

    If your theme does not support featured images, then you’ll not see the option to add a featured image in the content editor.

    To add featured image support in a WordPress theme, you need to add this line of code in your theme’s functions.php file:

    add_theme_support( 'post-thumbnails' );
    

    This code will enable featured image support for posts and pages. You can now go to posts or page block editor, and you will see the featured image option enabled.

    However, when you set a featured image, it will not automatically display in your WordPress theme. To display featured images in your theme, you need to edit your templates and add this line of code where you want to display the featured image:

    <?php the_post_thumbnail(); ?>
    

    The files you add the above code in will vary based on your theme. You will want to add the code inside your post loop.

    Related: See WordPress theme hierarchy cheat sheet to better understand how themes work.

    The above code is the basic function that you need to add featured image support and display featured images in your theme. To set image size for featured images you upload, you need to add this line of code to your functions.php file.

    set_post_thumbnail_size( 50, 50);
    

    The parameters for set_post_thumbnail_size are in this order: width, height.

    You can also set additional image sizes to use with the_post_thumbnail() function. For example:

    // Image size for single posts
    add_image_size( 'single-post-thumbnail', 590, 180 );
    

    In this example we have added a new image size called single-post-thumbnail with 590px with and 180px height.

    To use this image size in our theme, we will still need to add it to the appropriate theme file.

    Checkout our guide on adding additional image sizes in WordPress for more details.

    If you have previously uploaded featured images, but they are still appearing in some other size, then you need to regenerate thumbnails and image sizes for older posts.

    Below is an example of the featured image function with specific image size.

    <?php the_post_thumbnail( 'single-post-thumbnail' ); ?>
    

    This is the broken-down version of the full functionality. There are many other things you can do with featured images.

    FAQs About Featured Images in WordPress

    As a beginner, you may come across questions or issues when using featured images on your blog. Following are just some of the most frequently asked questions about featured images.

    1. Why featured image is appearing twice on my posts?

    Sometimes beginner add a featured image and then add the same image inside the content part of the post editor.

    All you have to do is remove the image from the content area and only use featured image metabox to add featured image. For more on this topic, see our article on how to fix featured image appearing twice in WordPress.

    2. What is the difference between the cover image and featured image?

    Cover images are used in the content area of your posts or pages. They are normally used to separate different sections of a lengthy page or post.

    Featured image is the representative image of an article. It does appear before or alongside the content but not inside the actual article.

    For more on this topic, see our guide on the difference between cover image and featured image in WordPress.

    3. How to display featured images next to recent blog posts?

    The WordPress block editor comes with a ‘Latest Posts’ block which allows you to display recent posts with post thumbnails.

    You can also display recent posts with thumbnails in sidebar widgets using Recent Posts Widget Extended plugin. For more details, see our article on how to display recent posts in WordPress.

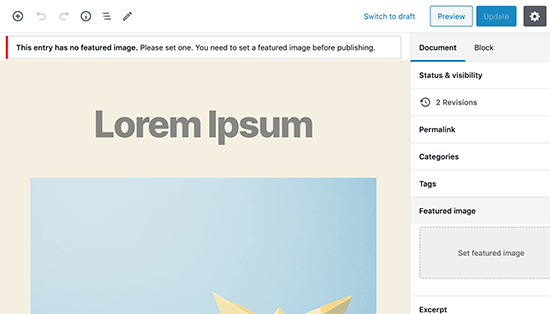
    4. How to remind authors to add featured image in WordPress?

    Featured images are prominently displayed on your homepage, blog page, and other archive pages.

    If you or another author on your blog forgot to set one and published the post then it will appear without a featured image. This will look bad and inconsistent, which is not good for user experience.

    You can install and activate the Require Featured Image plugin, which will show a notification when anyone tries to publish a post without featured image.

    Require featured image

    For more details, see our article on how to require featured images in WordPress.

    We hope that this article helped you learn how to add featured images or post thumbnails in WordPress. You may also want to check out our beginner’s guide to image SEO which shows how to optimize your WordPress images for search engines.

    If you liked this article, then please subscribe to our YouTube Channel for WordPress video tutorials. You can also find us on Twitter and Facebook.

    The post How to Add Featured Images or Post Thumbnails in WordPress appeared first on WPBeginner.