People always want more. More of everything. And there is nothing better in the world to fulfil that need than particle systems. Because you can have thousands of particles easily. And that’s what I did for this demo.
Creating a particle system
You start with just one particle. I like to use classes for that, because that perfectly describes the behaviour of particles. It usually it looks like this:
class Particle{
	// just setting initial position and speed
	constructor(){}
	// updating velocity according to position and physics
	updateVelocity(){}
	// finally update particle position,
	// sometimes these last two could be merged
	updatePosition(){}
}
And after all of that, you could render them. Sounds easy, right? It is!
Physics
So the particles need to move. For that we need to establish some rules for their movement. The easiest one is: gravity. Implemented in the particle it would look like this:
updateVelocity(){
	this.speed.y = gravity; // some constant
}

updatePosition{
	// this could have been just one line, but imagine there are some other factors for speed, not just gravity.
	this.position.y += this.speed.y;

	// also some code to bring particle back to screen, once it is outside
}
With that you will get this simple rain. I also randomized gravity for each particle. Why? Because I can!
But just rain didn’t seem enough, and I decided to add a little bit of physics to change the speed of the particles. To slow them down or speed them up, depending on the… image. Yup, I took the physics for the particles from the image. My friend @EncharmDre proposed to use some oscillations for the particles, and I also added some colors palettes here. It looked amazing! Like a real tropical rain.
Still, the physics part is the computational bottleneck for this animation. It is possible to animate millions of particles by using GPGPU techniques, and the GPU to calculate the positions. But 10000 particles seemed enough for my demo, and I got away with CPU calculations this time. 10s of thousands also were possible because I saved some performance on rendering.
Rendering
There are a lot of ways to render particles: HTML, Canvas2D, WebGL, SVG, you name it. But so far the fastest one is of course WebGL. It is even faster than Canvas2D rendering. I mean, of course Canvas2D works perfectly fine for particles. But with WebGL you could have MORE OF THEM! Which is the point of this whole adventure =).
So, WebGL narrowed down the search for rendering to a couple of frameworks. PIXI.js is actually very nice for rendering 2D particle systems, but because I love three.js, and because its always nice to have another dimension as a backup (the more dimensions the better, remember?), I chose three.js for this job.
There is already an object specifically for this job: THREE.Points. I also decided to use shaders (because it’s cool) but you could actually easily avoid that for this demo.
The simplified code looks somewhat like this:
// initialization
for (let i = 0; i < numberOfParticles; i++) {
  // because we are animating them in 2D, z=0
  positions.set([x, y, 0], i * 3);
  this.particles.push(
    new Particle({
      x,
      y
    })
  );
}
geometry.setAttribute(
  "position",
  new THREE.BufferAttribute(positions, 3)
);

// animation loop
particles.forEach(particle => {
  particle.updateSpeedAndPosition();
});
To make it even cooler, I decided to create trails for the particles. For that I just used the previous rendering frame, and faded it a little bit. And here is what I got:
Now combining everything, we could achieve this final look:
Final words
I beg you to try this yourself, and experiment with different parameters for particles, or write your own logic for their behavior. It is a lot of fun. And you could be the ruler of thousands or even millions of… particles!
Following my previous experiment where I’ve showed you how to build a 3D physics-based menu, let’s now take a look at how to turn an image into a cloth-like material that gets distorted by wind using Cannon.js and Three.js.
In this tutorial, we’ll assume that you’re comfortable with Three.js and understand the basic principles of the Cannon.js library. If you aren’t, take a look at my previous tutorial about Cannon and how to create a simple world using this 3D engine.
Before we begin, take a look at the demo that shows a concrete example of a slideshow that uses the cloth effect I’m going to explain. The slideshow in the demo is based on Jesper Landberg’s Infinite draggable WebGL slider.
Preparing the DOM, the scene and the figure
I’m going to start with an example from one of my previous tutorials. I’m using DOM elements to re-create the plane in my scene. All the styles and positions are set in CSS and re-created in the canvas with JavaScript. I just cleaned some stuff I don’t use anymore (like the data-attributes) but the logic is still the same:
Creating the physics world and update existing stuff
We’ll update our Scene.js file to add the physics calculation and pass the physics World as an argument to the Figure object:
// Scene.js’s constructor
this.world = new C.World();
this.world.gravity.set(0, -1000, 0);
For this example, I’m using a large number for gravity because I’m working with big sized objects.
// Scene.js’s constructor
this.figure = new Figure(this.scene, this.world);

// Scene.js's update method
this.world.step(1 / 60);

// We’ll see this below!
this.figure.update()
Let’s do some sewing
In the last tutorial on Cannon, I talked about rigid bodies. As its name suggests, you give an entire object a shape that will never be distorted. In this example, I will not use rigid bodies but soft bodies. I’ll create a new body per vertex, give it a mass and connect them to recreate the full mesh. After that, like with the rigid bodies, I copy each Three vertices’ position with Cannon’s body position and voilà!
Let’s start by updating the subdivision segments of the mesh with a local variable “size”:
const size = 8;

export default class Figure {
    constructor(scene, world) {
    this.world = world

//…

// Createmesh method
this.geometry = new THREE.PlaneBufferGeometry(1, 1, size, size);
Then, we add a new method in our Figure Class called “CreateStitches()” that we’ll call it just after the createMesh() method. The order is important because we’ll use each vertex coordinate to set the base position of our bodies.
Creating the soft body
Because I’m using a BufferGeometry rather than Geometry, I have to loop through the position attributes array based on the count value. It limits the number of iterations through the whole array and improves performances. Three.js provides methods that return the correct value based on the index.
createStitches() {
    // We don't want a sphere nor a cube for each point of our cloth. Cannon provides the Particle() object, a shape with ... no shape at all!
    const particleShape = new C.Particle();

    const { position } = this.geometry.attributes;
    const { x: width, y: height } = this.sizes;

    this.stitches = [];

    for (let i = 0; i < position.count; i++) {

      const pos = new C.Vec3(
        position.getX(i) * width,
        position.getY(i) * height,
        position.getZ(i)
      );

      const stitch = new C.Body({

        // We divide the mass of our body by the total number of points in our mesh. This way, an object with a lot of vertices doesn’t have a bigger mass.
        mass: mass / position.count,

        // Just for a smooth rendering, you can drop this line but your cloth will move almost infinitely.
        linearDamping: 0.8,

        position: pos,
        shape: particleShape,

        // TEMP, we’ll delete later
        velocity: new C.Vec3(0, 0, -300)
      });

      this.stitches.push(stitch);
      this.world.addBody(stitch);
    }
}
Notice that we multiply by the size of our mesh. That’s because, in the beginning, we set the size of our plane to a size of 1. So each vertex has its coordinates normalized and we have to multiply them afterwards.
Updating the mesh
As we need to set our position in normalized coordinates, we have to divide by the width and height values and set it to the bufferAttribute.
// Figure.js
update() {
    const { position } = this.geometry.attributes;
    const { x: width, y: height } = this.sizes;

    for (let i = 0; i < position.count; i++) {
      position.setXYZ(
        i,
        this.stitches[i].position.x / width,
        this.stitches[i].position.y / height,
        this.stitches[i].position.z
      );
    }

    position.needsUpdate = true;
}
And voilà! Now you should have a falling bunch of unconnected points. Let’s change that by just setting the first row of our stitches to a mass of zero.
for (let i = 0; i < position.count; i++) {
      const row = Math.floor(i / (size + 1));

// ...

const stitch = new C.Body({
    mass: row === 0 ? 0 : mass / position.count,

// ...
I guess you noticed I increased the size plus one. Let’s take a look at the wireframe of our mesh:
As you can notice, when we set the number of segments with the ‘size’ variable, we have the correct number of subdivisions. But we are working on the mesh so we have one more row and column. By the way, if you inspect the count value we used above, we have 81 vertices (9*9), not 64 (8*8).
Connecting everything
Now, you should have a falling bunch of points falling down but not the first line! We have to create a DistanceConstraint from each point to their neighbour.
// createStitches()
for (let i = 0; i < position.count; i++) {
    const col = i % (size + 1);
    const row = Math.floor(i / (size + 1));

    if (col < size) this.connect(i, i + 1);
    if (row < size) this.connect(i, i + size + 1);
}

// New method in Figure.js
connect(i, j) {
    const c = new C.DistanceConstraint(this.stitches[i], this.stitches[j]);

    this.world.addConstraint(c);
}
And tadam! You now have a cloth floating within the void. Because of the velocity we set before, you can see the mesh moves but stops quickly. It’s the calm before the storm.
Let the wind blow
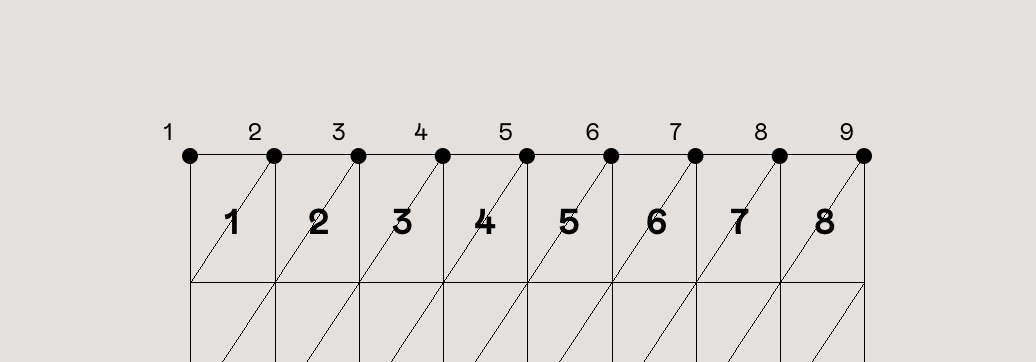
Now that we have a cloth, why not let a bit of wind blow? I’m going to create an array with the length of our mesh and fill it with a direction vector based on the position of my mouse multiplied by a force using simplex noise. Psst, if you have never heard of noise, I suggest reading this article.
We could imagine the noise looking like this image, except where we have angles in each cell, we’ll have a force between -1 and 1 in our case.
After that, we’ll add the forces of each cell on their respective body and the update function will do the rest.
Let’s dive into the code!
I’m going to create a new class called Wind in which I’m passing the figure as a parameter.
// First, I'm going to set 2 local constants
const baseForce = 2000;
const off = 0.05;

export default class Wind {
    constructor(figure) {
        const { count } = figure.geometry.attributes.position;
        this.figure = figure;

        // Like the mass, I don't want to have too much forces applied because of a large amount of vertices
        this.force = baseForce / count;

        // We'll use the clock to increase the wind movement
        this.clock = new Clock();

        // Just a base direction
        this.direction = new Vector3(0.5, 0, -1);

        // My array
        this.flowfield = new Array(count);

        // Where all will happen!
        this.update()
    }
}
update() {
    const time = this.clock.getElapsedTime();

    const { position } = this.figure.geometry.attributes;
    const size = this.figure.geometry.parameters.widthSegments;

    for (let i = 0; i < position.count; i++) {
        const col = i % (size + 1);
        const row = Math.floor(i / (size + 1));

        const force = (noise.noise3D(row * off, col * off, time) * 0.5 + 0.5) * this.force;

        this.flowfield[i] = this.direction.clone().multiplyScalar(force);
    }
}
The only purpose of this object is to update the array values with noise in each frame so we need to amend Scene.js with a few new things.
And before continuing, I’ll add a new method in my update method after the figure.update():
this.figure.applyWind(this.wind);
Let’s write this new method in Figure.js:
// Figure.js constructor
// To help performance, I will avoid creating a new instance of vector each frame so I'm setting a single vector I'm going to reuse.
this.bufferV = new C.Vec3();

// New method
applyWind(wind) {
    const { position } = this.geometry.attributes;

    for (let i = 0; i < position.count; i++) {
        const stitch = this.stitches[i];

        const windNoise = wind.flowfield[i];
        const tempPosPhysic = this.bufferV.set(
            windNoise.x,
            windNoise.y,
            windNoise.z
        );

        stitch.applyForce(tempPosPhysic, C.Vec3.ZERO);
    }
}
Congratulation, you have created wind, Mother Nature would be proud! But the wind blows in the same direction. Let’s change that in Wind.js by updating our direction with the mouse position.
window.addEventListener("mousemove", this.onMouseMove.bind(this));

onMouseMove({ clientX: x, clientY: y }) {
    const { innerWidth: W, innerHeight: H } = window;

    gsap.to(this.direction, {
        duration: 0.8,
        x: x / W - 0.5,
        y: -(y / H) + 0.5
    });
}
Conclusion
I hope you enjoyed this tutorial and that it gave you some ideas on how to bring a new dimension to your interaction effects. Don’t forget to take a look at the demo, it’s a more concrete case of a slideshow where you can see this effect in action.
Don’t hesitate to let me know if there’s anything not clear, feel free to contact me on Twitter @aqro.
Yeah, shaders are good but have you ever heard of physics?
Nowadays, modern browsers are able to run an entire game in 2D or 3D. It means we can push the boundaries of modern web experiences to a more engaging level. The recent portfolio of Bruno Simon, in which you can play a toy car, is the perfect example of that new kind of playful experience. He used Cannon.js and Three.js but there are other physics libraries like Ammo.js or Oimo.js for 3D rendering, or Matter.js for 2D.
After months of hard but fun work, I'm glad to finally show you my new portfolio ?https://t.co/rVPv9oVMud
In this tutorial, we’ll see how to use Cannon.js as a physics engine and render it with Three.js in a list of elements within the DOM. I’ll assume you are comfortable with Three.js and know how to set up a complete scene.
Prepare the DOM
This part is optional but I like to manage my JS with HTML or CSS. We just need the list of elements in our nav:
Let’s have a look at the important bits. In my Class, I call a method “setup” to init all my components. The other method we need to check is “setCamera” in which I use an Orthographic Camera with a distance of 15. The distance is important because all of our variables we’ll use further are based on this scale. You don’t want to work with too big numbers in order to keep it simple.
// Scene.js

import Menu from "./Menu";

// ...

export default class Scene {
    // ...
    setup() {
        // Set Three components
        this.scene = new THREE.Scene()
        this.scene.fog = new THREE.Fog(0x202533, -1, 100)

        this.clock = new THREE.Clock()

        // Set options of our scene
        this.setCamera()
        this.setLights()
        this.setRender()

        this.addObjects()

        this.renderer.setAnimationLoop(() => { this.draw() })

    }

    setCamera() {
        const aspect = window.innerWidth / window.innerHeight
        const distance = 15

        this.camera = new THREE.OrthographicCamera(-distance * aspect, distance * aspect, distance, -distance, -1, 100)

        this.camera.position.set(-10, 10, 10)
        this.camera.lookAt(new THREE.Vector3())
    }

    draw() {
        this.renderer.render(this.scene, this.camera)
    }

    addObjects() {
        this.menu = new Menu(this.scene)
    }

    // ...
}
Create the visible menu
Basically, we will parse all our elements in our menu, create a group in which we will initiate a new mesh for each letter at the origin position. As we’ll see later, we’ll manage the position and rotation of our mesh based on its rigid body.
If you don’t know how creating text in Three.js works, I encourage you to read the documentation. Moreover, if you want to use a custom font, you should check out facetype.js.
In my case, I’m loading a Typeface JSON file.
// Menu.js

export default class Menu {
  constructor(scene) {
    // DOM elements
    this.$navItems = document.querySelectorAll(".mainNav a");

    // Three components
    this.scene = scene;
    this.loader = new THREE.FontLoader();

    // Constants
    this.words = [];

    this.loader.load(fontURL, f => {
      this.setup(f);
    });
  }

  setup(f) {

    // These options give us a more candy-ish render on the font
    const fontOption = {
      font: f,
      size: 3,
      height: 0.4,
      curveSegments: 24,
      bevelEnabled: true,
      bevelThickness: 0.9,
      bevelSize: 0.3,
      bevelOffset: 0,
      bevelSegments: 10
    };


    // For each element in the menu...
    Array.from(this.$navItems)
      .reverse()
      .forEach(($item, i) => {
        // ... get the text ...
        const { innerText } = $item;

        const words = new THREE.Group();

        // ... and parse each letter to generate a mesh
        Array.from(innerText).forEach((letter, j) => {
          const material = new THREE.MeshPhongMaterial({ color: 0x97df5e });
          const geometry = new THREE.TextBufferGeometry(letter, fontOption);

          const mesh = new THREE.Mesh(geometry, material);
          words.add(mesh);
        });

        this.words.push(words);
        this.scene.add(words);
      });
  }
}
Building a physical world
Cannon.js uses the loop of render of Three.js to calculate the forces that rigid bodies sustain between each frame. We decide to set a global force you probably already know: gravity.
// Scene.js

import C from 'cannon'

// …

setup() {
    // Init Physics world
    this.world = new C.World()
    this.world.gravity.set(0, -50, 0)

    // …
}

// …

addObjects() {
    // We now need to pass the world of physic as an argument
    this.menu = new Menu(this.scene, this.world);
}


draw() {
    // Create our method to update the physic
    this.updatePhysics();

    this.renderer.render(this.scene, this.camera);
}

updatePhysics() {
    // We need this to synchronize three meshes and Cannon.js rigid bodies
    this.menu.update()

    // As simple as that!
    this.world.step(1 / 60);
}

// …
As you see, we set the gravity of -50 on the Y-axis. It means that all our bodies will undergo a force of -50 each frame to the infinite until they encounter another body or the floor. Notice that if we change the scale of our elements or the distance number of our camera, we need to also adjust the gravity number.
Rigid bodies
Rigid bodies are simpler invisible shapes used to represent our meshes in the physical world. Usually, their meshes are way more elementary than our rendered mesh because the fewer vertices we have to calculate, the faster it is.
Note that “soft bodies” also exist. It represents all the bodies that undergo a distortion of their mesh because of other forces (like other objects pushing them or simply gravity affecting them).
For our purpose, we will create a simple box for each letter of their size, and place them in the correct position.
There are a lot of things to update in Menu.js so let’s look at every part.
First, we need two more constants:
// Menu.js

// It will calculate the Y offset between each element.
const margin = 6;
// And this constant is to keep the same total mass on each word. We don't want a small word to be lighter than the others.
const totalMass = 1;
The totalMass will involve the friction on the ground and the force we’ll apply later. At this moment, “1” is enough.
// …

export default class Menu {
    constructor(scene, world) {
        // …
        this.world = world
        this.offset = this.$navItems.length * margin * 0.5;
    }


  setup(f) {
        // …
        Array.from(this.$navItems).reverse().forEach(($item, i) => {
            // …
            words.letterOff = 0;

            Array.from(innerText).forEach((letter, j) => {
                const material = new THREE.MeshPhongMaterial({ color: 0x97df5e });
                const geometry = new THREE.TextBufferGeometry(letter, fontOption);

                geometry.computeBoundingBox();
                geometry.computeBoundingSphere();

                const mesh = new THREE.Mesh(geometry, material);
                // Get size of our entire mesh
                mesh.size = mesh.geometry.boundingBox.getSize(new THREE.Vector3());

                // We'll use this accumulator to get the offset of each letter. Notice that this is not perfect because each character of each font has specific kerning.
                words.letterOff += mesh.size.x;

                // Create the shape of our letter
                // Note that we need to scale down our geometry because of Box's Cannon.js class setup
                const box = new C.Box(new C.Vec3().copy(mesh.size).scale(0.5));

                // Attach the body directly to the mesh
                mesh.body = new C.Body({
                    // We divide the totalmass by the length of the string to have a common weight for each words.
                    mass: totalMass / innerText.length,
                    position: new C.Vec3(words.letterOff, this.getOffsetY(i), 0)
                });

                // Add the shape to the body and offset it to match the center of our mesh
                const { center } = mesh.geometry.boundingSphere;
                mesh.body.addShape(box, new C.Vec3(center.x, center.y, center.z));
                // Add the body to our world
                this.world.addBody(mesh.body);
                words.add(mesh);
            });

            // Recenter each body based on the whole string.
            words.children.forEach(letter => {
                letter.body.position.x -= letter.size.x + words.letterOff * 0.5;
            });

            // Same as before
            this.words.push(words);
            this.scene.add(words);
        })
    }

    // Function that return the exact offset to center our menu in the scene
    getOffsetY(i) {
        return (this.$navItems.length - i - 1) * margin - this.offset;
    }

    // ...

}
You should have your menu centered in your scene, falling to the infinite and beyond. Let’s create the ground of each element of our menu in our words loop:
// …

words.ground = new C.Body({
    mass: 0,
    shape: new C.Box(new C.Vec3(50, 0.1, 50)),
    position: new C.Vec3(0, i * margin - this.offset, 0)
});

this.world.addBody(words.ground);

// …
A shape called “Plane” exists in Cannon. It represents a mathematical plane, facing up the Z-axis and usually used as ground. Unfortunately, it doesn’t work with superposed grounds. Using a box is probably the easiest way to make the ground in this case.
Interaction with the physical world
We have an entire world of physics beneath our fingers but how to interact with it?
We calculate the mouse position and on each click, cast a ray (raycaster) towards our camera. It will return the objects the ray is passing through with more information, like the contact point but also the face and its normal.
Normals are perpendicular vectors of each vertex and faces of a mesh:
We will get the clicked face, get the normal and reverse and multiply by a constant we have defined. Finally, we’ll apply this vector to our clicked body to give an impulse.
To make it easier to understand and read, we will pass a 3rd argument to our menu, the camera.
// Scene.js
this.menu = new Menu(this.scene, this.world, this.camera);
// Menu.js
// A new constant for our global force on click
const force = 25;

constructor(scene, world, camera) {
    this.camera = camera;

    this.mouse = new THREE.Vector2();
    this.raycaster = new THREE.Raycaster();

    // Bind events
    document.addEventListener("click", () => { this.onClick(); });
    window.addEventListener("mousemove", e => { this.onMouseMove(e); });
}

onMouseMove(event) {
    // We set the normalized coordinate of the mouse
    this.mouse.x = (event.clientX / window.innerWidth) * 2 - 1;
    this.mouse.y = -(event.clientY / window.innerHeight) * 2 + 1;
}

onClick() {
    // update the picking ray with the camera and mouse position
    this.raycaster.setFromCamera(this.mouse, this.camera);

    // calculate objects intersecting the picking ray
    // It will return an array with intersecting objects
    const intersects = this.raycaster.intersectObjects(
        this.scene.children,
        true
    );

    if (intersects.length > 0) {
        const obj = intersects[0];
        const { object, face } = obj;

        if (!object.isMesh) return;

        const impulse = new THREE.Vector3()
        .copy(face.normal)
        .negate()
        .multiplyScalar(force);

        this.words.forEach((word, i) => {
            word.children.forEach(letter => {
                const { body } = letter;

                if (letter !== object) return;

                // We apply the vector 'impulse' on the base of our body
                body.applyLocalImpulse(impulse, new C.Vec3());
            });
        });
    }
}
Constraints and connections
As you can see at the moment, you can punch each letter like the superman or superwoman you are. But even if this is already looking cool, we can still do better by connecting every letter between them. In Cannon, it’s called constraints. This is probably the most satisfying thing with using physics.
// Menu.js

setup() {
    // At the end of this method
    this.setConstraints()
}

setConstraints() {
    this.words.forEach(word => {
        for (let i = 0; i < word.children.length; i++) {
        // We get the current letter and the next letter (if it's not the penultimate)
        const letter = word.children[i];
        const nextLetter =
            i === word.children.length - 1 ? null : word.children[i + 1];

        if (!nextLetter) continue;

        // I choosed ConeTwistConstraint because it's more rigid that other constraints and it goes well for my purpose
        const c = new C.ConeTwistConstraint(letter.body, nextLetter.body, {
            pivotA: new C.Vec3(letter.size.x, 0, 0),
            pivotB: new C.Vec3(0, 0, 0)
        });

        // Optionnal but it gives us a more realistic render in my opinion
        c.collideConnected = true;

        this.world.addConstraint(c);
        }
    });
}
To correctly explain how these pivots work, check out the following figure:
(letter.mesh.size, 0, 0) is the origin of the next letter.
Remove the sandpaper on the floor
As you have probably noticed, it seems like our ground is made of sandpaper. That’s something we can change. In Cannon, there are materials just like in Three. Except that these materials are physic-based. Basically, in a material, you can set the friction and the restitution of a material. Are our letters made of rock, or rubber? Or are they maybe slippy?
Moreover, we can define the contact material. It means that if I want my letters to be slippy between each other but bouncy with the ground, I could do that. In our case, we want a letter to slip when we punch it.
// In the beginning of my setup method I declare these
const groundMat = new C.Material();
const letterMat = new C.Material();

const contactMaterial = new C.ContactMaterial(groundMat, letterMat, {
    friction: 0.01
});

this.world.addContactMaterial(contactMaterial);
Then we set the materials to their respective bodies:
// ...
words.ground = new C.Body({
    mass: 0,
    shape: new C.Box(new C.Vec3(50, 0.1, 50)),
    position: new C.Vec3(0, i * margin - this.offset, 0),
    material: groundMat
});
// ...
mesh.body = new C.Body({
    mass: totalMass / innerText.length,
    position: new C.Vec3(words.letterOff, this.getOffsetY(i), 0),
    material: letterMat
});
// ...
Tada! You can push it like the Rocky you are.
Final words
I hope you have enjoyed this tutorial! I have the feeling that we’ve reached the point where we can push interfaces to behave more realistically and be more playful and enjoyable. Today we’ve explored a physics-powered menu that reacts to forces using Cannon.js and Three.js. We can also think of other use cases, like images that behave like cloth and get distorted by a click or similar.
Cannon.js is very powerful. I encourage you to check out all the examples, share, comment and give some love and don’t forget to check out all the demos!