How to Repair WordPress Database (6 Easy Methods)

Over the years, many users have reached out to us and our partner companies to ask about fixing broken WordPress databases.

Keeping your WordPress website running smoothly requires a healthy database. If your database gets corrupted, then it can lead to many problems, including error messages, white screens, and even a complete loss of functionality.

We have experience with quickly repairing a WordPress database, and we will teach you how to get your site up and running in no time. For instance, you can check the login credentials or use different tools and plugins to fix WordPress databases.

In this article, we will show you how to repair a WordPress database in a few simple steps.

How to repair WordPress database in simple steps

Here’s a quick overview of everything we will cover in this guide. You can click the links below to jump ahead to any section:

How to Tell If Your WordPress Database Needs Repairs

A WordPress database is a collection of all the information needed to run your website properly. This includes all your blog posts, pages, registered users, media files, and settings.

If your database is corrupted and needs repairs, then here are some common signs to watch out for:

  • White Screen of Death (WSoDs): This is a general term for a situation where your website displays a blank white page instead of its usual content. A corrupted database can be one reason why you’re seeing a WSoD.
  • Error Messages: You might see error messages related to the database. For example, errors like ‘Error establishing a database connection‘ or ‘Unable to select database’ show that something is not right with the database.
Database connection error in WordPress
  • Missing Content or Formatting Issues: If your website’s content appears to be missing or the formatting is out of place, then it could be a sign of database corruption.
  • Plugin or Theme Malfunctions: Similarly, if plugins or themes suddenly stop working properly, then it’s possible that the underlying database is to blame.

That said, let’s see what could cause your WordPress database to corrupt.

What Causes Damage to WordPress Databases?

By understanding common causes that can damage your WordPress database, you can take steps to prevent them and keep your database healthy.

For instance, problems with your web server, such as a sudden power outage or hardware malfunction, can corrupt your database. Or a malicious attack on your website could target your database, potentially leading to corruption.

On the other hand, if the database credentials (username, password, etc.) stored in your wp-config.php file are incorrect, then it can lead to database connection problems.

Similarly, if your website is trying to use more memory than your web server allows (PHP memory limit), then it can also lead to database errors and potential corruption.

Now, let’s look at different ways you can easily repair a WordPress database.

Important Note: Before using any repair method, it’s essential that you back up your WordPress website and database. This way, if something goes wrong during the repair process, you can restore your website from the backup.

To learn more, please follow our guide on how to make a WordPress database backup.

1. Check and Edit WordPress Database Credentials

One of the most common and easy ways to repair your WordPress database is by checking the credentials. Usually, incorrect usernames and passwords lead to database connection errors, especially if you recently moved your site to a new host.

The WordPress database credentials are stored in the wp-config.php file. To edit the file, you’ll need to use an FTP client or File Manager tool. If you haven’t edited the file before, then please see our guide on how to edit the wp-config.php file.

Once you open the file, look for the following lines:

// ** MySQL settings - You can get this info from your web host ** //
/** The name of the database for WordPress */
define( 'DB_NAME', 'database_name_here' );
/** MySQL database username */
define( 'DB_USER', 'username_here' );
/** MySQL database password */
define( 'DB_PASSWORD', 'password_here' );
/** MySQL hostname */
define( 'DB_HOST', 'localhost' );

Next, you must ensure that the information for the database name, username, password, and database host is correct.

You can confirm this information from your WordPress hosting provider. For example, in Bluehost, you can head to your site’s settings.

Bluehost site settings

From here, switch to the ‘Advanced’ tab and scroll down the Database section.

Then click the ‘Manage’ button to continue.

Click the Manage button next to the Database section

This will open the MySQL Database page in the cPanel.

From here, you can find the username and password in the ‘Current Database’ section. If the credentials don’t match, copy and paste them into a Notepad (.txt) file so you can add them to the wp-config.php file.

Find your database name and username in the Current Databases section

2. Access phpMyAdmin to Repair WordPress Databases

If you’re comfortable with databases, then you can use phpMyAdmin to repair your WordPress database. phpMyAdmin is a web-based interface for managing MySQL databases.

First, you’ll need to log in to your WordPress hosting dashboard and head to the cPanel. In Bluehost, you can open website settings, go to the ‘Advanced’ tab, and then click the ‘Manage’ button in the cPanel section.

Bluehost advanced cPanel

Next, you will see the cPanel of your hosting provider.

Simply navigate to phpMyAdmin and click the link.

Selecting phpMyAdmin on cPanel

On the next screen, you should see the phpMyAdmin panel.

Now, you can select a database you want to repair from the left column or go to the ‘Databases’ section at the top.

Select database tables

Next, you’ll see different tables in the database. Simply scroll down and click the ‘Check All’ option.

You will also need to click the With selected dropdown menu and choose the ‘Repair table’ option.

Select tables to repair in database

phpMyAdmin will now attempt to repair the selected tables. If any errors are found, they will be fixed.

You should see a success message when the repair is done.

See repair table success message

You may also want to see our beginner’s guide to WordPress database management with phpMyAdmin.

3. Repair a WordPress Database Using a Plugin

Another way to repair WordPress databases is to use a plugin. This method is best if you’re not comfortable editing files or using phpMyAdmin.

There are many WordPress database plugins you can use. For this tutorial, we’ll use the WP-DBManager plugin. It is a free plugin and allows you to perform different actions on the database, like optimization, repair, backup, and more.

First, you’ll need to install and activate the WP-DBManager plugin on your site. If you need help, then please see our guide on how to install a WordPress plugin.

Upon activation, you can go to the Database » Repair DB page from the WordPress dashboard.

Select DB tables to repair

Next, you can select the tables you want to repair in the database. If you’re not sure which tables to repair, then simply select all of them and click the ‘Repair’ button at the bottom.

The plugin will then attempt to fix your WordPress database and resolve any problems.

4. Use the Built-in WordPress Database Repair Tool

WordPress also offers a built-in repair tool that you can use to fix minor database corruption issues. However, you’ll need to manually edit the wp-config.php file to access the repair tool.

First, you’ll need to open your website’s files using an FTP client or file manager. From here, locate the wp-config.php file, which is typically located in the root directory of your WordPress installation.

Go ahead and open the file using a text editor or notepad file. Next, you’ll need to add the following code snippet just before the /* That's all, stop editing! Happy publishing. */ line:

define ('WP_ALLOW_REPAIR', true);

Once that’s done, you can enter the following URL in the web browser to open the repair tool:

http://www.example.com/wp-admin/maint/repair.php

Just remember to replace ‘example.com’ with your own domain name.

Once the tool opens, simply click the ‘Repair Database’ button.

Repair WordPress database

After you’ve repaired the WordPress database, you can remove the code snippet from the wp-config.php file to prevent unauthorized access.

The repair tool doesn’t require users to log in to use it, so leaving the code can lead to security vulnerabilities.

5. Fix WordPress Database from Hosting Service cPanel

You can also access a pre-built repair tool from your web hosting provider’s cPanel to fix corrupted WordPress databases.

First, you’ll need to open the cPanel from the hosting service’s dashboard. For example, in Bluehost, you can open the website settings.

Bluehost site settings

After that, you will need to switch to the ‘Advanced’ tab.

From here, scroll down to the cPanel section and click the ‘Manage’ button.

Bluehost advanced cPanel

Once the cPanel opens, scroll down to the Database section.

Next, you can click the ‘MySQL Databases’ option.

MySQL database in cPanel

After that, you can click the dropdown menu under Repair Database and choose the database to fix.

Go ahead and click the ‘Repair Database’ button to continue.

Choose a database to repair

The hosting service will automatically repair your database.

Once the process is complete, you should see a success message.

Database repair success message

6. Using WP-CLI to Repair WordPress Database

For developers and advanced users, there’s a command-line option for repairing the WordPress database using WP-CLI (WordPress Command Line Interface).

WP-CLI is a powerful tool, but it’s also more technical than the other methods mentioned here. If you’re not comfortable with the command line, it’s best to stick with one of the other repair methods.

To start, you will need to access your website’s server using SSH. For this, you will need to know your SSH credentials to perform this step.

If you are using Mac or Linux, then SSH software comes preinstalled. However, Windows users will need third-party software like PuTTY to use SSH. To learn more, please see our guide on how to use PuTTY SSH in WordPress.

PuTTY Settings

Once the installation is complete and you’re connected to your site files, make sure you’re in the directory where your WordPress installation resides.

From here, simply run the following command in your terminal window:

wp db repair

This command will attempt to repair any corrupted tables in your WordPress database.

Bonus: Hire a WordPress Expert for Help

If you’re still having trouble fixing your WordPress databases or performing general maintenance, then it might be time to hire an expert.

With the WPBeginner WordPress Maintenance & Support plan, you will get our expert’s undivided attention. They’ll handle everything from updates to error fixes in the background and ensure your site continues to function without any issues.

WPBeginner Pro Maintenance Services

Plus, you get 24/7 support and around-the-clock uptime monitoring. Our experts can not only handle database repairs but also optimize your site for speed. This way, you get to deliver exceptional user experience while boosting SEO performance.

Besides maintenance, there are other services you can also use. For instance, we offer website design, repair hacked sites, optimize your site for SEO, and more. Check out all our Pro services for your website.

We hope this article helped you learn how to repair WordPress database in simple steps. You may also want to see our guide on how to preview your WordPress site before going live and the best website maintenance services for WordPress.

If you liked this article, then please subscribe to our YouTube Channel for WordPress video tutorials. You can also find us on Twitter and Facebook.

The post How to Repair WordPress Database (6 Easy Methods) first appeared on WPBeginner.

How to Stop Storing IP Address in WordPress Comments

Do you want to stop storing IP addresses in your WordPress comments?

By default, WordPress logs and stores the IP addresses of commenters to protect you against spammers. That said, with the rise of data privacy laws, you may want to stop this functionality to protect your website visitor data.

In this article, we will show you how to stop storing IP addresses in WordPress comments.

How to Stop Storing IP Address in WordPress Comments

Should You Stop Storing IP Addresses in WordPress Comments?

Unless your commenters use a VPN, WordPress will store their IP addresses on your website.

This is mainly used to combat spam comments from suspicious IP addresses. Some security plugins may also use IP addresses to put users in a comment blacklist or block malicious IP addresses to prevent threats like brute force attacks and DDoS attacks.

That said, some users may feel uncomfortable knowing that their IP address is logged after they leave a comment. They may think that this information can be used against them, which can make them hesitant to engage with your WordPress website.

If your website caters to a global audience, then storing IP addresses without user consent can also make your site less compliant with the General Data Protection Regulation (GDPR). This is because the GDPR classifies IP addresses as personal data.

Most WordPress web hosting providers keep raw access logs of all visitors to your website for a limited period of time. Plus, you can view these IP addresses when viewing the Comments page in the WordPress dashboard.

Now, let’s look at how to stop storing IP addresses and improve your WordPress security. Here is an overview of what we will cover:

This first method uses the WPCode plugin. We will use this plugin to insert a custom code snippet that stops your website from storing IP addresses from the comments section.

If this is your first time using code, don’t worry. WPCode’s user-friendly interface makes it easy to insert and manage custom code, even for a beginner.

To use WPCode, you need to install the plugin first. For more guidance, check out our article on how to install a WordPress plugin.

Note: This article will use the WPCode free version, but feel free to upgrade to a Pro plan for more advanced features like conditional logic and scheduled snippets.

Now, you need to go to Code Snippets » + Add Snippet from your WordPress admin panel. After that, click the ‘Use snippet’ button under ‘Add Your Custom Code Snippet’.

Adding custom CSS in WPCode

You will now see the Create Custom Snippet screen.

First things first, you have to add a title for your code snippet. It can be something like ‘Disable IP Address in Comments.’

In the Code Type dropdown, choose ‘PHP Snippet.’ Then, in the Code Preview box, you can insert the following code:

function wpb_remove_commentsip( $comment_author_ip ) { return ''; } add_filter( 'pre_comment_user_ip', 'wpb_remove_commentsip' );

After that, make sure the toggle in the top right corner says ‘Active’ and click ‘Save Snippet.’

It should look like this.

Removing IP addresses in the comments using WPCode

Now, the next time someone leaves a comment, you won’t see their IP address on the WordPress Comments page.

However, you will notice that previous comments still have this information stored. We will talk more about how to remove this data in the next part of the tutorial.

What the comment looks like after removing the IP address using WPCode

How to Remove IP Addresses From Older WordPress Comments

To remove IP addresses from your older WordPress comments, you will need to use phpMyAdmin. It’s a database management platform that usually comes with your WordPress hosting control panel.

Note: Before you do anything, we strongly recommend you back up your WordPress database first. That way, you can restore the database if you make a critical error.

Once you do that, you need to log in to your WordPress hosting account and look for the phpMyAdmin menu.

For Bluehost users, you will find phpMyAdmin by going to ‘Websites’ and selecting the website you want to configure in your dashboard. It should be under ‘Quick Links’.

Navigating to the phpMyAdmin in Bluehost

Inside phpMyAdmin, you can navigate to the ‘SQL’ tab.

After that, enter this query below:

UPDATE wp_comments SET comment_author_IP = '';

Note that if you have a custom WordPress database prefix, then please change wp_comments to your custom table prefix.

Once that’s done, simply click the ‘Go’ button below the text area to run your query.

Removing IP addresses in older WordPress comments using phpMyAdmin

At this stage, just go back to your WordPress Comments page to see if the query worked properly. That’s it!

We hope this article has helped you learn how to stop storing IP addresses in WordPress comments. You may also want to see our expert picks for the best WordPress security plugins and our guide to the tell-tale signs hackers have hijacked your WordPress site.

If you liked this article, then please subscribe to our YouTube Channel for WordPress video tutorials. You can also find us on Twitter and Facebook.

The post How to Stop Storing IP Address in WordPress Comments first appeared on WPBeginner.

How to Duplicate WordPress Database Using phpMyAdmin

Are you wondering how to duplicate your WordPress database using phpMyAdmin?

Whether you are looking to set up a web development environment or transfer your site to a new host, you will need to learn how to duplicate your WordPress database. If you are a beginner, the easiest way to do this is with phpMyAdmin, which is a web application for managing databases.

In this guide, we will walk you through the step-by-step process of duplicating your WordPress database using phpMyAdmin.

How to Duplicate WordPress Database Using phpMyAdmin

Expert Tip: Looking for an easy way to duplicate your entire website, including its database, plugins, themes, content, and files? Just check out our guide on how to clone a WordPress site with the Duplicator plugin.

Why Should You Use phpMyAdmin to Duplicate WordPress Database?

phpMyAdmin is a web application that helps website owners manage their databases.

Essentially, WordPress stores all your website content in a database. If you use a WordPress hosting service, then your data is most likely stored and organized in a MySQL database.

The thing is, to interact with MySQL, you will typically need to be familiar with command-line tools, which can be difficult if you are a beginner.

This is where phpMyAdmin comes in. It has a user-friendly interface that lets you do various database-related tasks without having to write complex commands, such as duplicating your WordPress database. Other than that, you can use it to:

With that in mind, let’s take a look at how to duplicate a WordPress database using phpMyAdmin. We will cover different methods, and you can use the links below to quickly jump to each one:

Method 1: Cloning Your WordPress Database With phpMyAdmin

This method is suitable if you want to manually create a backup or set up a staging environment for testing updates and changes.

First, you need to open your WordPress hosting control panel. In our tutorial, we are working with Bluehost, which uses cPanel for its hosting account management. Your control panel may look slightly different from our screenshots, but the steps will be similar.

Once you are logged in to cPanel, simply find the phpMyAdmin icon. It’s usually inside the ‘Databases’ section.

Selecting phpMyAdmin on cPanel

Now, you are inside your web hosting’s phpMyAdmin. Here, just click the ‘Databases’ tab at the top and select your WordPress database from the list of databases.

If you are not sure what your database name is, it’s the name you input when you first installed WordPress. You can also find it in your wp-config.php file if you forget.

Selecting a database on phpMyAdmin

Next, you will see a list of your WordPress database tables.

On this page, just click on the ‘Operations’ tab from the top menu.

Selecting the Operations tab on phpMyAdmin

This is where you will duplicate your database. Go ahead and scroll down to a section called ‘Copy database to.’

In the empty field, simply write the new database name. Then, make sure the ‘Structure and data’ box is checked. This option will copy both the structure and data of the database.

Additionally, the ‘CREATE DATABASE before copying’ option should be ticked. This will automatically create a new database where the duplicated data will be located.

The rest of the settings can be left as is. All you need to do next is click ‘Go’ at the bottom.

The 'Copy database to' section on phpMyAdmin

And that’s it! Your database has been successfully cloned.

After this, you can navigate to your newly duplicated database from the left panel.

Navigating to a newly duplicated database on phpMyAdmin

Method 2: Exporting and Importing WordPress Database With phpMyAdmin

This second method is best if your hosting company does not allow users to create databases directly from phpMyAdmin. This may be the case if you are using shared hosting services where certain privileges are restricted for security reasons.

In this situation, you may not be able to see the ‘Copy database to’ section in the ‘Operations’ tab. To duplicate your database, you can use the export method instead.

Essentially, you will export your database SQL file, set up a new database, and then import that database into the new setup.

The first step is to visit phpMyAdmin and select your WordPress database like we did in the previous method. Then, in the top menu, simply click the ‘Export’ button.

Here, you need to select ‘Custom – display all possible options’ in the ‘Export method’ section.

Opening the 'Export' tab on phpMyAdmin and selecting the Custom option

Once done, just scroll to the Output section and choose the ‘Save output to a file’ option. This will make sure that your database is exported as an SQL file.

For the rest of the settings, you can leave them as they are.

Configuring the phpMyAdmin Export Output settings

Now, all you have to do is scroll down to the bottom and click ‘Export.’

Your browser will now download the WordPress database as an .sql file.

Clicking the Export button on phpMyAdmin

Next, you need to create a new database where you can import this file to.

Go ahead and open your hosting control panel and click on ‘MySQL Databases.’

Opening the MySQL Databases page on cPanel

On this page, you need to fill out your new database name. In our example, we used _copy after the original database name to differentiate the old name from the newly duplicated one.

After that, just click the ‘Create Database’ button.

Creating a new MySQL Database on cPanel

Now that we’ve created a new database, let’s assign it to a MySQL user.

Go ahead and scroll down the ‘Add User to Database’ section and select a MySQL username from the dropdown menu. Make sure to choose the new database you’ve just created in the ‘Database’ field.

Once done, click ‘Add.’

Adding a new user to the MySQL Database on cPanel

You will now be redirected to the ‘Manage User Privileges’ page.

Simply check the ‘ALL PRIVILEGES’ option if you want to have total control over your database.

Checking the All Privileges option when adding a new MySQL user on cPanel

Then, go all the way down to the bottom of the page and click ‘Make Changes.’

Your newly created database is now ready.

Clicking the 'Make Changes' button to set the privileges of a new MySQL user on phpMyAdmin

Let’s go ahead and open phpMyAdmin again and select the database you just created in cPanel.

Once inside, you’ll see that the database is empty without tables like this:

No tables found in database message on phpMyAdmin

To continue, simply go to the ‘Import’ page from the top menu.

Here, click on the ‘Choose File’ button to select the .sql file you downloaded earlier.

Choosing an SQL file to import in phpMyAdmin

Once finished, scroll down to the bottom and click the ‘Import’ button.

phpMyAdmin will now upload the file from your computer and import your database.

Clicking the Import button on phpMyAdmin

And that’s all! You have successfully imported your duplicated database.

Bonus: Optimize Your WordPress Database for Better Performance

Managing the behind-the-scenes part of your WordPress website is just as important as how it looks on the outside. How you handle your database affects how fast your site loads, how secure it is, and how easily people can use it.

If your database is cluttered with unnecessary data, it can slow down your site and make it vulnerable to security risks. Regularly optimizing your database can prevent this from happening and make your website more reliable.

For more information about database management, you can see our beginner’s guide on managing a WordPress database with phpMyAdmin and our article on how to optimize your WordPress database with one click.

We hope this article has helped you learn how to duplicate a WordPress database using phpMyAdmin. You may also want to see our expert pick of the best WordPress database management plugins and our tutorial on how to fix the establishing a database connection error in WordPress.

If you liked this article, then please subscribe to our YouTube Channel for WordPress video tutorials. You can also find us on Twitter and Facebook.

The post How to Duplicate WordPress Database Using phpMyAdmin first appeared on WPBeginner.

How To Update PHP To The Suggested WordPress Version

Using an outdated version of WordPress core, plugins, or themes puts your site at risk. PHP is no different.

While WordPress technically works with some older versions of PHP, you’re sacrificing performance and compatibility, while opening yourself up to security vulnerabilities by using these.

For safety and stability, always aim to use the WordPress recommended versions of PHP.

In this post, we’ll talk about how to check what version of PHP you are running, how to update your PHP to the recommended version for WordPress, and how a capable hosting provider can take care of these elements for you.

Jump Links for this Article:

Respect for PHP

If you look in your WordPress site folders, you’ll see a lot of PHP files.

Since PHP powers a bulk of the core WordPress software, it’s a highly essential language for the WordPress community.

PHP runs on various platforms (Windows, Linux, Unix, Mac OS X, etc.), and is compatible with almost all servers used today (Apache, IIS, etc.).

Not only is it a major part of WordPress, but a major part of the whole web, powering 70% of all websites.

WordPress supports many versions of PHP, some even obsolete, but as a general rule you should use only those with security or stable support.

WordPress core officially supports PHP 5.6.20 to PHP 8.0; however, not all themes or plugins are supported.

WordPress currently works best with the following versions:

  • PHP 8.0
  • PHP 7.4
  • PHP 7.3

WordPress Recommendations

PHP has to be updated on a regular basis, just like WordPress core, themes, and plugins.

With PHP, each version receives support for two years after its initial release, then there is a period of another year where only critical security updates are released, as needed.

After this three year period, that version of PHP is no longer supported.

As of July 2021, the current recommended PHP version for WordPress is 7.4 or greater.

Quality hosting providers will generally require you to use the WP recommended version of PHP in order to use their servers, and will help you modify your site to ensure that the latest version of PHP will not break it.

For example, we’ll refer to ourselves (hey, we’re proud of our hosting!). WPMU DEV Hosting provides your site(s) with the latest sanctioned PHP versions.

Upgrading (or downgrading) to various versions is a simple process, done through our Hub 2.0.

Occasionally, some third party plugins may be out of date and cause issues with the latest version of PHP.

In that case you can look for updates, alternatives, or if necessary, downgrade your PHP version to an older one (as long as it’s still actively supported with security patch releases).

Click here if you’re interested in our full documentation on PHP through managed hosting in WPMU DEV.

PHP Versions WP Pie chart
Puny Helping (of) Pie — A miniscule 0.7% of sites use the most recent version of PHP, while a minimal 36.6% use the recommended version of PHP.

Less reputable, cheap hosts will not take the initiative to encourage you to upgrade your PHP because of the additional cost of support time and resources to help you transition.

Since they don’t want to break your site by updating to newer, recommended versions of PHP, they’ll often leave your site to use outdated versions of PHP and hope it goes unnoticed.

PHP 7.2 made its debut in November 2017. Considering the three year rule, we know it reached its End of Life cycle in November 2020 (as well as the even older PHP versions prior).

This means more than one-third (37.2%) of WordPress sites are currently running versions of PHP that are no longer actively supported.

That’s not the worst of it. Historically, there have been extended periods of time where that number has hovered at and even exceeded two-thirds (66%)! This is problematic for several reasons.

Why You Need to Update PHP

Speed

For one, there are tremendous performance benefits that come with using the latest version.

According to speed tests conducted by Kinsta, across 7 versions of PHP, consider the following stats:

Benchmark results PHP versions (Kinsta)
PHP versions show demonstrable speed differences.

You can see from the above table that with each newer version of PHP, the requests per second get incrementally faster.

Since using the recommended version of PHP takes less time to serve the same number of requests, you can give your visitors a much better user experience.
Kinsta also tested on PHP version 8, and I did want to note the scores for it, as the improvements in speed really continue to trend upwards.

With a benchmark result of 233.40 requests per second, PHP 8.0 takes a giant leap over PHP 7.4, proving to be 18.5% faster.

Step back a few more versions to 7.0, and it actually handles 50% more requests per second, comparatively.

I didn’t include PHP version 8.0 in my chart, because its support in the general WordPress purlieu is very difficult to assess. (WordPress 5.6 is presently considered beta compatible with PHP 8.0.)

Knowing this, please proceed with caution and do thorough testing before upgrading any crucial or client sites to PHP 8.0.

Expense

Maintaining code takes effort, and that effort is multiplied when you need to ensure backward compatibility for additional versions.

There is a collective sigh of relief among overworked theme and plugin developers whenever WordPress bumps up the minimum recommended PHP version, effectively knocking another obsolete version (and all of its associated coding efforts) off the table.

Rather than spending time parsing through the code to ensure that any changes to PHP do not affect it, developers can spend their time adding new features or improving security instead.

Vulnerabilities

Just like plugins, themes, and WordPress core get updates to fix security vulnerabilities, so does PHP.

This is also why using a PHP version that still gets updates is so important; it protects you from vulnerabilities such as SQL injection, XSS and DoS attacks.

According to security vulnerability datasource CVE Details, there were only 2 known vulnerabilities found in PHP in 2021 YTD.

Compare this to the 14 vulnerabilities discovered in 2020, the 23 noted in 2018, and the 105 found in 2016, and you can see why updating can help protect you from many known security exploits.

CVE vulnerabilities in PHP versions.
Number of vulnerabilities per PHP in a given year.

It’s a matter of fact that some hackers look to see what version of PHP you’re running to determine what kind of attack would be effective.

An Aversion to Versions?

The first step in compatibility is knowing what version of PHP your site is using.

You can easily see this information right within the WordPress dashboard.

Go to: Tools > Site Health > Status.

If your site should be using a newer version of PHP, it will be shown under recommended improvement.

If it is, then open the passed tests section to verify. You’ll see that it says Your site is running the current version of PHP, followed by the version number in parentheses.

WP Site Health, status passed tests
The WordPress dashboard Site Health screen reveals your PHP version.

Alternately, you can go to Tools > Site Health > Info > Server from your site Dashboard, to see what version of PHP you’re using.

WP dashboard settings to view PHP version info.

How to Update PHP in WordPress

Once you check to see what version of PHP your hosting server is running, you’ll know if you need to upgrade to the latest version of PHP.

If you do, checking your site’s compatibility with the new version of PHP is imperative. You never want to test major changes like updating your PHP on your live site, because if there are major incompatibilities, you could seriously impede or cripple your site.

For this reason, it’s ideal to create an alternate site where you can test your changes first.

Step 1: Create a Copy of Your Site

Start by getting a copy of your current site. You’ll need all of the files and a copy of the database.

You can do this by using SFTP for your files and exporting a copy of your database using MyPHP.

In some instances, you may be able to use your last backup, if your backups include both the files and the database.

You could lessen the load by using a plugin made specifically for this task. Duplicator is a free plugin offered on WP.org that has positive reviews.

If you want the most streamlined, painless process for duplicating your site, and you’re already using WPMU DEV as your hosting provider, it’s your lucky day!! Cloning is already a part of your membership!

With a few simple points and clicks through our Hub 2.0, you’ll have fully configured, deployment ready WP Sites in mere minutes.

Not already hosting with us but want to get on the bandwagon?! No problem, just click here.

For more details, see our documentation on cloning sites through WPMU DEV hosting.

Step 2: Create a Local or Staging Site

Once you have a copy of your site, you’ll need to set up a testing environment. You can either use a local environment or set up a staging environment if your host allows it*.

We have a great post on how to set up XAMPP on your local computer if you need help setting up your local environment.

Once your testing environment is set up, you can add the files and database from the previous step to your testing environment, so you have an exact replica of your live site.

After you have a copy of your site in your testing environment set up, you’re ready to upgrade the PHP version of your testing site.

*Hosting through WPMU DEV includes the ability to create a staging environment, and it is a breeze to do. Click here for details.

PHP QC

Now comes the fun part, and by fun, I mean the tedious task of QC-ing.

You’ll need to go through your test site to make sure that nothing is broken.

Pay careful attention to the critical functionality of your site. Check out processes, newsletter signups, comments, web forms, navigation, and all of the other elements that contribute to expected usability and visitor engagement.

You want to catch any issues before they have a chance to wreak havoc on your live site and cause a bad user experience for your visitors or clients.

Handy Tools

There are some tools that can assist with the QC process, for devs and non-devs alike. Any issues discovered that are outside your scope of knowledge can be intelligently relayed to support.

Error Log Monitor – This plugin will display a list of PHP issues as an error log in your WordPress dashboard.

WP_DEBUG – Not a plugin, rather a PHP constant (aka, a permanent global variable), this can be used to trigger debug mode throughout WordPress.

Turning on WP_DEBUG will allow you to see the PHP failure types so that you can fix them in your code. It also allows you to see any deprecated functions that are running on your site (ie, those that exist in WP but are no longer the standard way to perform a particular task).

To turn on debugging, head to your WordPress install files, open the wp-config.php file (located in the root directory), and add the following line of code near the bottom:

If that line of code already exists but says false, change it to true.

WP_DEBUG set to true
Make sure this code line in PHP matches the one in your file.

Check out this article from our blog, for a more indepth look at using WP_DEBUG.

Fixing Issues

If a plugin or theme is causing issues, work out the issue first on your test site, and find a suitable alternative that is compatible with the latest version of PHP.

Once you’ve found a solution, head over to your live site and make the changes there.

Smush showing version of PHP
PeeHP the supported version when considering plugins for your site.

When you’re looking for a suitable plugin in the WordPress repository, remember to check what versions of PHP are supported.

Resources

Once you’ve worked through all of the bugs and kinks with compatibility, you can either push staging to live, or make any necessary changes to the live site, and then change the PHP version on your live site.

This process will vary from host to host, but will most likely involve changing a setting in your hosting cPanel. Some shared hosts will not let you access this setting, in which case you’ll need to reach out to them for assistance.

Here’s a list with instructions on how to update the PHP version for a collection of popular hosts, including WP Engine, Pantheon, Kinsta, Pagely, Bluehost, Hostgator, GoDaddy, and more.

Hosting with WPMU DEV includes our Hub interface, which greatly streamlines changing your PHP version.

Accessing PHP settings via WPMU DEV’s Hub.

If you prefer a simple solution with a clean UI for checking or updating PHP versions, give WPMU DEV hosting a try, and take one more task off your plate.

PHP Host Partnering

Would you rather be in a Pretty Horrible Position, or a Professionally Happy Place? Rhetorical question… I really just wanted to play with that acronym. :)

Cheap, shared hosting has convinced a lot of people that hosting websites is a simple and straightforward process. The truth is, there is a lot that goes into maintaining your site files and database.

Keeping all of your software up-to-date is one of the tasks that your host can and should help you with.

If they’re unwilling to help you, or hide versions to keep you in the dark, that’s a red flag that you can do much better, and should seriously consider switching hosts.

At WPMU DEV, our hosting (backed by Digital Ocean) leads the industry in value.

Not only do we help you update your PHP version, we also provide a big ole goody bag of features, such as security, caching configuration, uptime monitoring, dedicated IP, nightly backups, free & automated migration, website analytics, and more.

If you ever need help on compatibility issues with your themes or plugins, or have questions about anything WP, our top-rated support team is ready to jump in and assist, 24/7.

Also, every hosting plan is covered by our full 30-day money back guarantee (we’ll happily refund 100% of your money if you decide you don’t like it).

Whether you host with us or elsewhere, keep in mind how much value your host can and should provide.

Choose a company you can trust to take care of those automation and update tasks, like keeping your PHP version current with WP recommendations.

Don’t let subpar hosting steal your focus. You should be able to devote your time and energies to the finer details; making your sites shine with the talents that set you apart from the competition.

How to Update PHP to the Recommended Version for WordPress

Using an outdated version of WordPress core, plugins or themes isn’t ideal. PHP is no different.

While WordPress technically works with PHP 5.6 and above, you’re sacrificing performance and compatibility, plus you’re open to security vulnerabilities by using older PHP versions. You should always aim to use the latest version of PHP.

In this post, you’ll learn everything you need to check what version of PHP you are running and how to update your PHP to the recommended version for WordPress.

What is PHP

PHP can do things like calculations, process conditional logic and pull information from the database so you can take a dynamic approach to build your webpages.

Unlike JavaScript, which modifies the HTML in the browser after the page has been constructed, PHP happens on the server. Since PHP happens before the HTML is rendered, you have more control over the final layout of the page.

If you look in your WordPress site’s files, you’ll see a lot of PHP files. These are the instructions that your server uses to build not only the webpages your visitor sees but also the WordPress admin backend. PHP is a major part of WordPress. PHP is a major part of the whole web, actually. It powers 70% of all websites.

WordPress PHP Version

You may recall that somewhat recently there was a big push to get everyone to upgrade WordPress to PHP 7. While it may have felt recent, that was a while ago. PHP has to be updated on a regular basis, just like WordPress core, themes, and plugins.

With PHP, each version receives support for two years after its initial release, then there is a period of another year where critical security updates are released as they’re needed. After this three year period, that version of PHP is no longer updated.

As of June 2019, when I’m writing this post, the current recommended PHP version for WordPress is 7.3 or greater.

The majority of quality hosting providers will require you to use the latest version of PHP in order to use their servers and will help you modify your site to ensure that the latest version of PHP will not break your site.

WPMU DEV Hosting, for instance, has your back and uses the latest PHP version automatically.

Pie chart depicting what PHP version WordPress sites use
Only 4.4% of sites are using the most up-to-date version of PHP

Less reputable cheap hosts will not take the initiative to encourage you to upgrade your PHP because of the additional cost of support time and resources to help you transition. Since they don’t want to break your site by updating to the latest version of PHP automatically, they’ll often leave your site to use an outdated version of PHP and hope you don’t notice.

This practice is quite common and most WordPress sites aren’t using the most recent version of PHP as a result. Take a look at these WordPress statistics:

  • 4.4% of WordPress sites are using PHP version 7.3
  • 18.4% of WordPress sites are using PHP version 7.2
  • 13.2% of WordPress sites are using PHP version 7.1
  • 16.9% of WordPress sites are using PHP version 7.0

PHP 7.0 made it’s debut on December 2015 and using our three-year rule, then we know it reached the end of its lifecycle in December 2018. This means 64% of WordPress sites are running a version of PHP that is no longer being actively supported and that’s problematic for several reasons.

Why you need to update PHP

Speed

For one, there are tremendous performance benefits that come with using the latest version. PHP 7.3 requires less time and resources to deliver the same number of requests to site visitors. It can handle as much as 3x as many requests per second as PHP 5.6.

According to this infographic, PHP 5.6 executes one WordPress request in just under 100M CPU instructions, while PHP 7 does the same using 25M CPU instructions, and PHP 7.3 uses even fewer. That’s a huge improvement that also goes a long way toward reducing memory usage on your host as well.

Since using the latest version of PHP takes less time to serve the same number of requests, you can give your visitor’s a much better user experience.

Ensuring Compatibility is Costly

Maintaining code takes effort, and that effort is multiplied when you need to ensure backward compatibility for additional versions.

No wonder people (probably overworked theme and plugin developers) at WordCamp US 2018 cheered when Matt Mullenweg proposed a plan to make PHP 7.0 the minimum required version by “as early as” December 2019.

Sometimes new versions of PHP introduce new features, such as error handling or new operators, as was the case with PHP 7. Other times, functions are deprecated or changed.

Rather than spending time parsing through the code to ensure that any changes to PHP do not affect the code, developers can spend their time adding new features or improving security instead.

Vulnerabilities

Just like plugins, themes and WordPress core get updates to fix security vulnerabilities, so does PHP. This is also why using a PHP version that is still getting updates is so important, as it protects you from vulnerabilities such as SQL injection, XSS and Dos attacks.

According to security vulnerability datasource CVE Details, there were 18 known vulnerabilities found in PHP in 2018. Compare this to the 43 vulnerabilities discovered in 2017 and the 107 found in 2016 and you can see why updating can help protect you from a lot known security exploits.

As a matter of fact, some hackers look to see what version of PHP you’re running in order to know what kind of attack would be effective.

How to Check PHP Version in WordPress

So how do you find out what version of PHP your site is using? Easy. You can see this information right within WordPress.

Go to Tools > Site Health

Site Health Menu
Site health was recently added in version 5.2

If your site is not using the latest version of PHP, then it will be shown as a recommended improvement.

If it is, then open the passed tests section to verify. You’ll see that is says PHP is up to date plus what version you’re running.

WordPress site health
Obviously if you don’t know what version you’re running yet, then you won’t know where to look exactly

How to Update PHP in WordPress

Once you check to see what version of PHP your hosting server is running, you’ll know if you need to upgrade to the latest version of PHP.

If you do, you’ll first need to see if your site will be compatible with the new version of PHP. You never want to test major changes like updating your PHP on your live site because if there are major incompatibilities, you’ll damage your site.

For this reason, you’ll need to create an alternate site to test your changes on first.

Step 1: Create a Copy of Your Site

You’ll first need to get a copy of your current site. You’ll need all of the files and a copy of the database. You can use SFTP for your files and export a copy of your database using MyPHP.

In some instances, you may be able to use your last backup, if your backups include both the files and the database.

Step 2: Create a Local or Staging Site

Once you have a copy of your site, you’ll need to set up a testing environment. You can either use a local environment or set up a staging environment if your host allows it.

See our post on how to set up XAMPP on your local computer if you need help setting up your local environment.

Once your testing environment is set up, you can add the files and database from the previous step to your testing environment, so you have an exact replica of your live site.

Then once you have a copy of your site in your testing environment set up, you’re ready to upgrade the PHP version of your testing site.

Check PHP Compatibility

Now comes the fun part, and by fun, I actually mean when the boring action happens.

You’ll need to go through your test site to make sure that nothing is broken. You’ll want to pay extra careful attention to the critical functionality of your site. Checkout processes, newsletter signups, web forms, navigation, and all of the other elements that contribute to the bottom line.

You want to catch these issues before they have a chance to wreak havoc on your live site and cause a bad user experience for your visitors.

Checking PHP Compatibility with Tools

There are some tools that can help you with this process.

PHP Compatibility Checker – This plugin is often recommended to help you scan your site for incompatibility issues. Unfortunately, it hasn’t been updated to be able to test PHP 7.3. It also is known to flag false positives, so be sure to double check incompatibilities manually.

PHP Compatibility Checker
PHP Compatibility Checker Dashboard

Error Log Monitor – This plugin will display a list of PHP errors in your WordPress dashboard which will help you diagnose the issues if you’re a developer. If you’re not a developer then it will help you relay the issue to support.

PHP Error Log
Error Log in WordPress Dashboard

WP_DEBUG – WP_DEBUG is a PHP constant (a permanent global variable) that can be used to trigger the “debug” mode throughout WordPress. To turn on debugging in WordPress, set the WP_DEBUG variable to true. You can find it in the wp-config.php file. Check out our other post on Debugging WordPress: How to Use WP_DEBUG.

Fix issues

If a plugin or your theme is causing issues, work out the issue on your test site. Find a suitable alternative that is compatible with the latest version of PHP. Once you’ve found a solution, be sure to also make the change to your live site.

Smush plugin showing compatible PHP versions
Check your active plugins to make sure they’re compatible with the latest version of PHP

When you’re looking for a suitable plugin in the WordPress repo, check to see what versions of PHP are supported.

How to Update PHP Version in WordPress

Once you’ve worked through all of the bugs and issues with compatibility, and have made the corresponding changes to your live site, then you can switch over your live site to the new version of PHP.

This process will vary from host to host, but will most likely involve changing a setting in your hosting cPanel. Ask your host for help on how to do this as some shared hosts will not let you access this setting.

Here’s a list with instructions to how to update the PHP version for 32 different hosts including popular hosts such as WP Engine, Pantheon, Kinsta, Pagely, Bluehost, Hostgator, GoDaddy and more.

If you never want to deal with having to update your PHP version, why not give WPMU DEV hosting a try and leave all the technical stuff to us.

Partnering with Your Host to Update PHP Version

Cheap shared hosting has convinced a lot of people that hosting websites is a simple and straightforward process, but the truth is, there is a lot that goes into maintaining your site files and database. Keeping all of your software up-to-date is one of the tasks that your host can and should help you with. If they’re unwilling to help you or hide your version to keep you in the dark, then that’s generally a sign that it’s time for you to switch hosts to something better.

At WPMU DEV, members get hosting for 3 free sites (even multisite) included with a monthly membership. Not only do we help you update your PHP version, we also backup your site daily, assist with caching configuration and monitor uptime. And if you ever need help fixing compatibility issues with your theme or plugins, our awesome support team is ready and willing to help. Sign up for a free 30-day membership to try everything out.

How to Move WordPress From Local Server to Live Site (2 Methods)

One way to speed up your website development is to build your website locally on your own computer using a software like WAMP (for Windows) or MAMP (for Mac).

Once you’re finished perfecting your website, the next step is to move it from your computer to a live site and share your creation with the world. In this article, we will show you how to easily move WordPress from local server to a live site.

Move WordPress From Local Server to Live Site

We will cover two different methods to move WordPress from local server to your live website (step by step).

The first method uses a WordPress migration plugin and is recommended for beginners. In the second method, we will show you how to manually move WordPress from local server to a live site.

You can choose the method that best suits you:

Before You Begin

In order for you to migrate WordPress from localhost to live server, you need to have a few things in place.

First, we’re assuming that you have a WordPress site running on local server (also called localhost) on your computer, and you have full access to it.

Next, you’ll need to have a domain name and web hosting. We have a list of the best WordPress hosting companies that you can choose from.

To speed it up, you can use Bluehost. They’re an official WordPress recommended hosting provider, and they are offering our users an exclusive 60% off discount + a free domain.

If you need help setting up your website, follow our step by step guide on how to make a website.

Finally, you will need to have a FTP program and know how to use FTP, so you can upload your content to the live site.

Ready? Let’s begin migrating your WordPress site.

Method 1. Transfer WordPress from Local Server to Live Site Using a Migration Plugin

This method is easier and recommended for beginners. We’ll be using a WordPress migration plugin to move WordPress from localhost to a live site.

Step 1. Install and Setup Duplicator Plugin

First, thing you need to do is install and activate the Duplicator plugin on your local site. For more details, see our step by step guide on how to install a WordPress plugin.

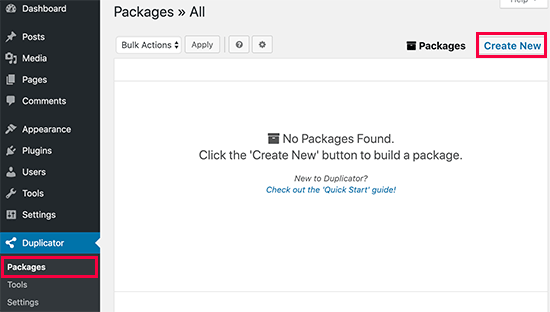
Upon activation, you need to go to Duplicator » Packages page and click on the ‘Create New’ button.

Creating a new Duplicator package

After that, click on the next button to continue.

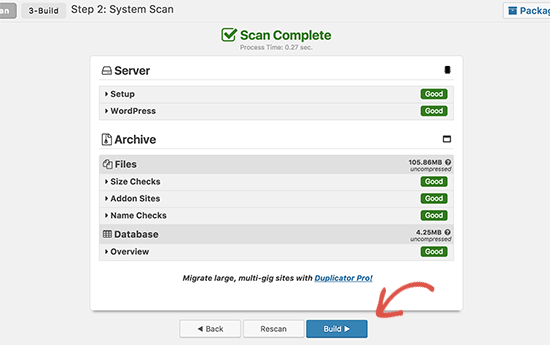
Duplicator will now run some tests to see if everything is in order. If all items are marked ‘Good’ then click on the ‘Build’ button.

Build package

This process may take a few minutes depending on the size of your website. You need to leave this tab open until the process is complete.

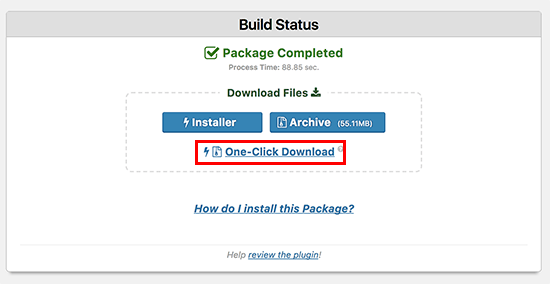
Once finished, you’ll see download options for Installer and the Archive package. You need to click on the ‘One click download’ link to download both files to your computer.

Download package

So what are these files?

Well, the archive file is a copy of your complete WordPress website. It includes all WordPress core files as well as your images, uploads, themes, plugins, and a backup of your WordPress database.

The installer file is a script that will automate the migration by unpacking the archive file.

Step 2. Create a Database for Your Live Site

Before you can run the installer or upload the WordPress website from localhost to your hosting server, you will need to create a MySQL database for your live website.

If you have already created a MySQL database, then you can skip this step.

To create a database you need to visit your hosting account’s cPanel dashboard. Scroll down to the Databases section and then click on the MySQL Databases icon.

Database icon in cPanel

On the next screen, you’ll see a field to create a new database. Simply provide a name for your database and click on the ‘Create Database’ button.

Create new database

cPanel will now create a new database for you. After that, you need to scroll down to the MySQL Users section.

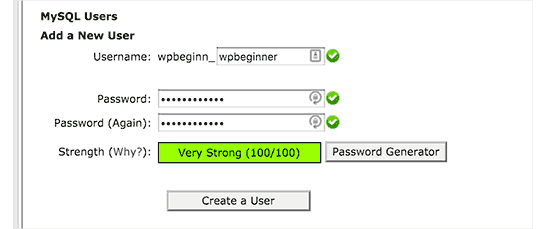
Next, provide a username and password for your new user and click on the ‘Create a user’ button.

Add a MySQL user

The new user you just created, still does not have permission to work on the database. Let’s change that.

Scroll down to the ‘Add User to Database’ section. Simply select the database user you created from the dropdown menu next to the ‘User’ field, then select the database, and click on the add button.

Save user to the database

Your database is now ready to be used with your WordPress site. Make sure to note down the database name, username, and password. You’ll need this information in the next step.

Step 3. Upload Files from Local Server to Live Site

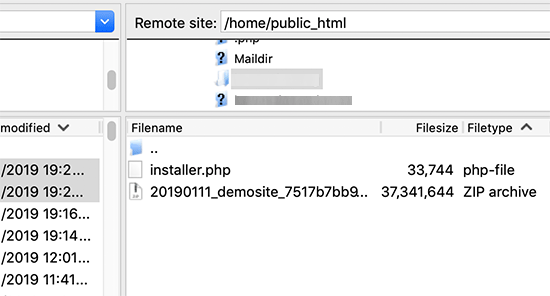
Now you need to upload the archive and installer files from your local site to your hosting account.

First, connect to your live site using an FTP client. Once connected, make sure that the root directory of your website is completely empty.

Normally, root directory is the /home/public_html/ folder.

Some WordPress hosting companies automatically install WordPress when you sign up. If you have WordPress files there, then you need to delete them.

After that, you can upload the archive and installer files from Duplicator to your empty root directory.

Migration files in the root directory

Step 4. Runing The Migration Script

After you have uploaded the migration files, you need to visit the following URL in your browser:

http://example.com/installer.php

Don’t forget to replace example.com with your own domain name.

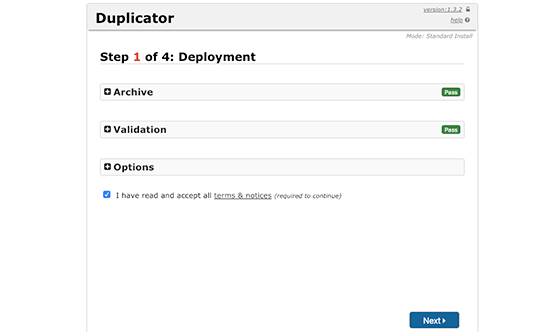
This will launch the Duplicator migration wizard.

Duplicator intialized

The installer will automatically scan for the archive file and run a validation test. You need to check the terms & conditions checkbox and continue by clicking on the Next button.

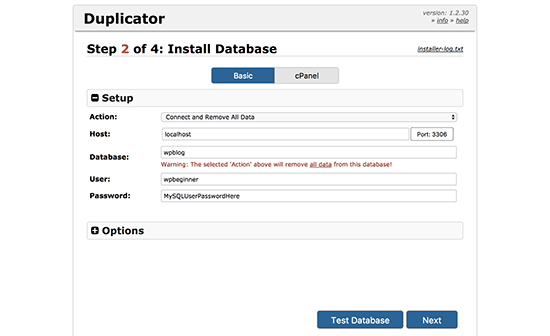
On the next screen, it will ask you to enter your WordPress database information.

Your host will likely be localhost. After that, you will enter the details of the database you created in the earlier step.

Connect your database

Click on the next button to continue.

Duplicator will now import your WordPress database backup from the archive into your new database.

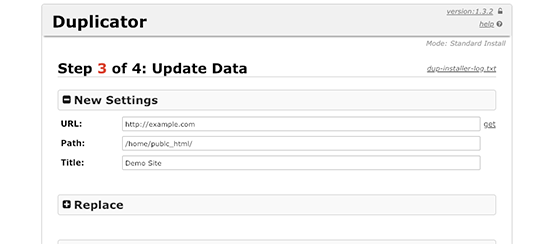
Next, it will ask you to update site URL or Path. You shouldn’t have to change anything since it automatically detects the URL of your live website, and its path.

Update site URL

Click on the next button to continue.

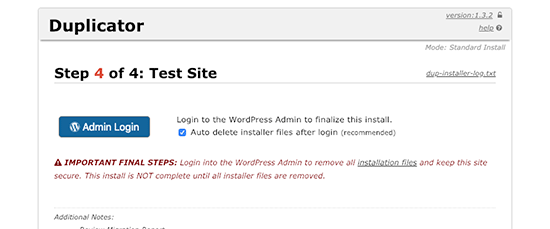
Duplicator will now finish the migration and will show you a success screen. You can now click on the ‘Admin Login’ button to enter the WordPress admin area of your live site.

Successfully moved

Once you login to your live site, Duplicator will automatically clean up the installation files.

That’s all, you have successfully moved WordPress from local server to your live site.

Method 2. Manually Transfer WordPress from Local Server to Live Site

In this method, we will show you how to manually move WordPress from local server to your live site. It will come in handy if the first method doesn’t work or you prefer to do it manually.

Step 1: Export Local WordPress Database

The first thing you need to do is export your local WordPress database. We’ll be using phpMyAdmin to do that. If you are unfamiliar with it, then you might want to take a look at our guide to WordPress database management using phpMyAdmin.

Simply go to http://localhost/phpmyadmin/ and click on your WordPress database. Next, click on the Export button from the top menu bar.

Export from localhost

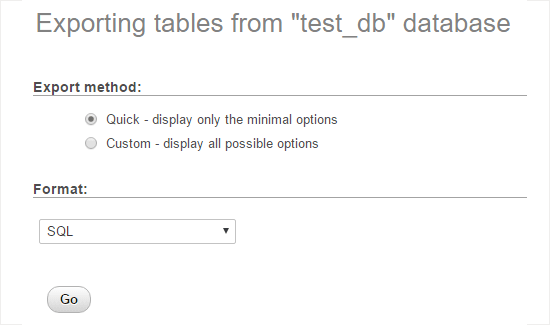
In the Export Method option, you can choose “Quick” or “Custom”. Custom will provide you with more options to export your database.

We recommend choosing Quick, and then click the Go button to download your database.

Export WordPress database using phpMyAdmin

Step 2: Upload WordPress Files to Live Site

Now we’ll need to move all your website files to the live site.

To get started, go ahead and open your FTP client and connect to your web hosting account.

Once you’re connected to your live site, make sure you upload the files in the right directory. For example, if you want the site to be hosted on yoursite.com, then you would want to upload all the files in your public_html directory.

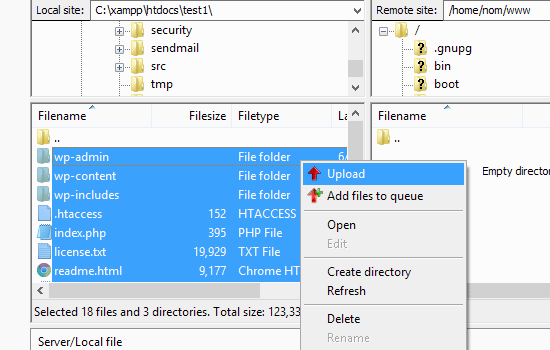
Now select your local WordPress files and upload them to your live server.

Uploading WordPress from localhost to live site

Step 3: Create MySQL Database on Live Site

While your FTP client is uploading your WordPress files, you can start importing your database to the live server. Most WordPress hosting providers offer cPanel to manage your hosting account, so we’ll show you how to create a database using cPanel.

First, you need to log in to your cPanel dashboard and click on the MySQL Databases icon which can be found in the databases section.

Database section in cpanel

On the next screen, create a database by entering a name for your database and clicking the Create Database button.

New database

After creating your database, scroll down to the MySQL Users section and create or add an existing user to the database.

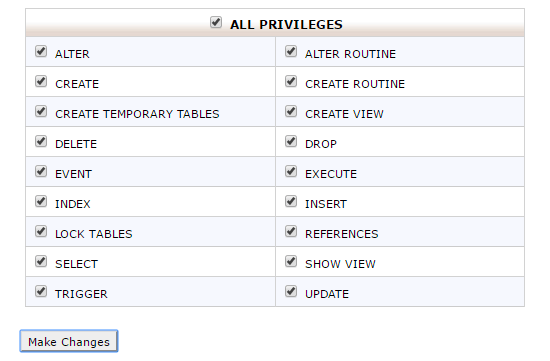
After adding the user, cPanel will take you to set MySQL privileges for that user. Simply grant all privileges to the user by making sure every box is checked, and then click the Make Changes button.

grant all privileges to database user

Step 4: Import WordPress Database on Live Site

The next step in the process is to import your WordPress database.

Go to your cPanel dashboard, scroll down to the databases section and click on phpMyAdmin.

This will take you to phpMyAdmin where you want to click on the database you created in Step 3. PhpMyAdmin will show your new database with no tables.

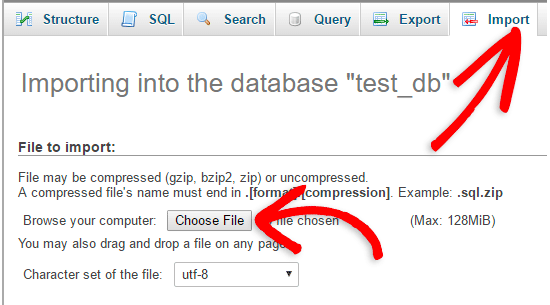
Click on the Import tab in the top menu. On the import page, click on Choose File button and then select the database file you saved in Step 1.

Lastly, press the Go button at the bottom of the page. PhpMyadmin will now import your WordPress database.

Import database via phpMyAdmin

Step 5: Change the Site URL

Now you need to change the site URL in your database, so that it will connect with your live WordPress site.

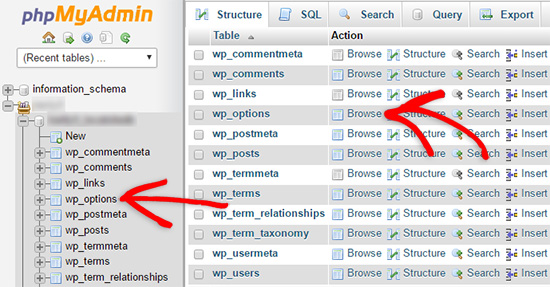
In phpMyAdmin, look for the wp_options table in your database that we just imported in step 4. If you changed your database prefix, then instead of wp_options it might be {prefix}_options.

Click on the Browse button next to wp_options or the link that you see in the sidebar to open the page with a list of fields within the wp_options table. See screenshot below:

Browse the wp options table

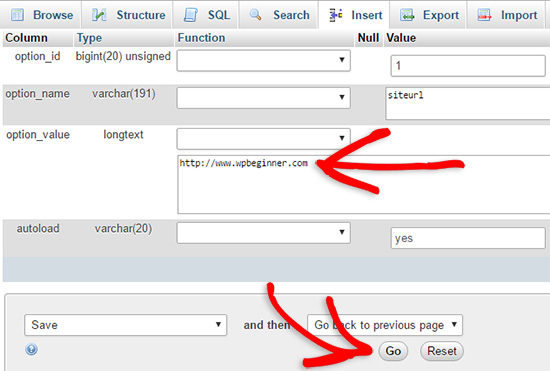
Under the field options_name, you need to look for siteurl. Click the Edit Field icon which can be found at the far left at the beginning of the row.

Edit siteurl in phpMyAdmin

When you click the edit field, an edit field window will appear. In the input box for option_value, you will see the URL of your local install probably something like: http://localhost/test. Carefully insert your new site url in this field, for example: https://www.wpbeginner.com

Save the field by clicking the Go button.

edit the siteurl field

Next, you need to replicate this step for the option name: home. The wp_options page can be a few pages long, so simply find the home tab.

Usually it is on the second page which you can navigate to by clicking on the pagination arrows in phpMyAdmin.

Update the home url to be the same as your siteurl.

Step 6: Setup Your Live Site

Now that we have imported the database and all of our content should be uploaded, it’s time to configure WordPress.

At this time, your site should be showing an Error Establishing Database Connection error.

To fix this, connect to your website using an FTP client and edit wp-config.php file.

You will need to provide the database name, user and password you created earlier in Step 3.

Next, save the wp-config.php file and upload it back to your server.

You can now visit your website, and it should be live now.

Next, you need to login to your WordPress admin panel and go to Settings » General. Without changing anything, scroll to the bottom and click the Save Changes button.

This will ensure that the site URL is corrected anywhere else that it needs to be.

After that go to Settings » Permalink and click Save Changes to ensure that all post links are working fine.

Step 7: Fix Images and Broken Links by Updating Paths

Whenever you are moving a WordPress site from one domain to another, or from local server to a live site, you’ll face broken links and missing images.

You can either use the SQL query or use the Velvet Blues WordPress plugin.

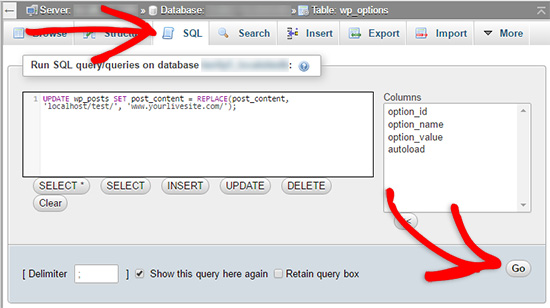
For those who want to do it via SQL, here is a simple SQL query that should solve this problem:

UPDATE wp_posts SET post_content = REPLACE(post_content, 'localhost/test/', 'www.yourlivesite.com/');

Simply go to phpMyAdmin, click on your database and then click on SQL from top menu. Write this query, but don’t forget to change it with your own local site and live site URLs.

Fixing WordPress images and broken URLs after moving to live site

That’s all, you have successfully migrated WordPress from localserver to a live site!

Hopefully now your live website is up and running smoothly. Be sure to check out your website to make sure that everything is working as expected. If you notice any errors, you can check out our guide to common WordPress errors for help troubleshooting.

If you liked this article, then please subscribe to our YouTube Channel for WordPress video tutorials. You can also find us on Twitter and Facebook.

The post How to Move WordPress From Local Server to Live Site (2 Methods) appeared first on WPBeginner.