Have you ever seen a calendar on a webpage and thought, how the heck did they did that? For something like that, it might be natural to reach for a plugin, or even an embedded Google Calendar, but it’s actually a lot more straightforward to make one than you might think and only requires the trifecta of HTML, CSS and JavaScript. Let’s make one together!
I’ve set up a demo over at CodeSandbox so you can see what we’re aiming for.
Let’s first identify some requirements for what the calendar should do. It should:
- Display a month grid for a given month
- Display dates from the previous and next months to so the grid is always full
- Indicate current date
- Show the name of the currently selected month
- Navigate to the previous and next month
- Allow the user to navigate back to current month with a single click
Oh, and we’ll build this as a single page application that fetches calendar dates from Day.js, a super light utility library.
We’re going to shy away from choosing a specific framework to keep things easy. For this setup, I’m using Parcel for package management so I can write in Babel, bundle things up, and manage the one and only dependency for the project. Check out the package.json file over at CodeSandbox for specifics.
Step 1: Start with the basic markup and styles
Let’s start with creating a basic template for our calendar. This doesn’t need to be anything fancy. But it also should be done without resorting to tables.
We can outline our markup as three layers where we have:
- A section for the calendar header. This will show the currently selected month and the elements responsible for paginating between months.
- A section for the calendar grid header. Again, we’re not reaching form tables, but this would be sort of like a table header that holds a list containing the days of the week, starting with Monday.
- The calendar grid. You know, each day in the current month, represented as a square in the grid.
Let’s write this up in a file called index.js. This can go inside a src folder in the project folder. We will indeed have an index.html file in the project root that imports our work, but the primary markup will live in the JavaScript file.
<!-- index.js -->
document.getElementById("app").innerHTML = `
<!-- Parent container for the calendar month -->
<div class="calendar-month">
  <!-- The calendar header -->
  <section class="calendar-month-header">
    <!-- Month name -->
    <div
      id="selected-month"
      class="calendar-month-header-selected-month"
    >
      July 2020
    </div>


    <!-- Pagination -->
    <div class="calendar-month-header-selectors">
      <span id="previous-month-selector"><</span>
      <span id="present-month-selector">Today</span>
      <span id="next-month-selector">></span>
    </div>
  </section>

  <!-- Calendar grid header -->
  <ol
    id="days-of-week"
    class="day-of-week"
  >
    <li>Mon</li>
    ...
    <li>Sun</li>
  </ol>


  <!-- Calendar grid -->
  <ol
    id="calendar-days"
    class="date-grid"
  >
    <li class="calendar-day">
      <span>
        1
      </span>
      ...
      <span>
        29
      </span>
    </li>
  </ol>
</div>
`;
Let’s go ahead and import this file into that index.html file that lives in the root directory of the project. Nothing special happening here. It’s merely HTML boilerplate with an element that’s targeted by our app and registers our index.js file.
<!DOCTYPE html>
<html>
  <head>
    <title>Parcel Sandbox</title>
    <meta charset="UTF-8" />
  </head>

  <body>
    <div id="app"></div>

    <script src="src/index.js"></script>
  </body>
</html>
Now that we have some markup to work with, let’s style it up a bit so we have a good visual to start with. Specifically, we’re going to:
- Position the elements using flexbox
- Create a calendar frame using CSS grid
- Position the labels within the cells
First up, let’s create a new styles.css file in the same src folder where we have index.js and drop this in:
body {
  --grey-100: #e4e9f0;
  --grey-200: #cfd7e3;
  --grey-300: #b5c0cd;
  --grey-800: #3e4e63;
  --grid-gap: 1px;
  --day-label-size: 20px;
}

.calendar-month {
  position: relative;
  /* Color of the day cell borders */
  background-color: var(--grey-200);
  border: solid 1px var(--grey-200);
}


/* Month indicator and selectors positioning */
.calendar-month-header {
  display: flex;
  justify-content: space-between;
  background-color: #fff;
  padding: 10px;
}


/* Month indicator */
.calendar-month-header-selected-month {
  font-size: 24px;
  font-weight: 600;
}


/* Month selectors positioning */
.calendar-month-header-selectors {
  display: flex;
  align-items: center;
  justify-content: space-between;
  width: 80px;
}


.calendar-month-header-selectors > * {
  cursor: pointer;
}


/* | Mon | Tue | Wed | Thu | Fri | Sat | Sun | */
.day-of-week {
  color: var(--grey-800);
  font-size: 18px;
  background-color: #fff;
  padding-bottom: 5px;
  padding-top: 10px;
}


.day-of-week,
.days-grid {
  /* 7 equal columns for weekdays and days cells */
  display: grid;
  grid-template-columns: repeat(7, 1fr);
}


.day-of-week > * {
  /* Position the weekday label within the cell */
  text-align: right;
  padding-right: 5px;
}


.days-grid {
  height: 100%;
  position: relative;
  /* Show border between the days */
  grid-column-gap: var(--grid-gap);
  grid-row-gap: var(--grid-gap);
  border-top: solid 1px var(--grey-200);
}


.calendar-day {
  position: relative;
  min-height: 100px;
  font-size: 16px;
  background-color: #fff;
  color: var(--grey-800);
  padding: 5px;
}


/* Position the day label within the day cell */
.calendar-day > span {
  display: flex;
  justify-content: center;
  align-items: center;
  position: absolute;
  right: 2px;
  width: var(--day-label-size);
  height: var(--day-label-size);
}
The key part that sets up our grid is this:
.day-of-week,
.days-grid {
  /* 7 equal columns for weekdays and days cells */
  display: grid;
  grid-template-columns: repeat(7, 1fr);
}
Notice that both the calendar grid header and the calendar grid itself are using CSS grid to lay things out. We know there will always be seven days in a week, so that allows us to use the repeat() function to create seven columns that are proportional to one another. We’re also declaring a min-height of 100px on each date of the calendar to make sure the rows are consistent.
We need to hook these styles up with the markup, so let’s add this to the top of our index.js file:
import "./styles.css";This is a good spot to stop and see what we have so far.
Step 2: Setting up current month calendar
As you probably noticed, the template only contains static data at the moment. The month is hardcoded as July and the day numbers are hardcoded as well. That’s where Day.js comes into play. It provides all the data we need to properly place dates on the correct days of the week for a given month using real calendar data. It allows us to get and set anything from the start date of a month to all the date formatting options we need to display the data.
We will:
- Get the current month
- Calculate where the days should be placed (weekdays)
- Calculate the days for displaying dates from the previous and next months
- Put all of the days together in a single array
First, we need to import Day.js and remove all static HTML (selected month, weekdays and days). We’ll do that by adding this to our index.js file right above where we imported the styles:
import dayjs from "dayjs";We’re also going to lean on a couple of Day.js plugins for help. WeekDay helps us set the first day of the week. Some prefer Sunday as the first day of the week. Other prefer Monday. Heck, in some cases, it makes sense to start with Friday. We’re going to start with Monday.
The weekOfYear plugin returns the numeric value for the current week out of all weeks in the year. There are 52 weeks in a year, so we’d say that the week starting January 1 is the the first week of the year, and so on.
So here what we put into index.js right after our import statements:
const weekday = require("dayjs/plugin/weekday");
const weekOfYear = require("dayjs/plugin/weekOfYear");


dayjs.extend(weekday);
dayjs.extend(weekOfYear);
Once we strip out the hardocded calendar values, Here’s what we have in index.js so far:
import dayjs from "dayjs";
import "./styles.css";
const weekday = require("dayjs/plugin/weekday");
const weekOfYear = require("dayjs/plugin/weekOfYear");


dayjs.extend(weekday);
dayjs.extend(weekOfYear);


document.getElementById("app").innerHTML = `
<div class="calendar-month">
  <section class="calendar-month-header">
    <div
      id="selected-month"
      class="calendar-month-header-selected-month"
    >
    </div>
    <div class="calendar-month-header-selectors">
      <span id="previous-month-selector"><</span>
      <span id="present-month-selector">Today</span>
      <span id="next-month-selector">></span>
    </div>
  </section>

  <ul
    id="days-of-week"
    class="day-of-week"
  >
  </ul>
  <ul
    id="calendar-days"
    class="days-grid"
  >
  </ul>
</div>
`;
Now let’s set few constants. Specifically, we want to construct an array of days of the weeks (i.e. Monday, Tuesday, Wednesday, etc.):
const WEEKDAYS = ["Mon", "Tue", "Wed", "Thu", "Fri", "Sat", "Sun"];Then, we want to fetch the current year and set in in YYYY format:
const INITIAL_YEAR = dayjs().format("YYYY");And we want to set the current month as the starting point when initially loading the calendar, where M formats the month as a numeric value (e.g. January equals 1):
const INITIAL_MONTH = dayjs().format("M");Let’s go and populate our calendar grid header with the days of the week. First we grab the proper element (#days-of-week), then we iterate through our WEEKDAYS array, creating a list item element for each item in the array while setting the name for each one:
// Select the calendar grid header element
const daysOfWeekElement = document.getElementById("days-of-week");


// Loop through the array of weekdays
WEEKDAYS.forEach(weekday => {
  // For each item in the array, make a list item element
  const weekDayElement = document.createElement("li");
  // Append a child element inside the list item...
  daysOfWeekElement.appendChild(weekDayElement);
  /// ...that contains the value in the array
  weekDayElement.innerText = weekday;
});
Step 3: Creating the calendar grid
That was pretty straightforward but now the real fun starts as we will now play with the calendar grid. Let’s stop for a second a think what we really need to do to get that right.
First, we want the date numbers to fall in the correct weekday columns. For example, July 1, 2020 is on a Wednesday. That’s where the date numbering should start.
If the first of the month falls on Wednesday, then that means we’ll have empty grid items for Monday and Tuesday in the first week. The last day of the month is July 31, which falls on a Friday. That means Saturday and Sunday will be empty in the last week of the grid. We went to fill those with the trailing and leading dates of the previous and next months, respectively, so that the calendar grid is always full.
Create days for the current month
To add the days for the current month to the grid, we need to know how many days exist in the current month. We can get that using the daysInMonth method provided by Day.js. Let’s create a helper method for that.
function getNumberOfDaysInMonth(year, month) {
  return dayjs(`${year}-${month}-01`).daysInMonth()
}
When we know that, we create an empty array with a length that’s equal to number of days in the current month. Then we map() that array and create a day object for each one. The object we create has an arbitrary structure, so you can add other properties if you need them.
In this example, though, we need a date property that will be used to check if a particular date is the current day. We’ll also return a dayOfMonth property that acts as the label (e.g. 1, 2, 3 and so on). isCurrentMonth checks whether the date is in the current month or outside of it. If it is outside the current month, we will style those so folks know they are outside the range of the current month.
function createDaysForCurrentMonth(year, month) {
  return [...Array(getNumberOfDaysInMonth(year, month))].map((day, index) => {
    return {
      date: dayjs(`${year}-${month}-${index + 1}`).format("YYYY-MM-DD"),
      dayOfMonth: index + 1,
      isCurrentMonth: true
    };
  });
}
Add dates from the previous month to the calendar grid
To get dates from the previous month to display in the current month, we need to check what is the weekday of the first day in selected month. That’s where we can use the WeekDay plugin for Day.js. Let’s create a helper method for that.
function getWeekday(date) {
  return dayjs(date).weekday()
}
Then, based on that, we need to check which day was the last Monday in the previous month. We need that value to know how many days from the previous month should be visible in the current month view. We can get that by subtracting the weekday value from the first day of the current month. For example, if first day of the month is Wednesday, we need to subtract 3 days to get last Monday of the previous month. Having that value allows us to create an array of day objects starting from the last Monday of the previous month through the end of that month.
function createDaysForPreviousMonth(year, month) {
  const firstDayOfTheMonthWeekday = getWeekday(currentMonthDays[0].date);


  const previousMonth = dayjs(`${year}-${month}-01`).subtract(1, "month");

  const previousMonthLastMondayDayOfMonth = dayjs(
    currentMonthDays[0].date
  ).subtract(firstDayOfTheMonthWeekday - 1, "day").date();


  // Account for first day of the month on  a Sunday (firstDayOfTheMonthWeekday === 0)
  const visibleNumberOfDaysFromPreviousMonth = firstDayOfTheMonthWeekday ? firstDayOfTheMonthWeekday - 1 : 6


  return [...Array(visibleNumberOfDaysFromPreviousMonth)].map((day, index) => {
    return {
      date: dayjs(
        `${previousMonth.year()}-${previousMonth.month() + 1}-${previousMonthLastMondayDayOfMonth + index}`
      ).format("YYYY-MM-DD"),
      dayOfMonth: previousMonthLastMondayDayOfMonth + index,
      isCurrentMonth: false
    };
  });
}
Add dates from the next month to the calendar grid
Now, let’s do the reverse and calculate which days we need from the next month to fill in the grid for the current month. Fortunately, we can use the same helper we just created for the previous month calculation. The difference is that we will calculate how many days from the next month should be visible by subtracting that weekday numeric value from 7.
So, for example, if the last day of the month is Saturday, we need to subtract 1 day from 7 to construct an array of dates needed from next month (Sunday).
function createDaysForNextMonth(year, month) {
  const lastDayOfTheMonthWeekday = getWeekday(`${year}-${month}-${currentMonthDays.length}`)


  const visibleNumberOfDaysFromNextMonth = lastDayOfTheMonthWeekday ? 7 - lastDayOfTheMonthWeekday : lastDayOfTheMonthWeekday


  return [...Array(visibleNumberOfDaysFromNextMonth)].map((day, index) => {
    return {
      date: dayjs(`${year}-${Number(month) + 1}-${index + 1}`).format("YYYY-MM-DD"),
      dayOfMonth: index + 1,
      isCurrentMonth: false
    }
  })
}
OK, we know how to create all days we need, let’s use the methods we just created and then merge all days into a single array of all the days we want to show in the current month, including filler dates from the previous and next months.
let currentMonthDays = createDaysForCurrentMonth(INITIAL_YEAR, INITIAL_MONTH)
let previousMonthDays = createDaysForPreviousMonth(INITIAL_YEAR, INITIAL_MONTH, currentMonthDays[0])
let nextMonthDays = createDaysForNextMonth(INITIAL_YEAR, INITIAL_MONTH)


let days = [...this.previousMonthDays, ...this.currentMonthDays, ...this.nextMonthDays]
Here’s everything we just covered put together in index.js:
// Same as before ...


const WEEKDAYS = ["Mon", "Tue", "Wed", "Thu", "Fri", "Sat", "Sun"];
const INITIAL_YEAR = dayjs().format("YYYY");
const INITIAL_MONTH = dayjs().format("M");
const daysOfWeekElement = document.getElementById("days-of-week");


// Add weekdays to calendar header
WEEKDAYS.forEach(weekday => {
  const weekDayElement = document.createElement("li");
  daysOfWeekElement.appendChild(weekDayElement);
  weekDayElement.innerText = weekday;
});


let currentMonthDays = createDaysForCurrentMonth(INITIAL_YEAR, INITIAL_MONTH);
let previousMonthDays = createDaysForPreviousMonth(INITIAL_YEAR, INITIAL_MONTH);
let nextMonthDays = createDaysForNextMonth(INITIAL_YEAR, INITIAL_MONTH);
let days = [...previousMonthDays, ...currentMonthDays, ...nextMonthDays];


console.log(days);


function getNumberOfDaysInMonth(year, month) {
  return dayjs(`${year}-${month}-01`).daysInMonth();
}


function createDaysForCurrentMonth(year, month) {
  return [...Array(getNumberOfDaysInMonth(year, month))].map((day, index) => {
    return {
      date: dayjs(`${year}-${month}-${index + 1}`).format("YYYY-MM-DD"),
      dayOfMonth: index + 1,
      isCurrentMonth: true
    };
  });
}


function createDaysForPreviousMonth(year, month) {
  const firstDayOfTheMonthWeekday = getWeekday(currentMonthDays[0].date);
  const previousMonth = dayjs(`${year}-${month}-01`).subtract(1, "month");
  const previousMonthLastMondayDayOfMonth = dayjs(currentMonthDays[0].date)
    .subtract(firstDayOfTheMonthWeekday - 1, "day")
    .date();
  // Cover first day of the month being sunday (firstDayOfTheMonthWeekday === 0)
  const visibleNumberOfDaysFromPreviousMonth = firstDayOfTheMonthWeekday
    ? firstDayOfTheMonthWeekday - 1
    : 6;


  return [...Array(visibleNumberOfDaysFromPreviousMonth)].map((day, index) => {
    return {
      date: dayjs(
        `${previousMonth.year()}-${previousMonth.month() +
          1}-${previousMonthLastMondayDayOfMonth + index}`
      ).format("YYYY-MM-DD"),
      dayOfMonth: previousMonthLastMondayDayOfMonth + index,
      isCurrentMonth: false
    };
  });
}

function createDaysForNextMonth(year, month) {
  const lastDayOfTheMonthWeekday = getWeekday(
    `${year}-${month}-${currentMonthDays.length}`
  );
  const nextMonth = dayjs(`${year}-${month}-01`).add(1, "month");
  const visibleNumberOfDaysFromNextMonth = lastDayOfTheMonthWeekday
    ? 7 - lastDayOfTheMonthWeekday
    : lastDayOfTheMonthWeekday;
  return [...Array(visibleNumberOfDaysFromNextMonth)].map((day, index) => {
    return {
      date: dayjs(
        `${nextMonth.year()}-${nextMonth.month() + 1}-${index + 1}`
      ).format("YYYY-MM-DD"),
      dayOfMonth: index + 1,
      isCurrentMonth: false
    };
  });
}

function getWeekday(date) {
  return dayjs(date).weekday();
}Step 4: Show calendar dates
OK, so we have the basic markup for our calendar, the data we need to display dates from the current month, plus dates from the previous and next month to fill in empty grid items. Now we need to append the dates to the calendar!
We already have a container for the calendar grid, #calendar-days. Let’s grab that element.
const calendarDaysElement = document.getElementById("calendar-days");Now, let’s create a function that will append a day to our calendar view.
function appendDay(day, calendarDaysElement) {
  const dayElement = document.createElement("li");
  const dayElementClassList = dayElement.classList;


  // Generic calendar day class
  dayElementClassList.add("calendar-day");


  // Container for day of month number
  const dayOfMonthElement = document.createElement("span");


  // Content
  dayOfMonthElement.innerText = day.dayOfMonth;


  // Add an extra class to differentiate current month days from prev/next month days
  if (!day.isCurrentMonth) {
    dayElementClassList.add("calendar-day--not-current");
  }


  // Append the element to the container element
  dayElement.appendChild(dayOfMonthElement);
  calendarDaysElement.appendChild(dayElement);
}
Notice that we’re tossing in a check for the dates that are coming from the previous and next months so that we can add a class to style them differently from the dates in the current month:
.calendar-day--not-current {
background-color: var(--grey-100);
color: var(--grey-300);
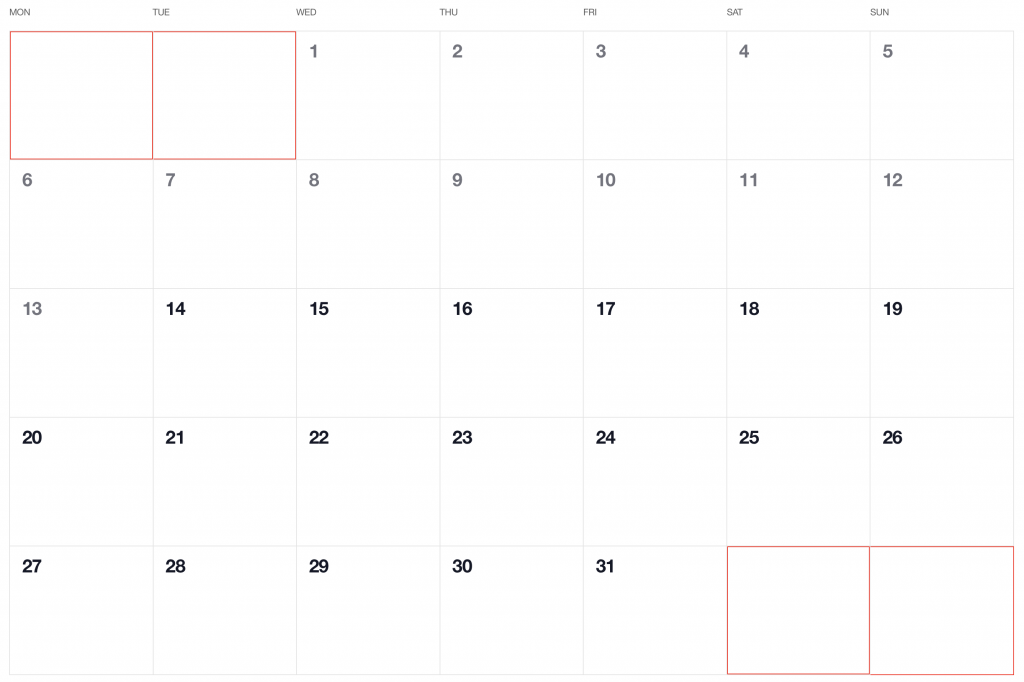
}That’s it! Our calendar should now look as we wanted.
Step 5: Select current month
What we have so far is pretty nice, but we want the user to be able to paginate from month-to-month forwards and backwards in time, starting from the current month. We have most of the logic in place, so all we really need to do is to add a click listener to the pagination buttons that re-runs the days calculation and re-draws the calendar with updated data.
Before we begin, let’s define variables for dates that are in the current month, previous month, and next month so we can reference them throughout the code.
let currentMonthDays;
let previousMonthDays;
let nextMonthDays;
Now, let’s create a method that will be responsible for re-calculating the calendar days and re-rendering the calendar when paginating to another month. We will call that function createCalendar. This method will accept two attributes — year and month — and based on that, the calendar will re-render with new data and without a new page load.
The method will replace the header content to always show the selected month label.
function createCalendar(year = INITIAL_YEAR, month = INITIAL_MONTH) {
  document.getElementById("selected-month").innerText = dayjs(
    new Date(year, month - 1)
  ).format("MMMM YYYY");


  // ...
Then it will grab the calendar days container and remove all existing days.
// ...


  const calendarDaysElement = document.getElementById("calendar-days");
  removeAllDayElements(calendarDaysElement);


  // ...
When the calendar is cleared, it will calculate new days that should be displayed using the methods we created before.
//...


currentMonthDays = createDaysForCurrentMonth(
  year,
  month,
  dayjs(`${year}-${month}-01`).daysInMonth()
);


previousMonthDays = createDaysForPreviousMonth(year, month);


nextMonthDays = createDaysForNextMonth(year, month);


const days = [...previousMonthDays, ...currentMonthDays, ...nextMonthDays];


// ...
And, finally, it will append a day element for each day.
// ...
days.forEach(day => {
  appendDay(day, calendarDaysElement);
});
There is one piece of logic still missing: a removeAllDayElements method that clears the existing calendar. This method takes the first calendar day element, removes it, and replaces it with another one. From there, it will run the logic in a loop until all of the elements are removed.
function removeAllDayElements(calendarDaysElement) {
  let first = calendarDaysElement.firstElementChild;


  while (first) {
    first.remove();
    first = calendarDaysElement.firstElementChild;
  }
}
Now we can reuse that logic when we want to change the month. Recall the first step when we created a static template for our component. We added these elements:
<div class="calendar-month-header-selectors">
  <span id="previous-month-selector"><</span>
  <span id="present-month-selector">Today</span>
  <span id="next-month-selector">></span>
</div>
These are the controls for paginating between months. To change it, we need to store the currently selected month. Let’s create a variable to keep track of what that is and set its initial value to the present month.
let selectedMonth = dayjs(new Date(INITIAL_YEAR, INITIAL_MONTH - 1, 1));Now, to make the selectors work, we need a bit of JavaScript. To make it more readable, we will create another method called initMonthSelectors and we will keep the logic there. This method will add event listeners to the selector elements. It will listen for click events and update the value of selectedMonth to the name of the newly selected month before running the createCalendar method with proper year and month values.
function initMonthSelectors() {
  document
  .getElementById("previous-month-selector")
  .addEventListener("click", function() {
    selectedMonth = dayjs(selectedMonth).subtract(1, "month");
    createCalendar(selectedMonth.format("YYYY"), selectedMonth.format("M"));
  });


  document
  .getElementById("present-month-selector")
  .addEventListener("click", function() {
    selectedMonth = dayjs(new Date(INITIAL_YEAR, INITIAL_MONTH - 1, 1));
    createCalendar(selectedMonth.format("YYYY"), selectedMonth.format("M"));
  });


  document
  .getElementById("next-month-selector")
  .addEventListener("click", function() {
    selectedMonth = dayjs(selectedMonth).add(1, "month");
    createCalendar(selectedMonth.format("YYYY"), selectedMonth.format("M"));
  });
}
That’s it! Our calendar is ready. While that’s great and all, it would be even nicer if we could mark the current date so it stands out from the rest. That shouldn’t be very hard. We are already styling days that are not in the selected month, so let’s do similar thing to that.
We’ll create a variable that’s set for today:
const TODAY = dayjs().format("YYYY-MM-DD");Then, in the appendDay method where we apply a class for dates outside the current month, we have to add another check to see if the element is today’s date. If it is, we’ll add a class to that element:
function appendDay(day, calendarDaysElement) {
  // ...
  if (day.date === TODAY) {
    dayElementClassList.add("calendar-day--today");
  }
}
Now we can style it!
.calendar-day--today {
  padding-top: 4px;
}


.calendar-day--today > div {
  color: #fff;
  border-radius: 9999px;
  background-color: var(--grey-800);
}Voilà, there we have it! Check out the final demo to see everything put together.
The post How to Make a Monthly Calendar With Real Data appeared first on CSS-Tricks.
You can support CSS-Tricks by being an MVP Supporter.