Spotify has long been one of the most popular music streaming services, but it’s not the only option available. Most people opt for it when they want to listen to their favorite songs. Several Spotify...
Recently, one of our readers asked if it was possible sell music online in WordPress?
The answer is yes. Whether you’re selling your own songs or creating an online music store, you can easily do this in WordPress. Selling music online is a great way to make money without having to pay high shipping or manufacturing costs. It can also be an easy way to promote your own band or music, as well as grow your fanbase.
In this article, we will show you how to easily sell music online in WordPress, step by step.
Unlike general eCommerce plugins like WooCommerce, Easy Digital Downloads is built specifically with the features you need to promote, sell, and distribute digital music online.
In this way, you don’t have to waste time configuring features that aren’t necessary for selling digital products, such as shipping and inventory management settings.
With that being said, let’s see how you can easily sell music online in WordPress.
Note: If you are looking to sell physical copies of your music, too, such as vinyl records or CDs, check out our guide on how to set up an online store.
Before You Get Started
Before you can start selling music online, it’s important that you have a WordPress site setup already.
For this, you will need a domain name and WordPress hosting.
We recommend using SiteGround’s EDD hosting because it comes with Easy Digital Downloads pre-installed.
Upon activation, head over to Downloads » Settings in the WordPress dashboard.
Even though you’re selling music, you still need to set your store’s location. This allows Easy Digital Downloads to auto-fill some fields in the order form, which will make it easier for fans to buy your music. Easy Digital Downloads will also use this information to calculate sales tax.
To add your location, simply open the ‘Business Country’ dropdown menu. You can then choose where your business is based.
Next, open the ‘Business Region’ dropdown menu and choose the state or province where your store operates from.
After making these changes, go ahead and click on Save Changes to store your settings.
Step 2. Adding a Payment Gateway to Your Music Store
By default, Easy Digital Downloads supports popular payment gateways including Stripe, PayPal and Amazon Payments.
Pro Tip: Want to use a different payment gateway instead? You can add extra payment options using the Easy Digital Download extensions.
To add payment gateways to your website, go ahead and click on the ‘Payments’ tab. Then make sure the ‘General’ tab is selected.
In the Active Gateways section, check the box next to each gateway you want to use on your WordPress website.
If you check more than one payment method, then you’ll need to choose a default gateway, which will be selected automatically when the visitor arrives at the checkout.
To make this decision, simply open the ‘Default Gateway’ dropdown and choose the payment method you want to use. You can use any gateway you want, but Stripe can accept credit cards as well as Apple Pay and Google Pay. With that in mind, we recommend using Stripe as your default gateway.
After selecting one or more payment gateways, click on the ‘Save Changes’ button. You’ll now have access to some new tabs where you can configure each payment gateway.
The process will vary depending on which gateway you’re using, but Easy Digital Downloads will walk you through the process.
Let’s use Stripe as an example.
To set up Stripe, simply select the ‘Stripe’ tab and then click on ‘Connect with Stripe.’
This launches a setup wizard that will walk you through the process of configuring Stripe as your payment gateway.
If you’re using multiple payment gateways, then you’ll need to repeat these steps to set up each gateway separately.
By default Easy Digital Downloads shows all your prices in US dollars. Once you’ve set up your payment gateway, you may want to change the currency that’s used on your website.
To show your prices in any currency other than US dollars, just click on the ‘General’ tab. Then, select ‘Currency.’
Next, open the ‘Currency’ dropdown. You can now choose the currency that you want to use on your online music store.
Just be aware that some payment gateways may not accept every currency. If you’re unsure, then you can always check your chosen payment gateway’s website. Most have a list of all the currencies they support.
With that done, click on ‘Save Changes’ to store your settings.
Step 3. Turn Your Music Files into Downloadable Products
Once you’ve set up a payment gateway, you’re ready to start adding music to your online store. With Easy Digital Downloads, you can add sell a single song or add multiple files to the same digital product. This is perfect for selling EPs, albums, compilations, and other products that have multiple separate audio files.
Create a New Digital Product
To create a digital product, simply select ‘Downloads’ from the left-hand menu. Then, click on the Add New button.
You can now type in a name for the product. This will be shown on the product’s page, so you’ll typically want to use something descriptive like the title of the album or single.
Next, type out the description that will appear on the product page.
This should give shoppers all the information they need to decide whether the product is right for them. For example, you might include the genre, duration, and track listing. You might also want to show customer reviews, quotes from music critics, or the star rating.
Add Categories and Tags
If you’re planning to sell music from lots of different artists, then categories and tags can help shoppers find what they’re looking for.
Helpful and descriptive categories can encourage shoppers to explore related artists and genres, which can get you more sales. You might even get creative and add tags for different characteristics like mood, influences, or activities, as you can see in the following image.
You can create new categories and tags in the ‘Categories’ and ‘Tags’ boxes.
After that, you’ll want to set a price by scrolling to the Download Prices section.
Here, type in how much visitors need to pay before they can download the digital product.
Most of the time you’ll want to charge a fixed amount, but Easy Digital Downloads also supports variable pricing.
You might use variable pricing to sell different versions of the same digital product. For example, you could create an extended album with additional tracks, or have several versions of a single with different bonus songs.
If you want to sell variations, then select the ‘Enable variable pricing’ checkbox. This adds a new section where you can start to build your variations.
For now, just type in a title and price for each variation.
To add more variations, simply click on ‘Add New Price.’ This adds another section where you can type in a title and price.
With that done, you’ll need to set the default variation, which will be selected when the visitor first lands on the product page. Simply check the radio button next to the variation you want to use.
Add Your Audio Files
You’re now ready to start uploading audio, which can either be a single file or multiple separate audio tracks.
When it comes to music, WordPress supports mp3, ogg, and wav. WordPress also supports m4a, although this format may not work in all browsers.
You can now scroll to the Download Files section and click on the ‘Upload a File’ icon.
Now simply choose a song from the media library, or upload a new file from your computer.
With that done, type a title into the ‘File Name’ field. This will be visible to the shopper, so you’ll typically want to use the song’s title. However, you can also add extra information such as the artist’s name.
If you want to add multiple tracks to the digital product, then click on ‘Add New File.’ This adds a section where you can upload another file.
Simply repeat these steps to upload all the files you want to include in the digital product.
Finish Setting Up Variable Pricing (Optional)
Did you enable variable pricing in the previous step? If you’re selling different versions of the same product, then you’ll need to choose which files to include in each variation.
For example, you might release ‘My Awesome Album’ with 10 tracks, and ‘My Awesome Album Extended Edition’ with 12 tracks.
Note: If you set a single price, then skip ahead to the next section.
In the ‘Price Assignment’ column, you’ll see that every audio file is set to ‘All’ by default. This means it’s included in every variation.
To change this, simply open a file’s ‘Price Assignment’ dropdown and choose the variation that customers need to purchase, in order to get this audio file.
Simply repeat these steps to build unique variations with different track listings.
Protect Your Music By Setting a Download Limit
By default, a customer can download a product as many times as they want after purchasing it. This can be useful if the person accidentally deletes their download, or they want to listen to the track on multiple devices such as their smartphone, tablet, and computer.
However, offering unlimited downloads can make you vulnerable to scams. For example, a customer might share their direct download link with dozens of other people, who then download your music for free.
With that in mind, you may want to set a reasonable file download limit by typing into the ‘File Download Limit’ field.
Note: If you set this value too low, then customers may occasionally contact you asking for extra downloads. If there’s a genuine reason why they need to re-download the file, then you can simply resend the purchase receipt by going to Downloads » Payment History in your WordPress dashboard.
Create a Refund Policy
Hopefully, everyone who buys your music will be happy with their purchase. However, it’s still smart to think about how you’ll handle refunds.
If you scroll to the ‘Refunds’ section in the left-hand menu, then you’ll see that Easy Digital Downloads offers your customers a 30-day refund by default.
If you want to give customers more or less time to claim a refund, then simply type a new number into the ‘Refund Window’ field.
A generous refund policy can make customers see your site as trustworthy and fair, which could get you more sales. It will also help turn hesitant visitors into first-time customers.
Giving unhappy customers their money back is a big part of good customer service. Even if they didn’t like their purchase, an easy refund process may still convince people to buy from you in the future.
For that reason, we recommend offering refunds wherever possible. However, if you don’t want to give refunds, then open the ‘Refund status’ dropdown and choose ‘Non-Refundable.’
Upload Your Album or Song’s Cover Art
With that done, you’ll need to add a product image. This will typically be the album or single’s front cover, or the musician’s logo.
Pro Tip: If you don’t already have a product image, then you can create one using web design software such as Canva.
To add a product image, simply scroll to the Download Image section and then click on the ‘Set Download Image’ link.
This launches the WordPress media library where you can choose an image or upload a new file from your computer.
Add Download Instructions
Finally, you may want to add some download instructions, which will appear on the order confirmation page.
They’ll also be added to the bottom of the purchase receipt email customers get when they buy from your site.
You can use this section to share technical information, such as the file format or the programs it’s compatible with. However, you can also write a thank you note, or even share exclusive perks such as a coupon code.
No matter what information you want to share, go ahead and type it into the ‘Download Instructions’ box.
Once that’s done, you can go ahead and click on the ‘Publish’ button to make the digital download live.
Step 4. Customize Your Digital Download Emails
Every time someone buys music from your store, Easy Digital Downloads will send them an email.
Inside the email, they will find a download link to their purchased music.
While this email has everything the customer needs by default, it’s a good idea to customize it. For example, you might help your email stand out by adding your own branding and logo.
To customize the default email, head over to Downloads » Settings. Then click on the ‘Emails’ tab.
Add Your Own Logo and Branding
You may want to start by adding a logo to the purchase confirmation email.
This logo appears at the top of the screen, so customers can immediately see who the purchase email is from.
To add a logo, click on the ‘Upload File’ button. You can now either choose an image from the WordPress media library or upload a file from your computer.
Change the ‘From’ Name and Email
You can also add a ‘From Name’ which will appear in the customer’s inbox. With that being said, you’ll want to use something that the customer will recognize such as the name of your band or online music store.
You’ll also need to add a ‘From Email,’ which will act as the ‘from’ and ‘reply-to’ address.
Some customers may reply to the purchase receipt email. For example, if they’re having problems downloading your music, then they might reach out by clicking ‘Reply.’
If shoppers don’t get the purchase receipt email, then they won’t be able to download the music they just bought.
This is a bad customer experience, so you’ll want to make sure the purchase receipt email arrives in the shopper’s inbox and not in their spam folder. For that reason, we recommend using WP Mail SMTP to improve email deliverability rates.
Simply click on the ‘Install & Activate WP Mail SMTP’ button and then follow the onscreen instructions to configure the free plugin. For more information, please see our step-by-step guide on how to fix the WordPress not sending email issue.
When you’re finished, don’t forget to click on the ‘Save Changes’ button.
Write Your Purchase Email
After all that, click on the ‘Purchase Receipts’ tab.
On this screen, you can type in an email subject, add a heading and also change the email’s body text.
You could simply type in the text that you want to send to every customer. However, you can create more helpful and personalized emails by using the Conditional Emails feature.
Conditional Emails use ‘template tags’ to personalize your messages. These template tags change based on factors such as the buyer’s name, how much they paid for their music download, and any coupon codes they used for the purchase.
When Easy Digital Downloads sends an email, it’ll automatically replace the template tags with real values.
To see all the different tags you can use, simply scroll to the bottom of the page.
Test Your Purchase Receipt Email
When you’ve finished making changes, you may want to send a test email to check how the message will look to your customers.
Simply click on the ‘Send Test Email’ button and Easy Digital Downloads will send an email to your admin email address.
When you’re happy with how the purchase receipt email looks, you can go ahead and click on the ‘Save Changes’ button.
Step 5. Test Your Digital Music Download
After all that, it’s a good idea to test the digital download to see whether there are any problems or anything you want to change.
Enable Test Purchases
To start, you’ll need to put Easy Digital Downloads into test mode so you can buy products without having to enter any payment information.
In the WordPress dashboard, go to Downloads » Settings and then click on ‘Payments.’
On this screen, check the box next to ‘Test Mode.’
Next, select ‘Store Gateway’ as this allows you to make a purchase without typing in any credit or debit card information.
After that, click on ‘Save Changes’ to store your settings.
Make a Test Purchase
Now you’re in test mode, go to Downloads » Downloads and hover your mouse over the product you want to test.
When it appears, click on the ‘View’ link.
This opens the item’s product page.
To go ahead and make a test purchase, click on the ‘Purchase’ button.
Easy Digital Downloads will now add this product to your shopping cart.
To proceed, click on the ‘Checkout’ button.
Under ‘Select payment method,’ click to select the radio button next to ‘Store Gateway.’
You can now type in your name and email address. Easy Digital Downloads will send the purchase receipt to this address, so you’ll need to use a real email address that you have access to.
After a few moments, you’ll get a purchase confirmation email containing links to download each track in the digital product.
If everything works as expected, then you’re ready to start accepting payments from real-life music fans.
To take Easy Digital Downloads out of test mode, go to Downloads » Settings, and then select the ‘Payments’ tab. Here, uncheck the box next to ‘Test Mode’ and the box next to ‘Store Gateway.’
At this point, you’ve created one or more digital products, but you still need to drive potential customers to your product pages so they can buy your music.
This might mean creating a sales page where you advertise all the latest releases, adding a particular product page to your website’s menu, or even highlighting your favorite track on a custom home page.
You could even write a WordPress blog where you talk about music topics such as the latest releases, your tour experiences, or your favorite records. These posts are the perfect place to include links to any relevant albums and singles that readers may want to buy.
No matter how you promote a product, you’ll need to know its URL.
To find this link, head over to Downloads » Downloads. You can then hover your mouse over the product and click on its ‘Edit’ link.
You’ll find the URL under ‘Summary’ in the right-hand menu.
You can now link to this product page from any area of your website, simply by using its URL. To learn more, see our step-by-step guide on how to add a link in WordPress.
Easy Digital Downloads also creates a ‘Purchase’ button for each digital download. Visitors can click this button to add that specific product to their shopping cart.
You can add this button to any page, post, or widget-ready area. This allows visitors to start the purchasing process without necessarily visiting the product’s page.
To get the button’s shortcode, simply scroll to the product’s Download Settings section. You can then copy the text in the ‘Purchase Shortcode’ field.
Qi Theme is a free WordPress theme created by Qode Interactive – an award-winning studio. This theme perfectly combines top speed and performance with a beautiful design.
It comes with 100 demos, allowing you to easily set up any type of website, whether it’s an online store, an artist’s portfolio, or a simple blog. If you can think it up, this theme will help you build it – it will even grant you free access to premium stock photos.
Qi Theme is fully supported by video tutorials as well as an extensive knowledge base, so you’ll always have a place to look for help.
I moved my blog to Hugo from Ghost over the holidays. This was after about a year of dissatisfaction with (very expensive) hosting on Ghost, after many years on WordPress.
While Hugo has fewer bells and whistles, it suits my purposes perfectly. I can write in Markdown, which I prefer over any other format. Ghost claims to support Markdown, but you can only input Markdown to its editor; you can't see it.
We already know that listening to music while you work can make you a better programmer, or at least a more focused one. And while everyone's tastes are unique and valid, trust me on this one, heavy metal can give you everything you need when it comes to work music.
JetBrains' developer survey found that only 17 percent of you listen to heavy metal while coding, but that number should be much, much higher. Well, if you want to be more productive, that is.
It's no secret that music is one of the best tools there is to help you dominate tricky code. It's also not a secret that devs have a particular penchant for electronic music on the job. (Thanks, Jetbrains!)
Keeping all that in mind, I present you with this killerdubstep mix. Trust me, you want to go there.
One of the most significant mistakes many creatives make is the failure to promote their work. You can have the best product in the world, the greatest app ever, or the most beautiful WordPress theme, but if you don’t showcase …
Saregama Carvaan, a digital music player that looks like an old-fashioned transistor radio and targets the non-millennial generation, has become a hugehitin India. The company analysed data from online music streaming sites like Saavn, Gaana and YouTube, came up with a catalogue of 5000+ “greatest” Hindi movie songs and pre-loaded them into Carvaan, classified by artists and moods.
Like a radio station, Saregama Carvaan mixes nostalgia with an element of surprise – the player’s algorithm plays music in a random sequence so the listener would never know which song is coming up next. Can the Carvaan experience be recreated with YouTube? Let’s find out.
1. The Songs List
A quick Google search on the Saregama website led me to this PDF document – it contains a complete list of every song that’s bundled into the Carvaan player. I imported the songs PDF into a Google Spreadsheet so the data could be easily filtered by movie names or artistes.
2. The YouTube Database
The YouTube API lets you query the video database by keywords. I wrote a simple Google Script that reads the song titles from the Google Spreadsheet and finds the corresponding video on YouTube. The YouTube API returns the video link, the description, the channel of the video uploader and the thumbnail image (source code).
3. The Spreadsheet Formulae
Google Spreadsheet provides the IMAGE formula that helped me embed the YouTube thumbnail URLs as images into the spreadsheet cells. I used Array Formulas to apply the same formula to the entire column in the spreadsheet.
The YouTube video IDs were converted to the YouTube URLs again with the help of a simple array formula.
=ArrayFormula(CONCAT("https://youtu.be/",D2:D))
4. The YouTube Playlist
Now the spreadsheet was populated with a list of songs that are preloaded into Carvaan and their corresponding YouTube videos.
The next task was to create a YouTube playlist with all the videos. I had earlier built a tool for copying YouTube playlists and the same API was used here for building the playlist inside the spreadsheet (source code).
The Final Result
And here’s the final result – a YouTube playlist with 5000 songs that come bundled with Carvaan. Press the “Shuffle” icon and the songs would play in random sequence continuously.
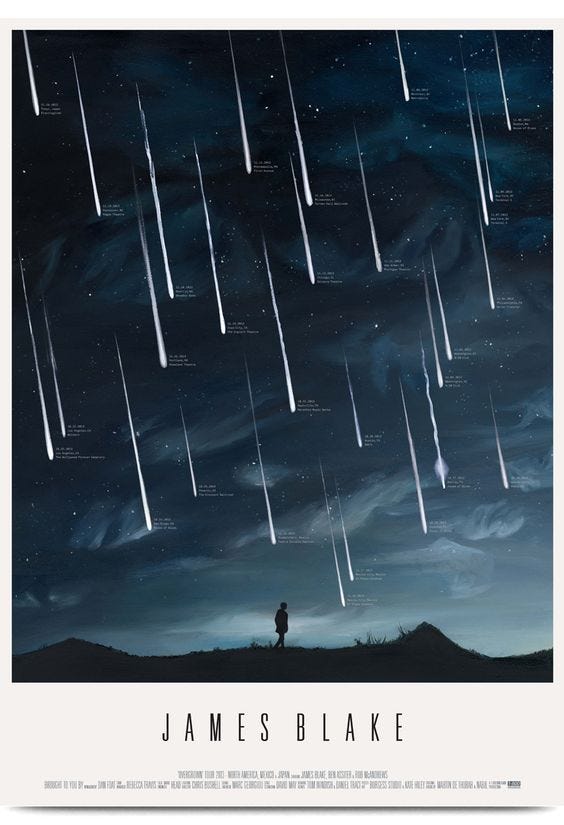
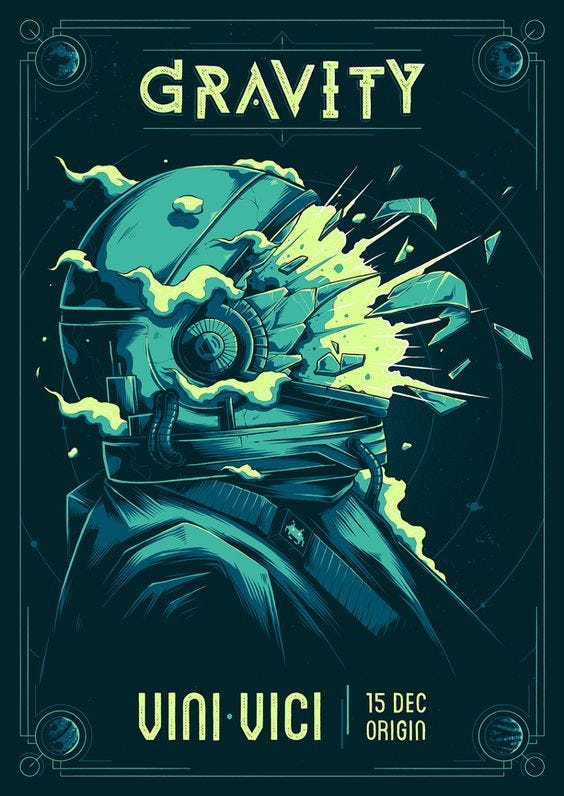
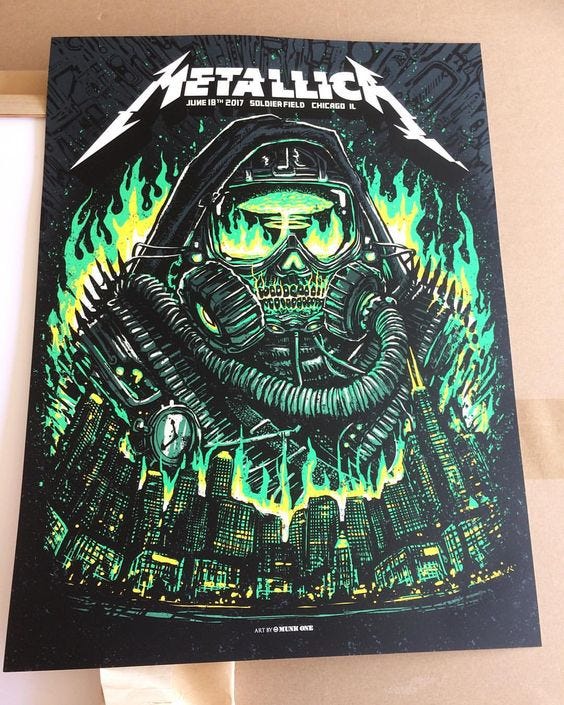
In today’s roundup I’ve gathered some new gig posters for you guys. Personally I just love it when bands goes the extra mile and puts in both time and money into creating their gig posters.
XX Poster by Mike KingRadiohead by Tad CarpenterFoals — Asheville, NCLa Boca: Adele by Levine/LeavittJames Blake ‘Overgrown’ Tour by Burgess StudioPhish by Dan MumfordGravity, Vini ViciMetallica Poster Art by Munk OneReignwolf Poster by Powerslide Design Co.St. Paul & The Broken Bones poster by DKNGMetallica by Munk OneRival Choir | Facedown Fest by Daniel MackeyUltra Panda PosterTame ImpalaThe Decemberists 2017 Tour Poster by DKNGSara Wood
More Great Gig Poster Designs was originally published in From up North on Medium, where people are continuing the conversation by highlighting and responding to this story.