Do you want to translate your WordPress site in multiple languages?
WordPress powers more than 35% of all websites on the internet. Many of them serve non-English or multilingual audiences.
In this article, we will show you how to easily create a multilingual WordPress site. We will cover three different solutions, so you can choose the one that works best for you.
With each solution, you’ll be able to easily translate your WordPress posts, pages, tags, categories, and themes into as many languages as you like.
What is a Multilingual WordPress Website?
A multilingual WordPress website serves the same content in multiple languages. It can automatically redirect users to a language based on their region, or users can select their preferred language using a dropdown link.
There are few different approaches used to create a multilingual website.
The first approach allows you to manually translate all the content into languages of your choice with the help of human translators.
The second method does not actually create a multilingual site but uses machine translations of your existing content by using auto-translate services.
However, Google Translate has stopped supporting new accounts for website translation. The other options are either not-free or not very good in quality.
It goes without saying that manually translating your content is a much better approach. This allows you to maintain quality throughout your website. You can translate the content yourself or hire professionals to do that.
Choosing a WordPress Multilingual Plugin
There are several WordPress plugins that you can use to translate your website into multiple languages. You need to choose a plugin that helps you easily manage translations without making things unnecessarily difficult for your users.
In this guide, we will show you three of the top WordPress multilingual plugins with step by step instructions on how to set them up.
If you know which plugin you are going with, then you can directly jump to the instructions.
- TranslatePress
- WPML
- Polylang
All three of them comes with the necessary features you’ll need to make a robust multilingual website.
- They allow you to translate posts, pages, products, and other post types
- You can easily translate your categories, tags, plugins, and themes
- They allow you to set up SEO friendly URLs for each language
With that said, let’s get started.
1. Create Multilingual WordPress Website Using TranslatePress
TranslatePress is one of the best WordPress translation plugins on the market. It is a bit different than other solutions mentioned in this guide.
Normally, multilingual plugins ask you to create multiple versions of the same article in order to translate it. TranslatePress allows you to create translations at the same time.
It also allows you to use a live editor to translate all the visual aspects of your website.
Most importantly, you can combine machine and human translations. This means you can use Google Translate or similar AI-powered tools to generate machine translations and only improve the parts that artificial intelligence missed.
The first thing you need to do is install and activate the TranslatePress plugin. For more details, see our step by step guide on how to install a WordPress plugin.
If you want to translate your website to more than one language, then you will also need to install ‘Extra Languages’ add-on. You can do this from the download addons button under your account on the TranslatePress website.
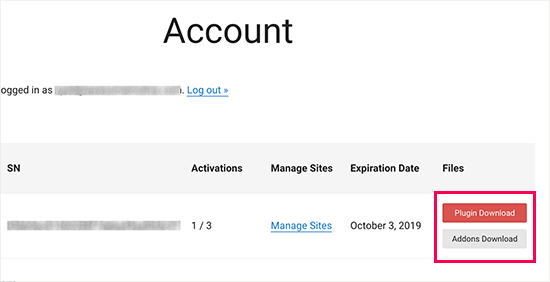
After downloading the add-on, you can install and activate it like any other WordPress plugin.
Upon activation, you need to visit Settings » TranslatePress page to configure plugin settings.
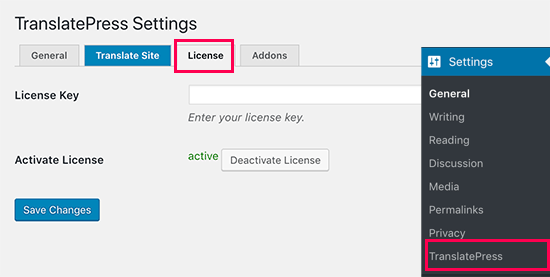
First, you need to switch to the license tab and enter your license key. You can find this information under your account on the TranslatePress website.
After that, you need to switch to the General settings tab to set up other settings.
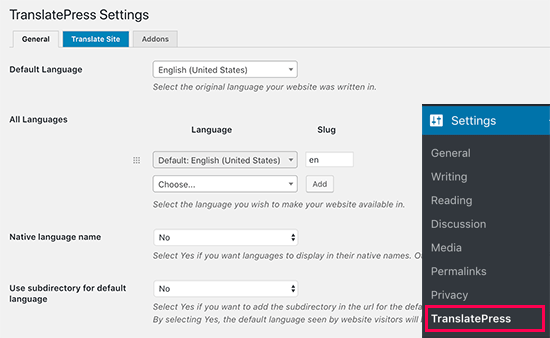
The first option on the page is to choose the default language of your website, and the languages you want to translate your website into.
Next, you need to choose whether you want to display language names in the native language. The default option is ‘No’ which means language names will be shown in the default language.
After that you need to choose whether you want to display the default language name in the URL as a subdirectory. For example, http://example.com/en/.
The default choice is no which means only the other languages will have the language name in URL as a subdirectory. We recommend leaving this setting as-is for best SEO.
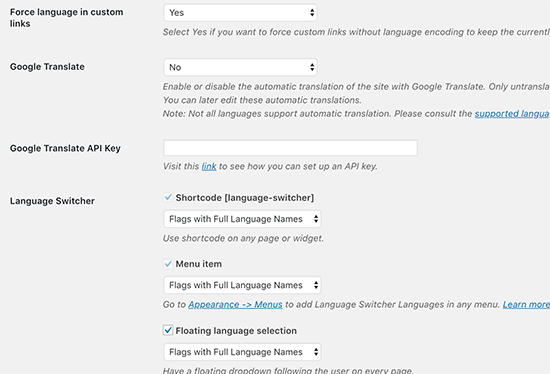
This brings you to the next setting, ‘Force language in custom links’. The default option is ‘Yes’, because that will change custom links for translated languages making the URLs more SEO friendly.
Next, you need to choose whether you want to use Google Translate for automatic translations. The default choice is ‘No’, but you can change that if you would like to use Google Translate.
You will need to provide a Google Translate API key in the next option. You will find a link under the option which will show you instructions on how to get one.
Finally, you will come to the options on how you want to display the language switcher on your website. TranslatePress provides you with three choices.
You can use a shortcode, add switcher to your navigation menu, or display a floating menu. We will show you how to add the language switcher to your website later in this article.
Go ahead and click on the ‘Save Changes’ button to store your settings.
Translating Your Website Content
To translate your website, you can simply click on the ‘Translate Site’ tab on plugin’s settings page or the button in your WordPress admin bar.
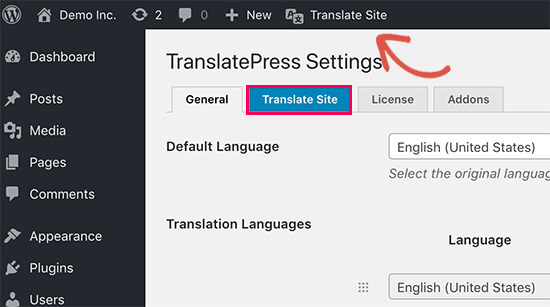
This will open the live translation editor in a new browser tab.
In this live editor, you can click on any text on your website in the right pane and TranslatePress will load it in the left column to translate.
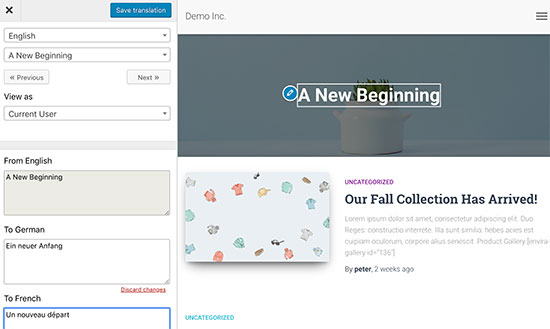
Now click on the language you want to translate the string into and then provide your translation.
After entering the translation, click on the ‘Save Translation’ button on the top and then click on the next button. TranslatePress will automatically load the next string on the page for you to translate.
You can also just click on the drop-down menu below your default language, and it will show you the list of translatable text strings on the page. You can select a string and then provide its translation.
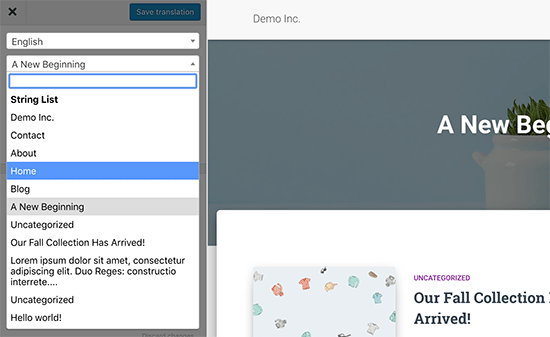
You can translate all content on any page. This includes navigation menus, buttons, sidebar widgets, meta text, and more.
You can also visit any page by clicking on the links on the screen and start translating that page.
TranslatePress allows you to instantly start translating any page or post on your site when logged in. Simply click on the ‘Translate Page’ button on the top to enter the live editor.
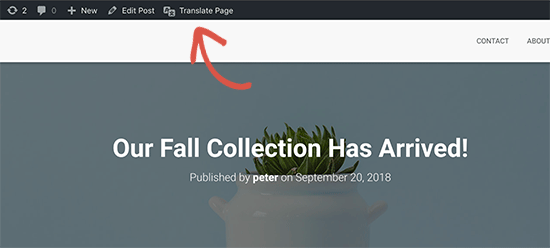
Once you have translated a string, the plugin will automatically translate it for you on other places. For example, if you translated a post title, then the post title in your sidebar widgets will be automatically translated.
Adding Language Switcher to Your Website
Language switcher allows your website visitors to select a language when they visit your website. It usually displays the flag of each country to indicate languages available on your site.
TranslatePress allows you to add language switcher by using a shortcode, as a navigation menu item, or as a floating banner. The language switcher can be displayed as flags, language names, or both.
Adding language switcher in WordPress using shortcode
You just need to add [language-switcher] shortcode to posts, pages, or a sidebar widget where you want to display the language switcher.
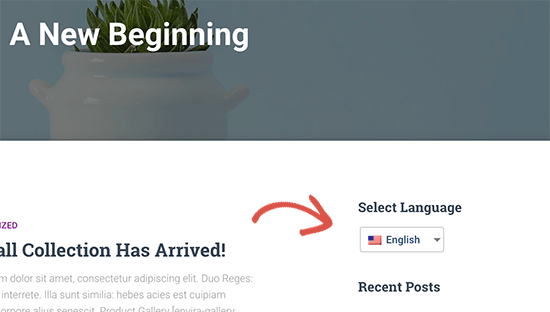
Adding language switcher to your WordPress navigation menu
Simply go to Appearance » Menus page and click on the ‘Language Switcher’ tab in the left column. Now select the languages you want to display and then click on add to menu button.
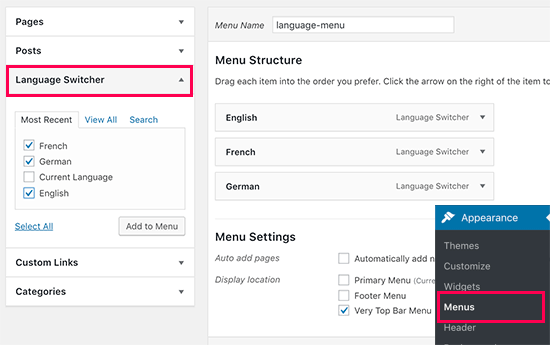
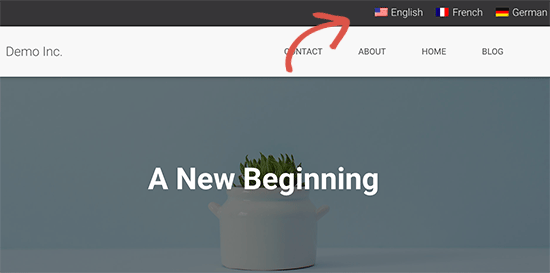
You will now see languages added to your WordPress navigation menu. Don’t forget to click on the ‘Save Menu’ button to store your changes.
This is how it looked on our test site:
Adding a floating language switcher
Go to plugin’s settings page and scroll down to language switcher section. From here make sure the box next to the ‘Floating language selection’ option is checked.
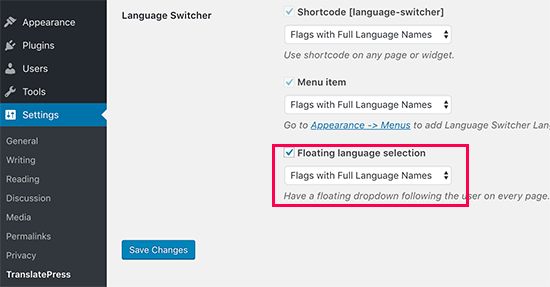
Don’t forget to click on the save changes button to store your settings.
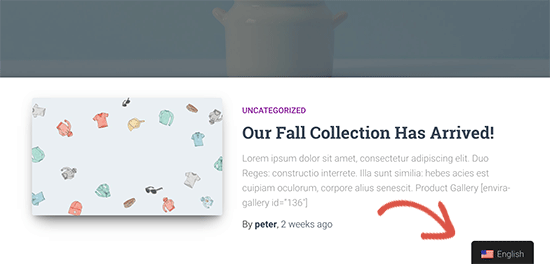
You can now visit your website to see the floating language switcher at the bottom of every page on your website.
2. Create Multilingual WordPress Website Using WPML
WPML (short for WordPress Multi-lingual) is one of the oldest and most popular WordPress multilingual plugin.
First thing you need to do is install and activate the WPML (WordPress Multi-language) plugin. For more details, see our step by step guide on how to install a WordPress plugin.
Upon activation, the plugin will add a new menu item labeled ‘WPML’ in your WordPress menu. Clicking on it for the first time will take you to plugin’s settings wizard.
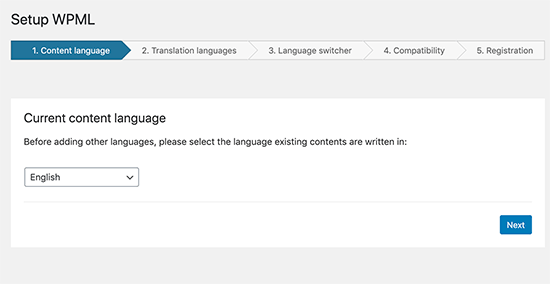
WPML will automatically detect your WordPress site’s language. You can change it here now if you want.
After that click on the next button to continue.
On the next screen, you will be asked to select the languages you want to enable on your site. Simply select the languages from the list that you want to add to your site.
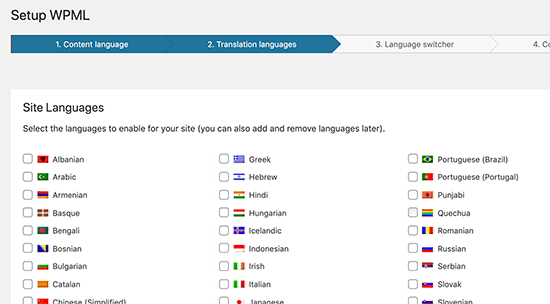
You can always add or remove languages later if you need them. Once you have selected the languages, click on the Next button.
Now you will be asked to add a language switcher to your site. This language switcher will allow your users to choose a language to view content in their preferred language.
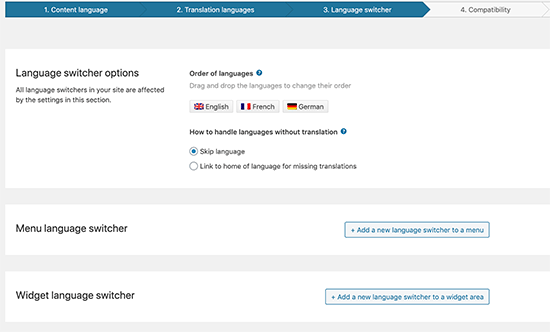
WPML allows you to automatically add content switcher as a sidebar widget, in your navigation menu, a plain list, or in the footer area.
Next, you will be asked if you like to send a compatibility report to WPML regarding the plugin and themes you are using.
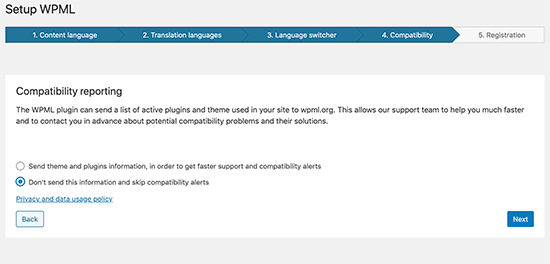
It is up to you to decide whether or not you want to send this data to WPML.
As the final step, you will be asked to enter your site key. If you have not generated one yet, then you can click on ‘Generate a key for this site’ button.
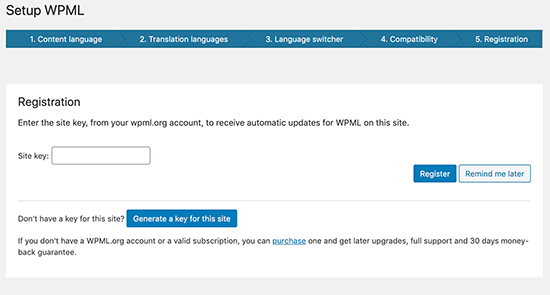
This will take you to the WPML website, where you will be asked to add the site you are coming from to your WPML account.
Once your site is added, you can click on it to get to your site key. Copy and paste this key into your WordPress site.
That’s all you have successfully finished the WPML setup wizard. You can now click on the Finish button to exit the setup.
Adding Multilingual Content into WordPress with WPML
WPML makes it really easy to translate every area of your WordPress site into multiple languages.
You will be able to easily translate your WordPress posts, pages, tags, categories, and themes into as many languages as you like.
Adding Multilingual Posts and Pages
Simply click on the posts menu to view your existing posts. You will notice the language column next to your post titles.
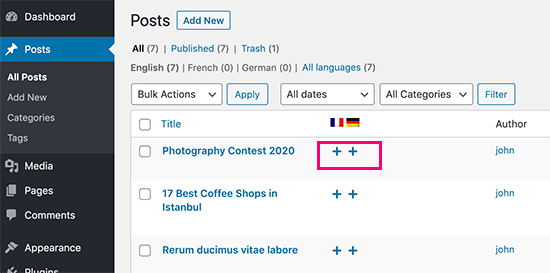
WPML assumes that your existing content is in your site’s primary language. It will show Add buttons for each language next to your posts. Click on the add button under a language to translate a post.
You can also manage translations by editing a post.
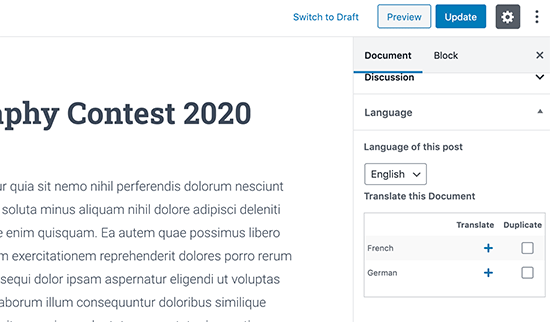
On the post edit screen, you will notice the new ‘Language’ meta box to manage translations.
WPML also offers a better way to manage users who work as translators on your website. If you purchase their Multilingual CMS Plan, then you can use their translation management module.
The translation management module allows you to add users as translators regardless of what role they have on your WordPress site. You can even add subscribers as translators.
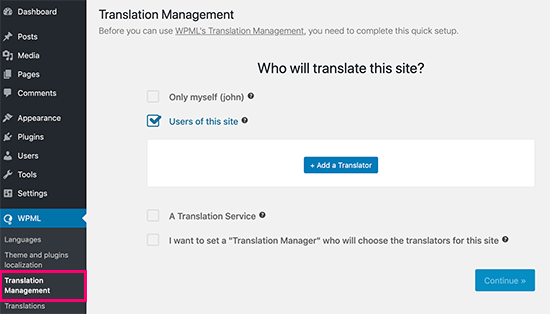
Instead of editing posts, these translators will be able to add translations directly in WPML.
Adding Translations for Categories and Tags
WPML allows you to easily translate categories and tags, or any other custom taxonomies that you may be using.
Visit WPML » Taxonomy Translation and load the custom taxonomies you want to translate.
For example: in this screenshot we selected categories, and it displayed all categories from our example site.
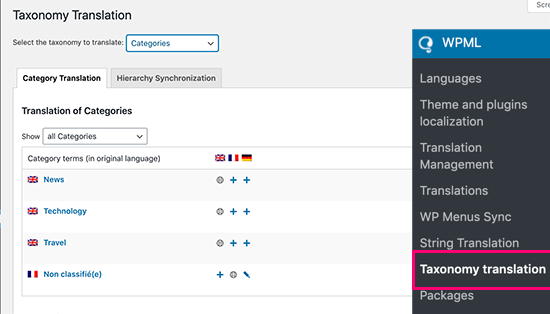
Click on the add button next to the taxonomy term to add the translation.
Translating Navigation Menus
WordPress comes with a robust navigation menu system. WPML allows you to translate it just like you would translate posts or taxonomies.
Visit Appearance » Menus page on your site. If you have more than one menus, then select the menu you want to translate.
In the right-hand column, you will see your menu with links to translate into other languages enabled on your site.
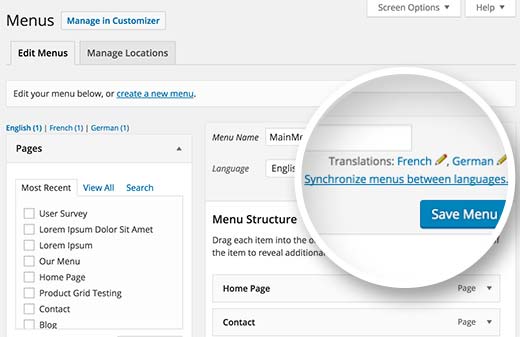
Clicking on a language will create a new menu for that language. You will need to add the same menu items as in your primary language menu.
If you have your posts and pages in navigation menus, then you will first need to translate them. After that, you can add them from the tabs on the left in edit menu screens.
Don’t forget to click on the Save button to save your menu.
Translating Themes, Plugins, & Other Text with WPML
WPML multilingual CMS allows you to choose between official translations of themes and plugins or use its own string translator.
Go to WPML » Themes and plugins localization page.
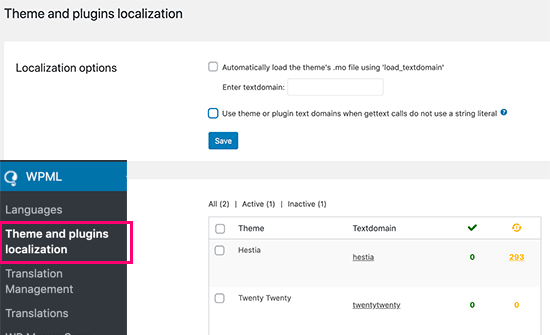
By default, WPML will look for your plugin’s translation files if they are available, and use them.
However, if your WordPress theme or WordPress plugins are not translated into the languages you are using, then you can translate them using the WPML string translation feature.
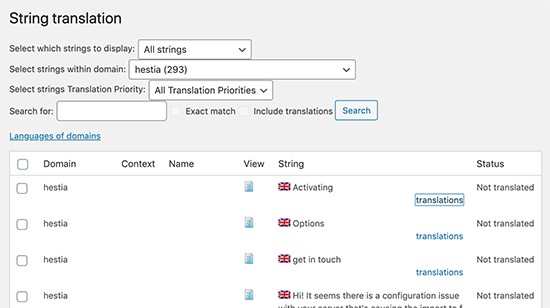
Simply scan your theme or plugin to load the strings and then start translating those strings.
This module will also allow you to translate custom fields, widgets, and other translatable strings generated by WordPress.
3. Create Multilingual WordPress Website Using Polylang
Polylang is a free WordPress multilingual plugin with more than 500,000 active installs. It allows you to easily create a multilingual website without purchasing the premium version.
Note: If you are running WooCommerce or need support, then you may want to upgrade to the Polylang Pro or purchase their WooCommerce addon.
For this tutorial, we’ll be using the free version of the plugin.
The first thing you need to do is install and activate the Polylang plugin. For more details, see our step by step guide on how to install a WordPress plugin.
Upon activation, you need to visit Languages » Languages page to configure the plugin.
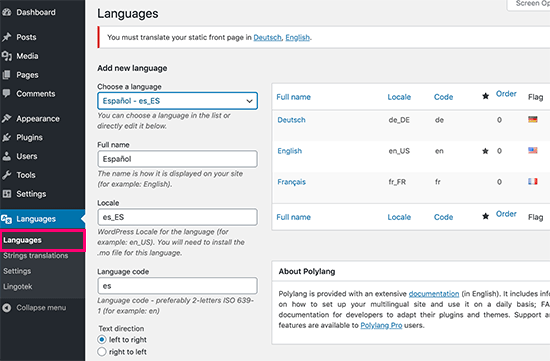
The language settings page is divided into three tabs. The first tab is labeled ‘Languages’. This is where you add the languages you want to use on your site.
You will need to add the default language, as well as select all other languages that users can choose on your site.
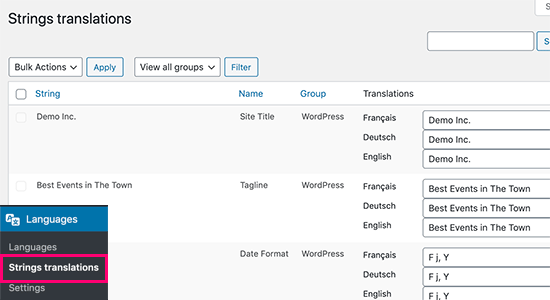
After adding the languages, switch to the ‘Strings Translations’ tab. Here you need to translate site title, description, and then choose the date and time format.
Next, you need to visit Languages » Settings page. From here you can set the URL settings for languages and set up SEO friendly URLs.
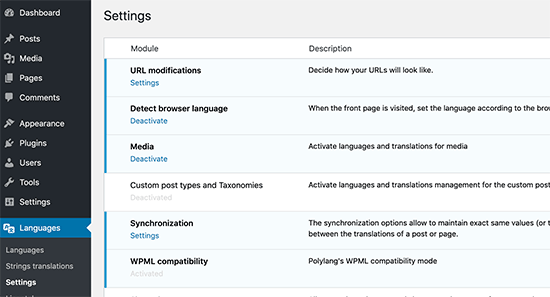
Once you are done, click on the save changes button to store your settings.
Translating Content in WordPress with Polylang
Polylang makes it super easy to add content in different languages. Simply create a new post/page or edit an existing one. On the post edit screen, you will notice the language meta box.
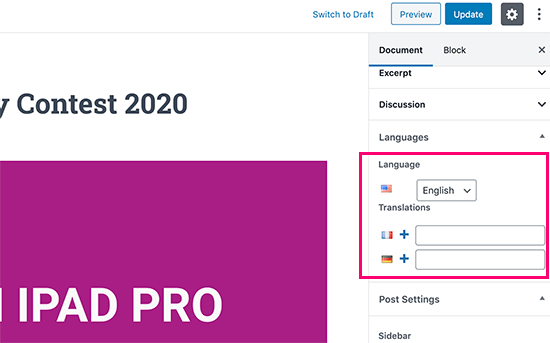
Your default language will automatically be selected, so you can first add content in your default language, and then translate it into others.
To translate, you need to click on the + button next to a language and then add content for that language.
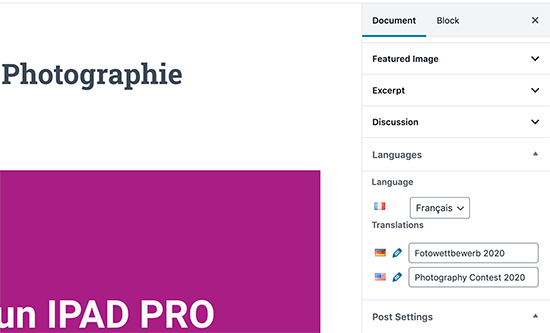
Repeat the process for all languages. Once you are done, you can publish your posts and pages.
Translating Categories, Tags, and Custom Taxonomies
You can also translate categories and tags, or any custom taxonomies you may be using.
If you want to translate categories, then go to Posts » Categories.
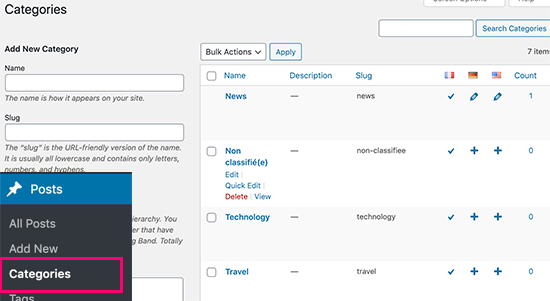
Add a category in your default language and then click on the plus icon for each language to start adding translations.
Displaying Language Switcher on Your WordPress Site
Adding a language switcher allows users to select a language when viewing your site. Polylang makes it super simple. Just go to Appearance » Widgets and add the language switcher widget to your sidebar or another widget-ready area.
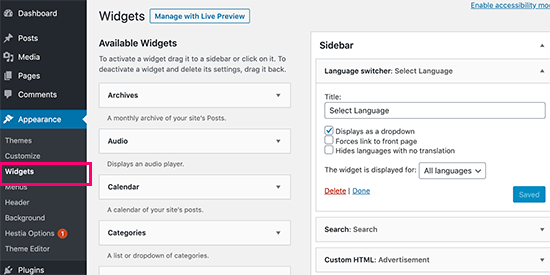
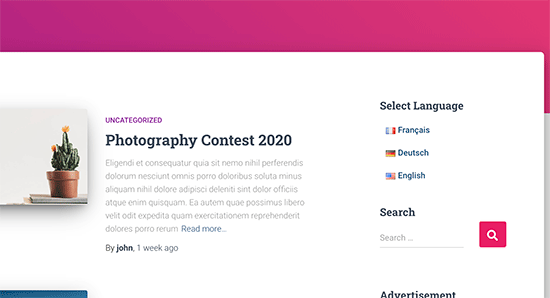
You can choose a drop-down, or use language names with flags. Once you are done, click the save button to store your widget settings.
You can now preview your site to see the language switcher in action.
FAQs About Creating a Multilingual WordPress Site
Having helped thousands of beginners start their websites, we know a thing or two about making a multilingual website. Following are some of the top questions we have been asked about multilingual WordPress websites.
1. Which WordPress multilingual plugin is the best?
All three plugins mentioned in this guide are the best. However, they are slightly different in some aspects.
If you are a beginner looking for an easier solution then we recommend using TranslatePress. Its live editor makes translations easier.
Advanced users and eCommerce websites may find WPML more comprehensive for their needs. Lastly, if you are looking for a free solution, then Polylang is the best option for you.
2. How to translate my WordPress admin area for users?
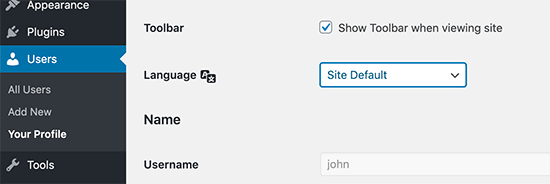
WordPress allows each user on your website to select the admin interface language. They simply need to edit their user profile and there they will find the option to select language.
3. How do I translate my WordPress theme?
All three plugins will allow you to automatically fetch theme translations. You can also find and translate a WordPress theme by yourself and then upload translation files to your website.
4. How do I translate a WordPress plugin
Many of the top WordPress plugins are translation ready. However, they may not be translated into all languages. TranslatePress and WPML allow you to easily translate strings within the plugin interface.
You can also translate WordPress plugins on your own and upload the translations to your website manually.
We hope this article helped you learn how to make a multilingual WordPress site like a pro. You may also want to see our guide on how to easily get more traffic to your website.
If you liked this article, then please subscribe to our YouTube Channel for WordPress video tutorials. You can also find us on Twitter and Facebook.
The post How to Easily Create a Multilingual WordPress Site appeared first on WPBeginner.


