How to Add a Blog Post Checklist to the WordPress Editor

Do you want to add a blog checklist to the WordPress editor?

A checklist can help you to make your posts the best they can possibly be. If you’ve added multiple authors to your site, then a checklist can also help everyone write in the same style and remember all the details.

In this article, we’ll show you how to add a blog post checklist to the WordPress editor.

How to add a blog post checklist to the WordPress editor

Why Add a Blog Post Checklist to the WordPress Editor

Writing a good blog post for your WordPress website is only the first step.

Once you’ve finished writing, you’ll want to edit, proofread, add categories and tags, optimize the post for search engines, and more.

This is where a checklist can help. Checklists show a list of tasks you need to do before publishing your post, such as adding internal links or alt text.

Some WordPress plugins such as AIOSEO use checklists to help site owners with search engine optimization.

The AIOSEO plugin's SEO checklist

Checklists typically monitor your post as you’re writing and then check off each task as you finish it. This makes it easy to see what you’ve done well, and what you still need to work on.

But what if you wanted to create your own custom checklist in WordPress?

Perhaps you have a multi-author blog where you want to ensure a certain quality standard for your content. That’s where checklists come in handy.

With that in mind, let’s see how you can add a blog post checklist to the WordPress editor.

How to Add a Blog Post Checklist to the WordPress Editor

The easiest way to add a blog post checklist to the WordPress editor is by using PublishPress Checklists. This plugin adds a checklist to the right-hand menu of the WordPress editor.

A blog post checklist created with PublishPress

PublishPress has a list of default tasks that you can add to your checklists. It also lets you create custom checklist tasks for your WordPress blog.

First, you’ll need to install and activate the plugin. If you need more instructions, then please see our guide on how to install a WordPress plugin.

Upon activation, head over to Checklists » Settings.

The PublishPress Checklist settings

Here you can choose where WordPress will show your checklist. To add a blog checklist to the WordPress editor, you’ll want to check the ‘Posts’ checkbox.

Once you’ve done that, click on the ‘Save Changes’ button.

Adding a checklist to the WordPress post editor

You can then build your checklist by going to Checklists » Checklists.

Here you’ll see all of the default tasks that you can add to your blog post checklist. PublishPress is able to detect when these tasks are completed and check them off for you.

Tasks for your WordPress blog post checklist

All these tasks are disabled by default.

To add a task to your blog post checklist, simply open the ‘Disabled, Recommended or Required’ dropdown menu.

The Recommended and Required checklist dropdown

You can now choose between ‘Required’ or ‘Recommended.’

If you click on ‘Required,’ then authors won’t be able to publish their blog post without checking off this task first.

If the user clicks on the ‘Publish’ button without completing all ‘Required’ tasks, then WordPress will show a ‘Please complete the following tasks before publishing’ message.

A WordPress blog post checkbox

If you choose ‘Recommended’ instead, then the editor will show a message encouraging authors to complete any outstanding ‘Recommended’ tasks before publishing.

However, authors will be able to publish their post without completing these tasks.

A list of recommended blog post tasks

After choosing between ‘Recommended’ and ‘Required,’ you can move onto ‘Who can ignore the task?’

Here, you can let certain user roles publish a post without completing the task, even if that task is ‘Required.’ For example, you may trust your site’s admins or editors to skip this task if they think it’s for the best.

To add a user role to your ‘ignore’ list, click on the ‘Who can ignore the task?’ box.

Creating an 'ignore' list for your WordPress checklist

This opens a dropdown showing all of the different user roles on your site.

You can now simply click on a role to add those users to your ‘ignore’ list.

Adding a blog post checklist to the WordPress editor

For some tasks, you may need to set a maximum and minimum value. For example, you can set a minimum number of categories that authors must add to a post. To learn more, please see our guide on how to add categories and subcategories in WordPress.

If the task has a ‘Min’ and ‘Max’ section, then you can type in the numbers you want to use.

Setting maximum and minimum tasks

To add more tasks to your checklist simply repeat the process described above.

You can also add custom tasks to your blog post checklist.

The drawback is that PublishPress can’t check whether the author has completed custom tasks. This means the author will need to do this check manually.

For more information about custom tasks you may want to add, please see our guide on how to optimize your blog posts for SEO like a pro.

To create a custom task, simply scroll to the very bottom of your screen and then click on ‘Add custom task.’

Creating custom blog list checklist tasks

This adds a new task ready for you to customize.

To start, type the task’s name into the ‘Enter name of custom task’ field. This text will be shown in your checklist, so make sure it lets authors know exactly what they need to do.

Adding a title to your custom checklist task

You can now make this task ‘Recommended’ or ‘Required,’ and give some users the option to ignore this task by following the process described above.

For custom tasks, you can specify the users who can mark this task as a complete. For example, you might use custom tasks to create a special ‘Editing’ checklist for users who have the Editor role.

How to add a blog post checklist to WordPress

To do this, click on the ‘Which roles can mark this task as complete’ box. This opens a dropdown where you can click to select any of your user roles.

Once you’ve added all the tasks to your checklist, click on the ‘Save Changes’ button. Now, you can visit the WordPress editor to see your blog post checklist live.

We hope this article helped you learn how to add a blog checklist to the WordPress editor. You may also want to check out our guide on how to create an email newsletter, and our expert pick of the best WordPress SEO plugins and tools you should use to improve your rankings.

If you liked this article, then please subscribe to our YouTube Channel for WordPress video tutorials. You can also find us on Twitter and Facebook.

The post How to Add a Blog Post Checklist to the WordPress Editor first appeared on WPBeginner.

How to Effectively Attract and Manage Guest Bloggers in WordPress

Are you looking for ways to attract guest bloggers and manage them in WordPress?

Guest blogging is a powerful way to gain exposure and build brand awareness. You can publish different types of content through guest post submissions and boost your traffic.

In this article, we will show you how to effectively attract and manage guest bloggers in WordPress.

Manage Guest Bloggers in WordPress

Benefits of Accepting Guest Posts for Publishers

Guest blogging has tons of benefits for the guest author or the company they represent, helping them to get publicity and backlinks to their website.

But what’s in it for you as a publisher?

Here are some of the advantages of accepting guest posts on your website.

  • New Perspective – Every author brings their unique perspective with their writing. Your audience will like a little change of pace and ideas.
  • New Audience – Often the guest author will share the published post with their audience. This will attract new users to your website and grow your audience.
  • New Connection – By allowing the other person to guest post on your site, you can build a relationship with them. This increases your chances of helping each other in the future.
  • New Post – You get an extra post on your site that you didn’t have to write. You can use that time to focus on growing other areas of your brand.

Now that you see the benefits of accepting guest posts on your site, let’s find out how to attract guest bloggers in WordPress.

Attracting Guest Bloggers in WordPress

There are various ways you can attract guest bloggers in WordPress. The simplest way of doing this is by creating a Write for Us page on your site.

You can highlight the details for guest post submissions and offer publishing guidelines for writers on the write for us page. If you have particular topics to cover, then you can also list them down on the page.

Write for us section

Besides that, it’s a good idea to make this page visible to your visitors. You can place the link in the main navigation area of your WordPress website, like in the top menu or sidebar.

Other than that, you can place the ‘write for us’ page after each post in the author bio or on each guest author post.

Bonus Tip: You can create stunning write for us pages using SeedProd. It’s the best landing page plugin for WordPress and offers a drag and drop builder along with numerous customization options. You follow our detailed guide on how to create a landing page in WordPress for more details.

Another way to attract guest bloggers to your website is by offering them a monetary reward. You can set different prices for different types of content.

For example, DAME Magazine offers guest authors a monetary reward of $150 for essays and between $300 to $500 for reported features.

Sites that pay for guest posts

You can also partner with other businesses by guest posting on other sites and allowing their authors to guest post on your website.

Often bloggers tend to reciprocate guest posts, which can work out great, especially if you are in the same niche.

Lastly, you can join different communities of guest bloggers and look for opportunities to attract new guest posts to your website.

Once you know how to attract guest bloggers, let’s find out how to accept guest posts on your WordPress blog.

Accepting Guest Posts in WordPress

There are several ways to accept guest posts in WordPress. The easiest way is by allowing users to submit guest posts from the front end of your WordPress website.

This way, you won’t have to give access to the WordPress admin area or require users to register. Guest bloggers can simply upload their content using a post-submission form.

For this tutorial, we’ll be using WPForms. It’s the best form plugin for WordPress and offers a drag and drop form builder. The plugin offers a post submissions addon that makes it easy for users to upload content to your site.

You’ll need the WPForms Pro version as it includes the post submissions addon.

First, you’ll need to install and activate the WPForms plugin. If you need help, then simply follow our guide on how to install a WordPress plugin.

Once the plugin is active, you can head over to WPForms » Settings from your WordPress admin area and enter the license key. You can find the license key in your WPForms account area.

Enter WPForms license key

Next, you’ll need to go to WPForms » Addons page. Then scroll down to the Post Submissions Addon and click the ‘Install’ button. The addon will now automatically install and activate.

Installing the WPForms post submissions addon

Upon installing the addon, you’re now ready to create your post submission form. To start, simply go to WPForms » Add New to launch the WPForm’s form builder.

After that, go ahead and enter a name for your form and then select the ‘Blog Post Submission Form’ template in the Select a Template area.

Select Blog Post Submission Form template

Now, you can use the drag and drop builder to customize your form. Simply add new form fields by dragging them from the options on your left and placing them where you want in the form.

Add new form fields

WPForms also lets you customize each individual field. All you have to do is click on any field you want to edit, and you’ll see options to change their label, size, format, add a description, and more.

After you’re done customizing your post submission form, you can head over to the ‘Settings’ tab.

In the General settings, you’ll be able to edit your form name, form description, change the submit button text, edit the anti-spam protection option, enable AJAX form submissions, and more.

General Form Settings

Next, you can go to the Notifications settings tab to change the email address and message you’ll receive when someone submits a guest post using the form.

Once that’s done, you can head over to the Confirmations settings tab and edit the message people will see once they submit a form. WPForms lets you show a message, direct users to a new URL, or display a page.

After that, go ahead and click on the Post Submissions settings tab to map each form field to the respective fields in WordPress.

Change the Post Submission settings

Now, save your settings to store your post submission form and exit the form builder.

Next, you’ll need to add your guest post submission form to your website. You can do that by adding a new page or editing an existing one.

Once you’re in the WordPress block editor, simply click the plus (+) button and add a WPForms block.

WPForms block

After that, you’ll need to select your posts submission form from the dropdown menu in the WPForms block.

Select your post submission form from the dropdown menu

You can now go ahead and publish your page and visit your website to see the post submission form in action.

Post submission form example

Aside from using WPForms, there are more ways to allow users to submit guest posts to your WordPress website. For instance, you can create individual WordPress accounts for each contributor.

However, this would mean allowing guest writers to access your WordPress admin area and view other blog posts and pages on your website.

If you’re looking for more options to accept guest posts, then please refer to our guide on how to allow users to submit posts to your WordPress site.

Set Up Website Traffic Tracking by Authors

Once you start publishing guest posts, it’s important to know how they’re performing. One way of tracking their performance is by finding out which authors drive the most traffic to your website.

This way, you’ll get to see the most popular guest author on your website. You’ll also get to know which content your audience likes, so you can accept more guest posts on similar topics.

With MonsterInsights, you can easily set up author tracking in Google Analytics. MonsterInsights is the best Analytics solution for WordPress and is used by over 3 million businesses.

It makes it very easy to add Google Analytics to WordPress without editing code or hiring a professional. Using the MonsterInsights Dimensions addon, you can identify the most popular contributors on your blog.

Select Author from the custom dimensions dropdown menu

The Dimensions addon lets you set up custom dimensions in WordPress. Custom dimensions are additional information that you can track in Google Analytics. This includes authors, post type, user ID, category, logged-in users, and more.

The best part about using MonsterInsights is that you can see the data inside your WordPress admin area and don’t have to switch between tabs or windows.

To view the most popular author on your site, simply head over to Insights » Reports and go to the ‘Dimensions’ tab.

Top authors report in MonsterInsights

For more details, you can follow our step-by-step guide on how to enable author tracking in WordPress.

Bonus: Tips for Accepting Guest Posts

Ever since Google has started cracking down on paid text links, SEO companies and spammers rely on guest posts to pick up the slack. For this very reason, no matter how popular your blog is, you will see at least a few guest posts request.

When your blog is relatively new and you get a guest post request, you get really excited. In that excitement, you tend to make the mistake of approving sub-par or even low-quality content.

To help you out, here are some rules that we think you should follow when accepting guest posts.

Ask What Keyword or Backlinks Do You Want?

You don’t want to link to spammy sites like porn, inkjet printers, car insurance companies, etc. You also don’t want to link to a specific keyword, which isn’t relevant to your industry or niche.

If you don’t ask your guest bloggers which keyword they’re focusing on or are they linking to spammy websites, then they will write an article that won’t add value.

At this point, if you reject their post, it sort of looks bad. It’s best not to waste time and get this out of the way.

Ask for Topic Ideas and Summary Before the Final Post

Often these SEO companies and spammers tend to have pre-written articles. They will say that we want to write for your blog, but they don’t suggest ideas.

Chances are, you will get a pre-written post that has been published on numerous sites. This is bad for your site as duplicate content can hurt your WordPress SEO.

It’s always best to ask them for topic ideas along with a summary or an outline of the article. This shows you how qualified they are to write the post, and you can approve or reject the topic.

It will also help you screen out generic posts or list posts that have already been covered by numerous other websites.

We hope this article helped you learn how to effectively attract and manage guest bloggers in WordPress. You may also want to check out our guides on how to choose the best blogging platform and our expert pick of the must have WordPress plugins for all websites.

If you liked this article, then please subscribe to our YouTube Channel for WordPress video tutorials. You can also find us on Twitter and Facebook.

The post How to Effectively Attract and Manage Guest Bloggers in WordPress appeared first on WPBeginner.

How to Allow Blog Users to Moderate Comments in WordPress

Do you want to allow blog users to moderate comments in WordPress?

If your site gets a lot of comments, then it can be difficult to moderate them all. One solution is creating a separate user role so that other people can manage the comments for you.

In this article, we will show you how to allow blog users to easily moderate comments on your WordPress blog.

How to allow blog users to moderate comments in WordPress

Why Allow Blog Users to Moderate Comments in WordPress?

Comment moderation can take a lot of time and effort, especially for big blogs that get lots of comments. If you are slow to approve comments or delete spam, then visitors may stop interacting with you.

By giving blog users the power to moderate comments, you can combat spam and deliver a better experience for your visitors.

These users might be members of your customer support team, your community manager, or even an active and trusted commenter on your WordPress blog.

By default, WordPress doesn’t let you create a user who is only responsible for moderating comments. With that being said, let’s see how you can easily allow blog users to moderate comments using a WordPress plugin.

Simply use the quick links below to jump straight to the method you want to use.

Method 1: Add a Comment Moderator Role to Specific Users

The Comment Moderation Role plugin allows you to quickly and easily give a comment moderator role to specific users. This plugin creates a new WPB Comment Moderator role that enables the user to approve, decline, or edit comments on any post without giving them access to other parts of the WordPress dashboard.

The first thing you need to do is install and activate the plugin. For more details, see our step-by-step guide on how to install a WordPress plugin.

Upon activation, you will have access to a new user role called ‘WPB Comment Moderator’.

To assign this role to an existing user, simply go to Users » All Users. Then, check the box next to that person’s username.

Editing user roles in WordPress

After that, simply open the ‘Change role to…’ dropdown menu and select the ‘WPB Comment Moderator’ role.

You can then go ahead and click on ‘Change’.

Editing the built-in user roles in WordPress

Now, this person will have access to the WordPress comment moderation panel.

You can also create a new user and assign them the comment moderator role. To do this, simply go to Users » Add New and enter the person’s information, such as their email address.

Creating a new comment moderator user role in WordPress

Next, you need to open the ‘Role’ dropdown and select ‘WPB Comment Moderator’.

When you are happy with the information you have entered, just click on the ‘Add New User’ button.

Adding a new comment moderator role in WordPress

Now, this person can log in to their account and see a comment moderation dashboard, similar to the image below.

As you can see, this person can only moderate comments and edit their profile. All other WordPress admin dashboard features are hidden.

Allowing users to moderate comments in WordPress

Method 2: Add Comment Moderation Capabilities to Any User Role

You can also add the comment moderation permission to a user role or even create a completely new user role for managing your site’s comments.

This is a great choice if you want to allow multiple people to moderate comments.

For example, you might create a comment moderation team or give your site’s Contributors permission to moderate comments. This makes it easy for guest bloggers to interact with their readers.

The easiest way to edit user permissions in WordPress is by using the Members plugin. This free plugin allows you to customize the permissions for every user role and even create completely new roles.

The first thing you need to do is install and activate Members. For more details, see our step-by-step guide on how to install a WordPress plugin.

Upon activation, go to the Members » Roles page to see all the different user roles on your WordPress website.

Editing WordPress member roles

To start, you can add the comment moderation permission to any existing user role.

To do that, simply hover over that role and then click on the ‘Edit’ link when it appears.

How to edit a user role in WordPress

The left column shows all the different types of content, such as reusable blocks and WooCommerce products. Simply click on a tab, and you will see all the permissions for that content type.

To allow users to moderate comments, you need to select the ‘General’ tab in the left-hand menu. Then, find ‘Moderate Comments’ and check the ‘Grant’ box.

Giving moderate comment permissions to a user role in WordPress

With that done, simply click on ‘Update’ to save your changes. Now, anyone with this user role can moderate your website’s comments.

Another option is to create a new user role by going to Members » Add New Role. You can now type in a title for the new role, such as Community Manager, Comment Moderator, or something similar.

How to add a new user role in WordPress

After that, you can add the comment moderator permission to this role by following the same process described above. To give this role additional permissions, simply check any of the other ‘Grant’ boxes.

For more details on user roles and permissions, please see our beginner’s guide to WordPress user roles and permissions.

When you are happy with how the user role is set up, don’t forget to click on ‘Add Role.’

Creating a community manager role to moderate comments in WordPress

Now, you can assign this role to anyone who needs the comment moderator permission. For step-by-step instructions, please see our guide on how to add new users and authors to your WordPress blog.

We hope this article helped you learn how to allow blog users to moderate comments in WordPress. You may also want to see our expert picks for the best email marketing services for small business and read our guide on how to allow user registration on your WordPress site.

If you liked this article, then please subscribe to our YouTube Channel for WordPress video tutorials. You can also find us on Twitter and Facebook.

The post How to Allow Blog Users to Moderate Comments in WordPress first appeared on WPBeginner.

21 Plugins to Efficiently Manage WordPress Multi-Author Blogs

Are you looking for WordPress plugins to manage multi-author blogs?

Running a multi-author WordPress website comes with different challenges compared to a single-author WordPress blog. You’ll need to plan content, create an editorial workflow, monitor user activity, and make sure that your website runs at peak performance.

This sounds like a lot of work, but luckily some really helpful plugins can make it all go smoothly.

In this article, we will share some of the best plugins to efficiently manage multi-author WordPress blogs.

Best Plugins to Efficiently Manage WordPress Multi Author Blogs

Without any further delay, let’s look into the best WordPress plugins to efficiently manage multi-author blogs.

1. PublishPress

PublishPress

PublishPress is the best publishing tool kit for any type of content-rich website and a must-have plugin for multi-author WordPress blogs.

It allows you to create and manage an editorial calendar inside WordPress, follow up on drafts and article ideas progress, manage authors, set up custom notifications, and more.

The plugin comes with addons that give you a powerful set of tools. These addons include Capability Manager Enhanced (to customize user permissions), Revisions (to manage revisions in WordPress), and Press Permit, which lets you control viewing permissions on WordPress.

This incredibly powerful plugin helps you every step of the way, from content planning to publishing, while ensuring that nothing slips through the cracks. For more details, see our guide on how to improve your editorial workflow in WordPress.

Bonus: See our guide on how to do keyword research to find blog post ideas.

2. WPForms

WPForms

WPForms is the best WordPress contact form plugin on the market. It allows you to easily build forms using a simple drag and drop form builder.

Their Pro plan also comes with user registration, a custom login form, and post-submission addons. This allows you to accept posts on your website without allowing anyone accesses to your WordPress admin area,

For details, see our step-by-step guide on how to allow users to submit posts to your WordPress website.

3. MemberPress

MemberPress

If you want to build a website where only paid members can submit posts, then you’ll love MemberPress. It is the best WordPress membership plugin and allows you to easily sell subscriptions and membership plans.

It allows you to easily restrict access to any content based on the user’s membership level. You can also use it with WPForms to create front-end post submission pages.

For detailed instructions, see our guide on how to easily create a membership website in WordPress.

4. TranslatePress

TranslatePress

TranslatePress is a fantastic plugin that helps you easily manage translations if you run a multilingual WordPress website.

It allows you and other authors on your website to easily translate content with a live preview. You can also use it to translate WordPress themes and plugins as well.

For step-by-step details, see our tutorial on how to easily translate your WordPress website

Alternatives: WPML, Polylang

5. Sucuri

Sucuri

Sucuri is the best WordPress security plugin to protect your website against unauthorized access, brute-force attacks, and hacking.

As a multi-author WordPress site, more people have access to the admin area of your WordPress website. While making sure that your authors can write posts, you would also want to make sure that your admin area is safe and secure.

Sucuri performs regular security checkups and acts as a website firewall. This allows malicious attacks to be blocked even before they reach your website.

6. Pre-Publish Checklist

Pre Publish Checklist

Pre-Publish Checklist helps you add a post editor checklist, allowing authors to check everything on the list before publishing or submitting it for review.

As the administrator of a multi-author WordPress website, you want to ensure that all authors follow the editorial process you have set up for your website.

7. Simple Local Avatars

Simple Local Avatars

Simple Local Avatars plugin allows users on your WordPress site to upload their author photo by editing their profile.

By default, WordPress uses Gravatar to display user avatars in comments and user profiles. If some of your users may not have a gravatar setup for their email address or simply want to use another picture on their author profile, then Simple Local Avatars is the go-to-plugin.

8. MonsterInsights

MonsterInsights

MonsterInsights is the best Google Analytics plugin for WordPress. It allows you to easily install Google Analytics in WordPress.

It also shows where your users are coming from, what content is doing well, what users do when viewing your website, and more. This data provides insights to make an effective content strategy for your website.

Bonus: See the top marketing metrics you must track on all WordPress sites.

9. WP Revisions Control

WP Revisions Control

WP Revisions Control helps you set several revisions that WordPress should keep. After that number, WordPress will automatically delete the oldest revision. You can also delete all revisions for a specific post if you want.

WordPress automatically saves drafts as revisions. This helps you easily undo changes and revert to an earlier draft of your article. However, these revisions add to your WordPress database size if you run a large multi-author WordPress site.

To learn more, see our beginner’s guide to WordPress post revisions with step-by-step instructions on how to use revisions on your blog.

10. Author Avatars List

Authors Avatar List

Author Avatars List plugin allows you to easily add a blog authors list anywhere on your site. It comes with a sidebar widget, and you can also use the shortcode to easily add it to a post or page.

An easy way to attract more authors to write for your website is by showcasing authors prominently on your website. One way to do this is by displaying a list of blog authors.

11. Adminimize

Adminimize

Adminimize gives admins full control over what users can or cannot see inside the WordPress admin area. Admins of a multi-author blog can use it to disable user access to unnecessary sections.

This enables them to provide a lean and distraction-free writing space for the authors. For more details, see our tutorial on how to hide unnecessary items from WordPress admin.

12. User Notes

User Notes

User Notes allow you to leave notes on user profiles. These notes can only be seen by admins, can be very helpful, and may serve as a reminder tool.

For example, if an author is not following the deadlines, you can add a note to remind yourself that this particular author is careless with the deadlines.

13. Simple Author Box

Simple Author Box

Simple Author Box helps you easily add an author bio box below articles. You can customize it to match your theme colors, configure what you want to show, and add social sharing buttons.

By default, modern WordPress themes can display an author’s profile pic along with their bio below the article. However, some are not very good at it, or you may want to get more control over the author bio box, and that’s where the Simple Author Box plugin comes in handy.

14. Edit Author Slug

Edit Author Slug

Edit Author Slug plugin allows you to do that. You can simply edit a user profile and change the author URL slug. It also allows you to change the author base.

WordPress has an SEO-friendly URL structure that allows you to choose URL slugs for your posts and pages. However, there is no option to do so for an author page, so you can use the Edit Author Slug plugin to make it happen.

For more information, see our detailed tutorial on how to change the author URL slug and base in WordPress.

15. User Submitted Posts

User Submitted Posts

User Submitted Posts plugin does just what it says. It allows users to submit posts to your website without login in or creating an account.

This lets you manage user-submitted content without managing user accounts or giving users access to the admin area.

For details, see our guide on how to allow users to submit posts to your WordPress site.

16. Theme My Login

Theme My Login

Theme My Login allows you to create a custom WordPress login page for your website. You can also create a front-end registration and profile editing page.

Basically, users can log in without having access to the admin area of your website. Theme My Login can be used with other plugins to create a front-end editing experience for your authors.

17. Two Factor

TwoFactor

Two Factor plugin allows you to easily add Two Factor authentication to your website. This adds an extra step to your WordPress login screen and makes it difficult for hackers to access your website.

To finish the login process, you can generate a one-time password using an app like LastPass Authenticator.

For details, see our guide on how to add two-factor authentication in WordPress.

18. WP Activity Log

WP Activity Log

WP Activity Log helps you keep a log of everything on your website. This allows you to see when each user logged in, what they did, and all other website activities.

This helps you find an imposter, catch mistakes, block hacking attempts, and more. For details, see our guide on how to monitor user activity on your WordPress site.

19. Constant Contact

Constant Contact

Constant Contact plugin allows you to quickly send an email to all authors and registered users on your website. This comes in handy if you want to communicate important announcements, notifications, and site-related updates.

You’ll need the WP Mail SMTP plugin and a proper SMTP service provider like SendLayer to ensure your emails reach the user’s inbox.

20. Emergency Password Reset

Emergency Password Reset

Emergency Password Reset plugin allows you to reset all user passwords in WordPress with a single click. It also sends an email to all your users with a link to set new passwords.

If you are worried that your WordPress site’s security is compromised, you need to immediately change all WordPress passwords. Now, if you run a multi-author WordPress website, you must make sure all user passwords are changed.

For details, you can see our guide on how to reset passwords for all users in WordPress.

21. User Blocker

User Blocker

User Blocker plugin allows you to easily block an author on your WordPress website without changing author information or deleting their account.

This helps you make sure that content on your website is not affected while ensuring unwanted users can no longer access the WordPress admin area.

For more information, see our step-by-step guide on how to block a WordPress user without deleting their account.

That’s all for now.

We hope this article helped you find useful plugins to manage your multi-author WordPress blogs. You may also want to see our proven tips to increase your blog traffic and our ultimate guide on how to speed up your WordPress site.

If you liked this article, then please subscribe to our YouTube Channel for WordPress video tutorials. You can also find us on Twitter and Facebook.

The post 21 Plugins to Efficiently Manage WordPress Multi-Author Blogs first appeared on WPBeginner.

How to Monitor User Activity in WordPress with Security Audit Logs

Do you want to monitor user activity on your WordPress site?

Running a multi-author blog or membership site comes with its own unique challenges such as stopping spam registrations and managing editorial workflow.

One solution that owners and admins of multi-user WordPress sites seek out is the ability to easily monitor user activity on their website.

This allows them to put a check and balance system in place. If things go out of control, then they can easily figure out what went wrong, who did it, and how to fix it.

In this article, we will show you how to monitor user activity and keep a security audit log in WordPress.

Monitor User Activity in WordPress

Why You Should Enable WordPress Activity Monitor and Logs?

A common objection that often comes up is you shouldn’t give WordPress login access to anyone that you don’t trust. If you do that, then you won’t need an activity tracking solution.

That’s a bit extreme because there are several very valid use-cases of activity logs.

Sometimes users can accidentally make an error or mistake that may break your WordPress website. Having an activity tracking log helps you identify and fix those issues faster.

Since the audit logs will show you which user made the mistake, you can also educate them on best practices to prevent the same mistake in the future.

A good example is if a moderator approved a comment that doesn’t fit your comment guidelines, then you can quickly correct their mistake and also notify them about it.

Another very good use-case for security audit logs is when you hire a WordPress developer from third-party contract websites like Codeable, Upwork, etc.

While most developers are trustworthy, sometimes you will run into a dishonest developer who can cause your business to lose significant amount of money.

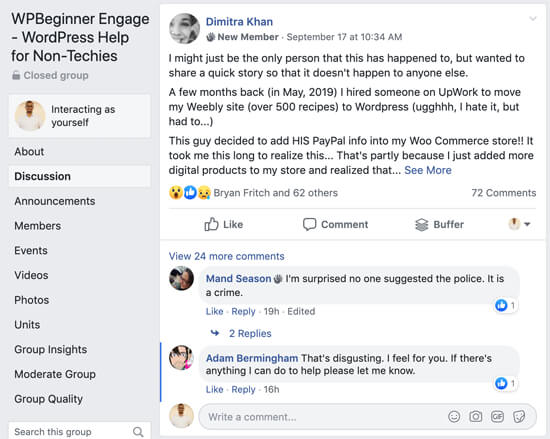
Recently one of our Facebook group members reported that a developer she hired from Upwork changed the PayPal address in her WooCommerce store.

Upwork Scammer

These kind of subtle changes are extremely hard to detect unless you have a WordPress user audit log that keeps track of all activity.

Several years ago this issue happened to WPBeginner founder, Syed Balkhi, where a freelance developer quietly changed several of his affiliate links. Syed caught and fixed the issue thanks to a security audit log plugin.

With the above benefits in minds, let’s take a look at how to set up and monitor user activities on your WordPress website.

We will share two WordPress audit log plugins.

  1. Simple History (free plugin, but not as robust)
  2. WP Security Audit Log (best-in-class for what it does)

Monitoring User Activity with Simple History

Simple History is a free user activity monitoring plugin for WordPress, but it is not as feature rich. If you run a small website or WordPress blog, then this plugin will work for you.

The first thing you need to do is install and activate the Simple History plugin. You may follow our beginner’s guide on how to install a WordPress plugin for detailed instructions.

Upon activation, head over to Settings » Simple History from the left sidebar of your WordPress admin panel.

Simple History plugin settings page

On the settings page, you can choose whether you want the activity log to appear on the dashboard, on a separate page, or both.

You can also decide the number of items that will appear on the Dashboard and the log page.

By default, the Simple History plugin cleans the activity log history that is older than 60 days. You can also delete the history manually by clicking on the Clear log now button on the settings page.

This plugin allows you to monitor the history with the help of a secret RSS feed. However, you need to check the “Enable RSS feed” option to use it.

Viewing User Activities with Simple History

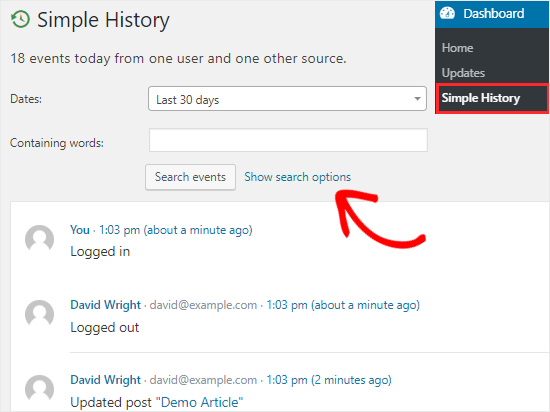
To check the user activity log, you need to visit the Dashboard » Simple History page. You can also view them on the Dashboard, but this will depend on how you have configured the settings of this plugin.

Simple History user activity log

This plugin displays the events of the last 30 days by default. You can change it to a fixed range (up to 60 days) or to a custom range by clicking on the Dates dropdown menu.

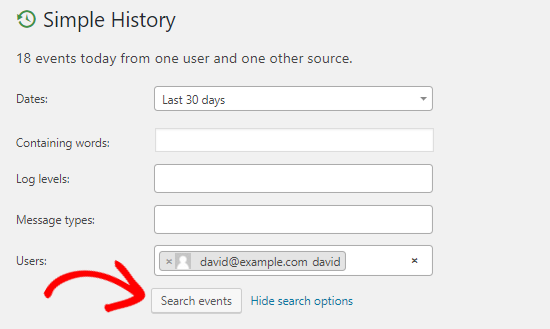
To search for specific events on your site, you need to click on the “Show search options” link. This will open up a number of fields. You can either use a single field or a combination of them to find the desired data.

Simple History activity log search options

For example, you can use the Users field to find someone and then, click on the Search events button to see the activities of that person in the last 30 days.

By default, the Simple History plugin allows you to monitor login, logout, wrong password, post/page editing, media upload, plugin install/update, user profile changes, and more.

It also has support for bbPress forums which lets you see the forum and topic activities on your website.

Simple History allows you to add your own custom events as well. If you have development experience and want to add a custom event, then you can check out the details on this page.

Monitor User Activity using the WP Security Audit Log

Although Simple History does a good job of tracking user activities on your website, it is limited in functionality.

If you are looking for a plugin that provides detailed and real-time user activity reports, then you should use the WP Security Audit Log plugin.

It is a feature-rich plugin that allows you to keep track of every change that happens on your website. You can also get email and SMS notifications for important site events.

To get started, you need to install and activate the WP Security Audit Log plugin on your WordPress site.

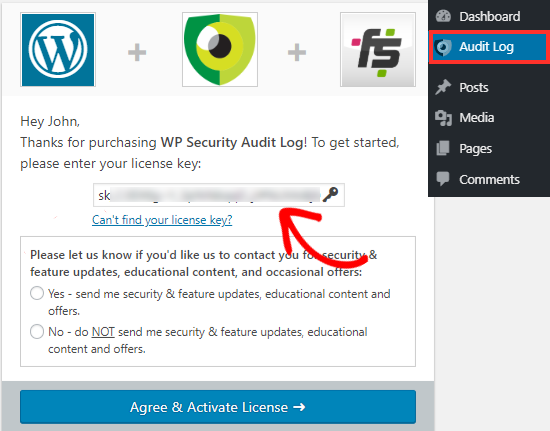
Upon activation, you will see a new menu item Audit Log in the left sidebar of your admin panel. You need to click on it to configure this plugin.

WP Scurity Activity Log plugin

On the settings page, you will have to enter the license key of this plugin, and then you need to click on the “Agree & Activate License” button to start using this plugin.

Note: To get the license key, you can check the welcome email that you have received after purchasing the plugin.

Once activated, you will see new options under the Audit Log menu in the left sidebar.

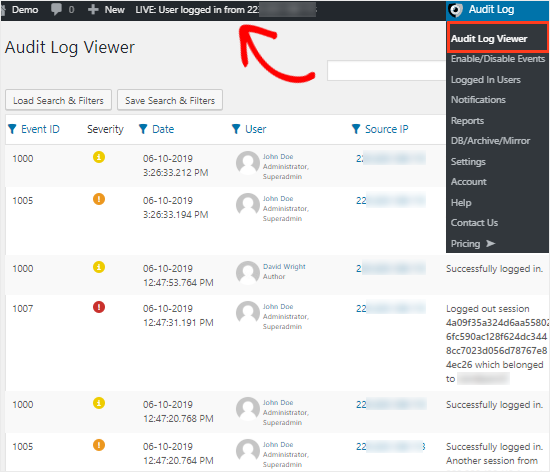
To monitor the events on your website, you need to head over to the Audit Log » Audit Log Viewer page.

Audit Log Viewer to monitor events

This plugin displays the latest events at the top bar of your screen. You can also click on those notifications to go to the Audit Log Viewer page.

The log page will allow you to see all events on your website. You will get important details like the date of the event, the user involved, IP address of the user, and the event message.

For example, if someone logged into your site, then you will be able to find out who was that user, when did that person login, and the IP address of the user.

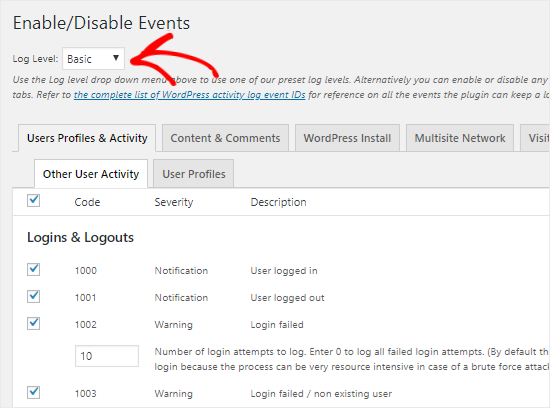
You can also control the events that you want to track by going to the Audit Log » Enable/Disable Events page.

Enable or Disable Events to monitor

Here you can select Basic, Geek, or Custom from the Log Level dropdown menu. Based on your selection, you will see different event names and their description on that page.

You can now enable or disable individual events by checking/unchecking the boxes. You can do the same by going to different tabs like Content & Comments, WordPress Install, Visitor Events, etc.

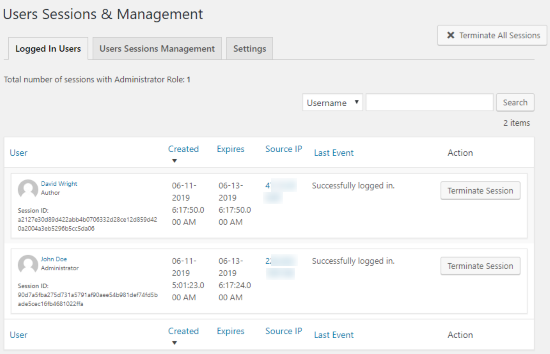
To track the logged in users on your site, you need to go to the Audit Log » Logged In Users page.

WP Security Audit Log Plugin logged in users

From here you will see all the users who are logged into your site. You can also force someone to log out by clicking on the Terminate Session button.

If you want to download the activity log of your site, then simply go to the Audit Log » Reports page to generate a report based on the criteria that you may have.

That’s all! We hope this article helped you to understand how to monitor user activity in WordPress with the help of Simple History or WP Security Audit Log plugin.

You may also want to check out our ultimate WordPress security guide and our list of the best WordPress firewall plugins.

If you liked this article, then please subscribe to our YouTube Channel for WordPress video tutorials. You can also find us on Twitter and Facebook.

The post How to Monitor User Activity in WordPress with Security Audit Logs appeared first on WPBeginner.