How To Efficiently Manage Post Series in WordPress

Are you looking for a better way to manage post series in WordPress?

If you’re working on an online novel or simply want to cover a broad industry topic, then creating a long post may not work for you. A post series allows you to dig deep into a particular topic and encourage readers to keep coming back for more.

In this article, we’ll show you how to efficiently manage post series in WordPress.

How To Efficiently Manage Post Series in WordPress

Why Publish Post Series in WordPress?

If you are writing about a complex topic on your WordPress website, then it is often better to write a series of posts that break the topic up into smaller chunks than to write one long post.

For example, our ultimate guide to speed up WordPress is a roundup of a series of posts we published on different ways to improve your site’s performance.

When you write a big series of posts like that, it can be tough to help your readers navigate the series and find all the information in the right order.

You could simply add a paragraph before each post telling your users that the post is part of a series and then list the rest of the posts at the bottom. But then you would have to manually update every post each time you publish a new article in the series.

Another solution would be to create a custom taxonomy called ‘Series’, but this also creates more work, such as creating or customizing template files.

Luckily, there is a WordPress plugin that will help you manage a series of articles. Let’s take a look at how to efficiently manage post series in WordPress.

How to Efficiently Manage Post Series in WordPress

The first thing you need to do is install and activate the Issues and Series plugin. For more details, see our step by step guide on how to install a WordPress plugin.

There is a premium version with more features, but for this tutorial, we’ll use the free plugin.

As soon as the plugin is activated, you will be able to create new series and add posts to it.

Creating a New Series

To create your first series, you’ll need to head over to the Posts » Manage Series page. This looks similar to the page you see when adding new categories.

Once there, you will need to type a name, slug, and description for the series. When you’re finished, you’ll need to click the ‘Add New Series’ button at the bottom of the page.

Add a New Series in WordPress

You’ll notice that the new series is added to the list on the left.

Adding Posts to the Series

Now you can add some blog posts to the series. To start, simply create a new post or edit an old one.

In the settings panel on the right of the screen, you’ll notice a new section called ‘Series’. Simply click the button next to the series you created to add this post.

Add a New Post to Your Series

Make sure you click the ‘Publish’ or ‘Update’ button at the top of the page to push the post live as part of the series.

Next, you should add any other existing posts to the series. As you continue to write new articles, simply repeat this step to add them to the series.

Customizing the Order of Posts in the Series

By default, your articles will be displayed in the order you add them to the series. However, you can customize the post order by visiting the Posts » Publish Series page in your WordPress admin area.

Here you will see all the series you have created, with columns to show how many articles are published, unpublished, and scheduled in each. You will also see links to update the post order, publish or unpublish all, and view the series.

Click the 'Update Order' Link to Reorder Your Posts

To change the order of the posts, you will need to click the ‘Update order’ link. You will now see a list of all the posts in that series.

You can reorder the articles by dragging the post names up or down the list. When you move a post, the ‘Current Part’ number will be updated automatically to reflect the new order.

Drag and Drop Your Posts to Place Them in the Right Order

When you’re happy with the order of the posts, make sure you click the ‘Update Order’ button to store your settings.

Previewing Your Post Series

Now you can visit your WordPress blog to see how your new post series looks. Simply view a post that is part of the series.

At the top of the article, there will be a message that the post is part of a series. You will also see a list of all posts in the series and can easily navigate between them by clicking a link.

Post Order Preview

You will also find links at the bottom of the article to navigate to the next and previous article in the series.

We hope this tutorial helped you learn how to efficiently manage post series in WordPress. You may also want to learn how to track visitors to your WordPress site, or check out our list of must have plugins to grow your site.

If you liked this article, then please subscribe to our YouTube Channel for WordPress video tutorials. You can also find us on Twitter and Facebook.

The post How To Efficiently Manage Post Series in WordPress first appeared on WPBeginner.

How to Create a To-Do List in WordPress

Do you want to create a to-do list in your WordPress site?

Getting things done can often be boiled down to having an old-fashioned to-do list. And being able to see your to-do list within WordPress can enhance your productivity.

In this article, we’ll show you how to easily create a to-do list in WordPress.

Creating a to do list in WordPress

Why Create a To-Do List in WordPress?

To-do lists are the ultimate productivity tool. You can use a simple notebook to manage your daily to-do lists.

However, when you are trying to stay productive at work, then you may want to consider more advanced and efficient to-do list apps. This allows you to stay on top of things and ensure that nothing slips through the cracks.

For WordPress site owners, to-do lists can be used to manage an editorial calendar, website design tasks, manage website conversions, and almost any other task you may want to track.

We’ll show you how to create one inside WordPress with a plugin, and then a more flexible solution using one of our favorite productivity tools that we use in our business.

Ready, let’s get started.

Method 1. How to Make A To-Do List in WordPress

For this method, we’ll be using a WordPress plugin to create and manage your to-do list directly from the WordPress admin area.

It basically let’s you create a Trello style to-do list boards inside WordPress admin.

First, you need to install and activate the Kanban Boards for WordPress plugin. For more details, see our guide on how to install a WordPress plugin.

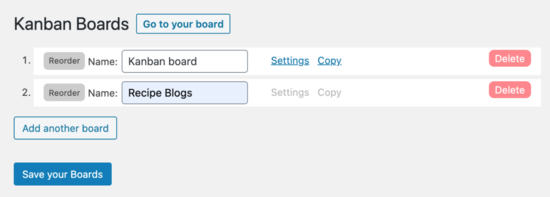
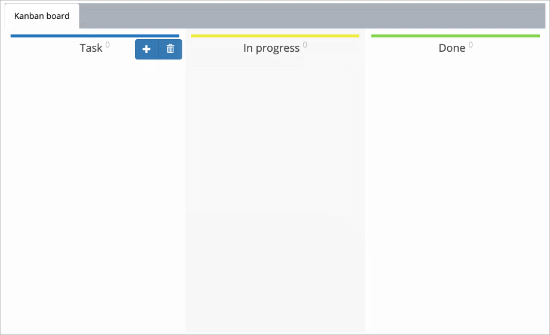
After installation, go to Kanban » Boards in your WordPress dashboard and click the ‘Add another board’ button to create your new board. You’ll see there’s a ‘Kanban board’ by default.

Create your Kanban Board

You need. to click the ‘Save your Boards’ button before you go on.

Next, you want to visit the Kanban » Settings page. You’ll immediately land on the ‘General’ tab. Go ahead and click on the name of the board and select the board you just created.

General settings tab

You need to make sure to select ‘Yes’ on the ‘show all columns’ option, so you can see the entire board on one screen in an upcoming step. Don’t forget to save your settings.

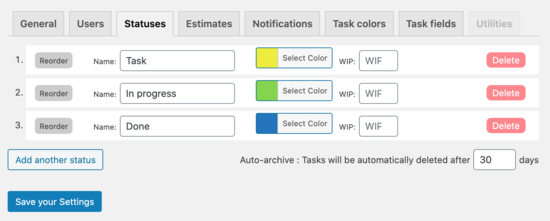
Next, click on the ‘Statuses’ tab to configure the columns on your board. This is where you will build your to-do list.

Create new status

Since this is a brand new board, we are going to create 3 statuses, which indicate how far along you are when working on a task.

We’ll call these three statuses: ‘Task’, ‘In progress’, and ‘Done.’

To do this, click on the ‘add another status button and then name it ‘Task.’

Task on your to-do list

Repeat this process two more times to create all three statuses.

All statuses complete

Now that you have all your statuses created, click the ‘Save your Settings’ button.

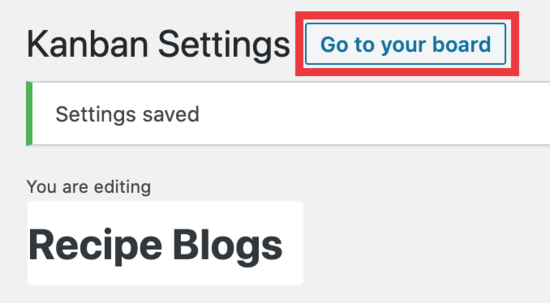
Once that’s done, it’s time to go to your board and create your to-do list. Simply click on the ‘Go to your board’ button at the top of your screen.

Go to board

Now, you’ll see your board, and it’s time to create some tasks.

Your Kanban board

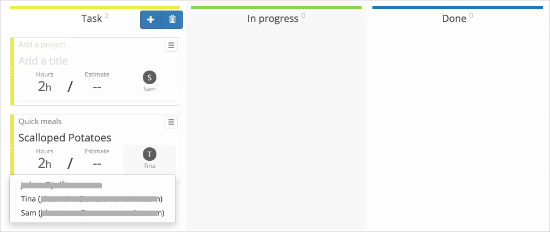
When you hover your mouse over one of the status columns, the blue button will appear. Click on the ‘+’ sign to create your first task.

You have two fields to fill out:

  • Add a project
  • Add a title

When you click into those fields, you can fill these out. For our example, we’re creating a project called ‘Quick meals’ and then adding blog post titles.

Label your statuses

Inside these statuses, you can set a timeframe for them to be completed. And then you can also select which users to assign the task to.

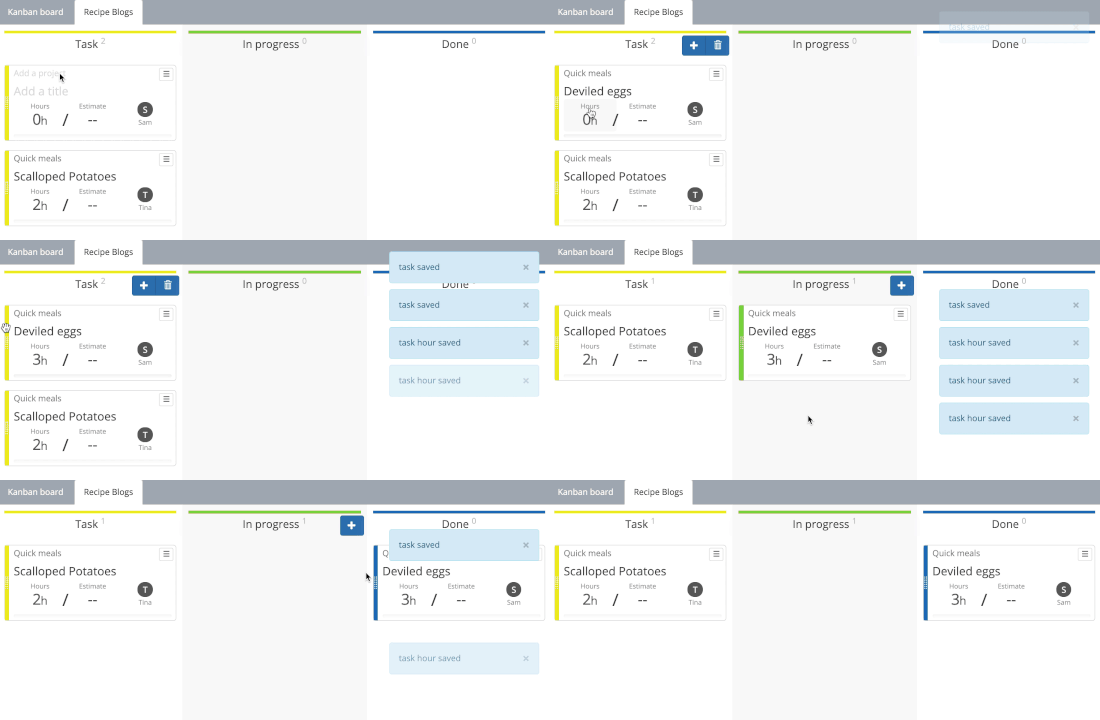
Once you create your task, you can then move it over to the ‘In progress’ and ‘Done’ column to mark them as being worked on or finished.

How to move statuses

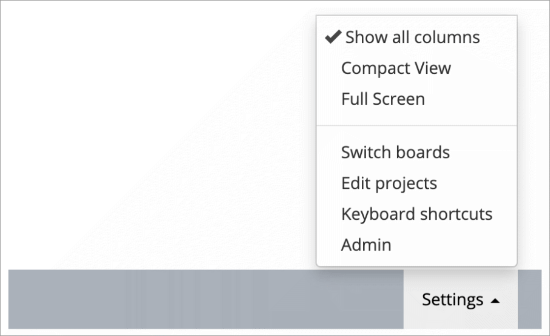
Lastly, to exit your board and get back to your WordPress dashboard, you will click the ‘settings’ button at the bottom of the screen, and then click on ‘Admin.’

Admin dashboard

Kanban for WordPress is an excellent way to manage to-do lists inside your WordPress admin area.

However, if you need more features or don’t want to give team members access to WordPress admin area, then this next method is for you.

Method 2. Create Your To-Do List With Asana

At WPBeginner and Awesome Motive, we use Asana to manage all our tasks. It is the best project management tool that allows you to keep track of your work and chart your progress along the way.

It is more flexible and offers far more features. You can share access to your Asana project with your team without sharing access to your WordPress admin area.

It is free to get started for small teams and individuals. Plus, it works on mobile devices and has apps for both iOS and Android phones.

That being said, let’s take a look at how to set up and use Asana to create a to-do list for your WordPress website.

Asana homepage

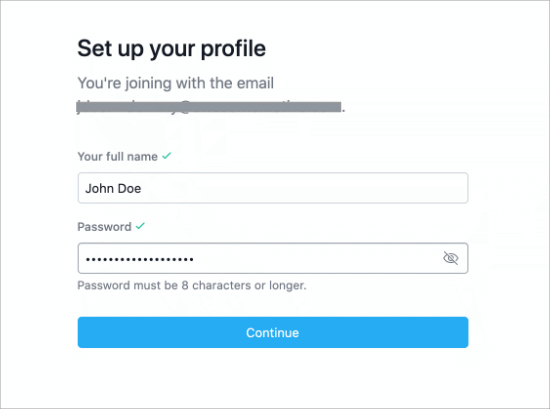
First, go to the Asana website and click on the ‘Try for free’ button and submit your email to create your account.

Now, check your business email for a verification link. You need to click that link and follow the instructions to finish creating your account.

Set up your Asana profile

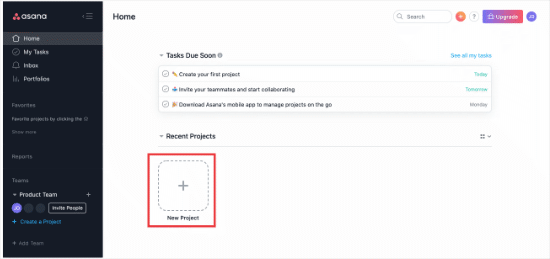
Once you’re done, it’ll take you straight to your dashboard, which looks like this:

Asana dashboard

Since we’re creating a to-do list for the first time, click on the ‘New Project’ button to get started.

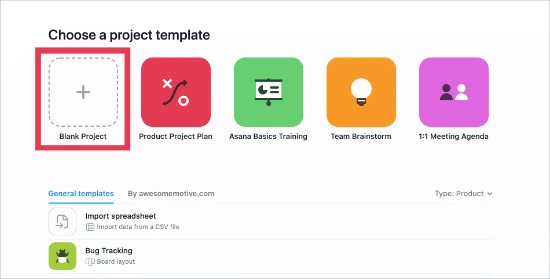
New project

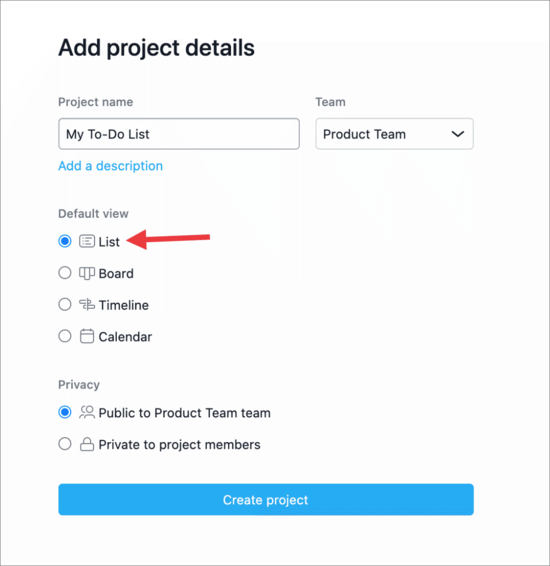
Now, click on the ‘Blank Project’ button to start creating your to-do list. Go ahead and give your project a name. We called ours ‘My To-Do List’ for this example.

Add project details

Click on ‘Create project’ and now it’s time to add some tasks to your list.

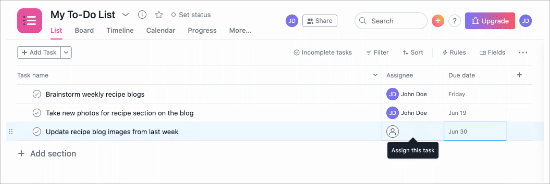
To create new tasks, you need to follow the instructions by clicking in the area that reads ‘Click here to add a task’. If you need to create more tasks, you simply click the ‘+ Add Task’ button at the top of your dashboard.

Here’s what yours could look like after adding a few tasks.

Your tasks

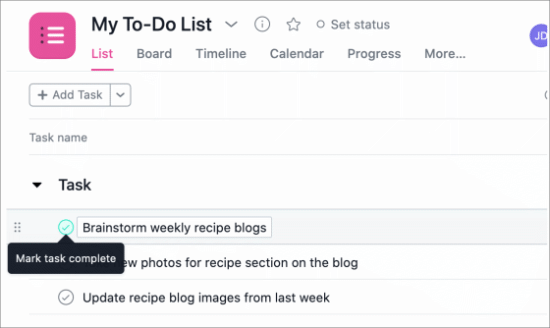
When you finish a task and want to mark it as complete, you simply click on the round circle with a checkmark in it.

Mark task complete

Add Team Members to Your Project

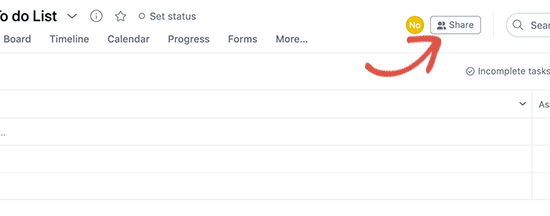
Asana makes it super easy to invite anyone to join your team. Simply click on the share button at the top of a project for inviting users to join your team.

Inviting and adding team members to your projecct

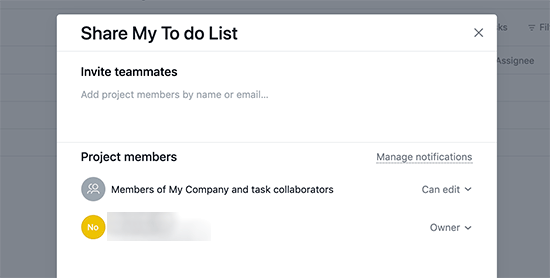
You can then add email addresses of users you want to invite to join your team. You can also remove them at any time you want from your team and control which projects they can edit.

Managing team members in Asana

After these team members join your project, you can assign them items from your to-do list to work on.

Asana is a powerful project management tool. Once you start using it, you’ll be delighted to explore new features like its powerful search, team management, task management, and other built-in tools.

We hope this article helped you learn how to create a to-do list in WordPress. You may also want to check out our must-have WordPress plugins for business websites, and our pick for the best business phone services for remote teams.

If you liked this article, then please subscribe to our YouTube Channel for WordPress video tutorials. You can also find us on Twitter and Facebook.

The post How to Create a To-Do List in WordPress appeared first on WPBeginner.

How to Monitor User Activity in WordPress with Security Audit Logs

Do you want to monitor user activity on your WordPress site?

Running a multi-author blog or membership site comes with its own unique challenges such as stopping spam registrations and managing editorial workflow.

One solution that owners and admins of multi-user WordPress sites seek out is the ability to easily monitor user activity on their website.

This allows them to put a check and balance system in place. If things go out of control, then they can easily figure out what went wrong, who did it, and how to fix it.

In this article, we will show you how to monitor user activity and keep a security audit log in WordPress.

Monitor User Activity in WordPress

Why You Should Enable WordPress Activity Monitor and Logs?

A common objection that often comes up is you shouldn’t give WordPress login access to anyone that you don’t trust. If you do that, then you won’t need an activity tracking solution.

That’s a bit extreme because there are several very valid use-cases of activity logs.

Sometimes users can accidentally make an error or mistake that may break your WordPress website. Having an activity tracking log helps you identify and fix those issues faster.

Since the audit logs will show you which user made the mistake, you can also educate them on best practices to prevent the same mistake in the future.

A good example is if a moderator approved a comment that doesn’t fit your comment guidelines, then you can quickly correct their mistake and also notify them about it.

Another very good use-case for security audit logs is when you hire a WordPress developer from third-party contract websites like Codeable, Upwork, etc.

While most developers are trustworthy, sometimes you will run into a dishonest developer who can cause your business to lose significant amount of money.

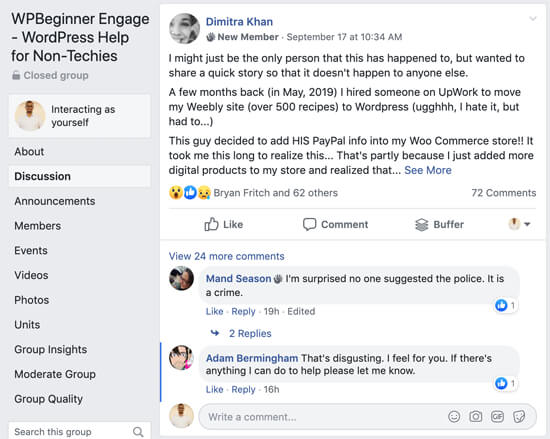
Recently one of our Facebook group members reported that a developer she hired from Upwork changed the PayPal address in her WooCommerce store.

Upwork Scammer

These kind of subtle changes are extremely hard to detect unless you have a WordPress user audit log that keeps track of all activity.

Several years ago this issue happened to WPBeginner founder, Syed Balkhi, where a freelance developer quietly changed several of his affiliate links. Syed caught and fixed the issue thanks to a security audit log plugin.

With the above benefits in minds, let’s take a look at how to set up and monitor user activities on your WordPress website.

We will share two WordPress audit log plugins.

  1. Simple History (free plugin, but not as robust)
  2. WP Security Audit Log (best-in-class for what it does)

Monitoring User Activity with Simple History

Simple History is a free user activity monitoring plugin for WordPress, but it is not as feature rich. If you run a small website or WordPress blog, then this plugin will work for you.

The first thing you need to do is install and activate the Simple History plugin. You may follow our beginner’s guide on how to install a WordPress plugin for detailed instructions.

Upon activation, head over to Settings » Simple History from the left sidebar of your WordPress admin panel.

Simple History plugin settings page

On the settings page, you can choose whether you want the activity log to appear on the dashboard, on a separate page, or both.

You can also decide the number of items that will appear on the Dashboard and the log page.

By default, the Simple History plugin cleans the activity log history that is older than 60 days. You can also delete the history manually by clicking on the Clear log now button on the settings page.

This plugin allows you to monitor the history with the help of a secret RSS feed. However, you need to check the “Enable RSS feed” option to use it.

Viewing User Activities with Simple History

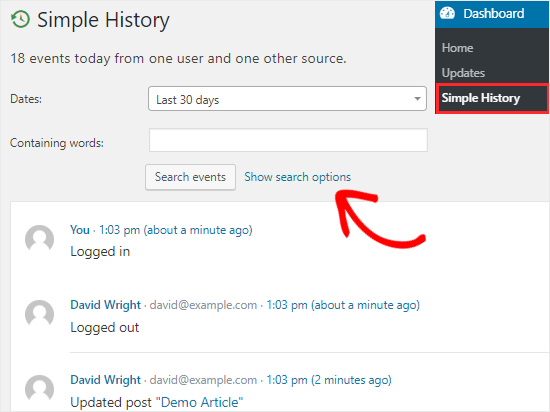
To check the user activity log, you need to visit the Dashboard » Simple History page. You can also view them on the Dashboard, but this will depend on how you have configured the settings of this plugin.

Simple History user activity log

This plugin displays the events of the last 30 days by default. You can change it to a fixed range (up to 60 days) or to a custom range by clicking on the Dates dropdown menu.

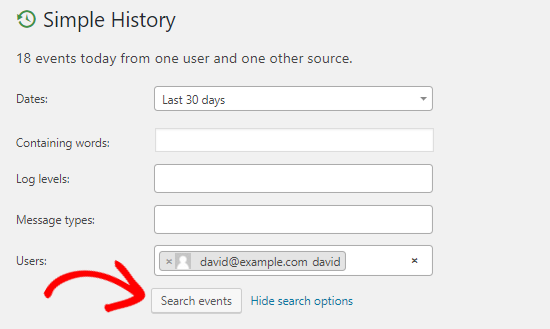
To search for specific events on your site, you need to click on the “Show search options” link. This will open up a number of fields. You can either use a single field or a combination of them to find the desired data.

Simple History activity log search options

For example, you can use the Users field to find someone and then, click on the Search events button to see the activities of that person in the last 30 days.

By default, the Simple History plugin allows you to monitor login, logout, wrong password, post/page editing, media upload, plugin install/update, user profile changes, and more.

It also has support for bbPress forums which lets you see the forum and topic activities on your website.

Simple History allows you to add your own custom events as well. If you have development experience and want to add a custom event, then you can check out the details on this page.

Monitor User Activity using the WP Security Audit Log

Although Simple History does a good job of tracking user activities on your website, it is limited in functionality.

If you are looking for a plugin that provides detailed and real-time user activity reports, then you should use the WP Security Audit Log plugin.

It is a feature-rich plugin that allows you to keep track of every change that happens on your website. You can also get email and SMS notifications for important site events.

To get started, you need to install and activate the WP Security Audit Log plugin on your WordPress site.

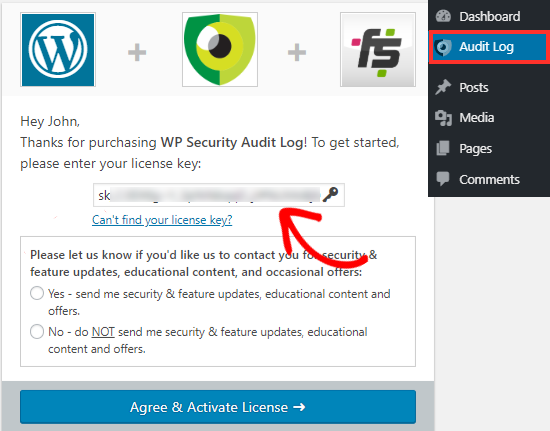
Upon activation, you will see a new menu item Audit Log in the left sidebar of your admin panel. You need to click on it to configure this plugin.

WP Scurity Activity Log plugin

On the settings page, you will have to enter the license key of this plugin, and then you need to click on the “Agree & Activate License” button to start using this plugin.

Note: To get the license key, you can check the welcome email that you have received after purchasing the plugin.

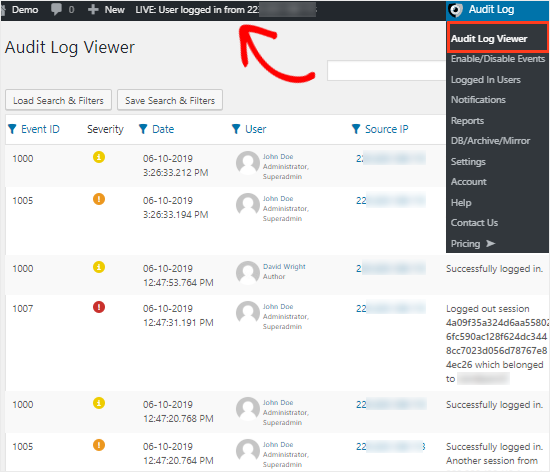
Once activated, you will see new options under the Audit Log menu in the left sidebar.

To monitor the events on your website, you need to head over to the Audit Log » Audit Log Viewer page.

Audit Log Viewer to monitor events

This plugin displays the latest events at the top bar of your screen. You can also click on those notifications to go to the Audit Log Viewer page.

The log page will allow you to see all events on your website. You will get important details like the date of the event, the user involved, IP address of the user, and the event message.

For example, if someone logged into your site, then you will be able to find out who was that user, when did that person login, and the IP address of the user.

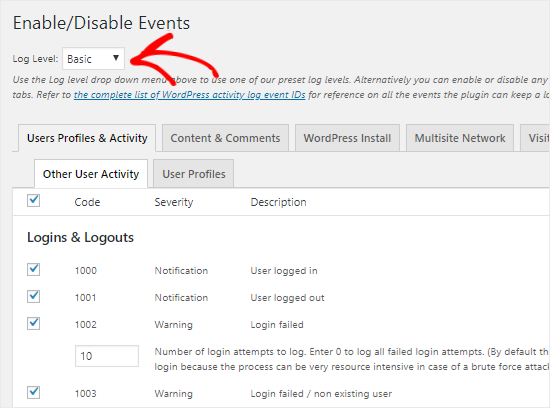
You can also control the events that you want to track by going to the Audit Log » Enable/Disable Events page.

Enable or Disable Events to monitor

Here you can select Basic, Geek, or Custom from the Log Level dropdown menu. Based on your selection, you will see different event names and their description on that page.

You can now enable or disable individual events by checking/unchecking the boxes. You can do the same by going to different tabs like Content & Comments, WordPress Install, Visitor Events, etc.

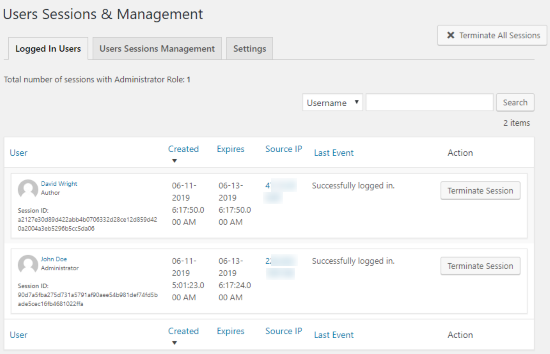
To track the logged in users on your site, you need to go to the Audit Log » Logged In Users page.

WP Security Audit Log Plugin logged in users

From here you will see all the users who are logged into your site. You can also force someone to log out by clicking on the Terminate Session button.

If you want to download the activity log of your site, then simply go to the Audit Log » Reports page to generate a report based on the criteria that you may have.

That’s all! We hope this article helped you to understand how to monitor user activity in WordPress with the help of Simple History or WP Security Audit Log plugin.

You may also want to check out our ultimate WordPress security guide and our list of the best WordPress firewall plugins.

If you liked this article, then please subscribe to our YouTube Channel for WordPress video tutorials. You can also find us on Twitter and Facebook.

The post How to Monitor User Activity in WordPress with Security Audit Logs appeared first on WPBeginner.