9 Best Zendesk Alternatives for Small Businesses

Are you looking for Zendesk alternatives for your small business’s customer support?

You’re not alone. While Zendesk is a popular choice, many users have complained about its high costs, complex interface, and limited support. These factors are important for small businesses, where every penny and minute counts.

Here at WPBeginner, we understand these challenges firsthand. We’ve tested many different customer service tools to optimize our own operations and helped millions of users with their projects.

In this guide, we will walk you through the best Zendesk alternatives for small businesses.

Best Zendesk Alternatives

The Best Zendesk Alternatives: A Summary

RankPlatformBest ForStarting Price
🥇GrooveComplete customer support solution$16/user/mo
🥈Heroic InboxWordPress ticketing system$199.50/yr
🥉NextivaPhone support$23.95/user/mo
4HubSpotSupport + CRM$15/user/mo
5HelpDeskAdvanced ticket management$29/user/mo
6LiveChatLive chat support$20/user/mo
7ChatBotAI chat support$52/mo
8Help ScoutSimple help desk$20/user/mo
9FreshdeskFreemium solution$15/user/mo

Why Trust WPBeginner?

The WPBeginner editorial team has over 16 years of experience in WordPress, digital marketing, and eCommerce. We’ve tried and tested various plugins and software on real websites to find the most suitable ones for our readers’ specific needs.

Want to learn more? Just check out our editorial process.

How We Found and Tested the Best Zendesk Alternatives

To review the best Zendesk alternatives, we focused on one key question: why are people moving away from Zendesk in the first place?

Our research found 3 key problems:

  • Difficult to use –The latest Zendesk UI (user interface) has a higher learning curve than the previous version and takes more time to navigate.
  • Expensive – Zendesk’s most affordable plan is $55/agent per month. If you have at least a team of 5 agents, you will need to pay $3300 per year to use the platform. That’s a significant expense for a small business.
  • Limited support – Zendesk’s 24/7 online support is only available via an add-on. Meanwhile, there are many other customer service platforms out there that offer that feature out of the box.

From there, we decided to focus on finding the best Zendesk alternatives with the following criteria: ease of use, value for money, and great support.

Some options on the list just happen to be products we already use on our WordPress websites, so we are confident in recommending them. The ones we don’t use are popular platforms that we tested ourselves.

We are honest with our reviews and will let you know if there are any drawbacks you should consider. We would not recommend a product that we personally would not use.

Here’s some more advice on how to pick customer support software for your business:

“To pick the right platform, identify the communication channels that resonate best with your customers and determine the solution based on your business needs. From there, narrow down products based on price, essential features, user reviews, and your experience during a free trial or demo.”

Jess Pingrey from Fit Small BusinessJess Pingrey from Fit Small Business

1. Groove (Best Overall Zendesk Alternative)

Groove vs Zendesk comparison landing page

Out of all the customer service software we’ve tested, Groove is the best Zendesk alternative by far. We’ve been using Groove to manage both support and marketing emails across our projects, and it’s been a smooth experience from day one.

What truly sets Groove apart is its easy-to-use interface. Even if you are a small business owner with no prior experience with help desk software, you’ll be up and running in no time. The design is clean and clutter-free, with straightforward language that makes every button and tool clear.

Here’s the best part: Groove offers a powerful omnichannel customer support platform for a fraction of the price of Zendesk’s basic plan. With Groove, you can create a shared inbox, add live chat functionality, manage social media messaging, and build a knowledge base – all under one roof.

An example of a shared GrooveHQ inbox

Groove also has exceptional customer support. They offer onboarding assistance to get you started quickly, and their 24/7 support is available to all users, regardless of their plan.

Pros of Groove:

  • Effortless ticket management – Groove makes managing tickets easy with automation capabilities like routing rules and automatic escalation for complex customer interactions.
  • Enhanced ticketing system – Groove boasts features like collision detection to prevent duplicate communication, internal notes for team collaboration, and agent availability to help with workload distribution.
  • True omnichannel support – No matter your plan, you’ll get a shared inbox, live chat, social media messaging integrations, and a self-service knowledge base, all in one place.
  • Actionable insights – Gain valuable intel with Groove’s reporting metrics, including first response times, customer satisfaction reports, and average resolution times.
  • Extensive API and integrations – Groove seamlessly integrates with popular tools you already use, like Zapier, Slack, and Jira.

Cons of Groove:

  • Limited AI-powered features – These tools are only available on higher-tier plans.

Pricing: Starts at $16/user per month, with a 7-day free trial. Their highest plan costs $56/user per month and unlocks advanced features like advanced rule automation, team-specific reporting, and load balancing for optimized conversation assignments.

Why we chose Groove: It’s simply the best Zendesk alternative for anyone seeking a user-friendly and affordable customer software solution. The user-friendly interface, powerful features, and exceptional customer support make Groove a strong competitor.

For more details, you can read our full Groove review.

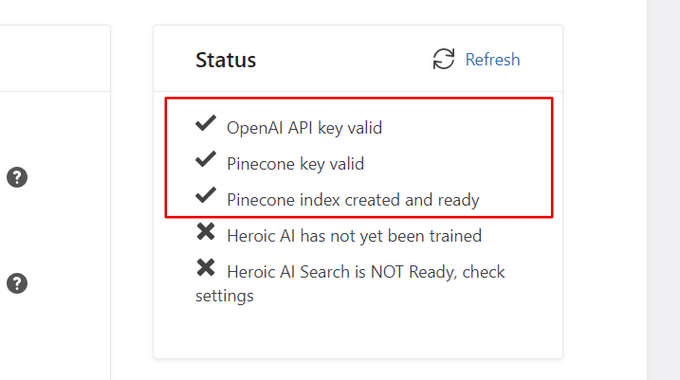
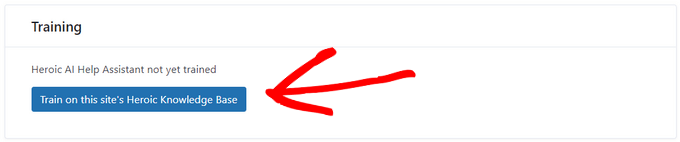
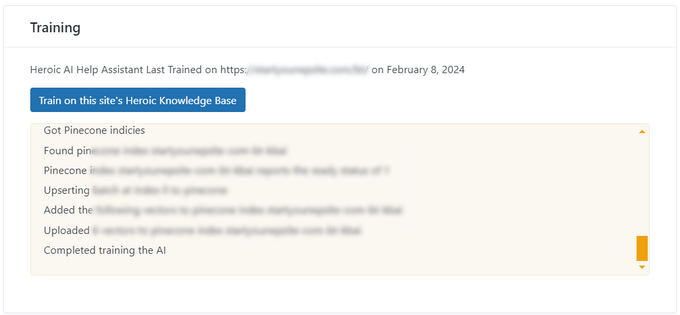
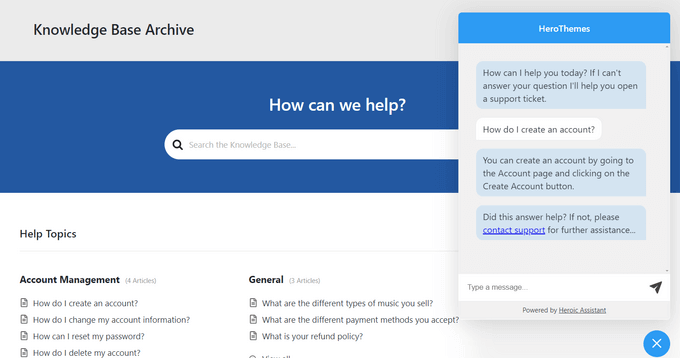
2. Heroic Inbox (Best for Ticket Management in WordPress)

Heroic Inbox

If you use WordPress to manage your website, then Heroic Inbox is a great alternative to Zendesk for handling customer support emails. We’ve talked extensively about this help desk plugin in other reviews, and that’s for a good reason.

With Heroix Inbox, you can manage all your emails from Gmail or Outlook in one place, right within your WordPress dashboard. Plus, you can have unlimited inboxes for not just your customer support teams but also other departments like marketing or sales.

Heroic Inbox integrates seamlessly with WooCommerce, so you can see the customer’s purchase history directly within the ticketing system. This lets you provide more targeted and helpful support. Plus, you have access to a complete history of all your support tickets for easy reference.

Another benefit of Heroic Inbox is that it supports multiple languages right out of the box, which is helpful if you have customers around the world. This is a major advantage over Zendesk, where you need a higher-tier plan to offer multilingual support.

Pros of Heroic Inbox:

  • Unlimited power – Manage an unlimited number of tickets and users without worrying about monthly fees.
  • Time-saving features – Save precious time with features like saved replies and auto-responders for frequently asked questions (FAQs).
  • Seamless teamwork Set up efficient collaboration with features like team notes, draft replies, and collision detection to avoid duplicate efforts.
  • Enhanced communication Allow both customers and agents to provide richer context within messages by attaching files directly to tickets.

Cons of Heroix Inbox:

  • Limited user roles – Heroic Inbox offers only two user roles: Mailbox User and Administrator.
  • No live chat – You’ll have to install a different plugin to respond to customer queries directly.

Pricing: Heroic Inbox’s pricing structure is based on website licensing. It starts from $199.50 per year for a single website.

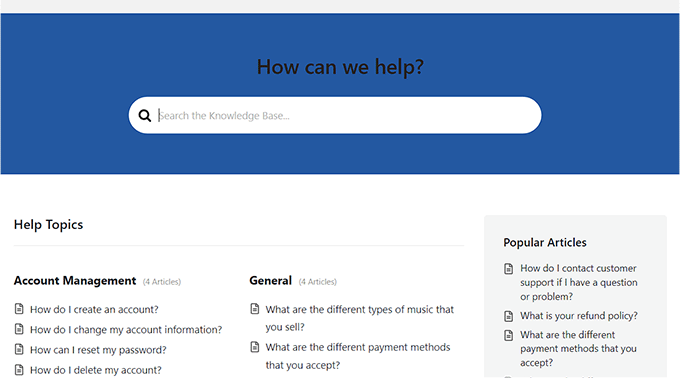
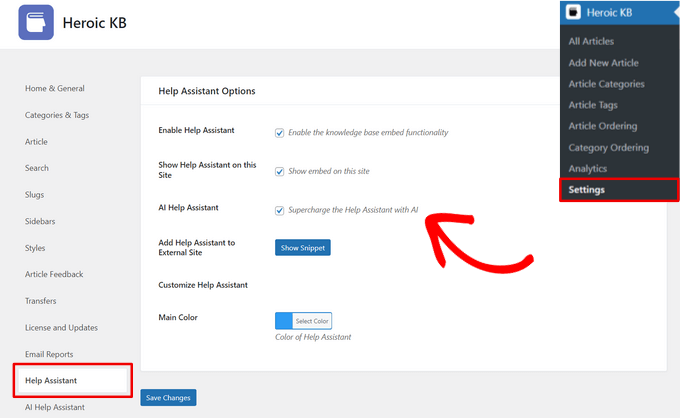
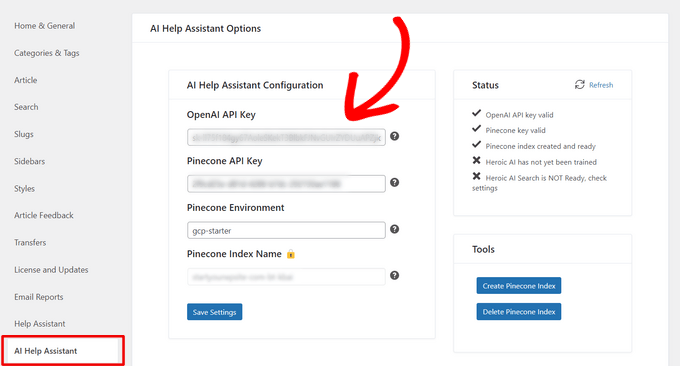
For the best value, consider the Heroic Bundle Essential for $299.50 per year. This bundle includes both Heroic Inbox and Heroic KB, so you can create a knowledge base for customers to help themselves and reduce your support tickets.

Why we chose Heroic Inbox: This help desk solution stands out as a Zendesk competitor for WordPress. While it doesn’t include a built-in live chat feature, you can easily add that functionality with another plugin if needed.

You can learn more about Heroic Inbox in our HeroThemes review.

3. Nextiva (Best for Call Centers)

Nextiva help desk page

While chat and knowledge bases are popular, some customers still prefer talking directly to agents. That’s why we wanted to show you a Zendesk alternative that can fulfill this need.

Meet Nextiva, the top-rated business phone service. This platform offers comprehensive customer service tools, including call center, voicemail, SMS, live chat, video, and social media support.

Fun fact: we use Nextiva at WPBeginner for our call center. It lets our teams easily handle customer calls from anywhere in the world without using their own personal cell phone numbers.

Nextiva makes call handling a breeze. You can direct calls based on priority and skills, with easy transfers between agents. Plus, you can offer callback request options, letting customers choose when to receive a call for better convenience.

Pros of Nextiva:

  • Enhanced call experience – See caller details on-screen to prepare for conversations and improve your agents’ service.
  • Smart routing – Use Interactive Voice Response (IVR) to direct calls to the right agents based on their business hours, skills, priority, and more.
  • Call recording – You can record, pause, and playback customer interactions anytime for future reference.
  • Reliable service – Enjoy an industry-leading 99.999% uptime guarantee, which means you won’t have to worry about losing connection in the middle of a conversation.

Cons of Nextiva:

  • Limited unlimited calling – Nextiva’s unlimited plan is currently only available in the US and Canada.

Pricing: The Business Communication plans start from $23.95/user per month for a team of 1-4 people. Besides phone support features, these plans include team communication tools like video conferencing. Prices can get lower as your team grows.

If you just want to use the phone service to support your customers, then you can contact the Nextiva team to get a quote on their Contact Center plans.

You can also use our Nextiva coupon to get 21% off of your first purchase.

Why we chose Nextiva: It’s a great Zendesk alternative if phone support is important to your business. Its comprehensive call center features let you assist customers easily over the phone.

You can learn more about the service in our full Nextiva review.

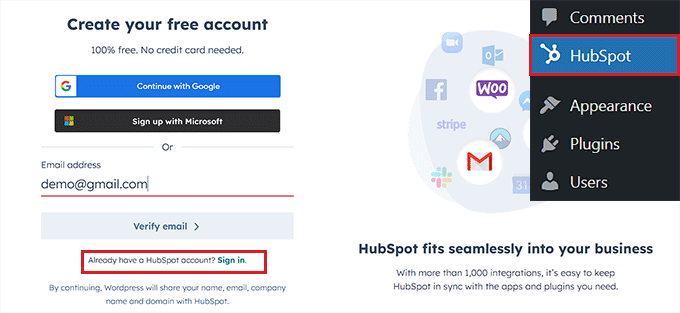
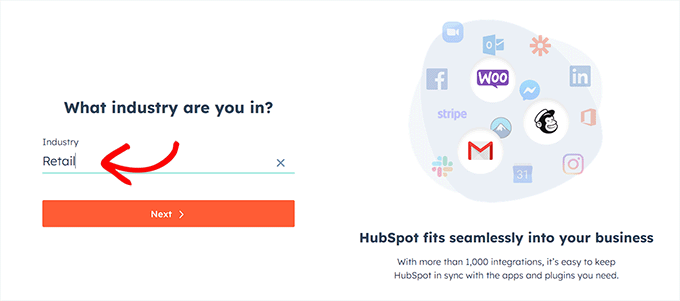
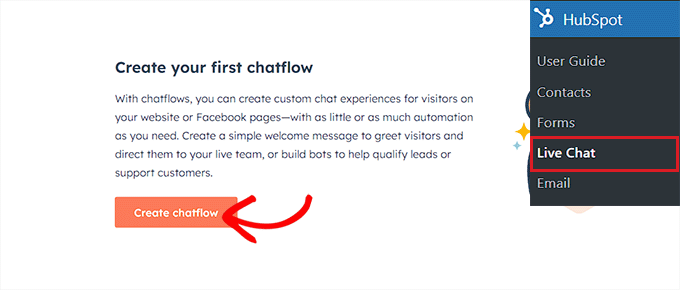
4. HubSpot (Best for Support + CRM)

HubSpot vs Zendesk landing page

Do you want to manage customer support and customer relationship management (CRM) on the same platform? If you use Zendesk and want a simpler solution, then consider HubSpot. It’s known for its CRM and offers a customer support solution called HubSpot Service Hub.

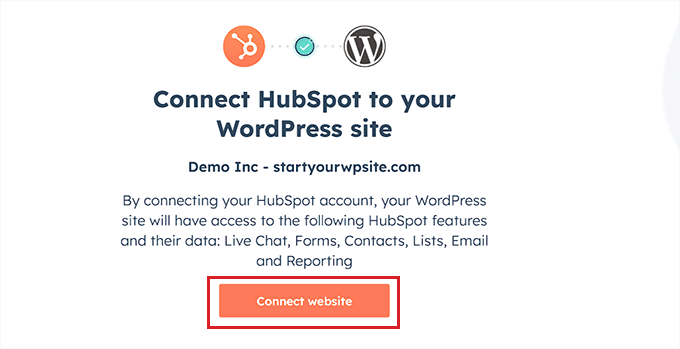
HubSpot combines support and CRM in one platform, so you don’t need separate tools. To access both, you can get the Customer Platform plan, which includes Service Hub, Sales Hub, Content Hub, Operations Hub, and Commerce Hub.

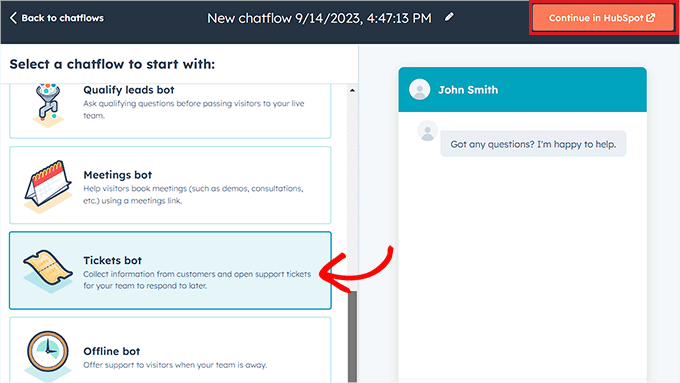
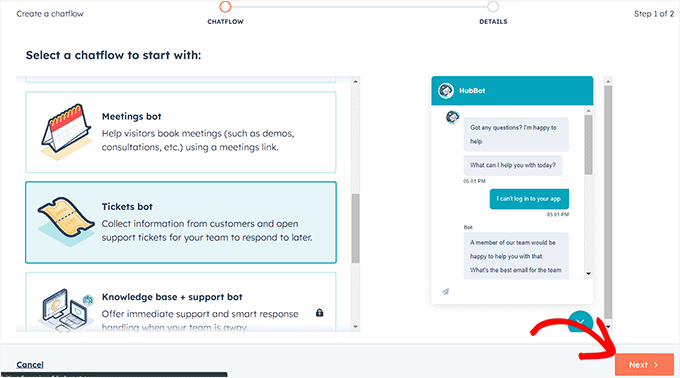
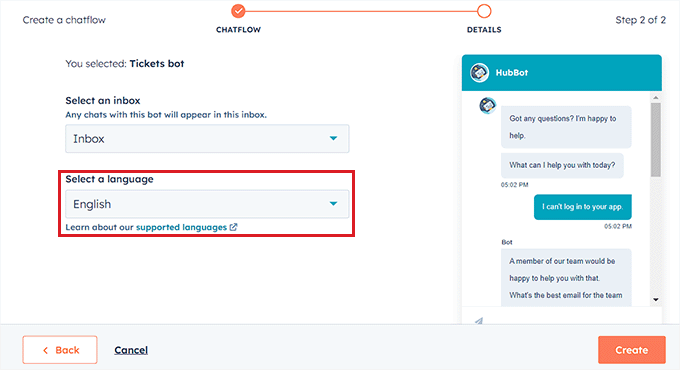
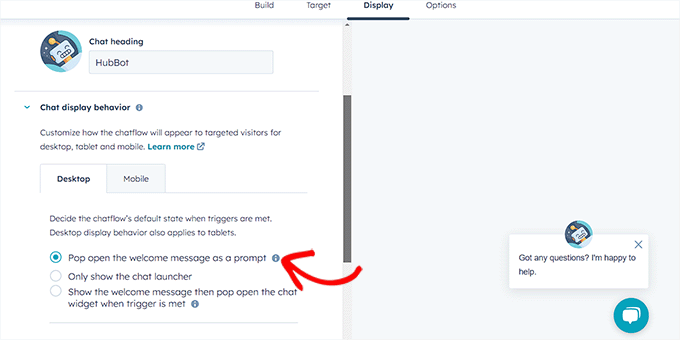
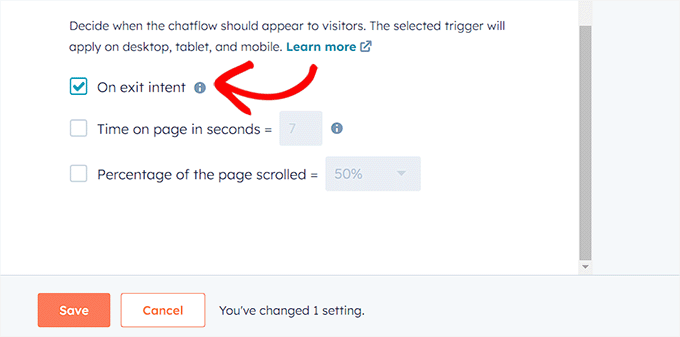
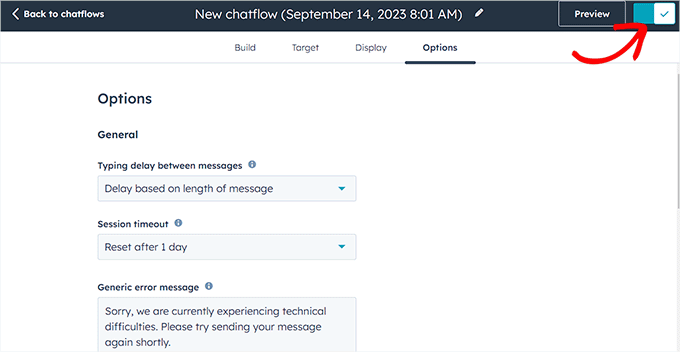
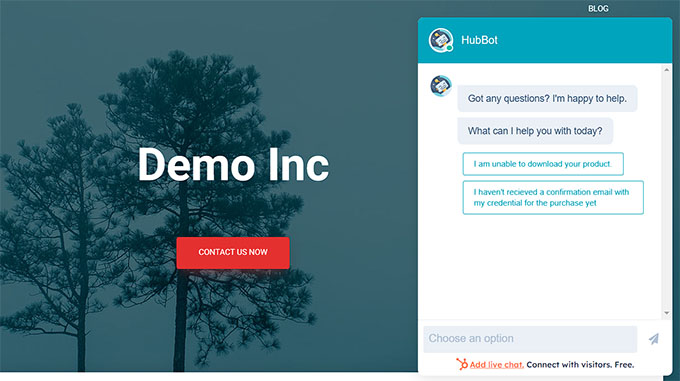
Service Hub offers more than just ticketing. It has features like conversational bots to answer simple queries, email health reporting to track the effectiveness of your email outreach and a mobile app for managing customer interactions on the go.

Pros of HubSpot:

  • Powerful free plan – Includes features like canned snippets for faster responses and Slack integration for real-time notifications.
  • Unified platform – Integrates seamlessly with its other HubSpot products for marketing and sales. This way, all your data and interactions are accessible within a single platform.
  • Automation tools – Streamline your workflow with automatic conversation routing, automated to-do lists, and triggers to send customer emails automatically.

Cons of HubSpot:

  • Pricing jump – There’s a big gap from the Starter plan to the Professional plan ($15/user per month to $1080/month), which might be a lot for some. This can be a hurdle if you need specific features like WhatsApp integration, which is only available in higher tiers.

Pricing: A free plan is available for businesses with up to 5 agents. Paid Customer Platform plans start at $15/user per month.

Why we chose HubSpot: It’s a great all-in-one solution for businesses. It covers support, CRM, marketing, and more. If you like things simple and want all your customer communications in one place, HubSpot is a solid choice instead of Zendesk.

For more information, check out our full HubSpot review.

5. HelpDesk (Advanced Ticketing System)

HelpDesk as Zendesk alternative landing page

HelpDesk is an excellent Zendesk alternative if you are looking for a powerful ticketing software solution.

Like Zendesk, HelpDesk lets you create multiple custom forms for different purposes, such as technical support requests or sales inquiries. There’s no limit to the number of forms you can create, giving you the flexibility to tailor the intake process to your specific needs.

HelpDesk also simplifies the process of managing complex issues. If a customer submits multiple tickets related to the same problem, then you can easily merge them into a single thread for a clearer overview.

Additionally, HelpDesk offers a shared ticket view feature similar to Zendesk’s ticket-sharing functionality. This lets multiple team members collaborate on the same ticket simultaneously, allowing them to resolve a complicated issue together.

Pros of HelpDesk:

  • Advanced ticketing features You can merge tickets, allow team members to view the same ticket, and enable users to follow tickets that may be relevant to their teams.
  • Email delivery tracking Track the deliverability of your support emails to ensure they reach your customers.
  • Built-in AI features – All plans include AI-powered features like ticket summaries and text enhancements to improve your customer communication.
  • Multi-channel support – HelpDesk offers 24/7 support via chat, email, and phone so that you can get assistance whenever needed.

Cons of HelpDesk:

  • Limited pricing – HelpDesk offers only one plan. If your business outgrows this plan, then you’ll need to upgrade to a custom-priced Enterprise plan.

Pricing: The Team plan costs $29/agent per month and includes unlimited contact forms, multiple mailboxes, unlimited workflows to automate tasks, and 5 email templates to respond to customer inquiries. A 14-day free trial is available.

Why we chose HelpDesk: This help desk platform can be a great option if you want a Zendesk alternative with a robust ticketing system. The single plan’s key features are enough for most small businesses, so long as you don’t create more than 5 email templates.

6. LiveChat (Best for Live Chat Support)

LiveChat as Zendesk alternative landing page

LiveChat is a handy tool made by the same folks who created HelpDesk. We’ve used it for many of our eCommerce projects to answer pre-sales questions.

Getting started with LiveChat is super simple. When we did it, all we had to do was just sign up, add the LiveChat plugin to the WordPress website, and log in via the plugin page. The chat widget would then pop up on the site, ready to connect with customers.

But LiveChat isn’t just a basic chat tool. It’s also packed with cool features like real-time chat monitoring, automatic prompts to collect visitor emails when no agents are around, and routing chats to the right experts for tricky questions.

Pros of LiveChat:

  • Live chat focus – Chat-specific features like tracking traffic, letting customers rate agents, and directing chats to the right people.
  • Great for online stores – It integrates with eCommerce platforms like WooCommerce, Shopify, and BigCommerce. Plus, you can track chats that lead to sales.
  • Chat window editor – You can customize the chat feature to suit your branding and use pre-made themes.
  • Fast loading time – The chat window opens faster than many other live chat providers and works across every device.

Cons of LiveChat:

  • Basic analytics in the lowest-priced plan – The Starter plan only gives you simple stats like daily and weekly summaries. You’ll need to upgrade for more detailed insights into how your agents are doing.

Pricing: Starts from $20/agent per month. With the Starter plan, you can monitor up to 100 visitors and get access to your chat history from the past 60 days. A 14-day free trial is available, and you can use our LiveChat coupon to get 30% off your first purchase.

Why we chose LiveChat: We use LiveChat frequently on our websites, and we think it’s a top choice for businesses looking for an easy-to-use live chat solution.

Just remember, LiveChat focuses solely on live chat. If you also need a ticketing system and a knowledge base, then you will have to pay for HelpDesk, too.

You can learn more about the software in our LiveChat review.

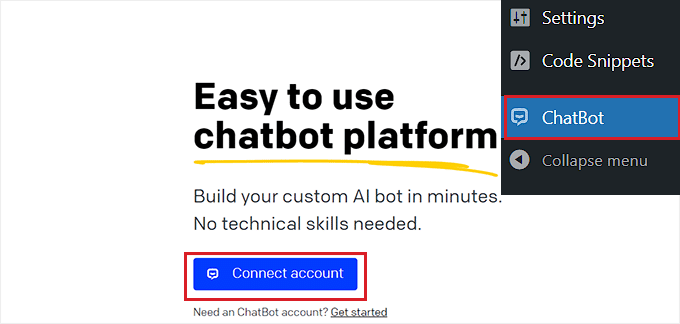
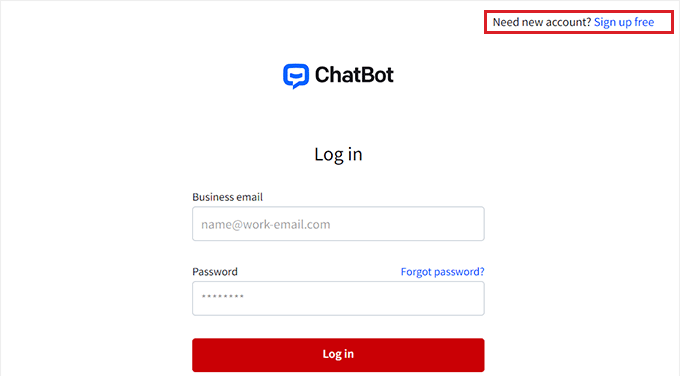
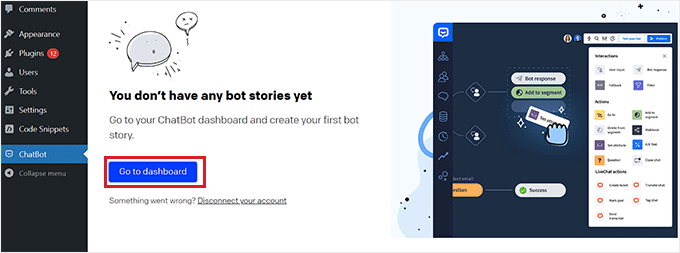
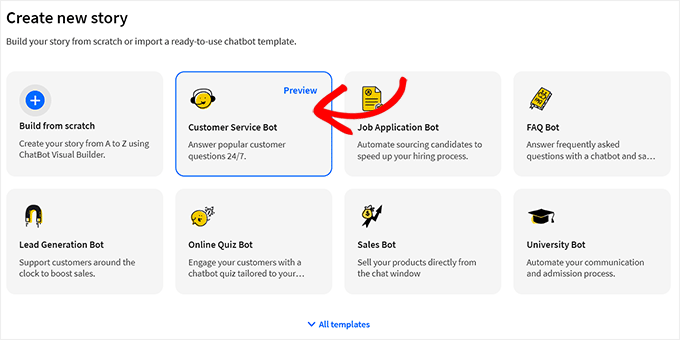
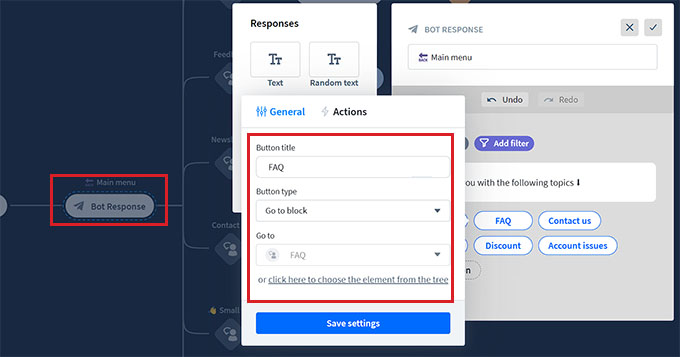
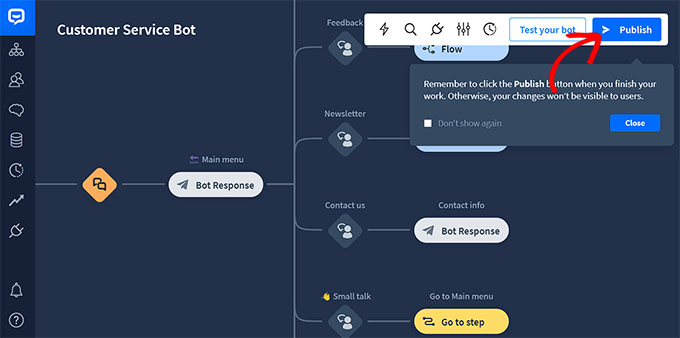
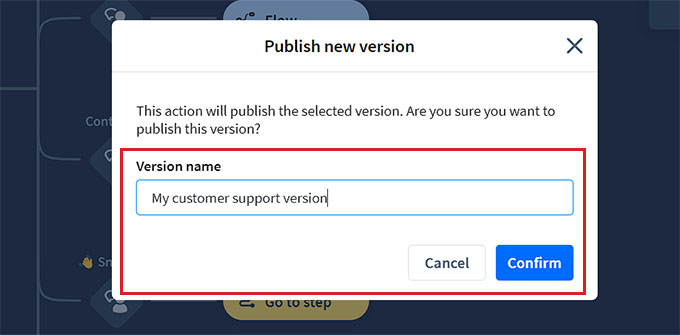
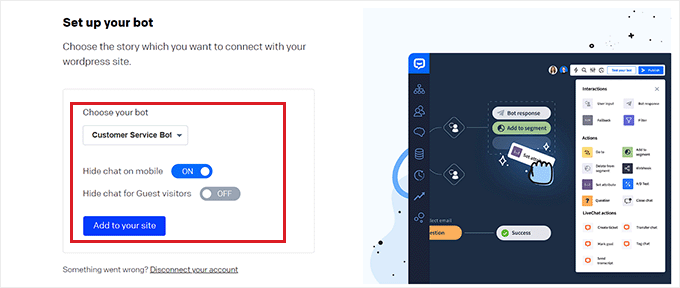
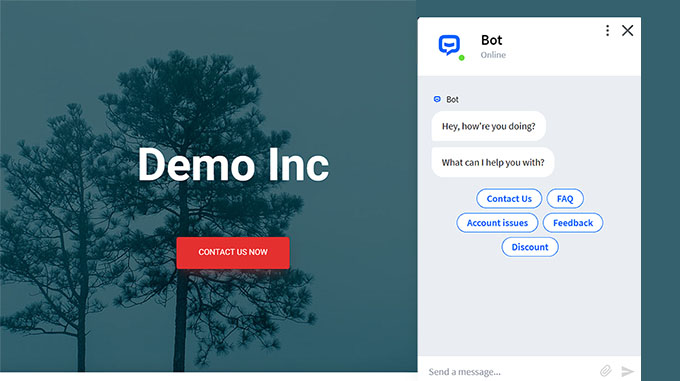
7. ChatBot (Best for AI Chatbot Support)

ChatBot Review: Is is the right chatbot plugin for your WordPress website?

Managing customer support for a small business can be tough, especially if you can’t afford a big team. If that’s the case, ChatBot can be a great Zendesk alternative.

ChatBot is a cloud-based AI assistant for your website. It can handle customer questions in real time like live chat, but you don’t need a human agent to run it. Even if you already have a support team, ChatBot can take care of basic questions to free up your team’s time for more complex issues.

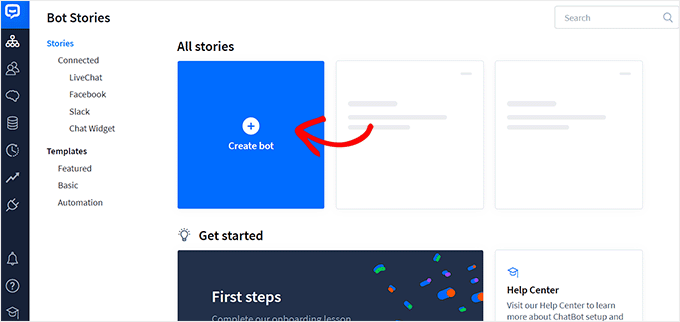
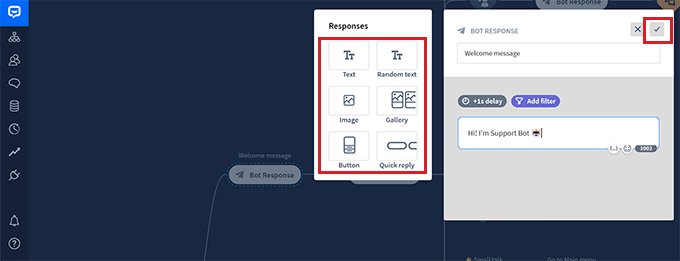
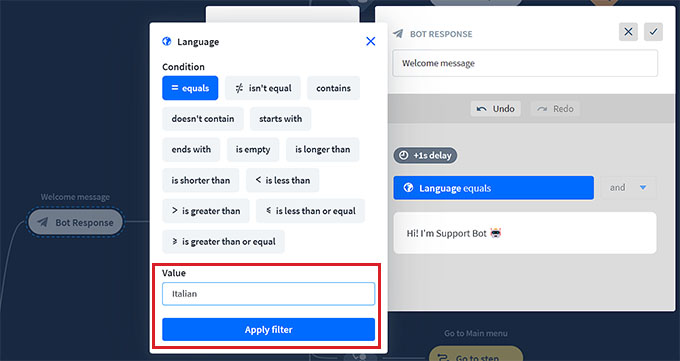
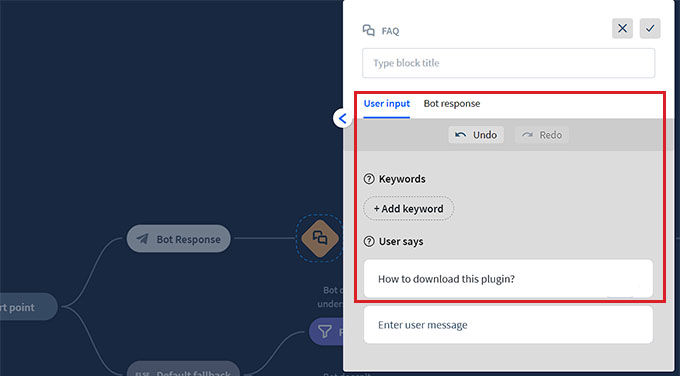
Before launching your ChatBot, you can train it using various resources like FAQs, website content, articles, or even your existing knowledge base. ChatBot can also learn from unanswered questions to improve its response accuracy over time.

We use ChatBot in our SaaS businesses to handle questions before a sale and pass on the tough queries to our live support team.

Pros of ChatBot:

  • Teachable AI – ChatBot lets you teach and improve your AI helper so it gets better at giving helpful answers.
  • Performance insights – Get useful stats about how your bot is doing, like how many messages it handles, when it’s busiest, and how engaged users are.
  • Data security – ChatBot works independently and is not affiliated with big AI companies like OpenAI, so your data stays safe within your system.
  • Dynamic responses – ChatBot can use images, product cards, and carousels to create engaging and informative conversations.

Cons of ChatBot:

  • Overage chat fees – If you go over your monthly limit, you’ll pay a small fee for each extra chat ($0.03 each).

Pricing: Starts at $52 per month billed annually, which includes up to 1,000 monthly chats. They also offer a 14-day free trial.

Why we chose ChatBot: For small businesses, ChatBot is a budget-friendly way to handle customer questions without hiring any staff. Plus, it integrates with LiveChat and HelpDesk, so you can build a full support system that covers all your bases.

To learn more, you can read our comprehensive ChatBot review.

8. Help Scout (Simple Zendesk Competitor)

Help Scout vs Zendesk comparison landing page

Zendesk offers a powerful suite of customer support tools. But for small business owners, it can feel overwhelming. If that sounds like you, then Help Scout might be a perfect fit.

Help Scout is a popular customer support software known for its user-friendly interface. While it’s slightly more expensive than Groove at $20/user per month, Help Scout provides all the essential functionality you need to manage customer conversations effectively.

Another key advantage we discovered is that their Business Hours feature is available in all plans, unlike Zendesk where it’s restricted to higher tiers. This feature lets you activate auto-replies based on your operating hours.

Pros of Help Scout:

  • Customizable data tracking – Track specific data points on each customer interaction to gain valuable insights into customer engagement.
  • White-labeling – You can customize Help Scout’s customer portal interface to match your brand and create a seamless customer experience.
  • In-site or in-app surveys – Use these to quickly collect Net Promoter Scores (NPS) or gain customer feedback on your website’s user experience.
  • Smart content suggestions – Help Scout can recommend relevant help content to customers based on the webpage they’re visiting, reducing the burden on your support team.

Cons of Help Scout:

  • Limited integrations in the lowest-priced plan – The lowest plan doesn’t connect with popular task management tools like Jira and has no AI features.
  • Limited scalability – The core features are great, but we found some bugs and limits when our projects started to grow. Our Groove announcement explains more about why we decided to switch away from Help Scout.

Pricing: Starts from $20/user per month with a 15-day free trial. The lowest plan has a cap of 25 users. You will need to upgrade to the $40/user per month plan for unlimited users.

Why we chose Help Scout: This customer service platform prioritizes its core functionality and user-friendliness over having a lot of features. Because of that, Help Scout is a great Zendesk alternative for small businesses and startups.

9. Freshdesk (Freemium Zendesk Alternative)

Freshdesk as Zendesk alternative landing page

Starting a new business can be expensive, and every penny counts. If you are looking for a cost-effective way to manage customer support, Freshdesk is a great option to consider.

We found Freshdesk’s free plan to have a surprising amount of functionality for small businesses just getting started. It allows you to manage customer inquiries from email and social media with a team of up to 10 agents.

You can also create rules to automatically route tickets to the most qualified team member. As a result, your customers receive the best possible care.

Freshdesk also provides valuable insights into your support performance with built-in ticket trend reports. This allows you to stay on top of your workload and identify areas for improvement.

Pros of Freshdesk:

  • Free plan – The plan provides a robust ticketing system with email and social media support, perfect for startups on a budget.
  • Self-service portal – Empower customers with a knowledge base to answer common questions and troubleshoot issues independently.
  • All year-round support – Freshdesk offers 24/7 email support in the free plan and 24/5 phone support in higher tiers.
  • Actionable analytics – The free plan offers basic ticket trend reports. Meanwhile, paid plans include advanced analytics like customer journey tracking, average handling times, and custom metrics to suit your specific needs.

Cons of Freshdesk:

  • Limited communication channels – The free plan doesn’t include live chat or phone support. To access these features, you’ll need to purchase additional Freshworks add-ons or upgrade to the Customer Service Suite.

Pricing: Free plan available. Paid plans start from $15/agent per month. Upgrading unlocks additional features like SLA management, which helps ensure your team consistently meets your company’s service level agreements.

Why we chose Freshdesk: If you run a new business, Freshdesk’s free plan can be a lifesaver. You can focus on growth while offering your customer support without breaking the bank.

What Is the Best Zendesk Alternative for Small Businesses?

The best Zendesk alternative for small businesses is Groove. It offers omnichannel support, covering chat, email, knowledge base, social media, and more all at a fraction of Zendesk’s cost.

For people using WordPress, Heroic Inbox is also worth considering. It lets you manage tickets and your knowledge base directly from WordPress, saving you from switching between platforms too often.

Alternatively, if your business relies on phone support, then Nextiva is your best choice.

Top Zendesk Competitors: FAQs

Let’s answer some commonly asked questions about Zendesk alternatives:

What are the disadvantages of Zendesk?

Despite its extensive features, Zendesk is too pricey for some small businesses, as its plans start from $55/user per month. Its UI is also more difficult to use compared to other platforms, and the support is not the most responsive.

For this reason, we recommend using Groove, Heroic Inbox, or Nextiva as alternatives.

Is Zendesk free?

No. Zendesk’s plans are all paid, though they have a 14-day free trial.
If you’re looking for a free Zendesk alternative, then we recommend Freshdesk or HubSpot as both offer powerful free plans.

How do you evaluate customer service software?

The first thing you must do is understand your team’s requirements. This will help you avoid going over budget and find the best business tool that suits your exact needs.

We also recommend taking a look at trusted review sites like WPBeginner Solution Center and testing the software yourself to see how easy it is to use.

Discover More Customer Support Guides

We hope this article helped you discover the best Zendesk alternatives for your small business. You may also want to check out our list of the best HubSpot alternatives and our ultimate guide to growing your business online without a lot of money.

If you liked this article, then please subscribe to our YouTube Channel for WordPress video tutorials. You can also find us on Twitter and Facebook.

Disclaimer: We also looked at other Zendesk competitors, such as Gorgias, HappyFox, Kustomer, Salesforce Service Cloud, and Zoho Desk. However, they didn’t meet our criteria for the best options for small businesses.

The post 9 Best Zendesk Alternatives for Small Businesses first appeared on WPBeginner.

How to Add a Chatbot in WordPress (Step by Step)

Are you looking to add a chatbot in WordPress?

A chatbot is software that can start talking with your website visitors. Adding a chatbot to your website can help you provide instant customer support, generate leads, and improve the user experience.

In this article, we will show you how to easily add a chatbot in WordPress, step by step.

add chatbot-in-wordpress-og

What Is a Chatbot?

A chatbot is a computer program that uses a chat interface to talk with your website visitors. It acts just like your customer support team does when they use a live chat plugin.

However, while live chat is a real-time conversation between a customer and your support staff, chatbots are automated.

This means that they can only provide answers that you have programmed them for.

For example, a customer service chatbot can answer questions about products or services, troubleshoot problems, and make recommendations.

Similarly, a healthcare chatbot might answer questions about health conditions, provide reminders for appointments, and connect patients with doctors.

Why Should You Use a Chatbot in WordPress?

Adding a chatbot to your WordPress website will allow you to provide 24/7 customer support to your visitors, even when your support team isn’t available.

This will reduce the number of support tickets on your website and improve user experience.

Chatbots can also be used to automate other customer support tasks like answering frequently asked questions, providing product support, and fixing smaller issues.

This will save a lot of time and let your team focus on more complex issues.

If you have an online store, then you can also use a chatbot to find out about a customer’s interests and ask them about their needs. The chatbot can then answer the customer’s queries and close the deal.

Having said that, let’s see how to easily add a chatbot in WordPress, step by step. We’ll cover three different methods, and you can use the quick links below to jump to the one you want to use:

Add a Chatbot in WordPress Using Heroic KB (Best for Customer Support)

If you want to create a custom chatbot to automate customer support inquiries, then this method is perfect for you.

Heroic KB is the best WordPress knowledge base plugin that adds a searchable knowledge base to your existing site.

It also comes with a powerful Heroic AI Assistant that lets you easily add a chatbot to your knowledge base page. The AI chatbot is trained directly from your knowledge base articles so it can provide accurate responses to visitor questions.

To get started, you need to install and activate the Heroic KB plugin. If you need help, see our tutorial on how to install a WordPress plugin.

Note: You’ll need the Heroic KB Pro plan to access the Heroic AI Assistant.

Once the plugin is activated, you need to create a knowledge base so that you can train your AI chatbot on it. Make sure that your knowledge base includes detailed, high-quality articles that will help your audience learn how to use your products/services.

Website documentation preview

For step by step instructions, you can follow our tutorial on how to add knowledge base documentation in WordPress.

After you’ve created your knowledge base, you can set up the Heroic AI Assistant.

To do that, go to Heroic KB » Settings from the WordPress dashboard and click on the ‘Help Assistant’ tab.

From there, you need to place a checkmark next to the Enable Help Assistant, Show Help Assistant on this Site, and AI Help Assistant options.

Enable the Heroic AI Help Assistant

You can also select the main color of your Help Assistant chatbot on this page.

When you’re done, click on the ‘Save Changes’ button.

Next, you need to click on the ‘AI Help Assistant’ tab from the Heroic KB Settings page. Here, you need to add API keys for OpenAI and Pinecone.

Add OpenAI and Pinecone API keys in Heroic KB

You can generate an OpenAI API key on the OpenAI website by visiting the API Keys page from your paid account.

Simply generate a new secret key and copy and paste it into the Heroic KB AI Help Assistant Configuration settings.

OpenAI API keys

You can generate a Pinecone API key on the Pinecone website with a free or paid account.

Just go to the ‘API Keys’ page and click on the ‘Create API Key’ button. Then, copy and paste it into the Heroic KB settings.

Generate Pinecone API key

After copying and pasting your API keys, you also need to fill out the ‘Pinecone Environment’ field.

For free Pinecone accounts, you can use gcp-starter as the Pinecone Environment. For paid accounts, you can use any GCP Region supported by Pinecone like eu-west4-gcp or us-central1-gcp, for example.

Enter Pinecone environment

Don’t forget to hit the ‘Save Settings’ button.

Next, click on the ‘Create Pinecone Index’ button to automatically create a new Pinecone index.

Create Pinecone index

You can check the ‘Status’ box to see if your API keys have been validated and the Pinecone index has been created.

Check status of your Pinecone index

Once those are ready, you can start to train the AI assistant chatbot on your knowledge base.

To do that, simply click on the ‘Train on this site’s Heroic Knowledge Base’ button.

Train Heroic AI assistant on your knowledge base

The AI assistant will then begin training, this may take a few minutes depending on the size of your knowledge base. The progress will be displayed in the Training panel.

Completed training for Heroic AI assistant

When the training is complete, you can visit your Knowledge Base page to see your Heroic AI Assistant chatbot in action.

Visitors can ask a question and the chatbot will provide an accurate response based on your knowledge base documentation.

Example of Heroic AI assistant chatbot

Add a Chatbot in WordPress Using ChatBot (Best for Sales & Customer Service)

If you are looking for an all-in-one chatbot for lead generation, sales, customer service, and more, then this method is for you.

You can easily add a chatbot to your WordPress site using ChatBot. It is the best AI chatbot software that allows you to make chatbots using a drag-and-drop builder. It also offers more chatbot customization options and multilingual features.

First, you will need to install and activate the free ChatBot plugin. For detailed instructions, please see our step-by-step guide on how to install a WordPress plugin.

Upon activation, visit the ChatBot menu tab from the WordPress admin sidebar and click the ‘Connect Account’ button.

Click Connect to account button

This will open the ChatBot website in a new window, where you have to enter your login credentials and click the ‘Login’ button.

However, if you don’t have an account on ChatBot yet, then just click the ‘Sign up free’ link at the top.

Login to your Chatbot account

This will take you to a new page where you will need to provide your email address and enter an account name and password.

Once you are done, just click the ‘Create account’ button.

Create Chatbot account

Upon account creation, you will be redirected to your WordPress dashboard. You have now successfully connected your WordPress site with ChatBot.com.

Now, to start creating a chatbot, just click the ‘Go to dashboard’ button.

Click the Go to dashboard button

You will then be directed to your ChatBot account dashboard.

From here, click the ‘Create bot’ button at the top to start the process.

Click Create bot button

This will take you to the ‘Create new story’ page, where you need to choose the type of chatbot that you want to make.

By default, ChatBot allows you to create a customer service bot, job application bot, lead generation bot, FAQ bot, sales bot, and more.

However, you can also pick the ‘Build from Scratch’ option to make a bot yourself. For this tutorial, we will be creating a customer service bot.

Choose the customer service bot template

This will open the premade customer service bot template on your screen.

From here, you can easily create a conversation flow for your chatbot by clicking on the ‘Bot Response’ tabs in the chatflow.

This will open a prompt on the screen, where you can add chat responses and quick replies like text, images, and buttons by dragging and dropping the blocks into the prompt.

Once you have done that, just add the bot response and click the ‘Save and Close’ button at the top.

Add a bot response

If you want, you can also add custom filters with the chatbot response by clicking on the ‘Add Filter’ button in the prompt.

This will open a dropdown menu where you can pick a filter that will be added to your chatbot’s response, including:

  • Message: Personalize the conversation by tailoring the responses to the user’s message.
  • Score: Prevent irrelevant conversations by filtering out messages that have a low score.
  • Failures: Improve chatbot accuracy by filtering out messages that are likely to result in failure. This can prevent the chatbot from giving incorrect or misleading information.
  • Email: Rule out invalid email addresses or address users by their emails.
  • Name: Create a personalized experience for the user or block messages that contain certain names.
  • Username: Filter out messages that contain certain usernames.
  • Integration: Create specific messages for users who use a particular tool.
  • Language: Write messages in specific languages for multilingual websites.
  • Timezone: Filter messages according to the relevant time zone.

Additionally, you can create specific messages for users in different regions and countries. This can be helpful if you have a large international audience.

Add filter to response

After that, you can also select conditional logic for the now-filtered response. The response that you are creating will only be used by the chatbot if the customer that it is interacting with fits the filter.

For example, if you have a multilingual website and want to create a chatbot for different languages, then you can use the ‘Language’ filter.

Once you do that, select the ‘= equals’ option as the condition and then type in the language name.

After that, you can add the response in the language that you chose. In our example, when a user types a query in the chatbot in Italian, the chatbot will show them the Italian response that we created with this filter.

Add filter value

When you have finished adding your filter, just click on ‘Apply filter’.

After that, you can also use the ‘+’ button to add different blocks to your chat flow. This will open a prompt where you can select any block of your choice, including:

  • User Input: Add user messages that will trigger the bot’s response.
  • FAQ: Add frequently asked questions and their answers in this block.
  • Attachment Input: Let users attach files in an ongoing conversation with the chatbot.
  • Bot Response: Add a chatbot’s response to a question.
  • Backtracking: Prevent users from viewing previously matched interactions with the bot.
  • Fallback: Display a general message or trigger an action anytime your chatbot can’t match the user query with any chatbot response.
  • Flow: Visually organize complex chatbot response scenarios.
  • Add to segment: Segment all the users into different groups based on user data.
  • Delete from segment: Delete users from a specific segment.
  • Set attribute: Save information about users.
  • Mark Goal: Mark a conversation as having reached its goal.

You also have the option to send a transcript of a conversation to an email address or tag different chatbot conversations with keywords and phrases.

Add FAQs block to the chatflow

For example, if you choose the FAQ block, it will open on your screen, where you can now add common customer support questions and their answers.

Your chatbot will then use these responses to answer customer queries on your website.

Add FAQs

Next, click on the ‘Main Menu’ bot response tab to open the block prompt. Here, you can add buttons for all the services that your chatbot can offer using the Button block.

After that, click on each Button block to open its settings and configure where you want the button to direct the users.

For example, you can allow users to be directed to the FAQs chatbot response that you created by selecting the button type as ‘Go to block’.

Next, select the ‘FAQ’ block from the ‘Go to’ dropdown menu and click the ‘Save Settings’ button.

Configure main menu bot response

Other than FAQs, you can also create buttons for directing users to your newsletter signup, contact us page, discount offers, and more.

Once you are done, don’t forget to click the ‘Publish’ button at the top to store your settings.

Publish the bot

A prompt will now open on your screen, asking you to provide a name for your chatbot.

After entering the details, simply click the ‘Confirm’ button to publish your chatbot.

Save chatbot

Next, visit your WordPress dashboard and head over to the ChatBot tab, where you will now notice that the ‘Choose your bot’ section will be visible on the screen.

Note: Keep in mind that it might take 3-4 hours between creating your chatbot and it being visible in your WordPress dashboard.

Now, simply choose the bot that you just created from the dropdown menu.

After that, toggle the ‘Hide chat on mobile’ switch to ‘On’ if you don’t want people visiting your website from their phones to be able to see the chatbot.

Add chatbot to your site

You can also toggle the ‘Hide chat for Guest visitors’ to ‘On’ if you want the chatbot to be exclusive for your members only.

Finally, click the ‘Add to Site’ button. Now, you can visit your website to view the chatbot in action.

Chatbot preview

Add a Chatbot in WordPress Using HubSpot (Free & Easy)

If you are looking for a free and easy way to build a chatbot, then you can use this method.

HubSpot is an amazing customer relationship management (CRM) system that comes with a suite of tools for sales, customer service, marketing, and content management.

It even lets you create automated conversations with your website visitors with its free chatbot builder.

First, you will need to install and activate the HubSpot plugin on your website. For detailed instructions, you may want to see our beginner’s guide on how to install a WordPress plugin.

Upon activation, you need to visit the HubSpot menu tab from the WordPress admin sidebar and enter your email address to create a HubSpot account.

If you already have one, then just click the ‘Sign In’ link at the bottom.

Create or sign in to your HubSpot account

Once you’ve provided your details and set a password for your new account, HubSpot will ask you about the industry that you work in.

Simply select an industry of your choice from the dropdown menu and click the ‘Next’ button.

Add your industry and click the 'Next' button

After that, HubSpot will create a new account for you and then ask you to connect it with your WordPress site.

From here, simply click the ‘Connect Website’ button.

Connect website to HubSpot

Now, it’s time for you to start creating your chatbot.

To do this, visit the HubSpot » Live Chat page from the WordPress dashboard and click the ‘Create chatflow’ button.

Click the Create Chat flow button

This will take you to the next page, where you can select any of the premade chatbot templates.

By default, HubSpot allows you to create a concierge bot, qualify leads bot, meetings bot, ticket bot, offline bot, or even a chatbot from scratch.

For this tutorial, we will be creating a ‘Tickets bot’.

Just select the chatflow you want to use and then click the ‘Continue in HubSpot’ button to move forward.

Choose a bot template

You will then be directed to your HubSpot account, where you will be creating the rest of your chatbot.

From here, click the ‘Next’ button to move ahead.

Click Next on the HubSpot website

In the next step, you need to select the language for your chatbot from the dropdown menu.

You can leave the other settings as they are and click the ‘Create’ button.

Choose chatbot language

Your template will now open in the chatbot builder, where you can edit the chatflow.

Simply click on the ‘Options’ tab in the bot response and select the ‘Edit’ link.

This will open the action settings in the left column, where you can change the action name and text.

In HubSpot, an action is a step in the chatbot conversation that performs a specific task, like asking questions or sending responses. The first action for your chatbot will be the first question that is sent to the website visitor.

configure chatbot action settings

After that, scroll down to the ‘Your visitors’ responses’ section and type all the quick replies that a visitor may potentially give to this question.

For example, a visitor may ask you how to purchase your product, or they might want to report an error that they are facing on your website.

Add customer quick replies

After that, scroll back to the top and switch to the ‘If/then branches’ tab.

From here, you have to select the action the chatbot will take if the customer replies with one of the quick responses that you just added.

For example, if you want the chatbot to open support tickets every time a user is unable to receive a confirmation email with credentials, then select the ‘Create Ticket’ option from the dropdown menu.

After that, just click the ‘Save’ button to store the action settings.

Choose an action for customer response

After that, you can leave the rest of the chatflow settings as they are or keep editing the different actions for your chatbot.

Chatbot will now create a support ticket for all the quick responses that you’ve added to the action prompt.

Next, switch to the ‘Target’ tab from the top. Here, you have to choose where the chatbot widget will appear on your website.

You can leave these settings as they are if you want the chatbot to appear on every page of your website.

However, if you want to hide the chatbot on specific pages, then you will have to click the ‘Add exclusion rule’ link. This will open another rule where you can simply add the URL of the page where you want to hide the chatbot in the field on the right.

Configure target settings

Once you are done, scroll down to the ‘Visitor information and behavior’ section. Here, you can choose the visitors that you want the chatbot to be shown to.

For example, if you only want visitors who are part of your contact list to be able to see the chatbot, then you can choose the ‘Visitor’ option from the left dropdown menu and the ‘Is a contact’ option in the right field.

After that, click the ‘Save’ button and switch to the ‘Display’ tab.

Add exclusion rule and behavior rule

From here, you can upload an avatar image for your chatbot and change its name.

Next, expand the ‘Chat display behavior’ section and choose the chatbot’s default state when the triggers are met.

For example, if you want the bot’s welcome message to appear immediately once someone visits your website, then you can choose the ‘Pop open the welcome message as a prompt’ option.

If you pick ‘Only show the chat launcher’, then visitors will have to click on your chatbot to see its prompts.

However, if you want the chatbot to appear only when a trigger is met, then you can select the third option.

Configure chat display behavior

After that, scroll down and choose the trigger for the chatbot appearance.

For instance, if you want the chatbot to be displayed once the visitor is leaving your site, then select the ‘On exit intent’ option.

However, you can also choose the percentage of pages scrolled or minutes spent on your website as triggers.

Next, you can also switch to the ‘Mobile’ tab to configure chat display settings for mobile phones.

Once you have done that, simply click the ‘Save’ button to store your changes.

Choose a trigger for chatbot

Now, switch to the ‘Options’ tab from the top to configure general settings like delay message text, session timeout, generic error message, bot language, availability, and more.

After that, click the ‘Save’ button to store your settings. Finally, toggle the switch at the top to activate your chatbot on your website.

Save HubSpot chatbot

Now, you can visit your WordPress site to see your chatbot in action.

This is what it looked like on our demo website.

HubSpot chatbot preview

Bonus: Add Live Chat to Your WordPress Site

Live chat is a communication tool that allows visitors to chat with a member of your customer support team through a chat window on your website.

It is a super popular way to connect with customers and has a satisfaction level of 73%, which is much higher than email, phone, and SMS support.

Adding live chat to your WooCommerce store will allow customers to get help quickly and easily without having to wait on hold or send an email. 

This reduces the bounce rate, increases sales, and even gives you a chance to collect feedback from users.

You can easily add this feature to your website using LiveChat, which is the best live chat support software for WordPress.

Live Chat Inc Website

It comes with pre-made live chat templates, real-time chat, multiple support channels, canned responses, chat transcripts, chat analytics, and so much more.

Plus, it integrates with tools like WooCommerce, HubSpot, ChatBot, Constant Contact, and Mailchimp.

For detailed instructions, you can see our step-by-step tutorial on how to add free live chat in WordPress.

We hope this article helped you learn how to easily add a chatbot in WordPress. You may also want to see our guide on how to optimize the customer journey in WooCommerce and our top picks of the best video chat software for small businesses.

If you liked this article, then please subscribe to our YouTube Channel for WordPress video tutorials. You can also find us on Twitter and Facebook.

The post How to Add a Chatbot in WordPress (Step by Step) first appeared on WPBeginner.

How to Make a Transportation and Logistics Website in WordPress

Do you want to make a transportation and logistics WordPress website?

If you run a logistics and transportation business, then you will need an online presence to get your brand known and set yourself apart from the competition. WordPress is one of the easiest and most flexible platforms to build a website for that very purpose.

In this article, we will show you how to make a transportation and logistics website in WordPress.

How to Make a Transportation and Logistics Website in WordPress

What Features Should a Logistics & Transportation Site Have?

Like any other business, transportation and logistics companies need a professional website to reach customers online. Without a site, your business might miss out on opportunities and struggle to communicate effectively with potential clients.

But having a website isn’t just about showing your brand. Big companies like DHL use their websites to help customers track their shipments and answer questions quickly.

That’s why logistics and transportation companies usually have certain unique features on their sites, like shipment tracking.

This function allows customers to monitor where their shipment is located in real-time and identify any potential issues with the delivery.

Other than that, a logistics and transportation website should follow best practices, like responsive website design, fast loading speeds, and strong security to prevent unauthorized access.

With that in mind, let’s look at how you can make a transportation and logistics website using WordPress, the most popular website builder on the market. You can use the quick links below to navigate through the steps:

Step 1: Get a Hosting Plan and Domain Name

The first step is to sign up for a WordPress hosting service. If you are unfamiliar with web hosting, then it’s essentially a service that stores and displays your website files so that they are publicly accessible.

At WPBeginner, we recommend using Bluehost for your WordPress hosting. Besides offering great value for money, they are also fast and easy to use, even for beginners who are new to web hosting.

Bluehost offer for WPBeginner readers

Bluehost also has a huge discount for WPBeginner readers, along with a free domain name and an SSL certificate. You can sign up by clicking on the button below:

Since you will be running a logistics website, we recommend going with the Bluehost Pro plan. It’s designed for high traffic, so your site will stay online at all times, even if multiple users are tracking their shipments.

Simply click on ‘Select’ beneath the plan you want to buy.

Bluehost Pricing Plans

Once you have chosen a plan, you will now need to pick a domain name, which is the online address for your website.

In general, it’s best to use a domain that includes your brand name in it, like fedex.com or dhl.com. If you want, you may also add a transportation or logistics-related keyword after it, like murphylogistics.com.

For help with picking the best domain name, see our guide on how to choose a domain name for your WordPress website. You can also try WPBeginner’s free business name generator to play around with some options.

Once you have chosen a domain name, just click ‘Next.’

Choosing a logistics website domain name in Bluehost

After this, you will be asked to enter your account information, business email address, name, country, phone number, and more.

You will also see optional extras that you can buy. We generally don’t recommend buying them straight away, as you can always add them later if your business needs them.

Bluehost's package extras

At this stage, you can insert your payment information to complete the purchase.

Then, you will receive a confirmation email with the login credentials to your Bluehost dashboard, which is the control panel where you will manage your logistics site.

Step 2: Create a New WordPress Website

Note: If you have chosen other hosting services like SiteGround, DreamHost, HostGator, or WP Engine, then read our guide on how to install WordPress for step-by-step instructions.

If you used our Bluehost link before, then Bluehost will automatically install WordPress on your hosting service by default, so you can skip this section.

That said, if you miss this step or want to set up another WordPress site on the same hosting plan, you can follow these instructions.

First, go to the ‘Websites’ tab in the Bluehost dashboard. Then, click the ‘Add Site’ button.

Adding a new site in Bluehost

The Bluehost website setup wizard will now appear.

To begin, simply select ‘Install WordPress’ and click ‘Continue.’

Choosing WordPress as the CMS to use in Bluehost

You can now insert a title for your website.

After that, just click ‘Continue.’

Inserting a site title in Bluehost

At this stage, you can connect a domain name to your website.

You can add your existing domain or use a temporary subdomain until you are ready to purchase a new domain name.

Connecting a domain name to a website in Bluehost

Now, just wait a few moments for Bluehost to install WordPress.

Once the installation is successful, you will land on the ‘Websites’ tab in Bluehost again and find your new site there. To log in to the WordPress admin panel, just click ‘Edit Site.’

Clicking on the Edit Site button in Bluehost

Alternatively, you can use your WordPress login URL (like example.com/wp-admin/) in your web browser. Make sure to replace the domain name with your own.

At this point, you can continue to the next steps to start creating the transportation and logistics WordPress website.

Step 3: Choose a Transportation and Logistics WordPress Theme

WordPress themes make it easy to create a good-looking website without web design skills. All you have to do is choose a theme you like, install it, and tweak some of the design elements.

When you first install WordPress, you will have one of the default themes installed, which may not be the most attractive. But don’t worry, there are many other logistics and transportation WordPress themes that you can use.

For guidance on theme setup and theme recommendations, you can check out the following articles:

How to Edit Your Logistics and Transportation WordPress Theme

The great thing about WordPress is it offers several options to customize your WordPress theme, so you can choose the one that suits your skills and needs best.

One is to use the WordPress Full Site Editor (FSE), which is what you will use with a WordPress block theme.

Check out our beginner’s guide to WordPress Full Site Editing for step-by-step guidance.

Using the WordPress Full Site Editor to edit a transportation and logistics website

Another option is to use the Theme Customizer, which is the default option for classic WordPress themes. You can read more about how to edit a theme using the Theme Customizer in our article.

However, our recommendation is to use a page builder plugin like SeedProd.

While WordPress’ built-in editing features are good, their customization options may be a bit basic. Since you are working on a professional website, you want to leave a memorable impression on visitors.

SeedProd offers a flexible drag-and-drop builder with various fonts, color options, widgets, and even animations to personalize your website design. Plus, you get access to 300+ theme templates that are optimized for conversions from the get-go.

The SeedProd page builder plugin for WordPress

To use a SeedProd theme, you will need to install the SeedProd plugin. While a free version of SeedProd is available, we recommend getting a Pro or Elite plan. Both come with the Theme Builder, which allows you to customize every part of the theme.

For instructions on plugin installation, see our guide on how to install a WordPress plugin.

Once the plugin is installed and active, go ahead and activate your license. Simply paste your license key and click ‘Verify key.’

Adding the SeedProd license key to your WordPress website

After that, go to SeedProd » Theme Builder.

Now, just click ‘Theme Template Kits.’

Accessing SeedProd's Theme Template Kits

You will now see dozens of templates on the screen.

For a transportation and logistics website, you can use the Oceanic Cargo Shipping Agency theme. The theme template kit already has an attractive services page, so you can simply adjust the information and images there for your business.

Just hover your cursor over it and click the orange checkmark.

Choosing the Oceanic Cargo Shipping Agency SeedProd theme

You will now be directed to the SeedProd page builder, where you can drag and drop blocks, add new sections, change the background, create animated effects, and so on.

Every area is customizable, so feel free to play around with the editor.

Editing the transportation and logistics SeedProd theme

For more information about using SeedProd, you can check out our guide on how to create a custom theme in WordPress.

Step 4: Create a Homepage With a Services Section

When editing your website design, one of the most important things you should pay attention to is the homepage.

As the first page that visitors will most likely see, the homepage has to create a strong impression and give users enough information about your logistics business.

Typically, new WordPress websites have a homepage that displays their latest blog posts.

Example of a blog homepage

Since you are running a business site, it’s a good idea to separate your blog page from your homepage and create a new custom static front page from scratch. Otherwise, people may think your website is mainly for blogging and not for business.

You also want to add a services section to your homepage to give users an overview of what kind of logistics and transportation services you offer. Here’s a great example by DHL:

DHL's shipping service section

We also recommend linking this section to your services page later on so that you can provide more details about each offer there.

For guides to create a good-looking homepage, you can check out our article on how to create a custom homepage and how to create a services section in WordPress.

Step 5: Set Up Your Important Web Pages

Once you have set up your homepage, it’s time to create other pages on your transportation and logistics WordPress website.

We have an article that details the most important pages your WordPress site should have. But for this type of business, here are some pages that you should pay careful attention to:

  • Services page(s) This is where you will detail the services you offer. You can include the types of shipping supplies and boxes, types of delivery, and their prices. Feel free to create a dedicated child page for all your services to provide more details.
  • Contact page Here, potential customers can get in touch with you, or existing clients can reach out for help. We recommend adding a contact form using WPForms and including relevant contact information like your business address and phone number.
  • Service locations page Highlight the areas where your transportation and logistics services are available. This will be helpful if you have multiple pickup and dropoff points that customers can go to.
  • Shipment tracking page This page allows clients to monitor their shipments in real-time. You will want to create a blank page for this now, as we will show you how to add the tracking feature in the next step.
  • Booking page for pickups – This is for clients to schedule a pickup service for their packages. We will also show you how to add the booking form to this page later.
  • Customer portal – Create a secure and user-friendly portal for customers to access their shipment history, payments, invoices, and any other relevant data. Check out our article on how to make a client portal for step-by-step guidance.
  • FAQ page – Answer common questions clients may have so that they can better understand your services and feel confident about doing business with you. You can learn more about this topic in our article about adding an FAQ section in WordPress.

For more information, just see our article on how to create a custom page in WordPress.

Step 6: Install a Cargo Tracking Plugin for Your Logistics Site

We mentioned earlier that you will need a shipment tracking page for customers to monitor their deliveries. After setting up the page for this, you will need to install a cargo tracking plugin to display the user’s shipping information.

WPCargo is one cargo tracking plugin you could use. The free plugin comes with the standard shipment tracking functionality, including auto-tracking IDs, shipment management tools, and tracking forms. This may be enough if your business is new and that’s all the features you need at the moment.

There is also a premium plugin that gives you access to a barcode scanner, custom field manager, and more.

To use WPCargo, you need to install and activate the plugin. Then, go to WPCargo » General Settings from your WordPress dashboard.

On this page, you can add information about your services, like the types of shipments, shipment modes, shipment locations, and shipment carriers.

All this information will be useful when you need to add a new shipment from the WordPress admin.

WPCargo's general settings

One of the things you want to do in this tab is scroll down to ‘Track Page Settings.’

Then, select a page to insert the [wpcargo_trackform] shortcode.

Choosing a page for customers to track shipments in WPCargo

This tag will display a field that users can fill out with their shipment tracking number and get a real-time status on where their shipment is.

Here is what it looks like:

WPCargo's tracking shipment page on the frontend

Other than that, you can go ahead and configure other settings, like customizing the shipment number format and assigning shipment emails.

Once you’ve done that, just scroll down to click ‘Save Changes.’

Clicking save changes in WPCargo

If you switch to the ‘Multiple Package Settings’ tab, then you can choose whether clients can ship multiple packages in one order.

If so, feel free to specify what dimension and weight units to use and what package types they can select.

WPCargo's multiple package settings

Moving on to the Map Settings tab, you can choose to enable a map where users can view their shipment history.

We only recommend activating this setting if you know how to work with Google Maps APIs.

WPCargo's map settings

The Client Email Settings and Admin Email Settings tabs are basically similar. This is where you can customize the email notifications sent to website administrators and clients.

WPCargo comes with handy shortcode tags that you can include to display the shipment data. You can also choose which shipment statuses will make the plugin send an email notification to the client.

WPCargo's client email settings

Whenever you configure the settings in a WPCargo tab, don’t forget to save your changes.

Expert Tip: At times, emails sent from WordPress don’t get successfully delivered due to your site’s hosting configuration. To prevent this from happening, we recommend using the WP Mail SMTP plugin. For more details, you can see our guide on how to fix the WordPress not sending emails issue.

Adding a New Shipment in WPCargo

If you want to add a new shipment in WPCargo, then you have to do it in the WordPress admin. Only WPCargo admin, employee, and agent user roles have this access, whereas clients on your website don’t.

To add a new shipment, go to WPCargo » Add Shipment. Then, fill out the shipper and receiver’s details.

Adding a new shipment in WPCargo

Scrolling down, you will need to fill out more information about the shipment details.

All the things you configured in the General Settings will show up here as options you can choose.

Filling out WPCargo's shipment details

After that, scroll back up to the ‘Assign shipment to’ section.

Make sure to assign the shipment to a Client, Agent, and Employee responsible for it.

Assigning a WPCargo shipment

Then, move down to the ‘Current Status:’ section and update the shipment’s date, time, location, status, and remarks, if any.

After that, just click ‘Publish.’ Depending on your email settings from earlier, the plugin will notify the client about the shipment’s status.

Updating the shipment status in WPCargo

For an alternative method, you can see our guide on how to offer shipment tracking in WooCommerce.

Step 7: Add a Shipping Calculator Form to Your WordPress Site

Besides a tracking plugin, logistics companies typically have a shipping calculator form on their websites. This feature helps potential customers see the estimated price of their shipments, which can be handy if they want to deliver multiple packages.

If you use WPCargo, they have a premium add-on to create a shipping calculator. It allows users to see the distance between the origin and destination and the resulting fees based on the distance.

WPCargo vehicle rate add-on

Alternatively, you can use WPForms, which is the easiest WordPress form plugin on the market. It includes 1200+ templates for various forms, including a shipping cost calculator form.

All you need to do is install the plugin, choose this template, and customize the form fields to your liking.

The shipping cost calculator form already includes a calculations add-on that will automatically calculate the shipping price based on the user’s information.

Creating a shipping cost calculator in WPForms

For more information about this topic, check our out guide on how to add a shipping calculator in WordPress.

Step 8: Create a Booking Form for Scheduling Pickups

If you offer package pickup services, then it’s a good idea to create a booking form for customers to easily schedule their pickups on your website.

A booking form on a logistics site usually asks for information like:

  • The sender’s details, such as their contact information and origin address.
  • The receiver’s details, including their contact information and destination address.
  • Package weight and dimensions.
  • The shipping supplies they need, such as what type of box they want to use.
  • The type of delivery, such as express delivery or regular delivery.
  • Pickup date and time.

For that last part, we recommend specifying the availability of your pickup schedule. This way, customers can’t insert a date and time that’s outside of your work hours.

You can display this booking form on a dedicated page for scheduling pickups and the account page of your customer portal.

Creating a pickup booking form in WPForms

Our guide on how to create a booking form in WordPress can walk you through the entire process.

Step 9: Enable Payment Methods in Your Transportation Website

To accept payments for your transportation and logistics services, you will need to enable some payment methods on your website.

Usually, WordPress websites install an eCommerce or shopping cart plugin to accept payments. You can follow our guide on how to make an online store for more details.

If you are looking for a simpler solution, then we recommend using the WP Simple Pay plugin. It’s a Stripe payment plugin that lets you create a payment form without having to add an unnecessary shopping cart feature to your website.

WP Simple Pay

Since WP Simple Pay uses Stripe, you will have multiple payment methods by default, including buy-now-pay-later payment options.

If you use WPForms, then you can also add a payment function to your forms by connecting the plugin with Stripe. Or, you can install payment add-ons like Square, PayPal Commerce, and Authorize.net.

The payment fields in WPForms

For more information about enabling payments, just check out our guides on how to easily accept credit card payments.

If you have B2B clients that use your logistics services regularly, then we also recommend reading our article on accepting recurring payments in WordPress.

Step 10: Create a Request a Quote Form for Your Business

If you offer transportation and logistics services to businesses, then you may use a custom pricing structure that varies by the company’s needs.

In this case, it may not be possible to display a set list of prices on your website. Instead, the client has to consult with you first to get more information about your pricing.

It’s best to create a quote request form. Then, users can insert information about their business, company size, and the kind of transportation and logistics services they need. With this information, you can offer them the right service and pricing structure.

WPForms has a ‘Request a Quote’ form template ready, so you can use that and simply change the form fields according to your needs.

WPForms' Request a Quote template

You can read more in our article about how to create a request a quote form in WordPress.

For a transportation and logistics business, we recommend following these tips to create your form:

  • Make important form fields required to fill out – These include the type of goods, dimensions, weight, origin, and destination. This ensures that the potential client gives you enough information about the shipment so you can provide the right quote for them.
  • Enable autocompletion for address fields – This feature helps users enter their addresses faster and avoid any mistakes when inserting their information.
  • Mention how long you’ll take to respond – This way, the potential customer isn’t left wondering when to expect an email back. For example, you can say that you’ll get back to them within 24 hours.

Step 11: Add Live Chat to Your Company Website

Unfortunately, problems can happen during shipments and cause delays. When this occurs, customers will want to get answers quickly so that they aren’t wondering if their package has gotten lost or compromised.

To deal with this problem, we recommend using live chat support software. This allows users to talk to you or an agent directly on your website rather than having to email you and wait for a reply.

We recommend installing LiveChat, which is well-known in the customer support industry. With this tool, you can easily customize the live chat window in WordPress so that it doesn’t look out of place with your web design.

LiveChat

For more details, you can see our tutorial on how to add live chat in WordPress.

If you use WhatsApp, then you can also add a WhatsApp chatbox to communicate with users directly. We recommend doing this if this social media platform is popular among your region and target demographic.

WhatsApp chatbox on a website

In many cases, users use the live chat feature and ask questions that many other people also ask. To make answering these responses more efficient, you can try adding an automated chatbot to your website.

With this, instead of connecting the customer with a live agent, they will have to talk with a chatbot first. The chatbot will then show the user some pre-made responses based on what they’re asking.

For more details, check out our article on how to add a chatbot to your website.

Tools to Increase Sales for Your Transportation and Logistics Business

While you have now successfully created a transportation and logistics WordPress website, the journey doesn’t end here. To ensure the success of your business, you will need to continually optimize your site.

Here are some WordPress plugin and tool recommendations you can use to take your website to the next level:

  • All in One SEO (AIOSEO) – This plugin makes it easy to optimize your website for search engines and increase your site’s rankings. This way, you can get steady organic traffic to your business from Google.
  • MonsterInsights – If you want to use Google Analytics, then MonsterInsights can easily integrate your site with the platform. It has a user-friendly reporting dashboard that tells you where your customers are coming from and what they do on your site.
  • Reviews Feed Pro – Boost your social proof by displaying customer testimonials on your website. With Reviews Feed Pro, you can pull testimonials from third-party review sites like Google Reviews and Trustpilot.

We hope this article has helped you learn how to make a transportation and logistics website in WordPress. You may also want to check out our guides on dropshipping made simple and our expert picks for the best WooCommerce dropshipping plugins.

If you liked this article, then please subscribe to our YouTube Channel for WordPress video tutorials. You can also find us on Twitter and Facebook.

The post How to Make a Transportation and Logistics Website in WordPress first appeared on WPBeginner.

8 Best WordPress Chat Plugins (Expert Pick)

Are you looking for the best chat plugins for WordPress?

Chat plugins allow you to talk with your users in real time to provide support. You can also create chatbots to help customers when your team isn’t available to improve the user experience.

In this article, we will share the best WordPress chat plugins that will help you communicate with your users.

Best chat plugins for WordPress

Why Use Chat Plugins in WordPress?

With chat plugins, you can easily add live chat functionality to your WordPress website. This allows you to open a channel of real-time communication to interact with your visitors.

Most users do not like using emails, SMS, or help desk plugins to reach out to a website because those methods can be a bit time-consuming.

However, with chat plugins, customers can contact you directly if they need to debug an issue, provide feedback, or get help with your products and services.

With WordPress chat plugins, you can further improve the quality of the customer service on your site by helping users address their concerns over live chat and providing support.

You can also create chatbots for when your team isn’t available to assist customers, open support tickets, and solve their problems,

Plus, if you have an online store, then you can even use chat plugins to increase sales by letting your team or chatbots answer questions from potential customers.

Chat plugins can also make your website more user-friendly, help build a community around your brand, and increase customer loyalty.

That being said, here is a list of the best chat plugins for WordPress that can help you communicate with your users.

1. LiveChat

LiveChat website

LiveChat is a super popular live chat software that can easily be integrated with your WordPress website using its plugin.

It allows you to communicate with your users in real time by adding a chat widget to your website.

Plus, the tool is super easy to use. It comes with many customization options like chat widget themes and the ability to add your company logo, change the chat window message, add social media buttons, and create custom live chat agent profiles.

It can also integrate with over 130 tools like Facebook, Dropbox, ZenDesk, and WooCommerce, making LiveChat the ultimate choice for online stores.

LiveChat customer reply

Pros

  • The chat functionality loads super quickly, which is great for user experience.
  • The tool saves all the chat history and transcripts and even lets customers provide feedback for your product or service using its rating system.
  • LiveChat can integrate with ChatBot to add chatbots to your site.
  • It offers file uploads, canned responses, and analytics.
  • LiveChat comes with a multiple chat window feature for customer support teams.

Cons

  • LiveChat does not offer a free plan.
  • Sometimes, a client may not receive a chat notification.
  • It can be a bit difficult to use for beginners.

Why we recommend using LiveChat: It is the leading live chat software in the industry that lets you add and customize a chat widget.

If you have an online store, then we recommend using LiveChat due to its comprehensive features, ability to open multiple chat windows for different customers, integration with over 130 tools, and much more.

2. HubSpot Chat

HubSpot website

HubSpot is a powerful customer relationship management (CRM) platform that comes with a suite of tools for marketing, sales, and customer service, including HubSpot Chat.

It is the best WordPress chat plugin on the market that allows you to easily add chatbots and live chat functionality to your website with its free plugin.

The plugin lets you chat with your customers in real time and even saves their contact information in HubSpot’s customer relationship management app.

This can help you build an email list or communicate with your customers using SMS, email, or Slack.

If you have a small business, then you can also use HubSpot to create chatbots that provide support to your customers when your team members aren’t available for live chat.

HubSpot chatbot preview

Pros

  • HubSpot has a free plugin that can be used to add live chat and chatbots.
  • The CRM also offers other features like email marketing, forms and popups, landing pages, and detailed analytics.
  • It comes with a marketing automation that sends an email when a customer reaches out.
  • You can respond to chats directly from the inbox and even take notes, create support tickets, and schedule calls.

Cons

  • There are limited customization options for the chat widget.
  • To unlock advanced features, you will have to upgrade to the paid plan.

Why we recommend using HubSpot: We recommend using HubSpot because it is the best WordPress chat plugin that allows you to create live chat widgets and chatbots without using any code. It also saves your customer information, creates support tickets, and offers a suite of other tools that can help you grow your business.

3. ChatBot

Chatbot.com website

ChatBot is a drag-and-drop chatbot builder that allows you to make smart chatbots for your website without writing any code. This makes it the best AI chatbot software for WordPress.

You can then easily add these chatbots to your WordPress site using the free ChatBot.com plugin. For detailed instructions, just see our tutorial on how to add a chatbot in WordPress.

ChatBot comes with pre-made templates, a chatbot testing tool, a customizable chat widget, and integrations with platforms like Slack, Facebook, WhatsApp, and more.

Plus, it also lets you create a multilingual chatbot using different filters, making it a great choice if you have a multilingual website.

Chatbot preview

Pros

  • ChatBot can integrate with LiveChat to provide live chat and chatbot support.
  • It provides detailed analytics about your chatbot’s performance.
  • ChatBot can organize your users in a contact list and even import new customers directly to your CRM.
  • It automatically collects user data during conversations and archives all the conversations between customers and the chatbot.

Cons

  • Its free plan offers limited features.
  • Creating a workflow in ChatBot can be a bit difficult for beginners due to the numerous customization options.

Why we recommend using ChatBot: We recommend using ChatBot if you want to design a detailed chatbot for your website. If you have a multilingual website, then ChatBot is a great choice as it lets you create chatbots in multiple languages.

4. Brevo Chat

Brevo chat website

Brevo is a popular SMS and email marketing service that offers a chatbox feature. It allows you to chat with your visitors in real time and respond to questions, resolve issues, and qualify leads. It even lets you create chatbots to answer user questions when your support team isn’t available.

To create a chatbox with Brevo, all you have to do is sign up for an account on the website and then connect to your WordPress blog using a free plugin.

Pros

  • It allows visitors to rate conversations with chat agents, which can help you gain feedback from users.
  • Brevo Chat allows you to see what visitors are typing before they send the message, which can help prepare you for the answer.
  • It allows your visitors to chat with you using their mobile devices.
  • Brevo Chat offers a CRM, landing pages, user data segmentation, SMS and email marketing features, and more.

Cons

  • The Brevo chatbox can be a bit slow at times.
  • It offers limited customization.

Why we recommend using Brevo Chat: If you are looking for an all-in-one solution that lets you manage your users through SMS, email, live chat, and chatbots, then Brevo is the perfect choice. It is powerful and allows you to communicate with all your customers in one place.

5. Tidio

Tidio website

Tidio is a WordPress live chat and chatbot plugin that uses conversational AI to solve up to 70% of your customer’s problems.

It comes with pre-built chatbot templates and customizable chat widgets. Tidio also shows a live typing preview and saves the chat history with customers.

Tidio even integrates with WooCommerce and allows your support team to see a customer’s cart, check their order history, and recommend other products in the chatbox.

Pros

  • Tidio is super beginner-friendly and has a free version.
  • It comes with a customizable chatbox design.
  • It allows your support team to open tickets in the chatbox.
  • Tidio integrates with platforms like HubSpot, Brevo, Constant Contact, and more.
  • Tidio lets you manage email, Facebook Messenger, and live chat conversations in one place.

Cons

  • Its paid plan is a little expensive.
  • Tidio is not available in many languages.
  • It can be slow and unresponsive at times.

Why we recommend using Tidio: Overall, Tidio is an amazing chat plugin. If you are on a budget or just have a simple WordPress blog, then you can use the free version of Tidio to easily connect with your visitors.

6. JivoChat

JivoChat website

JivoChat is an all-in-one business messenger tool that lets you communicate with website visitors using email, live chat, chatbots, phone calls, and more.

Other than adding chat widgets to your website, the tool lets you contact your customers on their preferred social media platforms like Facebook, Instagram, or WhatsApp.

Some of JivoChat’s other features include chat history, voice messages, file and screen sharing, video calls, multiple chat agents, and chat routing.

Pros

  • The plugin has a free version with most of the features of the paid plan.
  • It comes with built-in CRM tools.
  • JivoChat monitors visitor behavior on your site and offers smart triggers.
  • It provides detailed analytics and reports on chat performance.

Cons

  • Its paid plan can be expensive, especially for small businesses.
  • JivoChat offers limited chat widget customization options.
  • It sometimes does not tell the visitor when the chat agent leaves the chat.

Why we recommend using JivoChat: We recommend using JivoChat if you are used to chatting with visitors over multiple platforms, as the plugin allows you to create a central place for all your messages.

7. Olark

Olark website

Olark is another great chat plugin that allows you to integrate chatbots and live chat widgets on your WordPress site.

It enables you to customize your chatbox according to your WordPress theme and even allows you to add a contact form to the widget. This can help your support team collect customer data so that they can contact users at a later date or build an email list.

Pros

  • With Olark, you can easily distribute chats and monitor team performance.
  • You can integrate the tool with Mailchimp, Salesforce, HelpScout, and Zendesk.
  • Olark lets you create automated messages for when your team isn’t available.
  • It comes with analytics and reporting features.

Cons

  • It does not offer a free version.
  • Olark does not allow you to create a custom chatbot.
  • To create complex automated workflows, you have to integrate Olark with other platforms.

Why we recommend using Olark: We recommend using Olark if you have a large customer support team, as the tool lets you monitor your agents’ performance. It even comes with chatbots and automated message features to make work easier for your team.

8. Chaty

Chaty website

Chaty is a well-known WordPress plugin that offers a multi-channel communication platform. With this plugin, you can easily chat with your website visitors through Facebook, Messenger, Slack, Telegram, and more.

It adds a floating chat widget to your website and lets you choose a trigger for when the chatbox should be displayed.

Pros

  • You can add various buttons in the chatbox, like email, Google Maps, and phone number.
  • It has a free version.
  • You can add a contact form to the chat widget.
  • Chaty can connect with live chat solutions like Tidio, Formilla, and Zoho.
  • Chaty’s built-in ticketing system allows you to track and manage customer issues and requests.

Cons

  • Some of Chaty’s features, like multi-channel support and a ticketing system, are only available in the premium plan.
  • Chaty does not offer a mobile app for chat agents.
  • The plugin chatbox can be slow at times.

Why we recommend using Chaty: Overall, Chaty is a great solution if you are on a budget because it has a free version. You can also use this tool to chat with users over social media platforms.

Which Is the Best Chat Plugin for WordPress?

In our expert opinion, LiveChat is the best WordPress chat plugin, especially for online stores, because of its comprehensive features and integration with WooCommerce.

If you are looking for an affordable and user-friendly alternative, then HubSpot is easy to use, allows you to add a chatbot and a chat widget to your website, and even has a free version.

Similarly, you can also use Brevo Chat if you want to manage all your SMS, email, and chat messages in one place.

However, if you have a multilingual site, then ChatBot is the best choice because it lets you create a chatbot in any language you want and even integrates with LiveChat.

Frequently Asked Questions About WordPress Chat Plugins

Let’s wrap up with some of the questions that our readers often ask us about using chat plugins for WordPress.

Do I need a WordPress chat plugin?

By using a chat plugin on your website, you can communicate with your users in real-time to provide customer service quickly and efficiently.

You can also use WordPress chat plugins to increase sales by answering questions about your products or services and convincing visitors to buy your products.

You can even reduce the number of support tickets on your site by immediately solving problems through chat widgets.

What is the best live chat plugin for WordPress?

If you want to add live chat functionality to your website, then we recommend using LiveChat, which is the best live chat solution for WordPress.

It offers beautifully designed live chat support apps, allows you to add pre-chat survey forms, integrates with CRMs, and is also easily customizable.

For details, you can see our showcase of the best live chat software for small businesses.

Best WordPress Guides for Customer Communication

If you liked this article, then please subscribe to our YouTube Channel for WordPress video tutorials. You can also find us on Twitter and Facebook.

The post 8 Best WordPress Chat Plugins (Expert Pick) first appeared on WPBeginner.

How to Greet Each User With a Custom Welcome Message in WordPress

Do you want to greet each user with a custom welcome message in WordPress?

Greeting users with a welcome message can help boost engagement on your website, as it makes people feel welcomed and cared for. It’s a great way to keep in touch with your visitors, generate leads, and increase sales.

In this article, we will show you how to greet each user with a custom welcome message in WordPress.

How to greet user with a custom welcome message in WordPress

Why and When You Should Greet Users With Welcome Messages in WordPress

Not all websites need to greet users with a custom welcome message. However, if you are running an online store, trying to generate leads, or boosting user engagement, then a welcome message can be very useful.

There are different types of welcome messages that you can use. The goal here is to offer users a lot of value with each message.

Here are some use cases for showing a welcome message on your WordPress site:

  • When customers arrive at your eCommerce store, you can show a welcome message greeting them with discount offers, the deal of the day, or assist them in the checkout process.
  • A welcome message helps provide live support to users who might not be familiar with your products and services. You can encourage them to ask questions and resolve any questions they might have.
  • Showing a welcome message to returning visitors can boost sales on your site. You can show a popup with popular products, discounts, and other incentives.
  • You can also create personalized welcome messages in different languages for your global audience. This helps boost engagement and makes users from around the world feel welcome.
  • On a WordPress blog, a welcome message can help you grow your email list. You can encourage users to download a free course, show them your best content, and more.
  • Creating a welcome message for a nonprofit website can help you get more donations. You can greet users and show top causes to support in the popup message.

That being said, let’s see how to easily greet each user with a custom welcome message in WordPress. We will cover 2 methods, so you can click the links below to jump to any section:

Method 1: Greet Users With a Custom Welcome Message Using OptinMonster

For this method, we will be using OptinMonster. It is the most popular lead generation software in the world that helps you convert website visitors into subscribers and customers.

First, you need to sign up for an OptinMonster account. Simply visit the website and click the ‘Get OptinMonster Now’ button to get started.

OptinMonster website

After registering, you will need to install and activate the OptinMonster plugin. For more details, please see our guide on how to install a WordPress plugin.

It is a free plugin that acts as a connector between your WordPress site and OptinMonster.

Upon activation, you will see the OptinMonster setup wizard and welcome screen. Go ahead and click the ‘Connect Your Existing Account’ button.

Connect your existing account

After that, a new window will now open.

You need to click the ‘Connect to WordPress’ button to connect your WordPress website with OptinMonster.

Connect OptinMonster to WordPress

You are now ready to create a new campaign for your website.

Simply head to OptinMonster » Campaigns from the WordPress admin panel and click the ‘Create Your First Campaign’ option.

Create your first campaign

Next, you need to choose a campaign type and a template. OptinMonster comes with different campaign types, and you can use any of them to greet users with a welcome message in WordPress.

For this tutorial, we will be using the slide-in campaign type with the Flatland template.

Choose slide in campaign type

Next, you will be asked to give your campaign a name.

Once that’s done, simply click the ‘Start Building’ button.

Enter a name for new campaign

OptinMonster will now launch the drag-and-drop editor, where you can simply add any element and edit it.

You can add different blocks like columns, text, video, buttons, sign-up fields, and more.

Edit the welcome message

You can also change the text in the welcome message popup.

OptinMonster also integrates with your email marketing services. Simply switch to the ‘Integrations’ tab at the top.

Click add a new integration

After that, you will need to click the ‘Add a New Integration’ button from the menu on your left.

OptinMonster works seamlessly with popular tools like ActiveCampaign, Constant Contact, HubSpot, and more.

Go ahead and select the email marketing tool you would like to integrate and click the ‘Connect’ link. You can then follow the onscreen instructions to log in to your preferred service.

Select the email marketing tool

Next, you need to switch to the ‘Display Rules’ tab to select when you want to display the greeting.

OptinMonster comes with a bunch of options that you can use to create less intrusive and highly engaging welcome messages.

Displaying Welcome Message Using Time on Page Rule

By default, OptinMonster will use the time-on-page display rule to show your welcome message campaign.

Let’s say a user arrives at your eCommerce store and spends 5 seconds on the homepage. You can then show a popup message welcoming the user and show recent sales, popular products, or other incentives.

Similarly, if you have a WordPress blog, you can display popular articles, the latest announcements, or information about new products or services to users in the welcome message.

Popular display rules

Simply select the ‘Time on Page’ display rule to get started and set the time to 5 seconds.

If you want to show the campaign on all the pages on your website, then you will need to use the ‘current URL path’ and ‘is any page’ rules.

However, you can change these settings and increase the time or select a particular page to show your welcome message.

Set up display rules

Display Welcome Message Based on Location

You can also show your display different messages to users from specific locations. You can even create multiple campaigns and greet users in their native languages.

All you need to do is select the ‘Physical Location’ display rule in OptinMonster.

Select physical location display rule

Next, you can enter the country name in the display rule settings.

From here, you will need to click the ‘Validate’ button.

After setting up the display rules, you can switch to the ‘Publish’ tab at the top.

Validate your location

On the next screen, you will need to confirm the location that you entered.

Simply click on the location name to continue.

Confirm your physical location

You can keep the setting for displaying the campaign on all the pages.

However, if you want, you can edit this and show your welcome message on a particular page, like the homepage.

Show welcome campaign on homepage

There are many more display rules you can use in OptinMonster to show your welcome message. For instance, there are options to show the campaign based on a user’s device, when they click a link, when they visit a particular page, and more.

Publish Your Welcome Message Campaign

Once your welcome message is ready, go ahead and change the Publish Status to ‘Publish.’ Then, you can click the ‘Save’ button at the top and exit the campaign builder.

Publish the welcome screen campaign

Next, you will see the WordPress output settings for your campaign.

To make sure your campaign is live, click the ‘Status’ dropdown menu on the right and select the ‘Published’ setting.

Change status from pending to published

Don’t forget to save the settings after changing the status.

You can now visit your website to see your custom welcome message in action.

See welcome message popup

You can create other popups like this using different rules for other users, too. For more details, you can see our guide on how to show personalized content to different users in WordPress.

Method 2: Greet Users With a Custom Welcome Message Using LiveChat

LiveChat is the best live chat support software for WordPress websites. It allows you to create beautifully-designed live chat buttons and live chat support for your WordPress site.

You can customize the greeting message, display your own buttons, upload your logo, show agent profiles, and more.

First, you need to visit the LiveChat website and sign up for an account. Simply follow the onscreen instructions to set up your account.

LiveChat

After that, you will be taken to your LiveChat dashboard.

Next, you need to go to the ‘Settings’ tab from the left panel and head to the Chat widget » Customization page.

View LiveChat settings

Here, you can customize your chat widget.

LiveChat lets edit widgets directly on your website. Simply enter your site’s URL into the ‘Customize widget on website’ option and click the blue arrow button.

Edit live chat widget on website

You can now change the color of your chat widget, select dark or light mode, adjust the style, and change the alignment and spacing.

LiveChat also lets you edit the appearance of your live chat widget from the dashboard settings.

Edit the appearance of live chat widget

Besides that, you can also make additional tweaks to your chat widget.

For instance, there are options to show a logo or an agent’s photo, enable sound notifications, let customers rate agents, and more.

Change additional settings

Next, you need to switch to the Engagement » Targeted messages section from the panel on your left.

By default, LiveChat enables a few targeted messages. However, you can create your own types of targeted messages, such as:

  • A welcome message to new customers
  • A welcome message to returning customers
  • Help on the pricing page
  • A discount on the checkout page
  • Product announcements
  • New feature releases
  • Time-sensitive deals and discount offers
Targeted messages in LiveChat

You can click on the default messages to further customize them or add a new message.

For this tutorial, we will add a new welcome notification by clicking the ‘New targeted message’ button.

Next, a small window will open where you can choose the type of message you’d like to create. Go ahead and select the ‘Greeting’ option.

Create a greeting message

After that, you can edit the message that users will see as a greeting.

LiveChat also offers templates for your greeting message. For instance, you can show a product, announce a new feature, share knowledge, and more. We will use the default template for this tutorial.

There are also options to change the button text, add another button, and more.

Customize your greeting

Once you have edited the greeting message, simply click the ‘Next: set conditions’ button at the bottom.

Next, you will need to specify when the greeting message will appear. LiveChat shows 3 options, which include showing it to all visitors, first-time visitors, or returning visitors.

The live chat software also lets you choose the time a user spends on a page before showing the greeting message. After that, you will need to select a page where the message will appear.

Set conditions for new greeting

When you have made the changes, simply click the ‘Save greeting’ button.

A new window will now open. Go ahead and enter a name for your greeting message and enable the ‘Set greeting live’ option. After that, click the ‘Save’ button.

Save your greeting message

Note that you can disable the default welcome message set by LiveChat if you have just created a new one.

Next, you need to select an eye-catcher. This is an image that is displayed when the LiveChat window is minimized.

LiveChat comes with several ready-made eye-catchers that you can use. You can also upload your images and use one of them.

Simply go to Engagement » Eye-catcher in the LiveChat settings and click the toggle to enable the eye-catcher. Don’t forget to click the ‘Save changes’ button when you are done.

Enable eye catcher

Once you are happy with the design of your LiveChat window and custom greeting, you are ready to add it to your WordPress website.

Next, you can switch back to your WordPress admin area to install and activate the LiveChat plugin. For more details, see our step-by-step guide on how to install a WordPress plugin.

Upon activation, the plugin will add a new menu item labeled LiveChat to your WordPress admin sidebar. Plus, it will redirect you to a login screen, where you can select your LiveChat account and click the ‘Log in’ button.

Login to LiveChat in WordPress

You will now see a success message that you have successfully added LiveChat to WordPress.

Simply click the ‘Got it’ button to continue.

See a success message

That’s it. You have successfully added a welcome greeting message through live chat on your website.

You can now visit your site in a new browser tab to see the LiveChat custom greeting in action.

View livechat preview

We hope this article helped you learn how to greet each user with a custom welcome message in WordPress. You may also want to see our article on how to add push notifications in WordPress and our expert picks for the must have WordPress plugins to grow your website.

If you liked this article, then please subscribe to our YouTube Channel for WordPress video tutorials. You can also find us on Twitter and Facebook.

The post How to Greet Each User With a Custom Welcome Message in WordPress first appeared on WPBeginner.

10 Best Help Desk Software for Small Businesses 2024 (Compared)

We handle thousands of support queries every day across all of our partner companies, and we’ve used a bunch of different help desk software to do it. While we have first-hand experience with support tools like Groove, Heroic Inbox, and Help Scout, we know that there are plenty of other options suitable for small businesses.

That’s why we’re here to help. We’ve tested lots of help desk software to find the best options for you. While doing so, we paid attention to ease of use, workflow automation, and price.

In this article, we will show you some of the best help desk software on the market.

Best help desk software for small business

An Overview of the Best Help Desk Software

SoftwareStarting PriceBest ForFree Trial/Version?
🥇Groove$4.08/user/moAll-in-one help desk
🥈Heroic Inbox$199.50/yearShared support inbox in WP
🥉Help Scout$20/user/moAdvanced help desk
4HelpDesk$29/user/moAdvanced ticket assignment
5HubSpot$15/moHelp desk + CRM
6Freshdesk$15/user/moOmnichannel support
7Nextiva$23.95/user/moPhone support
8LiveChat$20/user/moLive chat support
9ChatBot$52/moAI chatbot support
10WPForms$49/50/yrContact form support

How Do We Test and Review Help Desk Software?

Here’s what we did to recommend the best help desk software for your small business:

  • Finding out what’s important – First, we looked into the key factors that small businesses prioritize when selecting help desk software (like ease of use and workflow automation). This ensured we could focus on the essentials rather than just fancy features.
  • Trying them out – We actually use some options on the list ourselves for different projects, so we are confident in recommending them. Others are popular options that we tested ourselves. We would not recommend a product that we wouldn’t use.
  • Reading user feedback – We take into account real stories and reviews from people who use the software. This makes sure our suggestions are based on real experiences and situations that people actually encounter.
  • Being honest – If there are any downsides, we will tell you. We want to be straight up about what we find.

Why Trust WPBeginner?

At WPBeginner, our editorial team has over 16 years of experience in WordPress, eCommerce, and online marketing. We dive deep into every plugin or software, test them on real websites, and ensure they meet our high standards before recommending them.

Want to know more about how we do it? Just check out our editorial process.

1. Groove

Groove review: Is it the right help desk for your WordPress website?

Out of all the help desk platforms we have tried, Groove is one of the most affordable and easiest to use. At a small business-friendly price, it offers all the key features you need to provide fast personalized support to your customers.

In fact, we use Groove at WPBeginner to manage our email support needs.

First off, Groove’s intuitive shared inbox allows you to easily manage customer conversations via email, live chat, and even social channels like Facebook Messenger and Instagram. This way, you can be present wherever your users are most active.

Plus, you can easily create a self-service knowledge base that your customers can use 24/7, which helps to reduce support requests.

Groove also includes easy-to-read reports that will help you track the success of your customer support team. It includes important metrics like average first response time, average resolution rate, total resolutions, happiness rate, and much more.

Analyzing your customer support activities using Groove

Pros of Groove:

  • Shared email inbox that can connect to Gmail, Outlook, Office 365, live chat, and social channels.
  • Features to make conversation assignments more efficient, like collision detection to avoid double replies, @mention notifications, and private internal notes for team collaboration.
  • 50+ automation templates and rules to streamline your customer request processes, such as auto-replies, conversation routing, conversation classification, SLA management, and more.
  • AI features to save you more time, such as reply assistance, instant reply creation, conversation summaries, and conversation explanations.
  • Easy-to-use and customizable live chat widget that lets you interact with customers from any page on your site in real time.
  • Integrations with popular apps and tools like Slack, HubSpot, Salesforce, and GitHub, just to name a few.

Cons of Groove:

  • WordPress users can only integrate Groove with their websites using code.
  • If you use the Standard plan, then you cannot customize your knowledge base using your own branding.

Pricing: The Standard plan starts at $4.08 per user per month and includes 2 channels, 2 email inboxes, live chat, and more. There’s also a free 7-day trial with no credit card required.

Why we chose Groove: All in all, Groove offers an excellent end-to-end customer experience for support. You can use it for email support, live chat, and knowledge base all in one user-friendly and affordable platform.

For more details, see our complete Groove review.

2. Heroic Inbox

Heroic Inbox

When reviewing software for this article, we also considered how some WordPress users prefer to manage their customer support processes right in their WordPress admin dashboard. This way, you don’t have to go back and forth between two different platforms.

If that sounds like you, then check out Heroic Inbox. It is the best help desk plugin for WordPress because it lets you manage all your emails and support tickets right from your WordPress admin area.

The best part is that you can add unlimited tickets and unlimited users in one central place. Other options in the list may come with limits, making Heroic Inbox more cost-effective in comparison.

Since everything is done in WordPress, you can simply add existing WordPress users to your inbox so that they can work on their tickets right away. You can also add notes to conversations that are only visible to your team, perfect for coordinating responses.

Adding notes to email tasks

Pros of Heroic Inbox:

  • Unlimited tickets and users with no monthly fees.
  • Ticket history available. You can read previous conversations with the customer so that you have all the key information you need while providing support.
  • Features to save time on repetitive tasks, like saved replies and auto-responders.
  • Read receipts to see when customers have read your messages.
  • WooCommerce integration that allows you to see the customer’s purchases while helping them out.

Cons of Heroic Inbox:

  • During our testing, we found its Gmail setup not as user-friendly as other options because you need to create a Google Workspace app first.
  • Only includes two types of user roles: Mailbox User and Administrator.

Pricing: Heroic Inbox’s plans start from $199.50 per year to use on 1 website. Unlike many other help desk solutions on this list, there are no per-user limits or pricing.

Or you can get the Heroic Bundle Essential for $299.50 per year. It also includes Heroic KB, which lets you create a knowledge base to reduce the number of support tickets you receive.

Why we chose Heroic Inbox: If you’d rather manage your tickets inside WordPress, then Heroic Inbox is the best help desk software for you.

To get the most value for money, we recommend getting the Heroic Bundle so that you can offer customer support via tickets and knowledge base. You can learn more about Heroic Inbox in our HeroThemes review.

3. Help Scout

Help Scout

Help Scout is one of the most popular all-in-one help desk software on the market and for a good reason. It has nearly every feature you need to streamline your customer support process and then some.

Like Groove, Help Scout can help manage all of your chat and email support requests from one place. That way, your customers can reach out using the method they prefer, and your support team can manage requests from a single queue.

You can also speed up support requests by creating saved replies so your team can respond to common questions instantly.

One feature that stood out for us during testing was the SEO options for the knowledge base. Included in all plans, you can create articles in your help center that are optimized for search engines using Help Scout’s automatically generated sitemap.

Pros of Help Scout:

  • Time tracking report to see where your support team is spending the most time so you can improve your customer interaction workflows.
  • The Beacon live chat can recommend knowledge base articles for users to solve problems. If they can’t find a solution, then they can chat with your team.
  • Survey and rating features to collect user feedback on how well your customer support team did.
  • Office hours to enable automatic replies based on your business hours.
  • SMS and phone support are available via integrations.

Cons of Help Scout:

  • With a starting price of $20 per user per month, the price could be a bit expensive for small businesses that are just starting out.

Pricing: The Standard plan starts at $20 per user per month (with a limit of 25 users) and includes 2 shared mailboxes, live chat, 1 knowledge base, and 100+ integrations. A free 15-day trial is available.

Why we chose Help Scout: As a top-rated help desk software, Help Scout offers great essential features and some additional ones that can scale your support team. If you have the budget for it, then we recommend using Help Scout.

4. HelpDesk

HelpDesk website

Do you want to make support ticket assignments easier for your team? If so, then consider HelpDesk.

This tool boasts a clean and user-friendly interface, but we found that its features go beyond the surface. Besides assigning tickets to agents, you can also add ‘followers’ to tickets to ensure non-agent users relevant to the issue stay in the loop.

Plus, you can merge multiple support tickets into a single one. This comes in handy when dealing with duplicate submissions from the same customer or managing related issues under a single ticket.

Additionally, HelpDesk lets you create multiple teams to separate conversations related to sales, customer support, marketing, finance, IT support, and so on. This means each team can concentrate on their own work, but they can also forward tickets easily if they need to.

Pros of HelpDesk:

  • Ticket merging to make handling duplicate tickets and related tickets easier.
  • Ability to create multiple teams, useful for separating conversations based on which team is most relevant to them.
  • Team collaboration tools to handle customer issues like ticket following, collision detection, and agent mentioning.
  • Workflow improvement features like first response time and resolution time to figure out the average speed of responding to a ticket.
  • Simple pricing compared to other options on the list. There is only one starter plan that includes all of the features (except white labeling), and then you need to upgrade to a custom plan.

Cons of HelpDesk:

  • Like Help Scout, HelpDesk’s starting price may seem too expensive for new businesses.

Pricing: For teams, pricing starts at $29 per agent per month and includes a ticketing system, a 60-day chat history, and more. A free 14-day trial is available.

Why we chose HelpDesk: We were impressed by the fact that HelpDesk includes most of the features in the starting plan, including its AI ticket summary and AI text enhancement. Some software makes you upgrade for these, but HelpDesk includes them from the start.

Though it might seem pricey at first, as your business grows, the cost could feel more reasonable. It also integrates with LiveChat and ChatBot, which we will talk more about later in the article.

5. HubSpot

HubSpot marketing automation tools

HubSpot is a well-known all-in-one platform for help desk, marketing, sales, and customer relationship management (CRM). During our testing, we found that HubSpot is a great option for people who want an all-inclusive solution for managing their customer interactions.

With HubSpot’s Customer Platform, a support agent can escalate a support issue to a sales representative, who can then follow up with the customer. This seamless escalation and collaboration can lead to increased sales opportunities and improved customer satisfaction.

HubSpot’s service desk features are also pretty robust. Besides the standard shared inbox and ticketing system, you also get a live chat bundled with a chatbot function to respond to customer questions when your agents are unavailable.

Pros of HubSpot:

  • Connects with other HubSpot products like marketing, sales, and CRM so you can create a seamless customer experience with just one platform.
  • Trackers for important support metrics like ticket volume, agent response time, and more. This helps you see if you are hitting your goals and meeting your customer service level agreements (SLAs).
  • Conversation routing to automatically assign tickets to specific users, such as the least busy agents.
  • Free plan available.

Cons of HubSpot:

  • HubSpot is a versatile platform. However, because it covers so much ground, its help desk features might not be as detailed as some of the other options on the list.

Pricing: A free plan is available for all users. The Customer Platform plans start from $15 per month. You can also get a Starter plan for the service desk only at $15 per month for one seat.

Why we chose HubSpot: HubSpot’s help desk does more than just customer support. It’s also your CRM, marketing, and sales hub. It’s a one-stop solution for managing everything, ideal for those who want simplicity across the board.

Learn more about this platform in our HubSpot review.

6. Freshdesk

FreshDesk

Freshdesk is another popular, cloud-based help desk software option for businesses. It’s very user-friendly, while still offering plenty of advanced features.

First off, the help desk system includes AI automation rules to automatically assign tickets based on certain rules. For example, if the ticket’s subject includes refund-related keywords, then you can automatically route it to the agent specializing in that field.

What stood out to us about Freshdesk is its ticket conversion features. They allow you to convert phone calls, social media direct messages, and even brand mentions into tickets and have your team handle those issues. This allows you to create an omnichannel customer experience.

Pros of Freshdesk:

  • AI automation to improve your customer support workflow and run processes on autopilot.
  • Ticket integration features for converting external messages from various communication channels into tickets.
  • Ability to create a self-service portal through forum support, FAQs, and a help widget.
  • Powerful call center features, like automated AI voice responses.

Cons of Freshdesk:

  • There used to be an official Freshdesk plugin for WordPress, but it’s no longer available.

Pricing: The basic version of the software starts at $15 per month per agent. There is a free version of the support software that supports up to 10 agents, but it only includes ticketing and knowledge base features. A 14-day free trial is available.

Why we chose Freshdesk: Freshdesk can be a great help desk software for people looking for a user-friendly yet powerful tool to assist their customers. While not as cheap as Groove, it’s still much more affordable than more well-known options like Help Scout.

7. Nextiva

Nextiva help desk page

Nextiva is the best business phone service for small businesses. Beyond phone support, they offer a complete multichannel support solution that works great for small business owners and large call centers.

In fact, we use Nextiva at WPBeginner for all of our phone support needs. It helps our teams respond to incoming customer calls from anywhere in the world without using their own personal cell phone numbers.

The integrated help desk solution is also excellent. It lets you communicate across many different channels from a single app including, phone, email, and team messaging.

The ticket management system is straightforward to use, and you can set priorities, send reminders, message your team, and more.

Pros of Nextiva:

  • Features to enhance your customer support processes, such as canned responses, self-service knowledge base, and instant insights about your customers.
  • Like HubSpot, Nextiva offers great integration across different services. If you use their help desk tool, then you can use it together with their business VoIP and sales CRM.
  • Mobile app available for agents to respond to tickets on the go.
  • Powerful phone support features like call forwarding, custom greetings, virtual business phone numbers, analytics, and more.

Cons of Nextiva:

  • Nextiva’s unlimited calling is only available for users in the US and Canada.
  • If you are not interested in phone support, then using Nextiva for your help desk can seem like overkill.

Pricing: Nextiva’s plans start from $23.95 per month per user. You can also use our Nextiva coupon to get a 21% discount.

Why we chose Nextiva: While ticket, chat, and knowledge base support can be helpful, some folks prefer talking over the phone to get direct assistance. We find Nextiva to be perfect for reaching those customers.

For more information, you can read our full Nextiva review.

8. LiveChat

LiveChat website

Do you want to use live chat support as your primary help desk service? Then look no further than LiveChat. This is what we use across all of our eCommerce projects to support our pre-sales staff, and it integrates with HelpDesk.

The setup is really quick and easy. When we went through the setup process, all we had to do was create a LiveChat account, install the LiveChat plugin on WordPress, and sign in through the plugin page. Then, we could see the LiveChat widget right away on our website.

LiveChat also comes with mobile, desktop, and tablet apps across Android and iOS. This way, your support team can answer requests without logging into the WordPress dashboard.

We also like LiveChat’s work hours feature. Agents’ statuses can automatically switch to accepting chats during business hours and not accepting them when offline. This ensures agents can finish ongoing conversations or transfer them to colleagues before going offline.

Pros of LiveChat:

  • Easy to set up on WordPress websites.
  • Work hours settings to transfer chat requests from offline agents to online ones.
  • Customizable LiveChat window to match your website’s branding.
  • Speedy and responsive chat window. It loads faster than many other live chat providers and works across every device.
  • If you use their KnowledgeBase app, you can integrate it with LiveChat to browse and send articles in the chat window.

Cons of LiveChat:

  • Some basic features that you may find in other solutions, like chat tagging, canned responses, and metrics dashboard, are only available if you get a higher-tier plan.

Pricing: The plans start from $20 per month per person. A 14-day free trial is available. You can also use our LiveChat coupon to get an exclusive 30% discount.

Why we chose LiveChat: We’ve been using LiveChat for our own projects, so we are confident it will be a good fit for those who want to use chat support for their help desk. It’s easy to set up in WordPress and won’t slow down your website.

Learn more about this help desk software in our complete LiveChat review.

9. ChatBot

ChatBot Review: Is is the right chatbot plugin for your WordPress website?

Live chat and ticket support are great, but they require human agents to operate and maintain. At times, you may not have the resources to hire users or the time to actually respond to customer questions.

This is where ChatBot can come in handy. This AI chatbot software makes it easy for small businesses and startups to create chatbots that answer questions at all times. This process can make your customer service more effective, and free up time for your support staff.

We use ChatBot in several of our SaaS businesses to handle pre-sales questions and forward users to our live support team if necessary.

ChatBot also integrates easily with WordPress, WooCommerce, LiveChat, HelpDesk, and/or your customer service software of choice.

Pros of ChatBot:

  • Drag-and-drop builder to create a customer support chatbot quickly.
  • Industry-specific chat templates to help you develop a unique chatbot based on user questions and scenarios.
  • Standalone AI (no relations to OpenAI, Bard, or Bing AI), so your data will be secure.
  • Features to improve your chatbot’s accuracy, like training them using unmatched queries and tracking changes you’ve made to your chatbot.

Cons of ChatBot:

  • Any additional chat that is not included in your plan will cost $0.03 per chat.

Pricing: It starts at $52 per month billed annually for up to 1,000 monthly chats, and goes up from there. There’s a 14-day free trial included in every plan, so you can see if chatbots work for your business.

Why we chose ChatBot: This help desk software is an excellent option if you don’t have the resources to hire assistants but still want to offer chat support. You can also use it to complement your existing support options so that you are always available 24/7.

10. WPForms

WPForms Site

If you want to create a contact form to submit tickets, then check out WPForms. It’s the best contact form plugin for WordPress and is used on over 6 million websites. We use WPForms here on WPBeginner and across all of our other websites.

You can use the drag-and-drop builder and the customizable support ticket template to create a contact form quickly.

The free version of the plugin lets you build a basic contact form and includes spam protection, email notifications, and more.

The pro version of the plugin takes these features even further and turns th plugin into a useful service desk tool. It lets you create more advanced forms with conditional logic, form abandonment functionality, geo-location, and more.

Pros of WPForms:

  • User-friendly form submission management dashboard, so you can quickly respond to customer queries in WordPress.
  • Instant form notifications that automatically send you an email when a user submits a form. You can notify yourself or your team members in charge of customer support.
  • User journey addon that lets you see what your visitor did on your website before submitting a form. This makes it easy to see where your user got stuck so you can resolve their issue faster.
  • Tons of software integrations, including service desk, HR software, project management tools, marketing automation tools, and more.

Cons of WPForms:

  • Since WPForms is mainly a contact form plugin, its built-in features are not as comprehensive as other help desk solutions.

Pricing: The Basic plan starts at $49.50 per year and has features for simple form creation. But to get access to user journey reports, advanced integrations, and more, the Pro plan is $199.50 per year.

You can also use our WPForms coupon code to get 50% off.

Why we chose WPForms: If you have a small business website and just need a simple ticket submission solution, then WPForms can be a great start. It also integrates with popular service desk software like Freshdesk.

You can learn more about this plugin in our WPForms review.

What Is the Best Help Desk Software for a Small Business?

If you are looking for the overall best help desk software solution, then Groove is our top recommendation. It offers an affordable and easy-to-use customer support platform with a shared inbox, automation features AI assistance, and customizable live chat.

Alternatively, if you want a help desk plugin to manage all of your support tickets right from the WordPress dashboard, then we recommend Heroic Inbox. With features like saved replies, WooCommerce integration, and no per-user limits, it’s a cost-effective solution for managing customer support.

For a more popular choice, Help Scout could be the right help desk software for you. It comes at a higher price tag than Groove, but it has the essential and advanced features to improve your customer support.

Help Desk Software: Frequently Asked Questions

Now that we’ve discussed the best help desk software for a small business, let’s answer some frequently asked questions:

What is help desk software?

Help desk software is a tool that helps businesses manage their support team and respond to customers’ requests for help. It includes features like creating tickets for problems, sending automatic answers, and connecting with other tools to make support easier.

Is a help desk a CRM?

No, a help desk is not a CRM system. While both are tools used in customer service, they serve different purposes and have distinct functionalities. A help desk is focused on providing technical support to users, while CRM helps businesses manage their interactions with current and potential customers.

Which is the best ticketing system for small businesses?

The best ticketing system for small businesses is Groove. The price is affordable compared to most options on the market. Still, it has all the features you need, such as a shared inbox and efficient ticket assignment with collision detection and private internal notes.

Ultimate Guides for Your Business Help Desk

We hope this article helped you find the best help desk software for your business. You may also want to see our picks of the best email marketing services for small businesses and our guide on how to choose the best WordPress hosting.

If you liked this article, then please subscribe to our YouTube Channel for WordPress video tutorials. You can also find us on Twitter and Facebook.

Disclaimer: Aside from the top help desk software on this list, we also looked at other providers like Zoho Desk, Jira Service Management, LiveAgent, Hiver, HappyFox, Zendesk Support, and more.

However, we decided not to list them to help you avoid choice paralysis so you can quickly find the best software option for your needs.

The post 10 Best Help Desk Software for Small Businesses 2024 (Compared) first appeared on WPBeginner.

14 Best WooCommerce Sales Funnel Plugins to Boost Your Conversions

Are you looking for the best WooCommerce sales funnel plugins to boost your conversions?

There are many WooCommerce plugins out there to help you optimize your sales funnel, so you can make more money from your existing traffic.

In this article, we’ve hand picked some of the best WooCommerce sales funnel plugins you can use to increase conversions.

14 best WooCommerce sales funnel plugins to boost your conversions

Why Use WooCommerce Sales Funnel Plugins?

WooCommerce makes it easy to create an online store, but the default features and settings aren’t built to help you sell more products.

On average, only 10% of shoppers will add anything to their carts. After they do, 60-80% of them abandon their carts without finishing the purchase.

Luckily, there are all kinds of WooCommerce plugins to help you boost conversions, so you can make more sales from your existing traffic. Using WooCommerce sales funnel plugins can help your store in a lot of ways.

  • Recover sales from users abandoning their carts
  • Stay in touch with customers via email marketing
  • Create store pages to promote best-selling products
  • Offer coupon codes to bring in more sales
  • And much more

With that said, let’s look at some of the best WooCommerce sales funnel plugins that you can use with your WooCommerce store.

1. SeedProd

SeedProd

SeedProd is the best drag and drop WordPress page builder in the market used by over 1 million websites.

It’s very easy to use and has a collection of pre-made templates and blocks that will help you customize your WooCommerce product pages, checkout pages, and more.

SeedProd WooCommerce blocks

By creating custom pages for your WooCommerce store, you can improve conversions, promote popular and related products, and make more money.

Plus, it works with any WooCommerce theme, so you can create custom product pages, checkout pages, and more, without any limitations.

There is a free version of Seedprod you can use to create beautiful landing pages. However, the WooCommerce blocks are only available in the pro version of the plugin.

2. OptinMonster

OptinMonster

OptinMonster is the best WordPress popup plugin and lead generation tool in the market used by over 1 million websites.

It helps you convert your abandoning website visitors into new customers and email subscribers.

You can use OptinMonster to boost your conversions, reduce shopping cart abandonment, show targeted website messages, grow your email list, and much more.

OptinMonster has a ton of built-in popup features that can help you boost sales easily.

For example, you can create floating header or footer bars perfect for announcing ongoing sales, free shipping, sale countdown timers, and other special offers.

Floating header bar

Plus, every popup can be customized to display based on the rules you decide. For example, you could set your countdown timer to only appear during checkout, or only show a sales banner on a certain product category.

You can even create popups that will display based upon the visitor’s location. Plus, you can gamify popups with the spin the wheel feature, and much more.

Spin the wheel popup example

For more details, see our guide on how to create a WooCommerce popup to increase sales.

Note: You can get a free version of OptinMonster to get started through WordPress.

3. MonsterInsights

MonsterInsights

MonsterInsights is the best analytics solution for WooCommerce stores.

It’s incredibly easy to set up and comes with enhanced eCommerce tracking, which gives you more insights you can use to optimize your funnel and make more sales.

Plus, all of this information is displayed directly in your WordPress dashboard. You don’t need to sort through the complex Google Analytics reports to find what you’re looking for.

WooCommerce analytics report

You can also get a detailed breakdown of your shopping cart activity, the total number of purchases, top performing products, and more.

This helps you make data-driven decisions to grow your business and quickly see if the changes you’re making are helping to improve your store’s conversions.

WooCommerce cart report

For more details, see our step by step guide on how to setup WooCommerce conversion tracking.

4. WooFunnels

WooFunnels

WooFunnels is an easy to use WooCommerce sales funnel builder. It lets you create lead pages, checkout pages, order bump pages, upsells, downsells, and more.

It has dozens of different templates you can use to create your sales funnel pages in a couple of clicks.

You can easily customize every page of your funnel with the drag and drop builder. WooFunnels also includes built in customer reporting, so you can track customer and order data.

5. TrustPulse

TrustPulse

TrustPulse is the best social proof plugin for WooCommerce that helps you improve conversions and get more sales.

When potential customers are close to making a purchase, they’ll see a notification from other customers who have just made a purchase. By adding social proof, you give your visitors a nudge to complete their purchase.

TrustPulse example

TrustPulse makes setting up this kind of notification incredibly easy. You can install it on any WordPress website without code and customize the notifications to match your brand and website design.

There are advanced targeting options, so you choose the products and pages to run the campaign.

For more details, see our guide on how to use FOMO to increase conversions.

6. CartFlows

CartFlows

CartFlows is a feature rich WooCommerce sales funnel builder that helps you optimize your WooCommerce checkout process.

It includes a variety of templates and lets you create custom pages for every part of the sales process, including thank you pages, checkout pages, and more.

Once you activate the plugin, it’ll automatically replace the default WooCommerce checkout with a checkout process optimized for conversions.

Plus, it integrates with most popular WordPress page builders like Divi, Beaver Builder, etc to easily customize the templates and pages.

7. LiveChat

LiveChat

LiveChat is the best live chat support software in the market. It lets you easily add live chat to your WooCommerce store and instantly respond to questions.

This makes it easy to help your visitors move forward with their purchase and avoid abandoned carts. Plus, the chat window can be fully customized to match your brand.

It also integrates with top email marketing, WooCommerce CRM, and customer support tools.

The live chat apps work across mobile, tablet, and desktop devices, so you can answer questions on the go, without having to login to your WordPress dashboard.

For more details, see our guide on how to add LiveChat to your WooCommerce store.

Alternative: If you’re looking for chatbot software, then check out ChatBot.com to fully automate your WooCommerce live chat.

8. Nextiva

Nextiva

Nextiva is the best business phone service in the market that works seamlessly with WooCommerce.

Adding a business phone number to your online store will help improve credibility and trust, while boosting your store conversions.

Since it’s a virtual business phone app, you can use it to receive calls on your mobile phone, tablet, and desktop computer.

It offers advanced enterprise level features at an affordable price like call routing, auto-attendant, and more.

Once you’ve set up your business VOIP, you can add a free click-to-call button to your store, so customers can reach your team with a single click.

Alternative: RingCentral and Ooma are good business phone alternatives.

9. WP Mail SMTP

WP Mail SMTP

WP Mail SMTP is the best WordPress SMTP plugin in the market used by over 2 million websites. It helps to ensure that all of your WooCommerce emails are delivered to your customer’s email inboxes.

WooCommerce will send email notifications to the store owner and customers when certain actions are taken in your store.

But, many WordPress hosting companies haven’t set up the email function correctly, and some even block it from happening. In this case, your store emails will not send.

WP Mail SMTP fixes this problem and uses an SMTP service provider to send emails. This ensures your emails will actually be delivered to your user’s inbox and not go to the spam folder.

The free version of WP Mail SMTP will work for most WooCommerce stores. The premium version, WP Mail SMTP Pro, gives you access to premium support, a white glove set up service, and even more features.

10. Advanced Coupons

Advanced Coupons

Advanced Coupons is the best WooCommerce coupon code plugin in the market. It expands the default WooCommerce coupon functionality and helps you boost sales by offering attractive coupons for your visitors.

It easily integrates perfectly with WooCommerce and lets you create BOGO offers (Buy One Get One), scheduled coupons, auto apply coupons, shipping coupons, and more.

You can even get started with the free version of the plugin to test out different coupon offers and see how it impacts your online store.

For more details, see our guide on how to create smart coupons in WooCommerce.

11. Easy Affiliate

Easy Affiliate

Easy Affiliate is the best affiliate tracking and management plugin for WooCommerce.

It lets you easily create an affiliate program for your online store, so your customers can promote your products.

When someone joins your affiliate program, they’ll get a unique link and will earn a commission whenever a sale is made through their link.

It’s fully customizable, and you can control who is allowed to join your affiliate program and the payment options you want to offer.

Easy Affiliate also includes reporting, so you can track sales, payments, link clicks, and more.

For more details, see our guide on how to add an affiliate program in WooCommerce.

12. WPForms

WPForms

WPForms is the best contact form builder in the market used by over 4 million websites. It’s very beginner friendly and lets you create contact forms to answer your customer’s questions and resolve issues.

You can choose from the collection of 100+ prebuilt templates to quickly create the exact kind of form you need.

WPForms templates

You’ll find templates for user feedback forms, polls, surveys, and more. Then, you can simply customize the form with the easy to use drag and drop builder.

The free version of WPForms lets you create simple contact forms, but if you want to create more advanced forms, then you’ll need the premium version of WPForms.

13. PushEngage

PushEngage

PushEngage is the best web push notification software in the market used to send over 9 billion push messages every month.

It lets you connect with your visitors and customers after leaving your online store with targeted push messages. These are messages that will display in your subscriber’s browser even when they’re not browsing your store.

For example, if a customer adds items to their cart and leaves before making a purchase, then you can send an abandoned cart notification to improve conversions.

You can also send out information about product webinars, flash sales, coupons, and much more.

There’s also a free version of the plugin that lets you send messages to up to 500 subscribers.

For more details, see our guide on how to add web push notifications to WordPress.

14. Constant Contact

Constant Contact

Constant Contact is the best email marketing service for WooCommerce businesses. It’s packed with features while still being beginner friendly, so you can easily add it to your store and start building your email list.

With this tool, you can easily manage your email subscribers and deepen your relationship with your customers.

Every plan gives you access to unlimited emails, tracking and reporting, list segmentation, and much more.

It has dozens of professionally designed email templates built for specific niches, so you can quickly start creating your own email campaigns.

WPBeginner readers can use our Constant Contact coupon code to get 20% off your plan.

Alternative: HubSpot, SendinBlue, and Drip are great alternatives for WooCommerce email marketing.

15. Bonus: Uncanny Automator

Uncanny Automator

Uncanny Automator is the best automation plugin for WooCommerce. It acts as a connector between your WooCommerce store and other apps, so they can talk to each other without you writing any code.

It’s very easy to use and comes with all kinds of automated workflows you can set up in a couple of clicks.

With Uncanny Automator, you can automate many WooCommerce tasks to save time and offer your customers a better user experience.

For example, you can automatically send SMS notifications to your customers and send order data to Google Sheets for better customer tracking.

There are dozens of other automations you can create to help you run your online store more efficiently.

We hope this article helped you find the best WooCommerce sales funnel plugins to boost your conversions. You may also want to see our guide to creating a free business email address and creating an email newsletter the right way.

If you liked this article, then please subscribe to our YouTube Channel for WordPress video tutorials. You can also find us on Twitter and Facebook.

The post 14 Best WooCommerce Sales Funnel Plugins to Boost Your Conversions appeared first on WPBeginner.

9 Best Customer Service Software for Business in 2021 (Compared)

Are you looking for the best customer service software for your business?

Using the right customer service software can streamline your customer support workflow and help you create better customer relationships.

In this article, we’ve hand picked some of the best customer service software that you can use along with your WordPress site. We’re using these tools in our various businesses to help deliver top-notch customer support.

9 best customer service software for business in 2021 (compared)

Why Use Customer Service Software?

Customer service software makes it easy for your business to provide a great customer experience. This leads to improved customer retention, which means more revenue for your business over the long run.

As your WordPress website or online store grows, it can be hard to maintain high customer satisfaction, but the customer service software makes this easy.

Since customers will make or break your success, investing in the right support software stack can give you a competitive advantage.

The best customer service software:

  • Enables you to deliver a faster and more consistent support experience
  • Lets you gather customer insights and data to improve your business
  • Allows you to scale up your customer support easily as your business grows
  • Helps you build a more efficient customer service team

That being said, let’s take a look at the top customer support software that you can use along with your small business website.

1. Help Scout

Help Scout

Help Scout is one of the best all in one customer support tools. It’s packed with nearly every feature you need to streamline your customer support processes.

Note: we use Help Scout here at WPBeginner and across all of our other businesses for our email support needs.

It lets you simply manage your email and chat support from a single tool. This lets your customers contact you from where they feel the most comfortable, and your team can work from a single support queue.

Your customer support team can create saved replies, so they can quickly respond to common questions and save time.

There’s a knowledge base feature that lets you build your own help center. This makes it easy for your customers to find the answers they need on their own while reducing the number of support requests.

Help Scout also provides detailed reporting data and metrics, so you can quickly get an overview of what’s working and where your team can improve. Their time tracking report helps you see where your agents are spending the most time, so you can improve your product workflows to improve time to resolution.

For business owners who want to add more support channels, there’s a live chat feature available. It’s not as powerful as other market leading live chat software, but it can be a good solution for many businesses.

Help Scout Live chat feature also known as Beacon has a self-service answer feature that recommends articles to your users. If they can’t find an answer, then they can quickly start chatting with your team.

Plus, there are over 40 integrations with tools your business is using like HubSpot, Slack, Google Apps, WooCommerce, and more.

Pricing: An affordable Basic plan starts at $20 per user per month. This provides 3 mailboxes, live chat, and more. Bigger teams can opt for the Plus plan that starts at $35 per user per month.

2. LiveChat

LiveChat

LiveChat is the best live chat software in the market today. It’s very flexible and feature rich, plus there’s a WordPress plugin that makes it easy to integrate with your website.

The LiveChat apps are very easy to use and work across mobile, desktop, and tablet devices. So, you don’t have to be logged in to WordPress to access your customer service hub.

You can set up LiveChat to work during your team’s off hours so that live chat requests will go directly to your support ticket management system.

Note: we use LiveChat across all of our eCommerce businesses to support our pre-sales staff. Their customization options make it easy to match the chat window to our company branding.

One stand out feature of this service is speed. The chat window loads much faster, has a better user experience, and works across every device. A lot of other live chat providers can’t match this.

When it comes to customer support, speed is essential, and this tool shines.

It integrates with nearly all the marketing services you’re already using, like Google Analytics, HelpDesk, and HubSpot.

You’ll find many additional tools to elevate support quality like visitor tracking, smart API that integrates with your knowledge base, and proactive chat.

The thing that we absolutely love about Live Chat is that they focus on sales conversion. They have built-in conversion tracking, and they have additional tools to help you get more leads / sales.

Pricing: You’ll find different plans for all businesses sizes. The starter plan begins at $16 per agent per month for a yearly plan, or $19 monthly. Every plan has a 14 day free trial to test out the service.

Deal: WPBeginner readers can get 30% off the first payment by using our LiveChat coupon code.

3. Nextiva

Nextiva

Nextiva is the best business phone service provider in the market today. They also offer a customer service CRM that’s very simple and easy to use.

It offers your business multichannel support including, email, phone, live chat, social media, and SMS messaging. You can view customer data from every source in a single dashboard.

Plus, you can respond to inquiries from one place, no matter how your customers reach you.

If you’re using other Nextiva services like Nextiva business VoIP or the Sales CRM, then these can integrate instantly.

You’ll find other features like call routing, a self-service knowledge base, canned responses, and a mobile app.

Note: we use Nextiva at WPBeginner for all of our phone support needs. If you need to offer phone support, then it’s the best option available.

There are a ton of other powerful features to help your phone support team as well, like call forwarding, call routing, custom greetings, call analytics, virtual business phone number, and a lot more.

Nextiva is a perfect platform for both small businesses as well as large call centers who’re looking for a customizable solution to help automate their sales and support contact center.

Pricing: The plans start at $18.95 per month for between 20-99 users. If you want support for SMS and additional integrations, then the Pro plan starts at $22.95 per month.

4. ChatBot.com

Chatbot.com

ChatBot.com is the best chatbot software in the market today. It make it easy for small business owners to unlock the power of AI chatbots to improve customer service.

It’s effortless to create your customer service chatbot with the drag and drop interface.

You can also use one of their pre built templates created specifically for your industry. You can use these conversation templates to develop your unique chatbot based on common questions and scenarios.

In the past, making a chatbot was very difficult, but this tool makes it very easy.

Adding a chatbot to your customer service workflow can make your customer support system more effective.

Your chatbot can handle simple requests and ask your users preliminary questions, then forward this to your team for a more detailed response.

Note: we use ChatBot.com in several of our SaaS businesses. It lets us automate portion of our pre-sales questions while seamlessly forwarding our support requests to our live support teams when needed.

ChatBot also integrates easily with both WordPress and WooCommerce. Plus, it integrates with your live chat software of choice, along with dozens of other popular apps.

Pricing: The starter plan is $50 per month and gives you up to 1,000 chats per month. Pricing and the number of chats scale up from here. Every plan has a 14 day free trial, so you can see if it’s right for your business.

5. FreshDesk

Freshdesk

FreshDesk is another very popular customer service solution. It’s packed with features while still being intuitive and easy to use.

It’s an all-in-one tool and can bring all of your support channels together in one place. You’ll find live chat support, chatbots, modern messaging, omnichannel support, automation features, and more.

The ticketing system has features like a team inbox for fast and easy collaboration and problem solving. You can also route support tasks based on team member availability.

You’ll find a wealth of reporting data to help refine your support service over multiple channels, including social media.

There are plenty of additional customer self service tools like a chatbot, help widget, forum support, and more.

For business owners and startups on a budget, a free version of the tool that supports an unlimited number of agents is available. However, it only offers basic ticketing and knowledge base functionality.

Pricing: The basic version of the help desk software starts at $15 per month. Full omnichannel plans start at $79 when billed annually, or $99 when billed monthly.

Note: We have used Freshdesk in the past for few of our businesses, but over time have switched everything to Help Scout, so we can centralize our processes.

6. HelpDesk.com

HelpDesk

HelpDesk is a very easy to use customer support software. The interface is incredibly clean and intuitive.

It can help you and your team manage tickets simply. You can manage emails, customer requests from contact forms, and more, all in one place.

Plus, there are advanced ticketing, sorting, and tagging features to prioritize what’s most important.

The team collaboration features let you create multiple mailboxes, add private notes to ticket threads, and create agent groups.

There are automation features available, like canned responses, automated task assignments, and fully automated workflows.

You can also integrate HelpDesk with LiveChat, so you can solve support tickets and talk to customers in chat from one app.

Beyond that, there are various other integrations like Slack, Zapier, HubSpot, Salesforce, and more that you can use to improve your workflow.

Pricing: The Starter plan is $5 per month per user, while the Team plan is $24 per month and adds the ticketing system and support for larger teams. There’s also a 14 day free trial for you to test out the service.

7. HubSpot

HubSpot

HubSpot offers small business owners a wide range of tools to grow and improve customer interactions. They have one of the best CRMs for small businesses and offer an excellent customer support software solution.

The support software is an all-in-one solution and has a ton of different tools. You’ll find help desk software and a ticketing system to keep track of long-term support requests.

There’s also knowledge base software to help your customers quickly resolve their problems.

On top of that, there’s live chat and chatbot functionality for real-time communication with your customers.

The free plan is free forever and has all the features you need to help your customer support staff.

Plus, everything integrates with the HubSpot CRM, so it’s easy to start using this software if you’re already using the CRM software for managing customer relationships.

Pricing: The entry level plan is free forever. The Starter plan begins at $45 per month and gives you access to more automation tools and support for a bigger team.

8. WPForms

WPForms

WPForms is the best contact form plugin for WordPress used by over 4 million websites. Not only is it the most beginner friendly form plugin, but it’s very powerful and packed with features.

Note: we use WPForms on WPBeginner and all of our other websites.

You can use the drag and drop builder to simply create a contact form for your users to submit a support request.

The free version has basic contact form features, including basic form fields, spam protection, email notifications, and more.

The pro version extends these features and makes it a more helpful customer service tool. You can create forms with conditional logic, geo-location, form abandonment, and much more.

You can see all of your form submissions directly in your WordPress dashboard, making it easy to manage requests. You can even have these requests sent to the right team member in charge of support.

There’s also instant form notification, which will automatically email you when a user submits a form. You can choose to notify yourself or your entire team.

The user journey reports addon lets you see what your visitors did on your site before submitting a request. This can help you resolve their issue faster and see where they got confused.

WPForms lets you connect your forms with over 3000+ other software integrations including most marketing automation tools, project management software, service desk, human resources (HR software), and more. This makes it easy for you to streamline your workflow and save time.

Pricing: For simple form creation, the Basic plan starts at $39.50 per year, however, to get access to advanced integrations, user journey reports, and more the Pro plan is $199.50 per year.

9. Slack

Slack

Slack is a popular communication and team collaboration tool for remote teams, businesses, and bloggers. However, it also can be used as a unique customer service management solution and support channel.

It can be a great way to offer VIP support for your enterprise customers and clients. It provides a very open and collaborative environment, which can help you resolve the issue quickly and move forward on big projects.

Note: we offer VIP support through private Slack channels and receive enterprise support the same way. It’s one of the most effective remote communication tools.

With various integrations available, you can also pair this tool with another support software on this list. You can drop support team issues into Slack to have team members collaborate easily.

You can also integrate Slack with WordPress to receive website notifications, like form entries, directly in Slack. For more details, see our beginner’s guide on how to integrate Slack with WordPress.

There’s an advanced AI powered search feature to find documents and past conversations quickly. You can also bring in team members from different departments all in one place.

Best of all, it’s very cost effective. You can create communication channels for your important clients and customers and add them as guests, which is entirely free.

Pricing: The free plan should be enough for most businesses. The Pro plan is $8 per month and offers more secure outside collaboration. Businesses that require enhanced communication security can opt for the Business plan for $15 per month.

What is the Best Customer Service Software (Expert Pick)?

In our expert opinion, there are a several services that can qualify for the best customer support software title, but it depends entirely on your needs.

If you need the best email support software, then Help Scout is the best option.

If you want a live chat tool to provide instant customer support, then LiveChat is the best choice.

If you are looking for a customer support phone system with addon features like live chat, then Nextiva is perfect.

If you like the idea of live chat support, but would prefer to automate with a chatbot, then ChatBot.com is a great choice.

If you were going to choose just one customer service software to support your business, then we recommend using Help Scout.

Besides the stand out email tools, you can also add live chat, create a knowledge base, plus integrate with popular tools like Slack, WooCommerce, and more.

Aside from the top customer service software on our list, we also looked at other providers like Zendesk, Salesforce, Zoho Desk, LiveAgent, and more.

However, we decided not to list them, so you can avoid choice paralysis and quickly find the best customer service software for your business.

We hoped this article helped you find the best customer service software for your business. You may also want to see our list of the best SEO tools to increase your traffic and our expert picks of the must have WordPress plugins for business websites.

If you liked this article, then please subscribe to our YouTube Channel for WordPress video tutorials. You can also find us on Twitter and Facebook.

The post 9 Best Customer Service Software for Business in 2021 (Compared) appeared first on WPBeginner.

How to Speed Up Your eCommerce Website (14 Proven Tips)

Do you want to speed up your eCommerce website?

Speed is crucial for the success of an eCommerce site. It not only improves customer experience, but it directly impacts conversions and sales.

In this guide, we’ll show you how to easily speed up your eCommerce store to improve performance and conversions.

Improving eCommerce website speed

Why Speed Matters for Your eCommerce Store

Speed is extremely important when it comes to user experience. No one likes a slow website, a slow computer, or a slow app.

But for online stores, a slow website can actually costs you business.

For instance, a study found that a single-second delay in page load time results in 7% loss in conversions, 11% fewer page views, and 16% decrease in customer satisfaction.

StrangeLoop study

In simpler words, slow websites can lead to lower sales.

Now apart from user experience and sales, eCommerce site speed also affects your SEO rankings. Search engines like Google consider speed as an important user experience indicator and ranking factor.

In fact, Google’s page experience search update is solely focused on user experience metrics like bounce rate and website speed. A faster eCommerce website will help you bring more free traffic from search engines.

That being said, let’s take a look at how to easily bump up your eCommerce store speed and performance.

Here is a quick overview of the topics we’ll cover in this guide.

1. Choose a Better Ecommerce Hosting Provider

All eCommerce performance optimization you make to your website will have little impact if you don’t have a good eCommerce hosting provider.

Not all WordPress hosting companies are the same. For better performance, you need to choose an eCommerce hosting provider that does the following:

  • Provides a stable and up-to-date platform to host your eCommerce store.
  • It is optimized for WordPress, WooCommerce, or any other eCommerce plugin that you may want to use
  • Their servers are optimized for speed and performance. This means built-in caching, security, and other features to improve performance

We recommend using SiteGround. They are one of the officially recommended WordPress hosting providers.

SiteGround servers run on Google Cloud Platform which is known for high performance. They have built-in caching and even have their own optimization plugin that automatically implements many of the performance tips that we’ll recommend later in this article.

If you are looking for alternatives, then check out our list of best WooCommerce hosting providers.

After setting up your eCommerce store on a good hosting service, you can implement the following optimization tips to boost performance.

2. Install a WordPress Caching Plugin

WooCommerce is a dynamic eCommerce platform. This means all your product data is stored in a database and product pages are generated when a user visits your website.

To do this, WordPress needs to run the same process each time. If more people visit your eCommerce store at the same time, then it will slow down and may even crash.

A caching plugin, helps you fix that issue.

Instead of generating pages each time, a caching plugin shows user a cached version of the HTML page. This frees up your server resources and allows it to run more efficiently thus improving website loading time.

How caching works in WordPress

There are some great WordPress caching plugins available, and popular WordPress hosting companies like SiteGround and Bluehost offer their own caching systems.

We recommend using WP Rocket. It is the best WordPress caching plugin on the market with the most beginner-friendly settings.

Unlike other WordPress caching solutions, WP Rocket doesn’t wait for users to visit a page to generate a cached version. Instead, it automatically prepares a cache of your website and keeps it up to date.

With the right WP Rocket settings, you can easily get near perfect scores in speed test tools like Pingdom, GTMetrix, Google Pagespeed Insights, and more.

For details and instructions, see our article on how to install and set up WP Rocket in WordPress.

Top WordPress hosting companies, like SiteGround and Bluehost offer their own caching solutions too.

SiteGround SG Optimizer

SiteGround allows you to easily turn on caching on your eCommerce store by using their SG Optimizer plugin.

This all-in-one performance tool includes caching, performance tweaks, WebP image conversion in WordPress, database optimization, CSS minification, GZIP compression, and more.

Simply install and activate the SG Optimizer plugin in WordPress. For more details, see our step by step guide on how to install a WordPress plugin.

Upon activation, click on the SG Optimizer menu in your WordPress admin sidebar to access plugin settings. From here, you need to turn on the Dynamic Caching option.

Turn on caching in SiteGround

Turn on Caching on Bluehost

Similarly, Bluehost also allows you to use its built-in caching system for optimizing WooCommerce. Simply login to your Bluehost dashboard and go to My Sites page. If you have multiple sites, then select your site and then switch to the Performance tab.

Bluehost caching levels

From here you can select a caching level for your website. For instance, you can choose eCommerce but if your website still remains slow then you can come back here and increase the caching level.

3. Use Latest PHP Version

WordPress and WooCommerce are both mainly written in the PHP programming language.

With each new version, PHP improves in performance and becomes faster. It also fixes bugs and patches security issues that may compromise your website’s stability and speed.

This is why you should always use the latest PHP version.

You can find out your eCommerce store’s PHP version by visiting Tools » Site Health in your WordPress dashboard and switching to the ‘Info’ tab.

Site Health in WordPress

From here, you need to click on the ‘Server’ section to expand it, and you’ll be able to see the PHP version used by your server.

PHP version in WordPress site health

If your website is running on a PHP version lower than 8.0, then you should reach out to your hosting provider and ask them to update it for you.

For more details, see our article on how PHP updates impact your website.

Note: Some managed WordPress hosting companies like SiteGround have built their own Ultrafast PHP to improve overall server response time. Others are using PHP FastCGI to help customers improve eCommerce speed.

4. Latest Version of WordPress & WooCommerce

WordPress and WooCommerce developers spend a significant amount of time on improving performance during each development cycle. This makes both apps run more efficiently and use fewer server-side resources.

Each new version also fixes bugs and strengthens security which is crucial for an eCommerce business.

As the store owner, it is your responsibility to make sure that you are using the latest version of WordPress, WooCommerce, other plugins, and your WordPress theme.

Simply go to Dashboard » Updates page to install all available updates.

Installing updates

5. Optimize Product Images for Performance

Product images are one of the most visually important things for an online store. Better product images keep customers engaged and can help boost sales conversion.

This is why it’s important to add high-quality product images. However, you need to make sure that large image file sizes are properly optimized.

There are two ways to optimize product images for the web without losing quality.

First, you can optimize each product image on your computer before uploading it to your website. This requires image editing software like Adobe Photoshop, Affinity, Gimp, etc.

Most of them have an option to export an image for the web. You can also adjust the quality of the image before saving it for upload.

Export for web in Adobe Photoshop

Alternately, you can use an image compression plugin for WordPress. These plugins automatically optimize your product image size for better site performance.

Aside from image compression, the image file type you choose can also help. For example, JPEG images are better for images that have a lot of color, whereas png images are better for transparent images.

6. Use a DNS Level Website Firewall

Brute force and DDoS attacks are common internet nuisances. Basically, hackers try to overload your server to break in, steal data or install malware.

Most hosting companies have basic safeguards that protect your websites from such attacks. However, one downside of these attacks is that they make your website loads extremely slow.

This is where you need a Website Application Firewall (WAF).

Now, common WordPress firewall plugins run on your own webserver. This makes them a little less efficient as they cannot block suspicious attacks until they reach your server.

On the other hand, a DNS-level firewall is able to filter your traffic on the cloud and block suspicious attacks even before they reach your website.

Website firewall

We recommend using Sucuri. It is the best WordPress firewall plugin with a comprehensive security suite.

Sucuri also comes with a powerful CDN (content delivery network). A CDN serves your website’s static content (images, stylesheets, JavaScript) from a global network of servers. This further reduces your server load and improves overall site load time.

If you are looking for a free option, then Cloudflare free CDN gives you basic level DNS firewall protection.

7. Choose a Better WordPress Theme

Choose better eCommerce theme

WordPress themes control the appearance of your eCommerce store. However, not all of them are optimized for performance and often add too much clutter which makes your website slower.

When choosing a WordPress theme for an eCommerce store, you need to find the balance between functionality and speed. Theme features like sliders, carousels, web fonts and icon fonts can slow down your website.

We recommend going for a simple theme and then use plugins to add the features you need. This gives you better control over both the performance and appearance of your online store.

WordPress themes by StudioPress, Elegant Themes, and Astra are all optimized for performance. For more individual theme recommendations, see our expert pick of the best WooCommerce themes for WordPress.

8. Use Better WordPress Plugins

One of the most often asked questions by WordPress beginners is that how many plugins they can use on their store without affecting performance?

The answer is as many as you like.

The total number of plugins does not affect the performance of your online store. It’s the quality of code that does.

A single poorly coded WordPress plugin may load too many scripts or stylesheets that could affect page load speed.

On the other hand, a well coded plugin would use standard best practices to minimize the performance impact. We recommend testing your plugins for performance impact before and after installing them.

We also maintain a list of must have WooCommerce plugins where we hand-picked essential WooCommerce plugins used by most online stores.

For example, the SeedProd drag & drop landing page builder helps you build blazing fast eCommerce landing pages without writing any code.

SeedProd Page Builder

For more on this topic, see our guide on how to choose the best WordPress plugins. It has a step by step process on how to evaluate WordPress plugins and picking the right one for your online store.

9. Reduce External HTTP Requests

A typical eCommerce page contains several components. For instance images, CSS and JavaScript files, video embeds, and more.

Each such component is separately loaded by users’ browsers by making an HTTP request to your server. More HTTP requests mean longer page load times.

Your server may also be fetching things from third-party tools and services like Google Analytics, social media retargeting, and other services. These are called external HTTP requests. These can take even longer to finish on a typical web page load.

It is ok to have these scripts on your WordPress website, but if they are affecting your website’s performance, then you need to consider reducing them.

You can view external HTTP requests by visiting your website and opening the Inspect tool in your browser. From here, switch to the Sources » Page tab to view all external HTTP requests.

External HTTP requests

10. Reduce Database Requests

WordPress and WooCommerce use database to store a lot of content and settings. Your WordPress theme and plugins also make database queries to fetch and display that information on screen.

Database queries are extremely fast, and your website can run hundreds of those in mere milliseconds. However, if your website is handling a traffic spike, then these queries can slow down your page load time.

You can check the database calls by using a plugin like Query Monitor in WordPress. Upon activation, the plugin will add the query monitor menu into your WordPress admin bar.

Query monitor menu

However, minimizing these requests may not be possible for beginner-level users. For instance, you may need to modify your WordPress theme to reduce database calls.

If you are comfortable editing your WordPress theme files or debug code, then you can look for database calls that can be avoided.

Other users, can try finding a better WordPress theme and alternate plugins to reduce database calls if needed.

11. Optimize WordPress Database

Over a period of time, your WordPress database may get bloated with information that you may not need anymore.

This clutter can potentially slow down database queries, backup processes, and overall WordPress performance. From time to time, it’s important to optimize your WordPress database to declutter unnecessary information.

Simply install and activate the WP Sweep plugin. Upon activation, simply go to Tools » Sweep to clean up your WordPress database.

WordPress database optimization

For more on this topic, see our article on how to optimize WordPress database for speed and performance.

12. Use Staging Sites to Track Performance Issues

Making changes to a live eCommerce store can cause issues. For instance, a customer may loose their order, or your site may go down during a sale event.

A staging site helps you easily try out performance optimization tips, new plugins, or a theme without affecting your live store.

Basically, a staging site is a clone of your live website that is used for testing changes before making them live.

Many popular WordPress hosting companies offer 1-click staging site set up. Once set up, you can try your changes and track your page load speed and performance.

Once you are ready to implement those changes, you can simply deploy staging site to the live version.

For step by step instructions, see our tutorial on how to create a staging site for WordPress.

13. Offload Ecommerce Emails

Offload eCommerce emails

Emails play a very important role on an eCommerce store. They are used to deliver order confirmations, invoices, password reset emails, sales and marketing messages, and more.

However, many beginners don’t realize this and use their hosting provider’s limited email functionality for eCommerce emails.

Most hosting companies don’t support the default WordPress mail function. Some even disable it to prevent spam and abuse.

This is why you need to use a dedicated SMTP email service provider along with the WP Mail SMTP plugin. These companies specialize in sending mass emails and ensure higher deliverability, which means your emails don’t end up in the spam folder.

We recommend using SMTP.com as one of the best SMTP service provider for transactional emails.

It is easy to set up and works with WooCommerce and all top WordPress contact form plugins. Plus, they offer a 30-day free trial with up to 50,000 emails.

If you want to look at others, then do check out Sendinblue or Mailgun.

14. Use Better Conversion Rate Optimization Tools

When it comes to eCommerce website, conversion rate optimization (CRO) is important for increasing sales.

A typical online store has many dynamic elements to increase conversions such as free shipping bar on homepage, black friday sale countdown timer in website header, exit-intent popup on checkout pages, or even spin a wheel gamification on mobile site to reduce abandonment.

Free shipping bar example

Often store owners and retailers use a combination of tools and plugins to add these dynamic elements. The challenge is that not all of them are properly optimized for speed.

This is why it’s important to choose conversion optimization tools that offer a suite of features in one platform, so you’re not loading multiple external scripts.

Below is a list of popular conversion optimization tools that we use on our eCommerce websites:

  • OptinMonster – it’s the most powerful conversion optimization toolkit that lets you create personalized popups, gamification campaigns, floating bars, and more.
  • LiveChat.com – it’s the best live chat software. They also offer ChatBot automation software as well that works for both WooCommerce and Shopify.
  • TrustPulse – it’s the best social proof software in the market that’s optimized for speed. You can use it to show real-time user activity without slowing down your site.

When it comes to analytics and A/B testing tools, we recommend only using what’s absolutely needed.

For example, if you’re launching a new landing page or website design, it’s important to run heatmap analytics. However after a short period of analysis, we recommend disabling heatmaps so it doesn’t slow down your website speed.

Similarly for A/B testing tools, you don’t need to run those scripts on every page of your website. You can selectively load A/B testing scripts on specific pages, and when you’re done with the test, don’t forget to remove the script.

We hope this article helped you speed up your eCommerce website. You may also want to see our WordPress security handbook or check out our WooCommerce SEO guide to get free traffic from search engines to your online store.

If you liked this article, then please subscribe to our YouTube Channel for WordPress video tutorials. You can also find us on Twitter and Facebook.

The post How to Speed Up Your eCommerce Website (14 Proven Tips) appeared first on WPBeginner.

6 Best Email Capture Tools Compared for 2020 (+ Best Practices)

Do you want to capture the email addresses of your website visitors?

Over 70% of first time visitors will never return to your website again. Getting their email address is the smartest way to keep in touch and get them to visit again.

In this article, we’ll compare some of the best email capture tools for WordPress and share the best practices to help you get results fast.

The best WordPress tools for email capture

What is Email Capture and Why Does It Matter?

Email capture is the process of collecting email addresses from people who come to your website.

Studies show that an email list can offer as high as 4300% return on investment (ROI). But simply creating an email list isn’t enough.

You need to actively capture email addresses from the visitors of your WordPress website. This allows you to turn visitors into email subscribers and soon after into paid customers.

Of course, you can encourage people to like your page on Facebook, follow your Instagram, and other social media platforms, but all smart marketers agree that capturing an email address should be your #1 priority.

That’s because your email newsletter will reach a far higher percentage of your audience than Facebook or Instagram posts because it’s not controlled by an algorithm.

With that said, here are some of the best tools for email capture in WordPress and beyond.

1. OptinMonster

The OptinMonster website

OptinMonster is the best lead capture software on the market. It helps you convert abandoning visitors into email subscribers, so you can get more leads from your existing website traffic.

With OptinMonster, you can create a whole range of high converting dynamic lead forms including popups, floating bars, full screen welcome mats, slide-in scroll boxes, inline personalized lead forms, gamified spin to win optin forms, and more.

The best part about OptinMonster is that it lets you show the right message at the right time, so you can get the highest conversions.

For instance, you could make a lead form popup that uses OptinMonster’s Exit Intent® technology to detect when a visitor is about to leave your site.

Your popup can offer the visitor an incentive to put in their email address. This could be a coupon, free shipping, a free download, or a sample of a digital product.

There are lots of other ways to use OptinMonster on your site. You can create a gamified ‘Spin to Win’ lead form or add Yes/No multi-step optins. These campaigns can significantly increase the number of people signing up for your email list.

You can also use OptinMonster to create full-screen welcome mats, lock premium content so that visitors need to subscribe to view it, add countdown timers to leverage urgency, use smart tags to add website personalization, and more.

OptinMonster comes with dozens of pre-made templates that you can easily customize with their drag & drop builder. You can also create custom forms without writing any code.

OptinMonster makes it easy to integrate your email optin campaigns with your favorite email marketing service and analytics platforms like Google Analytics. This lets you run detailed reports and see exactly how your different email optins are performing.

Each month, OptinMonster helps optimize over 2 billion sessions for smart website owners. There’s not a tool in the market that offers more targeting and personalization options, and this is why all the top marketers prefer OptinMonster.

Price:

OptinMonster costs from just $9/month (billed annually). For powerful features like Exit Intent®, countdown timers, and Yes/No optins, you need the Pro plan. That costs from $29/month (again, billed annually).

OptinMonster is a SaaS platform, so it works on WordPress as well as other platforms like Shopify, BigCommerce, and other website builders.

2. WPForms

The WPForms website

WPForms is the best contact form plugin for WordPress. Over 3 million website owners use their drag & drop form builder to create lead capture forms.

You can use WPForms to create all sorts of different forms, including email subscription forms, payment forms, polls, surveys, and more. Each form can be setup, so it capture users’ email addresses and add it to your CRM.

WPForms lets you use conditional logic so that certain fields are shown based on options that the user has selected. For instance, if you have a survey form, you might have different questions that you show based on whether the user is interested in fashion or food.

The plugin seamlessly integrates with a range of popular email marketing services and CRM platforms including Drip, AWeber, GetResponse, Active Campaign, Salesforce, MailChimp, and more.

Their Form Templates addon comes with over 150+ pre-made form templates that you can use to create a form with literally 1-click. These templates include: online event registration, newsletter signup form, contest entries, requesting a quote, suggestions, food ordering, and more.

Even better, all the forms created by WPForms are mobile-friendly. That means they work perfectly on mobile devices as well as on computers.

Price:

WPForms costs from $39.50/year. To get features like newsletter forms and integration with popular email marketing tools, you need the Plus plan. That costs from $99.50/year.

3. LiveChat

The LiveChat website

LiveChat is one of the best live chat software in the market. It lets you add a live chat feature to your site so that visitors can easily ask questions. This can be a powerful way to boost sales.

When a visitor starts a chat, they’ll be prompted to enter their email address. This means you can easily answer their question by email if there’s no customer service agent available to answer it live.

LiveChat also integrates with a range of email marketing services. You can simply add a checkbox to the pre-chat questionnaire that lets users opt-in to receive your email newsletter.

Best of all, LiveChat integrates with other smart services such as ChatBot.com. This lets you create AI chatbots that can answer customers’ questions on the spot. Chatbots can also capture email addresses and automatically pass these onto your email marketing service or CRM.

Price:

LiveChat costs from $16/month, billed annually. There’s a 14 day free trial. WPBeginner users can get an extra 30% off and a 30 day free trial using our LiveChat coupon.

4. Bloom

The Bloom plugin on Elegant Themes' website

Bloom is a plugin from Elegant Themes that lets you create attractive popups. It has a drag and drop builder that’s easy to use.

With Bloom, you get a range of different types of popups as well as in-line forms that you can place within or below your content.

It integrates with 19 different email marketing services, including Constant Contact, Active Campaign, AWeber, Get Response, and more.

One key drawback to Bloom compared with OptinMonster is that it’s a standalone WordPress plugin that loads all the code from your website. If you have a large, busy website, this could affect your site’s speed and performance.

Price:

Bloom comes packaged with Elegant Themes’ other tools, including the Divi theme and page builder. Membership of Elegant Themes costs from $89/year.

5. ThriveLeads

The ThriveLeads plugin on the ThriveThemes' website

ThriveLeads is another lead building WordPress plugin, similar to OptinMonster and Bloom. It lets you create a range of different email optin forms, including popups, sticky ribbons that stay at the top of the screen, forms you can place within your content, and more.

It’s easy to integrate ThriveLeads with a range of popular email services. It comes with built-in basic A/B testing and analytics, too. This lets you see which of your email optins are performing well.

Like Bloom, ThriveLeads loads all the code from your website itself. This could slow your site down. It’s also not quite so beginner-friendly as OptinMonster and Bloom.

Price:

ThriveLeads costs from $67 for a single site license. Alternatively, you can get it as part of ThriveThemes membership for $19/month (paid annually). This gives you access to all ThriveThemes’ themes and plugins.

6. Formidable Forms

The Formidable Forms website

Formidable Forms is a powerful forms plugin for WordPress. It lets you create all sorts of different types of forms, including calculator forms and lead quizzes.

You can use Formidable Forms to capture email addresses and integrate with your email marketing service or CRM platform.

The easiest way to do this is to use the built-in newsletter signup template. If you want something more specialized, you could try the event registration form template or the B2B leads form template.

Formidable Forms integrates with a range of popular email services, including Constant Contact, AWeber, Get Response, Active Campaign, and more.

It also lets you style your forms to look just how you want. Formidable is extremely powerful which can be a little overwhelming if you’re a beginner, but once you familiarize yourself with the software, then it’s extremely powerful.

Price:

Formidable Forms costs from $99.38/year. For integration with some tools including Constant Contact and Get Response, you need the Business plan from $199.43/year.

Best Practices for Email Capture

Once you’ve chosen a tool for email capture, you need to make sure you’re using it effectively.

Here are 3 key best practices for email capture that you need to follow:

1. Give Your Visitors a Reward for Signing Up

If you want people to hand over their email address, you need to give them something in return.

That could be a coupon for your online store, a useful PDF, a free sample of your video course, or almost anything else that fits with your online business.

For instance, Blog Tyrant offers new readers a downloadable guide:

Blog Tyrant's ultimate blogging toolkit offer

You can take this even further by offering different rewards on different pages for your site. You might offer a coupon to people who are visiting your online store and a free download to people who are browsing blog posts.

2. Don’t Annoy Your Visitors

Sometimes, email optin popups get a bad reputation. You might have come across popups that were annoying and got in your way when you visited a website.

There are plenty of ways to use popups while also letting visitors enjoy your site. For instance, you could use OptinMonster’s Exit Intent® technology to only show a popup at the moment when a visitor is about to leave. That way, your popup isn’t interrupting them as they read your content.

Here’s the popup that appears on WPBeginner when a new visitor moves to leave the site:

WPBeginner's exit intent popup, offering videos, plugins, and more

This email capture form helped us increase our conversions by over 600%.

3. Use Multiple Optins

It’s easy to create a single popup or email sign up form and think that you’re done. But to capture more emails, you need more optin forms.

Some of the best places to put your optins are:

  • At the top or bottom of your page as a sticky bar, or in the bottom right corner of your page as an unobtrusive slide-in.
  • During your content. You could place an optin part way through a blog post, for instance.
  • At the end of your content. You could add an optin at the bottom of your posts and pages.
  • In your sidebar. This is such a common place for an email list optin that visitors will often look there for it, without any prompting from you.

For example, Smash Balloon has an email optin displayed prominently in their blog’s sidebar:

Email optin in Smash Balloon's sidebar

Remember, you can also create different popups to appear on different pages. This lets you tailor each popup to your content.

We hope this article helped you learn about the best tools for email capture in WordPress. You may also want to see our comparison of the best business phone services and our beginner’s guide on how to create a custom business email address.

If you liked this article, then please subscribe to our YouTube Channel for WordPress video tutorials. You can also find us on Twitter and Facebook.

The post 6 Best Email Capture Tools Compared for 2020 (+ Best Practices) appeared first on WPBeginner.

12 Best Lead Generation WordPress Plugins (Powerful)

Are you looking for the best lead generation WordPress plugins?

Using the right lead generation tools can help you get more customers and sales faster so that you can grow your business.

In this article, we will share some of the best lead generation WordPress plugins to help you improve your marketing.

Best Lead Generation WordPress Plugins (Powerful)

What Is Lead Generation, and Why Does It Matter?

Lead generation means getting the interest of prospective customers. It can be done in several different ways.

On your website, lead generation might mean getting visitors to:

  • Join your email newsletter.
  • Submit a contact or inquiry form on your website.
  • Contact someone at your company through live chat.
  • Talk to a chatbot (automated chat).
  • Call your sales team, or book a call with them.

Lead generation is essential for all online businesses. Of course, it’s also important to have a strong process for converting the leads into customers. However, most businesses struggle to get enough leads in the first place.

Even if you run a nonprofit, lead generation matters. It can help you get more donations and more support.

Our goal with this list is to share the absolute best WordPress lead generation plugins that you can use to grow your business faster.

Unlike other best lead generation tool lists, we are not just sharing a list of plugins that do the same thing. Instead, we’re focusing on lead generation from a holistic point of view.

For each lead generation solution category, we share an expert pick along with one alternative option for that category. This will help us keep this list comprehensive without causing choice paralysis.

With that said, here are the best lead generation plugins for WordPress.

1. WPForms

WPForms

WPForms is the best contact form plugin on the market. Over 6 million website owners use the beginner-friendly, drag-and-drop builder to create any kind of online form for their WordPress sites.

It comes with over a hundred pre-built form templates you can use as a starting point. After that, you can customize the form to match your needs using the drag-and-drop form builder interface.

Here are just some of the lead generation forms you can create:

WPForms also integrates with your favorite email marketing services and CRM providers. This lets you automatically add leads to your email list.

Each time someone submits the form, you will automatically get an email notification. You can easily turn this off if you prefer not to receive email alerts. WPForms will store each completed form entry in your WordPress database too.

It’s also possible to send notifications to multiple recipients using WPForms. For example, you might want to send a customer inquiry notification to a specific person in the sales team and their supervisor.

Price:

WPForms pricing starts at $49.50/year. There’s also a free version of the plugin, which has limited features.

Alternative:

Formidable Forms ($39.50 per year) is a good alternative to WPForms. It has powerful tools that let you create different forms, including lead generation calculators. However, it’s not as beginner friendly as WPForms.

2. OptinMonster

OptinMonster

OptinMonster is a powerful lead generation and popup plugin that you can use on your WordPress site.

It lets you create high-converting popups and email signup forms that help you turn abandoned website visitors into subscribers and customers.

It has lots of useful features, including Exit Intent® technology. This lets you show your popup at the exact moment when someone is about to leave your site.

You can combine it with their page targeting feature to show customized popup messages for each page on your site, which is proven to increase conversions.

With OptinMonster, you even get special popups like spin the wheel popups and Yes/No optins. These can boost your conversion rate even further.

OptinMonster Spin Wheel Campaign

There are lots of different professionally designed templates included in the app. This makes it quick and easy to create your lead forms using the drag-and-drop builder.

You can also use OptinMonster to generate leads in other ways. For instance, you might use the content-locking feature to ask visitors to join your email list before they can read your full content.

You don’t necessarily need to use it to generate email leads, either. You could add a click-to-call button to your popup, use it to show special discount codes, and more.

Price:

OptinMonster starts at $9/month when billed annually. To get advanced features like Exit Intent technology and Yes/No forms, you need the Pro plan from $29/month.

Alternative:

Thrive Leads ($99 per year) is a good alternative to OptinMonster. It offers a range of different types of lead generation forms and popups. It also has a built-in template library to speed up the building process.

3. SeedProd

SeedProd website builder

SeedProd is the best WordPress website and theme builder on the market. It’s used by over a million website owners to easily create any type of website without writing any code.

It has dozens of professional templates you can customize easily with the drag and drop builder.

SeedProd also provides you with a beginner-friendly landing page builder. And you will find a ready-made sales page, opt-in page, webinar registration, coming soon page templates, and more.

All of these landing page templates can be completely customized to help you start generating leads as quickly and easily as possible.

Customize SeedProd

It includes dozens of blocks designed to help you build better landing pages, like testimonial blocks, countdown timers, CTA buttons, pricing tables, and so much more.

You will find a searchable stock photo library with over 2 million photos that you can add to your pages to improve conversions.

It also has powerful integrations with the top email marketing software and thousands of third-party apps via Zapier. This lets you easily send your leads to your lead management tool of choice.

For online store owners, you can use the WooCommerce blocks to build custom WooCommerce product pages easily, thank you pages, and more to collect leads and sell more products.

Price:

SeedProd starts from $39.50 per year (only $3.29 per month). Plus, there’s a free version you can try to see how the plugin works.

Alternative:

Instapage offers similar page builder features but is more expensive and starts at $199 per month (billed annually).

4. LiveChat

Live Chat Inc Website

LiveChat is the best live chat software for WordPress websites. It’s very easy to set up, and you can integrate it with dozens of other marketing services.

By adding live chat support to your WordPress website, you can build a better relationship with your users and convert more visitors into customers.

This plugin places a chat button in the bottom right-hand corner of your website. Visitors can click on this to chat with your team in real time.

Plus, your support team members don’t need to log in to WordPress to use LiveChat. Instead, they can use the LiveChat app on their laptop or mobile devices.

LiveChat will create a support ticket if a visitor contacts your team outside of support hours.

LiveChat is fast and easy to use for your visitors and your support team. It lets you quickly turn leads into customers by answering pre-sales questions straight away.

Price:

LiveChat starts at $20 per month when billed annually with a 14-day free trial. Our LiveChat coupon gives you an extended 30-day free trial plus a 30% discount.

Alternative:

Brevo (Previously Sendinblue) offers a simple, free live chat feature that you can use on your website. It also offers email, SMS, and a CRM tool that integrate with live chat.

5. ChatBot

ChatBot

ChatBot is one of the best AI chatbot software options on the market and lets you use automated live chat to connect with your potential customers and respond to questions 24/7.

To help you get started quickly, ChatBot has lots of pre-designed templates. For instance, you can use the lead generation bot to book calls. Meanwhile, the sales bot template allows you to sell products directly from the chat window.

ChatBot can be used in Facebook Messenger as well as on your website. That makes it a great option for companies and organizations that get a lot of inquiries through Facebook.

It’s easy to integrate it with other apps, such as LiveChat. A live agent can step into the conversation seamlessly if needed.

Price:

ChatBot pricing starts at $52 per month. There’s a 14-day free trial available.

Alternative:

Hubspot offers a suite of business CRM tools, including a chatbot builder and live chat. You can get started free, and paid plans start at $30 per month.

6. RafflePress

RafflePress

RafflePress is one of the best WordPress giveaway plugins on the market. It allows you to easily create viral giveaways and contests that you can use to grow your website traffic and email list.

You can use the drag and drop builder to quickly create giveaway campaigns in minutes without writing any code. Plus, there’s a built-in template library to help make giveaway creation even faster.

A unique refer-a-friend feature lets you do word-of-mouth marketing by letting users share your contest on their social media profiles.

This helps to build engagement and can get you a lot of new visitors to your WordPress blog.

You will find many other powerful features that help improve your campaigns, like email verification, fraud protection, social logins, giveaway landing pages, success tracking, and more.

Plus, your giveaways will run on mobile devices, so you can reach your visitors no matter where they happen to be.

For more details, see our guide on how to run a giveaway/contest in WordPress.

Price:

RafflePress has a free version of the plugin you can use to get started. Paid plans start at $39.50 per year for the starter plan.

Alternative:

Gleam is an advanced giveaway platform you can use to run contests and giveaways. However, it’s not as beginner friendly, and you will need at least the $97 per month Pro plan to unlock useful features.

7. PushEngage

PushEngage

PushEngage is the best web push notification software on the market, used by over 10,000 companies, including Harvard, Dominoes, and Business Insider.

It lets you easily send targeted push messages to visitors after they leave your website.

We use push notifications here at WPBeginner, and they are consistently a top 5 source of our traffic. They are a highly-effective way to convert website visitors into loyal followers and customers.

Visitors simply give their permission to receive push notifications by clicking a button:

An example of a push notification optin on the WPBeginner website

You can set up push notifications to automatically send out to your subscribers whenever you publish a blog post or use them to send completely custom messages.

It’s a very easy-to-use solution for beginners to advanced users. You will find powerful features like A/B testing, custom-triggered campaigns, interactive messages, custom drip campaigns, and so much more.

Plus, you can use the marketing automation features to create abandoned card sequences, scheduled messages, and more.

You will be able to see a detailed breakdown of your subscriber engagement and even the transactional revenue generated from your push campaigns.

Price:

PushEngage starts at $9 per month and gives you support for 100,000 subscribers and unlimited campaigns. There’s also a free plan available that gives you 30 campaigns per month for 200 subscribers.

Alternative:

OneSignal has a free plan for unlimited notifications on mobile. For advanced features like delayed notifications, pricing starts at $99 per month.

8. FunnelKit

FunnelKit homepage

FunnelKit, formerly known as WooFunnels, is the best sales funnel builder for WordPress.

You can use it to create lead-generation funnels, sales funnels, high-converting checkout pages, one-click upsells, and more.

It’s essentially a ClickFunnels alternative that helps you convert website visitors into leads and customers.

FunnelKit comes with a built-in library of beautiful funnel templates that you can import in one click.

FunnelKit templates

You can easily customize the templates using the WordPress block editor as well as popular page builder plugins like Elementor, Divi, and others.

FunnelKit offers in-depth analytics so that you can see how your funnels are performing in real time. Plus, it comes with A/B testing that lets you experiment with different versions of your funnels to find out which one converts best.

In addition, FunnelKit has a marketing automation solution called FunnelKit Automations. It allows you to set up automated email and SMS campaigns for lead nurturing, welcome series, abandoned cart recovery, post-purchase upsell, and more.

Price:

FunnelKit starts at $99.50 per year. To access FunnelKit Automations, you need at least the Professional plan, which costs $249.50 per year.

Alternative:

SeedProd, which we mentioned earlier in this list, can also be used to easily create lead generation pages, sales pages, custom WooCommerce checkout pages, and more.

9. WP Call Button

WP Call Button

WP Call Button allows you to easily add a ‘click to call’ button on your WordPress website or WooCommerce store. Visitors can simply click or tap the button to call you straight away.

If your customers need to call you before purchasing a service or booking an appointment, adding a click-to-call button on your website will increase your leads and sales.

It can also be used to easily set up business call forwarding.

WP Call Button makes adding your button to any post or page easy. You can include it in your WordPress sidebar, too. It’s also easy to create a sticky floating call button that stays visible all the time.

Price:

WP Call Button is free and works with all top business phones and business VoIP providers.

Alternative:

You can also create a click-to-call link using the manual method covered in our article on adding a click-to-call button in WordPress.

10. AffiliateWP

AffiliateWP

AffiliateWP is one of the best affiliate tracking and management solution for WordPress. It lets you simply create your own fully featured affiliate program on WordPress.

By creating an affiliate program, you can have your own team of affiliates promoting your products in exchange for a commission.

This can help you get more visibility online, traffic, and of course, make more sales. You can even create your very own WooCommerce affiliate program using this plugin.

It comes with everything you need to manage your program, including accurate affiliate tracking, integrated payouts, real-time reporting, affiliate coupon tracking, and so much more.

With manual affiliate approval and top-performing affiliate data, you can build lasting partnerships with your most valuable affiliates for years to come.

Price:

AffiliateWP starts at $149.50 per year and has everything you need to run a successful affiliate program.

Alternative:

Easy Affiliate is another popular WordPress plugin for creating and managing an affiliate program. The basic plan starts at $99.50 per year.

11. All in One SEO

All in One SEO

All in One SEO is the best WordPress SEO plugin used by over 3 million websites. It’s the most comprehensive SEO toolkit that makes it easy to improve your SEO rankings without learning any complicated SEO jargon.

Doing WordPress SEO is an important part of lead generation. You need to bring people to your website before they can join your email list, call you, subscribe to push notifications, or do anything else on this list.

Once you install and activate the plugin, an easy-to-use setup wizard will help you choose the best SEO settings for your business, so you can start getting more traffic.

It has a TruSEO score, which offers detailed on-page SEO analysis and gives you an actionable SEO checklist to help you easily optimize your posts and pages.

AIOSEO checklist

All in One SEO can help you improve your post SEO titles and meta descriptions, generate rich snippet schema markup and create smart XML sitemaps and RSS sitemaps.

Plus, there are built-in WooCommerce SEO settings, like individual product optimizations, product image SEO, and more, to help your online store get more visitors from the search results.

Price:

AIOSEO starts at $49.60 per year for access to advanced SEO features. You can also try out the free version to begin optimizing your site for SEO.

Alternative:

Yoast SEO is another popular SEO plugin for WordPress that will help you optimize your site. There is a free version and a premium version that starts at $99 per year.

12. MonsterInsights

The MonsterInsights Google Analytics plugin

MonsterInsights offers a powerful way to add Google Analytics to your WordPress website. It lets you quickly and easily see crucial statistics about your site and find your most important pages.

This means you can easily find out what’s working and what’s not, focusing on the areas that really matter.

For instance, you might use MonsterInsights to enable author tracking and see which writers for your site are producing the best-performing posts.

Or you could use MonsterInsights to track link clicks and button clicks. This lets you figure out which links and buttons are getting clicked and which ones aren’t, letting you pinpoint areas for improvement.

MonsterInsights is quick and easy to set up and gives you real-time stats. It can even track things like your eCommerce data, form completions, and file downloads. This gives you more insights into your lead generation efforts.

Price:

MonsterInsights starts at $99.50/year. There’s also a free version available for WordPress with limited features.

Alternative:

ExactMetrics offers similar features to MonsterInsights and starts at $99.50 per year.

Bonus: Nextiva

Nextiva

Nextiva is the best business phone service for small business owners in terms of features and ease of use.

If your business relies on phone calls for lead generation, then Nextiva can help you improve your business communication across the board.

It has a web-based admin panel that will let you manage your entire unified communications platform in one place.

You will find business phone features like call routing, voicemail to text and email, SMS messaging, unlimited domestic calling, online faxing, and so much more.

Every new account can get a free local or toll-free number. Plus, you get all standard features like caller ID, call forwarding, routing, custom greetings, and more.

You can even integrate your business phone with powerful features like live chat and CRM services.

We use Nextiva at WPBeginner for our business phone service. It works well for our remote team since they can receive business calls on their cell phones while still keeping their numbers private.

Price:

Nextiva starts at $14.95 per month per user for all your business phone needs. The Enterprise plan costs $26.95 per month per user and includes video conferencing, call recording, and more.

Alternative:

RingCentral is another popular business phone provider that’s packed with features. Paid plans start at $20 per month per user.

What Is the Best Lead Generation Plugin for WordPress?

We believe you need multiple plugins for a robust lead-generation strategy on your site.

With that said, WPForms is the best lead generation plugin for WordPress. You can use their drag-and-drop form builder to create any online form.

If you are looking for a live chat solution to improve leads and support, then LiveChat and ChatBot are both great options.

If you want to improve your overall conversion rate on your website, then nothing beats the powerful features that OptinMonster has to offer.

If you want to improve your existing website and product pages to generate more leads and make more sales, then SeedProd is a must-have plugin.

With any lead generation strategy, attracting leads is only the first part. You have to ensure a proper sales process to close the deal.

If you rely on phone calls, then we recommend using Nextiva. It comes with auto-attendant, call-routing, CRM, and powerful sales features that you can use to increase your sales.

To summarize, our top lead generation tools are:

  1. WPForms
  2. OptinMonster
  3. SeedProd
  4. LiveChat.com
  5. ChatBot.com
  6. Nextiva

We hope this article helped you learn about the best lead-generation plugins and tools for WordPress.

You might also want to see our other guides that can help you generate new leads and turn them into customers.

Best WordPress Guides for Lead Generation

If you liked this article, then please subscribe to our YouTube Channel for WordPress video tutorials. You can also find us on Twitter and Facebook.

The post 12 Best Lead Generation WordPress Plugins (Powerful) first appeared on WPBeginner.