How to Create a “Sticky” Floating Footer Bar in WordPress

Are you looking for a way to create a sticky floating footer bar in WordPress?

A sticky floating footer bar stays visible on your website even when users scroll down on your page. It can help you promote discount offers or social media handles, which can reduce the bounce rate and get more conversions.

In this article, we will show you how to easily create a sticky floating footer bar in WordPress, step by step.

Create a "Sticky" Floating Footer Bar in WordPress

What Is a Floating Footer Bar in WordPress?

A sticky floating footer bar allows you to prominently display important content and news to users.

This bar remains visible to visitors at all times, so they are more likely to click on it and discover more useful content.

WPForms floating footer bar preview

You can use the floating footer bar to:

  • Drive more clicks to other blog posts.
  • Generate leads and build your email list.
  • Bring attention to special coupons or discount offers/sales.
  • Promote your social media accounts.
  • Build brand recognition.
  • Provide access to important resources on your WordPress website.

Having said that, let’s see how to easily create a sticky floating footer bar in WordPress. We will show you two methods in this tutorial, and you can use the links below to jump to the method of your choice:

You can easily create a sticky floating footer bar with OptinMonster. It is the best lead generation and conversion optimization tool on the market that makes it super easy to convert your website visitors into subscribers.

OptinMonster comes with a drag-and-drop builder and premade templates that allow you to create a floating footer bar, slide-in popups, and banners without using any code.

We recommend this method because OptinMonster is super easy to use and offers more customization options than the free plugin method.

Step 1: Install OptinMonster on Your Website

First, you will need to sign up on the OptinMonster website by clicking on the ‘Get OptinMonster Now’ button.

The OptinMonster lead generation tool

Next, you must install and activate the free OptinMonster connector plugin on your website. For more instructions, see our beginner’s guide on how to install a WordPress plugin.

Upon activation, the OptinMonster setup wizard will open up on your screen, where you have to click the ‘Connect Your Existing Account’ button. This will connect your WordPress site with your OptinMonster account.

Connect your existing account

Once you do that, a new window will open up on your screen.

Here, click the ‘Connect to WordPress’ button to move ahead.

Connect OptinMonster to WordPress

Step 2: Create And Customize the Floating Sticky Footer Bar

Now that you have connected OptinMonster with your website, it’s time to create a sticky floating footer bar.

To do this, you need to visit the OptinMonster » Templates page from the WordPress admin sidebar and select ‘Floating Bar’ as the campaign type.

Once you do that, all the premade templates for the floating bar will load on the screen. From here, you can click the ‘Use Template’ button on the one you want to use.

Choose a premade template for a floating sticky footer bar

This will open the ‘Create Campaign’ prompt on the screen, where you can add a name for the floating footer bar that you are about to create. It can be anything you like, as the name won’t be displayed to your visitors.

After that, just click the ‘Start Building’ button.

Add a name for your floating sticky footer bar

OptinMonster’s drag-and-drop builder will now be launched on your screen, where you can start customizing your floating footer bar. Here, you will notice a floating bar preview on the right with blocks in the left column.

For example, you can use a countdown timer block if your floating footer bar is promoting a discount offer. This will help create a sense of urgency among users and encourage them to take action.

You can also add a CTA, video, or social media block to the footer bar. For detailed instructions, you can see our tutorial on how to create an alert bar in WordPress.

Add blocks to customize your floating footer bar

You can also edit text on the footer bar by clicking on it. This will open the block settings in the left column, where you can adjust them according to your liking.

For example, if you want to change the discount offer in the template, then you can change the button text. After that, you can select the ‘Redirect to a URL’ option and add the page link that you want users to be directed to upon clicking on the button.

Change button text in the footer bar

Step 3: Configure The Display Rules For Your Floating Footer Bar

Once you are satisfied with your footer bar’s customization, just switch to the ‘Display Rules’ tab from the top.

Here, you can configure when to display the bar on your page. If you want to display the floating footer bar at all times, then you must select the ‘time on page’ option from the left dropdown menu.

After that, choose the ‘is immediate’ option from the dropdown menu on the right.

Configure display rules to display the floating footer bar at all times

However, to display the floating footer bar on a specific page, you must select the ‘Page Targeting’ option from the right dropdown menu.

After that, choose the ‘exactly matches’ option from the dropdown menu in the middle and then add a page URL. Once you do that, the floating footer bar will only displayed on the page you chose.

Configure page targeting for floating footer bar

Additionally, you can select the ‘Exit Intent’ option to show the sticky floating footer bar when the user is about to leave your site. You can then configure the exit intent sensitivity and choose the devices where the footer bar will be displayed. This can be handy if you want to reduce your bounce rate.

You can even select the ‘Visitor’s Device’ option if you only want to display the floating footer bar to desktop visitors.

Configure exit intent technology for footer bar

You can also configure the display rules according to the date, time, or scroll distance by selecting the ‘When’ option from the left column.

For an explanation of more display rule options, you can see our complete OptinMonster review.

Step 4: Publish Your Floating Footer Bar

Once you have defined the display conditions for your footer bar, switch to the ‘Publish’ tab from the top.

Here, simply click the ‘Publish’ button.

Publish floating footer bar

After that, don’t forget to click on ‘Save’ to make your changes live.

Now, you can visit your WordPress blog to see the sticky floating footer bar in action.

Sticky floating footer bar preview

Alternative: You can also use Thrive Ultimatum to show a countdown timer floating footer bar on your website. For more details, see our Thrive Themes Suite review.

Method 2: Create a Sticky Floating Footer Bar With a Free Plugin

If you are looking for a free way to create a sticky floating footer bar, then this method is for you. However, keep in mind that you will have limited customization options compared to OptinMonster.

First, you need to install and activate the Firebox Popup Builder plugin. For detailed instructions, see our tutorial on how to install a WordPress plugin.

Upon activation, visit the Firebox » Campaigns page from the WordPress dashboard and click the ‘+ New Campaign’ button.

Click + New Campaign button

This will open the Firebox campaign library, where you can search for sticky floating bar premade templates.

Next, simply click the ‘Insert’ link under the floating footer bar that you like. Keep in mind that if you select a header bar, then you won’t be able to change its position. You must ensure the template you select is for a footer bar.

Click the Insert link under a template

The block editor will now open up on your screen, where you can start by adding a name for your floating bar.

After that, you can edit the text in the footer by clicking on it and add new blocks by clicking the ‘+’ button. This will open the block menu, where you can add images, headings, paragraphs, videos, quotes, or list blocks.

For instance, if you want to add social media handles, then you can choose the Social Icons block. After that, you can add social media accounts and links using the block panel.

For more details, you can see our tutorial on how to add social media icons in WordPress menus.

Add blocks in the floating footer bar from the block menu

You can also change the text in the button block and add a link to the page where you want to direct users by clicking on the link icon in the block toolbar.

After that, type in the URL of your choice and press ‘Enter’.

Add a link for the button

Next, you can scroll down to the ‘Firebox Settings’ section.

Here, you can change the background color, text color, alignment, size, padding, and margin for the floating footer bar.

Configure floating footer bar design

After that, switch to the ‘Behaviour’ tab from the left column and select ‘Page Load’ as the floating bar trigger point.

Then, use the ‘Delay’ slider to choose a delay timing for the floating bar. For example, if you drag the slider to 15 seconds, then the floating footer bar will be displayed once the user has spent 15 seconds on your site.

If you want the sticky floating footer bar to be displayed immediately, then you can keep the slider at 0.

Choose a trigger point for footer bar

Next, you can leave other settings as they are or configure them according to your liking.

Once you are done, don’t forget to click the ‘Publish’ button at the top.

Publish floating footer bar

Now visit your WordPress site to view the sticky floating footer bar in action.

This is what it looked like on our demo site.

Sticky floating footer bar preview

Bonus: Create a Sticky Floating Navigation Menu in WordPress

Apart from adding a sticky footer bar, you might also like to create a sticky floating navigation menu on your WordPress site.

A navigation menu contains links to the most important pages on your WordPress blog and acts as an organizational structure for your website.

If you make this menu sticky, then it will remain visible on your page at all times, even as the user scrolls down on your screen. This can increase engagement and make your website easier to navigate.

Sticky floating navigation menu preview

To create a sticky floating navigation menu, simply install and activate the Sticky Menu & Sticky Header plugin. For details, see our tutorial on how to install a WordPress plugin.

Upon activation, visit the Settings » Sticky Menu page from the WordPress dashboard and type #main-navigation next to the ‘Sticky Element (required)’ option.

Type navigation menu as the sticky element

After that, click the ‘Save Changes’ button to store your settings. You have now successfully created a sticky floating navigation menu.

For detailed instructions, please see our tutorial on how to create a sticky floating navigation menu in WordPress.

We hope this article helped you learn how to easily create a floating sticky footer bar in WordPress. You may also want to see our beginner’s guide on how to add header and footer code in WordPress and our checklist of things to add to the footer on your WordPress site.

If you liked this article, then please subscribe to our YouTube Channel for WordPress video tutorials. You can also find us on Twitter and Facebook.

The post How to Create a “Sticky” Floating Footer Bar in WordPress first appeared on WPBeginner.

6 Best WordPress Banner Plugins in 2022 (Compared)

Are you looking for the best WordPress banner plugins?

Banner plugins make it easy to add high-converting banners to your WordPress website. You can then use them to promote your products, highlight your services, sell advertising placements, and more.

In this article, we will compare the best WordPress banner plugins to help you boost your website revenue.

Best WordPress banner plugins

Why Use a WordPress Banner Plugin?

Many website owners use banners to encourage visitors to take some action on their website, like buying their products or services. For example, you might use a banner to promote your online courses.

Banners are also a great way to generate leads. You might create a banner that offers visitors a coupon code if they sign up to your email newsletter.

And if you’re a blogger, you may sell banner ads on your site to make money from your blog.

Whether you want to show a banner announcements on your eCommerce store, use a simple banner to generate leads, or sell banner ads in a slider, a WordPress banner plugin lets you do it without writing any code.

Some WordPress banner plugins also have advanced targeting features, so you can show personalized messages to the right people at the right time.

They may also come with professionally-designed templates for your banners, and offer other design tools to help you customize them.

That being said, let’s take a look at the best banner plugins for WordPress for various industry use-cases.

1. OptinMonster

OptinMonster

OptinMonster is the best lead generation tool for WordPress. We use OptinMonster on WPBeginner and have increased our conversions by over 600% with this plugin alone.

Pro Tip: There is a free version of OptinMonster that you can use to get started. They have a special free plan that can only be found from inside their WordPress plugin dashboard.

OptinMonster lets you add all kinds of banners to your website, including floating banner bars like in the image below.

Floating header bar example from MonsterInsights

This is a “sticky” floating bar that attaches to the top or bottom of the page and follows visitors as they scroll. This allows you to show a banner without annoying the visitor or interrupting what they’re doing on your WordPress website.

OptinMonster also has full support for popup banners. You can even level-up these banners with OptinMonster’s powerful exit-intent technology. This allows you to show a popup just as the user is about to leave your website.

A popup created using OptinMonster

Many website owners use these extent-intent popups to convince visitors to stay on the website by offering them exclusive discounts.

To learn more, please see our step by step guide on how to create mobile-friendly popups that convert.

Popups are a great way to get the visitor’s attention, but they can also become intrusive. With that in mind, OptinMonster gives you the option to show your banners as slide-ins.

These are small popups that OptinMonster shows in the bottom-right corner of the screen as the visitor scrolls down. As you can see in the following image, slide-ins are a way to show content without interrupting whatever the visitor is currently doing on the website.

A slide-in banner created using OptinMonster

Gamified popups are a fun alternative to the traditional banner.

Many website owners have increased their conversions and overall engagement by using OptinMonster to create ‘spin to win‘ banners.

OptinMonster's gamified banner template

You can see our guide on how to build customer loyalty in WordPress with gamification for more details.

Even better, you can create all of these different banners within minutes by using OptinMonsters huge library of templates.

All of these templates are fully mobile responsive. This means your banner is guaranteed to look good on mobile devices, tablets, and full-sized desktop computers.

Simply choose a template from the OptinMonster setup wizard, and you’re ready to start creating your banner.

The OptinMonster templates including banner templates

All of OptinMonster’s banner templates are easy to customize. Just open the built-in OptinMonster editor and start making changes using simple drag and drop. You can also remove content from the template and add new content with just a few clicks.

Let’s look at an example.

Many of OptinMonster’s banner templates have optin fields, so you can collect names, email addresses, or phone numbers, plus a call to action (CTA) button. To customize this button, you just need to give it a click.

The OptinMonster editor will then update to show all the settings you can use to customize that field or button.

The OptinMonster editor

You can now go ahead and make your changes in the left-hand menu.

For example, you might type a new call to action into the ‘Button Text’ field.

A banner created using OptinMonster

Once you’re happy with your banner, you’ll want to show it in the right places, to the right people, and at the right time.

OptinMonster makes it easy to create advanced targeting rules.

This allows you to show personalized banners based on things like the page the visitor is on, their location, and even the device they are using. You can even show different banners to first-time visitors and returning visitors.

OptinMonster's banner time triggers

OptinMonster comes with hundreds of powerful targeting rules to help you maximize your banner conversions.

Smart website owners often use OptinMonster banners to:

  • show an announcement
  • grow their email list
  • boost eCommerce conversions

If you’re using an email marketing service, then OptinMonster integrates with Constant Contact, Sendinblue, and all other popular providers.

If you have an online store, then OptinMonster also integrates with WooCommerce and many other popular eCommerce platforms.

For more details, see our guide on how to create a sticky floating footer bar in WordPress.

Price: OptinMonster starts at $9 per month when billed annually.

There’s also a free version you can use to create simple banners on your website.

2. TrustPulse

TrustPulse

TrustPulse is the best social proof plugin for WordPress. It shows live notifications of actions that visitors are taking on your website.

You can set up TrustPulse within a few minutes, and then create notification bubbles that show recent purchases, form submissions, sign ups for a free trial, and more.

TrustPulse’s notifications aren’t banners in the traditional sense. However, TrustPulse has an Action Message campaign that lets you show text in a notification bubble.

A banner created using TrustPulse

TrustPulse’s Action Messages are perfect for letting visitors know about sales, promotions, updates, and much more.

Plus, they use the power of social proof so you can get maximum conversions.

The TrustPulse editor makes it easy to create an Action Message that acts exactly the same as a banner would.

Creating an action message using TrustPulse

When the visitor clicks on your Action Message, you can redirect them to any WordPress page or post such as your landing pages or product pages. You can also send visitors to any third-party URL, which is perfect for promoting your affiliate links.

TrustPulse comes with built-in analytics so you can see which pages and Action Messages have the best conversion rates. You can then use this information to fine-tune your content and boost your conversions even further.

For more information, you can see our guide on how to use FOMO on your WordPress site to increase conversions.

Price: You can get a TrustPulse license starting at $5 per month.

3. Advanced Ads

The WP Advanced Ads WordPress plugin

Advanced Ads is an ad management plugin that works with all the major ad types and networks. This includes Google AdSense, Google Ad Manager, and Amazon Ads.

Using this plugin, you can create and show unlimited banner ads on your WordPress website.

Large banners can be intrusive on devices with smaller screens, especially mobile devices. The good news is that with Advanced Ads, you can choose to show or hide your banners based on whether the visitor is using a smartphone, tablet, or a desktop computer.

You can also show or hide your banners depending on the visitor’s user role, or whether they’re logged into your membership site. This is a simple but effective way to show personalized banners and boost your conversion rates.

Advanced Ads supports lots of different ad placements as well.

Price: Advanced Ads starts at €49 (about $52 USD) per year. There’s also a basic free version you can use to try it out.

4. WPFront Notification Bar

WPFront Notification Bar

WPFront Notification Bar is a simple free notification bar WordPress plugin that lets you add a single banner to your website.

A banner created using WPFront

Upon activation, WPFront Notification Bar adds a new area to your WordPress dashboard under Settings » Notification Bar.

Here, you can build your banner by working through the different menus and checkboxes. You can then simply type your banner text into the standard WordPress text editor.

WPFront's WordPress banner settings

You can also encourage visitors to click on your banners by adding a button.

This button can redirect the visitor to any page, post, or third-party URL. It can also run JavaScript code.

Creating a banner with WPFront

When it comes to customization, this free plugin is much more limited than premium plugins like OptinMonster.

For example, there are no professionally-designed templates and no drag-and-drop builder. However, you can change your banner’s color and height.

If you accept user registrations on your WordPress site, then you can show or hide the banner based on the visitor’s role. After creating your banner, you can choose where this banner will show up on your website.

Adding a banner to your WordPress page or post

WPFront Notification Bar can show your banner at the top or bottom of the page. It can also hide the banner until the visitor scrolls.

If you like to schedule your banner campaigns in advance, then WPFront Notification Bar gives you the option to set a start and end date.

Price: WPFront Notification Bar is completely free, but very limited in features.

If you want to add multiple banners to your website, then you’ll need to upgrade to the pro version which costs $49.00 for a single website.

However, we’d recommend going with OptinMonster for a premium plugin instead, since it has so many more design and targeting features.

5. AdSanity

adsanity ad management plugin

AdSanity is a beginner friendly WordPress ad management plugin that lets you create as many advertisements as you want.

AdSanity can show ads from external networks like Google AdSense. However, you can also create your own banner using web design software such as Canva and then upload it to WordPress.

Once you’ve done that, you can show your banner on any page or post using a shortcode that AdSanity creates automatically.

AdSanity also adds three new widgets to your WordPress dashboard: Ad Group, Random Ad, and Single Ad. You can use these widgets to add banners to any widget-ready area of your WordPress blog or website such as your sidebar.

The AdSanity ad and banner widgets

Many WordPress website owners want to show several different ads in the same area, similar to a banner slider plugin.

With AdSanity, you can group ads together by creating ad groups. Once you’ve created some ads and assigned them to ad groups, you can place these groups on your site in exactly the same way you place single ads.

Once you’ve done that, your ad groups will rotate through their different ads on every page refresh. In this way, AdSanity can also work similar to a banner slider plugin.

To learn more, see our article on how to manage ads in WordPress with AdSanity.

Price: An AdSanity license starts at $59 per year.

6. WooCommerce Banner Management

WooCommerce Banner Management

WooCommerce Banner Management is a banner plugin designed especially for WooCommerce stores.

This plugin has separate sections where you can create unique banners for the different areas of your WooCommerce store. This includes WooCommerce’s cart, checkout, thank you, and product pages.

This makes it easy to run lots of different campaigns at the same time. You can even show multiple banners on the same page.

Product images are a big part of running a successful WooCommerce store. With that in mind, you can use this plugin to create image carousels showing lots of different products.

WooCommerce Banner Management

You can also set a start and end date for your banners, which is perfect for scheduling all of your different campaigns ahead of time.

Since this banner plugin is designed to be used with WooCommerce, you’ll need to install and activate the WooCommerce plugin first. If you need help, then please see our complete guide on WooCommerce.

Price: WooCommerce Banner Management costs $99 per year for a single website. There is also a limited free version that you can download from the official WordPress repository.

BONUS: MonsterInsights

MonsterInsights

Once you start adding banners to your website, you’ll want to track how many people are clicking on each banner and whether those banners are bringing you conversions.

That’s where MonsterInsights comes in.

MonsterInsights is the best Google Analytics plugin for WordPress and over 3 million businesses use it, including Microsoft, Bloomberg, PlayStation, and Subway.

MonsterInsights lets you easily install Google Analytics in WordPress so you can see what’s working, and what isn’t.

The MonsterInsights analytics dashboard

After adding MonsterInsights to your website, you can see how many people are clicking on your banners, where they come from, and whether they convert. You can then make data-driven decisions to encourage more people to interact with your banners and boost your conversion rates.

To learn more, see our step by step guide on WordPress conversion tracking made simple.

Price: MonsterInsights starts at $99.50 per year. There is also a free version version that lets you track your banners, no matter what your budget.

Expert Pick: Which is the Best Banner Plugin for WordPress?

In our opinion, OptinMonster is the best banner plugin for WordPress because of all the different types of banners you can create, including popup banners, floating banners, and full-screen banners. It also comes with a huge selection of templates, so you can create high-converting WordPress banners within minutes. 

Not to mention it also comes with powerful personalization and targeting features that are helpful for publishers, eCommerce site owners, and just about every small business website. 

If you are a blogger or publisher looking to sell ads, then we believe that WP Advanced Ads is the best banner ad management plugin for WordPress.

If you are an eCommerce website owner, then we believe that TrustPulse is the best social proof banner plugin for WordPress.

We hope this article helped you find the best banner plugins for your WordPress website. You may also want to check out our guide on how to track website visitors to your WordPress website and the best WordPress landing page plugins.

If you liked this article, then please subscribe to our YouTube Channel for WordPress video tutorials. You can also find us on Twitter and Facebook.

The post 6 Best WordPress Banner Plugins in 2022 (Compared) first appeared on WPBeginner.

Lead Generation Strategies for SaaS

Introduction

Think of your SaaS business as an orchard. If you don’t tend the trees, they won’t bear fruit. Similarly, if you don’t maintain your services, you won’t make a profit. Generating leads for your business is an essential step in maintaining your business’s health and growth. We’re here to show you why and how lead generation can work for you! 

What Is Lead Generation?

A lead is someone who has shown an interest in your product, to the point where they’ve given you their information. You’ll need to nurture this interest to turn it into customer action, as well as generating more leads for your business. 

How to Require an Email Address to Download a File in WordPress

Do you want to have users enter an email address before downloading a file from your WordPress site?

Many businesses use free file downloads like eBooks, white papers, etc to collect email addresses and potential leads. These lead magnets convert really well because it offers users an incentive that motivates them to sign up.

In this article, we’ll show how to easily require an email address to download a file in WordPress.

Requiring email address for file downloads on your WordPress website

Why Require an Email Address to Download a File in WordPress?

Email is still the best way to communicate with customers online. Many businesses collect email addresses as potential leads that they can follow up with to make a sale.

For instance, an online store may capture email leads based on user interests. Those users may not make a purchase right away, but it gives you an option to convert them later.

Similarly, if you are selling an online course, you can offer users a free lesson download in exchange for their email addresses. This way, you can send targeted emails to those users and convince them to buy your premium course.

It doesn’t always have to be a free file download. You can sell e-books, music, software, and other digital downloads.

What You Need to Collect Email Addresses

The easiest way to collect and build email lists is by using an email marketing service. This allows you to not only collect the email addresses but also be able to send beautiful emails, create customer segments, track open rates, and more.

We recommend using Constant Contact as the best email marketing service for small businesses. It allows you to easily collect email addresses, send targeted emails, segment your audiences, and grow your business.

Most importantly, it works really well with WordPress, WooCommerce, and all other essential WordPress plugins.

If you need alternatives, then do check out Sendinblue or Drip.

Note: You can still collect email addresses even if you don’t want to use an email marketing service right away. All the methods described below would still work for manual outreach.

That being said, let’s take a look at how to require an email address to download a file in WordPress. We’ll show multiple methods, and you can choose one that works best for you.

1. Collect Email Address for File Downloads in WordPress with OptinMonster

This method is the most flexible, incredibly powerful, and recommended for all users.

For this method, we’ll be using OptinMonster. It is the best lead generation software on the market and allows you to easily collect email addresses with powerful popups, sign up forms, banners, and more.

First, you need to sign up for an OptinMonster account.

OptinMonster

After that, you need to install and activate the OptinMonster plugin on your WordPress website. For more details, see our step by step guide on how to install a WordPress plugin.

This free plugin is a mere connector between your WordPress website and your OptinMonster account.

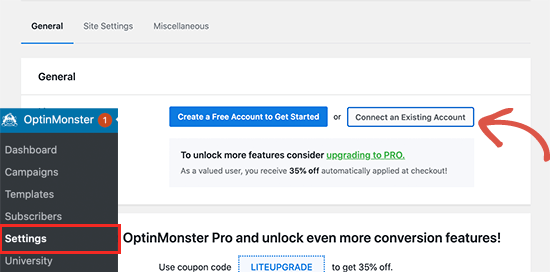
Upon activation, you need to visit OptinMonster » Settings page and click on the ‘Connect existing account’ button.

Connect OptinMonster account to WordPress

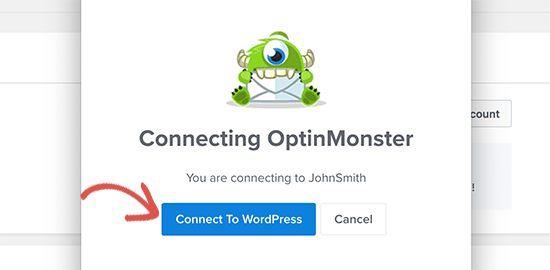
This will bring up a popup where you can log in and connect your WordPress site to your OptinMonster account.

Connect WordPress

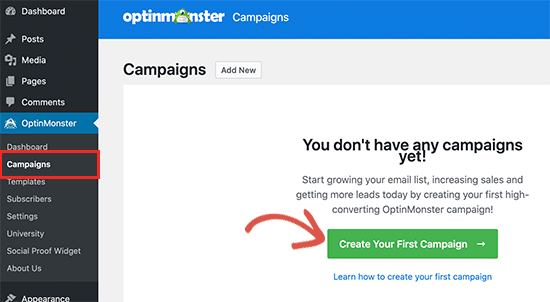
Now that your WordPress site is connected, you are ready to create your first campaign. Head over to OptinMonster » Campaigns page and click on the ‘Add New’ or ‘Create your first campaign’ button.

Create campaign

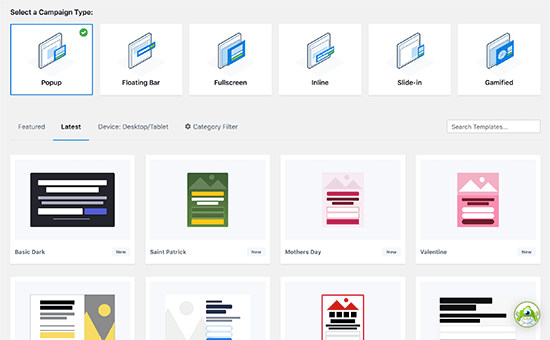
Next, you’ll be asked to select a campaign type. OptinMonster supports lightbox popups, floating bars, inline optins, fullscreen, slide-in, and gamified campaigns.

For the sake of this tutorial, we’ll create a lightbox popup campaign. Below that, you can choose a campaign template by clicking on it.

Choose campaign type and template

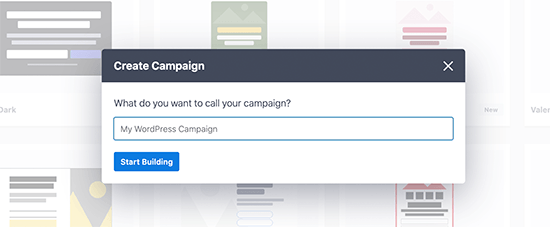
You’ll then be asked to provide a name for your campaign. You can enter any name here to identify it easily, and then click on the Start building button.

Choose campaign name

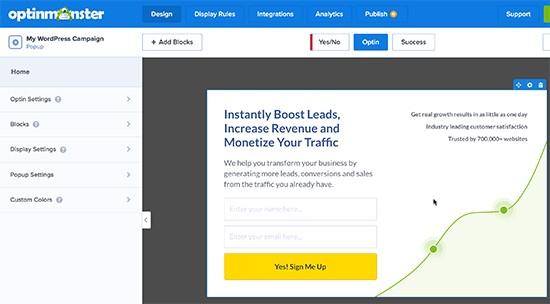
This will launch OptinMonster’s campaign builder interface with a live preview of your campaign in the right panel. You can click on any item in your campaign to edit it.

Campaign builder

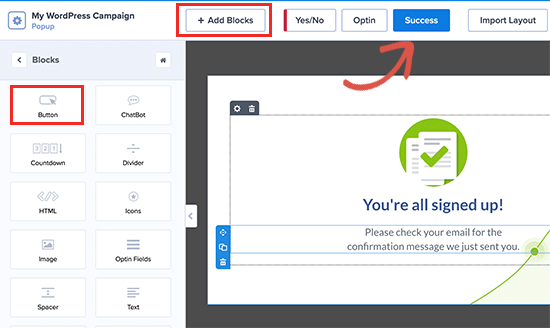
You can also add new items to your campaign by clicking on the Add Blocks button.

Once you are satisfied with the design, you can switch to the success view. This is the view your users will see when they have submitted their email addresses.

Edit the success view

There are multiple ways to allow users to download the file on the success view. You can edit the text and add a link to the download file.

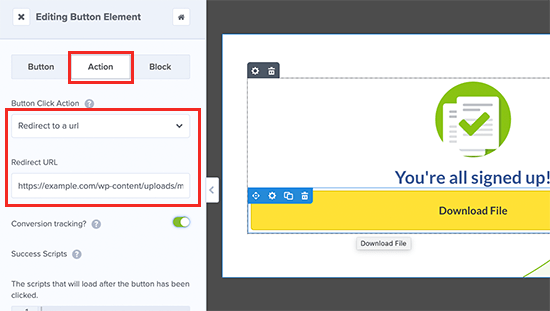
Alternately, you can click on the Add Blocks button and then add a ‘Button’ block. After that, click to select the button block and switch to the ‘Action’ panel.

Adding file download button

From here, select ‘Go to a URL’ under the ‘Button click action’ setting and then enter the file download URL.

Once finished, don’t forget to click on the Save button to store your campaign settings.

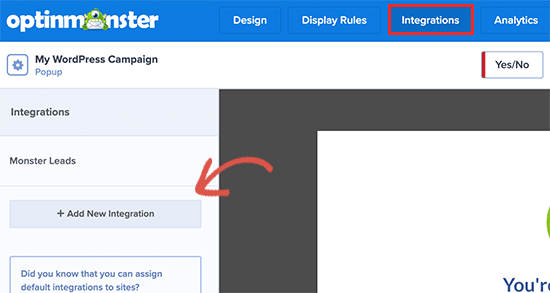
Next, you need to click on the Integrations tab on the top to connect your email service provider.

Add new integration

Simply click on the Add New Integration button and then select your email provider from the list. Follow the on-screen instructions to set it up.

Note: If you just want to capture email leads for your CRM software or manual outreach, then OptinMonster can automatically use their MonsterLeads feature to store them for you.

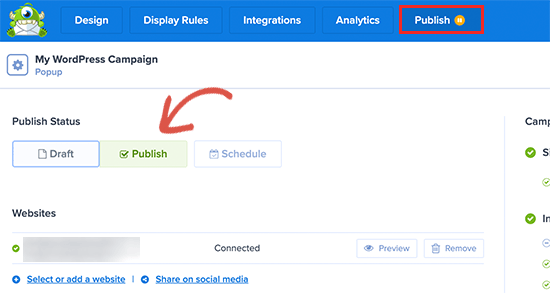
Now that everything is set up, you can switch to the Publish tab to make your campaign go to live. Simply switch to the ‘Publish Status’ from Draft to Publish by clicking on it.

Publish campaign

Don’t forget to click on the Save changes button to save your campaign settings and then click on the close button to exit the builder.

After that, you’ll be redirected back to your WordPress site, where you can configure where and when you want to display the campaign.

For example, you can show it on specific pages or posts, existing customers, target WooCommerce customers, and more. For details, see our guide on how to show personalized content to different users in WordPress.

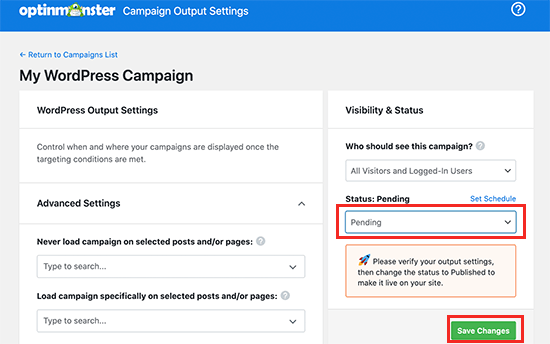
Output settings for your campaign

For this tutorial, we will be showing it to all visitors. After that, simply set the status from pending to published and click on the ‘Save Changes’ button to launch your campaign.

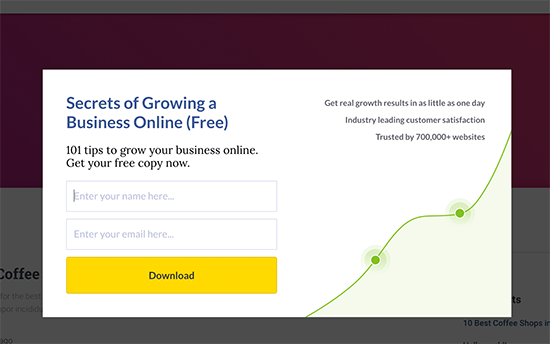
You can now visit your website in a new incognito tab to see your campaign in action.

Campaign preview

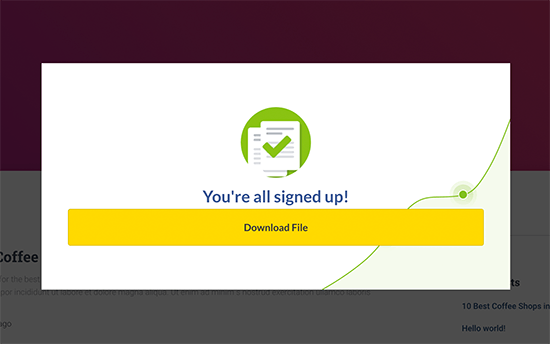
Your users will be able to provide their email address, and after that, they will see the success view of your campaign with a file download link.

Download file after submitting the email address

2. Collect Email Address for File Downloads in WordPress with WPForms

This method is handy if you want to create custom lead generation forms and add them to your WordPress landing pages.

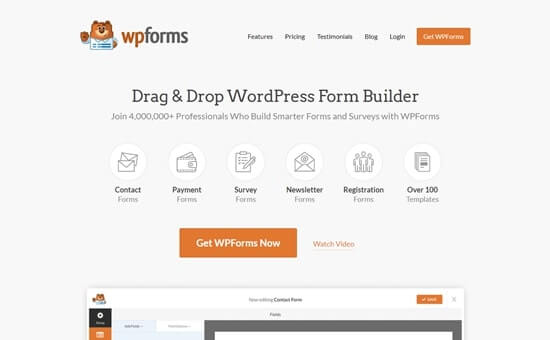
For this method, we’ll be using WPForms. It is the best WordPress form builder plugin that allows you to easily create custom lead capture forms that you can add anywhere on your website.

It also allows you to redirect users to a file download upon form submission.

wpforms

First, you need to install and activate the WPForms plugin. For more details, see our step by step guide on how to install a WordPress plugin.

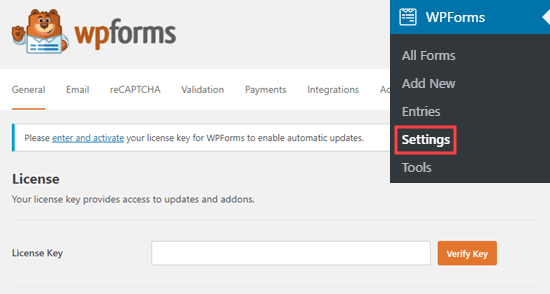
Upon activation, you need to visit WPForms » Settings page to enter your license key. You can find this information under your account on the WPForms website.

Entering your WPForms license key on your site

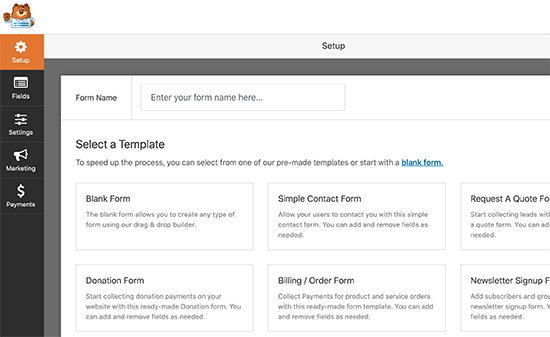
After that, you can go to WPForms » Add New page to create your email capture form. First, provide a name for your form and then select a template.

Adding a new form

Templates are a starting point, and WPForms comes with several commonly used templates. For instance, you can choose a newsletter sign-up form or a contact form template.

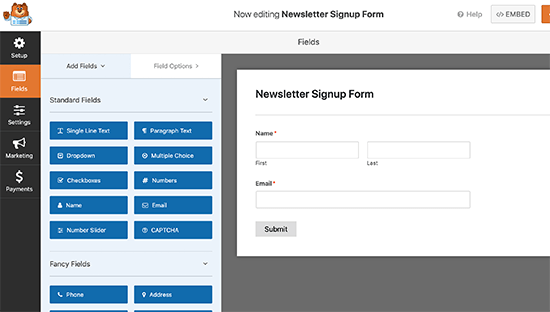
After choosing the template, WPForms will launch the form builder interface with a preview of your live form on the right.

WPForms builder interface

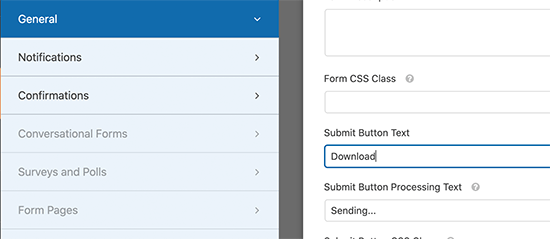
From here, you can click on any form field to add. edit, move it up or down, or delete it. You can also click on the ‘Submit’ button to change the text to ‘Download’.

Change submit button text

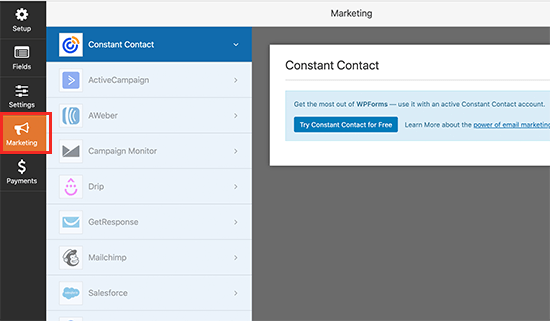
Once you are done editing your form, you need to switch to the marketing tab to connect it to your email service provider. You can skip this step if you are manually managing form leads.

Connect your email marketing service to WPForms

WPForms supports all the top email marketing platforms. Simply click on your email service provider and follow the on-screen instructions to connect it.

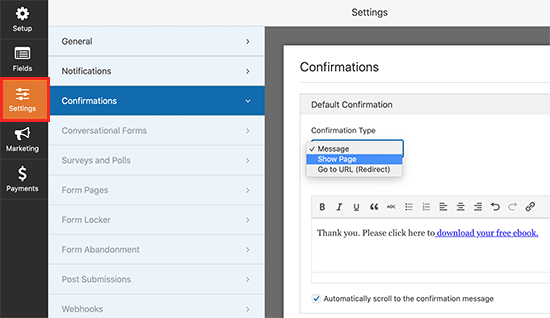
Once finished, you need to switch to the Settings tab and then click on Confirmation. From here, you can configure what to do when a user submits the form.

Form confirmation

You can choose to show a message with a link to the file download. You can also show users a page on your website to download the file or redirect them to the file download URL.

Once finished, don’t forget to click on the Save button at the top to store your settings.

Adding The Form to Your Website

WPForms makes it super easy to add your forms anywhere on your website.

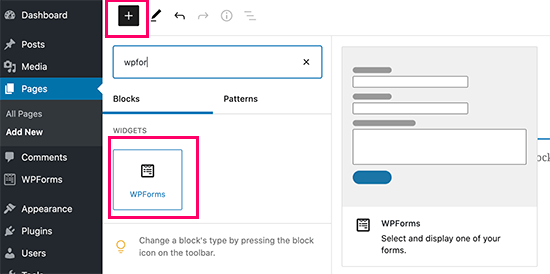
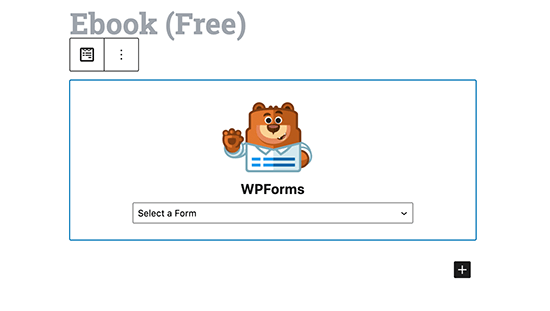
Simply, edit the post or page where you want to display the form. On the post edit screen, click on the (+) add new block button and select WPForms block.

WPForms block

This will add the WPForms block to your post or page content. You need to select the form your created earlier from the drop-down menu.

Select your form

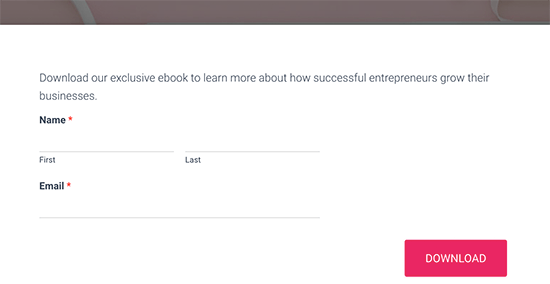
You’ll see a live preview of your form in the content editor. You can now save or publish your post / page and visit your website to see your form in action.

Form preview

Based on your settings, when users submit the form they will get the confirmation message with the file download link or redirected.

Confirmation message

3. Collect Email Address for File Downloads in WordPress with MemberPress

This method is recommended if you want to make the file download available to existing users, members, or paid users.

For this method, we will be using MemberPress. It is the best WordPress membership plugin and allows you to easily control access to premium content, file downloads, members-only content, and more.

MemberPress

First, you need to install and activate the MemberPress plugin. For more details, see our step by step guide on how to install a WordPress plugin.

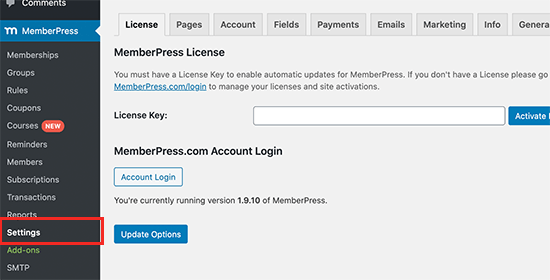
Upon activation, you need to visit MemberPress » Settings page to enter your license key. You can find this information under your account on the MemberPress website.

MemberPress license key

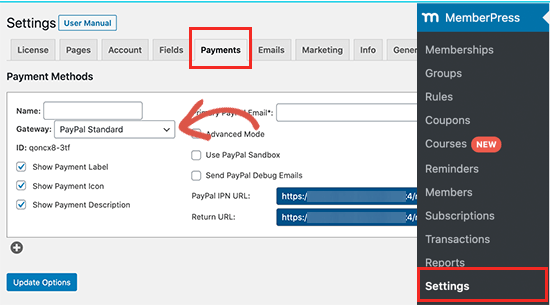
Next, you need to switch to the ‘Payments’ tab and select a payment method to accept payments for membership subscriptions. You can also create free subscription plans if you want.

Add a payment method in MemberPress

MemberPress supports PayPal and Stripe. You can also use Authorize.net with their Plus and Pro plans.

After selecting your payment method, you’ll be asked to provide your account details. You can also choose to add multiple methods.

Once finished, click on the ‘Update Options’ button to save your changes.

Now you are ready to create a membership plan.

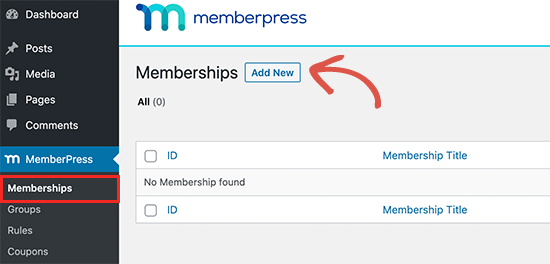
Simply go to the MemberPress » Memberships page and click on the Add New button.

Add new membership plan

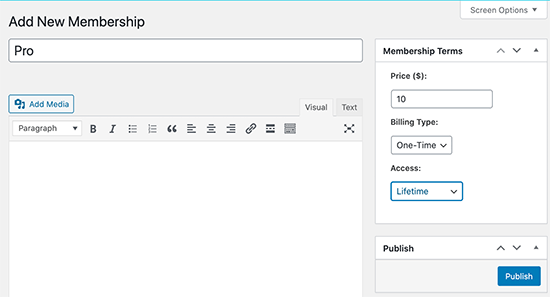
On the next screen, you can give your membership plan a name and set a pricing option. Depending on how you want to organize your memberships, you can choose lifetime, expiring, or fixed expiring plans.

Creating a membership plan in MemberPress

After that, click on the Publish button to make your membership plan available.

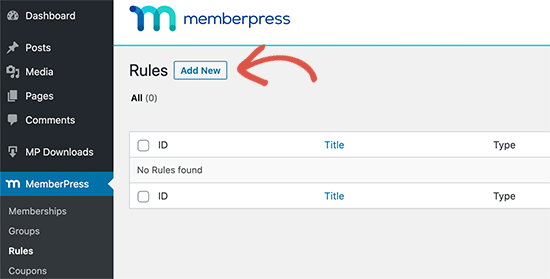
Next, you need to create an access rule. This allows you to control which parts of your website you want to be protected and available to members-only.

Add new rule

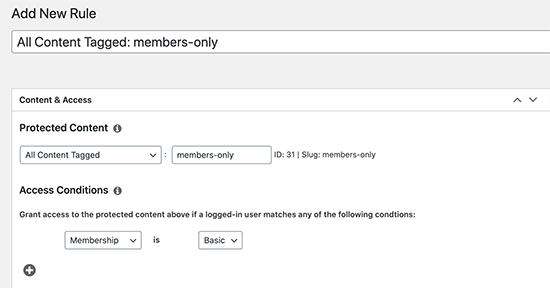
On the next screen, first you need to choose which content you want to be restrict under ‘Protected Content’.

MemberPress offers a whole range of options. You can select posts that match certain tags, categories, pages that are under the same parent page, single posts, or any URL.

Rule settings

For instance, we have chosen to protect all content tagged members-only.

Below that, you need to select who will have access to the protected content. We have chosen anyone who has Basic membership.

Once you have set up the rule, don’t forget to click on the Save Rule button to save your changes.

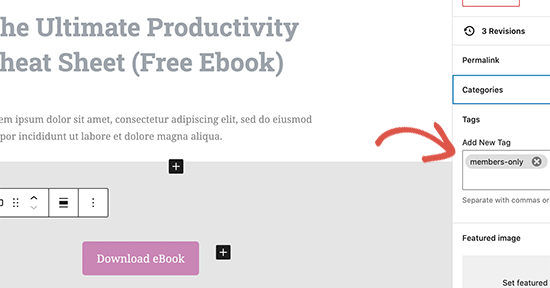
Next, you need to create content that you want to be protected. For this tutorial, we want users to be able to download a file.

You can create a new post in WordPress, based on our rules settings we will simply add the tag members-only to protect this page.

Creating members only content

After that, you can simply add your file download as a link or a download button in the post content.

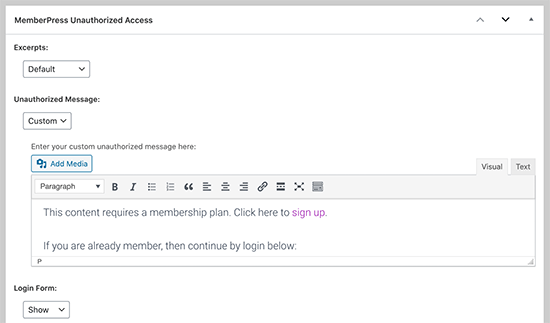
Next, scroll down to the ‘Membership Unauthorized Access’ box and set the ‘Unauthorized Message:’ to custom. After that, you can add a custom message you want to show to users who have not signed up yet.

Unauthorized access message

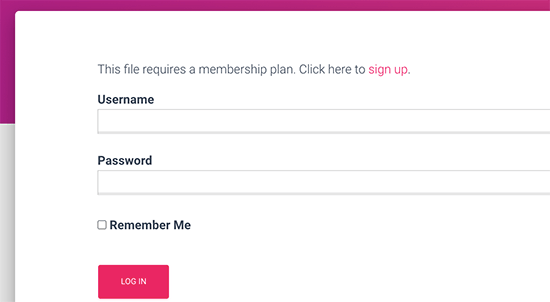
You can now save or publish your content and preview it in a new browser window using incognito mode. You’ll see your custom unauthorized access message with the login form.

Restricted file download page

Connecting MemberPress to Your Email Service

MemberPress works with all top email marketing providers and you can automatically add all new members to your website into your email list.

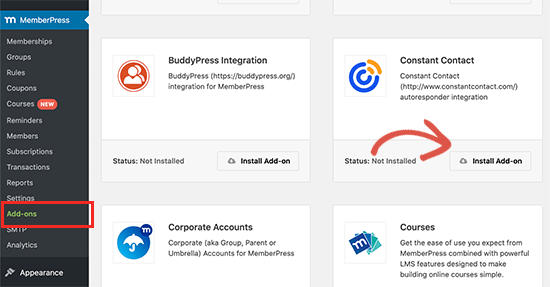
Simply go to the MemberPress » Addons page and install the addon for your email provider. For the sake of this tutorial, we’ll show you Constant Contact but settings are pretty much the same for most email providers.

Install email marketing addon

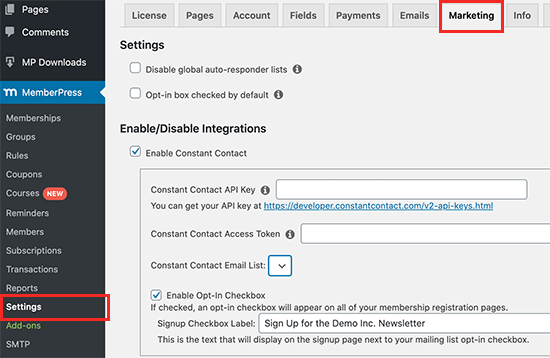
Next, go to MemberPress » Settings page and switch to the Marketing tab. From here, you can connect your email service by providing your account API keys.

Enable email marketing service

For details, you’ll need to see MemberPress documentation for your email service provider.

After entering the required information, click on the Update Options button to save your settings.

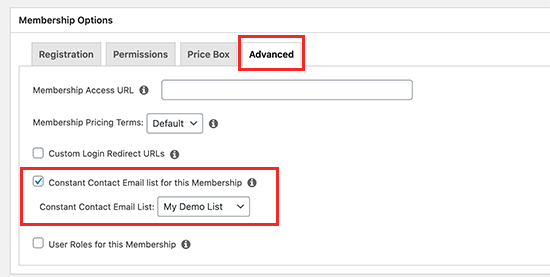
Next, you need to visit MemberPress » Memberships page and edit the membership plan you created earlier. Scroll down to the ‘Membership Options’ box and switch to the Advanced tab.

Turn on email optin for a membership plan

From here you can check the option to enable email sign up checkbox for that membership plan.

After that, don’t forget to click on the ‘Update’ button to save changes.

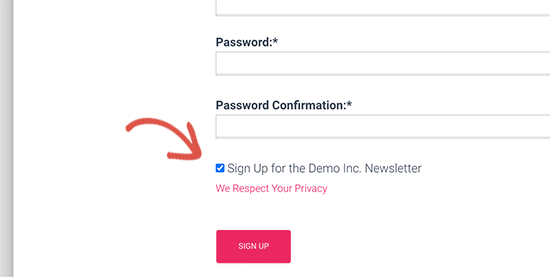
Now when users visit the sign up page, they will see an option to subscribe to your email list.

Sign up option to join your email list

Tracking Your File Downloads in WordPress

Now that you have enabled email requirement to download a file in WordPress, you may want to see how users are finding it and how many users download it.

You can do that by using the MonsterInsights. It is the best Google Analytics plugin on the market and allows you to easily track file downloads in WordPress.

monsterInsights

For more details, see our complete guide on how to easily track file downloads in WordPress.

We hope this article helped you learn how to easily require an email address to download a file in WordPress. You may also want to see our guide on how to get more traffic to your website and our expert pick of the best business phone services, so you can ask for phone numbers in exchange for file downloads using the methods above.

If you liked this article, then please subscribe to our YouTube Channel for WordPress video tutorials. You can also find us on Twitter and Facebook.

The post How to Require an Email Address to Download a File in WordPress appeared first on WPBeginner.

12 Best Lead Generation WordPress Plugins (Powerful)

Are you looking for the best lead generation WordPress plugins?

Using the right lead generation tools can help you get more customers and sales faster so that you can grow your business.

In this article, we will share some of the best lead generation WordPress plugins to help you improve your marketing.

Best Lead Generation WordPress Plugins (Powerful)

What Is Lead Generation, and Why Does It Matter?

Lead generation means getting the interest of prospective customers. It can be done in several different ways.

On your website, lead generation might mean getting visitors to:

  • Join your email newsletter.
  • Submit a contact or inquiry form on your website.
  • Contact someone at your company through live chat.
  • Talk to a chatbot (automated chat).
  • Call your sales team, or book a call with them.

Lead generation is essential for all online businesses. Of course, it’s also important to have a strong process for converting the leads into customers. However, most businesses struggle to get enough leads in the first place.

Even if you run a nonprofit, lead generation matters. It can help you get more donations and more support.

Our goal with this list is to share the absolute best WordPress lead generation plugins that you can use to grow your business faster.
Unlike other best lead generation tool lists, we are not just sharing a list of plugins that do the same thing. Instead, we’re focusing on lead generation from a holistic point of view.
For each lead generation solution category, we share an expert pick along with one alternative option for that category. This will help us keep this list comprehensive without causing choice paralysis.

With that said, here are the best lead generation plugins for WordPress.

1. WPForms

WPForms

WPForms is the best contact form plugin on the market. Over 6 million website owners use the beginner-friendly, drag-and-drop builder to create any kind of online form for their WordPress sites.

It comes with over a hundred pre-built form templates you can use as a starting point. After that, you can customize the form to match your needs using the drag-and-drop form builder interface.

Here are just some of the lead generation forms you can create:

WPForms also integrates with your favorite email marketing services and CRM providers. This lets you automatically add leads to your email list.

Each time someone submits the form, you will automatically get an email notification. You can easily turn this off if you prefer not to receive email alerts. WPForms will store each completed form entry in your WordPress database too.

It’s also possible to send notifications to multiple recipients using WPForms. For example, you might want to send a customer inquiry notification to a specific person in the sales team and their supervisor.

Price:

WPForms pricing starts at $49.50/year. There’s also a free version of the plugin, which has limited features.

Alternative:

Formidable Forms ($39.50 per year) is a good alternative to WPForms. It has powerful tools that let you create different forms, including lead generation calculators. However, it’s not as beginner friendly as WPForms.

2. OptinMonster

OptinMonster

OptinMonster is a powerful lead generation and popup plugin that you can use on your WordPress site.

It lets you create high-converting popups and email signup forms that help you turn abandoned website visitors into subscribers and customers.

It has lots of useful features, including Exit Intent® technology. This lets you show your popup at the exact moment when someone is about to leave your site.

You can combine it with their page targeting feature to show customized popup messages for each page on your site, which is proven to increase conversions.

With OptinMonster, you even get special popups like spin the wheel popups and Yes/No optins. These can boost your conversion rate even further.

OptinMonster Spin Wheel Campaign

There are lots of different professionally designed templates included in the app. This makes it quick and easy to create your lead forms using the drag-and-drop builder.

You can also use OptinMonster to generate leads in other ways. For instance, you might use the content-locking feature to ask visitors to join your email list before they can read your full content.

You don’t necessarily need to use it to generate email leads, either. You could add a click-to-call button to your popup, use it to show special discount codes, and more.

Price:

OptinMonster starts at $9/month when billed annually. To get advanced features like Exit Intent technology and Yes/No forms, you need the Pro plan from $29/month.

Alternative:

Thrive Leads ($99 per year) is a good alternative to OptinMonster. It offers a range of different types of lead generation forms and popups. It also has a built-in template library to speed up the building process.

3. SeedProd

SeedProd website builder

SeedProd is the best WordPress website and theme builder on the market. It’s used by over a million website owners to easily create any type of website without writing any code.

It has dozens of professional templates you can customize easily with the drag and drop builder.

SeedProd also provides you with a beginner-friendly landing page builder. And you will find a ready-made sales page, opt-in page, webinar registration, coming soon page templates, and more.

All of these landing page templates can be completely customized to help you start generating leads as quickly and easily as possible.

Customize SeedProd

It includes dozens of blocks designed to help you build better landing pages, like testimonial blocks, countdown timers, CTA buttons, pricing tables, and so much more.

You will find a searchable stock photo library with over 2 million photos that you can add to your pages to improve conversions.

It also has powerful integrations with the top email marketing software and thousands of third-party apps via Zapier. This lets you easily send your leads to your lead management tool of choice.

For online store owners, you can use the WooCommerce blocks to build custom WooCommerce product pages easily, thank you pages, and more to collect leads and sell more products.

Price:

SeedProd starts from $39.50 per year (only $3.29 per month). Plus, there’s a free version you can try to see how the plugin works.

Alternative:

Instapage offers similar page builder features but is more expensive and starts at $199 per month (billed annually).

4. LiveChat

Live Chat Inc Website

LiveChat is the best live chat software for WordPress websites. It’s very easy to set up, and you can integrate it with dozens of other marketing services.

By adding live chat support to your WordPress website, you can build a better relationship with your users and convert more visitors into customers.

This plugin places a chat button in the bottom right-hand corner of your website. Visitors can click on this to chat with your team in real time.

Plus, your support team members don’t need to log in to WordPress to use LiveChat. Instead, they can use the LiveChat app on their laptop or mobile devices.

LiveChat will create a support ticket if a visitor contacts your team outside of support hours.

LiveChat is fast and easy to use for your visitors and your support team. It lets you quickly turn leads into customers by answering pre-sales questions straight away.

Price:

LiveChat starts at $20 per month when billed annually with a 14-day free trial. Our LiveChat coupon gives you an extended 30-day free trial plus a 30% discount.

Alternative:

Brevo (Previously Sendinblue) offers a simple, free live chat feature that you can use on your website. It also offers email, SMS, and a CRM tool that integrate with live chat.

5. ChatBot

ChatBot

ChatBot is one of the best AI chatbot software options on the market and lets you use automated live chat to connect with your potential customers and respond to questions 24/7.

To help you get started quickly, ChatBot has lots of pre-designed templates. For instance, you can use the lead generation bot to book calls. Meanwhile, the sales bot template allows you to sell products directly from the chat window.

ChatBot can be used in Facebook Messenger as well as on your website. That makes it a great option for companies and organizations that get a lot of inquiries through Facebook.

It’s easy to integrate it with other apps, such as LiveChat. A live agent can step into the conversation seamlessly if needed.

Price:

ChatBot pricing starts at $52 per month. There’s a 14-day free trial available.

Alternative:

Hubspot offers a suite of business CRM tools, including a chatbot builder and live chat. You can get started free, and paid plans start at $30 per month.

6. RafflePress

RafflePress

RafflePress is one of the best WordPress giveaway plugins on the market. It allows you to easily create viral giveaways and contests that you can use to grow your website traffic and email list.

You can use the drag and drop builder to quickly create giveaway campaigns in minutes without writing any code. Plus, there’s a built-in template library to help make giveaway creation even faster.

A unique refer-a-friend feature lets you do word-of-mouth marketing by letting users share your contest on their social media profiles.

This helps to build engagement and can get you a lot of new visitors to your WordPress blog.

You will find many other powerful features that help improve your campaigns, like email verification, fraud protection, social logins, giveaway landing pages, success tracking, and more.

Plus, your giveaways will run on mobile devices, so you can reach your visitors no matter where they happen to be.

For more details, see our guide on how to run a giveaway/contest in WordPress.

Price:

RafflePress has a free version of the plugin you can use to get started. Paid plans start at $39.50 per year for the starter plan.

Alternative:

Gleam is an advanced giveaway platform you can use to run contests and giveaways. However, it’s not as beginner friendly, and you will need at least the $97 per month Pro plan to unlock useful features.

7. PushEngage

PushEngage

PushEngage is the best web push notification software on the market, used by over 10,000 companies, including Harvard, Dominoes, and Business Insider.

It lets you easily send targeted push messages to visitors after they leave your website.

We use push notifications here at WPBeginner, and they are consistently a top 5 source of our traffic. They are a highly-effective way to convert website visitors into loyal followers and customers.

Visitors simply give their permission to receive push notifications by clicking a button:

An example of a push notification optin on the WPBeginner website

You can set up push notifications to automatically send out to your subscribers whenever you publish a blog post or use them to send completely custom messages.

It’s a very easy-to-use solution for beginners to advanced users. You will find powerful features like A/B testing, custom-triggered campaigns, interactive messages, custom drip campaigns, and so much more.

Plus, you can use the marketing automation features to create abandoned card sequences, scheduled messages, and more.

You will be able to see a detailed breakdown of your subscriber engagement and even the transactional revenue generated from your push campaigns.

Price:

PushEngage starts at $9 per month and gives you support for 100,000 subscribers and unlimited campaigns. There’s also a free plan available that gives you 30 campaigns per month for 200 subscribers.

Alternative:

OneSignal has a free plan for unlimited notifications on mobile. For advanced features like delayed notifications, pricing starts at $99 per month.

8. FunnelKit

FunnelKit homepage

FunnelKit, formerly known as WooFunnels, is the best sales funnel builder for WordPress.

You can use it to create lead-generation funnels, sales funnels, high-converting checkout pages, one-click upsells, and more.

It’s essentially a ClickFunnels alternative that helps you convert website visitors into leads and customers.

FunnelKit comes with a built-in library of beautiful funnel templates that you can import in one click.

FunnelKit templates

You can easily customize the templates using the WordPress block editor as well as popular page builder plugins like Elementor, Divi, and others.

FunnelKit offers in-depth analytics so that you can see how your funnels are performing in real time. Plus, it comes with A/B testing that lets you experiment with different versions of your funnels to find out which one converts best.

In addition, FunnelKit has a marketing automation solution called FunnelKit Automations. It allows you to set up automated email and SMS campaigns for lead nurturing, welcome series, abandoned cart recovery, post-purchase upsell, and more.

Price:

FunnelKit starts at $99.50 per year. To access FunnelKit Automations, you need at least the Professional plan, which costs $249.50 per year.

Alternative:

SeedProd, which we mentioned earlier in this list, can also be used to easily create lead generation pages, sales pages, custom WooCommerce checkout pages, and more.

9. WP Call Button

WP Call Button

WP Call Button allows you to easily add a ‘click to call’ button on your WordPress website or WooCommerce store. Visitors can simply click or tap the button to call you straight away.

If your customers need to call you before purchasing a service or booking an appointment, adding a click-to-call button on your website will increase your leads and sales.

It can also be used to easily set up business call forwarding.

WP Call Button makes adding your button to any post or page easy. You can include it in your WordPress sidebar, too. It’s also easy to create a sticky floating call button that stays visible all the time.

Price:

WP Call Button is free and works with all top business phones and business VoIP providers.

Alternative:

You can also create a click-to-call link using the manual method covered in our article on adding a click-to-call button in WordPress.

10. AffiliateWP

AffiliateWP

AffiliateWP is one of the best affiliate tracking and management solution for WordPress. It lets you simply create your own fully featured affiliate program on WordPress.

By creating an affiliate program, you can have your own team of affiliates promoting your products in exchange for a commission.

This can help you get more visibility online, traffic, and of course, make more sales. You can even create your very own WooCommerce affiliate program using this plugin.

It comes with everything you need to manage your program, including accurate affiliate tracking, integrated payouts, real-time reporting, affiliate coupon tracking, and so much more.

With manual affiliate approval and top-performing affiliate data, you can build lasting partnerships with your most valuable affiliates for years to come.

Price:

AffiliateWP starts at $149.50 per year and has everything you need to run a successful affiliate program.

Alternative:

Easy Affiliate is another popular WordPress plugin for creating and managing an affiliate program. The basic plan starts at $99.50 per year.

11. All in One SEO

All in One SEO

All in One SEO is the best WordPress SEO plugin used by over 3 million websites. It’s the most comprehensive SEO toolkit that makes it easy to improve your SEO rankings without learning any complicated SEO jargon.

Doing WordPress SEO is an important part of lead generation. You need to bring people to your website before they can join your email list, call you, subscribe to push notifications, or do anything else on this list.

Once you install and activate the plugin, an easy-to-use setup wizard will help you choose the best SEO settings for your business, so you can start getting more traffic.

It has a TruSEO score, which offers detailed on-page SEO analysis and gives you an actionable SEO checklist to help you easily optimize your posts and pages.

AIOSEO checklist

All in One SEO can help you improve your post SEO titles and meta descriptions, generate rich snippet schema markup and create smart XML sitemaps and RSS sitemaps.

Plus, there are built-in WooCommerce SEO settings, like individual product optimizations, product image SEO, and more, to help your online store get more visitors from the search results.

Price:

AIOSEO starts at $49.60 per year for access to advanced SEO features. You can also try out the free version to begin optimizing your site for SEO.

Alternative:

Yoast SEO is another popular SEO plugin for WordPress that will help you optimize your site. There is a free version and a premium version that starts at $99 per year.

12. MonsterInsights

The MonsterInsights Google Analytics plugin

MonsterInsights offers a powerful way to add Google Analytics to your WordPress website. It lets you quickly and easily see crucial statistics about your site and find your most important pages.

This means you can easily find out what’s working and what’s not, focusing on the areas that really matter.

For instance, you might use MonsterInsights to enable author tracking and see which writers for your site are producing the best-performing posts.

Or you could use MonsterInsights to track link clicks and button clicks. This lets you figure out which links and buttons are getting clicked and which ones aren’t, letting you pinpoint areas for improvement.

MonsterInsights is quick and easy to set up and gives you real-time stats. It can even track things like your eCommerce data, form completions, and file downloads. This gives you more insights into your lead generation efforts.

Price:

MonsterInsights starts at $99.50/year. There’s also a free version available for WordPress with limited features.

Alternative:

ExactMetrics offers similar features to MonsterInsights and starts at $99.50 per year.

Bonus: Nextiva

Nextiva

Nextiva is the best business phone service for small business owners in terms of features and ease of use.

If your business relies on phone calls for lead generation, then Nextiva can help you improve your business communication across the board.

It has a web-based admin panel that will let you manage your entire unified communications platform in one place.

You will find business phone features like call routing, voicemail to text and email, SMS messaging, unlimited domestic calling, online faxing, and so much more.

Every new account can get a free local or toll-free number. Plus, you get all standard features like caller ID, call forwarding, routing, custom greetings, and more.

You can even integrate your business phone with powerful features like live chat and CRM services.

We use Nextiva at WPBeginner for our business phone service. It works well for our remote team since they can receive business calls on their cell phones while still keeping their numbers private.

Price:

Nextiva starts at $14.95 per month per user for all your business phone needs. The Enterprise plan costs $26.95 per month per user and includes video conferencing, call recording, and more.

Alternative:

RingCentral is another popular business phone provider that’s packed with features. Paid plans start at $20 per month per user.

What Is the Best Lead Generation Plugin for WordPress?

We believe you need multiple plugins for a robust lead-generation strategy on your site.

With that said, WPForms is the best lead generation plugin for WordPress. You can use their drag-and-drop form builder to create any online form.

If you are looking for a live chat solution to improve leads and support, then LiveChat and ChatBot are both great options.

If you want to improve your overall conversion rate on your website, then nothing beats the powerful features that OptinMonster has to offer.

If you want to improve your existing website and product pages to generate more leads and make more sales, then SeedProd is a must-have plugin.

With any lead generation strategy, attracting leads is only the first part. You have to ensure a proper sales process to close the deal.

If you rely on phone calls, then we recommend using Nextiva. It comes with auto-attendant, call-routing, CRM, and powerful sales features that you can use to increase your sales.

To summarize, our top lead generation tools are:

  1. WPForms
  2. OptinMonster
  3. SeedProd
  4. LiveChat.com
  5. ChatBot.com
  6. Nextiva

We hope this article helped you learn about the best lead-generation plugins and tools for WordPress.

You might also want to see our other guides that can help you generate new leads and turn them into customers.

Best WordPress Guides for Lead Generation

If you liked this article, then please subscribe to our YouTube Channel for WordPress video tutorials. You can also find us on Twitter and Facebook.

The post 12 Best Lead Generation WordPress Plugins (Powerful) first appeared on WPBeginner.