Here at Sentry, we like to dogfood our product as much as possible. Sometimes, it results in unusual applications of our product and sometimes these unusual applications pay off in a meaningful way. In this blog post, we’ll examine one such case where we use the Sentry JavaScript SDK to instrument Jest (which runs our frontend test suite) and how we addressed the issues that we found.
We have high-level metrics for how well (or not) our CI is performing. This is useful to get a general sense of the health of the system, however, it does not help when doing a deeper dive into why a system is slow. We decided to instrument our CI jobs at the test runner level in order to get insights into the performance of the individual tests. We needed to be able to see if our test suite was slowing down because we were adding more tests or if it was because we had poor-performing tests.
With a long list of end-to-end (e2e) test frameworks available to choose from, it’s hard to know which one you should be using. Cypress and Selenium are leading the market as the most widely used options, but there’s also Appium for mobile app testing, Puppeteer for automating tasks in Chrome, and Protractor for Angular and AngularJS applications, just to name a few.
Recently a newcomer has joined the pack: TestProject, a free, open-source test automation platform for e2e testing that helps simplify web, mobile, and API testing. The TestProject SDK has language support for Java, C#, Python, and, most recently, JavaScript.
This is the 10th article documenting what I’ve learned from a series of 13 Trailhead Live video sessions on Modern App Development on Salesforce and Heroku. In these articles, we’re focusing on how to combine Salesforce with Heroku to build an “eCars” app—a sales and service application for a fictitious electric car company (“Pulsar”) that allows users to customize and buy cars, service techs to view live diagnostic info from the car, and more. In case you missed my previous article, you can find the link here.
Just as a quick reminder: I’ve been following this Trailhead Live video series to brush up and stay current on the latest app development trends on these platforms that are key for my career and business. I’ll be sharing each step for building the app, what I’ve learned, and my thoughts from each session. These series reviews are both for my own edification as well as for others who might benefit from this content.
This is a 3 part series for unit testing the controller, service, and repository layers in a typical REST architecture. There are many approaches to doing this, I'm sharing a pattern that I find very flexible and hopefully, you can pick up some tips and tricks along the way.
This is a 3 part series for unit testing the controller, service, and repository layers in a typical REST architecture. There are many approaches to doing this, I'm sharing a pattern that I find very flexible and hopefully, you can pick up some tips and tricks along the way.
GitLab CI allows you to run tests much faster thanks to its CI parallelization feature. You can run parallel jobs across multiple GitLab Runners. In order to do it, you will learn how to split tests in a dynamic way across parallel tasks to ensure there is no bottleneck in GitLab Pipeline. Thanks to that CI build can be run as fast as possible so your Ruby and JS tests can be finely fast.
GitLab CI Parallelization
The common problem when you want to run tests in parallel to complete your one-hour test suite in a few minutes instead of waiting hours is to find a way to split tests on parallel jobs. Some of your Ruby or JavaScript tests can take milliseconds and some even a few minutes per test file (for instance, when using Capybara in RSpec features testing). The problem with slow tests also occurs in E2E (end to end testing) when using Cypress test runner as browser testing can take quite a long time to execute.
Semaphore CI 2.0 allows for configuring your CI build task with parallel jobs. This way, you can run simultaneously a few different commands that do not depend on each other. But we could also use parallel jobs to split your test suite across a few jobs and save time this way. I will show you how to speed up your CI build for your Ruby or JavaScript project (Rails/Node project).
With Semaphore CI 2.0, you don’t pay for a reserved amount of containers that can be run in parallel as in some other CI providers. Instead, they count the amount of work time spent on running containers. This creates an incentive to run more parallel jobs to execute our tests fast and still keep bill at a similar level as if we would just run all tests in single container waisting our own time.
When working on a larger project, you may struggle with the problem of an increasingly growing set of tests, which over time begins to perform slower on your continuous integration (CI) server. I had this problem while working on a project in Ruby on Rails, where RSpec tests on CircleCI took about 15 minutes.
As it was bothering me, I decided to do something about it, which resulted in building an open-source Knapsack Ruby gem library (the name derives from the knapsack problem), which deals with distributing tests between parallel CI servers. In this article, you will learn about two approaches to split tests on parallel continuous integration servers - static and dynamic.
This is the first post in a series on using TypeScript in practical applications. It shows a simple TypeScript pattern for building type-safe, unit test dummies. The focus is on simplicity for the consumer so tests emphasize what's important and avoid incidental details.
At Instil, we’re big fans of TypeScript. Although we appreciate the strengths of dynamic languages, all things considered, strong static typing wins more often than not.
According to Michael Feathers, “Any code that has no tests is a legacy code.” So as a developer it is your duty to avoid creating legacy code by using test-driven development (TDD).
There are many tools available for unit testing in ReactJS but we will be going through Enzyme and Jest.
I'm a developer advocate at Snyk, and couldn't reinforce more how important it is to test your applications for security vulnerabilities in third-party open source libraries. If there's something I like as much as the sSyk developer tooling, it's Jest. The developer experience with it just amazing!
Oh yes. The developer experience with Jest is transforming the act of writing tests from a chore to hell of a fun time. I promise!
While it is important to have a well-tested API, solid test coverage is a must for any React application. Tests increase confidence in the code and helps prevent shipping bugs to users.
That’s why we’re going to focus on testing in this post, specifically for React applications. By the end, you’ll be up and running with tests using Jest and Enzyme.
No worries if those names mean nothing to you because that’s where we’re headed right now!
Installing the test dependencies
Jest is a unit testing framework that makes testing React applications pretty darn easy because it works seamlessly with React (because, well, the Facebook team made it, though it is compatible with other JavaScript frameworks). It serves as a test runner that includes an entire library of predefined tests with the ability to mock functions as well.
Enzyme is designed to test components and it’s a great way to write assertions (or scenarios) that simulate actions that confirm the front-end UI is working correctly. In other words, it seeks out components on the front end, interacts with them, and raises a flag if any of the components aren’t working the way it’s told they should.
So, Jest and Enzyme are distinct tools, but they complement each other well.
For our purposes, we will spin up a new React project using create-react-app because it comes with Jest configured right out of the box.
yarn create react-app my-app
We still need to install enzyme and enzyme-adapter-react-16 (that number should be based on whichever version of React version you’re using).
yarn add enzyme enzyme-adapter-react-16 --dev
OK, that creates our project and gets us both Jest and Enzyme in our project in two commands. Next, we need to create a setup file for our tests. We’ll call this file setupTests.js and place it in the src folder of the project.
Here’s what should be in that file:
import { configure } from 'enzyme';
import Adapter from 'enzyme-adapter-react-16';
configure({ adapter: new Adapter() });
This brings in Enzyme and sets up the adapter for running our tests.
To make things easier on us, we are going to write tests for a React application I have already built. Grab a copy of the app over on GitHub.
Taking snapshots of tests
Snapshot testing is used to keep track of changes in the app UI. If you’re wonder whether we’re dealing with literal images of the UI, the answer is no, but snapshots are super useful because they capture the code of a component at a moment in time so we can compare the component in one state versus any other possible states it might take.
The first time a test runs, a snapshot of the component code is composed and saved in a new __snapshots__ folder in the src directory. On test runs, the current UI is compared to the existing. Here’s a snapshot of a successful test of the sample project’s App component.
Every new snapshot that gets generated when the test suite runs will be saved in the __tests__ folder. What’s great about that Jest will check to see if the component matches is then on subsequent times when we run the test, Jest will check to see if the component matches the snapshot on subsequent tests. Here’s how that files looks.
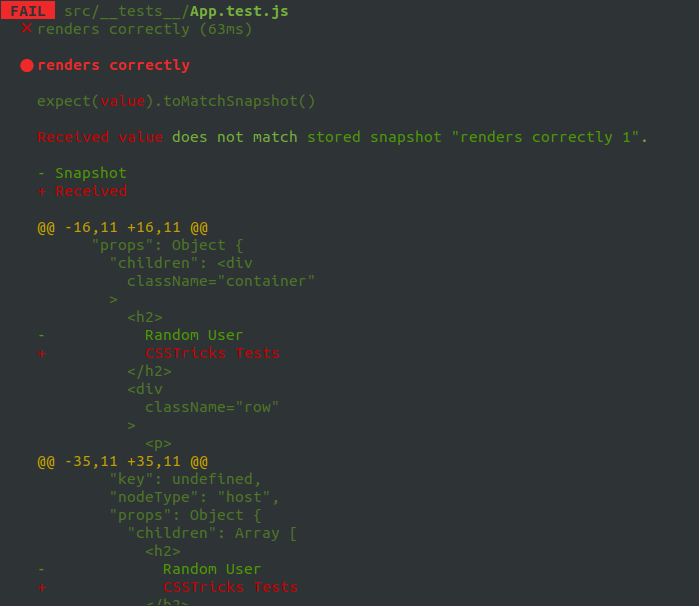
Let’s create a conditions where the test fails. We’ll change the <h2> tag of our component from <h2>Random User</h2> to <h2>CSSTricks Tests</h2> and here’s what we get in the command line when the tests run:
If we want our change to pass the test, we either change the heading to what it was before, or we can update the snapshot file. Jest even provides instructions for how to update the snapshot right from the command line so there’s no need to update the snapshot manually:
Inspect your code changes or press `u` to update them.
So, that’s what we’ll do in this case. We press u to update the snapshot, the test passes, and we move on.
Did you catch the shallow method in our test snapshot? That’s from the Enzyme package and instructs the test to run a single component and nothing else — not even any child components that might be inside it. It’s a nice clean way to isolate code and get better information when debugging and is especially great for simple, non-interactive components.
In addition to shallow, we also have render for snapshot testing. What’s the difference, you ask? While shallow excludes child components when testing a component, render includes them while rendering to static HTML.
There is one more method in the mix to be aware of: mount. This is the most engaging type of test in the bunch because it fully renders components (like shallow and render) and their children (like render) but puts them in the DOM, which means it can fully test any component that interacts with the DOM API as well as any props that are passed to and from it. It’s a comprehensive test for interactivity. It’s also worth noting that, since it does a full mount, we’ll want to make a call to .unmount on the component after the test runs so it doesn’t conflict with other tests.
Testing Component’s Lifecycle Methods
Lifecycle methods are hooks provided by React, which get called at different stages of a component's lifespan. These methods come in handy when handling things like API calls.
Since they are often used in React components, you can have your test suite cover them to ensure all things work as expected.
We do the fetching of data from the API when the component mounts. We can check if the lifecycle method gets called by making use of jest, which makes it possible for us to mock lifecycle methods used in React applications.
We attach spy to the component’s prototype, and the spy on the componentDidMount() lifecycle method of the component. Next, we assert that the lifecycle method is called once by checking for the call length.
Testing component props
How can you be sure that props from one component are being passed to another? We have a test confirm it, of course! The Enzyme API allows us to create a “mock” function so tests can simulate props being passed between components.
Let’s say we are passing user props from the main App component into a Profile component. In other words, we want the App to inform the Profile with details about user information to render a profile for that user.
Mock functions look a lot like other tests in that they’re wrapped around the components. However, we’re using an additional describe layer that takes the component being tested, then allows us to proceed by telling the test the expected props and values that we expect to be passed.
This particular example contains two tests. In the first test, we pass the user props to the mounted Profile component. Then, we check to see if we can find a <h4> element that corresponds to what we have in the Profile component.
In the second test, we want to check if the props we passed to the mounted component equals the mock props we created above. Note that even though we are destructing the props in the Profile component, it does not affect the test.
Mock API calls
There’s a part in the project we’ve been using where an API call is made to fetch a list of users. And guess what? We can test that API call, too!
The slightly tricky thing about testing API calls is that we don’t actually want to hit the API. Some APIs have call limits or even costs for making making calls, so we want to avoid that. Thankfully, we can use Jest to mock axios requests. See this post for a more thorough walkthrough of using axios to make API calls.
First, we'll create a new folder called __mock__ in the same directory where our __tests__ folder lives. This is where our mock request files will be created when the tests run.
We want to check and see that the GET request is made. We’ll import axios for that:
import axios from 'axios';
Just below the import statements, we need Jest to replace axios with our mock, so we add this:
jest.mock('axios')
The Jest API has a spyOn() method that takes an accessType? argument that can be used to check whether we are able to “get” data from an API call. We use jest.spyOn() to call the spied method, which we implemented in our __mock__ file, and it can be used with the shallow, render and mount tests we covered earlier.
it('fetches a list of users', () => {
  const getSpy = jest.spyOn(axios, 'get')
  const wrapper = shallow(
    <App />
  )
  expect(getSpy).toBeCalled()
})
We passed the test!
That’s a primer into the world of testing in a React application. Hopefully you now see the value that testing adds to a project and how relatively easy it can be to implement, thanks to the heavy lifting done by the joint powers of Jest and Enzyme.