How to Clean iPad Screen & Device

The iPad is a crucial piece of electronic equipment that contributes to technological advancement in various sectors of the economy today. Illustrators, artists, teachers, graphic designers are the primary users of apple pads in their workstations. But why? With an iPad, you have a smartphone, a computer, sketching tool, and e-learning device; anyone can use...

The post How to Clean iPad Screen & Device appeared first on DesignrFix.

Why Choose Sustainable, Eco-friendly Accessories for Your iPhone or Android Phone

Our smartphone has fast become an essential part of our everyday life and almost inevitable needs. With technology continually expanding to all areas of our lives, people are increasingly becoming reliant on mobile phones either iPhone or Android. Thankfully, as technology develops, eco-friendly smartphones and accessories also become more advanced. This improvement allows this modern […]

The post Why Choose Sustainable, Eco-friendly Accessories for Your iPhone or Android Phone appeared first on designrfix.com.

How to Move your iCloud and Apple Photos to Google Photos

A friend writes - “Any suggestions on how to combine the Google photo library with iPhoto. Which is a better platform for keeping the photos? Google seems to be very handy in sorting and searching. Would love to know your views”

I am a big fan of Google Photos for several reasons - you get unlimited storage space, Google is pretty good at visual image search and you can have collaborative photo albums where multiple people can upload to a common folder.

Transfer Photos from Apple iCloud / Mac to Google Photos

If you would like to copy your photos from iCloud / Apple Photos to Google Photos, there are no browser plugins or software that can automate this - you’ll have to manually transfer the picture library from Apple to Google Photos. Luckily, that migration process isn’t difficult either.

It is a two-step process - you download the photos from iPhoto and iPad to your computer via iCloud and then put them on to the Google Cloud. Let’s see how:

Step 1: Download Photos from iCloud

Via Web Browser

You may directly go to the icloud.com/photos website, select your photos and then click the download button to save them from the iCloud library to your Windows PC or Mac.

Download Photos from the iCloud website

On Windows PC

If you have photos on your iPhone or iPad that are getting backed up on iCloud, you can copy them to your Windows PC with iCloud for Windows.

Inside iCloud, sign-in with your Apple ID, then open the File Explorer window, click on iCloud Photos under Quick Access and then choose Download photos and videos.

On Apple Mac OS

Open the Apple Photos app on your Mac and press ^1 (Ctrl+1) to switch to the main Photo view that has a list of all pictures that are available in your iPhoto library.

Select one or more photos, then go to the File menu and choose Export to download pictures from Apple Photos to another folder on your desktop.

Include Location in Photos

For the export options, you may stick to the default values but do check the “Include Location Information” option. This will help Google group your photos by location.

Also, if you aren’t seeing all your iPhone photos inside Mac, go to Preferences inside the Photos app and make sure that the Download originals to this Mac option is checked under the iCloud Photos section.

Download Original Photos from iCloud

Step 2 - Upload Photos to Google Photos

Once you have saved the photos that you wish to transfer to your local drive, you need to send them to Google Photos and there are two ways to go about it.

Upload Photos via Web Browser

Open Google Chrome, or any other web browser, and go to photos.google.com. Simply drag the photos folder from your desktop to the Google Photos website and they’ll be uploaded in sequence.

The browser should remain open and your Internet connection should be working for the upload to happen in the background.

Upload Photos via Google App

If you have a large number of photos to upload from your Windows PC or Mac to the Google Photos library, it is recommended that you use Google’s Backup and Sync tool that is available for both Windows and Mac OS.

Upload Apple Photos to Google Photos

With the app installed, sign-in with your Google account, select the folders on your desktop that you wish to backup and click Start to initiate the backup process.

While the name is Backup and Sync, it is not exactly a synchronization tool. So once your photos are uploaded to Google Photos, you can remove them from the local drive and they won’t be deleted from your Google Photos.

Free iPhone 13, 13 Pro Max, Mini and XR Mockups (PSD, Figma, AI, Adobe XD)

This post is originally published on Designmodo: Free iPhone 13, 13 Pro Max, Mini and XR Mockups (PSD, Figma, AI, Adobe XD)

The time has come to raise your game and replace your already old iPhone 12 with a newer and younger yet more sophisticated version, iPhone 13. Although it is not a game-changer, it was still engineered to push the boundaries …

For more information please contact Designmodo

How to use WordPress App on your iPhone, iPad, and Android (Guide)

Did you know that nearly half of all global website traffic originates from mobile devices? People are not just browsing the web on mobile, they are also creating content using mobile apps from platforms like WordPress, Facebook, and other media sites.

Over the years, the WordPress mobile apps have seen significant improvements to help you easily publish content and manage your website using a mobile device. WordPress app is already available for both Android and iOS devices.

In this article, we will show you how to use the WordPress app on your iPhone, iPad, Android, and other mobile devices.
How to use the WordPress app on mobile devices

Why Use WordPress App on iPhone or iPad?

The WordPress app allows you to create content and manage your website from anywhere in the world specially when you’re traveling.

You can capture and upload photos, record and upload a video, write quick blog posts while riding the train or bus, walking around, or hanging out with friends. You can take your WordPress site with you in your pocket.

By default, the WordPress admin area is fully responsive and works well on mobile browsers.
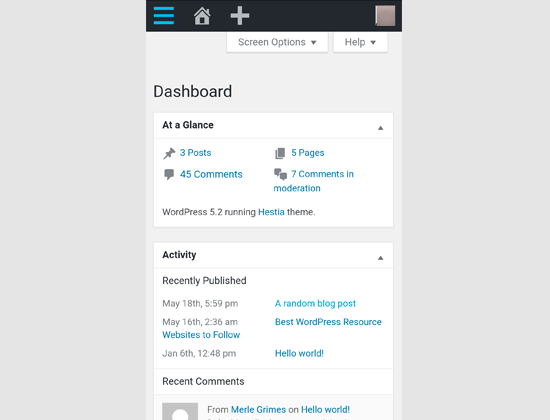
WordPress admin area on mobile browser

However, this user interface is not optimal for mobile usage.

On the other, the WordPress app is designed to be touch-friendly, mobile optimized, and easy to use. It has an intuitive user interface which makes using the WordPress app a pleasure.

Writing without a physical keyboard had been an issue for many bloggers. The app combines your device’s native touch keyboard with WordPress formatting buttons, making it simple and easy to write posts on touch devices.

What Do You Need to Use the WordPress Mobile App?

Unlike other mobile apps, you actually need to have a WordPress website or a WordPress blog before you can start using the WordPress app.

The WordPress app works for both the popular free self-hosted WordPress.org platform as well as the WordPress.com blog hosting service.

For details, see our side-by-side comparison of WordPress.com vs WordPress.org.

Setting up Your Website for WordPress Mobile Apps

You’ll need the following two things to connect your website to the WordPress app:

  • JetPack plugin on your website
  • A free WordPress.com account

Let’s get started.

First, you need to install and activate the JetPack plugin on your website. For more details, see our step by step guide on how to install a WordPress plugin.
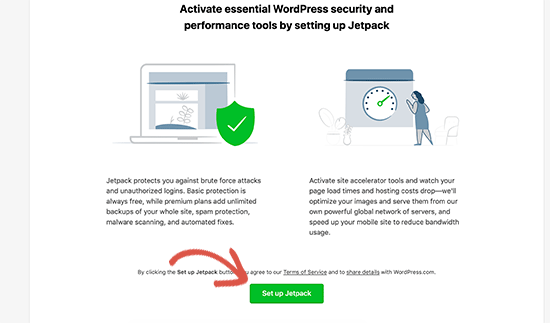
Upon activation, you’ll need to click on the setup button to continue.

Next, you will be asked to sign in with a WordPress.com account. If you already have one, then you can go ahead and sign in. Otherwise, you can continue to signup for a free account.
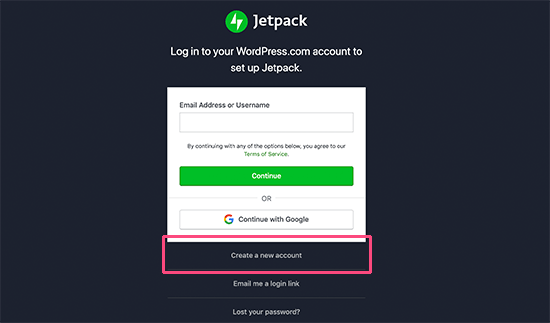
Sign up with WordPress.com

During this process your self-hosted WordPress.org website will be connected to JetPack servers via your free WordPress.com account.

Once that’s done, you are now ready to start using the WordPress app on your mobile device(s).

Setting up the WordPress App on Your Mobile Device

First, you need to install the WordPress app on your device. It is available for Android, iOS (iPhones and iPads), Windows, MacOS, and Linux.
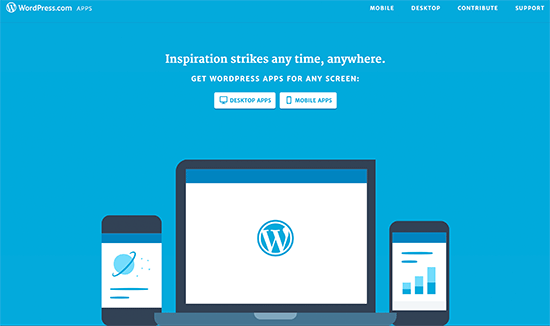
WordPress Apps

Next, you need to open the app and sign in to your WordPress.com account.
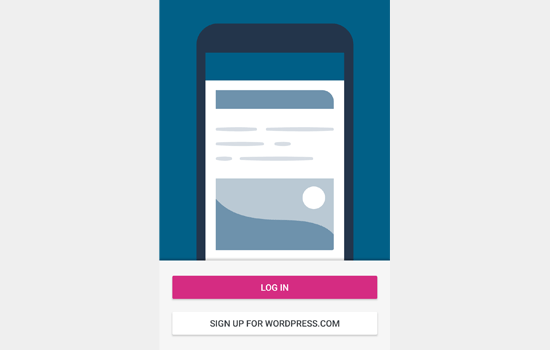
Login to your WordPress.com account

After that, the app will connect and fetch your website information.
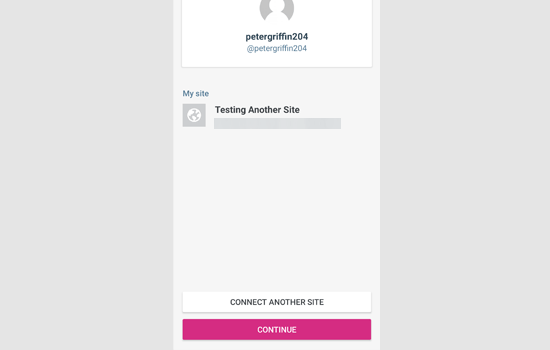
Logged in to the WordPress app

You can now click on the continue button to move forward and view the app dashboard. This is where you will manage your WordPress site using the mobile app.
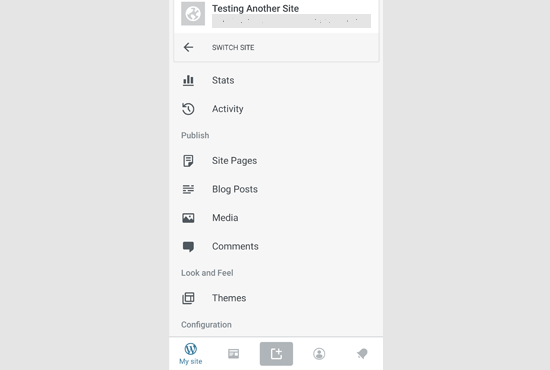
WordPress App dashboard

Editing Blog Posts with WordPress App

The WordPress app comes with an intuitive user interface to make it easy for you to create / edit blog posts and pages on your website.

You can view all your posts by clicking on the Blog Posts menu from the app dashboard. This will show you a list of your recent blog posts.
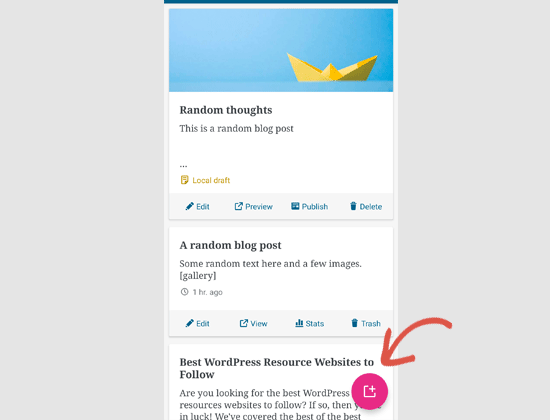
Adding new blog post using the WordPress app

You can edit any blog post or tap the add new button to create a new blog post.

This will launch the WordPress app’s content editor. From here, you can write a new post using your phone’s native keyboard which will have a formatting toolbar at the bottom.
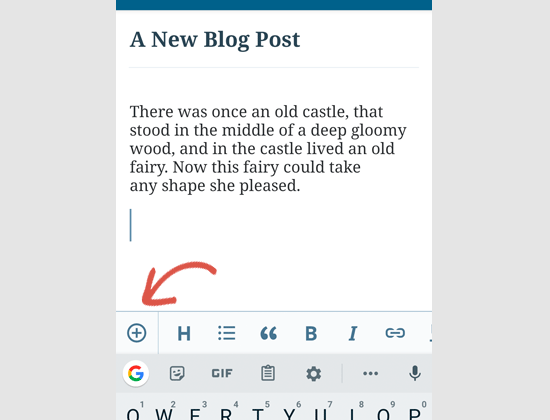
Editing posts in the WordPress app

You can click on the ‘Add’ button to add images to your blog post. The app will allow you to upload images from your device, using your phone’s camera, or from the WordPress media library.
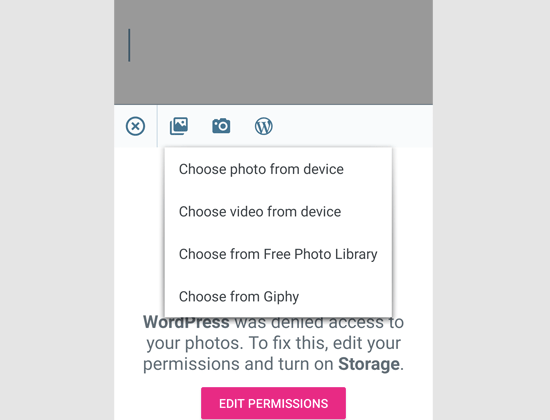
Upload images to your blog posts

The app also allows you to change other post options. To access those options, tap on the three-dot menu on the top right corner of the edit screen and then select ‘Post settings’.
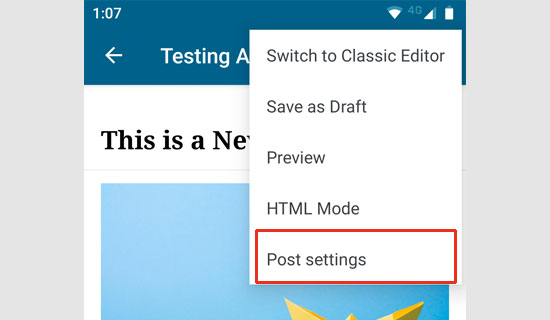
Editing post settings

This will bring up the post settings menu. From here, you can add category and tags, featured image, change post status, and other options.
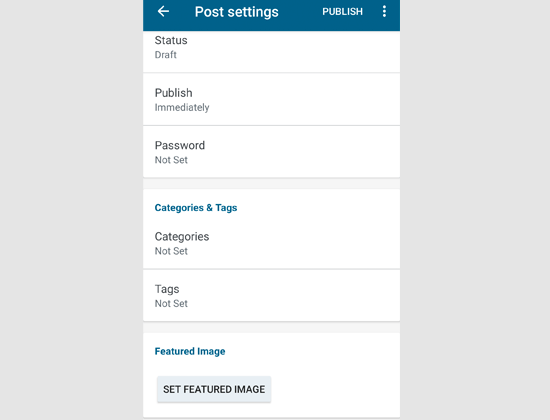
Post options

The WordPress app comes with built-in autosave feature which saves your posts locally on your device. Once you are done editing the blog post, simply click on the publish or update button at the top right corner.

The app will now upload the post to your website. You can visit your website in a browser to see it in action.

Switching to The New Block Editor in WordPress App

The app also includes the new WordPress block editor, but it is not turned on by default. In order to use the new editor with the app, you need to tap on your profile icon at the bottom and then select App Settings.
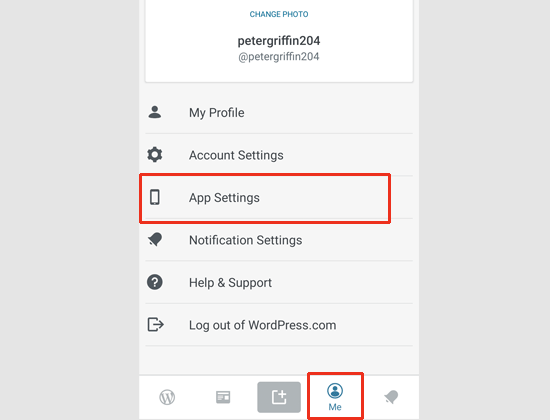
App settings

This will bring up the app settings menu where you can turn on the block editor.
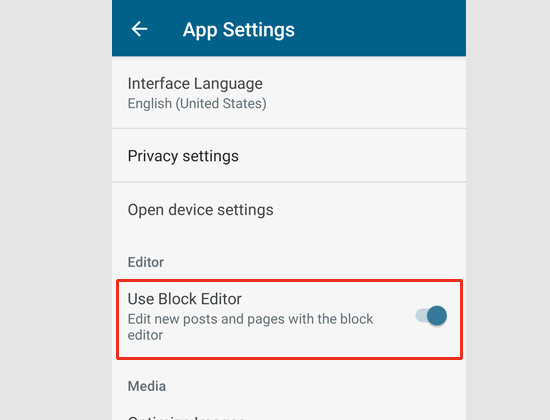
Enable block editor in the WordPress app

You can now create WordPress posts in the app using the same block editor that you use on Desktop. However, the number of blocks available on the app is very limited at the moment.
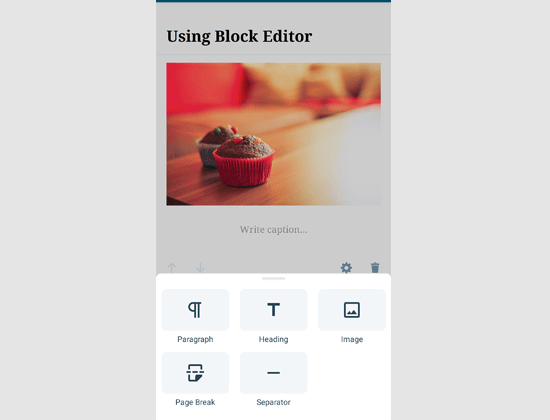
Editing with the block editor in WordPress app

Upload and Manage Media Files Using WordPress App

The WordPress app allows you to easily manage and upload photos / videos from your phone.

You can upload media while writing posts, or you can directly launch the Media library from the app dashboard.
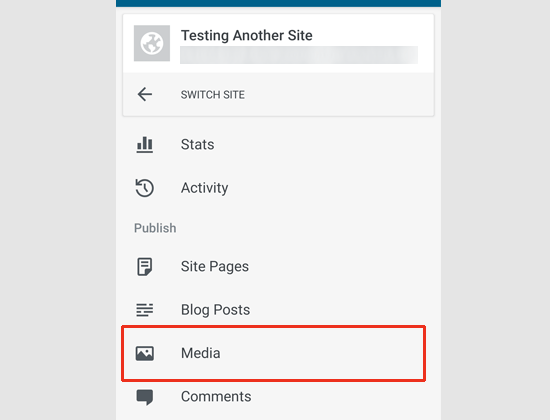
Media menu in WordPress app

This will launch the WordPress media library, and you’ll be able to see all media files in your library. You can edit media files, delete them, and even upload new photos and videos from your phone using the Add button.
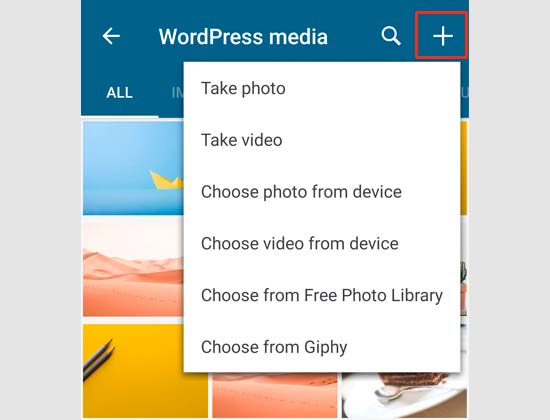
Upload media

Managing Comments on The Go Using The WordPress App

Comments help boost user engagement and build a community around your WordPress blog. The WordPress app makes it easy to moderate comments on the go.

Managing comments via WordPress app

You can view all comments on your site by visiting the Comments tab from the app dashboard. You’ll see comments awaiting moderation and approved comments.
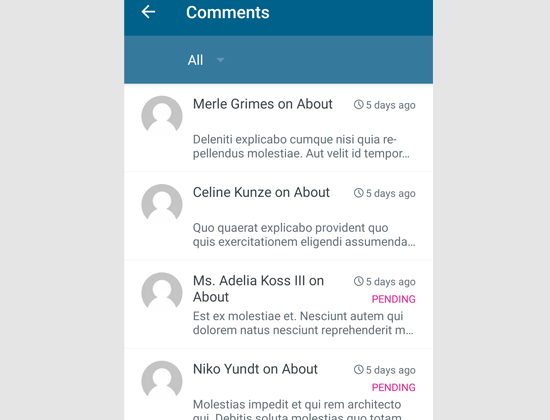
Comments list

You can click on any comment to view more options. This will allow you to edit the comment, approve or disapprove it, mark it as spam, or add a reply.
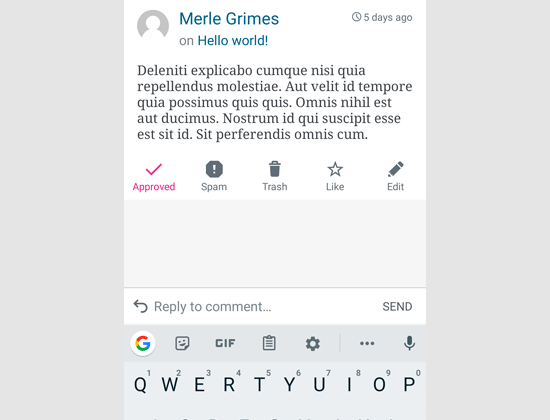
Replying a comment via WordPress app

Performing Admin Tasks via WordPress App

The WordPress app comes with limited options to manage administrative tasks on your WordPress site via the app. Let’s take a look at these options and what you can do with them.

First, the WordPress app allows you to modify some of the site settings from the ‘Settings’ tab.
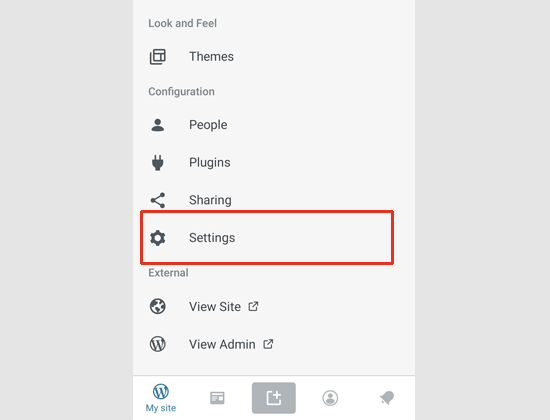
Settings menu

These settings are similar to the settings you see in your WordPress admin area. You can change site title, tagline, default category, timezone, and other options.
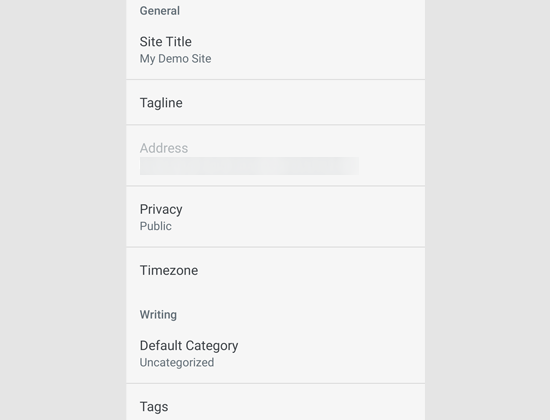
Site settings in WordPress app

However, you will not see settings pages created by your WordPress plugins.

Speaking of plugins, the WordPress app does allow you to manage and even install plugins from the WordPress.org plugin directory.
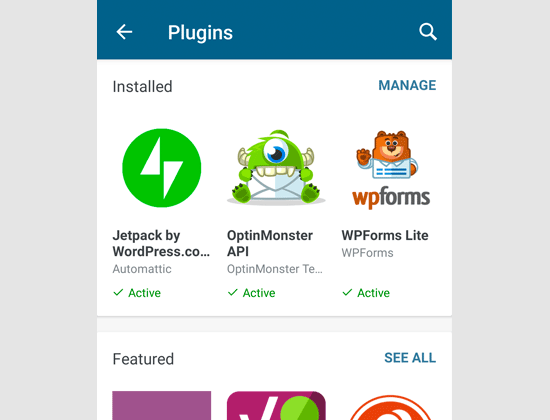
Managing plugins via WordPress app

However, you cannot use any of the plugins inside the app or access their settings. This feature is mainly useful when you need to activate or deactivate a plugin while away from your computer.

Same goes for WordPress themes. The app allows you to switch between installed themes on your WordPress site, but you cannot install new themes from the app or customize them.
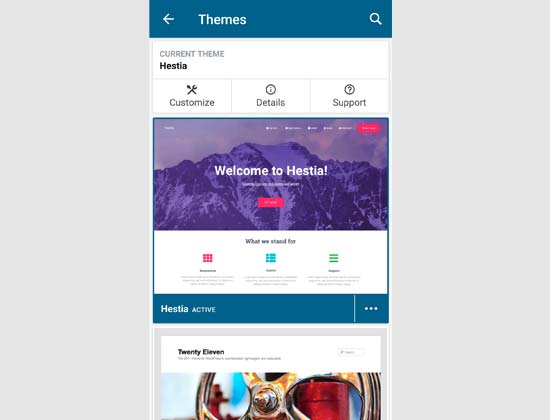
Managing WordPress themes via the app

Is it Possible to Run WordPress Entirely from The App?

No. Currently, it is not possible to efficiently run a WordPress site using only the WordPress app.

For example, you cannot manage plugins using the app. Plugins are an essential part of a WordPress website and you need them to extend your website’s functionality.

You also cannot access custom post types, SEO options, use cover images, use blocks created by plugins, and more.

Why and When to Use The WordPress App?

While the WordPress app is not enough to efficiently run the entire website, it does an excellent job of providing you an easy to use interface to write content, upload photos, and manage comments while away from your computer.

It can also be used when traveling to places with low connectivity. You can use some of the app features offline which allows you to save content as local drafts.

It can be used as a companion app to create content on the go and manage routine tasks like moderating comments.

We hope this article helped you learn how to use the WordPress app on your mobile devices. You may also want to see our list of the best mobile apps to manage your WordPress site.

If you liked this article, then please subscribe to our YouTube Channel for WordPress video tutorials. You can also find us on Twitter and Facebook.

The post How to use WordPress App on your iPhone, iPad, and Android (Guide) appeared first on WPBeginner.

How to Receive Push Notifications for Google Forms on your Mobile Phone

The Google Form Notifications add-on sends the form data in an email message each time a respondent submits your Google Form. The add-on can also send automated emails to form respondents as soon as they complete your Google Form.

The email notifications add-on for Google Forms can also send push notifications to your mobile phones and tablets as well. That means when respondents complete and submit your online Google Form, you’ll instantly get a real-time notification (sample) on your iPhone or Android phone.

The rich push notifications on your mobile can include answers from the Google Form as well as a link to the submitted form so you can view the form answers on your mobile device directly.

A fast response time is a key to success, especially in areas like customer service and closing sales leads, and mobile notifications will ensure that your important form entries are never lost in the daily deluge of emails.

Setup Mobile Notifications for Google Forms

It takes a few easy steps (video tutorial) to get up and running.

  1. Install the Email Notifications for Google Forms from the Google add-on store.
  2. Install the IFTTT mobile app on your Android or iPhone. It will work on the iPad and Android tablets as well.

Next, we need to create a connection between our Google Form and the IFTTT app so that mobile notifications are triggered on the mobile phone immediately after the form is submitted.

1. Configure IFTTT

Open ifttt.com on your desktop and create a new applet. Choose the Maker Webhooks service for if-this condition and select the “Receive a web request” trigger. Set the Event name as the name of your Google Form.

For if-this-then-that action, choose Notifications as the service and choose either “Send a notification from IFTTT app” or “Send a rich notification”. Choose the latter if you want to include the form response URL in the notification that can directly view on the mobile phone.

On the next screen, put {{Value 1}} in the Title field, {{Value 2}} for Message and {{Value 3}} for Link URL. Click the “Create Action” button and then press “Finish” (this is important) to make your IFTTT applet live.

2. Configure Google Forms

Open any Google Form, go to the Add-ons menu, choose Email Notifications and then select Mobile Notifications. Enter the Event name, the IFTTT key, and the notification text. You can put any {{form field name}} in the text and these will be replaced with actual values filled by the user.

That’s it. Click the Test button to test the connection between the form and your mobile phone. If it works, click Save to enable mobile notifications.

Google Forms - Mobile Notifications

If you have multiple Google Forms, you need to create separate IFTTT applets for each form and the event name should be unique for each applet.

Internally, when someone submits your form, the Google Addon triggers and sends a web request to the IFTTT service which in turn pushes the notification to your mobile device.

Troubleshooting Mobile Notifications

  • Ensure that your mobile is connected to the Internet.
  • The event name in the applet should match the event name in the form configuration.
  • You are logged into the IFTTT app on your mobile phone.
  • Check the activity log to ensure that notifications are getting sent.

The post How to Receive Push Notifications for Google Forms on your Mobile Phone appeared first on Digital Inspiration.