Introducing WPCode – Easy WordPress Code Manager to Future-Proof Your Website Customizations

Have you ever wanted to reduce the number of WordPress plugins you’re using on your website?

Wouldn’t it be nice if there was an easy way that allowed you to add future-proof WordPress customizations through code snippets WITHOUT breaking your website?

If you’re like me and most other smart website owners, then you have at least wished for this solution a couple times in your WordPress journey.

Today, I’m excited to share the launch of my free WPCode plugin which will transform the way you think about WordPress customization.

We built this tool to help you save time and hassle when managing your website customizations. This is like the ultimate Swiss-Army knife tool that will help you replace dozens of existing WordPress plugins while making your website faster.

Introducing WPCode - WordPress Code Snippets Plugin

Background Story

In 2012, I created a free plugin called Insert Headers and Footers.

The goal of this plugin was to make it easy for me and other WPBeginner readers to add code to our WordPress site’s header and footer area without editing theme files!

This would include things like Google Analytics script, custom CSS code, Facebook Pixel, AdSense code, and more.

Over the last decade, this simple plugin grew to over 1 million active installs.

Enter tracking code in header

In the same time period, WordPress grew a lot too with tons of new features and plugins.

Every month, I would get requests from our users to add more functionality such as the ability to conditionally load scripts on certain pages, ability to add code snippets in other areas of the website, and so on.

After a lot of thought and consideration, we have decided to expand this free plugin and make it a full-featured code snippet management solution for WordPress with conditional logic, auto-insertion, and much more.

Using the new plugin you can:

  • Add tracking scripts / various webmaster tool verification meta details in your site with just a few clicks.
  • Add banner ads or other dynamic content elements after first paragraph of every blog post, at the end of each blog post, etc.
  • Remove WordPress features that you don’t want such as REST API, XML-RPC, Comments, etc.
  • Easily copy & paste code snippets from tutorials in your WordPress site without errors.
  • And really this is just scratching the surface.

All of these features are available to you for free!

If you’re a marketer, think of WPCode like a Google Tag Manager but inside WordPress.

If you’re a regular business owner, think of this as a swiss-army knife for your website. It will help you do what you want to do – nothing more, nothing less.

WPCode is by far the MOST POWERFUL plugin you’ll install on your WordPress site, and I’m not exaggerating.

Just give me 5 minutes of your attention, and I’ll show you — keep on reading.

What is WPCode?

WPCode is a powerful WordPress code snippet plugin that makes it easy for you to add custom WordPress features using code snippets without editing your theme’s functions.php file.

It comes with a built-in code snippets library where you can find some of my most popular WordPress code snippets that will help you eliminate the need of separate plugins.

WPCode WordPress Code Snippets Library

For example, there are ready-made snippets that will help you:

  • Disable XML-RPC – this is good for WordPress security
  • Allow SVG File Upload – eliminates the need for separate plugin
  • Disable Gutenberg – eliminates the need for separate plugin
  • Disable Comments – eliminates the need for separate plugin
  • Add Tracking Scripts for Google Analytics, Facebook, AdSense, and other platforms

And there are currently over two dozen other code snippets that you can use to add custom functionality while reducing the number of plugins on your site.

For an average website owner, this plugin will help you reduce at least 6 – 8 other plugins that you might be using right now with just the ready-made snippets that are there.

My plan is to continue to add more custom code snippets there to cover popular use-cases. If you have suggestions, please let us know by filling out the form here.

If you’re a WordPress developer / freelancer that wants to contribute code snippets, please send us your snippet using the form above.

Future-Proof Site Customization & Code Management

Most WordPress customization tutorials will ask you to add code snippets to your theme’s functions.php file. This old way simply makes managing code snippets messy, and it also prevents you from updating your theme.

If you ever update your theme or switch to another theme, then you will lose all custom code functions that you added in your functions.php file.

WPCode solves this by providing you an easy way to insert header and footer scripts along with other code snippets directly from your WordPress dashboard. These code snippets actually run as if they were in your theme’s functions.php file, but we make your customizations future-proof.

Create New Custom Snippet in WordPress

You can safely update themes or switch to another theme without ever losing your important website customizations.

Another problem with adding custom code snippets on your theme’s functions.php file was that even the smallest mistake can break your website and make it inaccessible.

So we created our smart code snippet validation. This helps you prevent common code errors to ensures you never break your website when adding code snippets or header and footer scripts.

You can manage all your header and footer scripts as well as other custom code snippets from a single screen. We even make it easy for you to organize code snippets using Tags and add reminder notes with each code snippet.

WPCode - WordPress Snippets Organized by Tags

Built-in WordPress Code Generators

Aside from our growing code snippets library, we also have WordPress code generators to help you quickly get ready-to-use custom code using the latest WordPress coding standards and API’s.

WPCode Generators for WordPress

Examples of Custom Code Generators with Admin UI include:

  • Custom Post Type Generator – Create custom code snippet for Post Types.
  • Custom Taxonomy Generator – Get custom code snippet for Taxonomies.
  • WP Query Generator – Get custom code snippet for WP_Query to load posts.
  • Custom Sidebar Generator – Create custom code snippet to register custom sidebars or widget-ready areas.
  • Custom Widget Generator – Custom code snippet to register custom widgets.
  • Navigation Menu Generator – Custom code snippet for registering new navigation menu locations in your theme.

Aside from the above, we also have code snippet generator for scheduling a cron job, registering scripts & stylesheets, adding custom post status, and more.

In the past, beginners and intermediate users would use WordPress plugins to create custom post types, taxonomies, etc with an admin UI. The problem is that those are one-time use plugins that in the background are just generating custom code snippets.

Now with WPCode free generators, you can cut out those plugins while still adding the custom functionality that you want with an admin UI.

This will be a huge time-saver for new WordPress developers and web professionals who’re building websites for clients.

Conditional Logic for Code Snippets + Auto Insertion Priority

My goal with WPCode was to create a WordPress code snippets plugin that’s both EASY and POWERFUL.

That’s why aside from our global header and footer scripts, we added advanced features like conditional logic for code snippets and made it easy.

Instead of learning WordPress conditional logic queries, you can use visual conditional logic to decide when a certain snippet would load.

WPCode Smart Conditional Logic

Examples use-cases of WPCode conditional logic:

  • Load code snippets for logged in users only
  • Load PHP code snippets for specific user roles
  • Load PHP code snippets only on specific page URLs
  • Insert header and footer pixel scripts on specific pages
  • Show code snippets based on type of page
  • Run code snippet only on certain post types
  • Load header and footer code snippet based on referrer source
  • and more…

We also added both automatic code insertion and manual output using shortcodes. This way you can add features using a custom shortcode, or simply automatically add certain features on area that you want.

WPCode Auto Insert PHP Code

Our Auto Insert feature allows you to run the code snippet everywhere or choose from custom options like:

  • Run code snippet only on frontend
  • Run code snippet only in WordPress admin area
  • Add header and footer scripts sitewide
  • Insert PHP code snippet before or after post content
  • Insert code snippet before or after specific paragraph
  • Insert code snippet on specific archive pages

Aside from that, we also added a visual code snippet priority system, so you can choose the order for your custom functions to avoid code conflict.

Add code description, tags, and priority in WPCode

What are Some Example Use Cases + Plugins You Can Replace?

WPCode is the one plugin that helps you get rid of dozens of other plugins without losing functionality.

Here are some of the top use-cases :

  • Insert Headers and Footers scripts
  • Insert Google Analytics Tracking Code in Header and Footer
  • Insert PHP Code Snippets or JavaScript code snippet without modifying theme’s functions.php file
  • Insert Facebook Pixels code, Google Conversion Pixels code, and other Advertising Conversion Pixel Scripts in WordPress header and footer with conditional logic
  • Insert Google AdSense Ads code, Amazon Native Contextual Ads code, and other Media Ads code
  • Insert Custom JavaScript, CSS, and HTML code
  • Insert Site Verification Meta tags for Social Media, Google Search Console, and other Domain verification in the header and footer of your site
  • Insert re-usable custom content blocks
  • Insert Ads code in content after specific paragraphs
  • Show or hide custom code snippets based on conditional logic
  • Disable XML-RPC, Disable Rest API, disable comments, allow SVG file uploads, disable Gutenberg and enable Classic Editor without adding extra plugins

Just with our current features and ready-made code snippets library, you can replace several popular plugins including:

WPCode comes with a ready-made code snippets library that allows you to replace several popular plugins including:

  • Disable Comment plugins
  • Disable XML-RPC plugins
  • Disable Rest API plugins
  • Disable Gutenberg plugins
  • Classic Editor plugin
  • Allow SVG File Upload plugins
  • Disable RSS feed plugins
  • Disable Search plugins
  • Disable Automatic Updates plugins
  • Disable Admin Bar plugins
  • Disable Widget Blocks plugin
  • Classic Widgets plugin
  • Remove WordPress Version Number plugins
  • Facebook Pixel plugins
  • Google AdSense plugins
  • Custom Post Types UI plugins
  • Other WordPress Generator plugins

On average, I believe you can easily replace 6 – 8 existing plugins on your website because a typical website often installs these one-off feature plugins.

Now you can remove those plugins, clean up your admin area, and simplify your website management.

What’s Coming Next in WPCode?

Since the Insert Headers and Footers plugin had over 1 million users, getting all these new features for free was a surprise for everyone.

I’m extremely pleased with the community response so far, as everyone is loving the new features.

We have an exciting roadmap ahead of us to make this plugin even more powerful. Some of the things that we’re working on:

  • A larger list of Code Snippet library that is vetted by our WordPress experts
  • Save custom snippets to cloud – this will be great for those creating & managing multiple websites as you can build your personalized snippet library inside the plugin
  • and much more

We’re truly building something special here. If you have ideas on how we can make the plugin more helpful to you, please send us your suggestions.

As always, I want to thank you for your continued support of WPBeginner, and we look forward to continue serving you for years to come.

Yours Truly,

Syed Balkhi
Founder of WPBeginner

P.S. Want us to acquire or invest in your WordPress business? Learn more about the WPBeginner Growth Fund.

The post Introducing WPCode – Easy WordPress Code Manager to Future-Proof Your Website Customizations first appeared on WPBeginner.

How to Add Your WordPress Site to Google Search Console

One of the most important step in optimizing your WordPress site for SEO is adding it to Google Search Console (formerly Google Webmaster Tools).

Google Search Console offers specific webmaster tools to help website owners monitor and maintain their search presence and rankings.

In this guide, we will show you how to easily add and verify your WordPress site in Google Search Console also known as Webmaster Tools.

How to easily add your WordPress site to Google Search Console

What is Google Search Console?

Google Search Console is a free tool offered by Google to help website owners monitor their website’s presence in Google search results.

It helps you track search rankings along with keeping you updated about site errors, security issues, and indexing issues that may affect your website’s search performance.

If you are serious about growing your website, then you need to add it to Google webmaster tools from day one.

That being, let’s take a look at how to easily add your site to Google Search Console.

Adding Your WordPress Site to Google Search Console

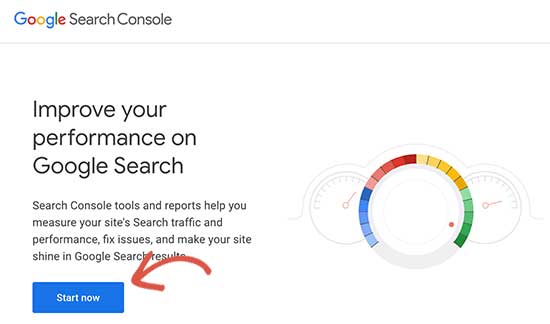
First, you need to visit the Google Search Console website and click on the ‘Start Now’ button.

Start Google Search Console

Next, you’ll need to sign in with your Google / Gmail account.

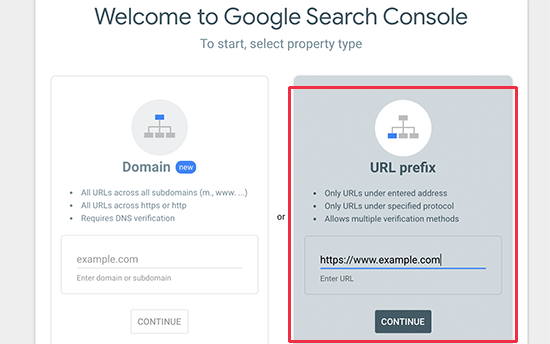
Once logged in, you’ll be asked to enter your website URL.

There are two methods for site verification: domain name or URL prefix. We recommend the URL prefix method because it is more flexible.

Add website URL

Keep in mind that Google considers an HTTP and HTTPS as two different protocols. It also considers https://www.example.com and https://example.com as two different websites.

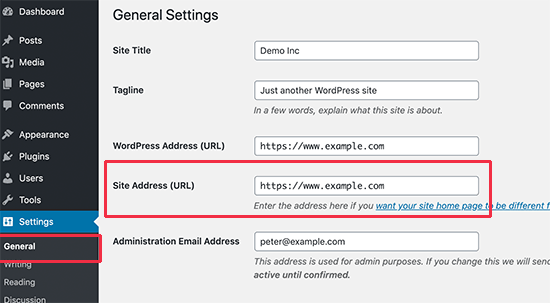
You need to enter the correct website URL used by WordPress.

If you are unsure, then there is an easy way to find out the exact URL you need to enter. Simply login to your WordPress admin area and go to Settings » General page.

There you will see your website’s URL in the site address field.

Copy your site address from WordPress settings page

After entering your correct website address in Google webmaster tools setup wizard, click on the ‘Continue’ button to go to the next step.

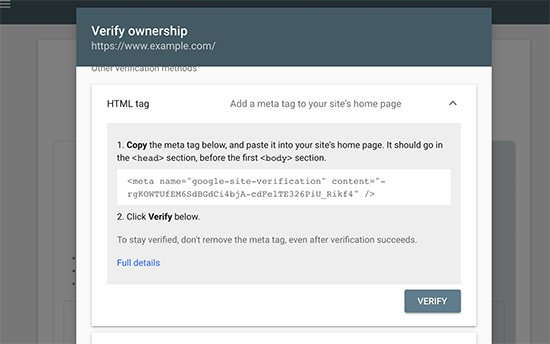
Now, you’ll be asked to verify ownership of your website. There are several ways to do that, but we will show the HTML tag method because it is the easiest one.

Copy the HTML tag

Click on the HTML tag to expand it and then copy the code inside it.

Now, you need to add this Google site verification meta tag in WordPress, so Google can verify that you are the owner of the website.

Most WordPress tutorials will guide you to just edit the header.php file in your WordPress theme and add the code just above the <body> tag.

However, we don’t recommend this method because if you update or change your theme, then the HTML tag will disappear.

Google periodically checks for the HTML tag and will disable your access to the site data in the search console if it cannot find the verification tag.

Here is how to make sure that Google can always verify your ownership of the website.

First, you need to install and activate the Insert Headers and Footers plugin. For more details, see our step by step guide on how to install a WordPress plugin.

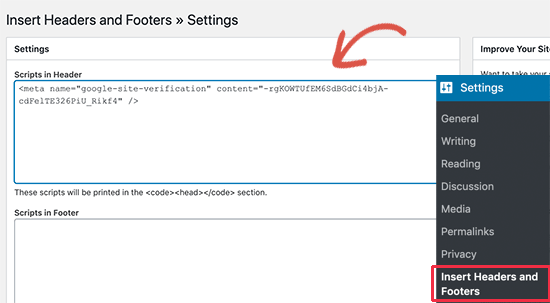
Upon activation, go to Settings » Insert Headers and Footers page and paste the Google HTML tag code you copied earlier inside the ‘Scripts in Header’ box.

Add HTML verification tag to site header

Don’t forget to click on the ‘Save’ button to store your changes.

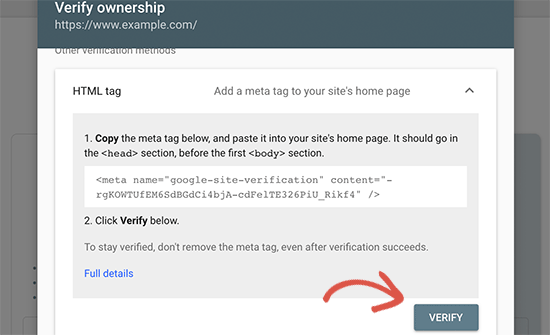
You can now go back to Google Search Console settings and click on the ‘Verify’ button.

Verify ownership

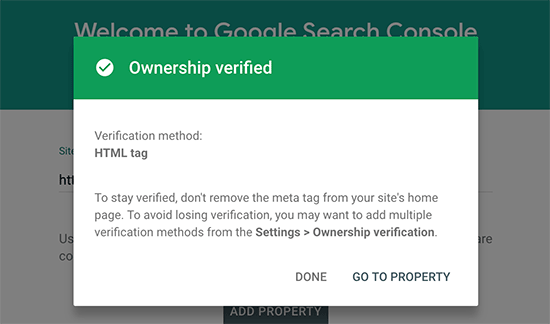
Google Search Console will now look for the HTML tag in your website code and will show you a success message.

Your website successfully added to Search Console

Note: If you don’t see a success message, then you need to clear your WordPress cache. This will ensure that Google can fetch the latest version of your website.

That’s all. You have successfully added your site to the Google Search Console (Webmaster tools). You can now click on the ‘Go to Property’ link to visit your Google Search Console dashboard.

Google Search Console dashboard

From here you can see your website’s performance reports and index coverage.

Before you do that, let’s tell Google a little bit more about your website. This will help Google crawl your website a bit more efficiently.

Add XML Sitemap to Google Search Console

An XML sitemap is a file that lists all your website content in XML format, so search engines like Google can easily discover and index your content.

The easiest way to add an XML sitemap to your WordPress website is by installing and activating the Yoast SEO plugin.

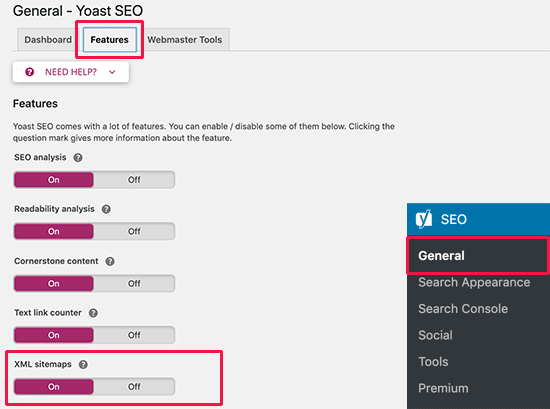
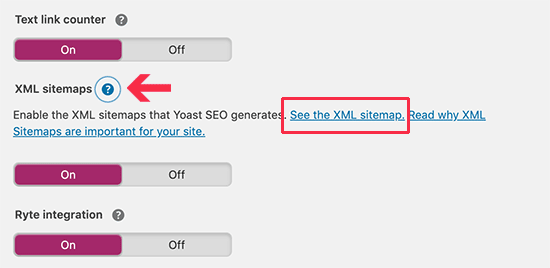
Upon activation, go to SEO » General and switch to the ‘Features’ tab. From here, you need to scroll down to the ‘XML Sitemap’ option and make sure that it is turned on.

XML Sitemap option in Yoast SEO

Next, you need to get the XML sitemap link. Simply click on the question mark icon next to the XML sitemap option, and you will see a link to your XML sitemap.

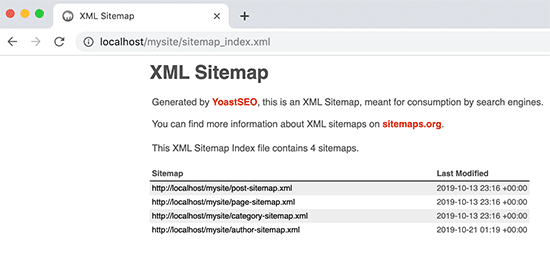
View your XML sitemap

Clicking on the link will take you to your XML sitemap. From there, you can just copy the URL from your browser’s address bar.

Copy your XML Sitemap URL

Alternatively, you can directly access your XML sitemap by adding sitemap_index.xml at the end of your website address. For example:

https://www.example.com/sitemap_index.xml

Now that you have XML sitemap ready, let’s help Google find it quickly.

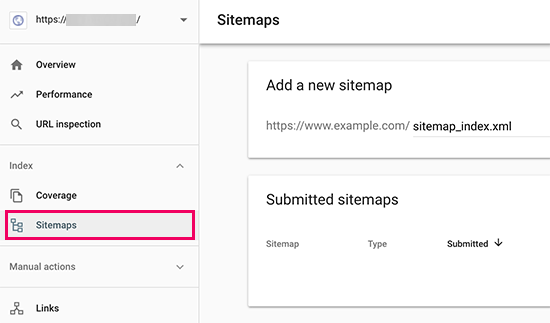
Simply switch to the Google Search Console dashboard and click on the Sitemaps menu from the left column.

Add your sitemap URL to Google Search Console

After that, you need to add the last part of your sitemap URL under the ‘Add new sitemap’ section and click the Submit button.

Google will now add your sitemap URL to your Google Search Console.

That’s all, you have successfully added your website to Google Search Console.

The next step is to learn how to use the treasure trove of information in Google search console to grow your business. We have a complete Google Search Console guide for beginners which shows you how to make the most out of Google Search Console data.

Google Search Console and WordPress FAQs

Having helped thousands of readers add and verify their website in Google search console, we have seen just about every question you can think of. Here are the answers to some of the most frequently asked questions.

1. How can I upload a Google HTML verification file to my WordPress blog?

Google Search Console allows few different ways to verify website ownership. In this article, we covered the easiest method which is to use the Google site verification meta tag. However some website owners prefer to upload the HTML file to verify site ownership.

To upload the Google search console HTML verification file to WordPress, you will need to login to your WordPress hosting cPanel or connect to your hosting account using FTP.

Next, you need to upload the HTML verification file inside the /public_html/ folder of your website. This is the root directory where you’ll see other WordPress folders like /wp-admin/, /wp-content/, etc.

2. Should I use a Google Site verification plugin for WordPress?

There are many WordPress plugins that are designed specifically to help you with Google site verification. However you don’t need to use them because you’ll likely need to verify ownership on other webmaster tools and platforms like Bing, Yandex, Pinterest, etc.

It’s much better to use the Insert Headers and Footers plugin because it lets you add site verification for all platforms (in a single plugin).

3. How can I become a power user of Google Search Console?

Google search console has a lot of useful information that you can use to grow your business. We have created the ultimate Google Search Console guide that you can use to become a power user.

4. I’m running into problems, is there a Google Search console phone number that I can contact?

No, there’s no Google search console phone number that you can contact. If you’re running into problems with Google search console, then you can use their online support center. For specific questions about WordPress, you can always join our free WordPress help group to ask your questions.

We hope this article helped you learn how to easily add your WordPress site to Google Search Console. You may also want to see our guide on how to get more traffic to your website, and our comparison of the best email marketing services for small business.

If you liked this article, then please subscribe to our YouTube Channel for WordPress video tutorials. You can also find us on Twitter and Facebook.

The post How to Add Your WordPress Site to Google Search Console appeared first on WPBeginner.

How to Add Header and Footer Code in WordPress (the Easy Way)

Have you ever been asked to add some code snippets to <header> or <footer> section of your WordPress website?

Often you are asked to add header and footer code in WordPress when trying to integrate with web services like Google Analytics, Facebook Pixel, Google Search Console, etc.

You may also come across WordPress tutorials that might ask you to add some custom CSS or Javascript code to your WordPress header or footer.

By default, WordPress doesn’t provide an option to insert code in your website’s header and footer. Luckily there is an easy solution for beginners.

In this article, we will show you how to easily add header and footer code in WordPress. The goal is to safely add the code without directly editing your WordPress theme files.

How to Add Header and Footer Code in WordPress

The Best Way to Add WordPress Header and Footer Code

If you want to add WordPress header and footer code, there are three possible solutions:

  1. Manually, by editing you theme’s header.php and footer.php files
  2. With your theme’s built-in header and footer code feature
  3. Using a plugin

The first option is not beginner friendly because it requires you to add header and footer code by directly editing the header.php and footer.php files manually.

Another disadvantage of using this method is that your code will be removed if you install an update to your theme.

The second option is using your theme’s built-in feature. Some WordPress themes like Elegant Themes and Genesis Framework by StudioPress offer a built-in option for quickly adding code and scripts to your WordPress header and footer.

If you are using a theme with a built-in feature, then it seems like a safe and simple solution. However if you change your theme, then all the code snippets added to your website will be gone. This includes site verification in Google Search Console, website analytics via Google Analytics, etc.

This why we always recommend users to use the third option, a headers and footers plugin. This option is by far the easiest and safest method to add header and footer code in WordPress.

After a lot of request from readers, our team has built a 100% free Insert Headers and Footers plugin to let users easily add code to the header and footer in WordPress.

Insert Headers and Footers

Here are some benefits of using the Insert Headers and Footers plugin:

1. Easy, Fast, and Organized: It lets you add codes to your site’s header and footer easily and quickly. Plus, it keeps you organized by allowing you to store all your footer and header codes in one place.

2. Prevents Errors: It helps prevent errors which may occur if you edit your theme files manually.

3. Upgrade or Change Your Theme Without any Worry: The plugin will save your header and footer code in a separate place, so you can update or change your theme without worrying about the code being erased.

With that said, let’s see how to easily add header and footer code in WordPress using Insert Headers and Footers plugin.

Adding Code to Header and Footer in WordPress

First thing you need to do is install and activate the Insert Headers and Footers plugin. For more details, see our step by step guide on how to install a WordPress plugin.

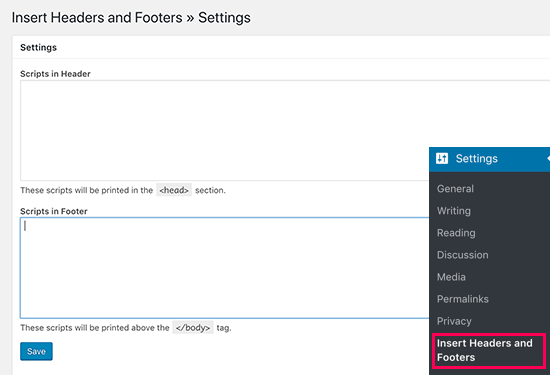
Once the plugin is activated, go to Settings » Insert Headers and Footers from your admin panel. After that, you will see two boxes for adding code to header and footer.

Insert Headers and Footers plugin settings

Simply paste the code in one of the two boxes. Once done, don’t forget to click the Save button to store your changes.

The plugin will now automatically load the code in the respective locations on your WordPress site.

You can always edit and remove any code that you don’t want to keep.

You’ll need to keep the plugin installed and activated at all times. Deactivating the plugin will stop adding all custom code to your site.

If you accidentally deactivate the plugin, the code will still be safely stored in your WordPress database. You can simply reinstall or reactivate the plugin, and the code will start appearing again.

Note: You may have to clear your WordPress cache after saving changes, so the code properly appears on the front-end of your website.

We have found the biggest reason why a lot of beginners use the Insert Headers and Footers plugin is to add Google Analytics to their website. For that, we actually recommend using the free MonsterInsights plugin. It’s the best Google analytics plugin for WordPress which helps you properly setup Google analytics tracking with just a few clicks, and it shows you helpful stats right inside your WordPress dashboard.

We hope this article helped you to learn how to add header and footer code in WordPress easily. You may also want to see our comparison of the best email marketing services and the best business phone services.

If you liked this article, then please subscribe to our YouTube Channel for WordPress video tutorials. You can also find us on Twitter and Facebook.

The post How to Add Header and Footer Code in WordPress (the Easy Way) appeared first on WPBeginner.