De-Mystifying IndieWeb on a WordPress Site

Well, sheesh. I opened a little can of worms when sharing Miriam’s “Am I on the IndieWeb yet?” with a short post bemoaning my own trouble getting on the IndieWeb train. But it’s a good can of worms.

I think it was something like the next day after publishing that short post that David Shanske reached out and offered to help wrap my head around IndieWeb and the components that it comprises. And gosh dang if it wasn’t ridiculously helpful! So much so that I’d like to link you up to a new post David wrote after we talked, then summarize things here as best as I can because (1) it’s helpful to write things down and (2) have a reference for later.

Yes, IndieWeb is confusing.

David had actually helped someone get their WordPress site all set up with IndieWeb powers. That person, too, was struggling to understand how the various pieces fit together. So, David already had this top of mind when Miriam and I were writing.

“IndieWeb” is a new term for many folks and that’s where a lot of confusion breeds. Is it a framework? A philosophy? A set of standards? Depending on which one it is, the expectations shift as far as what it looks like to be a part of it.

It’s sort of all of the above. And that needs to be solidified a bit. There’s nothing inherently confusing about IndieWeb itself once you view it through those different lenses. After reading David’s post my understanding is that IndieWeb is more of a set of protocols. Sorta like working with structured data or OpenGraph in markup. There’s nothing to install per se, but there are standards for how to integrate them into your work.

Your identity powers IndieWeb. In other words, your site establishes your identity and can be used to do lots of things, like:

  • Notify other IndieWeb-supported sites when they are mentioned
  • Receive notifications from other IndieWeb sites when you are mentioned
  • Fetch information from a mention and format it for display
  • Authenticate your identity through your own website (a là a Google sign-in button but connected to your site)
  • …among other things.

If that sorta sounds like pingbacks, well, it sorta is. But much more robust and maintained.

It’s different (and perhaps easier) to implement IndieWeb features on WordPress than it is a static site.

The big difference is that WordPress provides a lot of the requirements needed to do IndieWeb-y things. I like how David explains it:

The IndieWeb implementation on WordPress is a [series] of building blocks that you can or cannot choose to use, which is what makes it wonderful, but sometimes confusing. WordPress has a philosophy of decisions, not options. But the IndieWeb is all about options…about building the features that are right for you.

Those building blocks are plugins that you install to add IndieWeb protocols and technologies to WordPress. It’s awesome those are readily available because that takes a a lot of the work out of things. Running a static site, though, you’re on the hook for establishing most of that yourself.

David’s post is 100% focused on the WordPress implementation. Your mileage may vary, but you will certainly walk away with a better idea of what protocols are available and how they fit together after reading his post — and hopefully this one as well.

The IndieWeb WordPress plugin establishes your identity.

I thought it was doing so much stuff behind the scenes, but it’s a lot more simple than that:

The plugin by itself handles establishing your identity as the IndieWeb sees it. It offers an h-card template and widget. H-Card is the markup for marking up information about a person or place. So, this is an element many people opt to put on their site anyway.

So, really, it’s possible to get the same sort of thing by correctly marking up a WordPress theme. The convenience here is that you get a handy little template that’s marked up to support the h-card open format and a widget to drop it into a theme’s widget area.

Here’s a super detailed example of the h-card markup pulled from the documentation for Microformats2:

<div class="h-card">
  <img class="u-photo" alt="photo of Mitchell"
       src="https://webfwd.org/content/about-experts/300.mitchellbaker/mentor_mbaker.jpg"/>
  <a class="p-name u-url"
     href="http://blog.lizardwrangler.com/" 
    >Mitchell Baker</a>
 (<a class="u-url" 
     href="https://twitter.com/MitchellBaker"
    >@MitchellBaker</a>)
  <span class="p-org">Mozilla Foundation</span>
  <p class="p-note">
    Mitchell is responsible for setting the direction and scope of the Mozilla Foundation and its activities.
  </p>
  <span class="p-category">Strategy</span>
  <span class="p-category">Leadership</span>
</div>

See those class names? Classes like .h-card, u-photo, p-name, etc. all provide contextual meaning for a person’s identity which it then parsed as JSON:

{
  "items": [{ 
    "type": ["h-card"],
    "properties": {
      "photo": ["https://webfwd.org/content/about-experts/300.mitchellbaker/mentor_mbaker.jpg"],
      "name": ["Mitchell Baker"],
      "url": [
        "http://blog.lizardwrangler.com/",
        "https://twitter.com/MitchellBaker"
      ],
      "org": ["Mozilla Foundation"],
      "note": ["Mitchell is responsible for setting the direction and scope of the Mozilla Foundation and its activities."],
      "category": [
        "Strategy",
        "Leadership"
      ]
    }
  }]
}

The plugin isn’t doing the sending, receiving, or parsing. Instead, it provides a WordPress site with a way to verify your identity in the markup.

Not all WordPress themes support Microformats

If you scratched your head first time you saw “Microformats” like I did, David defines it nicely:

[…] Microformats…a way of marking up HTML to allow elements to be identified. It is one of several ways of doing this, but is a very simple and readable one, which is why it is popular in the IndieWeb community.

The problem, as David continues, is that many themes aren’t marked up in a Microformats-friendly way — which is what the Microformats2 plugin is designed to fix. That said, David is quick to call out that the plugin is extremely limited in how it accomplishes this, and he recommends instead marking up a theme by hand.

According to David, the next major release of the Webmention plugin will likely include smarter ways of detecting content and images it can use and formatting them for Microformats2 support.

Webmentions send and receive notifications.

OK, so if you’ve established your identity through your site so you are discoverable, and your site is marked up for h-card support using Microformats2. Great! You still need something in the middle working as an operator that sends and receives notifications. In other words, when another site mentions you — called a Webmention — the site mentioning you needs a way to support sending that mention to you, and your site needs a way to accept it (or vice versa).

That’s what the Webmention plugin is for. It’s also probably the source of most of my IndieWeb confusion. I thought it was formatting data and needed an additional service to send and receive it. Nope! It’s actually sending and receiving the data rather than creating the mention. Back to David:

Back when it was built, the plugin handled only the business of receiving and sending webmentions, not handling display to any degree. Semantic Linkbacks, a separate plugin handled that for not only webmentions, but the older pingback and trackback protocols.

So, the Webmention plugin is communicating notifications. Meanwhile, another plugin called Semantic Linkbacks is what handles the data. And what the heck are Semantic Linkbacks?

Semantic Linkbacks fetch and handle data.

Semantic Linkbacks is another plugin that handles another piece of the process. There’s no way I can explain it better than David already does:

Semantic Linkbacks takes a webmention, which is a notification that another site has linked to something on your site, fetches the other site, and tries to render a display of the information. How that is done can vary from just a profile photo (if it can find one), to interpreting it as a full comment.

It does this using Microformats.

I expected that the main IndieWeb plugin was already doing this since it handles other markup. But it only provides the template and widget to get your identity on your site. Once the Semantic Linkbacks plugin fetches an incoming webmention, it takes the data, formats it, then attempts to display it.

Sounds like the plugin will be somewhat merged with (or replaced by) an upcoming version of the Webmention plugin:

Since many people are not inclined, or not comfortable modifying a theme, the new version of Webmentions will include several different alternative ways to try to find an image or summary to display…from OpenGraph (which Facebook and Twitter use to display URLs provided to it) to detecting the WordPress REST API version of a page and using that to get the author name and profile image. None of them will provided as much context as Microformats, but the experience will still be something worth installing.

That’s certainly nice as it taps into the WordPress REST API for the JSON response and formats that for display.

Brid.gy is a service to help display interactions.

A Webmention can be an interaction, say someone likes your post on Twitter or retweets it.

Differentiating a like from a repost from a comment from a whatever needs to happen, and you’d need to implement the Twitter (or whatever) API to draw those distinctions.

That’s something you can certainly do! But if you’d rather plug and play, one of the IndieWeb community members made a service called Brid.gy. You create an account, hook up your site, and give app permissions to the service… then you’re done!

What Brid.gy has done is essentially implement the APIs for Twitter, Facebook, Instagram, and others, so that when it detects that a post in those services that interacts with your syndicated post, a Webmention is sent to your site and goes through the process of publishing on your own site.

There’s so much more!

Quick hits:

  • IndieAuth: This is a protocol based on OAuth 2. The plugin establishes an endpoint in the WordPress REST API that can be used to authenticate your identity through your own self-hosted site — essentially your own Google sign-in button but without establishing that endpoint yourself or needing to rely on a separate hosted API.
  • Micropub: For those who use WordPress but prefer a different editor can install the Micropub plugin. This adds an endpoint that allows you to publish content to your site and using a Micropub-supported editor create items in a Microformats2 feed, giving you way more options for writing content outside of the WordPress Block Editor.
  • Simple Location: David wrote this plugin and I was super impressed when he demoed it for me. The idea is it pulls in data from your current location that can used for everything from displaying the weather at the time you wrote a post, to creating an entire archive of posts on an embedded map based on the post location. I’d honestly love to see something like this baked directly into WordPress.
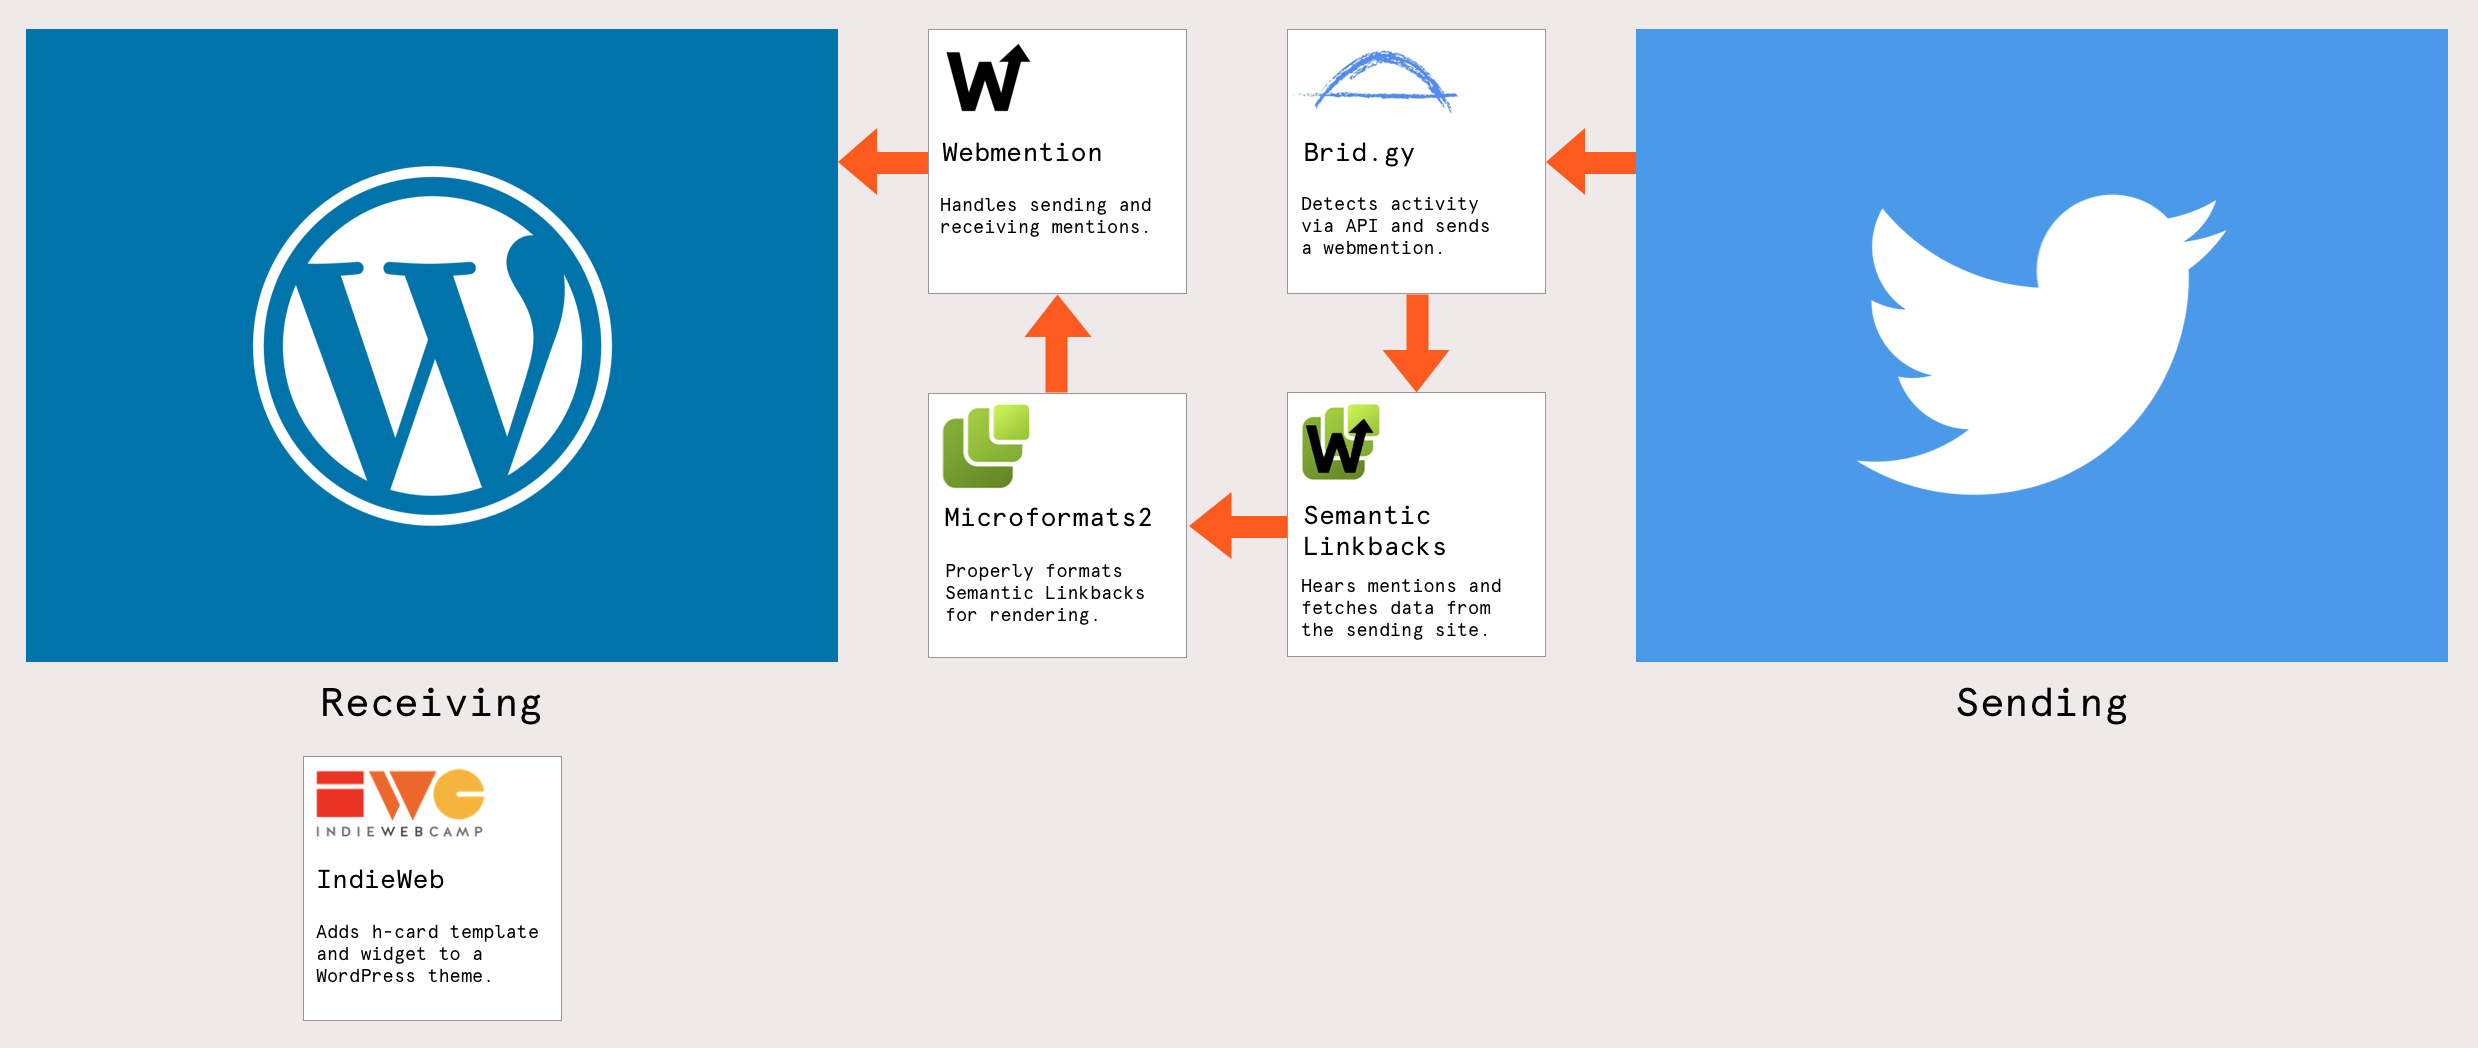
The updated flow

I attempted to make an illustration that outlines the various pieces in my last post, but let’s try again with an updated understanding of what’s happening:

Outlining the flow between an IndieWeb enabled site and a site that mentions it.
(Full size)

Is this all making sense?

High fives to David for both reaching out and taking the time to show me what it looks like to implement IndieWeb on WordPress. I can’t claim I fully understand all the nuances, but I at least feel like I have a decent grasp of the pieces — the philosophy, protocols, and tech — that are required to make it happen.

I’d like to turn it around to you! Does this help clarify things for you? Is there anything you’re struggling to understand? Think you’re able to configure a WordPress site with IndieWeb features now? Let’s take it to the comments!


De-Mystifying IndieWeb on a WordPress Site originally published on CSS-Tricks. You should get the newsletter.

Am I on the IndieWeb yet?

Can’t smash the Like button hard enough for what Miriam Suzanne has to say on the challenging technical hurdles of implementing Webmentions:

The first round required several online services along with HTML & JS changes to my static site, just to verify my indieweb identity. Then more changes to the site and more online services to help fetch any mentions (so far, nothing to see, but that’s probably expected). It seems the only way to test the setup is to launch all those changes publicly, and then ask for other devs to send you mentions.

[…]

I’m an experienced web developer, and I can figure it out. But the steps aren’t simple, and most of my friends are not web developers. So, to me, this all feels like the prototype of an idea – a proof of concept.

A proof of concept for sure. And one that has been around for quite some time. The IndieWeb idea of owning your own data and using your website as a social hub is right up my alley — and likely yours, too, as someone working on the front end.

Yet, I’ve tinkered on and off with it — specifically Webmentions — over the past like three years with little to show for it. The problem isn’t so much the documentation of getting started because it’s all there. It’s more a combination of things…

  • The wiki is confusing. Wikis are super cool in general, but the non-linear nature of it makes it tough to know where to start and where to end.
  • The plugin ecosystem is complex. My personal site is on WordPress and there’s a plugin designed to make it easy to integrate IndieWeb features on it. Except that it’s really one plugin that steers you to install several others, each one introducing a technology that I honestly struggle to understand.
  • There’s a bunch of terms to learn. I mean, “IndieWeb” and “Webmention” are already difficult to grok. Toss in things like “Micropub,” “Microformats,” “IndieAuth,” and “Semantic Linkbacks,” and suddenly it feels like a bunch of puzzle pieces from different puzzles trying to fit together.
  • Some middleware seems necessary? For example, I had to give a service called Bridgy access to my Twitter to get that activity going. It apparently has something to do with Twitter’s shortened t.co URLs and making them play well with microformats.

But, like Miriam, I struggled my way through it and got something working in the end. This is the sort of visual I wish I had when I was first getting started, and maybe it’ll help you too.

Diagram of IndieWeb integration on a WordPress site.

Feels like a lot to get Webmentions going, but maybe that’s only because I have such a light grasp of the tech and how it all fits together. All the pieces are there, though, and even with the initial struggle, I love the IndieWeb concept, er prototype.

To Shared LinkPermalink on CSS-Tricks


Am I on the IndieWeb yet? originally published on CSS-Tricks. You should get the newsletter.

Jumping Into Webmentions With NextJS (or Not)

Webmention is a W3C recommendation last published on January 12, 2017. And what exactly is a Webmention? It’s described as…


[…] a simple way to notify any URL when you mention it on your site. From the receiver’s perspective, it’s a way to request notifications when other sites mention it.

In a nutshell, it’s a way of letting a website know it has been mentioned somewhere, by someone, in some way. The Webmention spec also describes it as a way for a website to let others know it cited them. What that basically bails down to is that your website is an active social media channel, channeling communication from other channels (e.g. Twitter, Instagram, Mastodon, Facebook, etc.).

How does a site implement Webmentions? In some cases, like WordPress, it’s as trivial as installing a couple of plugins. Other cases may not be quite so simple, but it’s still pretty straightforward. In fact, let’s do that now!

Here’s our plan

  1. Declare an endpoint to receive Webmentions
  2. Process social media interactions to Webmentions
  3. Get those mentions into a website/app
  4. Set the outbound Webmentions

Luckily for us, there are services in place that make things extremely simple. Well, except that third point, but hey, it’s not so bad and I’ll walk through how I did it on my own atila.io site.

My site is a server-side blog that’s pre-rendered and written with NextJS. I have opted to make Webmention requests client-side; therefore, it will work easily in any other React app and with very little refactoring in any other JavaScript application.

Step 1: Declare an endpoint to receive Webmentions

In order to have an endpoint we can use to accept Webmentions, we need to either write the script and add to our own server, or use a service such as Webmention.io (which is what I did).

Webmention.io is free and you only need to confirm ownership over the domain you register. Verification can happen a number of ways. I did it by adding a rel="me" attribute to a link in my website to my social media profiles. It only takes one such link, but I went ahead and did it for all of my accounts.

<a
  href="https://twitter.com/atilafassina"
  target="_blank"
  rel="me noopener noreferrer"
>
  @AtilaFassina
</a>

Verifying this way, we also need to make sure there’s a link pointing back to our website in that Twitter profile. Once we’ve done that, we can head back to Webmention.io and add the URL.

This gives us an endpoint for accepting Webmentions! All we need to do now is wire it up as <link> tags in the <head> of our webpages in order to collect those mentions.

<head>
  <link rel="webmention" href="https://webmention.io/{user}/webmention" />
  <link rel="pingback" href="https://webmention.io/{user}/xmlrpc" />
  <!-- ... -->
</head>

Remember to replace {user} with your Webmention.io username.

Step 2: Process social media interactions into Webmentions

We are ready for the Webmentions to start flowing! But wait, we have a slight problem: nobody actually uses them. I mean, I do, you do, Max Böck does, Swyx does, and… that’s about it. So, now we need to start converting all those juicy social media interactions into Webmentions.

And guess what? There’s an awesome free service for it. Fair warning though: you’d better start loving the IndieWeb because we’re about to get all up in it.

Bridgy connects all our syndicated content and converts them into proper Webmentions so we can consume it. With a SSO, we can get each of our profiles lined up, one by one.

Step 3: Get those mentions into a website/app

Now it’s our turn to do some heavy lifting. Sure, third-party services can handle all our data, but it’s still up to us to use it and display it.

We’re going to break this up into a few stages. First, we’ll get the number of Webmentions. From there, we’ll fetch the mentions themselves. Then we’ll hook that data up to NextJS (but you don’t have to), and display it.

Get the number of mentions

type TMentionsCountResponse = {
  count: number
  type: {
    like: number
    mention: number
    reply: number
    repost: number
  }
}

That is an example of an object we get back from the Webmention.io endpoint. I formatted the response a bit to better suit our needs. I’ll walk through how I did that in just a bit, but here’s the object we will get:

type TMentionsCount = {
  mentions: number
  likes: number
  total: number
}

The endpoint is located at:

https://webmention.io/api/count.json?target=${post_url}

The request will not fail without it, but the data won’t come either. Both Max Böck and Swyx combine likes with reposts and mentions with replies. In Twitter, they are analogous.

const getMentionsCount = async (postURL: string): TMentionsCount => {
  const resp = await fetch(
    `https://webmention.io/api/count.json?target=${postURL}/`
  )
  const { type, count } = await resp.json()


  return {
    likes: type.like + type.repost,
    mentions: type.mention + type.reply,
    total: count,
  }
}

Get the actual mentions

Before getting to the response, please note that the response is paginated, where the endpoint accepts three parameters in the query:

  • page: the page being requested
  • per-page: the number of mentions to display on the page
  • target: the URL where Webmentions are being fetched

Once we hit https://webmention.io/api/mentions and pass the these params, the successful response will be an object with a single key links which is an array of mentions matching the type below:

type TMention = {
  source: string
  verified: boolean
  verified_date: string // date string
  id: number
  private: boolean
  data: {
    author: {
      name: string
      url: string
      photo: string // url, hosted in webmention.io
    }
    url: string
    name: string
    content: string // encoded HTML
    published: string // date string
    published_ts: number // ms
  }
  activity: {
    type: 'link' | 'reply' | 'repost' | 'like'
    sentence: string // pure text, shortened
    sentence_html: string // encoded html
  }
  target: string
}

The above data is more than enough to show a comment-like section list on our site. Here’s how the fetch request looks in TypeScript:

const getMentions = async (
  page: string,
  postsPerPage: number,
  postURL: string
): { links: TWebMention[] } => {
  const resp = await fetch(
    `https://webmention.io/api/mentions?page=${page}&per-page=${postsPerPage}&target=${postURL}`
  )
  const list = await resp.json()
  return list.links
}

Hook it all up in NextJS

We’re going to work in NextJS for a moment. It’s all good if you aren’t using NextJS or even have a web app. We already have all the data, so those of you not working in NextJS can simply move ahead to Step 4. The rest of us will meet you there.

As of version 9.3.0, NextJS has three different methods for fetching data:

  1. getStaticProps: fetches data on build time
  2. getStaticPaths: specifies dynamic routes to pre-render based on the fetched data
  3. getServerSideProps: fetches data on each request

Now is the moment to decide at which point we will be making the first request for fetching mentions. We can pre-render the data on the server with the first batch of mentions, or we can make the entire thing client-side. I opted to go client-side.

If you’re going client-side as well, I recommend using SWR. It’s a custom hook built by the Vercel team that provides good caching, error and loading states — it and even supports React.Suspense.

Display the Webmention count

Many blogs show the number of comments on a post in two places: at the top of a blog post (like this one) and at the bottom, right above a list of comments. Let’s follow that same pattern for Webmentions.

First off, let’s create a component for the count:

const MentionsCounter = ({ postUrl }) => {
  const { t } = useTranslation()
  // Setting a default value for `data` because I don't want a loading state
  // otherwise you could set: if(!data) return <div>loading...</div>
  const { data = {}, error } = useSWR(postUrl, getMentionsCount)


  if (error) {
    return <ErrorMessage>{t('common:errorWebmentions')}</ErrorMessage>
  }


  // The default values cover the loading state
  const { likes = '-', mentions = '-' } = data


  return (
    <MentionCounter>
      <li>
        <Heart title="Likes" />
        <CounterData>{Number.isNaN(likes) ? 0 : likes}</CounterData>
      </li>
      <li>
        <Comment title="Mentions" />{' '}
        <CounterData>{Number.isNaN(mentions) ? 0 : mentions}</CounterData>
      </li>
    </MentionCounter>
  )
}

Thanks to SWR, even though we are using two instances of the WebmentionsCounter component, only one request is made and they both profit from the same cache.

Feel free to peek at my source code to see what’s happening:

Display the mentions

Now that we have placed the component, it’s time to get all that social juice flowing!

At of the time of this writing, useSWRpages is not documented. Add to that the fact that the webmention.io endpoint doesn’t offer collection information on a response (i.e. no offset or total number of pages), I couldn’t find a way to use SWR here.

So, my current implementation uses a state to keep the current page stored, another state to handle the mentions array, and useEffect to handle the request. The “Load More” button is disabled once the last request brings back an empty array.

const Webmentions = ({ postUrl }) => {
  const { t } = useTranslation()
  const [page, setPage] = useState(0)
  const [mentions, addMentions] = useState([])


  useEffect(() => {
    const fetchMentions = async () => {
      const olderMentions = await getMentions(page, 50, postUrl)
      addMentions((mentions) => [...mentions, ...olderMentions])
    }
    fetchMentions()
  }, [page])


  return (
    <>
      {mentions.map((mention, index) => (
        <Mention key={mention.data.author.name + index}>
          <AuthorAvatar src={mention.data.author.photo} lazy />
          <MentionContent>
            <MentionText
              data={mention.data}
              activity={mention.activity.type}
            />
          </MentionContent>
        </Mention>
      ))}
      </MentionList>
      {mentions.length > 0 && (
        <MoreButton
          type="button"
          onClick={() => {
          setPage(page + 1)
        }}
        >
        {t('common:more')}
      </MoreButton>
    )}
    </>
  )
}

The code is simplified to allow focus on the subject of this article. Again, feel free to peek at the full implementation:

Step 4: Handling outbound mentions

Thanks to Remy Sharp, handling outbound mentions from one website to others is quite easy and provides an option for each use case or preference possible.

The quickest and easiest way is to head over to Webmention.app, get an API token, and set up a web hook. Now, if you have RSS feed in place, the same thing is just as easy with an IFTT applet, or even a deploy hook.

If you prefer to avoid using yet another third-party service for this feature (which I totally get), Remy has open-sourced a CLI package called wm which can be ran as a postbuild script.

But that’s not enough to handle outbound mentions. In order for our mentions to include more than simply the originating URL, we need to add microformats to our information. Microformats are key because it’s a standardized way for sites to distribute content in a way that Webmention-enabled sites can consume.

At their most basic, microformats are a kind of class-based notations in markup that provide extra semantic meaning to each piece. In the case of a blog post, we will use two kinds of microformats:

  • h-entry: the post entry
  • h-card: the author of the post

Most of the required information for h-entry is usually in the header of the page, so the header component may end up looking something like this:

<header class="h-entry">
  <!-- the post date and time -->
  <time datetime="2020-04-22T00:00:00.000Z" class="dt-published">
    2020-04-22
  </time>
  <!-- the post title -->
  <h1 class="p-name">
    Webmentions with NextJS
  </h1>
</header>

And that’s it. If you’re writing in JSX, remember to replace class with className, that datetime is camelCase (dateTime), and that you can use the new Date('2020-04-22').toISOString() function.

It’s pretty similar for h-card. In most cases (like mine), author information is below the article. Here’s how my page’s footer looks:

<footer class="h-card">
  <!-- the author name -->
  <span class="p-author">Atila Fassina</span>
  <!-- the authot image-->
  <img
    alt="Author’s photograph: Atila Fassina"
    class="u-photo"
    src="/images/internal-avatar.jpg"
    lazy
  />
</footer>

Now, whenever we send an outbound mention from this blog post, it will display the full information to whomever is receiving it.

Wrapping up

I hope this post has helped you getting to know more about Webmentions (or even about IndieWeb as a whole), and perhaps even helped you add this feature to your own website or app. If it did, please consider sharing this post to your network. I will be super grateful! 😉

References

Further reading

The post Jumping Into Webmentions With NextJS (or Not) appeared first on CSS-Tricks.

WPWeekly Episode 361 – Introduction to the IndieWeb With David Shanske

In this episode, John James Jacoby and I are joined by David Shanske. David introduces us to a set of philosophies known as the IndieWeb, explains how it’s different from the Open Web, and how he’s been involved in the community. We discuss tools that help people own their data while still being able to take advantage of the benefits that social networks offer. We also talk about WordPress’ role and how capable it is out-of-the-box for participating in the IndieWeb.

Stories Discussed:

Bridgy connects individual sites with social networks

IndieWeb Wiki

IndieWebCamps

IndieWeb WordPress Plugin

WordPress XFN

IndieWebifying Your WordPress – IndieWeb Summit 2019

WPWeekly Meta:

Next Episode: Wednesday, July 31st 3:00 P.M. Eastern

Subscribe to WordPress Weekly via Itunes

Subscribe to WordPress Weekly via RSS

Subscribe to WordPress Weekly via Stitcher Radio

Subscribe to WordPress Weekly via Google Play

Listen To Episode #361:

IndieWeb and Webmentions

The IndieWeb is a thing! They've got a conference coming up and everything. The New Yorker is even writing about it:

Proponents of the IndieWeb offer a fairly straightforward analysis of our current social-media crisis. They frame it in terms of a single question: Who owns the servers? The bulk of our online activity takes places on servers owned by a small number of massive companies. Servers cost money to run. If you’re using a company’s servers without paying for the privilege, then that company must be finding other ways to “extract value” from you.

As I understand it, the core concept is running your own website where you are completely in control, as opposed to publishing content you create on a third-party website. It doesn't say don't use third-party websites. It just says syndicate there if you want to, but make your own website the canonical source.

Don't tweet, but instead write a short blog post and auto-post it to Twitter. Don't blog on Medium, but instead write on your own blog and plop it over to Medium. Like that. In that way, you're getting the value of those services without giving anything up.

Continue reading "IndieWeb and Webmentions"