11-Point WordPress SEO Audit Checklist to Boost Your Rankings

Do you want to perform an SEO audit of your WordPress website so you can improve your search engine rankings and get more traffic?

Search engine optimization can be tricky if you don’t know what’s working and what’s not. By performing an SEO audit, you can analyze your site, find opportunities for improvement, and resolve critical issues.

In this article, we’ll go through a WordPress SEO audit checklist to boost your rankings.

WordPress SEO audit checklist to boost rankings

What Is an SEO Audit?

Optimizing your WordPress website for search engines is important for attracting more visitors and growing your audience. However, many business owners don’t know if their SEO strategy is working or not.

This is where SEO audit comes in handy. It is a process of finding out if your website is properly optimized to rank better in search results.

By conducting SEO audits, you can also uncover critical issues on your WordPress website that might be stopping you from ranking higher in search engine results.

Then, based on the results from the audit, you can make adjustments to your WordPress SEO strategy, resolve any issues, and optimize your site.

How to Perform an SEO Audit in WordPress

There are many SEO tools in the market that can help you audit your WordPress website. However, not all of them will let you conduct an audit inside WordPress, so you don’t have to leave your site.

To perform an SEO audit of your WordPress website, we recommend using the All in One SEO (AIOSEO) WordPress plugin.

All in One SEO

It’s the best SEO plugin for WordPress and helps you optimize your site for search engines without any technical knowledge.

The plugin offers an SEO Analysis Tool that allows you to perform a complete website SEO audit in your WordPress dashboard. It monitors your site and highlights critical issues, and then offers actionable insights to help you boost your organic traffic and keyword rankings.

You can get the SEO Analysis Tool in the AIOSEO free version. There is also a premium version of AIOSEO that offers advanced features like a redirection manager, schema markup, local SEO, powerful sitemap tools, and more.

First, you’ll need to install and activate the AIOSEO plugin. For more details, you can follow our guide on how to install a WordPress plugin.

Once the plugin is active, you can head over to All in One SEO » SEO Analysis from your WordPress dashboard.

SEO analysis performed by AIOSEO

Then under the SEO Audit Checklist tab, you’ll see an overall site score and a complete SEO checklist. A score of 70 or above is good, and it means that your site is well optimized for search engines.

AIOSEO will check your website on different parameters. It will then highlight critical issues on your site that could hurt your SEO and provide suggestions for improving your rankings.

AIOSEO SEO Audit Checklist

AIOSEO is a great tool to use to continuously monitor your site, so you’re aware of any big SEO issues that could hurt your rankings and traffic.

Besides that, it’s smart to do your own SEO audit once or twice a year to make sure everything on your site is working as expected.

The SEO audit checklist below can also help you troubleshoot any sudden drops in traffic, so you can fix the issue and recover your rankings.

That being said, let’s look at the SEO audit checklist for your WordPress blog.

1. Make Sure Your Website is Visible to Search Engines

When conducting a WordPress SEO audit, first you’ll want o make sure that your website is visible to search engines like Google and Bing.

WordPress has a built-in option to prevent search engines from crawling your website. If you’ve enabled that option, then Google or any other search engine will not list your site in the search results.

To view the setting, you can head over to Settings » Reading from your WordPress dashboard. After that, ensure that the ‘Search Engine Visibility option is not checked.

Search Engine Visibility option in WordPress

If it is enabled, then simply uncheck the ‘Discourage search engines from indexing this site’ option and click the ‘Save Changes’ button.

You can check and see if your site is indexed in Google by searching site:example.com in Google. Just replace “example.com” with your own domain.

If you just launched your site or recently changed the setting above, then it may take a few days to get indexed. You can also see our guide on how to get new content indexed faster.

2. Ensure That Your Site is Using HTTPS

The next SEO audit checklist item is to find out if your website has an SSL certificate. An SSL certificate encrypts the connection between your user’s browser and your website server.

Google and other search engines will give priority to secure website that use HTTPS over those that are still using HTTP.

You can check if your site is secure by looking for a padlock sign in your browser’s search bar.

Look for a padlock sign for HTTPS

If you don’t have an SSL certificate, then see our guide on how to get a free SSL certificate for your WordPress site and how to move your site from HTTP to HTTPS.

3. Check If All Versions of Your URL Lead to the Same Site

Now, you should check that the www and non-www versions or HTTP and HTTPS versions of your URL are redirected to the same website.

For example, if someone enters https://www.example.com, https://example.com, http://www.example.com, or http://example.com in their browser, then they should see the same website.

You can check your primary WordPress URL by going to Settings » General and then look at the address in the ‘WordPress Address (URL)’ and ‘Site Address (URL)’ fields.

Set your primary WordPress address

If different versions of your site’s URLs don’t redirect to the same location, then Google will consider the two URLs as separate websites.

As a result, it won’t know which URL to prioritize while indexing and could lead to duplicate content issues.

If you’re using AIOSEO, then it will automatically set the proper canonical URL in your site header, which will let Google know of your preference and prevent any issues.

4. Improve Indexing with an XML Sitemap

The next thing to check is whether there’s an XML sitemap and if it’s submitted to search engines.

An XML sitemap helps search engines to find and index your website pages easily. It also allows website owners to tell search engines about the most important pages on their website.

While having a sitemap won’t instantly boost your search engine rankings, it will help search engines crawl your website better.

For example, suppose you’re starting a new website. In that case, a sitemap will help Google or Bing to quickly discover new content on your website, as you won’t have many backlinks initially.

To create sitemaps, you can use the AIOSEO WordPress plugin. Simply head over to All in One SEO » Sitemaps from your WordPress dashboard and go to the ‘General Sitemap’ tab.

After that, make sure that the toggle for ‘Enable Sitemap’ is switched on.

Sitemap settings in All in One SEO

You can also preview the sitemap and use different options provided by the WordPress plugin to edit the sitemap. Besides that, the plugin also allows you to create video, news, and RSS sitemaps for your WordPress site.

Once the sitemap is created, you can submit it to different search engines like Google and Bing. For more details, check out our guide on how to create a sitemap in WordPress.

5. Find and Fix Broken Links on Your Website

A broken link or dead link occurs when a link goes to a page that no longer exists at that URL. In such cases, you’ll see a 404 not found error when you click on the broken link.

404 Page example

Some commons reason why you see a 404 error is because the WordPress site was moved to a new domain, the page was deleted, or it was moved to a new location.

Having a lot of broken links can be bad for your site’s SEO. They can have a negative impact on your keyword rankings and user experience, since search engines and website users won’t find the page they’re looking for.

That’s why when you’re conducting an SEO audit, it’s important to look for dead links and fix them.

To find broken links, we recommend using MonsterInsights. It’s the best Analytics solution for WordPress and it automatically tracks 404 errors on your site in Google Analytics.

404 error pages in Analytics

MonsterInsights monitors broken links without slowing down your website like other broken link plugins do.

Once you’ve found broken links on your website, you can fix them by setting up 301 redirections.

The easiest way to redirect dead links is by using AIOSEO’s powerful redirection manager. It will also logs 404 errors on your website and allows you to set up redirects.

Click 404 logs menu option

You can check out our complete guide on how to find and fix broken links in WordPress.

6. Check If You Are Missing Meta Tags

Meta tags are snippets of HTML code that help search engines like Google to understand what a page is about, so it can rank it for relevant searches.

There are different types of meta tags, but the two most important tags are the title tag and meta description. Search engines will use this information to understand the content of the page.

Usually the title tag and meta description are displayed in search results, though Google may sometimes change the text depending on various factors like what that user is searching for.

Blog post title in SERPs

When performing an SEO audit, you should ensure that the meta tags aren’t missing from your blog posts or product pages.

That’s because your title is the first thing people will read in the search engine page results and decide whether they want to click on your link or not.

Similarly, meta descriptions are short text that appears under your post title and URL on search engine page results. They help in describing your article to search engines and users.

You can add meta tags to any blog post or landing page using AIOSEO. Simply scroll down to the ‘AIOSEO Settings’ meta box in your WordPress editor and add your title and description.

Meta tags in AIOSEO

7. Ensure You’ve Got Internal and External Links

The next thing to check during an SEO audit is to make sure that the pages you’re trying to rank have internal and external links.

Internal links are links from other pages on the same website, while external links or outbound links are links to other website. They’re are crucial for your SEO success, yet many business owners overlook their importance.

Search engines follow different links to find and index new pages in the search results. Creating internal and external links allows search engine crawlers to discover new content on your website and boost rankings easily.

Not only that, but links also help your readers to navigate your website or find source for stats and other information.

You can use an SEO tool like Semrush to run a site audit, which will show you any pages that could use more internal links.

Semrush internal link audit

If you need help adding links to your site, then check out our guide on how to add a link in WordPress.

8. Measure Your Website Loading Speed

Google uses your website loading speed as a ranking factor. When you’re performing an SEO audit, it’s important to check for things that can slow down your website.

First, you’ll need to find out how fast your website loads for your users.

If you’re already using MonsterInsights, then you can check the Site Speed report inside your WordPress admin area.

Once you’ve connected Google Analytics to your WordPress website, simply head over to Insights » Reports from your WordPress dashboard and click the ‘Site Speed’ tab.

Site Speed Report in MonsterInsights

You can see a score for your site’s load time for desktop and mobile. Besides that, the report also shows different metrics that are important for measuring how fast your website is.

Next, if you scroll down, then you’ll notice that MonsterInsights offers recommendations and benchmark goals that you should aim for on your website.

Site Speed Recommendations

Using the report, you can audit your site and find how to load your web pages faster. For example, you can use a caching plugin to improve the server response time or use a content delivery network (CDN) to boost website speed.

For more tips, you can check out our guide on how to run a site speed test, and then see our ultimate guide to boost WordPress speed and performance.

9. Make Sure Your Site is Mobile-Responsive

The next item to check in a WordPress SEO audit is whether your website is mobile responsive or not.

Google uses your site’s mobile version for indexing, instead of desktop. If you want to boost your rankings, then your website needs to be mobile-ready.

To find out how mobile-friendly your website is, you can use Google’s Mobile-Friendly Test tool. Simply enter your site’s URL and click the ‘Test URL’ button.

Mobile friendly test tool

The tool will now analyze your website and show the test results whether your site is mobile-ready or not.

Mobile friendly test result

If your website isn’t optimized for mobile, then you can change your website theme and select a responsive WordPress theme. See our guide on how to properly change your WordPress theme so you don’t lose any data or traffic.

10. Scan for Malware and Unwanted Vulnerabilities

Another essential thing to check while conducting an SEO audit is to scan for security risks. If Google Safe Browsing flags your website for malware or unwanted software, then it will show a warning to your visitors.

This can hurt your SEO, as people will avoid visiting your site. Google will also lower your rankings since your site contains malware and harmful programs.

Google Safe Browsing warning

To remove malware and other suspicious files from your website, you’ll need a WordPress security scanner.

At WPBeginner, we use Sucuri as it’s the best WordPress firewall and security service. It checks your website for malicious code, malware, spam injection, and other vulnerabilities and helps clear your site.

Sucuri also monitors your site for potential threats 24/7 and blocks any suspicious activity, hacking attempts, DDoS attacks, and more. Not only that, but it also helps in protecting the server-side.

If Google Safe Browsing flags your site as unsafe, then check out our guide on how to fix ‘this site ahead contains harmful programs’ error in WordPress.

11. Track Your Keyword Rankings for Drop in Traffic

Finally, it’s important to keep track of your keyword rankings when conducting an SEO audit and check their positions in case there’s a drop in traffic.

Keeping an eye on your keyword rankings not only helps you see which search terms people use to find your website, but you can also find opportunities to get even more traffic.

To track your keyword rankings, you can use Google Search Console. First, you’ll need to add your WordPress site to Google Search Console.

Once that’s done, you can log in to your Google Search Console account and head over to the ‘Performance’ report. Next, scroll down and see the search queries your site is ranking on.

View your keyword rankings

Besides using Google Search Console, you can also use an SEO tool like Semrush to track keyword rankings.

Semrush is a popular keyword rank tracker tool that’s used by many professional marketers and SEO experts. All you have to do is enter your site’s URL in the ‘Organic Research’ option and click the ‘Search’ button.

Track keyword rankings in Semrush

From here you can view your top keywords, track their positions, and even monitor position changes.

Keyword positions in Semrush

If you’re seeing your rankings decline, you can use our guide on how to optimize your blog posts for SEO so you can recover your traffic and rankings.

We hope this article helped you learn how to perform a WordPress SEO audit using the checklist and boost your rankings. You may also want to check out our guide on the best email marketing services and our comparison of best keyword research tools.

If you liked this article, then please subscribe to our YouTube Channel for WordPress video tutorials. You can also find us on Twitter and Facebook.

The post 11-Point WordPress SEO Audit Checklist to Boost Your Rankings appeared first on WPBeginner.

How to Improve Organic Click Through Rate (CTR) in WordPress – 12 Proven Tips

Do you want to improve the organic click through rate (CTR) for your WordPress website?

Organic click-through rate is the average clicks a page gets when displayed in search results. Improving your CTR can help improve your SEO rankings and get more traffic to your website from search engines.

In this article, we’ll share our proven tips on how to easily improve organic click through rate (CTR) in WordPress like a total SEO pro.

Improving organic click through rate CTR in WordPress

Here is a quick overview of the topics we’ll cover in this guide.

What is Organic Click Through Rate?

Organic Click Through Rate is the percentage of users who click on an item in the search results.

Let’s suppose, one of your articles appeared 100 times in search results for a particular keyword. Out of those, 3 users clicked to view your article, which gives you a click-through rate of 3%.

Search engine algorithms use organic CTR to analyze the performance of your website in search results. The pages that have a higher click through rate tend to rank higher in search results.

Many SEO experts have found that improving your CTR is the fastest way to improve your SEO rankings.

As a website owner, you can see which pages on your website are getting more clicks, so you can replicate those techniques on other pages.

You can also find out which pages are not getting any clicks and then work to improve them, so they can get higher click through rate.

How to Find Out Organic Click Through Rate?

The easiest way to find out your organic click-through rate is by using Google Search Console.

Google Search Console is the free tool offered by Google to help website owners see how their website is doing in search results.

If you haven’t already done so, then follow our guide to learn how to add your website to Google Search Console.

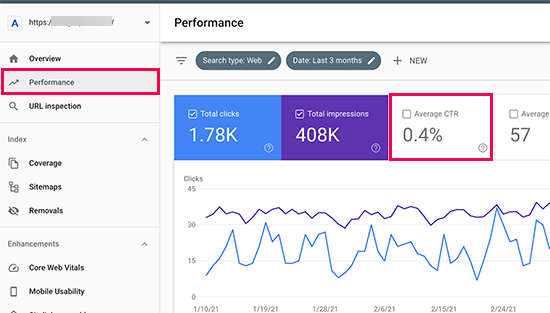
After that, you can login to your Google Search Console dashboard and switch to the Performance tab. At the top, you’ll see your website’s average click-through rate.

Average click through rate

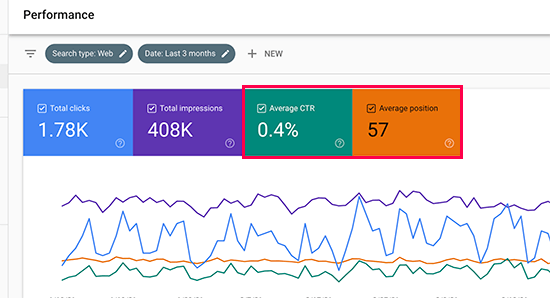
Click on the average click through rate to add it as a metric to your report. Next to it, you’ll also see the average position box, go ahead and click to select it as well.

Add CTR and Average Position to your performance report

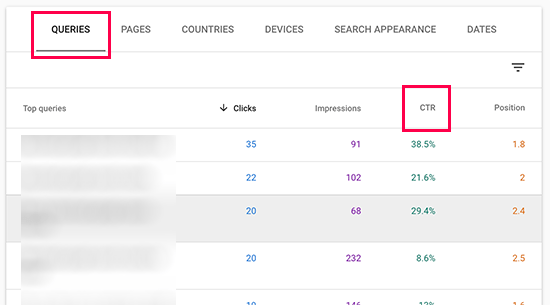
Now you need to scroll down to the detailed report section. Under the Queries tab, you’ll see keywords you rank for with average clicks, impressions, CTR, and position.

CTR details for keywords

You can click on any column to sort the results by position or by CTR.

Similarly, you can switch to the Pages tab to view the results for individual pages on your website instead of keywords.

Improving your Organic Click Through Rate in WordPress

Now that you know how to view your website’s average CTR scores, the next step is to improve your organic click through rate of your WordPress blog posts.

Ideally, you would want to start with pages that already rank higher, have good search impressions, with an average position of 1-10, but very low CTR.

After that, you would gradually move on to low-hanging fruits. These are the pages that rank on page 2 or 3 of the search results. You may want to improve their CTR, so you can rank higher and get more traffic.

That being said, let’s take a look at some of the proven tips that you can use to improve your click-through rates across the board.

1. Write Powerful Headlines and SEO Titles

Your blog post’s title or the headline is the most noticeable thing in search results.

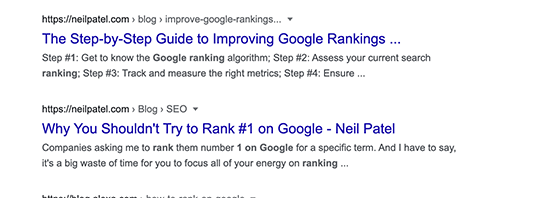
Title in search results

It has to be relevant, catchy, and engaging to compel user’s attention and get them to click.

But how do you figure out which headline will help you get better click through rates in search results?

Luckily, there are several headline analyzer tools that will analyze your headlines and make suggestions for improvements.

We’ll be using the MonsterInsights plugin since it has a built-in headline analyzer. It is the best Google Analytics plugin for WordPress and helps you see where your visitors are coming from and what they do on your website.

First, you need to install and activate the MonsterInsights plugin. For more details, see our step by step guide on how to install a WordPress plugin.

Note: The free version of MonsterInsights also has the headline analyzer built-in.

Next, you’ll need to connect the plugin to your Google Analytics account. It will automatically you walk through it, but if you need help then see our tutorial on how to install Google Analytics in WordPress.

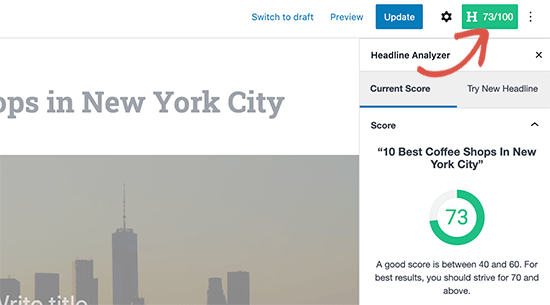
Once it is set up, you can simply edit any post or page where you want to optimize the headline. On the post edit screen, click on the Headline Analyzer button at the top right corner of the screen.

Headline analyzer

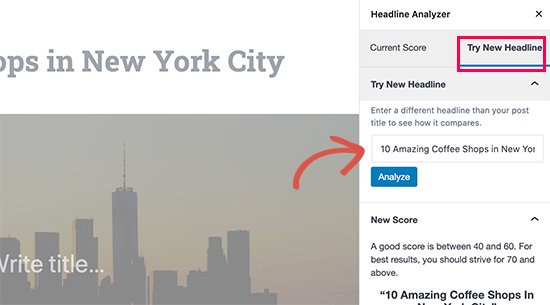
This will open the Headline Analyzer tool with a score and some practical tips to improve your post or page title. You can switch to the ‘Try New Headline’ tab and try new headlines without saving them.

Try a new headline

Alternative: You can also try the web version of MonsterInsights headline analyzer tool, or the IsItWP’s Headline Analyzer tool both of which allows you to test headlines outside your WordPress admin area.

2. Use Dynamic SEO Titles for Better Headlines

By default, WordPress automatically uses your page or post title as the <title> tag in the HTML. This title tag is used by search engines to display your website listing.

You can use All in One SEO plugin to automatically generate better SEO titles for your older blog posts and pages.

It is the best WordPress SEO plugin on the market used by over 2 million website owners to improve search rankings and click through rates.

First, you need to install and activate the All in One SEO plugin. There’s also a free version of AIOSEO available.

Upon activation, the plugin will walk you through a guided a set up wizard. You can follow along the instructions and if you need help then see our tutorial on how to properly set up All in One SEO for WordPress.

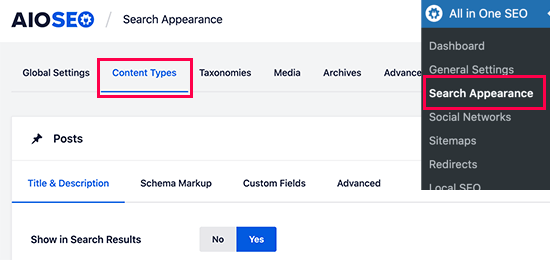
Once finished, you need to visit All in One SEO » Search Appearance page and switch to the Content Types tab.

Setting post types in All in One SEO

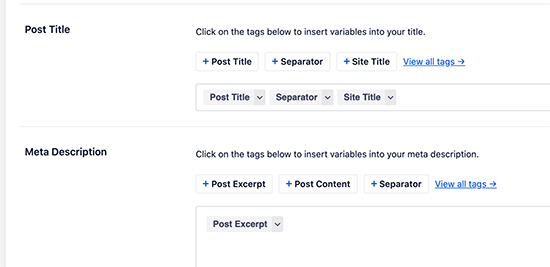
From here, you can set up dynamic SEO titles and descriptions for all your posts, pages, products, or any other post types. This title will be used when a post or page doesn’t have its own SEO title or description.

Dynamic post title and descriptions

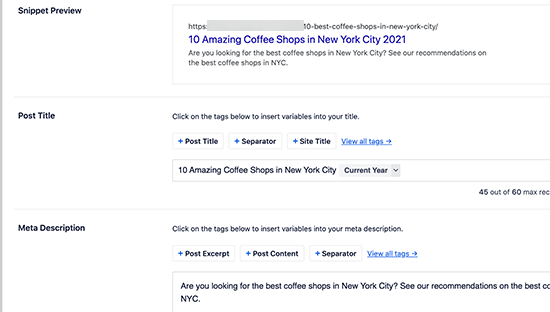
You can also edit any post or page on your WordPress site to edit its SEO title and description. Simply edit the post and scroll down to the ‘AIOSEO Settings’ section below the post editor.

Adding an SEO post title and description in All in One SEO

From here you can add a custom SEO title for your post and page. You’ll see a live snippet preview of how it will look in search results.

You can also use Dynamic tags like Current Month or Year in your post titles, so you don’t have to manually update them each year.

Don’t forget to Save and update your post once you’re done editing it.

3. Write Helpful Meta Descriptions

Most search engines automatically generate the description part when showing search results, so the most relevant content appears in the snippet.

Custom excerpt in Google search result

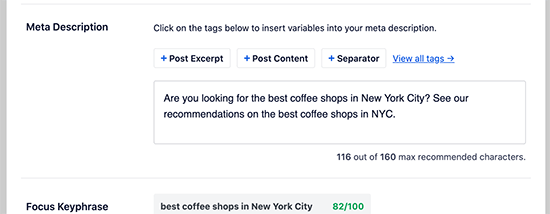
However, for some results, they would just show the description provided by the website owner. This is why it is important to add an SEO description for all your posts and pages.

If you are using All in One SEO for WordPress, then you can edit each post and page and simply provide your own SEO-friendly description.

Meta description

Make sure that your SEO description includes your target keywords and explains what users will see when they visit your website. This helps users understand your content better and encourages them to click more often.

4. Use Meaningful URL Slugs

WordPress uses SEO-friendly URL structure. This allows you to create meaningful URLs for your content like this:

https://example.com/best-coffee-shops-in-new-york-city/

The last part of these URLs is called the URL slug, and WordPress automatically generates it based on your post / page title.

However, if your post title contains numbers, years, or is too lengthy, then it could become less user-friendly.

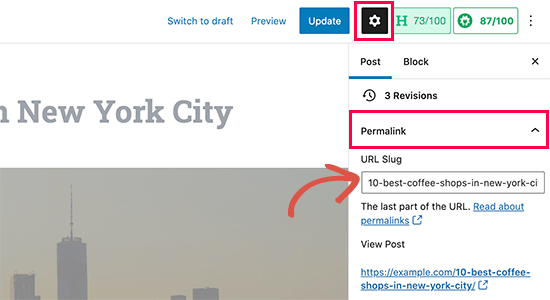
To remedy that, make sure that you manually correct the URL slug before publishing any post or page. You can do that by clicking on the Gear icon at the top right corner of the content editor screen.

Change URL slug for your post or page

Switch to the Post tab and then expand the Permalink option. Here you can replace the default URL slug with your own. Make sure that your URL slug is not using any capital letters, and words are separated by dashes.

Don’t forget to save or update your post / page to store your settings.

5. Aim to Appear in Rich Snippets or Answer Box

What’s better than ranking #1 for a search query?

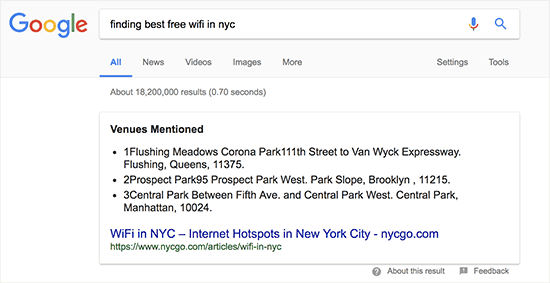
Ranking as the Answer box or Rich Results. The answer box is Google’s attempt to answer user’s search queries right on the search page with more detailed results.

A rich snippet result in Google Search

According to research conducted by Advanced Web Ranking, Answer boxes secure a whopping 32.3% CTR on average.

However, there is no easy shortcut to rank as a rich snippet for a search term. The most common strategy that has worked for most websites is simply improving the content.

For details, check out our complete guide on how to appear in Google Answer box / Rich snippets with real examples and practical tips.

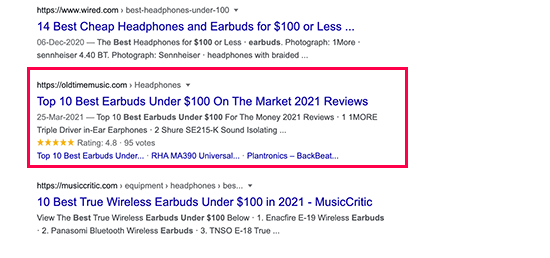
6. Use Rich Snippets Schema Markup to Standout

Rich snippets schema markup allows you to provide structured data along with your content. This structured data is written in a special format called Schema.org markup.

Search engines use this markup to show your content with additional information in search results. This makes your page stand out among other results and improves CTR.

Rich snippets in search results

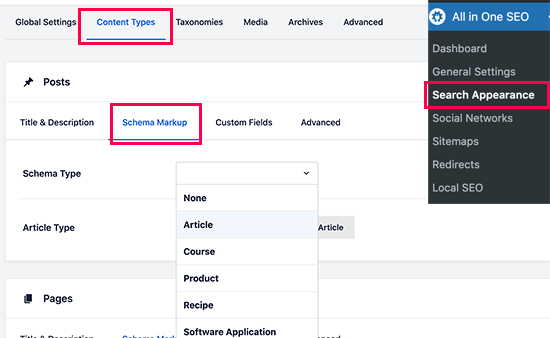
The easiest way to add rich snippets schema markup to your WordPress website is by using All in One SEO plugin. It comes with built-in support for schema markup, allowing you to set it up for each post type like posts, products, reviews, and more.

Setting schema type markup

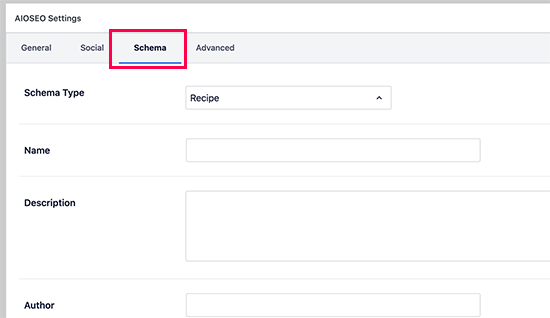
You can also change schema type markup for individual posts and pages. Allowing you to use your blog posts as recipes, reviews, articles, with additional structured data for search engines to use.

Schema markup for individual posts

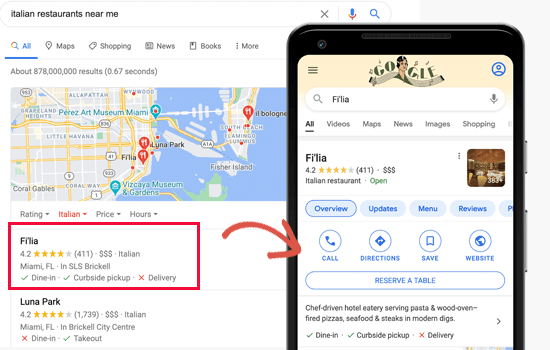
7. Improve Local SEO for Higher Click-Through Rates

Making your content appear for relevant terms but for the wrong audience can cause lower CTR. Local SEO helps you remedy that by allowing you to target regional audiences.

Local SEO search result example

This allows you to rank for a targetted audience which makes your result more relevant and boosts CTR.

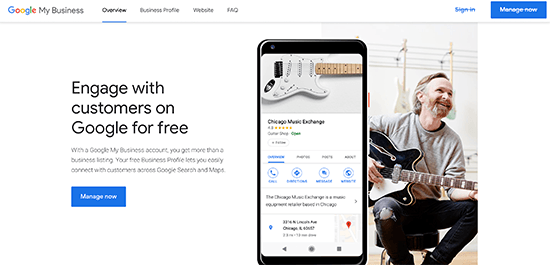
First, you may want to create a Google My Business account. This allows you to add your business listing, prove that you own the business, and manage your business information using Google’s My Business dashboard.

Google My Business

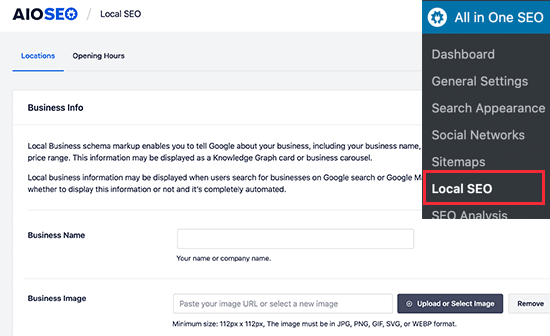
Next, you will need All in One SEO for WordPress plugin which has a Local SEO add-on. This addon allows you to add your local business information as Schema markup to your website.

Local SEO in AIOSEO for WordPress

You can provide your business information and opening hours by simply out the forms and AIOSEO adds the schema markup for search engines to use in their results.

8. Improve Older Articles for Better Click-Through Rates

You may have older articles on your website that have become outdated and dropped in ranking. Many WordPress blogs have several articles just ranking somewhere on page 2 of search results.

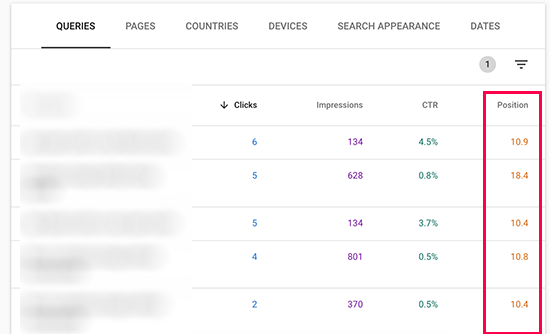
You can find them by simply sorting the Google Search Console’s Performance report by position.

Low performing search results

It would be quite easy to improve these pages with additional updated content. Making this optimization a part of your regular content review routine is a quick and easy way boost search rankings.

9. Fix Keyword Cannibalization Issues

If your targeted keywords are in a very niche category, and your website has multiple resources on them, then it is likely that some of them will cannibalize others.

This may create a confusing situation for search engines. For instance, they may ignore your most important page for something that is less important or even less relevant.

Contradictory results

You may be able to rank two pages for the same keyword, but they will give a contradictory impression. This can even create confusion for users as well.

We recommend keep an eye on your top keywords and consider merging similar keywords into one comprehensive resource when needed. After that, you can set up 301 redirects to point search engines to the main resource.

Related: See our guide on the best SEO keyword tracking tools.

10. Improve Page Load Times for Better User Experience

As of 2021, Google will be rolling out page experience algorithm updates. These updates will be focused on user experience and website speed.

Speed is already an important factor in SEO. Faster page loads affect your search rankings.

Here are some quick tips that you can apply right away.

We have a complete WordPress performance and speed guide with step by step instructions to optimize your website perfo

11. Keep Users Engaged on Your Site

Some of your pages may already have a very good organic CTR but very high bounce rate. This means users are coming to those pages but leaving without visiting any other pages.

Keeping users engaged allows you to show them other content and lead through your sales funnel to become a customer or a subscriber.

In our experience, nothing works better than internal linking to keep user engaged. Make sure that your top articles are linking to your other articles and giving users plenty of opportunities to click.

You can also add related posts or popular posts widgets to your site to add some more content discovery options for new users.

When users spend more time on a website, they’re more likely to visit more pages, join your email list, and buy your products.

For more details, see our detailed guide on how to reduce bounce rate and increase pageviews in WordPress.

12. Convert Users Into Subscribers and Customers

It is important to keep in mind that bringing traffic to your website is often not enough to grow your online business. Relying heavily on search traffic alone can hit your business hard when the algorithm update.

The ultimate goal for any business is to take advantage of higher CTR and convert those users into customers and subscribers.

This is where you’ll need OptinMonster. They have a free WordPress plugin that you can use.

It is the world’s best conversion optimization software. With OptinMonster, you can easily boost conversion rates, make more sales, and grow your email list.

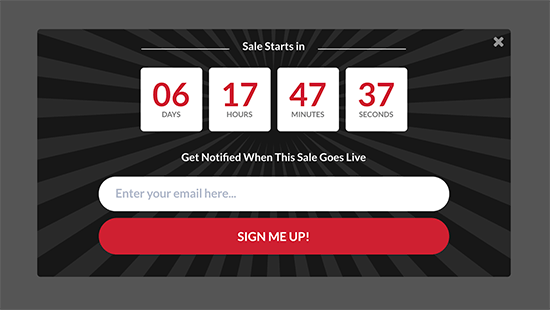
It comes with beautifully designed lightbox popups, countdown timers, notification bars, slide-in pops, spin the wheel popups, and more.

OptinMonster popup preview

All these tools help you nudge customers to spend more time on your website, buy products / services, follow you on social media or join your email list.

Spin the wheel popup

With powerful display rules, it allows you to show personalized campaigns at just the precise time. For instance, you can geo-target users in particular region with free delivery or give users a discount coupon just when they are about to leave your site.

GeoTargetted Popups in WooCommerce

With dozens of templates, you can easily convert traffic coming from your CTR into sales and returning visitors.

We hope this article helped you improve organic click through rate (CTR) for your WordPress website. You may also want to see our complete WordPress SEO guide for more tips, and our tutorial on how to add push notifications in WordPress to grow your traffic.

If you liked this article, then please subscribe to our YouTube Channel for WordPress video tutorials. You can also find us on Twitter and Facebook.

The post How to Improve Organic Click Through Rate (CTR) in WordPress – 12 Proven Tips appeared first on WPBeginner.