WebP vs. PNG vs. JPEG: The Best Image Format for WordPress

Don’t know whether to use WebP, PNG, or JPEG images on your WordPress site?

Images bring life to your content and make your website more attractive. However, choosing the right file format is important for performance. If your images take a lot of time to load, then your site won’t provide a great user experience.

In this article, we will compare WebP vs. PNG vs. JPEG and help you pick the best image format for WordPress.

Best image formats for WordPress

WebP vs. PNG vs. JPEG – Introduction

Let’s first look at all 3 image formats and see how each of them works.

What Is WebP?

WebP is a relatively new image format compared to PNG and JPEG. Created by Google, WebP provides superior lossless and lossy compression for images on the internet. This allows you to create smaller images that help improve website performance.

Lossless compression means that all the data in the image remains after it has been uncompressed. On the other hand, lossy compression reduces file size by permanently eliminating information from the image file.

One of the standout features of WebP is that it supports motion-based images, which isn’t possible in PNG or JPEG. This also makes WebP a great alternative to GIFs.

WordPress introduced support for the WebP image format with the 5.8 release. Previously, you had to install a WordPress plugin to use WebP images in WordPress.

All modern web browsers, including Google Chrome, Firefox, Safari, Edge, and more, support the WebP image format. Many image editing tools also support WebP and allow you to export images in this format.

WebP also has similar capabilities as PNG. You can achieve the same levels of transparency in WebP images as with PNG.

Pros:

  • Offers smaller file sizes compared to PNG and JPEG
  • Supported by popular web browsers
  • Get the same level of transparency in images as PNG
  • Supports both lossy and lossless compression
  • Lets you create motion-based images

Cons:

  • Requires third-party tools and plugins to convert images into WebP format
  • Limited support from photo editing software

What Is PNG?

Portable Network Graphics (PNG) is one of the most popular image formats used across the internet. It supports millions of colors, so you get sharp and much better-looking pictures.

The main advantage of using PNG is its lossless compression algorithm. When an image is compressed, it doesn’t lose any data or quality. This makes PNG a great format for your WordPress website if you need a smaller image file size and want to preserve the fine details in the picture.

Another benefit of using PNG is that it supports transparent backgrounds. That’s why you will find many website logo files and other elements in PNG format.

For example, here’s a logo for WPBeginner that’s in PNG format.

WPBeginner logo

Pros:

  • It doesn’t lose image quality when compressed
  • Has smaller image file sizes compared to JPEG
  • Offers high-quality image transparency
  • Supported by all major browsers and image editing tools
  • Ideal format for logos and graphics with low-color
  • Supports lossless compression

Cons:

  • It doesn’t support lossy compression
  • Limited color depth and not suitable for complex color-rich images

What is JPEG?

JPEG, short for Joint Photographic Experts Group, is an image format that was created in 1986. It is the standard image format for many devices, including digital cameras and smartphones. Many WordPress website builders and image gallery plugins also support JEPG images.

One of the advantages of using JPEG is that it offers vivid pictures and contains millions of colors. All web browsers support this format, and the image sizes are relatively small.

For example, here is an image of a butterfly in JPEG format. It has many colors and details, which aren’t as noticeable in other image formats.

JPEG image preview

JPEG is often the best format if you have complex images with many colors. In the JPEG image above, the colors are vibrant and prominent.

However, you might notice a small drop in image quality when optimized, especially if the image has low color data. Besides that, JPEG images are easily convertible. You can change them into any other format, including PNG and WebP.

Pros:

  • It supports millions of colors
  • Excellent format for complex and color-rich images
  • Highly convertible into other image formats
  • Supported by popular web browsers and image editing tools

Cons:

  • It loses image details after compression
  • It does not support layered images
  • There is no support for image transparency

WebP vs. PNG vs. JPEG – Image File Size

When it comes to comparing WebP vs. PNG vs. JPEG for image file size, a lot depends on the level of compression you choose when optimizing the image.

That being said, WebP lossless images are generally 26% smaller than PNG. Similarly, when comparing WebP vs. JPEG lossy images, WebP images are 25-34% smaller than JPEG.

For instance, a comparison by Google Developers shows a significant difference in image file size between JEPG and WebP formats.

JPEG vs WebP format

This shows that WebP images are much smaller in file size compared to PNG and JPEG. With a smaller image file size, you can boost your WordPress speed and ensure that web pages load faster.

As a result, you will also see an improvement in WordPress SEO. Google considers page load speed as a ranking factor. If your site loads quickly, then you will have an edge over slowing-loading sites.

WebP vs. PNG vs. JPEG – Image Quality

Choosing the best image format for WordPress based on image quality will depend on your website type.

For instance, if you are a photographer who posts color-heavy pictures on your WordPress website, then JPEG is the best image format to use. JPEG images have a high compression ratio and help retain color data.

On the other hand, if you are posting screenshots or individual pictures that have minimal colors, then you are better off using the PNG format. PNG delivers high-quality images and works seamlessly for complex and simple images.

The WebP format will work if you want to compress images on your site to maintain high performance. If you compare WebP vs. JPEG, then WebP achieves an average of 30% more compression than JPEG. However, we don’t recommend using WebP if you have a photography or graphic design portfolio website.

What Is the Best Image Format for WordPress?

After comparing WebP vs. PNG vs. JPEG, the best image format really depends on your needs.

WebP is said to be the format of the future that will soon be used by all websites. When we compare WebP vs. JPEG, WebP delivers the smallest image file size, which saves storage space and improves website load times. However, you will need to make sure that your website builder or image editing tool supports the WebP format.

On the other hand, JPEG is the best image format for professional photographers and site owners who need color-accurate images.

PNG is the best format for sharing screenshots and other images where there isn’t a lot of color. It is a very versatile format and offers high-quality images with a relatively low file size.

Bonus Tips for Using Images in WordPress

Images play a key part in your content, and many website owners don’t take the time to add quality images to their blog posts and pages.

Apart from choosing the right image format for WordPress, here are a few tips to help you create amazing images and optimize them for performance:

  • Use Image Compression Plugins – Large images can slow down your website. You should use image compression plugins to optimize WebP, JPEG, and PNG images to deliver fast performance.
  • Add Image Alt Text – Alt text or alternative text is an HTML image tag that describes an image. It allows search engine bots and users with screen readers to understand your pictures. When optimizing your site for SEO, adding alt text to your photos can help them appear in image search results.
  • Select the Right Image Size for Your Site – Often, beginners are unsure which image size they should use for their websites. Picking the right size provides consistency and a smooth user experience.
  • Use Watermark or Disable Right Click – If you don’t want others to use your images without permission, then you can add a watermark and disable right-click on images. To learn more, please see our guide on how to prevent image theft in WordPress.

We hope this article helped you learn about WebP vs. PNG vs. JPEG to find the best image format for WordPress. You may also want to see our list of the best design software and our beginner’s guide to image SEO.

If you liked this article, then please subscribe to our YouTube Channel for WordPress video tutorials. You can also find us on Twitter and Facebook.

The post WebP vs. PNG vs. JPEG: The Best Image Format for WordPress first appeared on WPBeginner.

How to Rename Images and Media Files in WordPress

Ever wanted to change an image file name after uploading it to WordPress? Image file names are important for image SEO and can help more users find your website.

While WordPress allows you to change an image alt tag and caption, there is no built-in option to change an image file name from the admin area.

In this article, we will show you how to easily rename images and media files in WordPress. We’ll also show you a method to replace media files after renaming them on your computer.

Rename image files and media in WordPress

Why Rename Images and Media File Names in WordPress?

Images can help you get more traffic to your website. Particularly, if you upload original images and other media files to your website.

However, unlike text, search engines and users both need your help to describe those images. This is a major part of optimizing image SEO.

One of the best ways to help search engines and your users find these images is by giving them a meaningful filename. For example, a file name like newyork-skyline.jpg is a lot more helpful than DSC00789.jpg.

Now the problem is that a lot of users upload images directly from their phones or cameras. Some users download images from other sources and forget to rename them before the upload.

Once you have uploaded those images to WordPress, there is no default option to rename those images or any media files.

Having said that, let’s take a look at how to easily rename images and media files in WordPress.

Renaming Images and Media Files in WordPress

This method does not automatically change the image file name in WordPress. However, it does allow you to manually change an image filename inside the WordPress admin area.

The first thing you need to do is install and activate the Phoenix Media Rename plugin. For more details, see our step by step guide on how to install a WordPress plugin.

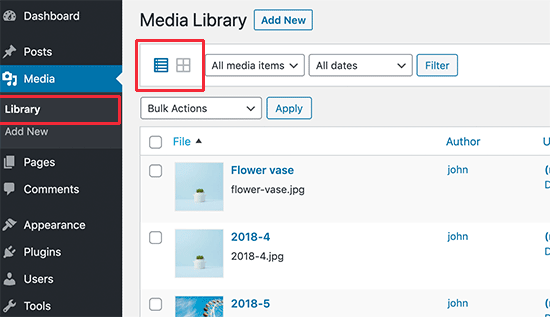
Upon activation, simply go to Media » Library. If your media library is displayed in the grid view, then you will need to switch to the list view.

Switching from grid to list view in WordPress media library

This will allow you to view more details for each media file including the file name.

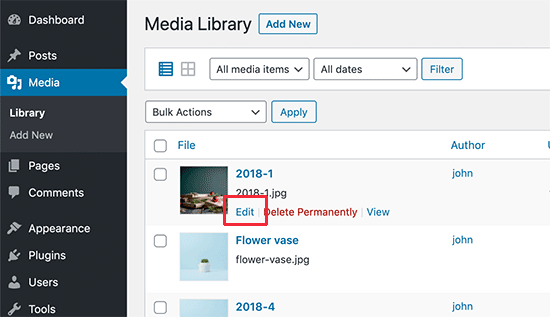
Next, you need to click on the ‘Edit’ link below the image or media file that you want to rename.

Edit media file

This will open your image in the WordPress media edit screen. From here, you can edit details of an image like Alt tag, caption, and more.

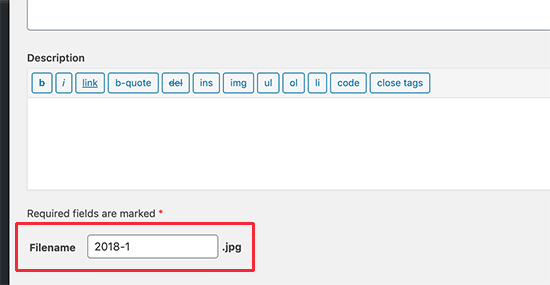
Scroll down to the bottom and you’ll see the filename field.

Change image file name

From here, you can change the file name. We recommend giving it a keyword-focused and meaningful name that actually describes the image. We recommend only using all lowercase letters and dashes between two words.

After that, click on the ‘Update’ button to save your changes.

That’s all. You have successfully renamed the media files without leaving the WordPress admin area. The plugin will also update the file name if you have used the image in a post or page.

Replace Image and Media Files in WordPress

If the above method does not work you, then you can try this method. Basically, you’ll download the file to your computer and rename it there.

After that, you’ll replace the original file on your website with the renamed version by using a plugin.

The first thing you need to do is install and activate the Enable Media Replace plugin. For more details, see our step by step guide on how to install a WordPress plugin.

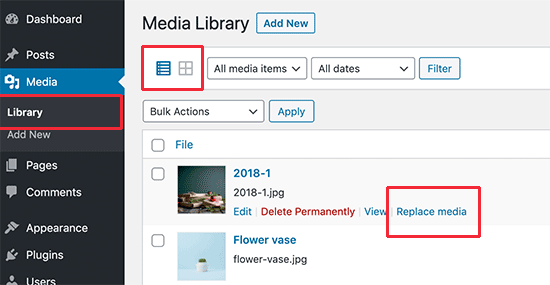
After that, visit Media » Library page. If you are using the grid-view, then you would need to switch to the list view.

Switching from grid to list view in WordPress media library

You will now see a new link to replace the media below each item in your media library.

Replace media link

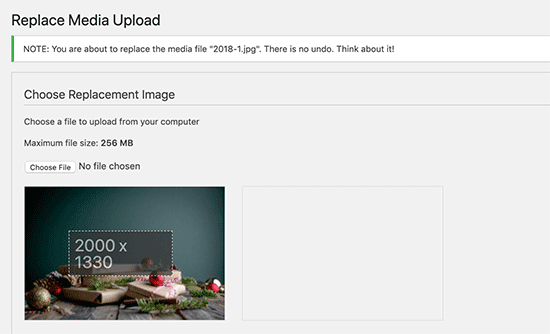
This will bring you to the replace media page.

First, you need to choose the file from your computer that you want to upload and replace the old file with. Make sure that you have already changed the file name on your computer.

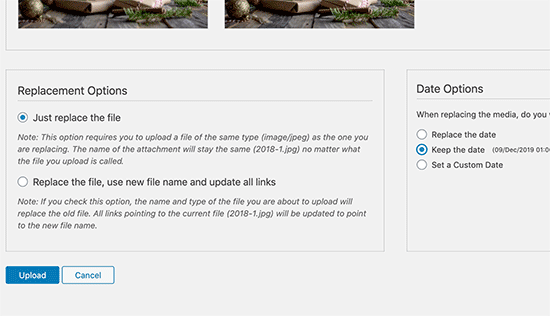
After that, you need to scroll down a little for more options.

Under replacement options, you can choose whether you just want to replace the file or also want to replace all the links. We recommend using the second option if you have already added that file to your WordPress posts and pages.

Replace options

You can also choose to keep the old date or use a new date.

Finally, click on the ‘Upload’ button to replace the old media file with the new and renamed file.

We hope this article helped you learn how to easily rename images and media files in WordPress. You may also want to see our article on best WordPress image compression plugins compared.

If you liked this article, then please subscribe to our YouTube Channel for WordPress video tutorials. You can also find us on Twitter and Facebook.

The post How to Rename Images and Media Files in WordPress appeared first on WPBeginner.

Beginner’s Guide to Image SEO – Optimize Images for Search Engines

Are you looking to improve image SEO on your website? When optimized properly, image search can bring many new visitors to your website.

To benefit from image SEO, you need to help search engines find your images and index them for the right keywords.

In this beginner’s guide, we will show you how to optimize image SEO by following top best practices.

Image SEO guide for beginners

Here is a brief overview of what you’ll learn in this article.

Optimizing Your Images for SEO and Speed

Speed plays an important role in SEO and user experience. Search engines consistently rank fast websites higher. This is also true for the image search.

Images increase your overall page load time. They take longer to download than text, which means your page loads slower if there are several large image files to download.

You need to make sure that images on your site are optimized for web. This can be a little tricky to get used to since many beginners are not experts in graphics and image editing.

We have a handy guide on how to properly optimize images before uploading them to your website.

The best way to optimize images is by editing them on your computer using a photo editing software like Adobe Photoshop. This allows you to choose the right file format to create a small file size.

You can also use an image compression plugin for WordPress. These image optimizer plugins allow you to automatically reduce file size while uploading an image to WordPress.

What is Alt Text?

Alt text or alternative text is an HTML attribute added to the img tag which is used to display images on a web page. It looks like this in plain HTML code:

<img src="/fruitbasket.jpeg" alt="A fruit basket" />

It allows website owners to describe the image in plain text. The main purpose of the alternate text is to improve accessibility by enabling screen readers to read out the alt text for visually impaired users.

Alt text is also crucial for image SEO. It helps search engines understand the context of the image.

Modern search engines can recognize an image and it’s content by using artificial intelligence. However, they still rely on website owners to describe the image in their own words.

Alt text also accompanies images in Google image search, which helps users understand the image and improves your chances of getting more visitors.

Alt text used in search results

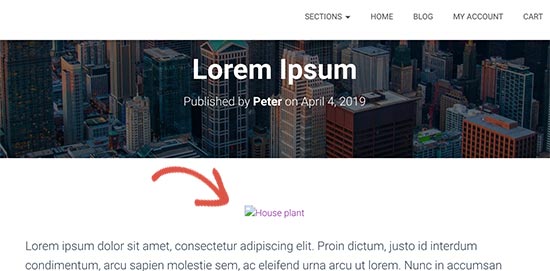
Usually, alt text is not visible on your website. However if an image is broken or cannot be found, then your users will be able to see the alternate text with a broken image icon next to it.

Alternate text displayed next to a broken image

What is the Difference Between Alt Text vs Title

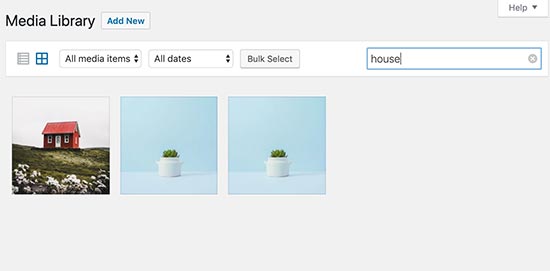
Alt text is used for accessibility and image SEO, while title field is used internally by WordPress for media search.

Search image by title

WordPress inserts the alt tag in the actual code used to display the image. The title tag is stored in the database to find and display images.

In the past, WordPress inserted the title tag in the HTML code as well. However, it was not an ideal situation from the accessibility point of view, which is why they removed it.

What is the Difference Between Alt Text vs Caption

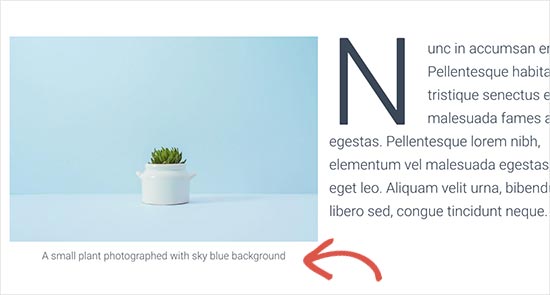
The alt text is used to describe the image for search engines and screen readers. On the other hand, the caption is used to describe the image for all users.

Alt text is not visible on your website while captions are visible below your images.

Example of a caption displayed below an image

The alt text is crucial for better image SEO on your website. The caption is optional and can be used only when you need to provide additional information about the image to website visitors.

How to Add Alt Text, Title, and Caption to Images in WordPress

Alt text, title, and caption make up the image metadata that you can add to images when uploading them into WordPress.

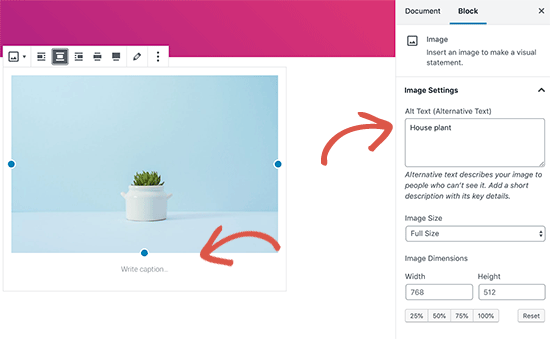
When you add an image using the default image block, WordPress allows you to add caption and alt text for the image.

Adding alt text and caption to an image in WordPress

It automatically generates a title for the image from the file name. You can change the title by clicking on the edit button in the image block’s toolbar.

Editing an image in default WordPress editor

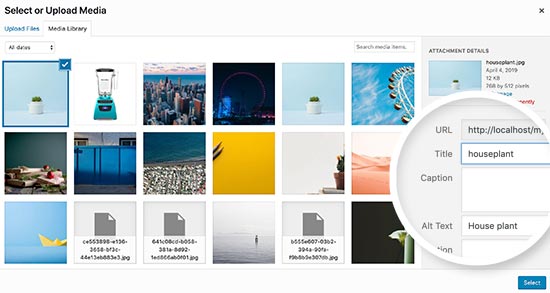
This will bring up the media uploader popup where you can enter your own custom title for the image.

Changing image title in WordPress

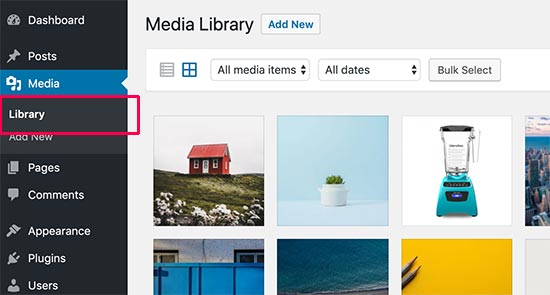
You can also edit the alt tag and title for the images that you have already uploaded to WordPress. To do that, you need to visit Media » Library page and locate the image you want to edit.

WordPress media library

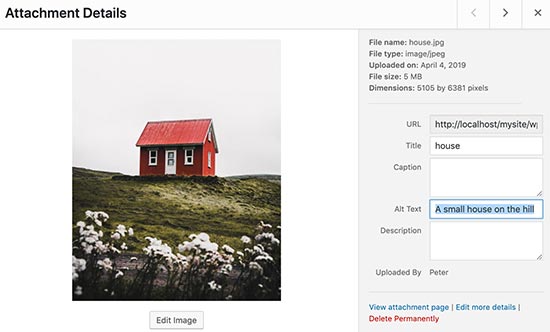
Simply clicking on an image will bring up the attachment details popup where you can enter title, alt text, and caption.

Add alt tag and title via media library

Note: Changing an image’s alt tag or caption via Media Library will not change it in the posts and pages where the image is already used.

When to Use Captions for Images in WordPress

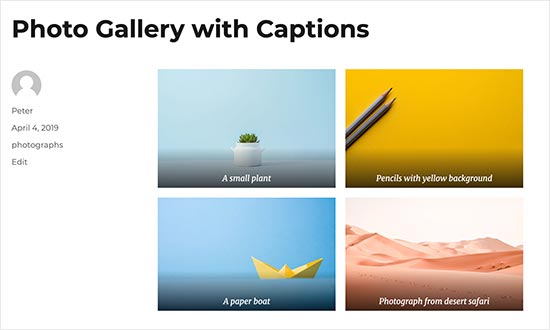
Captions allow you to provide additional details for an image to all your users. They are visible on the screen for all users including search engines and screen readers.

An image gallery with captions for each image

As you may have noticed that most websites don’t normally use captions with images in their blog posts or pages. That’s because captions are often not needed to explain an image.

Captions are more suitable in the following scenarios:

  • Family or event photos
  • Photos that need additional explanation describing the background story
  • Product image galleries

In most cases, you would be able to explain the image in the article content itself.

Disable Attachment Pages in WordPress

WordPress creates a page for all images you upload to your posts and pages. It is called the attachment page. This page just shows a larger version of the actual image and nothing else.

This can have a negative SEO impact on your search rankings. Search engines consider pages with little to no text as low quality or ‘thin content’.

This is why we recommend users to disable the attachment pages on your website.

The easiest way to do this is by installing and activating the Yoast SEO plugin. For more details, see our step by step guide on how to install a WordPress plugin.

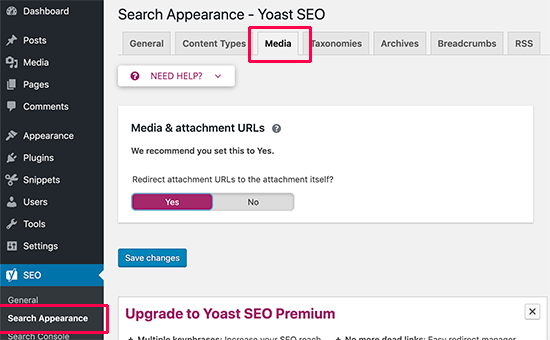
Upon activation, it automatically turns off attachment URLs. You can also manually turn off attachment pages in WordPress by visiting SEO » Search Appearance page and clicking on the Media tab.

Disable attachment URLs in WordPress

From here, make sure that the ‘Media & attachment URLs’ option is set to ‘Yes’.

If you are not using Yoast SEO plugin, then you can install the Attachment Pages Redirect plugin. This plugin simply redirects people visiting the attachment page to the post where the image is displayed.

You can also do this manually, by adding the following code to your theme’s functions.php file or a site-specific plugin.

function wpb_redirect_attachment_to_post() { 
if ( is_attachment() ) { 
global $post;
if( empty( $post ) ) $post = get_queried_object();	
if ($post->post_parent)	{
	$link = get_permalink( $post->post_parent );
	wp_redirect( $link, '301' );
	exit(); 
	}
else	{
	// What to do if parent post is not available
	wp_redirect( home_url(), '301' );
	exit(); 
	}
}
}
add_action( 'template_redirect', 'wpb_redirect_attachment_to_post' );

Additional Tips to Improve Image SEO

Adding alt tag is not the only thing you can do to improve image SEO. Following are a few additional tips that you should keep in mind when adding images to your blog posts.

1. Write descriptive alt text

Many beginners often just use one or two words as alt text for the image. This makes the image too generic and harder to rank.

For example, instead of just ‘kittens’ use ‘Kittens playing with a yellow rubber duck’.

2. Use descriptive file names for your images

Instead of saving your images as DSC00434.jpeg, you need to name them properly. Think of the keywords that users will type in the search to find that particular image.

Be more specific and descriptive in your image file names. For example, red-wooden-house.jpeg is better than just house.jpeg.

3. Provide context to your images

Search engines are getting smarter every day. They can recognize and categorize images quite well. However, they need you to provide context to the image.

Your images need to be relevant to the overall topic of the post or page. It is also helpful to place the image near the most relevant text in your article.

4. Follow the SEO best practices

You also need to follow the overall SEO guidelines for your website. This improves your overall search rankings including image search.

5. Use original photographs and images

There are many free stock photography websites that you can use to find free images for your blog posts. However, the problem with stock photos is that they are used by thousands of websites.

Try to use original photographs or create quality images that are unique to your blog.

We know that most bloggers are not photographers or graphic designers. Luckily, there are some great online tools that you can use to create graphics for your websites.

We hope this article helped you learn about Image SEO for your website. You may also want to see our guide on how to fix common image issues in WordPress.

If you liked this article, then please subscribe to our YouTube Channel for WordPress video tutorials. You can also find us on Twitter and Facebook.

The post Beginner’s Guide to Image SEO – Optimize Images for Search Engines appeared first on WPBeginner.