How to Fix Common Image Issues in WordPress

WordPress comes with some pretty neat tools to manage and edit images. You can easily upload images, align them, and even edit them inside WordPress.

Most beginners are not aware of these WordPress image editing features. It takes users a while to discover out some of them while other features go completely unnoticed.

If you ever had a question about WordPress images, then you’re in luck. In this article, we will cover the most common image issues in WordPress and how to fix them.
Fixing common image issues in WordPress

Since this is a detailed article, here is the list of image related issues that we will cover this article.

  1. How to Upload Images in WordPress?
  2. How to Align Image to the Left or Right in WordPress?
  3. How to Add Caption below Images?
  4. How to Display Photos in Columns and Rows?
  5. Create Beautiful Responsive Image Galleries in WordPress
  6. How to Fix Missing Post Thumbnails / Featured Image?
  7. How to Add Cover Images in WordPress Posts and Pages
  8. How to Fix Featured Image Appearing Twice Issue?
  9. Image too Big? How to Crop Images in WordPress?
  10. How to Add a Header Image in WordPress?
  11. How to Add a Background Image in WordPress?
  12. How to Find Free Images for Your WordPress Blog Posts?
  13. How to Tag Images in WordPress?
  14. How to Import External Images in WordPress?
  15. How to Require Featured Image for Posts in WordPress?
  16. How to Set a Default Featured Image in WordPress?
  17. How to Remove the Default Image Link in WordPress?

Let’s start with the most obvious one.

1. How to Upload images in WordPress?

WordPress makes it super easy to upload images to your posts, pages, and non-content areas like sidebars.

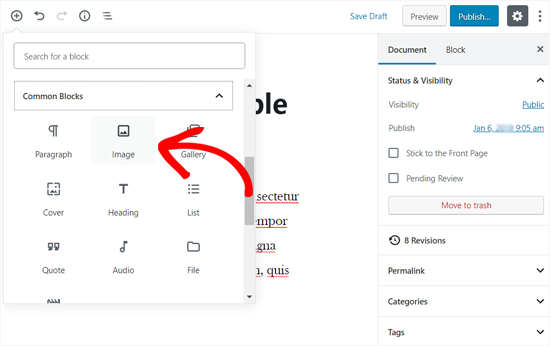
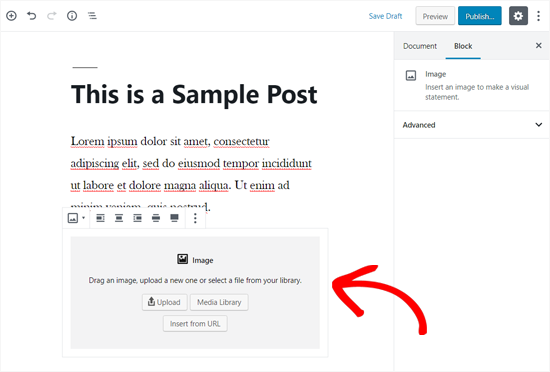
To upload images in WordPress posts and pages, you simply need to add the image block to the content editor.
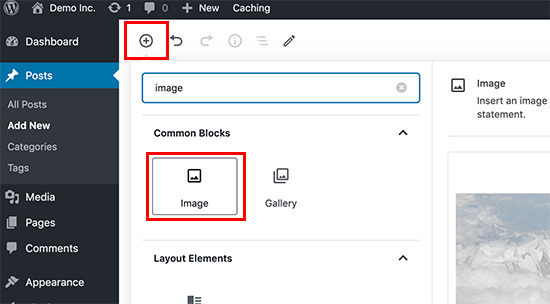
Adding an image block to a WordPress post or page

You can also add the image block by simply typing /image in a paragraph block. The editor will start showing blocks you can insert as soon as you start typing.
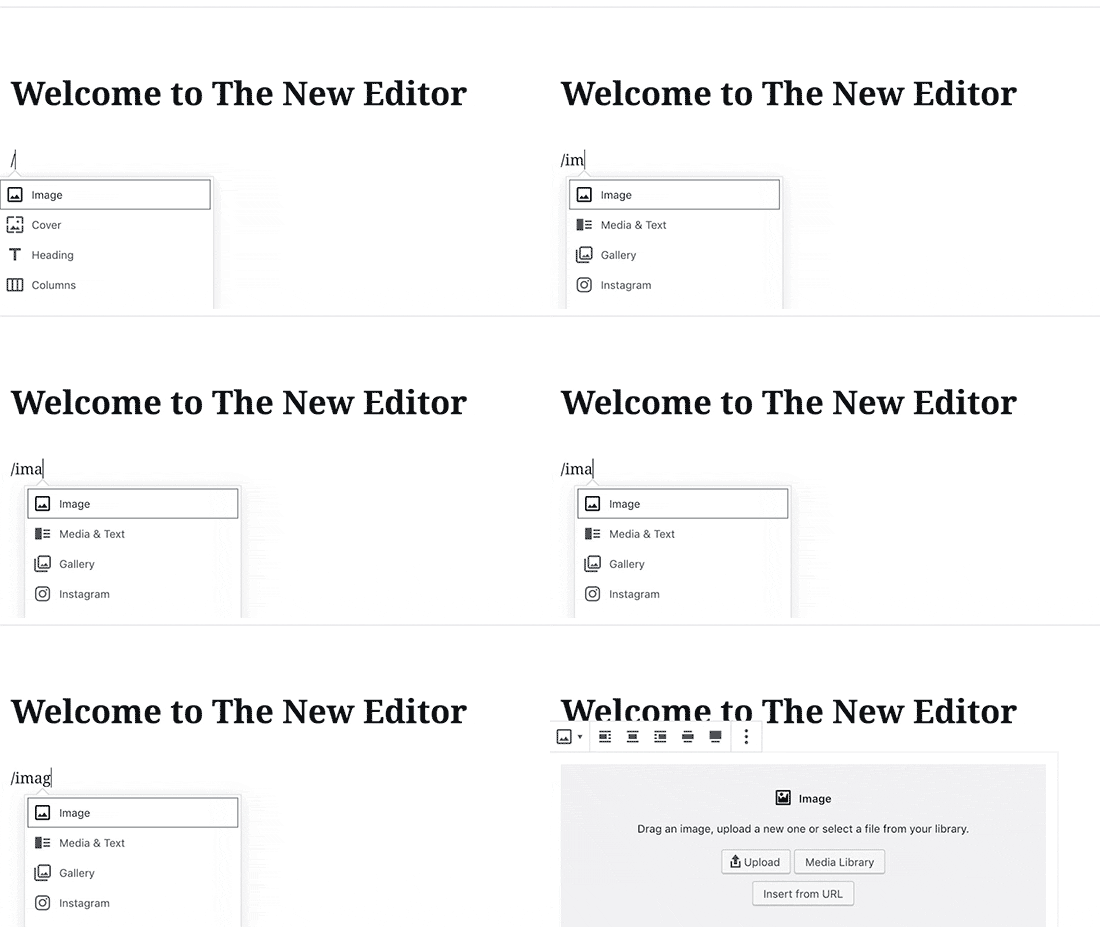
Adding image block

WordPress will now add the image block to the editor. You need to click on the ‘Upload’ button to select and upload the image from your computer.
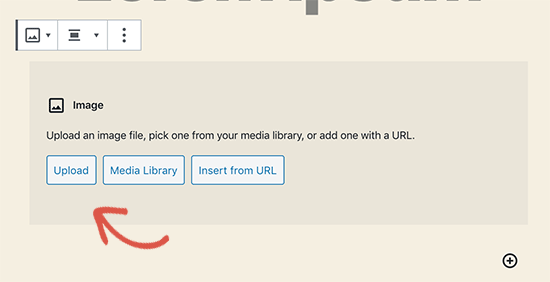
Select and upload image

You can also select a previously uploaded image from your media library.

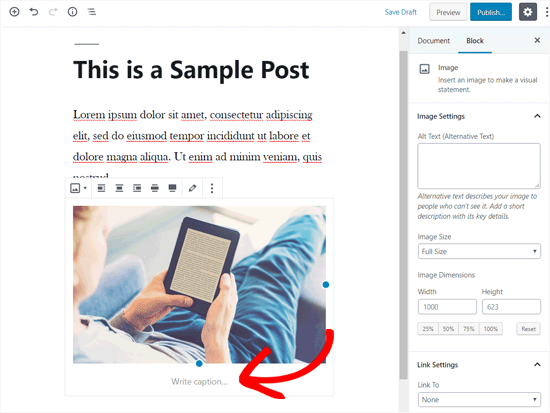
After uploading the image, you’ll see a live preview of the image in the content editor.
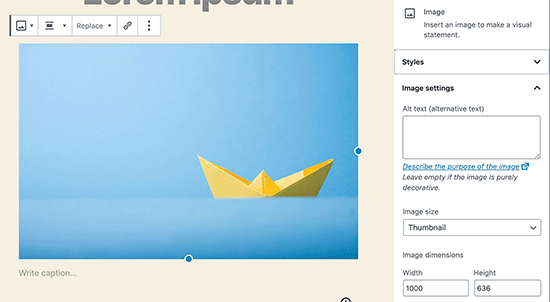
Image preview

You’ll see a bunch of image settings on the right panel. From there you can provide image alt text, select image size, and image style.

2. How to Align Image to the Left or Right in WordPress?

WordPress makes it easier to align images to the left, right, or center. Simply select the image by clicking on it, and then click on alignment button from the block toolbar.
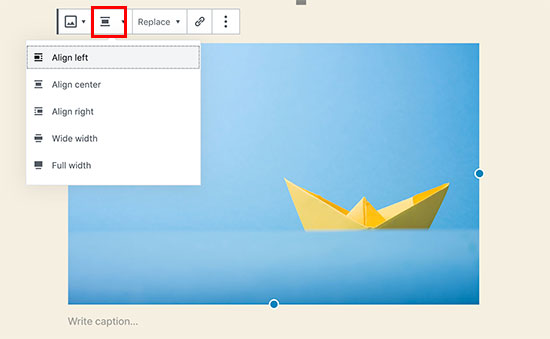
Image alignment options

You may have noticed how some popular blogs use images with text wrapped around them. This is done by using the align feature.
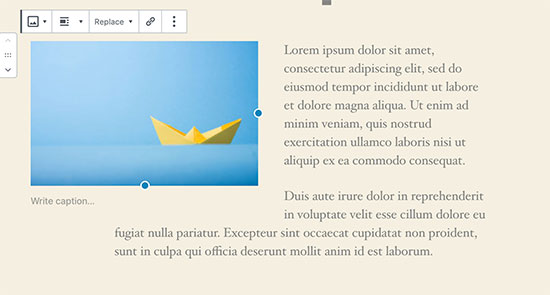
Image aligned left with text on the right

Alternatively, you can also use the ‘Media & Text’ block instead of the image block. This block is made specifically for adding images next to the text.
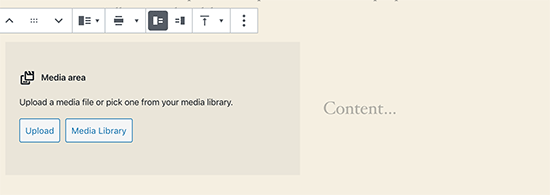
Media and text block

You can then upload an image and text side by side. You can also use the block toolbar to change the image or text side.
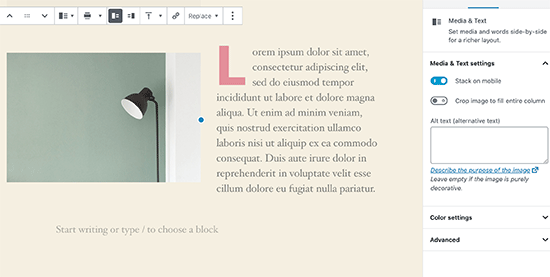
Image next to the text in WordPress

3. How to Add Caption below Images?

WordPress allows you to easily add caption for images. After you upload an image, you’ll see the option to add caption right below the image preview.
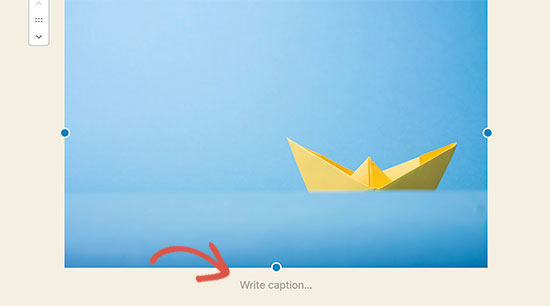
Write caption for an image in WordPress

Similarly, you can also add captions to image galleries in WordPress. For more details, see our guide on how to add captions to images in WordPress.

4. How to Display Photos in Columns and Rows?

Often users ask us how to neatly display photos in columns and rows.

Let’s say you want to share photos of a birthday party or vacation photos. You can add them one by one into a post, but this will look like a lengthy list of images.

The better way to group your photos is by creating image galleries.

WordPress comes with a built-in gallery block that allows you to easily add images in rows and columns with thumbnail previews.

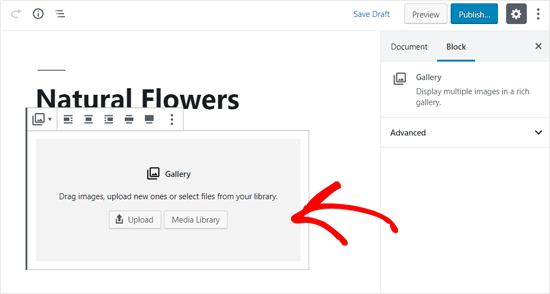
Simply add the gallery block to the post editor and select the images you want to upload.
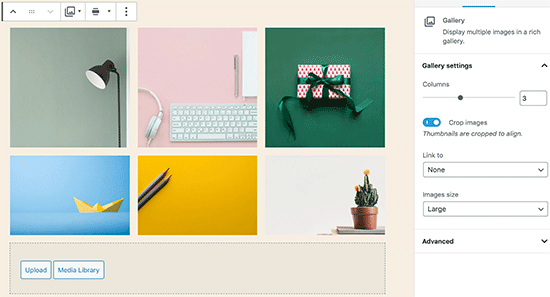
Adding a gallery in WordPress

For more detailed instructions see our guide on how to create an image gallery in WordPress.

5. Create Beautiful Responsive Image Galleries in WordPress

Envira Gallery

You will notice that the default WordPress image galleries lack several features. For instance, they are also not very easy to browse.

If you often upload images and photographs to your WordPress site, then you will need a proper WordPress photo gallery plugin.

We recommend using Envira Gallery. It allows you to easily create beautiful and fully mobile-friendly image galleries on your WordPress site.

The best part is that it adds additional functionality like albums, gallery templates, social sharing, slideshows, watermarking, pagination, password protection, tagging, fullscreen view, and much more.

6. How to Fix Missing Post Thumbnails / Featured Image?

Most WordPress themes allow you to prominently display a featured image with your articles. Here is how to set a featured image in WordPress to avoid missing thumbnails.
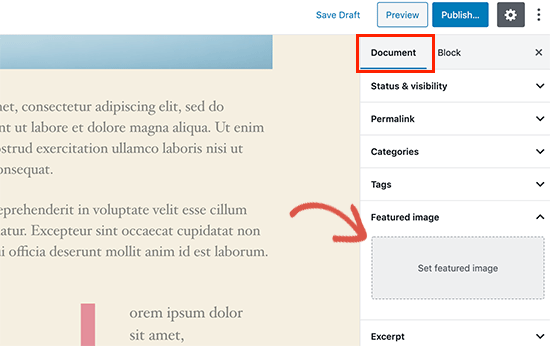
Setting a featured image for a WordPress post

Now, you can click on ‘Set Featured Image’ to upload your post thumbnail. After uploading the image, you’ll be able to see your post thumbnail in the featured image meta box like this:
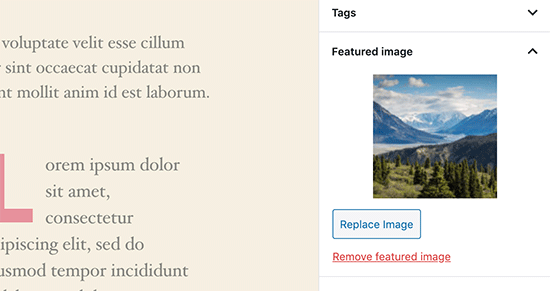
Featured image preview in post editor

For more details, see our guide on how to add featured image or post thumbnail in WordPress.

7. How to Add Cover Images in WordPress Posts and Pages

Cover images are the wide or full-width images that can be used as a separator between different sections of an article or a lengthy sales page.

They are highly engaging and help users easily scan a page without feeling overwhelmed by too much text.

To add a cover image, you simply need to add the ‘Cover’ block to the content editor.
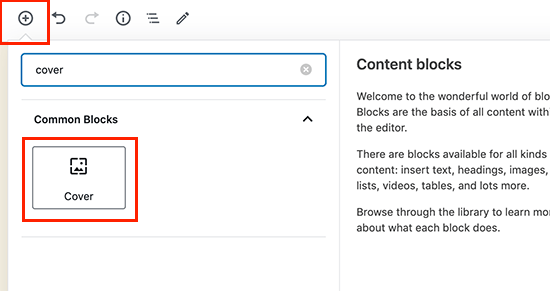
Adding cover block to WordPress post editor

Next, you need to upload the image you want to use from your computer or select one from the media library. If you don’t want to use an image, then you can also select a color background as the cover.

Tip: It is best to use a large image for a better result.

You’ll now see a liver preview of your cover image in the editor. You can change the cover image display options from the block toolbar or using the settings on the right.
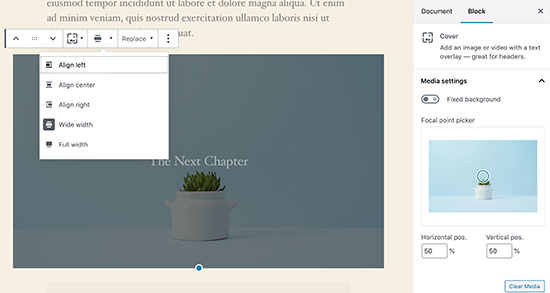
Cover image preview

To learn more see our guide on the difference between cover image vs featured image in WordPress and how to use them effectively.

8. How to Fix Featured Image Appearing Twice Issue?

Inserting the featured image inside content is a common mistake made by beginners.

Once you set a featured image, you don’t need to insert it into the post editor along with your post content.

Doing so, will make your featured image appear twice. Once as the featured image, and once as an image inside the post.
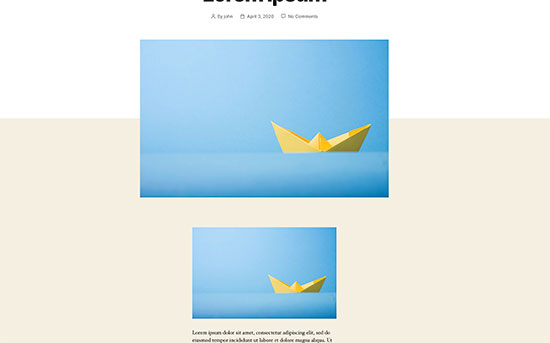
Featured image appearing twice

You can add other images in your post, but your featured image goes in the featured image box.

For more details, see our guide on how to fix featured image appearing twice in WordPress posts.

9. Image too Big? How to Crop Images in WordPress?

When you are uploading images from your phone or camera they are usually too big.

WordPress automatically creates small, medium, and large image sizes for your original upload. But sometimes you may need to crop the image in a different size.

WordPress is no Photoshop, but it comes with some basic image editing features like scale, crop, flip and rotate images.

Go to Media » Add New and upload your image. After uploading the image, you will see an Edit link next to the uploaded image.

Clicking on it will open the Edit Media screen where you will see an Edit Image button right below the image. This will open the WordPress image editor.
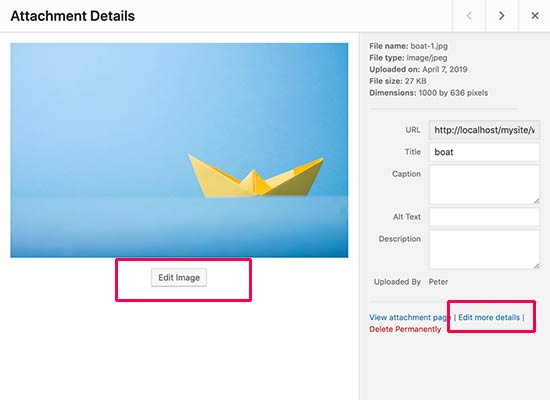
Editing image in WordPress

From here you can click on the ‘Edit Image’ button below the image preview. This will open the image editing screen.

On the image editor screen, you will see buttons to perform some basic image editing tasks such as cropping, rotating, resizing, etc.
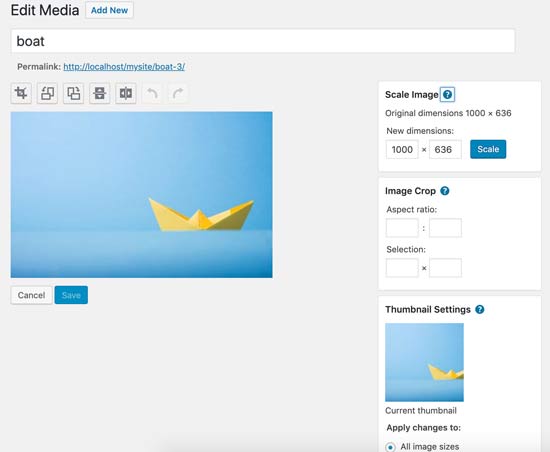
WordPress image editing features

For more detailed instructions see our guide on how to crop, rotate, scale, and flip images in WordPress.

10. How to Add a Header Image in WordPress?

A header image in WordPress is a theme feature. Many WordPress free and premium themes comes with support for header image.

You can upload your own custom header image from the Appearance » Customize page.

Header options

Since it is a theme feature, many WordPress themes come with their own header options. Some allow you to set a site-wide header image, while others allow you to only set a header image for the homepage.

11. How to Add a Background Image in WordPress?

Just like the custom header image, custom background image is also a WordPress theme feature. Many WordPress themes come with support for custom background images.

Visit Appearance » Customize to launch the theme customizer. If you can see the Background Image option, then your theme has support for custom backgrounds.

Custom background

It is a theme feature which is why it varies from one theme to another. Depending on your theme you’ll see different options for styling your background image.

If your theme does not support background image, then you can still use a plugin to add full-screen background images to your website.

12. How to Find Free Images for Your WordPress Blog Posts?

Finding images for blog posts

Images can make your articles stand out. However, you must respect copyrights of other people and try to find images that you are legally allowed to use.

We are often asked by our readers about how to find best royalty free images to use in their posts?

There are many websites where you can find free images to use. However, you will soon notice that images on those sites look overused and generic.

See our list of the best sources for free public domain and CC0-licensed images on the internet.

13. How to Tag Images in WordPress?

If you run a photography blog, then you will notice that WordPress does not allow you to sort photos and images.

Wouldn’t it be great if you could add tags to your images, so that you and your users can easily browse them?

Luckily, there are some great plugins that allow you to do just that.

For a photography related blog, the best option is to use Envira Gallery which comes with an add-on to add tags.

Envira Gallery allows you to create beautiful, mobile-ready, photo galleries in WordPress. Using tags, your users can easily filter and sort photos without even reloading a page.
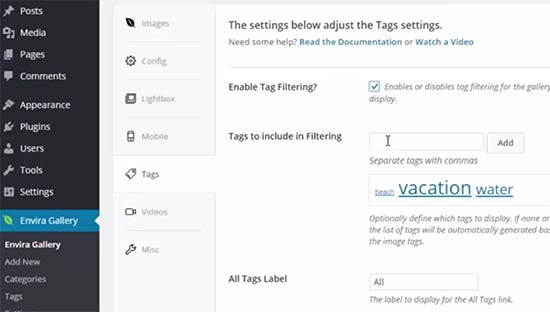
Envira Gallery tags feature

For more details, see our article on how to add categories and tags to WordPress media library.

14. How to Import External Images in WordPress?

This question often comes up when you are migrating your site to WordPress. Some images on your website may still be pointing to older location.

Specially users importing blogs from Blogger, Squarespace, or WordPress.com may face this problem.

While the images on your site may appear correctly, they are still loading from external source. To solve this issue, all you need to do is install and activate Auto Upload Images plugin.
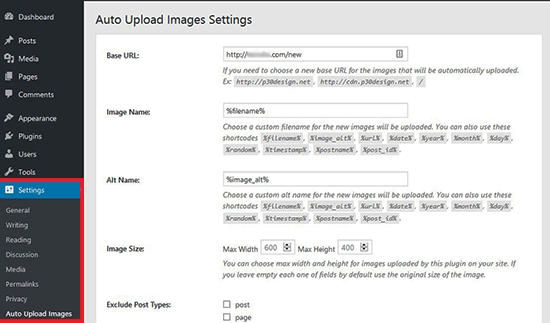
Auto upload image settings

The plugin will check for external images once you update or save any post or page. You can manually do that for each post or page or you can bulk edit all posts and simply click the update button.

For detailed instructions, see our guide on how to import external images in WordPress.

15. How to Require Featured Image for Posts in WordPress?

When running a multi-author site in WordPress, some of your authors may not be familiar with the featured image functionality.

In this case, you may want to remind yourself or your users to upload a featured image whenever they are submitting a post in WordPress.

You can do this by installing and activating the Require Featured Image plugin.

Once activated, the plugin will display a notification box in the post edit area, informing users that this post requires a featured image.
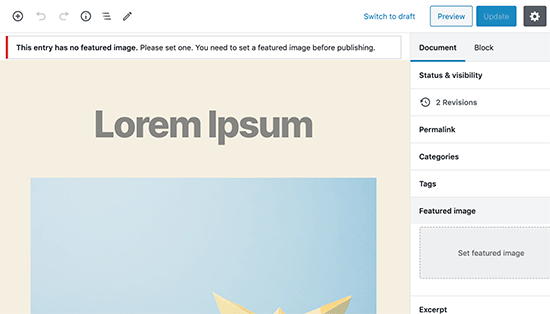
Require featured image

You and your users will be able to save posts as drafts, but you cannot publish the post until you add a featured image.

See our article on how to require featured images for posts in WordPress for more instructions.

16. How to Set a Default Featured Image in WordPress?

Finding the perfect featured image for every post or article is a tough task. Sometimes you may not want to add a featured image to a post, but your theme may look awkward without a featured image.

This is where a default featured image can come in handy. A default featured image is used when an article does not have a featured image of its own.

You can set a default featured image by using the default featured image plugin.
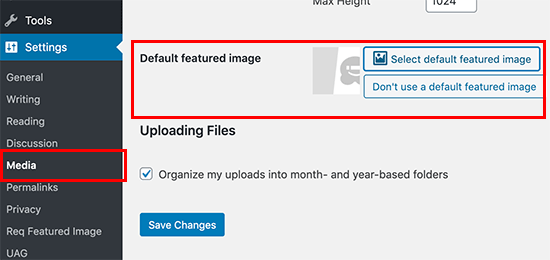
Default featured image

We hope this article helped you fix some of the most common image issues in WordPress. You may also want to see our list of the most common WordPress errors and how to fix them.

If you liked this article, then please subscribe to our YouTube Channel for WordPress video tutorials. You can also find us on Twitter and Facebook.

The post How to Fix Common Image Issues in WordPress appeared first on WPBeginner.

Angular Image Gallery With Bootstrap

Recently I was presented with a challenge to quickly build an image gallery. The key requirements for the exercise were to use Angular 8 and Bootstrap 4. In this article, I have explained how we can achieve this with minimum time, effort, and resources. Since this is a practical use case in many applications, I hope it will help developers trying to build a similar feature. 

Note that for this tutorial, I have used Visual Studio Code on a Windows machine. However, you can follow along with any environment and IDE that support Angular application development.

How to Create an Image Gallery in WordPress (Step by Step)

Are you looking to create an image gallery in WordPress?

An image gallery lets you add photos in rows and columns. This allows you to display more photos in less space while also making it easier for users to browse them.

In this article, we will show you how to easily create an image gallery in WordPress that makes your photos look even better.

How to create an image gallery in WordPress

Why Create an Image Gallery in WordPress?

WordPress makes it super easy to add an image to your blog posts and pages. You just need to add the image block and upload your image.

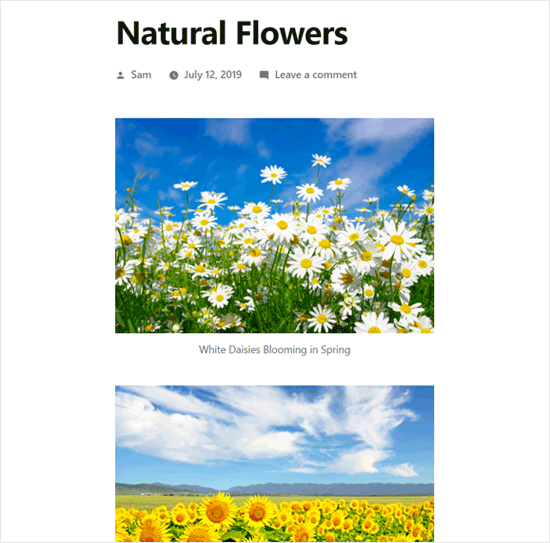
However, if you are adding multiple images, then all those images will appear one after another. It doesn’t look great, and your users will have to scroll a lot to view them all.

Adding Multiple Images in WordPress Post Without Creating a Gallery

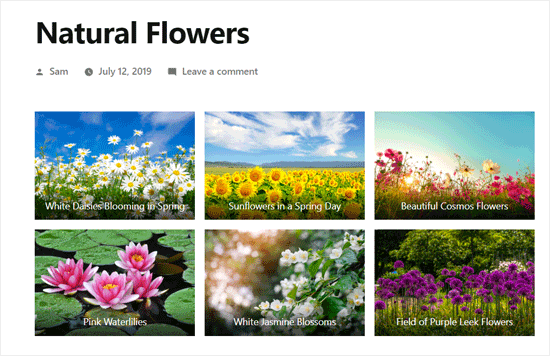
By creating a gallery, you can display images in a grid layout with columns and rows. You can show thumbnails for your pictures, and users can click on them to see the full image.

This way, you will be able to show more photos in less space, and it will look a lot more professional.

Preview of WordPress Photo Gallery Using Default Gallery Block

WordPress actually comes with a built-in gallery feature for quickly creating photo galleries. The new WordPress block editor includes a Gallery block to let you make a WordPress gallery in just a few clicks.

You can also use WordPress image gallery plugins to create even more robust galleries with more features.

In this tutorial, we will show you both methods to make a photo gallery in WordPress.

Let’s start with the default WordPress gallery block.

Method 1. Create an Image Gallery without a Plugin

WordPress comes with a built-in feature that lets you create a gallery. This feature is very basic and does not have many options, but it gets the job done.

Here is how you would create an image gallery in WordPress without using a plugin.

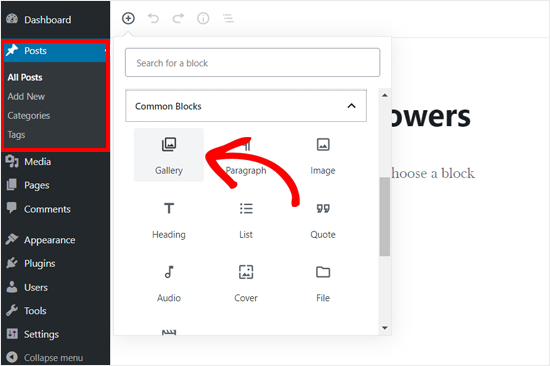
First, you need to edit the post or page where you want to add the image gallery. On the post edit screen, click on the Add New Block icon and select the Gallery block.

Add Gallery Block to WordPress Post Editor

This will add the Gallery block to your WordPress editor where you can click on the ‘Upload’ button to upload photos from your computer. You can also select from previously uploaded photos in the media library.

Image Upload Options in WordPress Gallery Block

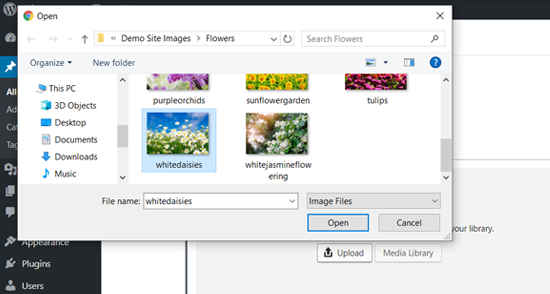
If you click on the Upload button, then you can generally upload one photo at a time. However, you can select and open multiple images with Ctrl key pressed on your keyboard.

Upload Images to Your WordPress Photo Gallery from Computer

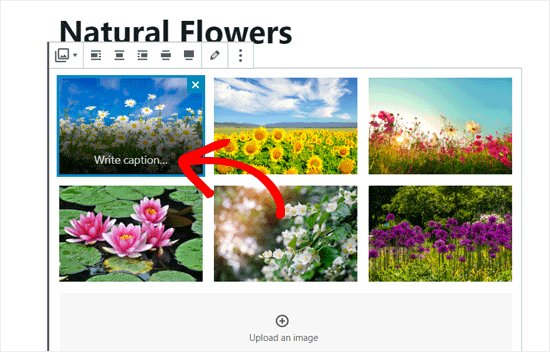
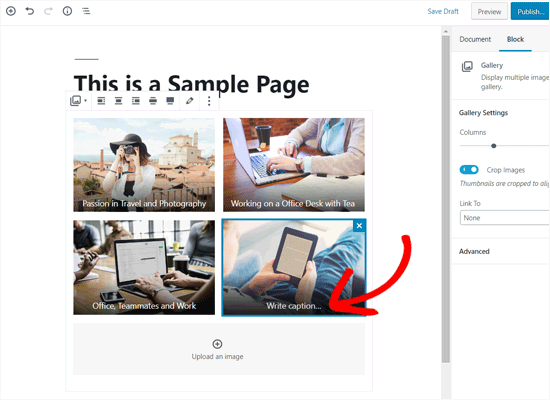
After you have uploaded all the images, you can add captions to your images. Simply click on the photos, and you will see ‘Write caption…’ option where you need to enter the caption.

Write Captions in Your Gallery Images

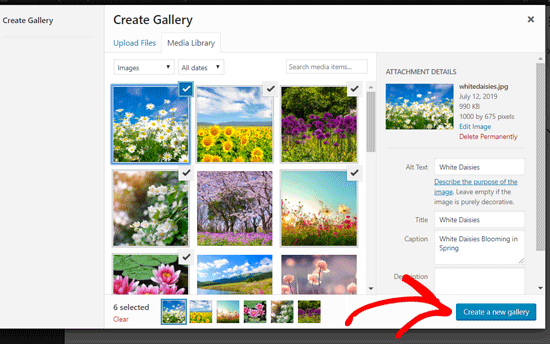
If you select the Media Library button, then you will be able to choose images for your gallery all at once. As you select images, you can also enter the image alt text, title, and caption from the attachment details panel on the right side.

Select Images from WordPress Media Library

Select the images you want to add and click on the ‘Create a new gallery’ button at the bottom right corner.

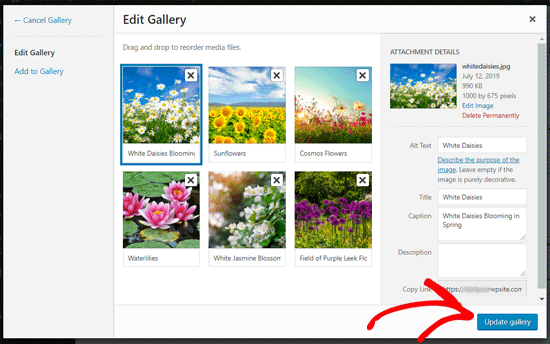
Next, you will see ‘Edit Gallery’ page where you can add/review your image captions. Once done, click on the ‘Update Gallery’ button at the bottom right corner.

Update Your WordPress Library

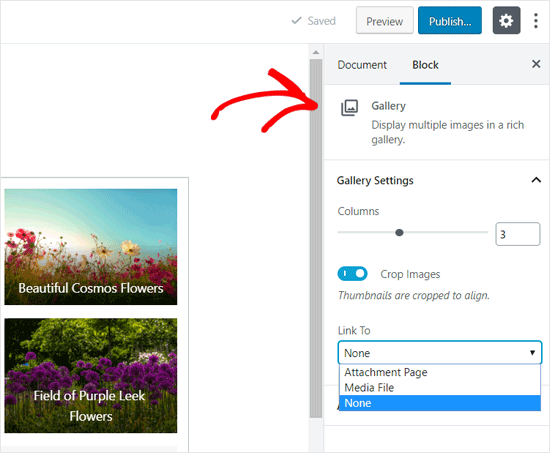
After that, your post edit screen will open with the gallery block settings panel on the right side. Now, you can choose the number of columns for each row, enable or disable the Crop images option, and choose where to link your gallery images.

WordPress Gallery Block Settings

From the Link to options, you can choose None if you want your users to only view your photo. This option disables clicking feature for your images.

If you select the Media File option, then the images will be clickable, and the image file will open when clicked. Similarly, the attachment page will open if you select the Attachment Page option.

Once you are satisfied with the settings, you can publish the post and preview the gallery on your live website.

For example, here is how the image gallery appeared on our demo website.

Preview of WordPress Photo Gallery Using Default Gallery Block

Wasn’t that quick and easy?

It looks pretty too. However, if you create image galleries regularly, then you will soon notice that it lacks certain essential features.

For example, your images will either be not clickable or open in a new page. If you link your gallery images to the media file or attachment page, then the users will have to click on the back button to view the gallery again.

It is not user-friendly, and your gallery’s appearance depends on your theme. In most cases, you get just one very generic style.

You can’t organize your galleries into topics, albums, tags, etc. Your gallery is not stored anywhere and if you needed to add the same gallery again, then you’ll have to recreate it.

If you want to add more professional looking image galleries on your site, then you should use the next method.

Method 2. Create an Image Gallery Using Envira Gallery

For this method, we will be using the Envira Gallery plugin. It is the best WordPress image gallery plugin in the market.

Envira allows you to easily create fully-responsive, beautiful, and modern image galleries in WordPress. It is super fast and comes with many features like lightbox popup, easy image navigation, drag and drop builder, and professional gallery templates.

Let’s get started.

First thing you need to do is install and activate the Envira Gallery plugin. For more details, see our step by step guide on how to install a WordPress plugin.

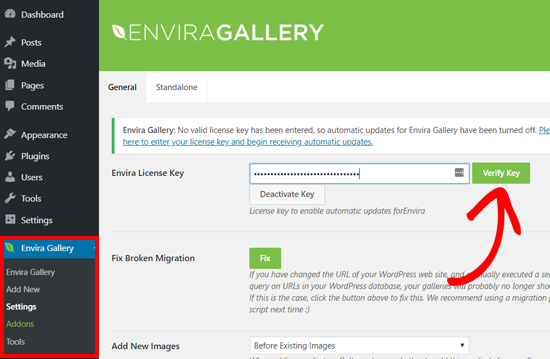
Upon activation, you need to visit the Envira Gallery » Settings page to enter your license key. You can get this key from your account on the Envira Gallery website.

Enter Envira Gallery License Key

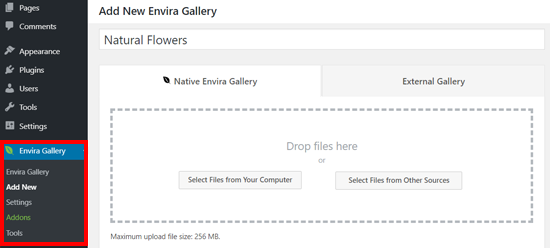
After verifying your license key, you can head over to Envira Gallery » Add New page to create your first gallery.

Creating a New Gallery with Envira Gallery WordPress Plugin

First, you need to provide a title for your gallery and then click on ‘Select files from computer’ button to upload your images.

You can also select files from your WordPress media library by clicking on ‘Select files from other sources’ button.

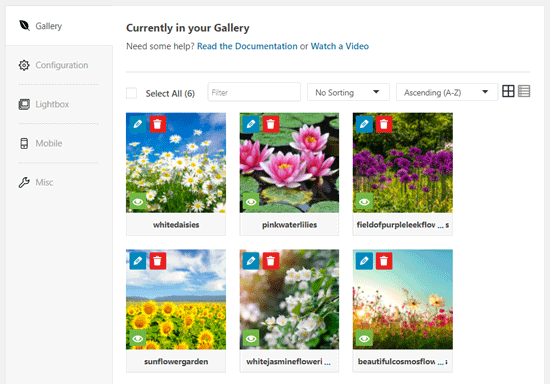
Once you upload the images, they will appear in the Gallery section.

Images in Envira Gallery Builder

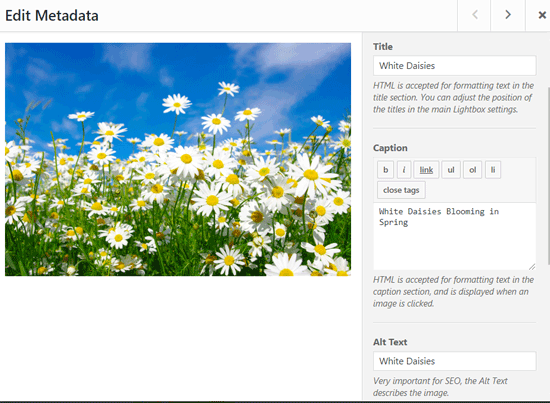
You can click the pencil icon on an image to add caption, title, and alt text for each image.

Edit Gallery Image Metadata

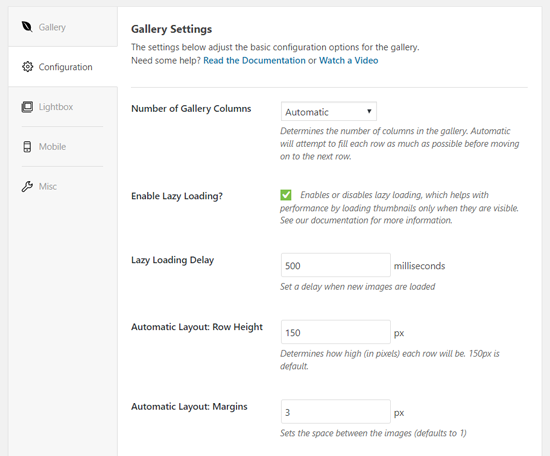
Next, you need to click on the ‘Configuration’ tab.

From here you can change your gallery settings like the number of columns, image lazy loading, title and caption positioning, margins, heights, thumbnail sizes, image dimensions, etc.

Configure Envira Gallery Settings

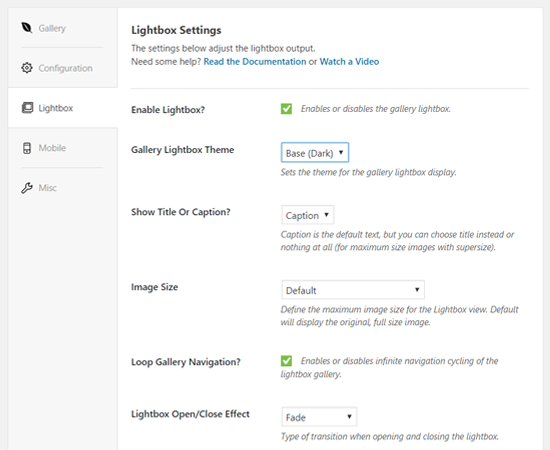
After that, you need to click on the ‘Lightbox’ tab.

The lightbox popup allows users to enlarge images and browse them without ever leaving the page.

The default settings will work very well for most websites, but you can review the options and change them if you like.

Envira Gallery Lightbox Options

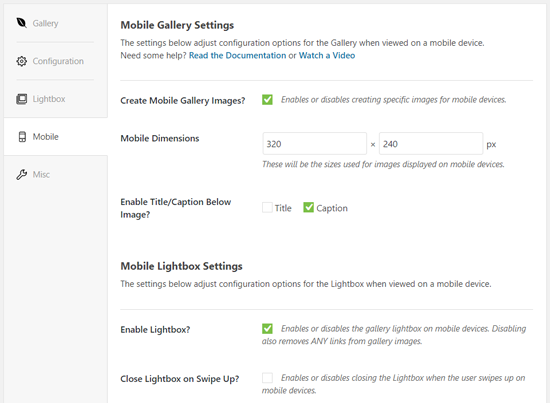
Next, you can click on the ‘Mobile’ tab to configure your gallery settings for mobile devices. It allows you to choose image dimensions for mobile devices, enable or disable lightbox, and more.

Envira Mobile Gallery Settings

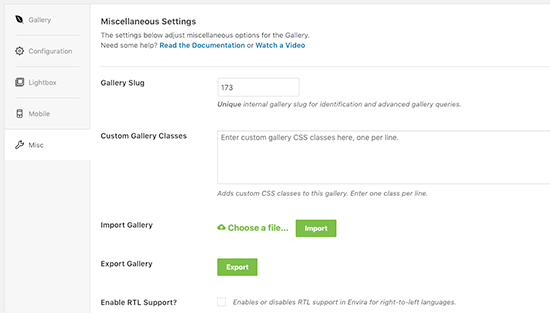
After that, you can review more options like gallery slug and add custom CSS from the ‘Misc’ section.

You can now publish your gallery which will make it available to be added anywhere on your WordPress site.

Next, you need to edit a post or page where you want to display your gallery.

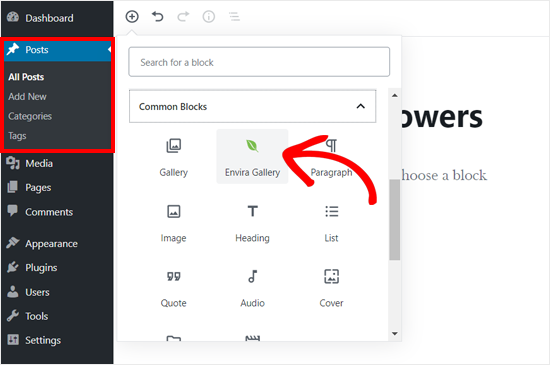
On the post edit screen, click on the Add New Block icon and select the Envira Gallery block.

Add Envira Block to WordPress Post Editor

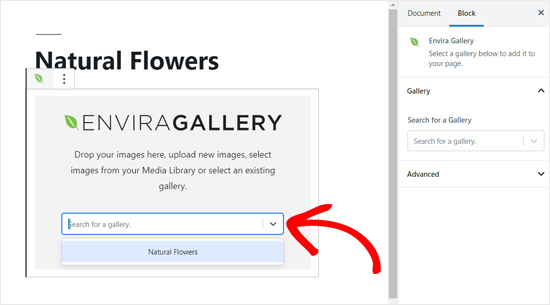
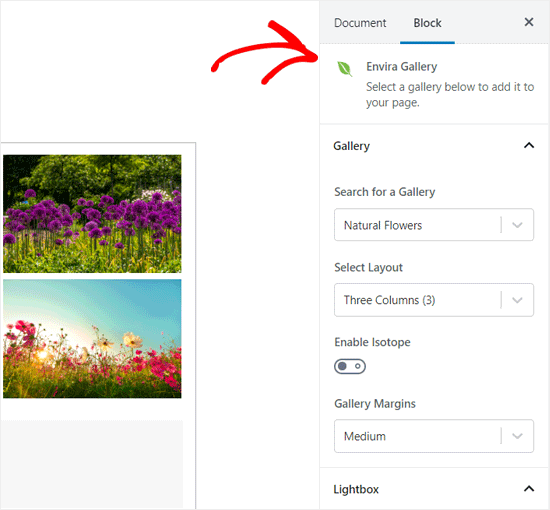
Clicking on it will add the Envira Gallery block in the post editor. Now you can search a gallery by its name or find it by clicking on the dropdown arrow icon.

Choose an Envira Gallery to Add to your WordPress Post

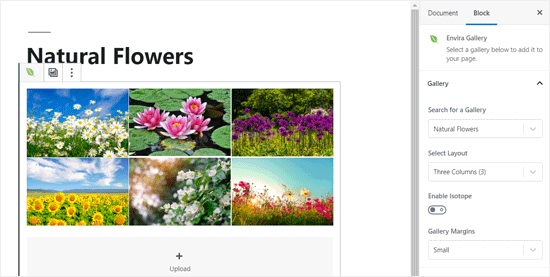
After that, the plugin will load your gallery in the post editor.

Envira Gallery Added to WordPress Post Editor

Next, you can review your gallery settings one more time from the block settings panel on the right side.

Envira Gallery Block Settings

You can now save your post and preview it to see the gallery on your live website.

WordPress Photo Gallery Created with Envira Gallery

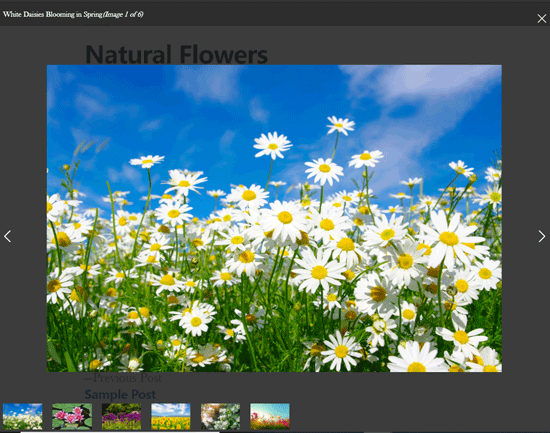
Clicking on any image in the gallery will open it in the lightbox popup. You can browse images in the lightbox by pressing the left and right arrow keys on the screen or on your keyboard.

Envira Gallery Image in the Lightbox Popup

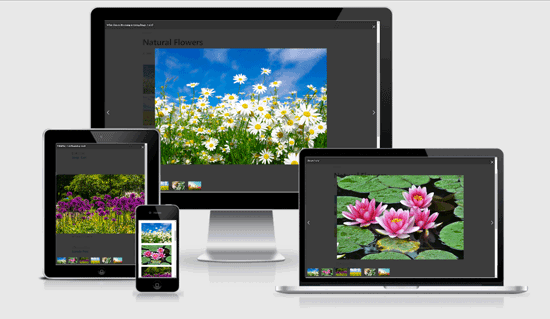
Your gallery will look equally great on mobile as well. Users will be able to tap on an image to enlarge it and swipe to view the next or previous image.

Responsive WordPress Photo Gallery

We hope this article helped you learn how to create an image gallery in WordPress. You may also want to see our guide on how to fix common image issues in WordPress.

If you liked this article, then please subscribe to our YouTube Channel for WordPress video tutorials. You can also find us on Twitter and Facebook.

The post How to Create an Image Gallery in WordPress (Step by Step) appeared first on WPBeginner.

How to Add Caption to Images in WordPress

Do you want to add captions to your images in WordPress? Captions are brief text descriptions that you can add to your images. They are typically used to provide additional details about an image.

WordPress comes with the built-in capability to easily add a caption and other metadata including title and alternative text for each image.

In this beginner’s guide, we will show you how to easily add a caption to images in WordPress.

How to Add Caption to Images in WordPress

Adding Caption to Images in WordPress

The first thing you need to do is to upload an image. On the post edit screen, click the ‘Add Block’ icon and select the ‘Image’ block.

Add Image Block in WordPress

Upon clicking on it, the Image block will be added to your post area.

Image Block Added In WordPress

You can now click on the upload button to select and upload an image from your computer to WordPress. You can also select a previously uploaded image by clicking on the media library button.

To learn more, see our article on how to add and align images in WordPress.

As soon as you add an image, it will appear inside the editor with a text box labeled ‘Write caption…’ below it.

That’s where you can add a caption for your image.

Add Caption to Image in WordPress post

Once done, you can save your post by clicking on the publish or update button.

That’s all. Wasn’t that easy?

Add Captions to Your Gallery Images

WordPress editor also comes with a Gallery block allowing you to upload multiple images and display them in a grid layout with rows and columns.

Let’s see how to add captions to images in a WordPress gallery block.

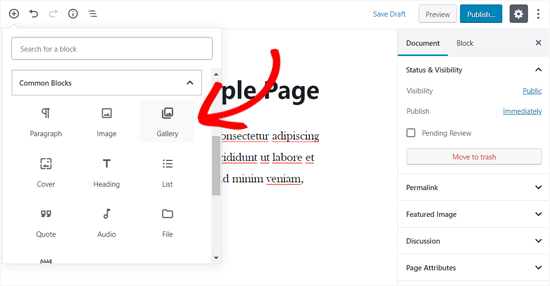
To create a gallery, go to your page or post edit screen. Then click the ‘Add Block’ icon and select the ‘Gallery’ block in the Common Blocks tab.

Add Gallery Block in WordPress

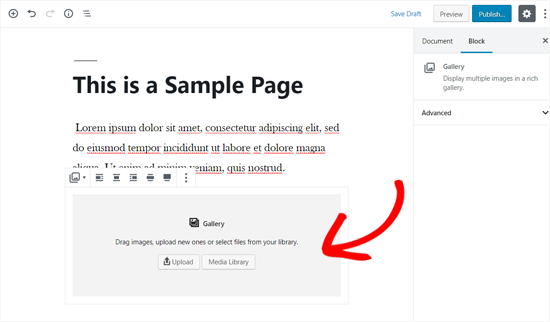
Next, you will see the Gallery block added to your page/post area. Now, you can upload images one by one from your computer or select the pre-uploaded pictures from your media library.

Gallery Block Added to a WordPress Page

If you upload images individually, then you can add a caption after uploading each one. When an image is uploaded, simply click on the image and the ‘Write caption…’ field will appear. You can add a caption by clicking on that.

Add Caption to Gallery Images in WordPress

If you select pre-added images from the library, you can add a caption to your pictures from the image metadata section on the right. If the photos already have a caption, then you don’t need to add it again.

Select Images to Create Gallery in WordPress

Adding Captions to Images in WordPress Media Library

WordPress allows you to upload images directly to the media library without embedding it in a post or page.

Here we will show you how to add caption to images when uploading them directly to the Media Library.

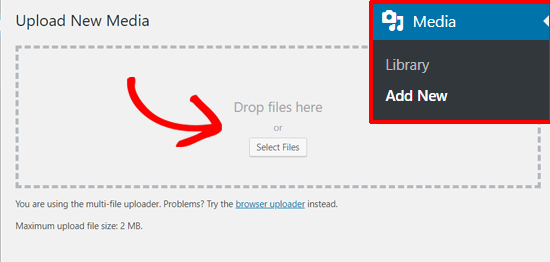
First, you need to visit Media » Add New page in WordPress admin area.

Add New Media to WordPress

From here, you can upload an image by dragging and dropping or by selecting one from your computer.

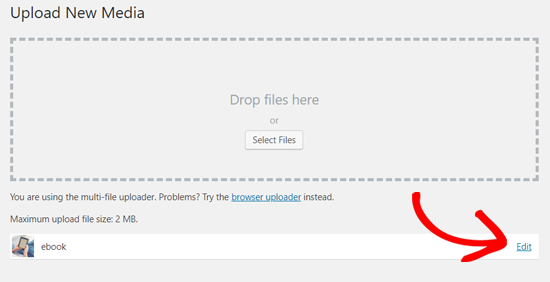
Once done, you will see the uploaded image below the Upload New Media box. You need to click the ‘Edit’ link.

Edit Image Option in WordPress Media Upload Page

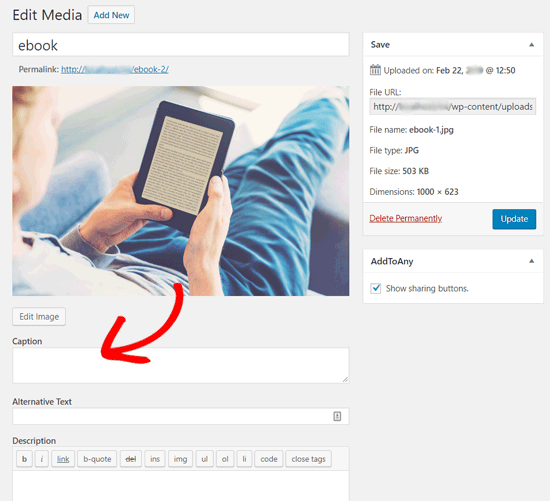
Next, it’ll open the edit media page in a new tab. You may notice that the edit media screen looks similar to the post edit screen. That’s because WordPress treats attachment (for example, image) as a default post type.

This allows it to store image metadata like title, description, and caption in WordPress database.

From this screen, you can edit your image title, add image metadata including caption, alternative text, and description.

Image Post Edit Screen in WordPress

Once you add the necessary information, you can update your image. This image metadata will now be saved in your media library.

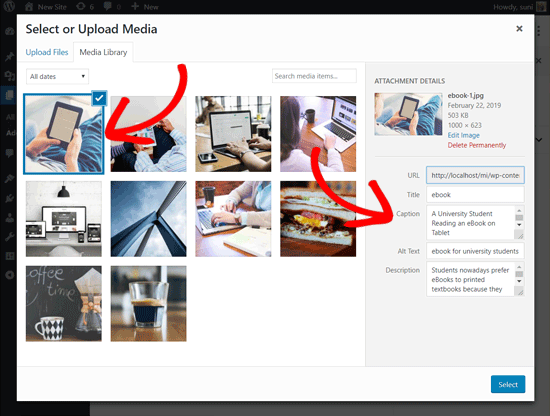
You can add this image on as many posts as you like without having to add the caption and other metadata again. Whenever you add this image to your post from the media library, it comes with the metadata already saved.

Select Image to Add in a WordPress Post

Adding Caption to Images in WordPress with Old Classic Editor

If you are still using the old Classic Editor on your WordPress site, then this is how you would add captions to images in WordPress.

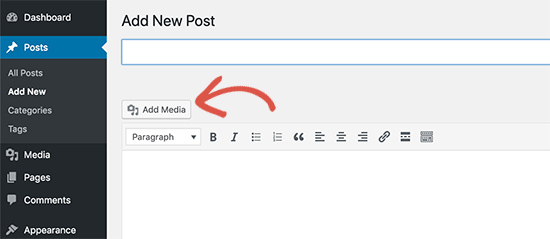
Simply click on the Add Media button above the post editor to upload an image or select one from the media library.

Add media button in the old classic editor

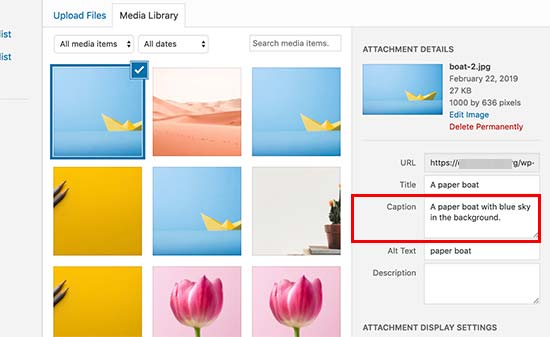
Once the image is uploaded you can enter meta data like title, alt text, and a caption of your image.

Adding caption to images using the Classic Editor

Click on the ‘Insert into post’ button to add the image to your post or page.

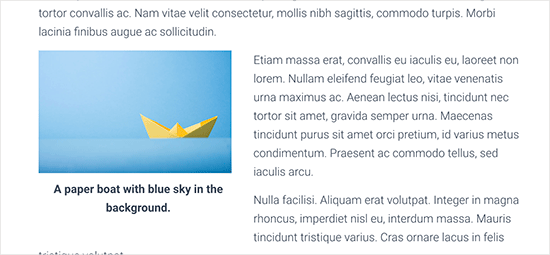
You will now be able to see the image preview in your post editor with the caption. You can save your changes and preview the post to see how it would look on your live site.

Preview of an image with the caption

Adding Captions to Gallery Images in WordPress with Classic Editor

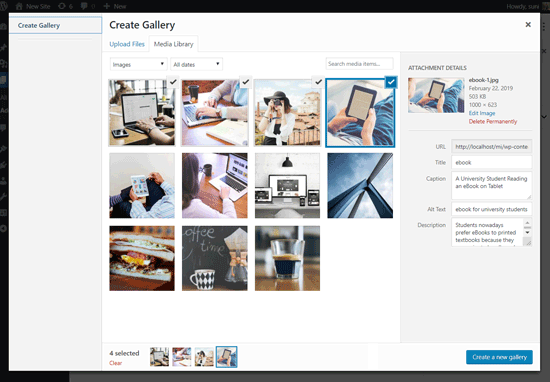
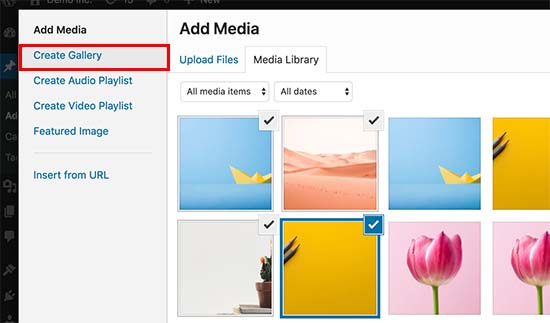
You can also add captions to images when creating a gallery using the Classic Editor. Simply upload and select multiple images and then click on the ‘Create gallery’ link from the left column.

Create gallery in media uploader

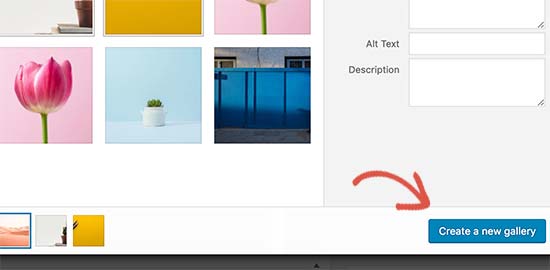
After that, you will need to click on the ‘Create a new gallery’ button at the bottom right corner of the popup.

Create a new gallery with selected images

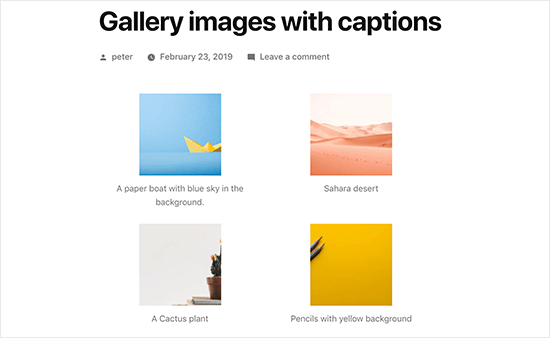
Now you will be able to add captions directly below each image or click on an image to load its settings in the right column and then add the caption.

You can now click on the Insert Gallery button to add gallery into your WordPress post or page.

Classic editor gallery images with captions

We hope this article helped you to add caption text to your images in WordPress. If you liked this article, you might also want to see our guide on how to fix common image issues in WordPress.

If you liked this article, then please subscribe to our YouTube Channel for WordPress video tutorials. You can also find us on Twitter and Facebook.

The post How to Add Caption to Images in WordPress appeared first on WPBeginner.

Which is the Best WordPress Photo Gallery Plugin? (Performance + Quality Compared)

Are you looking for the best WordPress gallery plugin for your website?

There are so many WordPress photo gallery plugins available, but the problem is that most will either slow down your website, or they’re extremely difficult to use.

To help you pick the right solution, we have created a detailed comparison of the performance, features, and quality of the best WordPress photo gallery plugins.

Our goal is to help you find the WordPress photo and video gallery plugin, that is fast, easy to use, and has all the features you will need.

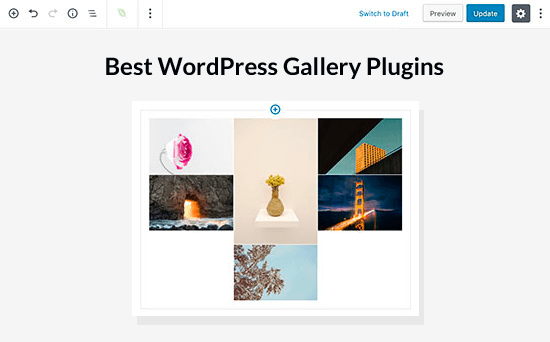
Best WordPress Gallery Plugins

Our Criteria for the Best WordPress Gallery Plugin

In our opinion, a perfect WordPress gallery plugin should be fast, easy to use, and have all the necessary features that you need to create beautiful galleries (such as lightboxes, image navigation, albums, pagination, etc).

The gallery plugin should offer a great user experience and help improve your image SEO as well.

4 Best WordPress Gallery Plugins

We have hand-picked the four most popular WordPress photo gallery plugins on the market.

In our comparison, we will look at the speed, features, ease of use, and reliability of these plugins:

Let’s get started with our comparison.

Speed

Speed is crucial when you are choosing a WordPress photo gallery plugin. Not only does it affect your WordPress SEO, but it also affects user experience on your site.

If you are using a gallery plugin for a portfolio or photography site, then you simply cannot afford to compromise on speed.

We ran a speed test for each of these plugins using the same images without modifying any default settings. Below are our results:

Gallery PluginPage Load TimeRequestsPage Size
Envira Gallery655 ms23988KB
Modula696 ms28948 KB
NextGEN867 ms351.0 MB
FooGallery917 ms27591 KB

As you can see in the above results, Envira Gallery came out as the fastest loading WordPress image gallery plugin. Modula came as a very close second with barely few milliseconds difference and with smaller page size.

The reason why Envira Gallery and Modula are so fast is that they are both well coded and highly optimized for speed. If performance and speed is your main concern (which it should be), then Modula and Envira Gallery are both great options.

Winner: It’s a tie between Envira Gallery and Modula

Ease of Use

Creating image galleries is not as simple as uploading a single image to your posts. You need to choose layouts, select columns, add thumbnail sizes, choose lightbox animations, etc.

Most beginners find the process quite overwhelming. The goal here is to find a WordPress photo gallery plugin that is both powerful and beginner friendly at the same time.

Envira Gallery

Envira Gallery follows and adheres to the WordPress coding standards and best practices. It provides a user interface that seamlessly blends into your WordPress admin area.

Creating a new gallery is quite simple and beginner friendly.

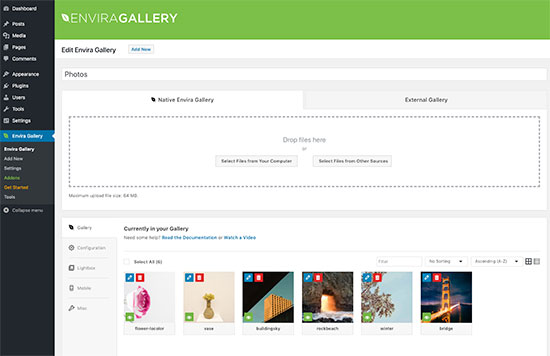
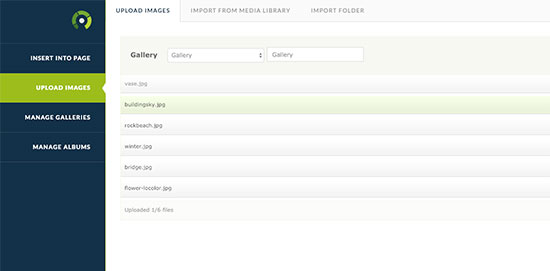
Envira Gallery user interface

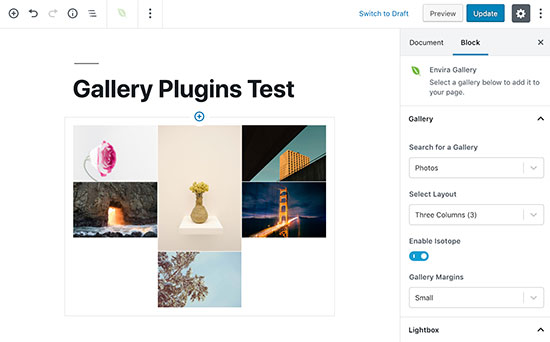
Envira Gallery also comes with a Gutenberg block allowing you to easily add photo galleries into any WordPress post and page. You can also change gallery settings right from the post edit screen.

Gutenberg block for Envira Gallery

Classic editor users can use the shortcode or the button above the post editor to quickly add any gallery or album in your post/page.

Aside from that Envira Gallery also shows you the template tag that you can use it in your WordPress templates. This is particularly handy if you are developing a site for a client and want to include galleries straight into the theme.

Modula

Modula Gallery uses a similar approach to create new photo galleries. You can simply upload your files or select them from the media library to create a photo gallery.

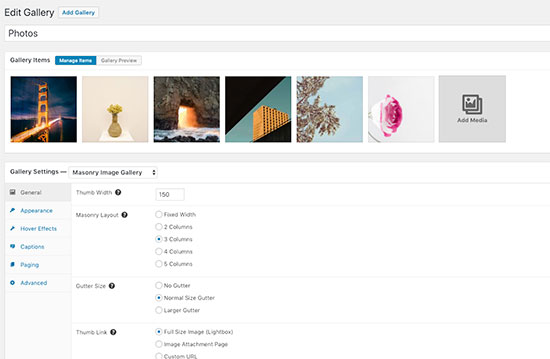
Modula Gallery user interface

Below the images, you will find all gallery settings organized in tabs. From here you can change gallery style, theme, lightbox, and other settings.

To insert the gallery into WordPress posts and pages, you will need to copy the gallery shortcode and insert it using the Shortcode block in the Gutenberg editor.

There are no sidebar widgets or Gutenberg blocks at the moment to make it easier for users to insert Galleries.

FooGallery

FooGallery takes the similar approach as Envira Gallery and Modula. They use a simple user interface that looks and feels like WordPress.

FooGallery user interface

After uploading your photos, you can adjust the gallery settings in great details below the images.

FooGallery also makes it easy to insert photo galleries. You can use the built-in Gutenberg block, shortcode, or sidebar widget to display your photo galleries anywhere in WordPress. It also adds a button on top of the Classic Editor to select and insert galleries.

Unlike Envira Gallery, FooGallery does not show the template tag to insert your galleries into theme files or templates.

NextGEN Gallery

NextGEN is a little different than our other three contenders. It brings its own user interface, database tables, and separate folders to store your images. This is why NextGEN user interface looks a bit complicated in WordPress.

NextGen UI

It does offer a gallery wizard which can be helpful for beginners. However, it will take users some time to understand how to upload images and create a gallery. You may also find it a bit difficult to add the gallery into your post/page.

NextGen adds a Gutenberg block which allows you to create and add galleries from the post edit screen. For classic editor users, it adds a button to the post editor.

Winner: No clear winner. Envira, Modula, and Foo Gallery all offer easy to use interface.
Features

In order to create a beautiful photo gallery, you need functionality like lightboxes, full-screen mode, albums, pagination, navigation, slideshow, password protection, EXIF metadata, social media sharing, and more.

However it’s important to remember that too many features can slow down your site, so let’s take a look at how our contenders handle the balance in features and functionality.

Envira Gallery

Envira Gallery is built with a mobile first approach. This means that it is fully responsive out of the box.

It allows you to easily choose thumbnail sizes, animations, gallery layouts, add meta tags for your images all from the single user interface.

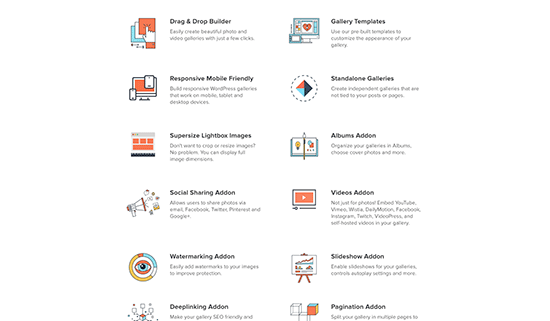
Apart from the built-in features, there are loads of features that you can add by installing addons such as: gallery templates, social sharing, videos, password protection, image protection, albums, slideshow, Pinterest, image proofing, WooCommerce support, and more.

Envira Gallery features

Modula

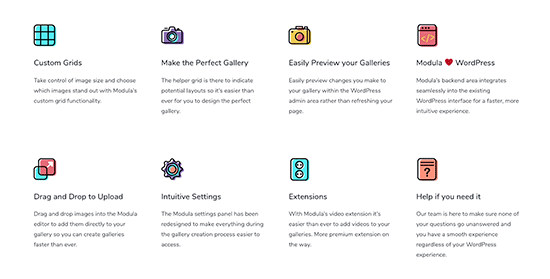
Modula is the newest of all plugins on our list, so they do not have the advanced features. However the plugin does cover all the basic features you’ll want from a WordPress gallery plugin like lightbox popup, social sharing, custom styles, grid layouts, and more.

It comes with a custom grid feature which allows you to use simple drag and drop to create your own custom grid for galleries.

It also has a video addon for creating video galleries. However, Modula is lacking other features like albums, watermarking, proofing, and gallery templates.

Modula features

FooGallery

FooGallery comes with a lot of powerful features however it is not mobile responsive out of the box. You can select the responsive template to add a responsive photo gallery.

Another feature that we missed is the lightbox. You can install the free Foobox plugin to add lightbox functionality, but we felt that it should have been packaged with the core gallery plugin.

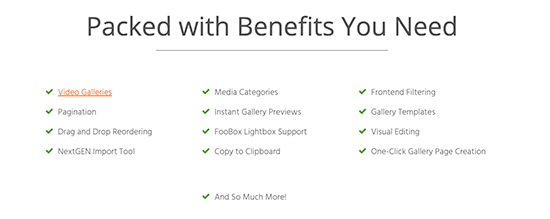
FooGallery also comes with extensions that you can install to add more features such as custom branding, cube effect, lightbox, and more.

FooGallery features

NextGEN Gallery

NextGEN Gallery is the oldest of all four plugins, and it comes with an extensive list of features.

Many of the features that are available as addons in Envira and Foo, are available out of the box in NextGEN gallery. There are also premium addons with more features that you can install.

Most NextGen features require a certain level of familiarity with the plugin. Users will need some time to figure things out, reading the documentation, and posting questions in support forums.

Winner: Envira Gallery is the clear winner here with its extensive list of features that cover all the basics + advanced features for photographers, eCommerce websites, and portfolios. NextGEN is the close second with a matching set of features.

Compatability

WordPress provides you the freedom to move your site from one web host to another and even to different competitors.

We need to see if you can easily import/export and backup your photo gallery data.

Envira Gallery

Envira stores all your photo galleries as custom post types in the WordPress database. It stores your media files using the default WordPress media location. This means if you backup your WordPress site, then you will have all Envira Gallery data backed up.

Envira also allows you to import/export your individual galleries. This means that you can move a single gallery from one WordPress site to another.
Import / Export photo galleries using Envira Gallery

When you move your WordPress site, Envira will automatically detect it and will show you an option to fix the migration. All these features make Envira Gallery the most reliable photo gallery plugin for WordPress.

Modula

Modula also uses a custom WordPress content type to store your photo galleries. This means you can save your photo galleries with your WordPress backup and restore them when you restore WordPress site from backup.

Modula doesn’t allow you to import/export individual galleries.

FooGallery

Similar to Envira, FooGallery also stores your galleries as custom post types in the WordPress database. If you backup your WordPress site, then you will have a FooGallery data backup as well.

However, if you just want to export individual galleries, then there is no option for that because the plugin doesn’t come with an import/export feature.

NextGEN Gallery

NextGEN gallery does not come with import/export feature. Since it stores your data in separate database tables, this means you will need to configure your WordPress backup plugin to include those tables.

NextGEN also stores your images in a separate folder. If you want to create a backup for them, then you will need to download the folder separately to your computer.
Both Envira and FooGallery offer NextGen importers to make it easy for users to switch to their platform.

Winner: Enivra Gallery offers the most comprehensive set of tools to import/export your photo galleries.

Pricing

All four plugins have a free WordPress gallery version available in the WordPress plugin directory. All four of them have paid upgrades available with more features. The pricing of your photo gallery plugin will depend on which plan you want to use for any of these plugins. You can choose a plan based on the features you need after trying the free versions.

Winner: No clear winners here – the pricing of products will vary based on what features you need and plan that you select.

Conclusion

If you’re looking for a simple and fast solution, then Envira Gallery and Modula Gallery are both great options for a WordPress gallery plugin.

If you need the advanced features and don’t mind a learning curve, then NextGen gallery is your best option.

We hope this article helped you pick the best WordPress gallery plugin for your website. You may also want to see our expert-pick of the must have WordPress plugins for all websites.

If you liked this article, then please subscribe to our YouTube Channel for WordPress video tutorials and join us on Facebook.

The post Which is the Best WordPress Photo Gallery Plugin? (Performance + Quality Compared) appeared first on WPBeginner.