How to Stop WordPress From Overwriting .htaccess File

Recently one of our readers asked if it was possible to stop WordPress from overwriting the custom code in your .htaccess file?

WordPress along with several plugins add custom settings to the .htaccess configuration file. If you have added your own custom code to .htaccess, then you may be worried that it will be overwritten or deleted.

In this article, we’ll show you how to stop WordPress from overwriting the .htaccess file.

How to Stop WordPress From Overwriting .htaccess File

Why Does WordPress Overwrite the .htaccess File?

Your .htaccess file is a powerful configuration file that stores important settings about your WordPress website. It contains rules that tell your hosting server how to handle your site.

WordPress uses the .htaccess file to store its permalink settings. Whenever you change or regenerate your permalinks, WordPress will automatically overwrite the old settings in .htaccess with the new settings.

Some WordPress plugins also save their settings in .htaccess. For example, the W3 Total Cache plugin will modify your .htaccess file in order to configure the caching and optimization tools that are part of the plugin.

Lastly, you can make your own custom changes to .htacess to control how your website works. For example, you can add custom rules to the file that protect your admin area, keep your site safe from hackers, set up redirects, ban suspicious IP addresses, and more.

Some users are concerned that if they add their own custom rules to .htaccess, then they may be deleted when WordPress overwrites the file with new settings. Other users prefer to manually configure .htaccess and not let WordPress write to it at all.

With that being said, let’s take a look at how to stop WordPress from overwriting your .htaccess file. Simply use the quick links below to jump to the section you are interested in.

How to Stop WordPress From Overwriting Your .htaccess Rules

The good news is that if you understand how the .htaccess file works, then you can be confident that your custom rules will not be overwritten.

That’s because the areas of the file that will be changed by WordPress or your plugins are clearly marked. Simply make sure that you don’t add code to those areas.

Don’t Modify Code Inside the WordPress Markers

As we said earlier, WordPress uses .htaccess to store the settings for an SEO-friendly URL structure. The code it saves to the file will be automatically overwritten and updated whenever you change your permalink settings.

As you can see in the screenshot below, WordPress saves this information between two markers, # BEGIN WordPress and # END WordPress.

WordPress Markers in .htaccess

Notice the warning inside those markers:

The directives (lines) between “BEGIN WordPress” and “END WordPress” are dynamically generated, and should only be modified via WordPress filters. Any changes to the directives between these markers will be overwritten.

This means that WordPress will not overwrite or modify any code that you add outside these markers. Users typically add their custom code to the top of the file, above the # BEGIN WordPress marker.

Tip: .htaccess is a hidden file located in your WordPress site’s root folder. If you are having difficulties finding it, then take a look at our guide on why you can’t find the .htaccess file on your WordPress site.

Don’t Modify Code Inside Your Plugins’ Markers

When a plugin saves its settings to .htaccess, it also places it between markers that look like # BEGIN Plugin and # END Plugin.

For example, if you install and set up the W3 Total Cache plugin to improve your website speed and performance, then it will add rules to .htaccess between # BEGIN W3TC Browser Cache and # END W3TC Browser Cache markers.

Example of Plugin Markers in .htaccess

These rules will be overwritten whenever you change the plugin’s settings, so you need to be careful not to add your own custom .htaccess rules between those markers.

Creating Markers for Your Custom Code

In rare cases, a badly behaved plugin may modify code outside of its # BEGIN and # END markers. However, it will normally not modify code found between the markers used by WordPress or other plugins.

If you are concerned about a badly behaved plugin overwriting your code, then you can add your own markers to the .htaccess file.

For example, you can type # BEGIN MyCustomCode and # END MyCustomCode markers at the top of the .htaccess file, and then add your own custom rules between those markers.

You Can Create Your Own Markers in .htaccess for Your Custom Rules

If you also need to add code to the end of .htaccess, then you can add a different set of markers there. Just be sure to give them different names. For example, you could use ‘MyCustomCodeTop’ and ‘MyCustomCodeBottom’.

How to Stop WordPress From Modifying .htaccess

Now that you understand how .htaccess works, you can be confident that your custom code will not be overwritten by WordPress or your plugins.

However, some developers and advanced users want to stop WordPress from making any changes to .htaccess.

For example, they may want to create permalinks by typing the settings manually into .htaccess. In this case, they will want to avoid conflicts by stopping WordPress from saving its own permalink settings to the file.

We don’t recommend this unless you know what you’re doing, because it can lead to unexpected consequences. However, it can be done by changing the file’s permissions or using code.

Stopping WordPress From Changing .htaccess Using File Permissions

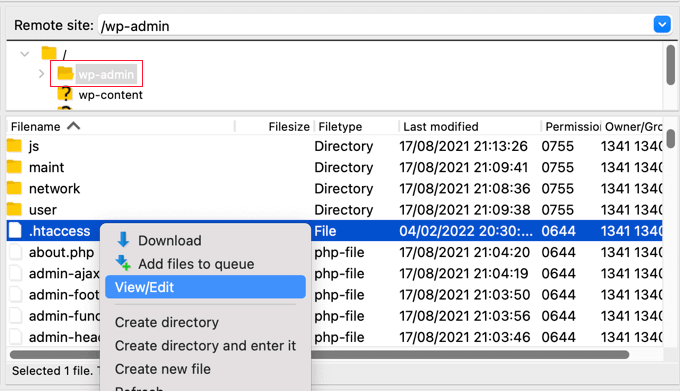
One way to stop WordPress from modifying .htaccess is to make the file read-only. To do this, you need to change the file permissions using an FTP client or the file manager provided by your WordPress hosting provider.

You will find the .htaccess file in the root directory of your WordPress installation. Next, you should right-click the file and select ‘File permissions’.

Selecting File Permissions From the Menu in Your FTP Client

This will display a pop-up where you can change the file’s attributes.

The default setting will be 644, but you can change this to 444 by typing directly into the ‘Numeric value’ field or making sure that only the ‘Read’ boxes are checked.

Changing the .htaccess File Permissions to 444 or Read-Only

Once you click the ‘OK’ button, the file will be read-only and cannot be modified.

Of course, this will mean that you are unable to write to the file as well. When you wish to make changes, you will need to temporarily set the file permissions back to 644.

Stopping WordPress From Changing .htaccess Using Code

Another solution is to use a code snippet that lets WordPress know not to write to the .htaccess file. This is useful if you want to stop WordPress from modifying .htaccess without blocking your plugins.

Note: Editing any core WordPress files can be dangerous. Even a small mistake can cause major errors on your site. That’s why we only recommend this method for advanced users.

Simply add the following code snippet at the end of your wp-config.php file. If you need help, then please refer to our guide on how to edit the wp-config.php file in WordPress.

add_filter('got_rewrite', '__return_false');

Once you’ve done that, WordPress will no longer write to the .htaccess file.

Error Message Displayed When WordPress Can’t Change .htaccess

If you try to change your permalink settings when .htaccess is set to read-only, then an error message will be displayed.

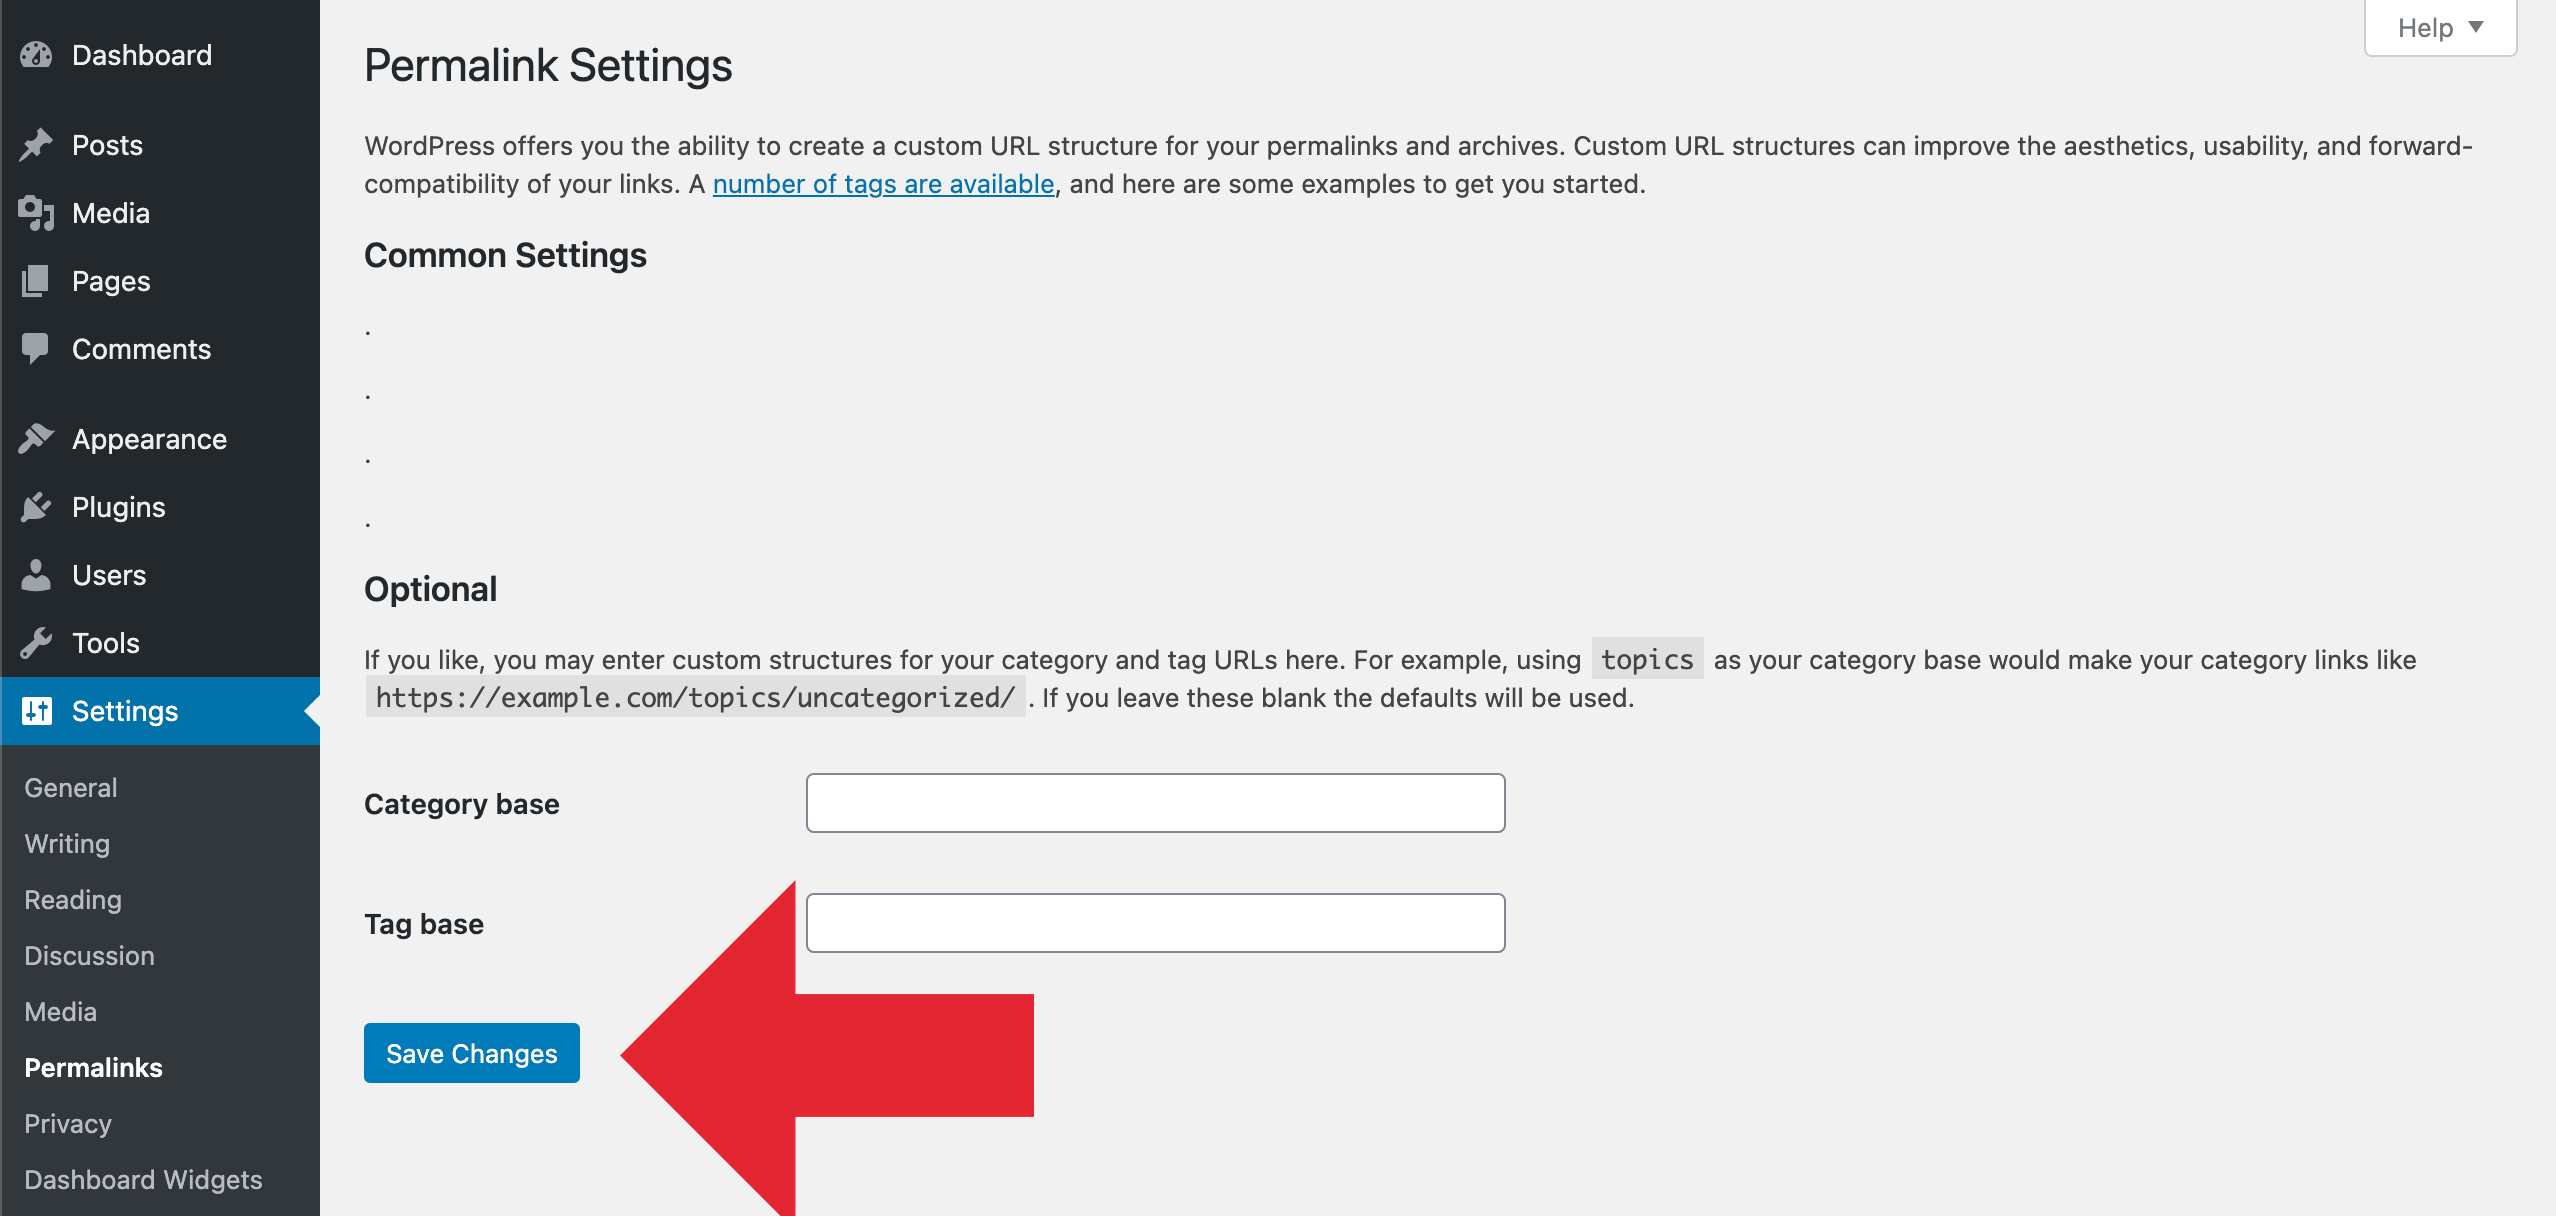
At the top of the Settings » Permalinks page, you will see the message ‘You should update your .htaccess file now.’

Permalink Settings Error Message When .htaccess Cannot Be Accessed

This lets you know that WordPress was unable to modify the .htaccess file.

Normally, this is what you intended. However, if you do wish to add the WordPress permalink settings to .htaccess, then you will need to do it manually.

At the bottom of the Settings ≫ Permalinks page, you will see another error message saying that your .htaccess file is not writable. Underneath that, you will see the rules that need to be added to .htaccess.

List of Rules You Will Need to Add to .htaccess Manually if Needed

If you wish to add those settings, then you will need to temporarily change the .htaccess file permissions back to 644 so that it can be edited. After that, you should paste the rules between the file’s WordPress BEGIN and END markers, replacing the code already there.

When you’re finished, simply set the value back to 444 and save the file. It will once again be unwritable.

We hope this tutorial helped you learn how to stop WordPress from overwriting the .htaccess file. You may also want to learn how to add push notification in WordPress and check out our expert list of the best WordPress SEO plugins and tools.

If you liked this article, then please subscribe to our YouTube Channel for WordPress video tutorials. You can also find us on Twitter and Facebook.

The post How to Stop WordPress From Overwriting .htaccess File first appeared on WPBeginner.

How to Add HTTP Security Headers in WordPress (Beginner’s Guide)

Do you want to add HTTP security headers in WordPress?

HTTP security headers allow you to add an extra layer of security to your WordPress website. They can help block common malicious activity from affecting your site’s performance.

In this beginner’s guide, we will show you how to add HTTP security headers in WordPress.

How to Add HTTP Security Headers in WordPress (Beginner's Guide)

What Are HTTP Security Headers?

HTTP security headers are a security measure that allows your website’s server to prevent some common security threats before they can affect your website.

When a user visits your WordPress website, your web server sends an HTTP header response to their browser. This response tells browsers about error codes, cache control, and other statuses.

The normal header response issues a status called HTTP 200. After this, your website loads in the user’s browser. However, if your website is having difficulty, then your web server may send a different HTTP header.

For example, it may send a 500 internal server error or a not found 404 error code.

HTTP security headers are a subset of these headers. They are used to protect websites from common threats like click-jacking, cross-site scripting, brute force attacks, and more.

Let’s have a quick look at some HTTP security headers and how they protect your website:

  • HTTP Strict Transport Security (HSTS) tells web browsers that your website uses HTTPS and should not be loaded using an insecure protocol like HTTP.
  • X-XSS Protection allows you to block cross-site scripting from loading.
  • X-Frame-Options prevents cross-domain iframes or click-jacking.
  • X-Content-Type-Options X-Content-Type-Options blocks content mime-type sniffing.

HTTP security headers work best when they are set at the web server level, which means your WordPress hosting account. This allows them to be triggered early on during a typical HTTP request and provide maximum benefit.

They work even better if you are using a DNS-level website application firewall like Sucuri or Cloudflare.

That being said, let’s take a look at how to easily add HTTP security headers in WordPress. Here are quick links to different methods so that you can jump to the one that suits you:

1. Adding HTTP Security Headers in WordPress Using Sucuri

Sucuri is one of the best WordPress security plugins on the market. If you are using their website firewall service, then you can set HTTP security headers without writing any code.

First, you will need to sign up for a Sucuri account. It is a paid service that comes with a server-level website firewall, security plugin, CDN, and malware removal guarantee.

During sign-up, you will need to answer simple questions, and Sucuri documentation will help you set up the website application firewall on your website.

After signing up, you must install and activate the free Sucuri plugin. For more details, see our step-by-step guide on how to install a WordPress plugin.

Upon activation, you need to go to Sucuri Security » Firewall (WAF) and enter your Firewall API key. You can find this information under your account on the Sucuri website.

Sucuri WAF API key

After that, you will need to click the green ‘Save’ button to store your changes.

Next, you must switch to your Sucuri account dashboard. From here, click on the ‘Settings’ menu on top and then switch to the ‘Security’ tab.

Setting HTTP security headers in Sucuri

From here, you can choose three sets of rules. The default protection will work well for most websites.

If you have a Professional or Business plan, then you also have options for HSTS and HSTS Full. You can see which HTTP security headers will be applied for each set of rules.

You need to click the ‘Save Changes in the Additional Headers’ button to apply your changes.

Sucuri will now add your selected HTTP security headers in WordPress. Since it is a DNS-level WAF, your website traffic is protected from hackers even before they reach your website.

2. Adding HTTP Security Headers in WordPress Using Cloudflare

Cloudflare offers a basic free website firewall and CDN service. It lacks advanced security features in its free plan, so you will need to upgrade to its Pro plan, which is more expensive.

You can learn how to add Cloudflare to your website by following our tutorial on how to set up the Cloudflare free CDN in WordPress.

Once Cloudflare is active on your website, you must go to the SSL/TLS page in your Cloudflare account dashboard and then switch to the ‘Edge Certificates’ tab.

Setting up HTTPS security headers in Cloudflare

Now, scroll down to the ‘HTTP Strict Transport Security (HSTS)’ section.

Once you find it, you need to click on the ‘Enable HSTS’ button.

Click the Enable HSTS Button

This will bring up a popup with instructions telling you that you must have HTTPS enabled on your website before using this feature.

If your WordPress blog already has a secure HTTPS connection, then you can click on the ‘Next’ button to continue. You will see the options to add HTTP security headers.

Enable HTTPS security headers in Cloudflare

From here, you can enable HSTS, apply HSTS to subdomains (if the subdomains are using HTTPS), preload HSTS, and enable no-sniff header.

This method provides basic protection using HTTP security headers. However, it does not let you add X-Frame-Options, and Cloudflare doesn’t have a user interface to do that.

You can still do that by creating a script using the Cloudflare Workers feature. However, we don’t recommend this because creating an HTTPS security header script may cause unexpected issues for beginners.

3. Adding HTTP Security Headers in WordPress Using .htaccess

This method allows you to set the HTTP security headers in WordPress at the server level.

It requires editing the .htaccess file on your website. This server configuration file is used by the most commonly used Apache webserver software.

Note: Before making any changes to files on your website, we recommend making a backup.

Next, simply connect to your website using an FTP client or the file manager in your hosting control panel. In the root folder of your website, you need to find the .htaccess file and edit it.

View of Edit the .htaccess File Using an FTP Client

This will open the file in a plain text editor. At the bottom of the file, you can add some code to add HTTPS security headers to your WordPress website.

You can use the following sample code as a starting point. It sets the most commonly used HTTP security headers with optimal settings:

<ifModule mod_headers.c>
Header set Strict-Transport-Security "max-age=31536000" env=HTTPS
Header set X-XSS-Protection "1; mode=block"
Header set X-Content-Type-Options nosniff
Header set X-Frame-Options DENY
Header set Referrer-Policy: no-referrer-when-downgrade
</ifModule>

Don’t forget to save your changes and visit your website to make sure that everything is working as expected.

Note: Take care when editing code on your website. Incorrect headers or conflicts in the .htaccess file may trigger the 500 Internal Server Error.

4. Adding HTTP Security Headers in WordPress Using AIOSEO

All in One SEO (AIOSEO) is the best SEO tool for WordPress and is trusted by over 3 million businesses. The premium plugin lets you easily add HTTP security headers to your website.

The first thing you will need to do is install and activate the AIOSEO plugin on your website. You can learn more in our step-by-step guide on how to set up All in One SEO for WordPress.

You then need to head over to the All in One SEO » Redirects page to add the HTTP security headers. First, you will need to click the ‘Activate Redirects’ button to enable the feature.

Activating Redirects in All in One SEO

Once redirects are enabled, you need to click on the ‘Full Site Redirect’ tab and then scroll down to the ‘Canonical Settings’ section.

Simply enable the ‘Canonical Settings’ toggle and then click the ‘Add Security Presets’ button.

Add Security Presets in AIOSEO

You will see a preset list of HTTP security headers appear in the table.

These headers are optimized for security. You can review and change them if needed.

Security Headers are Added in AIOSEO

Make sure to click the ‘Save Changes’ button at the top or bottom of the screen to store the security headers.

You can now visit your website to make sure that everything is working fine.

How to Check HTTP Security Headers for a Website

Now that you have added HTTP Security headers to your website, you can test your configuration using the free Security Headers tool.

Simply enter your website URL and click on the ‘Scan’ button.

Checking a Website's HTTP Security Headers

It will then check HTTP security headers for your website and show you a report. The tool will also generate a so-called grade label, which you can ignore as most websites will get a B or C score without affecting user experience.

It will show you which HTTP security headers are sent by your website and which ones are not included. If the security headers that you wanted to set up are listed there, then you are done.

We hope this article helped you learn how to add HTTP security headers in WordPress. You may also want to see our complete WordPress security guide and our expert picks for the best WordPress plugins for business websites.

If you liked this article, then please subscribe to our YouTube Channel for WordPress video tutorials. You can also find us on Twitter and Facebook.

The post How to Add HTTP Security Headers in WordPress (Beginner’s Guide) first appeared on WPBeginner.

Fix Site Health Error: The authorization header is missing

Quick post that explains how to fix the error, “The authorization header is missing”. This error may be found under “recommended improvements” in the WordPress Site Health tool (located under the WP menu ▸ Tools ▸ Site Health).

When running a Site Health check, the “authorization header” warning happens when you’ve upgraded WordPress (to version 5.6 or better) and have Permalinks enabled, but the site’s .htaccess rules have not been updated with the latest. This DigWP tutorial explains what’s happening and shows how to fix the error easily with a few clicks.

The authorization header is missing.

Contents

The solution

When testing your WordPress with the Site Health tool, if you get this:

Site Health Results: Authorization Header MissingWP menu ▸ Tools ▸ Site Health — The authorization header is missing. Click for full-size image.

If you click the error and toggle it open, you’ll get a bit more information: “The Authorization header comes from the third-party applications you approve. Without it, those apps cannot connect to your site.” Screenshot:

Site Health Results: Authorization Header Missing (Details)Details about the authorization-header error. Click for full-size image.

This error means that your WordPress Permalink rules are not up-to-date. To fix the issue, you need to update the Permalink rules in your site’s .htaccess file. There are several ways to do this:

  • Easy — Visit your Permalink settings and click “Save Changes”
  • Manual — Manually update .htaccess with current Permalink rules

So try the easy method first. If it works, then stop; you’re done. If it does not work, the “manual” method definitely should resolve the issue. Let’s walk through each of these solutions..

Flush Permalinks

The easiest way to fix the authorization-header issue, is to click on the “Flush permalinks” link, which is displayed right there on the Site Health screen. Here is a screenshot:

Authorization Header Missing: Flush PermalinksShowing the location of the “Flush permalinks” link. Click for full-size image.

That will take you to the WordPress Permalinks settings. This is where you can “flush” (i.e., update) your site’s Permalink rules. You can do this by clicking the “Save Changes” button as shown here:

Permalink settings showing Save Changes buttonPermalink settings showing the “Save Changes” button. Click for full-size image.

You do NOT need to make any actual changes to any Permalink settings. All you need to do is click “Save Changes” and done. Once you do that, WordPress will attempt to update the site’s .htaccess file with the latest/current Permalink rules. Thus solving the authorization-header issue. You can verify the fix by running a fresh Site Health test.

Important! Updating/flushing Permalink rules via the Admin Area results in changes made to the .htaccess file on the server. Flushing does not affect the local copy of your .htaccess file. So make sure to update both local and server copies to avoid having to go through this again in the future.

Manually update .htaccess

If the easy method does not work to resolve the “authorization header is missing”, you will need to update your Permalink rules manually. To do it, open your site’s .htaccess file. Look for a block of code that begins with this line:

# BEGIN WordPress

..and ends with this line:

# END WordPress

Located between these two lines are the WordPress Permalink rules. Whatever you have there, you want to replace with the latest set of rules. You can find the current rules at WordPress.org. So grab a copy of the correct rules for your site (Basic or Multisite), and replace your existing rules via copy/paste. Save the file, upload, and done.

That should resolve the Site Health authorization-header issue. To verify success, try another test with the Site Health tool.

If after updating your Permalink rules, Site Health continues to show the error, most likely there is something else that is interfering with normal functionality. In this case you may contact your support team. Or if you’re savvy, follow our Troubleshooting Guide to help diagnose and resolve any outstanding issues.

About the error

So what causes the “authorization header” error? WordPress version 5.6 introduces Application Passwords. This feature enables authenticated users and apps to interact with your site. Application Passwords started as an awesome free plugin that could be added to any WordPress site as needed. Now it’s been integrated into WordPress core so all sites must have it, whether needed or not.

DigWP Tip: If you have no need for Application Passwords, you can disable them easily with my free plugin, Disable Application Passwords.

WordPress users may be familiar with the new “Application Passwords” settings that are displayed on the Profile screen of every registered user. If you have yet to check it out, go take a look at the bottom of any “Edit User” screen. Here is a screenshot of how it looks in WordPress 5.6:

Application Passwords SettingsWP menu ▸ User Profile/Edit User ▸ Application Passwords settings. Click for full-size image.

That’s all great, but what most WordPress users probably are not aware of, is that the new Application Passwords feature brings changes to the WordPress Permalink rules located in the site’s .htaccess file. The changes are required for WordPress and Application Passwords to work properly.

.htaccess changes in WP 5.6

Here is the new line that is added to WordPress Permalink rules (via .htaccess) in version 5.6:

RewriteRule .* - [E=HTTP_AUTHORIZATION:%{HTTP:Authorization}]

This line helps to handle the Authorization header for HTTP requests coming from any approved third-party applications. Without proper handling of the Authorization header, apps will not be able to connect with your site.

So for sites using outdated Permalink rules, the above new line will be missing from .htaccess. This causes errors when WordPress tries processing requests. The Site Health error happens because WordPress expects certain authorization headers that are not included with the request.

As of now, here is what the WordPress Permalink rules look like in the site’s .htaccess file:

# BEGIN WordPress
# The directives (lines) between "BEGIN WordPress" and "END WordPress" are
# dynamically generated, and should only be modified via WordPress filters.
# Any changes to the directives between these markers will be overwritten.
<IfModule mod_rewrite.c>
RewriteEngine On
RewriteRule .* - [E=HTTP_AUTHORIZATION:%{HTTP:Authorization}]
RewriteBase /
RewriteRule ^index\.php$ - [L]
RewriteCond %{REQUEST_FILENAME} !-f
RewriteCond %{REQUEST_FILENAME} !-d
RewriteRule . /index.php [L]
</IfModule>

# END WordPress

Notice the E=HTTP_AUTHORIZATION rule added right up front there. When that line is included as shown here, the Site Health “authorization header” error should not happen.

DigWP Tip: For a complete guide to Apache/.htaccess, check out my book .htaccess made easy. Features an entire chapter covering all things WordPress :)

How to Disable PHP Execution in Certain WordPress Directories

By default, WordPress makes certain directories writeable so that you and other authorized users on your website can easily upload themes, plugins, images, and videos to your website.

However this capability can be abused if it gets in the wrong hand such as hackers who can use it to upload backdoor access files or malware to your website.

These malicious files are often disguised as core WordPress files. They are mostly written in PHP and can run in the background to gain full access to every aspect of your website.

Sounds scary, right?

Don’t worry there is an easy fix for that. Basically, you’d simply disable PHP execution in certain directories where you don’t need it. Doing so, any PHP files will not run inside those directories.

In this article, we will show you how to disable PHP execution in WordPress using the .htaccess file.

How to Disable PHP Execution in Certain WordPress Directories

Disabling PHP Execution in Certain WordPress Directories Using .htaccess File

Most WordPress sites have a .htaccess file in the root folder. This is a powerful configuration file used to password protect admin area, disable directory browsing, generate SEO friendly URL structure, and more.

By default, the .htaccess file located in your WordPress website’s root folder, but you can also create and use it inside your inner WordPress directories.

To protect your website from backdoor access files, you need to create a .htaccess file and upload it to your site’s /wp-includes/ and /wp-content/uploads/ directories.

Simply create a blank file on your computer by using a text editor like Notepad (TextEdit on Mac). Save the file as .htaccess and paste the following code inside it.

<Files *.php>
deny from all
</Files>

Create htaccess File with Code to Disable PHP

Now save the file on your computer.

Next, you need to upload this file to /wp-includes/ and /wp-content/uploads/ folders on your WordPress hosting server.

You can upload it by using an FTP client or via File Manager app in your hosting account’s cPanel dashboard.

Upload htaccess file to your WordPress site

Once the .htaccess file with the above code is added, it will stop any PHP file to run in these directories.

Using this .htaccess trick helps you harden your WordPress security, but it is not a FIX for an already hacked WordPress site.

Backdoors are cleverly disguised and can already be hidden in plain sight.

If you want to check for possible backdoors on your website, then you need to activate Sucuri on your website.

Sucuri

Sucuri is the best WordPress security plugin on the market. It scans your website for possible threats, suspicious code, malware, and vulnerabilities.

It also effectively blocks most hacking attempts to even reach your website by adding a firewall between your site and suspicious traffic.

Most importantly, if your WordPress site gets hacked, then they will clean it up for you. To learn more, you can check our Sucuri review because we have been using their service for years.

We hope this article helped you to learn how to disable PHP execution in certain WordPress directories to harden your website security. If you are looking for a complete guide, check out our ultimate WordPress security guide.

If you liked this article, then please subscribe to our YouTube Channel for WordPress video tutorials. You can also find us on Twitter and Facebook.

The post How to Disable PHP Execution in Certain WordPress Directories appeared first on WPBeginner.