I took a break from work and started some small, personal projects (toys). One of those small projects is potato.horse where I keep all of my doodles, visual short stories and jokes. Check it out!
However, this post is not about my break from work, other experiments, or the site itself. People seem to like one particular technique I used in the design, notably, the background effect applied that transitions between colors when the user browses the content:
Some asked me how this effect was implemented (including going as far as reading the minified code, which is very flattering).
So, here’s a quick gist, followed up with some context:
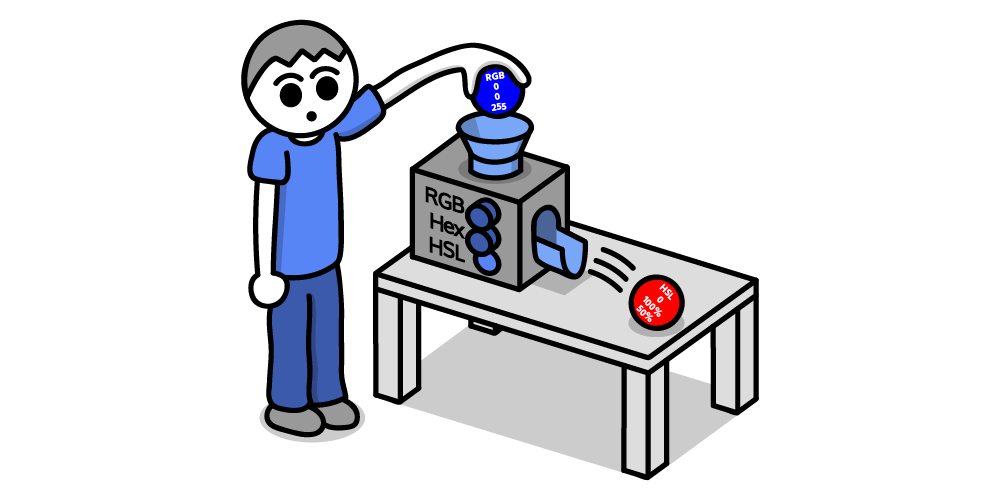
In short, I map the scroll position into the hue in the HSL color notation. Let’s break this down.
Color models
There are many ways of describing colors in CSS, with the two most common ones being RGB (left) and HSL (right):
RGB is an additive color palette. This means that mixing 100% of red, green and blue produces white, mixing 100% red and 100% green but 0% blue produces yellow, and so on. This is different from, say, using oil paint or the CMYK color model, where the resulting tone would be black(-ish)1.
We’re used to this approach because it’s easy to describe in code, but specifying colors in terms of hue, saturation and luminosity seems more natural, especially if you come from a design background, or… you know, are a human being using a human language.
We’ve gotten used to RGB as developers, but in spoken language, using it would feel unnatural and confusing. Façade would be very hard to use in RGB.
On the other hand, HSL can often be much more intuitive to work with. For instance, if I want to make a color slightly colder, I can just move the hue slider a bit towards blue and I should get closer to what I have in mind. With RGB, if we make the color appear colder by including more blue, the resulting tone will be a bit brighter as the blue component contributes to the overall lightness. This means that you’d have to lower the red and green values to compensate.
To see how this works in practice, try maxing out the blue color in the example below.
The first thing that stands out is that all tones are shifted towards blue and the overall brightness of the picture is increased. In the case of the effect we’re discussing, that would be undesirable.
Now, let’s try to do the same with the HSL color circle. Drag the slider to the left, by ca. 90 degrees:
In this scenario, using HSL not only turns Susan into a vampire, but also maintains a similar2 level of brightness. And that’s exactly what I’m looking for.
So, what I mean by saying this:
How does this work? In short, I map the scroll position into the hue in the HSL color notation. Rafal, 2 days earlier
…is that that every time we detect a scroll event, I try to map it to an angle on the hue circle:
I didn’t want to start with red as it would make me hungry and the base yellow fits the design a bit better, so I applied a small initial shift—hence const from = 51 set as the initial offset.
And, as far as the basic implementation goes, that’s it!
Now, there are three other areas of improvement.
useRainbow performance
We’re triggering a repaint on every scroll, so I was a bit worried that older mobile devices, or even some hi-end laptops plugged in to 4k screens might not be able to maintain solid 60fps. But, I’m happy with the results so far. Using passive event listeners provided a bit of a boost, especially on mobile.
If I realize that performance is a problem, especially with more content down the line, I’ll probably focus on:
removing the unnecessary call to getBoundingClientRect on every scroll handler call, and
deferring or throttling background color changes using requestAnimationFrame.
I expect the first improvement to have some impact, but the benefits of the second one should be negligible.
Measure before optimizing. Obsessing about the performance only makes sense when issues become noticeable, be it through a drop in framerate or battery impact. Your iPhone Pro has more computing power than many low-end laptops, so it’s a good idea to test on those devices too. It’s good to have a crappy old Android phone exacly for that purpose if you can spare a few quid.
Perceptually uniform color spaces
You might’ve noticed that in the previous illustrations some fully saturated colors seemed darker than others. That’s because the color spaces we normally use when coding don’t reflect the way the human eye works. I’ll leave the in-depth explanation to someone much more experienced than me, but suffice to say (gross oversimplification alert!) that, generally, the same amount of red/green/yellow will appear brighter than blue. This means that in some cases the text on the page will be harder to read.
For now, this isn’t an issue as I’ve just put this thing online and titles serve a secondary purpose. But there’s a solution to the problem and it’s not overly complicated: use a perceptually uniform color space. There’s a bunch of libraries that do it out of the box, both in JavaScript/TypeScript and CSS/Sass/<pick your CSS flavor here>. hsluv seems like a good starting point.
Accessiblity
Note that I’ll be focusing on the visual effect itself and not discussing the rest of the site (e.g. alt tags, document structure, etc…). I’d like to focus on contrast, color blindness and people who rely on prefers-reduced-motion. The site is a living document; there’s always so much to improve. For instance, contrast can be an issue in a few, non-critical places. I’m happy to accept feedback and implement it: hit me up!.
color blindness
I wanted to make sure that the effect doesn’t break the site completely for people with color blindness. So I focused on the most common types: deuteranomaly and protanomaly (red-green color blindness), but also ran wider tests. I used Photoshop and Colorblindly (Chrome extension) for some rudimentary checks.
prefers-reduced-motion
The prefers-reduced-motion CSS media feature is used to detect if the user has requested that the system minimize the amount of non-essential motion it uses.
This site doesn’t contain many animations (besides the Little Sausage Angels you’ll see if you hit “Share”), but I was wondering if people who rely on prefers-reduced-motion would like the background color to stay constant.
The short answer is: I don’t know. My intuition is that rotating colors don’t really qualify as motion, but my experience and understanding of the problem is, to say the least, limited. In situations like this, I’d rather depend on user research than guesses.
Luckily, the site had its five minutes of fame on Reddit which proved to be a decent opportunity to collect feedback. None of the users brought up an issue with the background effect so far. I’m also lucky enough to know a bunch of accessibility specialists, such as Sandrina Pereira. Her suggestion was that (a) background animations definitely qualify as motion, and (b) perhaps the effect feels natural because it’s a direct result of a user interaction.
Summary
The late-90s Geocities web felt playful and weird. It was fun in an uninhibited, somewhat less performative, way. I wanted to incorporate some of this look and feel in the site. But still, I didn’t want to make it feel esoteric to the point where you’d need to up your hipsterdom-level to 9000 and browse it exclusively throught Netscape 7. All of that, while listening to the new Nirvana Unplugged album.
I still wanted decent UX on mobile and desktop, and some space for easter eggs (something you can’t do when living in the strange and abusive relationship with social media we’ve grown so accustomed to).
As a kid, I had built six websites before I even got access to the Internet for the first time. Now, after being burned out for three years, even considering changing my job, it was the first time I genuinely enjoyed coding. I forgot how much fun it was!
Color is powerful — it can radically shift our mood, inspire us, and help us express ourselves in a way that few other things can. It is a fundamental building block of design, but it can also be a little intimidating.
Often when given the opportunity to play with color, we freeze. Choosing justone can be enough to trigger a kind of iridescent nightmare, not to mention combining lots of them! The options are infinite, and the “rules” somewhat hazy… a potentially overwhelming combination, particularly for those of us used to the (often) more definite world of code.
In this tutorial, we will be learning how to use familiar tools — a text editor and web browser — to make the process of creating striking color palettes a lot less scary and (most importantly!) fun.
Let’s do it!
Intended audience
This article is perfect for folks who already have a good grasp of HTML, CSS (knowledge of HSL and RGB colors will be helpful), and JavaScript. If you love to make things on the web, but often reach for a pre-curated selection or an automatic “generator” when adding color, you’re in the right spot.
Tutorial format
We won’t be building one single, strictly defined project here. Instead, we will be learning to create three special JavaScript functions, all uniquely suited to generating beautiful color palettes. Once written, these functions will form a solid foundation for our very own suite of programmatic color tools, which can be carried from project to project and iterated on/personalized over time.
A short introduction to LCH color
Throughout this tutorial, we will be working almost exclusively with LCH colors. LCH stands for lightness (how dark/light a color is), chroma (how vivid/saturated a color is), and hue (whether a color is red, green, blue…).
In short, LCH is a way of representing color just like RGB or HSL, but with a few notable advantages — the most important for this tutorial being its perceptual uniformity. I know this sounds a little scary, but I promise it’s not; let me show you what it means!
To start, take a look at these two pairs of HSL colors:
Notice how, despite both the top and bottom pairs having the same 20-degree hue variance, the difference we actually see is wildly different? This imbalance exists because HSL is notperceptually uniform.
Now take a look at the same experiment, this time using LCH colors:
— hue values do not align perfectly between HSL and LCH. In LCH, a hue of 0 is more pink, while in HSL, it is a pure red.
Ah, much better! The change in hue seen here is far more balanced because LCH isperceptually uniform.
Next, let’s take a peek at another two HSL colors:
These two colors have identical lightness values but appear very different to our human eyes. The yellow on the left is far “brighter” than the blue on the right.
Here’s a similar setup, but with LCH colors rather than HSL:
That’s more like it! As demonstrated by the image above, lightness values in LCH are far more accurate representations of what we perceive — this, in combination with LCH’s uniform hue distribution, will make our lives a lot easier when creating harmonious color palettes.
For now, this is all we need to know, but if you would like to learn more, I highly recommend this article by Lea Verou.
Before we write any code, we need a simple development environment. This setup is entirely your choice, but I recommend spinning up a CodePen to follow along with the examples, then moving to a custom setup/repository as and when you need to. Really, all we need here is an HTML/JavaScript file, and we will be using Skypack for all library imports, so there’s no need for any fancy build processes, etc.
Function #1 — “Scientific”
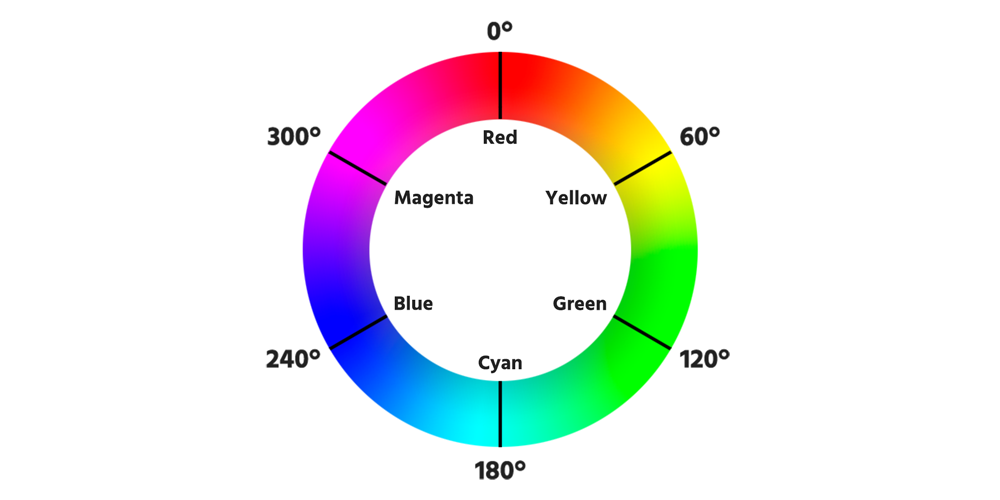
OK! First off, we are generating colors using “traditional” color theory. To get started with this method, let’s take a look at something called a color wheel:
Look familiar?
A color wheel is a visual representation of the hues in a color space. The wheel above represents the hues in LCH, incrementing in 30-degree steps, from 0 to 360-degrees — a well-established format. In fact, for hundreds of years, we have used wheels to find colors that work well together!
Here’s how:
We start with a base color. Then, we rotate around the wheel by a certain number of degrees a certain number of times; for a perfect complementary palette, we move 180 degrees once:
Lovely! For a triadic palette, we move 120 degrees, twice:
See where this is going? By altering the number of steps and rotation amount, we can create several “classic” color palettes:
Cool! Let’s take this method and turn it into 1s and 0s.
To keep things moving throughout this tutorial, I’ll show you the code, then break it down step-by-step:
The code
function adjustHue(val) {
  if (val < 0) val += Math.ceil(-val / 360) * 360;

  return val % 360;
}

function createScientificPalettes(baseColor) {
  const targetHueSteps = {
    analogous: [0, 30, 60],
    triadic: [0, 120, 240],
    tetradic: [0, 90, 180, 270],
    complementary: [0, 180],
    splitComplementary: [0, 150, 210]
  };

  const palettes = {};

  for (const type of Object.keys(targetHueSteps)) {
    palettes[type] = targetHueSteps[type].map((step) => ({
      l: baseColor.l,
      c: baseColor.c,
      h: adjustHue(baseColor.h + step),
      mode: "lch"
    }));
  }

  return palettes;
}
To break this down:
Define a function createScientificPalettes that expects a single baseColor argument.
Define the hue steps for several “classic” color palettes.
For each palette type: iterate over each hue step, add the step value to the base hue, and store the resulting color — making sure its chroma and lightness values match the base. Use a small adjustHue function to ensure all hue values are between 0 and 360.
Return the palettes in LCH format.
Usage
Awesome! We can call our createScientificPalettes function like so:
In the example above, we pass a baseColor object, and the function returns a variety of palettes, all centered around that base. Thanks to LCH, the lightness and intensity of the colors in these palettes will be visually consistent, and the hue modulations highly accurate; this is great for accessibility, as, unlike other color spaces, each color in the palette will have the same perceived contrast.
Cool! All that’s left to do now is convert the LCH colors to a more usable format. To do so, we can use Culori — an excellent color utility library used throughout this tutorial — to transform the LCH objects to, say, HEX:
— Culori requires an explicit mode on all color objects. You will notice this included in the code examples throughout this tutorial.
For our first function, that’s it! Let’s take a look at how we can use it in real life.
Practical application
One benefit of creating our color palettes with code (programmatically) is that it makes rapid prototyping/experimentation super easy. Say, for example, we were working on a design and got completely stuck with what color palette to use. Using our createScientificPalettes function, alongside some simple CSS custom properties, we can generate near-infinite palettes and test them with our UI in real-time!
Here’s a CodePen to demonstrate:
light
Challenge
Right now, our createScientificPalettes function accounts for all palette types, apart from monochromatic. Can you update it to support monochromatic palettes?
Function #2 — “Discovery”
So, this function is similar to the previous one but with quite a twist. We are still generating “classic” color combinations, but rather than calculating them scientifically (adding set “steps” to the hue of a base color), we are discovering them! That’s right; our discovery function will take an array of colors and find the best palette matches within it — analogous, triadic, tetradic, etc.
Here’s an illustrated example:
Using this function, we can discover beautiful palettes within images, color datasets, and more! Let’s see how it works.
The code
import {
  nearest,
  differenceEuclidean,
} from "https://cdn.skypack.dev/culori@2.0.0";

function isColorEqual(c1, c2) {
  return c1.h === c2.h && c1.l === c2.l && c1.c === c2.c;
}

function discoverPalettes(colors) {
  const palettes = {};

  for (const color of colors) {
    const targetPalettes = createScientificPalettes(color);

    for (const paletteType of Object.keys(targetPalettes)) {
      const palette = [];
      let variance = 0;

      for (const targetColor of targetPalettes[paletteType]) {
        // filter out colors already in the palette
        const availableColors = colors.filter(
          (color1) => !palette.some((color2) => isColorEqual(color1, color2))
        );

        const match = nearest(
          availableColors,
          differenceEuclidean("lch")
        )(targetColor)[0];

        variance += differenceEuclidean("lch")(targetColor, match);

        palette.push(match);
      }

      if (!palettes[paletteType] || variance < palettes[paletteType].variance) {
        palettes[paletteType] = {
          colors: palette,
          variance
        };
      }
    }
  }

  return palettes;
}
To break this down:
Pass an array of LCH colors to the discoverPalettes function.
For every color, create the “optimum” target palettes based on it using our createScientificPalettes function.
For every palette, find the closest match for each of its colors. We calculate color matches here using Culori’s nearest and differenceEuclidian functions.
Determine how similar/different the “discovered” palette is to the target. Keep a record of the closest palette matches.
Return the closest match of each palette type!
Awesome! This method is super exciting, as it operates much as a human would — looking at a selection of colors and finding the best (but never perfect) palettes; this is great, as sometimes, purely mathematic color theory can appear a touch sterile/predictable.
Usage
As a quick reference, here’s how we could use discoverPalettes with an array of HEX colors:
—discoverPalettes expects a minimum of four colors to function correctly.
Practical application
One of the most compelling aspects of discoverPalettes is its ability to pull coherent color combinations out of just about any source. Here it is, discovering palettes based on images from Unsplash:
light
Cool eh? Extracting palettes from photographs is a fantastic way of working when stuck for ideas, and discoverPalettes makes the process incredibly easy. This kind of approach, previously available only through “magic” color generators/apps, is now right at our fingers and ready to be tweaked, iterated, and improved to suit our own personal use-cases and preferences!
Challenge
Right now, our discoverPalettes function finds the best matches it can in an array of colors, but it isn’t too easy to control. Can you add a degree of bias/weighting to its selection? How might you modify the function to prioritize brighter colors, for example?
Function #3 — “Hue Shift”
For our third and final function, we will be taking inspiration from the world of pixel art!
Often when adding shades/highlights to a sprite, pixel artists will not only modulate the lightness/chroma of a color (saturation if working with HSL) but also shift its hue. Here’s an excellent video on the subject, but in short, this is what it looks like:
So pretty! As a color becomes lighter, its hue shifts up; as it becomes darker, it shifts down. When applied subtly, this technique helps ensure shades/tints of a color are vivid and impactful. When “dialed up” a little, it is a fantastic way of generating stunning standalone color palettes.
Pass a base color, min/max lightness, and hue step parameters to a createHueShiftPalette function. The min/max lightness values determine how dark/light our palette will be at either extreme. The step controls how much the hue will shift at each color.
Store the base color in an array. In the illustration above, this is the middle color.
Create a loop that iterates four times. Each iteration, add a darker shade to the start of the array and a lighter tint to the end. Here, we use map to calculate our lightness values — a function that takes a number that usually exists in one range and converts it to another — and increase or decrease the hue using our hueStep variable. Again, adjustHue is used here to ensure all hue values are between 0 and 360.
Return the palette!
Usage
Once our createHueShiftPalette function is defined, we can use it like so:
The palettes generated by createHueShiftPalette work fantastically for patterns/graphics; here’s an example using it to create random/generative patterns that differ ever-so-slightly each time they render:
light
Cool, right? As just one example using this approach, we can create UI elements that are always fresh and unique to the current user — a lovely way to bring a little joy to the folks who use our websites/applications!
Challenge
Right now, the lightness/hue values scale linearly in our createHueShiftPalette function. Could you apply some easing to them? Perhaps, starting with a larger/smaller hue shift and reducing/increasing it with each step?
Wrapping up
Well, folks, that’s all for now! We have learned how to create three beautiful color generation functions, seen how they can be applied and considered how they could be improved/changed. From here, I hope you take these functions and change them to suit you, and hopefully, even write your own!
As developers, we have a unique skill set that is perfect for creating truly innovative, stunning design. Whether that means creating a color generation tool for designers you work with or adding mind-blowing generative palettes to your website — we should all feel confident in our ability to work with color.
Lately I’ve been taking a look into designing with color (or “colour” as we spell it where I’m from in New Zealand). Looking at Adam Wathan and Steve Schroger’s advice on the subject, we find that we’re going to need more than just five nice looking hex codes from a color palette generator when building an application. We’re going to need a lot of grays and a few primary colors. From these primary colors we’ll want a variety of levels of brightness and saturation.
I’ve mainly been using hex codes or RGB colors when developing applications and I’ve found I get slowed down by trying to work out different levels of lightness and saturation from a single hue. So, to save you from getting RSI by carefully moving the color picker in VS Code, or continually opening hexcolortool, let’s look at some code to help you manipulate those colors.
HSL values
An effective way to write web colors is to use HSL values, especially if you plan to alter the colors manually. HSL stands for hue, saturation, lightness. Using HSL, you can declare your hue as a number from 0 to 360. Then you can note down a percentage for saturation and lightness respectively. For instance:
div {
  background-color: hsl(155, 30%, 80%);
}
This will give you a light, muted, mint green color. What if we needed to throw some dark text over this div? We could use a color close to black, but consistent with the background. For example, we can grab the same HSL values and pull the lightness down to 5%:
Nice. Now we have text that is very close to black, but looks a bit more natural, and is tied to its background. But what if this wasn’t a paragraph of text, but a call-to-action button instead? We can draw some more attention by ramping up the saturation and lowering the lightness a little on the background:
Or, what if there was some text that wasn’t as important? We could turn back up the brightness on the text, and lower the saturation. This takes away some of the contrast and allows this less important text to fade into the background a bit more. That said, we need to be careful to keep a high enough contrast for accessibility and readability, so let’s lighten the background again:
HSL values are supported in all major browsers and they are a superior way of defining colors compared to RGB. This is because they allow you to be more declarative with the hue, saturation and lightness of a color.
But, what if you’ve already committed to using RGB values? Or you get an email from your boss asking “is this going to work on IE 8?”
Libraries
There are a lot of great color libraries out there that are able to convert HSL values back into hex codes or RGB colors. Most of them also have a variety of manipulation functions to help build a color scheme.
Here is a list of some libraries I know:
If converting between formats is a problem, try colvertize by Philipp Mildenberger. It’s a lightweight library providing a lot of conversion methods and a few manipulation methods.
Then we have color, maintained by Josh Junon. This allows you to declare, process and extract colors using a fluent interface. It provides a variety of conversions and manipulation methods.
Another one is TinyColor by Brian Grinstead over at Mozilla, which can handle a whole lot of input types as well as utility functions. It also provides a few functions to help generate color schemes.
Naturally, after reading this, I built a React app to mathematically craft a color palette. Okay, it won’t solve all your problems, but it might start you off with some options. The app will create 100 different levels of saturation and lightness based the hue you select. You can either click a grid item to copy the hex code, or copy a color as a CSS custom property from a text area at the end. This could be something to try if you need a quick way to get variations from one or two hues.
Here are some techniques I learned for processing RGB colors as well for if you are using RGB colors and need a way to transform them.
How to find the lightness of an RGB color
Disclaimer: This technique does not account for the intrinsic value of a hue. The intrinsic value of a hue is its inherent brightness before you’ve started adding any black or white. It’s illustrated by the fact pure yellow looks a lot brighter to us than a pure purple.
This technique produces the level of lightness based on a programmatic measure of how much white or black is mixed in. The perceived brightness is affected by more than this measure so remember to also use your eyes to judge the level of light you need.
The level of lightness of an RGB color can be worked out by finding the average of the highest and lowest of the RGB values, then dividing this by 255 (the middle color does not affect the lightness).
This will give you a decimal between zero and one representing the lightness. Here is a JavaScript function for this:
function getLightnessOfRGB(rgbString) {
  // First convert to an array of integers by removing the whitespace, taking the 3rd char to the 2nd last then splitting by ','
  const rgbIntArray = (rgbString.replace(/ /g, '').slice(4, -1).split(',').map(e => parseInt(e)));


  // Get the highest and lowest out of red green and blue
  const highest = Math.max(...rgbIntArray);
  const lowest = Math.min(...rgbIntArray);


  // Return the average divided by 255
  return (highest + lowest) / 2 / 255;
}
Here’s a CodePen using this function:
How to saturate an RGB color without changing lightness or hue
What can we do with our newfound ability to find the lightness of an RGB? It can help us saturate an RGB color without changing the lightness.
Saturating an RGB comes with a few problems, though:
There is no information in the RGB format of a gray color to tell us what the saturated version will look like because gray doesn’t have a hue. So if we’re going to write a function to saturate a color, we need to deal with this case.
We can’t actually get to a pure hue unless the color is 50% lightness — anything else will be diluted by either black or white. So we have a choice of whether to keep the same lightness as we saturate the color, or move the color towards 50% lightness to get the most vibrant version. For this example, we’ll keep the same level of lightness.
Let’s start start with the color rgb(205, 228, 219) — a light, muted cyan. To saturate a color we need to increase the difference between the lowest and highest RGB value. This will move it toward a pure hue.
If we want to keep the lightness the same, we’re going to need to increase the highest value and decrease the lowest value by an equal amount. But because the RGB values need to be clamped between 0 and 255, our saturation options will be limited when the color is lighter or darker. This means there is a range of saturation we have available for any given lightness.
Let’s grab the saturation range available for our color. We can work it out by finding the lowest of these two:
The difference between the RGB values of a gray with the same lightness as our color, and 255
The difference between the RGB values of a gray with the same lightness as our color, and 0 (which is just the gray value itself)
To get a fully gray version of a color, we can grab the end result of the getLightnessOfRGB function from the previous section and multiply it by 255. Then use this number for all three of our RGB values to get a gray that’s the same lightness as our original color.
Let’s do this now:
// Using the previous "getLightnessOfRGB" function
const grayVal = getLightnessOfRGB('rgb(205, 228, 219)')*255; // 217
// So a gray version of our color would look like rgb(217,217,217);
// Now let's get the saturation range available:
const saturationRange =  Math.round(Math.min(255-grayVal,grayVal)); // 38
Let’s say we want to saturate the color by 50%. To do this want to increase the highest RGB value and decrease the lowest by 50% of the saturation range. However, this may put us over 255 or under zero, so we need to clamp the change by the minimum of these two values:
The difference between the highest RGB value and 255
The difference between the lowest RGB value and 0 (which is the value itself)
// Get the maximum change by getting the minimum out of:
// (255 - the highest value) OR (the lowest value)
const maxChange = Math.min(255-228, 205); // 27


// Now we will be changing our values by the lowest out of:
// (the saturation range * the increase fraction) OR (the maximum change)
const changeAmount = Math.min(saturationRange/0.5, maxChange) // 19
This means we need to add 19 to the highest RGB value (green) and subtract 19 from the lowest RGB value:
This is where things get a bit more complicated. The middle value’s distance from gray can be worked with the ratio between it and the distance from gray of either of the other two values.
As we move the highest and lowest values further away from gray, the middle value increases/decreases in proportion with them.
Now let’s get the difference between the highest value and full gray. Then the difference between the middle value and the full gray. Then we’ll get the ratio between these. I’m going to also remove the rounding from working out the gray value to make this more exact:
const grayVal = getLightnessOfRGB('rgb(205, 228, 219)')*255;
const highDiff = grayVal - 228; // -11 subtracting green - the highest value
const midDiff = grayVal - 219; // -2 subtracting blue - the middle value
const middleValueRatio = midDiff / highDiff; // 0.21739130434782608
Then what we need to do is get the difference between our new RGB green value (after we added 19 to it) and the gray value, then multiply this by our ratio. We add this back on to the gray value and that’s our answer for our newly saturated blue:
// 247 is the green value after we applied the saturation transformation
const newBlue = Math.round(grayVal+(247-grayVal)*middleValueRatio); // 223
So after we’ve applied our transformations, we we get an RGB color of rgb(186, 247, 223 — a more vibrant version of the color we started with. But its kept its lightness and hue.
Here are a couple of JavaScript functions that work together to saturate a color by 10%. The second function here returns an array of objects representing the RGB values in order of size. This second function is used in all of the rest of the functions in this article.
If you give it a gray, it will just return the same color:
If we completely desaturate a color, we’ll end up with a shade of gray. RGB grays will always have three equal RGB values, so we could just use the grayVal from the previous function to make a gray color with the same lightness as any given color.
What if we don’t want to go straight to gray, and only want to slightly desaturate a color? We can do this by reversing the previous example.
Let’s look at another example. If we start with rgb(173, 31, 104), we have a saturated rouge. Let’s grab the decimal measure of lightness and multiply it by 255 to get the gray version:
To desaturate our color by 30%, we want to move the highest and lowest color by 30% of this range toward full gray. But we also need to clamp the change amount by the distance between either of these colors (the distance will be the same for the highest and lowest), and full gray.
// Get the maximum change by getting the difference between the lowest (green) and the gray value
const maxChange = grayVal-31; // 71
// Now grab the value that represents 30% of our saturation range
const changeAmount = Math.min(saturationRange * 0.3, maxChange) // 30.59999
And add this change amount to the lowest RGB value and subtract it from the highest value:
Then use the same ratio technique as the last function to find the value for the third color:
const highDiff = grayVal - 173; // -71 subtracting red - the highest value
const midDiff = grayVal - 104; // -2 subtracting blue - the middle value
const middleValueRatio = midDiff / highDiff; // 0.02816901408
const newBlue = Math.Round(grayVal+(142.4-grayVal)*middleValueRatio); // 103
So that means the RGB representation of our rouge desaturated by 30% would be rgb(142, 62, 103). The hue and the lightness are exactly the same, but it’s a bit less vibrant.
Here’s a JavaScript function that will desaturate a color by 10%. It’s basically a reverse of the previous function.
function desaturateByTenth(rgb) {
  const rgbIntArray = (rgb.replace(/ /g, '').slice(4, -1).split(',').map(e => parseInt(e)));
  //grab the values in order of magnitude
  //this uses the getLowestMiddleHighest function from the saturate section
  const [lowest,middle,highest] = getLowestMiddleHighest(rgbIntArray);
  const grayVal = getLightnessOfRGB(rgb) * 255;


  if(lowest.val===highest.val){return rgb;}

  const saturationRange =  Math.round(Math.min(255-grayVal,grayVal));
  const maxChange = grayVal-lowest.val;
  const changeAmount = Math.min(saturationRange/10, maxChange);

  const middleValueRatio =(grayVal-middle.val)/(grayVal-highest.val);

  const returnArray=[];
  returnArray[highest.index]= Math.round(highest.val-changeAmount);
  returnArray[lowest.index]= Math.round(lowest.val+changeAmount);
  returnArray[middle.index]= Math.round(grayVal+(returnArray[highest.index]-grayVal)*middleValueRatio);
  return (`rgb(${[returnArray].join()})`);
}
Here’s a CodePen to experiment with the effect of these saturation functions:
How to lighten an RGB color keeping the hue the same
To lighten an RGB value and keep the hue the same, we need to increase each RGB value by the same proportion of difference between the value and 255. Let’s say we have this color: rgb(0, 153, 255). That’s a fully saturated blue/cyan. Let’s look at the difference between each RGB value and 255:
Red is zero, so the difference is 255.
Green is 153, so the difference is 102.
Blue is 255, so the difference is zero.
Now when we lighten the color, we need to increase each RGB value by the same fraction of our differences. One thing to note is that we are essentially mixing white into our color. This means that the color will slowly lose its saturation as it lightens.
Let’s increase the lightness on this color by a tenth. We’ll start with out lowest RGB value, red. We add on a tenth of 255 to this value. We also need to use Math.min to make sure that the value doesn’t increase over 255:
const red = 0;
const newRed = Math.round( red + Math.min( 255-red, 25.5 )); // 26
Now the other two RGB values need to increase by the same fraction of distance to 255.
To work this out, we get the difference between the lowest RGB value (before we increased it) and 255. Red was zero so our difference is 255. Then we get the amount the lowest RGB value increased in our transformation. Red increased from zero to 26, so our increase is 26.
Dividing the increase by the difference between the original color and 255 gives us a fraction we can use to work out the other values.
This means the color we end up with is rgb(26, 163, 255). That’s still the same hue, but a touch lighter.
Here’s a function that does this:
function lightenByTenth(rgb) {

  const rgbIntArray = rgb.replace(/ /g, '').slice(4, -1).split(',').map(e => parseInt(e));
  // Grab the values in order of magnitude
  // This uses the getLowestMiddleHighest function from the saturate section
  const [lowest,middle,highest]=getLowestMiddleHighest(rgbIntArray);

  if(lowest.val===255){
    return rgb;
  }

  const returnArray = [];

  // First work out increase on lower value
  returnArray[lowest.index]= Math.round(lowest.val+(Math.min(255-lowest.val,25.5)));

  // Then apply to the middle and higher values
  const increaseFraction  = (returnArray[lowest.index]-lowest.val)/ (255-lowest.val);
  returnArray[middle.index]= middle.val +(255-middle.val)*increaseFraction ;
  returnArray[highest.index]= highest.val +(255-highest.val)*increaseFraction ;

  // Convert the array back into an rgb string
  return (`rgb(${returnArray.join()})`);
}
How to darken an RGB color keeping the hue the same
Darkening an RGB color is pretty similar. Instead of adding to the values to get 255, we’re subtracting from the values to get toward zero.
Also we start our transformation by reducing the highest value and getting the fraction of this decrease. We use this fraction to reduce the other two values by their distance to zero. This is a reversal of what we did lightening a color.
Darkening a color will also cause it to slowly lose its level of saturation.
function darkenByTenth(rgb) {

  // Our rgb to int array function again
  const rgbIntArray = rgb.replace(/ /g, '').slice(4, -1).split(',').map(e => parseInt(e));
  //grab the values in order of magnitude
  //this uses the function from the saturate function
  const [lowest,middle,highest]=getLowestMiddleHighest(rgbIntArray);

  if(highest.val===0){
    return rgb;
  }

  const returnArray = [];

  returnArray[highest.index] = highest.val-(Math.min(highest.val,25.5));
  const decreaseFraction  =(highest.val-returnArray[highest.index])/ (highest.val);
  returnArray[middle.index]= middle.val -middle.val*decreaseFraction;
  returnArray[lowest.index]= lowest.val -lowest.val*decreaseFraction;

  // Convert the array back into an rgb string
  return (`rgb(${returnArray.join()}) `);
}
Here’s a CodePen to experiment with the effect of the lightness functions:
If you ever do need to work with RGB colors, these functions will help you get you started. You can also give the HSL format a try, as well as the color libraries to extend browser support, and the Colour Grid tool for conversions.
Before the advent of CSS custom properties (we might call them “variables” in this article as that’s the spirit of them), implementing multiple color schemes on the same website usually meant writing separate stylesheets. Definitely not the most maintainable thing in the world. Nowadays, though, we can define variables in a single stylesheet and let CSS do the magic.
Even if you aren’t offering something like user-generated or user-chosen color themes, you might still use the concept of theming on your website. For example, it is fairly common to use different colors themes across different areas of the site.
We’re going to build out an example like this:
Same layout, different colors.
In this example, all that changes between sections is the color hue; the variations in lightness are always the same. Here’s an example of a simplified color palette for a specific hue:
A palette of multiple hues might look something like this:
This would take effort to do with RGB color value, but in HSL only one value changes.
The syntax is very similar to traditional CSS. Here is an overview of the basic usage:
It’s common to see variables defined on the :root pseudo-element, which is always <html> in HTML, but with higher specificity. That said, variables can be defined on any element which is useful for scoping specific variables to specific elements. For example, here are variables defined on data attributes:
Adding calc() to the mix
Variables don’t have to be fixed values. We can leverage the power of the calc() function to automatically calculate values for us while adhering to a uniform pattern:
What we’re basically trying to do is change the color of the same component on different sections of the same page. Like this:
We have three sections in tabs with their own IDs: #food, #lifestyle, and #travel. Each section corresponds to a different hue. The data-theme-attribute on the div.wrapper element defines which hue is currently in use.
When #travel is the active tab, we’re using the --first-hue variable, which has a value of 180°. That is what gets used as the --hue value on the section, resulting in a teal color:
Clicking any of the tabs updates the data-theme attribute to the ID of the section, while removing the hash (#) from it. This takes a smidge of JavaScript. That’s one of the (many) nice things about CSS: they can be accessed and manipulated with JavaScript. This is a far cry from preprocessor variables, which compile into values at the build stage and are no longer accessible in the DOM.
<li><a href="#food">Food</a></li>
const wrapper = document.querySelector('.wrapper');
document.querySelector("nav").addEventListener('click', e => {
  e.preventDefault();
  e.stopPropagation();
  // Get theme name from URL and ditch the hash
  wrapper.dataset.theme = e.target.getAttribute('href').substr(1);
})
Progressive enhancement
When we use JavaScript, we should be mindful of scenarios where a user may have disabled it. Otherwise, our scripts — and our UI by extension — are inaccessible. This snippet ensures that the site content is still accessible, even in those situations:
document.querySelectorAll('section').forEach((section, i) => {
  if (i) { // hide all but the first section
    section.style.display = 'none';
  }
})
This merely allows the tabs to scroll up the page to the corresponding section. Sure, theming is gone, but providing content is much more important.
While I chose to go with a single-page approach, it’s also possible to serve the sections as separate pages and set [data-theme] on the server side.
Another approach
So far, we’ve assumed that color values change linearly and are thus subject to a mathematical approach. But even in situations where this is only partially true, we may still be able to benefit from the same concept. For instance, if lightness follows a pattern but hue doesn’t, we could split up the stylesheet like this:
Web components are an exciting (and evolving) concept. It’s enticing to think we can have encapsulated components that can be reused anywhere and theme them on a case-by-case basis. One component with many contexts!
We can use CSS variable theming with web components. It requires us to use a host-context() pseudo-selector. (Thanks to habemuscode for pointing this out to me!)
Theming a website with CSS custom properties is much easier than the workaround approaches we’ve resorted to in the past. It’s more maintainable (one stylesheet), performant (less code), and opens up new possibilities (using JavaScript). Not to mention, CSS custom properties become even more powerful when they’re used with HSL colors and the calc() function.
We just looked at one example where we can change the color theme of a component based on the section where it is used. But again, there is much more opportunity here when we start to get into things like letting users change themes themselves – a topic that Chris explores in this article.
A challenge I faced in building an image "emojifier" was that I needed to change the color spaces of values obtained using getImageData() from RGB to HSL. I used arrays of emojis arranged by brightness and saturation, and they were HSL-based for the best matches of average pixel colors with the emojis.
In this article, we’ll study functions that will be useful for converting both opaque and alpha-enabled color values. Modern browsers currently support the color spaces RGB(A), hex, and HSL(A). The functions and notations for these are rgb(), rgba(), #rgb/#rrggbb, #rgba/#rrggbbaa, hsl(), and hsla(). Browsers have always supported built-in names like aliceblue as well.
Along the way, we’ll encounter use of some color syntaxes provided by a new Level 4 of the CSS Colors Module. For example, we now have hex with alpha as we mentioned (#rgba/#rrggbbaa) and RGB and HSL syntaxes no longer require commas (values like rgb(255 0 0) and hsl(240 100% 50%) became legal!).
Browser support for CSS Colors Level 4 isn’t universal as of this writing, so don’t expect new color syntaxes to work in Microsoft browsers or Safari if trying them in CSS.
RGB to Hex
Converting RGB to hex is merely a change of radices. We convert the red, green, and blue values from decimal to hexadecimal using toString(16). After prepending 0s to single digits and under, we can concatenate them and # to a single return statement.
function RGBToHex(r,g,b) {
  r = r.toString(16);
  g = g.toString(16);
  b = b.toString(16);

  if (r.length == 1)
    r = "0" + r;
  if (g.length == 1)
    g = "0" + g;
  if (b.length == 1)
    b = "0" + b;

  return "#" + r + g + b;
}
RGB in String
Alternatively, we can use a single string argument with the red, green and blue separated by commas or spaces (e.g. "rgb(255,25,2)", "rgb(255 25 2)"). Substring to eliminate rgb(, split what’s left by the ), then split that result’s first item by whichever the separator (sep) is. r, g, and b shall become local variables now. Then we use + before the split strings to convert them back to numbers before obtaining the hex values.
function RGBToHex(rgb) {
  // Choose correct separator
  let sep = rgb.indexOf(",") > -1 ? "," : " ";
  // Turn "rgb(r,g,b)" into [r,g,b]
  rgb = rgb.substr(4).split(")")[0].split(sep);

  let r = (+rgb[0]).toString(16),
      g = (+rgb[1]).toString(16),
      b = (+rgb[2]).toString(16);

  if (r.length == 1)
    r = "0" + r;
  if (g.length == 1)
    g = "0" + g;
  if (b.length == 1)
    b = "0" + b;

  return "#" + r + g + b;
}
In addition, we can allow strings with channel values as percentages by adding the loop after redefining rgb. It'll strip the %s and turn what’s left into values out of 255.
function RGBToHex(rgb) {
  let sep = rgb.indexOf(",") > -1 ? "," : " ";
  rgb = rgb.substr(4).split(")")[0].split(sep);

  // Convert %s to 0–255
  for (let R in rgb) {
    let r = rgb[R];
    if (r.indexOf("%") > -1)
      rgb[R] = Math.round(r.substr(0,r.length - 1) / 100 * 255);
      /* Example:
      75% -> 191
      75/100 = 0.75, * 255 = 191.25 -> 191
      */
  }

  ...
}
Now we can supply values like either of these:
rgb(255,25,2)
rgb(255 25 2)
rgb(50%,30%,10%)
rgb(50% 30% 10%)
RGBA to Hex (#rrggbbaa)
Converting RGBA to hex with the #rgba or #rrggbbaa notation follows virtually the same process as the opaque counterpart. Since the alpha (a) is normally a value between 0 and 1, we need to multiply it by 255, round the result, then convert it to hexadecimal.
function RGBAToHexA(r,g,b,a) {
  r = r.toString(16);
  g = g.toString(16);
  b = b.toString(16);
  a = Math.round(a * 255).toString(16);

  if (r.length == 1)
    r = "0" + r;
  if (g.length == 1)
    g = "0" + g;
  if (b.length == 1)
    b = "0" + b;
  if (a.length == 1)
    a = "0" + a;

  return "#" + r + g + b + a;
}
To do this with one string (including with percentages), we can follow what we did earlier. Also note the extra step of splicing out a slash. Since CSS Colors Level 4 supports the syntax of rgba(r g b / a), this is where we allow it. Alpha values can now be percentages! This removes the 0-1-only shackles we used to have. Therefore, the for loop cycling through rgba shall include a part to wipe the % from the alpha without multiplying by 255 (when R is 3 for alpha). Soon we can use values like rgba(255 128 0 / 0.8) and rgba(100% 21% 100% / 30%)!
function RGBAToHexA(rgba) {
  let sep = rgba.indexOf(",") > -1 ? "," : " ";
  rgba = rgba.substr(5).split(")")[0].split(sep);

  // Strip the slash if using space-separated syntax
  if (rgba.indexOf("/") > -1)
    rgba.splice(3,1);

  for (let R in rgba) {
    let r = rgba[R];
    if (r.indexOf("%") > -1) {
      let p = r.substr(0,r.length - 1) / 100;

      if (R < 3) {
        rgba[R] = Math.round(p * 255);
      } else {
        rgba[R] = p;
      }
    }
  }
}
Then, where the channels are converted to hex, we adjust a to use an item of rgba[].
function RGBAToHexA(rgba) {
  ...

  let r = (+rgba[0]).toString(16),
      g = (+rgba[1]).toString(16),
      b = (+rgba[2]).toString(16),
      a = Math.round(+rgba[3] * 255).toString(16);

  if (r.length == 1)
    r = "0" + r;
  if (g.length == 1)
    g = "0" + g;
  if (b.length == 1)
    b = "0" + b;
  if (a.length == 1)
    a = "0" + a;

  return "#" + r + g + b + a;
}
Now the function supports the following:
rgba(255,25,2,0.5)
rgba(255 25 2 / 0.5)
rgba(50%,30%,10%,0.5)
rgba(50%,30%,10%,50%)
rgba(50% 30% 10% / 0.5)
rgba(50% 30% 10% / 50%)
Hex to RGB
We know that the length of hex values must either be 3 or 6 (plus #). In either case, we begin each red (r), green (g), and blue (b) value with "0x" to convert them to hex. If we provide a 3-digit value, we concatenate the same value twice for each channel. If it’s a 6-digit value, we concatenate the first two for red, next two for green, and last two for blue. To get the values for the final rgb() string, we prepend the variables with + to convert them from strings back to numbers, which will yield the decimals we need.
function hexToRGB(h) {
  let r = 0, g = 0, b = 0;

  // 3 digits
  if (h.length == 4) {
    r = "0x" + h[1] + h[1];
    g = "0x" + h[2] + h[2];
    b = "0x" + h[3] + h[3];

  // 6 digits
  } else if (h.length == 7) {
    r = "0x" + h[1] + h[2];
    g = "0x" + h[3] + h[4];
    b = "0x" + h[5] + h[6];
  }

  return "rgb("+ +r + "," + +g + "," + +b + ")";
}
Output RGB with %s
If we want to return rgb() using percentages, then we can modify the function to utilize an optional isPct parameter like so:
function hexToRGB(h,isPct) {
  let r = 0, g = 0, b = 0;
  isPct = isPct === true;

  if (h.length == 4) {
    r = "0x" + h[1] + h[1];
    g = "0x" + h[2] + h[2];
    b = "0x" + h[3] + h[3];

  } else if (h.length == 7) {
    r = "0x" + h[1] + h[2];
    g = "0x" + h[3] + h[4];
    b = "0x" + h[5] + h[6];
  }

  if (isPct) {
    r = +(r / 255 * 100).toFixed(1);
    g = +(g / 255 * 100).toFixed(1);
    b = +(b / 255 * 100).toFixed(1);
  }

  return "rgb(" + (isPct ? r + "%," + g + "%," + b + "%" : +r + "," + +g + "," + +b) + ")";
}
Under the last if statement, using +s will convert r, g, and b to numbers. Each toFixed(1) along with them will round the result to the nearest tenth. Additionally, we won’t have whole numbers with .0 or the decades old quirk that produces numbers like 0.30000000000000004. Therefore, in the return, we omitted the +s right before the first r, g, and b to prevent NaNs caused by the %s. Now we can use hexToRGB("#ff0",true) to get rgb(100%,100%,0%)!
Hex (#rrggbbaa) to RGBA
The procedure for hex values with alpha should again be similar with the last. We simply detect a 4- or 8-digit value (plus #) then convert the alpha and divide it by 255. To get more precise output but not long decimal numbers for alpha, we can use toFixed(3).
function hexAToRGBA(h) {
  let r = 0, g = 0, b = 0, a = 1;

  if (h.length == 5) {
    r = "0x" + h[1] + h[1];
    g = "0x" + h[2] + h[2];
    b = "0x" + h[3] + h[3];
    a = "0x" + h[4] + h[4];

  } else if (h.length == 9) {
    r = "0x" + h[1] + h[2];
    g = "0x" + h[3] + h[4];
    b = "0x" + h[5] + h[6];
    a = "0x" + h[7] + h[8];
  }
  a = +(a / 255).toFixed(3);

  return "rgba(" + +r + "," + +g + "," + +b + "," + a + ")";
}
Output RGBA with %s
For a version that outputs percentages, we can do what we did in hexToRGB()—switch r, g, and b to 0–100% when isPct is true.
function hexAToRGBA(h,isPct) {
  let r = 0, g = 0, b = 0, a = 1;
  isPct = isPct === true;

  // Handling of digits
  ...

  if (isPct) {
    r = +(r / 255 * 100).toFixed(1);
    g = +(g / 255 * 100).toFixed(1);
    b = +(b / 255 * 100).toFixed(1);
  }
  a = +(a / 255).toFixed(3);

  return "rgba(" + (isPct ? r + "%," + g + "%," + b + "%," + a : +r + "," + +g + "," + +b + "," + a) + ")";
}
Here’s a quick fix if the alpha ought to be a percentage, too: move the statement where a is redefined above the last if statement. Then in that statement, modify a to be like r, g, and b. When isPct is true, a must also gain the %.
function hexAToRGBA(h,isPct) {
  ...

  a = +(a / 255).toFixed(3);
  if (isPct) {
    r = +(r / 255 * 100).toFixed(1);
    g = +(g / 255 * 100).toFixed(1);
    b = +(b / 255 * 100).toFixed(1);
    a = +(a * 100).toFixed(1);
  }

  return "rgba(" + (isPct ? r + "%," + g + "%," + b + "%," + a + "%" : +r + "," + +g + "," + +b + "," + a) + ")";
}
When we enter #7f7fff80 now, we should get rgba(127,127,255,0.502) or rgba(49.8%,49.8%,100%,50.2%).
RGB to HSL
Obtaining HSL values from RGB or hex is a bit more challenging because there’s a larger formula involved. First, we must divide the red, green, and blue by 255 to use values between 0 and 1. Then we find the minimum and maximum of those values (cmin and cmax) as well as the difference between them (delta). We need that result as part of calculating the hue and saturation. Right after the delta, let’s initialize the hue (h), saturation (s), and lightness (l).
function RGBToHSL(r,g,b) {
  // Make r, g, and b fractions of 1
  r /= 255;
  g /= 255;
  b /= 255;

  // Find greatest and smallest channel values
  let cmin = Math.min(r,g,b),
      cmax = Math.max(r,g,b),
      delta = cmax - cmin,
      h = 0,
      s = 0,
      l = 0;
}
Next, we need to calculate the hue, which is to be determined by the greatest channel value in cmax (or if all channels are the same). If there is no difference between the channels, the hue will be 0. If cmax is the red, then the formula will be ((g - b) / delta) % 6. If green, then (b - r) / delta + 2. Then, if blue, (r - g) / delta + 4. Finally, multiply the result by 60 (to get the degree value) and round it. Since hues shouldn’t be negative, we add 360 to it, if needed.
function RGBToHSL(r,g,b) {
  ...
  // Calculate hue
  // No difference
  if (delta == 0)
    h = 0;
  // Red is max
  else if (cmax == r)
    h = ((g - b) / delta) % 6;
  // Green is max
  else if (cmax == g)
    h = (b - r) / delta + 2;
  // Blue is max
  else
    h = (r - g) / delta + 4;

  h = Math.round(h * 60);

  // Make negative hues positive behind 360°
  if (h < 0)
      h += 360;
}
All that’s left is the saturation and lightness. Let’s calculate the lightness before we do the saturation, as the saturation will depend on it. It’s the sum of the maximum and minimum channel values cut in half ((cmax + cmin) / 2). Then delta will determine what the saturation will be. If it’s 0 (no difference between cmax and cmin), then the saturation is automatically 0. Otherwise, it’ll be 1 minus the absolute value of twice the lightness minus 1 (1 - Math.abs(2 * l - 1)). Once we have these values, we must convert them to values out of 100%, so we multiply them by 100 and round to the nearest tenth. Now we can string together our hsl().
function RGBToHSL(r,g,b) {
  ...
  // Calculate lightness
  l = (cmax + cmin) / 2;

  // Calculate saturation
  s = delta == 0 ? 0 : delta / (1 - Math.abs(2 * l - 1));

  // Multiply l and s by 100
  s = +(s * 100).toFixed(1);
  l = +(l * 100).toFixed(1);

  return "hsl(" + h + "," + s + "%," + l + "%)";
}
RGB in String
For one string, split the argument by comma or space, strip the %s, and localize r, g, and b like we did before.
function RGBToHSL(rgb) {
  let sep = rgb.indexOf(",") > -1 ? "," : " ";
  rgb = rgb.substr(4).split(")")[0].split(sep);

  for (let R in rgb) {
    let r = rgb[R];
    if (r.indexOf("%") > -1)
      rgb[R] = Math.round(r.substr(0,r.length - 1) / 100 * 255);
  }

  // Make r, g, and b fractions of 1
  let r = rgb[0] / 255,
      g = rgb[1] / 255,
      b = rgb[2] / 255;

  ...
}
RGBA to HSLA
Compared to what we just did to convert RGB to HSL, the alpha counterpart will be basically nothing! We just reuse the code for RGB to HSL (the multi-argument version), leave a alone, and pass a to the returned HSLA. Keep in mind it should be between 0 and 1.
function RGBAToHSLA(r,g,b,a) {
  // Code for RGBToHSL(r,g,b) before return
  ...

  return "hsla(" + h + "," + s + "%," +l + "%," + a + ")";
}
RGBA in String
For string values, we apply the splitting and stripping logic again but use the fourth item in rgba for a. Remember the new rgba(r g b / a) syntax? We’re employing the acceptance of it as we did for RGBAToHexA(). Then the rest of the code is the normal RGB-to-HSL conversion.
function RGBAToHSLA(rgba) {
  let sep = rgba.indexOf(",") > -1 ? "," : " ";
  rgba = rgba.substr(5).split(")")[0].split(sep);

  // Strip the slash if using space-separated syntax
  if (rgba.indexOf("/") > -1)
    rgba.splice(3,1);

  for (let R in rgba) {
    let r = rgba[R];
    if (r.indexOf("%") > -1) {
      let p = r.substr(0,r.length - 1) / 100;

      if (R < 3) {
        rgba[R] = Math.round(p * 255);
      } else {
        rgba[R] = p;
      }
    }
  }

  // Make r, g, and b fractions of 1
  let r = rgba[0] / 255,
      g = rgba[1] / 255,
      b = rgba[2] / 255,
      a = rgba[3];

  // Rest of RGB-to-HSL logic
  ...
}
Wish to leave the alpha as is? Remove the else statement from the for loop.
for (let R in rgba) {
  let r = rgba[R];
  if (r.indexOf("%") > -1) {
    let p = r.substr(0,r.length - 1) / 100;

    if (R < 3) {
      rgba[R] = Math.round(p * 255);
    }
  }
}
HSL to RGB
It takes slightly less logic to convert HSL back to RGB than the opposite way. Since we’ll use a range of 0–100 for the saturation and lightness, the first step is to divide them by 100 to values between 0 and 1. Next, we find chroma (c), which is color intensity, so that’s (1 - Math.abs(2 * l - 1)) * s. Then we use x for the second largest component (first being chroma), the amount to add to each channel to match the lightness (m), and initialize r, g, b.
function HSLToRGB(h,s,l) {
  // Must be fractions of 1
  s /= 100;
  l /= 100;

  let c = (1 - Math.abs(2 * l - 1)) * s,
      x = c * (1 - Math.abs((h / 60) % 2 - 1)),
      m = l - c/2,
      r = 0,
      g = 0,
      b = 0;
}
The hue will determine what the red, green, and blue should be depending on which 60° sector of the color wheel it lies.
The color wheel divided into 60° segments
Then c and x shall be assigned as shown below, leaving one channel at 0. To get the final RGB value, we add m to each channel, multiply it by 255, and round it.
function HSLToRGB(h,s,l) {
  ...

  if (0 <= h && h < 60) {
    r = c; g = x; b = 0;
  } else if (60 <= h && h < 120) {
    r = x; g = c; b = 0;
  } else if (120 <= h && h < 180) {
    r = 0; g = c; b = x;
  } else if (180 <= h && h < 240) {
    r = 0; g = x; b = c;
  } else if (240 <= h && h < 300) {
    r = x; g = 0; b = c;
  } else if (300 <= h && h < 360) {
    r = c; g = 0; b = x;
  }
  r = Math.round((r + m) * 255);
  g = Math.round((g + m) * 255);
  b = Math.round((b + m) * 255);

  return "rgb(" + r + "," + g + "," + b + ")";
}
HSL in String
For the single string version, we modify the first few statements basically the same way we did for RGBToHSL(r,g,b). Remove s /= 100; and l /= 100; and we’ll use the new statements to wipe the first 4 characters and the ) for our array of HSL values, then the %s from s and l before dividing them by 100.
function HSLToRGB(hsl) {
  let sep = hsl.indexOf(",") > -1 ? "," : " ";
  hsl = hsl.substr(4).split(")")[0].split(sep);

  let h = hsl[0],
      s = hsl[1].substr(0,hsl[1].length - 1) / 100,
      l = hsl[2].substr(0,hsl[2].length - 1) / 100;

  ...
}
The next handful of statements shall handle hues provided with a unit—degrees, radians, or turns. We multiply radians by 180/π and turns by 360. If the result ends up over 360, we compound modulus divide to keep it within the scope. All of this will happen before we deal with c, x, and m.
function HSLToRGB(hsl) {
  ...

  // Strip label and convert to degrees (if necessary)
  if (h.indexOf("deg") > -1)
    h = h.substr(0,h.length - 3);
  else if (h.indexOf("rad") > -1)
    h = Math.round(h.substr(0,h.length - 3) * (180 / Math.PI));
  else if (h.indexOf("turn") > -1)
    h = Math.round(h.substr(0,h.length - 4) * 360);
  // Keep hue fraction of 360 if ending up over
  if (h >= 360)
    h %= 360;

  // Conversion to RGB begins
  ...
}
After implementing the steps above, now the following can be safely used:
hsl(180 100% 50%)
hsl(180deg,100%,50%)
hsl(180deg 100% 50%)
hsl(3.14rad,100%,50%)
hsl(3.14rad 100% 50%)
hsl(0.5turn,100%,50%)
hsl(0.5turn 100% 50%)
Whew, that’s quite the flexibility!
Output RGB with %s
Similarly, we can modify this function to return percent values just like we did in hexToRGB().
function HSLToRGB(hsl,isPct) {
  let sep = hsl.indexOf(",") > -1 ? "," : " ";
  hsl = hsl.substr(4).split(")")[0].split(sep);
  isPct = isPct === true;

  ...

  if (isPct) {
    r = +(r / 255 * 100).toFixed(1);
    g = +(g / 255 * 100).toFixed(1);
    b = +(b / 255 * 100).toFixed(1);
  }

  return "rgb("+ (isPct ? r + "%," + g + "%," + b + "%" : +r + "," + +g + "," + +b) + ")";
}
HSLA to RGBA
Once again, handling alphas will be a no-brainer. We can reapply the code for the original HSLToRGB(h,s,l) and add a to the return.
function HSLAToRGBA(h,s,l,a) {
  // Code for HSLToRGB(h,s,l) before return
  ...

  return "rgba(" + r + "," + g + "," + b + "," + a + ")";
}
HSLA in String
Changing it to one argument, the way we’ll handle strings here will be not too much different than what we did earlier. A new HSLA syntax from Colors Level 4 uses (value value value / value) just like RGBA, so having the code to handle it, we’ll be able to plug in something like hsla(210 100% 50% / 0.5) here.
function HSLAToRGBA(hsla) {
  let sep = hsla.indexOf(",") > -1 ? "," : " ";
  hsla = hsla.substr(5).split(")")[0].split(sep);

  if (hsla.indexOf("/") > -1)
    hsla.splice(3,1);

  let h = hsla[0],
      s = hsla[1].substr(0,hsla[1].length - 1) / 100,
      l = hsla[2].substr(0,hsla[2].length - 1) / 100,
      a = hsla[3];

  if (h.indexOf("deg") > -1)
    h = h.substr(0,h.length - 3);
  else if (h.indexOf("rad") > -1)
    h = Math.round(h.substr(0,h.length - 3) * (180 / Math.PI));
  else if (h.indexOf("turn") > -1)
    h = Math.round(h.substr(0,h.length - 4) * 360);
  if (h >= 360)
    h %= 360;

  ...
}
Furthermore, these other combinations have become possible:
hsla(180,100%,50%,50%)
hsla(180 100% 50% / 50%)
hsla(180deg,100%,50%,0.5)
hsla(3.14rad,100%,50%,0.5)
hsla(0.5turn 100% 50% / 50%)
RGBA with %s
Then we can replicate the same logic for outputting percentages, including alpha. If the alpha should be a percentage (searched in pctFound), here’s how we can handle it:
If r, g, and b are to be converted to percentages, then a should be multiplied by 100, if not already a percentage. Otherwise, drop the %, and it’ll be added back in the return.
If r, g, and b should be left alone, then remove the % from a and divide a by 100.
function HSLAToRGBA(hsla,isPct) {
  // Code up to slash stripping
  ...

  isPct = isPct === true;

  // h, s, l, a defined to rounding of r, g, b
  ...

  let pctFound = a.indexOf("%") > -1;

  if (isPct) {
    r = +(r / 255 * 100).toFixed(1);
    g = +(g / 255 * 100).toFixed(1);
    b = +(b / 255 * 100).toFixed(1);
    if (!pctFound) {
      a *= 100;
    } else {
      a = a.substr(0,a.length - 1);
    }

  } else if (pctFound) {
    a = a.substr(0,a.length - 1) / 100;
  }

  return "rgba("+ (isPct ? r + "%," + g + "%," + b + "%," + a + "%" : +r + ","+ +g + "," + +b + "," + +a) + ")";
}
Hex to HSL
You might think this one and the next are crazier processes than the others, but they merely come in two parts with recycled logic. First, we convert the hex to RGB. That gives us the base 10s we need to convert to HSL.
function hexToHSL(H) {
  // Convert hex to RGB first
  let r = 0, g = 0, b = 0;
  if (H.length == 4) {
    r = "0x" + H[1] + H[1];
    g = "0x" + H[2] + H[2];
    b = "0x" + H[3] + H[3];
  } else if (H.length == 7) {
    r = "0x" + H[1] + H[2];
    g = "0x" + H[3] + H[4];
    b = "0x" + H[5] + H[6];
  }
  // Then to HSL
  r /= 255;
  g /= 255;
  b /= 255;
  let cmin = Math.min(r,g,b),
      cmax = Math.max(r,g,b),
      delta = cmax - cmin,
      h = 0,
      s = 0,
      l = 0;

  if (delta == 0)
    h = 0;
  else if (cmax == r)
    h = ((g - b) / delta) % 6;
  else if (cmax == g)
    h = (b - r) / delta + 2;
  else
    h = (r - g) / delta + 4;

  h = Math.round(h * 60);

  if (h < 0)
    h += 360;

  l = (cmax + cmin) / 2;
  s = delta == 0 ? 0 : delta / (1 - Math.abs(2 * l - 1));
  s = +(s * 100).toFixed(1);
  l = +(l * 100).toFixed(1);

  return "hsl(" + h + "," + s + "%," + l + "%)";
}
Hex (#rrggbbaa) to HSLA
There aren’t too many lines that change in this one. We’ll repeat what we recently did to get the alpha by converting the hex, but won’t divide it by 255 right away. First, we must get the hue, saturation, and lightness as we did in the other to-HSL functions. Then, before the ending return, we divide the alpha and set the decimal places.
function hexAToHSLA(H) {
  let r = 0, g = 0, b = 0, a = 1;

  if (H.length == 5) {
    r = "0x" + H[1] + H[1];
    g = "0x" + H[2] + H[2];
    b = "0x" + H[3] + H[3];
    a = "0x" + H[4] + H[4];
  } else if (H.length == 9) {
    r = "0x" + H[1] + H[2];
    g = "0x" + H[3] + H[4];
    b = "0x" + H[5] + H[6];
    a = "0x" + H[7] + H[8];
  }

  // Normal conversion to HSL
  ...

  a = (a / 255).toFixed(3);

  return "hsla("+ h + "," + s + "%," + l + "%," + a + ")";
}
HSL to Hex
This one starts as a conversion to RGB, but there’s an extra step to the Math.round()s of converting the RGB results to hex.
function HSLToHex(h,s,l) {
  s /= 100;
  l /= 100;

  let c = (1 - Math.abs(2 * l - 1)) * s,
      x = c * (1 - Math.abs((h / 60) % 2 - 1)),
      m = l - c/2,
      r = 0,
      g = 0,
      b = 0;

  if (0 <= h && h < 60) {
    r = c; g = x; b = 0;
  } else if (60 <= h && h < 120) {
    r = x; g = c; b = 0;
  } else if (120 <= h && h < 180) {
    r = 0; g = c; b = x;
  } else if (180 <= h && h < 240) {
    r = 0; g = x; b = c;
  } else if (240 <= h && h < 300) {
    r = x; g = 0; b = c;
  } else if (300 <= h && h < 360) {
    r = c; g = 0; b = x;
  }
  // Having obtained RGB, convert channels to hex
  r = Math.round((r + m) * 255).toString(16);
  g = Math.round((g + m) * 255).toString(16);
  b = Math.round((b + m) * 255).toString(16);

  // Prepend 0s, if necessary
  if (r.length == 1)
    r = "0" + r;
  if (g.length == 1)
    g = "0" + g;
  if (b.length == 1)
    b = "0" + b;

  return "#" + r + g + b;
}
HSL in String
Even the first few lines of this function will be like those in HSLToRGB() if we changed it to accept a single string. This is how we’ve been obtaining the hue, saturation, and lightness separately in the first place. Let’s not forget the step to remove the hue label and convert to degrees, too. All of this will be in place of s /= 100; and l /= 100;.
function HSLToHex(hsl) {
  let sep = hsl.indexOf(",") > -1 ? "," : " ";
  hsl = hsl.substr(4).split(")")[0].split(sep);

  let h = hsl[0],
      s = hsl[1].substr(0,hsl[1].length - 1) / 100,
      l = hsl[2].substr(0,hsl[2].length - 1) / 100;

  // Strip label and convert to degrees (if necessary)
  if (h.indexOf("deg") > -1)
    h = h.substr(0,h.length - 3);
  else if (h.indexOf("rad") > -1)
    h = Math.round(h.substr(0,h.length - 3) * (180 / Math.PI));
  else if (h.indexOf("turn") > -1)
    h = Math.round(h.substr(0,h.length - 4) * 360);
  if (h >= 360)
    h %= 360;

  ...
}
HSLA to Hex (#rrggbbaa)
Adding alpha to the mix, we convert a to hex and add a fourth if to prepend a 0, if necessary. You probably already familiar with this logic because we last used it in RGBAToHexA().
function HSLAToHexA(h,s,l,a) {
  // Repeat code from HSLToHex(h,s,l) until 3 `toString(16)`s
  ...

  a = Math.round(a * 255).toString(16);

  if (r.length == 1)
    r = "0" + r;
  if (g.length == 1)
    g = "0" + g;
  if (b.length == 1)
    b = "0" + b;
  if (a.length == 1)
    a = "0" + a;

  return "#" + r + g + b + a;
}
HSLA in String
Finally, the lines of the single argument version up to a = hsla[3] are no different than those of HSLAToRGBA().
function HSLAToHexA(hsla) {
  let sep = hsla.indexOf(",") > -1 ? "," : " ";
  hsla = hsla.substr(5).split(")")[0].split(sep);

  // Strip the slash
  if (hsla.indexOf("/") > -1)
    hsla.splice(3,1);

  let h = hsla[0],
      s = hsla[1].substr(0,hsla[1].length - 1) / 100,
      l = hsla[2].substr(0,hsla[2].length - 1) / 100,
      a = hsla[3];

  ...
}
Built-in Names
To convert a named color to RGB, hex, or HSL, you might consider turning this table of 140+ names and hex values into a massive object at the start. The truth is that we really don’t need one because here’s what we can do:
Create an element
Give it a text color
Obtain the value of that property
Remove the element
Return the stored color value, which will be in RGB by default
So, our function to get RGB will only be seven statements!
function nameToRGB(name) {
  // Create fake div
  let fakeDiv = document.createElement("div");
  fakeDiv.style.color = name;
  document.body.appendChild(fakeDiv);

  // Get color of div
  let cs = window.getComputedStyle(fakeDiv),
      pv = cs.getPropertyValue("color");

  // Remove div after obtaining desired color value
  document.body.removeChild(fakeDiv);

  return pv;
}
Let’s go even further. How about we change the output to hex instead?
function nameToHex(name) {
  // Get RGB from named color in temporary div
  let fakeDiv = document.createElement("div");
  fakeDiv.style.color = name;
  document.body.appendChild(fakeDiv);

  let cs = window.getComputedStyle(fakeDiv),
      pv = cs.getPropertyValue("color");

  document.body.removeChild(fakeDiv);

  // Code ripped from RGBToHex() (except pv is substringed)
  let rgb = pv.substr(4).split(")")[0].split(","),
      r = (+rgb[0]).toString(16),
      g = (+rgb[1]).toString(16),
      b = (+rgb[2]).toString(16);

  if (r.length == 1)
    r = "0" + r;
  if (g.length == 1)
    g = "0" + g;
  if (b.length == 1)
    b = "0" + b;

  return "#" + r + g + b;
}
Or, why not HSL? 😉
function nameToHSL(name) {
  let fakeDiv = document.createElement("div");
  fakeDiv.style.color = name;
  document.body.appendChild(fakeDiv);

  let cs = window.getComputedStyle(fakeDiv),
      pv = cs.getPropertyValue("color");

  document.body.removeChild(fakeDiv);

  // Code ripped from RGBToHSL() (except pv is substringed)
  let rgb = pv.substr(4).split(")")[0].split(","),
      r = rgb[0] / 255,
      g = rgb[1] / 255,
      b = rgb[2] / 255,
      cmin = Math.min(r,g,b),
      cmax = Math.max(r,g,b),
      delta = cmax - cmin,
      h = 0,
      s = 0,
      l = 0;

  if (delta == 0)
    h = 0;
  else if (cmax == r)
    h = ((g - b) / delta) % 6;
  else if (cmax == g)
    h = (b - r) / delta + 2;
  else
    h = (r - g) / delta + 4;

  h = Math.round(h * 60);

  if (h < 0)
    h += 360;

  l = (cmax + cmin) / 2;
  s = delta == 0 ? 0 : delta / (1 - Math.abs(2 * l - 1));
  s = +(s * 100).toFixed(1);
  l = +(l * 100).toFixed(1);

  return "hsl(" + h + "," + s + "%," + l + "%)";
}
In the long run, every conversion from a name becomes a conversion from RGB after cracking the name.
Validating Colors
In all these functions, there haven’t been any measures to prevent or correct ludicrous input (say hues over 360 or percentages over 100). If we’re only manipulating pixels on a <canvas> fetched using getImageData(), validation of color values isn’t necessary before converting because they’ll be correct no matter what. If we’re creating a color conversion tool where users supply the color, then validation would be much needed.
It’s easy to handle improper input for channels as separate arguments, like this for RGB:
// Correct red
if (r > 255)
  r = 255;
else if (r < 0)
  r = 0;
If validating a whole string, then a regular expression is needed. For instance, this is the RGBToHex() function given a validation step with an expression:
function RGBToHex(rgb) {
  // Expression for rgb() syntaxes
  let ex = /^rgb\((((((((1?[1-9]?\d)|10\d|(2[0-4]\d)|25[0-5]),\s?)){2}|((((1?[1-9]?\d)|10\d|(2[0-4]\d)|25[0-5])\s)){2})((1?[1-9]?\d)|10\d|(2[0-4]\d)|25[0-5]))|((((([1-9]?\d(\.\d+)?)|100|(\.\d+))%,\s?){2}|((([1-9]?\d(\.\d+)?)|100|(\.\d+))%\s){2})(([1-9]?\d(\.\d+)?)|100|(\.\d+))%))\)$/i;

  if (ex.test(rgb)) {
    // Logic to convert RGB to hex
    ...

  } else {
    // Something to do if color is invalid
  }
}
To test other types of values, below is a table of expressions to cover both opaque and alpha-enabled:
Looking at the expressions for RGB(A) and HSL(A), you probably have big eyes right now; these were made comprehensive enough to include most of the new syntaxes from CSS Colors Level 4. Hex, on the other hand, doesn’t need expressions as long as the others because of only digit counts. In a moment, we’ll dissect these and decipher the parts. Note that case-insensitive values (/i) pass all these.
Because rgb() accepts either all integers or all percentages, both cases are covered. In the outmost group, between the ^rgb\( and \)$, there are inner groups for both integers and percentages, all comma-spaces or spaces only as separators:
In the first half, we accept two instances of integers for red and green from 0–99 or 111-199 ((1?[1-9]?\d)), 100–109 (10\d), 200-249 ((2[0-4]\d)), or 250–255 (25[0-5]). We couldn’t simply do \d{1,3} because values like 03 or 017 and those greater than 255 shouldn’t be allowed. After that goes the comma and optional space (,\s?). On the other side of the |, after the first {2} (which indicates two instances of integers), we check for the same thing with space separators if the left side is false. Then for blue, the same should be accepted, but without a separator.
In the other half, acceptable values for percentages, including floats, should either be 0–99, explicitly 100 and not a float, or floats under 1 with the 0 dropped. Therefore, the segment here is (([1-9]?\d(\.\d+)?)|100|(\.\d+)), and it appears three times; twice with separator (,\s?){2}, %\s){2}), once without.
It is legal to use percentages without space separators (rgb(100%50%10%) for instance) in CSS, but the functions we wrote don’t support that. The same goes for rgba(100%50%10%/50%), hsl(40 100%50%), and hsla(40 100%50%/0.5). This could very well be a plus for code golfing and minification!
The next expression is very similar to the pervious, but three instances of integers (((((1?[1-9]?\d)|10\d|(2[0-4]\d)|25[0-5]),\s?){3})) or percentages ((((([1-9]?\d(\.\d+)?)|100|(\.\d+))%,\s?){3})), plus comma optional space are checked. Otherwise, it looks for the same thing but with space separators, plus a slash and space (\/\s) after the blue. Next to that is ((0?\.\d+)|[01]|(([1-9]?\d(\.\d+)?)|100|(\.\d+))%) where we accept floats with or without the first 0 ((0?\.\d+)), 0 or 1 ([01]) on the dot, or 0–100% ((([1-9]?\d(\.\d+)?)|100|(\.\d+))%).
For both hex—with and without alpha—instances of numbers or letters a–f ([\da-f]) are accepted. Then one or two instances of this are counted for either short or longhand values supplied (#rgb or #rrggbb). As an illustration, we have this same short pattern: /^#([\da-f]{n}){1,2}$/i. Simply change n to 3 or 4.
([12]?[1-9]?\d) covers 0–99, 110–199, and 210–299. [12]0\d covers 110–109 and 200–209. Then (3[0-5]\d) takes care of 300–359. The reason for this division of ranges is similar to that of integers in the rgb() syntax: ruling out zeros coming first and values greater than the maximum. Since hues can be floating point numbers, the first (\.\d+)? is for that.
Next to the | after the aforementioned segment of code, the second (\.\d+) is for floats without a leading zero.
Now let’s move up a level and decipher the next small chunk:
This contains the labels we can use for the hue—degrees, turns, or radians. We can include all or none of deg. Values in turn must be under 1. For radians, we can accept any float between 0–7. We do know, however, that one 360° turn is 2π, and it stops approximately at 6.28. You may think 6.3 and over shouldn’t be accepted. Because 2π is an irrational number, it would be too messy for this example to try to satisfy every decimal place provided by the JavaScript console. Besides, we have this snippet in our HSLTo_() functions as a second layer of security if hues 360° or over were to happen:
// Keep hue fraction of 360 if ending up over
if (h >= 360)
  h %= 360;
Now let’s move up a level and decipher the second chunk:
(,\s?(([1-9]?\d(\.\d+)?)|100|(\.\d+))%){2}
We’re counting two instances of comma-space-percentages for the saturation and lightness (space optional). In the group after the ,\s?, we test for values 0–99 with or without decimal points (([1-9]?\d(\.\d+)?)), exactly 100, or floats under 1 without the leading 0 ((\.\d+)).
The last part the HSL expression, before the ending (\)$/i), is a similar expression if spaces are the only separator:
(\s(([1-9]?\d(\.\d+)?)|100|(\.\d+))%){2}
\s is in the beginning instead of ,\s?. Then in the HSLA expression, this same chunk is inside another group with ,\s? after its {2}.
((,\s?(([1-9]?\d(\.\d+)?)|100|(\.\d+))%){2},\s?)
That counts the comma-space between the lightness and alpha. Then if we have spaces as separators, we need to check for a space-slash-space (\s\/\s) after counting two instances of space and a percentage.
((\s(([1-9]?\d(\.\d+)?)|100|(\.\d+))%){2}\s\/\s))
After that, we have this left to check the alpha value:
Matches for (0?\.\d+) include floats under 1 with or without the leading 0, 0 or 1 for [01], and 0–100%.
Conclusion
If your current challenge is to convert one color space to another, you now have some ideas on how to approach it. Because it would be tiresome to walk through converting every color space ever invented in one post, we discussed the most practical and browser-supported ones. If you’d like to go beyond supported color spaces (say CMYK, XYZ, or CIE L*a*b*), EasyRGB) provides an amazing set of code-ready formulas.
To see all the conversions demonstrated here, I’ve set up a CodePen demo that shows inputs and outputs in a table. You can try different colors in lines 2–10 and see the complete functions in the JavaScript panel.


 — hue values do not align perfectly between HSL and LCH. In LCH, a hue of 0 is more pink, while in HSL, it is a pure red.