How to Send Email in WordPress using the Gmail SMTP Server

Are you having trouble sending emails from your WordPress site?

One easy way to solve this is by sending WordPress emails using the Gmail SMTP server.

In this article, we will show you how to send emails from your WordPress site using the Gmail SMTP server.
Using Gmail SMTP server in WordPress

Why and When You Need Gmail SMTP Server for WordPress Emails

Your WordPress site sends emails to notify you of new user registration, lost password reset, automatic updates, and even notifications from your contact forms.

By default, WordPress uses the PHP mail function to send out email notifications. However, this function doesn’t work as expected due to a number of reasons.

Most WordPress hosting companies restrict usage of this function to prevent abuse and spam.

Spam filters on popular email service providers check incoming emails to monitor if they are sent from authentic mail servers. Default WordPress emails fail this check and sometimes may not even make it to the spam folder.

SMTP (Simple Mail Transfer Protocol) is the industry standard for sending emails. Unlike the PHP mail function, SMTP uses proper authentication, which increases email deliverability.

Gmail provides SMTP service that you can use to send out emails from your WordPress site. If you just want to send WordPress notification emails to yourself and few users on your site, then Gmail SMTP servers are the best option.

However, if you are planning on sending newsletter emails using WordPress, then you should use a mass emailing service provider, like Sendinblue or Mailgun.

Free vs Paid Gmail SMTP Service for WordPress

You can use your free Gmail account to send out WordPress emails. However, for better deliverability, we recommend using paid G Suite.

With G Suite, you get your own professional branded email address such as (name@yoursite.com).

G Suite requires you to add MX records to your domain name which means that your emails will appear to be coming from your own domain name boosting authenticity and ensuring better deliverability.

We use G Suite for WPBeginner and can honestly say it’s the best.

How to Send Email using Google SMTP Video Tutorial

If you prefer written instructions, then please continue reading.

How to Send WordPress Emails Using Gmail SMTP Server

If you decided to use G Suite, then you first need to set up your domain to work with Google Apps. We have a step by step tutorial on how to set up a professional email address with G Suite.

The rest of the instructions are the same whether you are using a paid or free Gmail account.

First thing you need to do is install and activate the WP Mail SMTP plugin. For more details, see our step by step guide on how to install a WordPress plugin.

WP Mail SMTP is the best WordPress SMTP plugin on the market. It allows you to easily use any SMTP server to send WordPress emails with higher deliverability.

We recommend buying the paid version called WP Mail SMTP Pro which gives you access to premium support, more mailers, and white-glove set up by one of their experts.

Upon activation, you need to visit Settings » WP Mail SMTP page to configure the plugin settings.
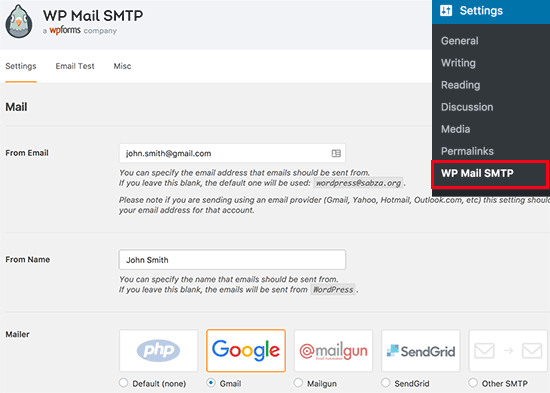
WP Mail SMTP Settings

First, you need to make sure that you use your Gmail email address in the ‘From Email’ field. Next, you need to provide the sender’s name.

WP Mail SMTP plugin offers two ways to connect your WordPress site to the Gmail servers.

The first method uses OAuth Authentication. This is a more secure method to send emails using Gmail servers.

The second method is by entering Gmail SMTP settings manually. This method is not recommended because it is less secure.

That being said, let’s set up WordPress to use Gmail SMTP for sending emails.

Method 1: Setting up Gmail to Send WordPress Emails using OAuth Protocol

This method is recommended for all users. It is more secure and once you set it up, you’ll never have to do that again.

You need to start by selecting Gmail as your mailer and set the return path to be the same as sender.

Select Gmail and set return path

Next, you will see the option to enter your Client ID, Client Secret, and a URL in ‘Authorized redirect URI’ field.

Let’s set up these fields.

Creating an App and Generate API Keys for Gmail

Visit the Google Developers Console website and create a new project.

Create a new Google Developer Console project

If you don’t see the blue button to create a project, then you can also click on select a project drop-down and create a new project.

You’ll be asked to provide a name for your project. Give it a memorable name, so that you can easily recognize it in the future.
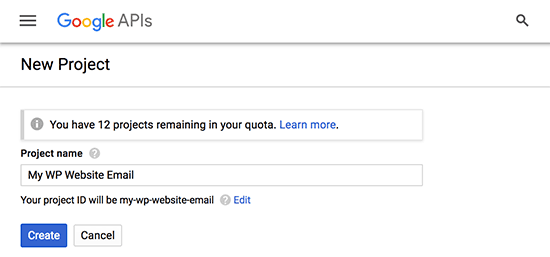
Name your project

After that, click on the create button to continue.

Developer console will now create your project and take you to its dashboard. Google offer developers access to many of their APIs and services. You need to enable the APIs that you will be needing for this project.
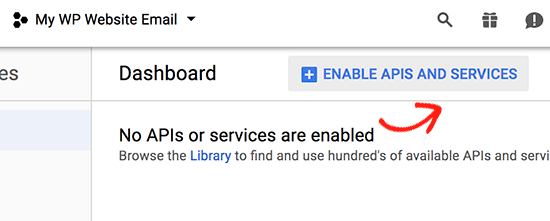
Enable APIs

Click on Enable APIs and services button to continue.

This will bring you to the APIs library page. Next, you need to type Gmail in the search box to quickly find the Gmail API and click to select it.
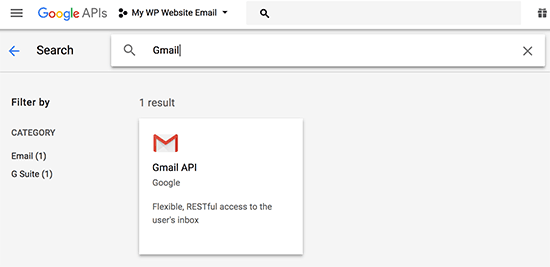
Select Gmail API

You will now see an overview of the API and what it can do. Simply click on the ‘Enable’ button to continue.

Enale Gmail API

Now that your API is enabled, the next step is to create credentials that you can use in your WP Mail SMTP plugin settings.

Click on the create credentials button to continue.
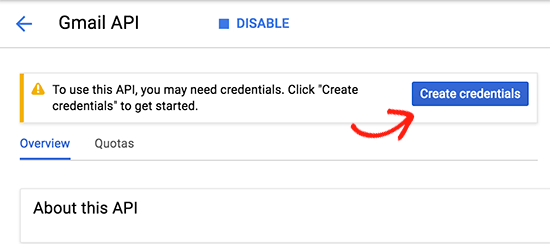
Create credentials

On the next screen, you will need to select ‘Web browser JavaScript’ in ‘Where you’ll be calling the API from’ field. After that click on the ‘User Data’ option.
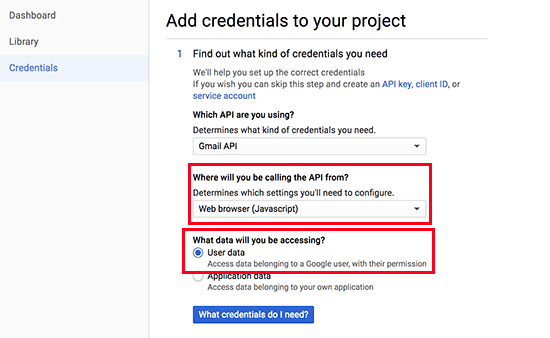
API credentials step 1

To continue, click on the ‘What credentials do I need?’ button.

You will now be asked to provide a name for your OAuth client name. You can enter ‘WP Mail SMTP’ here.

API Credentials step 2

Under JavaScript origins field, you need to add your website’s domain name. Next, you need to copy and paste the authorized redirect URL from WP Mail SMTP plugin settings.

After that, click on the ‘Create client ID’ button to continue.

Next, you need to enter a name for OAuth consent screen. You can put the plugin’s name here.

Ouath consent screen

After entering the details, click on the continue button and the developer console will show your client ID. You can copy and paste this in the WP Mail SMTP plugin’s settings page. However, you will still need to add your client secret key.

Getting your client ID

Go ahead and click on the Done button to move on.

You will now be taken to your project’s credentials page. On this page, you can see your recently created credentials listed here. You need to click on the edit icon next to your credentials to continue.

Edit credentials

This will bring you to the edit credentials page where you will be able to see your client secret key. You need to copy and paste the key in your plugin’s settings page.

Client secret key

Return back to plugin’s settings page in your WordPress admin area. Now that you have both client ID and client secret keys, you need to click on the save settings button to continue.

Save client credentials in plugin settings

The plugin will now store your settings and reload the page. After that, you need to scroll down to the bottom of the settings page and click on the ‘Allow plugin to send emails using your Google account’ button.
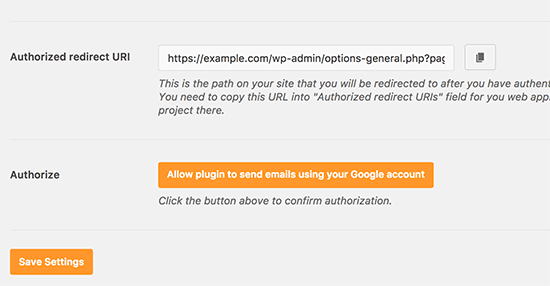
Allow plugin to send emails

This will take you to your account on Google, and you will be asked to give the website permission to send emails on your behalf.

Allow Gmail

Click on the Allow button to give permissions.

After that, you will be redirected back to your website where you will see a success message.

Connected successfully

Method 2: Setting up Gmail SMTP as SMTP Sender

This method allows you to manually connect to Gmail’s SMTP servers to send your WordPress emails.

First, you need to visit Settings » WP Mail SMTP page to configure the plugin settings.

You need to start by providing the Gmail address you want to use in the ‘From Email’ field, and your name in the From ‘Name’ field.
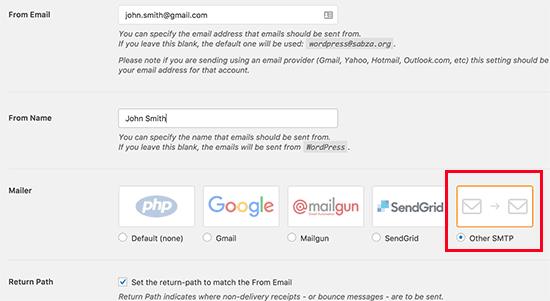
Gmail SMTP

Next, you need to select ‘Other SMTP’ as your mailer and check the box next to return path.

After that, scroll down to the Other SMTP section to configure more settings.
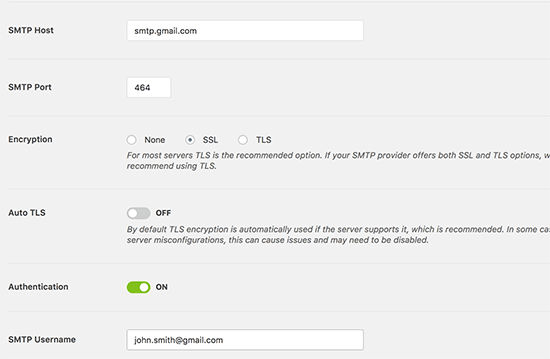
Gmail SMTP settings for WP Mail SMTP plugin

Here is the exact configuration you need to add in the plugin settings:

  • SMTP Host: smtp.gmail.com
  • SMTP Port: 465
  • Encryption: Use SSL encryption
  • Authentication: Turn on authentication
  • Username: Your complete Gmail address, e.g. john.smith@yourdomain.com or john.smith@gmail.com
  • Password: Password of your Gmail account

Once you are done, click on the save changes button to store your settings.

That’s all, you have successfully set up WP Mail SMTP to use Gmail SMTP servers.

Note: If you use method two, please know that it’s less secure because your password is stored in text. You can enhance this by using the constants tip, but we strongly recommend using Method 1.

Testing Your WP Mail SMTP Settings

WP Mail SMTP plugin allows you to test your email settings, so you can make sure that everything is working properly.

You need to visit Settings » WP Mail SMTP page and click on the ‘Email Test’ tab. Simply provide an email address that you can access in the send to field and click on the send email button.
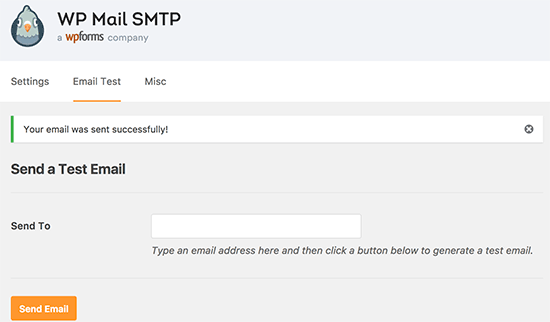
Send test email

You will see a success message. You can now check your inbox to see a message with the subject line ‘WP Mail SMTP: Test Email to…’.

That’s all, you have successfully setup your WordPress site to send emails using Gmail SMTP servers.

Get More With WP Mail SMTP Pro

If you want even more functionality, you should try WP Mail SMTP Pro.

With the Pro version of the plugin, you can connect with:

  • G Suite/Gmail
  • Amazon SES
  • Mailgun
  • Office 365 / Outlook.com
  • SendGrid
  • And more

You also get additional features like email logs, ability to fine-tune / control which notification your WordPress site sends, and more.

Troubleshooting Gmail SMTP Not Working Issues

We have seen users encounter few issues when using Gmail SMTP with certain shared hosting configurations.

Take the following steps to fix the Gmail SMTP issue:

  1. Log in to your cPanel account and create an email account that matches your Google apps email address. This might seem strange because you’re not using your server for emails. This step basically tricks your server into believing that you’re sending the email through the server.
  2. In your cPanel account, go to the MX Records and change the MX routing from automatic to remote. It might be a little tricky to find since each host now has a custom cPanel interface. You need to look for a small link next to MX that says Email Routing: Remote Mail Exchanger.
  3. After that log back into your WordPress site and send a test email.

We hope this article helped you learn how to send email in WordPress using the Gmail SMTP server. You may also want to see our list of the best contact form plugins for WordPress, and our comparison of the best email marketing services for small business.

If you liked this article, then please subscribe to our YouTube Channel for WordPress video tutorials. You can also find us on Twitter and Facebook.

The post How to Send Email in WordPress using the Gmail SMTP Server appeared first on WPBeginner.

How to Fix WordPress Not Sending Email Issue

One of the most commonly asked questions on WPBeginner is how to fix WordPress not sending email problem.

Many of our beginner level users ask us why their contact form plugin is not sending emails, or why they are not seeing any WordPress notifications.

In this article, we will show you how to fix the WordPress not sending email issue, so your website can send emails more reliably and bypass the spam folder.

How to fix the WordPress not sending email issue

Why You’re Not Getting Emails from Your WordPress Site

The most common reason for emails going missing is that your WordPress hosting server is not properly configured to use the PHP mail() function.

Even if your hosting is configured to use it, many email service providers like Gmail and others use a variety of tools to reduce email spam. These tools try to detect that an email is really coming from the location that it claims to be from.

Emails sent by WordPress websites often fail this test.

This means that when an email is sent out from your WordPress site (contact form plugin, admin notification, etc), it may not even make it into the recipient’s spam folder let alone inbox.

This is why we recommend not using WordPress to send your email newsletter.

This is also the reason why we recommend everyone to use SMTP for sending emails in WordPress.

What is SMTP?

SMTP (Simple Mail Transfer Protocol) is the industry standard for sending emails.

Unlike the PHP mail() function, SMTP uses proper authentication which leads to high email deliverability.

WordPress has a WP Mail SMTP plugin that configures your WordPress site to send emails using SMTP instead of the PHP mail() function.

You can use it to connect with any popular SMTP services like SendinBlue, Gmail (G Suite), Office365, Amazon SES, etc.

With that said, let’s take a look at how to fix the WordPress not sending email issue.

Installing the WP Mail SMTP Plugin

Whatever SMTP service you choose, you’ll need to have the WP Mail SMTP plugin installed on your site. This lets you switch WordPress from using the built-in PHP mail() function to using your SMTP service.

First, install and activate the WP Mail SMTP plugin. If you’re not sure how, see our step by step guide on how to install a WordPress plugin.

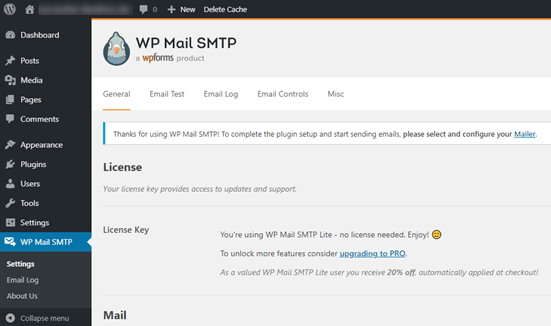
Next, click on WP Mail SMTP in your WordPress dashboard to configure the plugin settings.

The WP Mail SMTP settings page in your WordPress dashboard

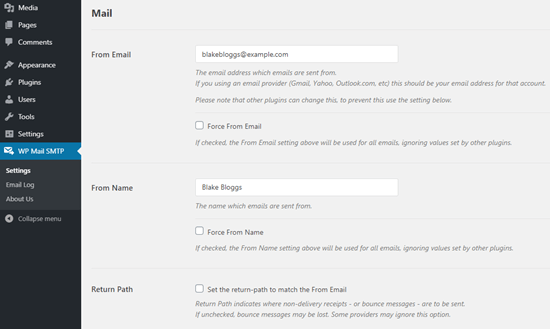
You will need to start by entering the name and business email address you want your site’s emails to come from. Make sure you use the same email address here that you’ll be using for your SMTP mailing service.

Entering the name and email address that you want your WordPress emails to come from

You can choose to force emails to use this name and email address, even if other plugins (like WPForms) have different settings. WP Mail SMTP will override the other plugins’ settings.

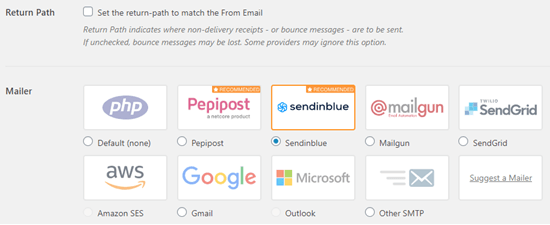
After that, you need to choose a SMTP mailing service for your site.

For the sake of this tutorial, we’re going to setup SMTP using Sendinblue. If you’d prefer to use Gmail or Office365, then we’ve got instructions on those later in this article as well.

Select Sendinblue as your mailer in WP Mail SMTP

To finish setting up WP Mail SMTP, you’ll need to create an account with Sendinblue. We’ll move on to that next, and then come back to finalizing the setup on WP Mail SMTP.

Sending WordPress Emails using Sendinblue

Sendinblue is a popular email service provider. They let you send a large number of emails with high deliverability.

You can use Sendinblue to send up to 300 emails per day for free which is more than enough for most small websites.

These could be emails from your contact form, new user account details, password recovery emails, or any other emails sent through your WordPress site.

First, you’ll need to go to the Sendinblue website to create an account. Click the ‘Sign up free’ button to set up your account.

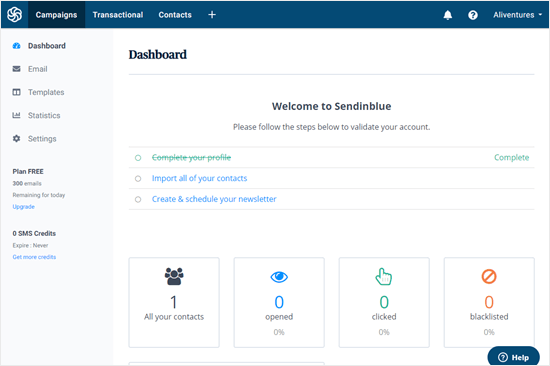
Once you’ve created an account, you’ll see your Sendinblue dashboard. If you didn’t complete your profile during the setup stage, you’ll be prompted to do so here.

The Sendinblue dashboard

Next, you’ll need to contact the support team to ask them to verify your account, so you can send emails through Sendinblue.

We recommend contacting the support team at this stage as it can take around 24 hours for them to verify your account. You can move on with the other steps while you’re waiting.

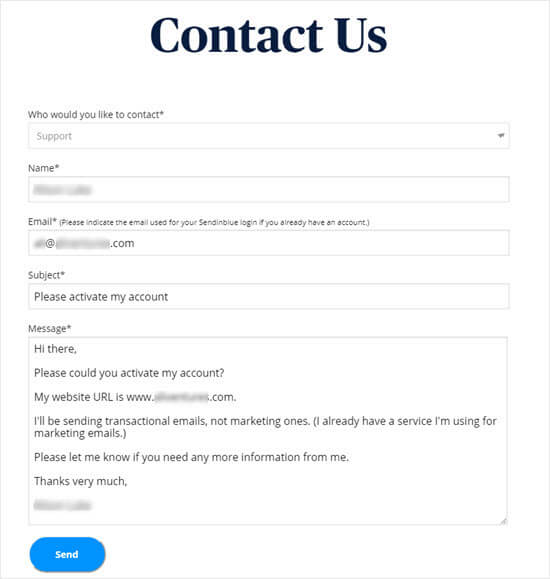
Go to sendinblue.com/contact and write a message that includes:

  • A request to activate your account
  • Your site’s URL
  • A note that you’ll be sending transactional emails. If you also want to use Sendinblue for your email newsletter, then you’ll need to state that you’ll be sending marketing emails too.

Contact form message to Sendinblue to request account activation

You may be asked for further information. If not, you should receive an email from Sendinblue letting you know that your account has been approved.

Once you’ve sent your message to the contact team, you can move on to add your domain name to the site.

Remember, you don’t need to wait for a reply before moving on with the next stage of this tutorial.

Setting Up a Subdomain for Your Website

First, you’ll need to set up a subdomain. This is like a separate section of your site. We suggest using mail1.yourdomain.com.

Note: Your WordPress host may not allow you to use mail as your subdomain, which is why we’ve put the 1 in there too.

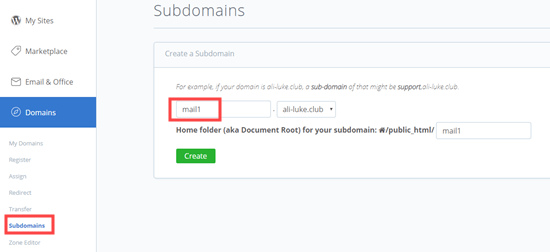
To add your subdomain, log in to your web hosting account and find the Domains section of your control panel.

For the sake of this tutorial, we’ll demonstrate how to do that on our example hosting account on Bluehost. After you login, go to Domains » Subdomains.

You can then type in your subdomain and click ‘Create’.

Adding a subdomain in WordPress

If you’re using other hosting companies or if your DNS is managed at domain registrar like Domain.com or GoDaddy, then follow their respective instructions.

After you have created the subdomain, you will need to add it in your Sendinblue account.

Adding Your Subdomain to Sendinblue

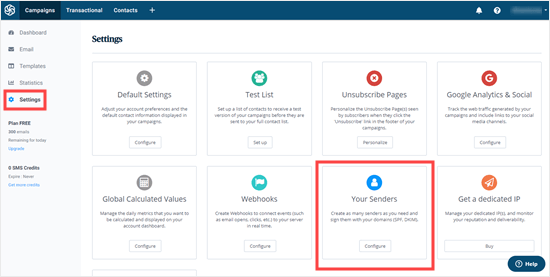
In your Sendinblue account, go to ‘Settings’ then find ‘Your Senders’ and click the ‘Configure’ button:

Configuring your sender settings in Sendinblue

Next, click on the ‘Domains’ tab and then click the ‘Add a New Domain’ button.

Adding a new domain in Sendinblue

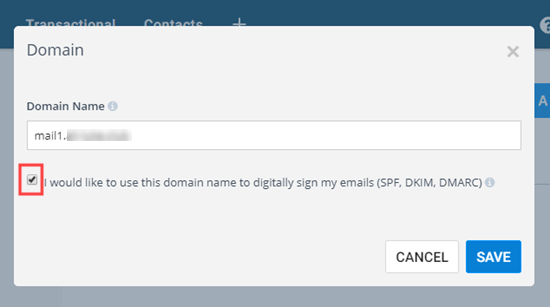
Enter the entire subdomain (e.g. mail1.yoursite.com) and check the box next to “I would like to use this domain name to digitally sign my emails (SPF, DKIM, DMARC)”.

Add your subdomain and check the box

Next, click ‘Save’, and you’ll see a popup with several DNS records listed.

These lines of code let Sendinblue authorize your domain name.

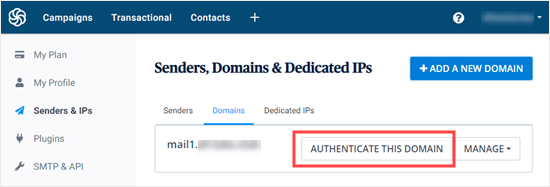
Tip: Don’t worry if you close this popup by accident. You can get back to it by clicking the ‘Authenticate This Domain’ button next to your subdomain:

The Authenticate Domain button which lets you go back to the DNS settions

Open up a new browser tab and log back into your web hosting account. You need to find your domain and open up the DNS records.

In Bluehost, you do this by going to Domains » My Domains then clicking ‘Manage’ next to your domain.

You’ll need to add 3 of TXT records provided by Sendinblue here.

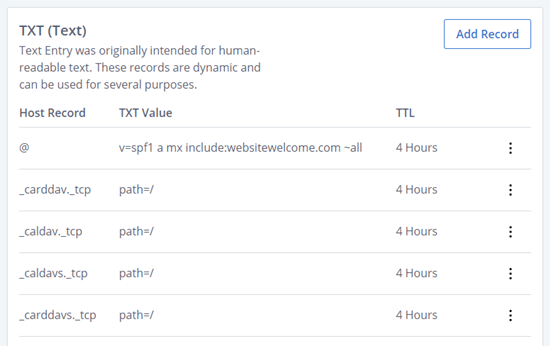
First, scroll down to find the TXT section of your DNS records. It will look something like this:

DNS TXT records in Bluehost

Then, click ‘Add Record’.

Complete the first record as follows:
Host Record: mail._domainkey.mail1
Record Type: TXT
TXT Value: Copy this from Sendinblue.
TTL: 1 day

Tips: Host Record might be called Host or Name by your web host. Change mail1 if you used something different for your subdomain. Record Type may not be required. TXT Value might also be called TXT data: it’s the first, long piece of code in the Sendinblue details. TTL could be 24 hours or 86400 seconds (both are equivalent to 1 day). If you’re using GoDaddy, set it to 1 hour.

Once you have added the first record, click ‘Save’.

Next, you need to add the second record. Complete it as follows:

Host Record: mail1
Record Type: TXT
TXT Value: v=spf1 include:spf.sendinblue.com mx ~all
TTL: 1 day

Once you’re done, click ‘Save’.

After saving that, you need to add the third record. Complete it as follows:

Host Record: mail1
Record Type: TXT
TXT Value: Copy this from Sendinblue. It’s the third piece of code.
TTL: 1 day

Once you’re done, go ahead and save that record too.

Warning: Sendinblue also has a fourth piece of code for a DMARC record. You don’t need this, and we strongly recommend skipping it unless you’re experienced with DMARC configuration.

After you’ve added your records, go back to Sendinblue. For each record, click the button ‘Record Added. Please Verify It.’ It may take 24-48 hours before Sendinblue is able to verify your records, but it’s often much quicker.

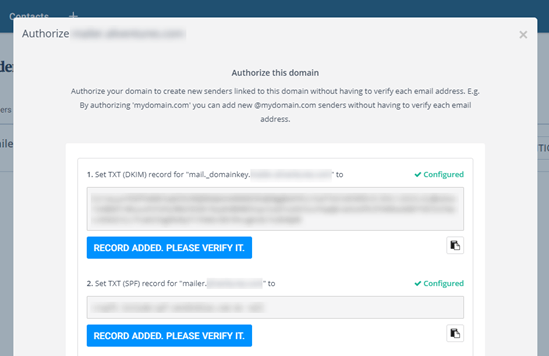
If nothing happens when you click that button, the records can’t yet be verified. Check again later and see if they’ve been verified. Once they have, you’ll see the word ‘Configured’ next to the records in green:

Sendinblue DNS TXT records once they've been verified

You can keep going with this tutorial while you wait for the verification to take place.

Finishing Setting Up WP Mail SMTP to Use Sendinblue

Go back to your WP Mail SMTP settings in your WordPress dashboard. You should have already entered the From Email and From Name, but if not, you can do that now.

Leave the ‘Return Path’ checkbox unchecked as this option isn’t used by Sendinblue.

Next, click on ‘Sendinblue’ for your mailer.

Select Sendinblue as your mailer in WP Mail SMTP

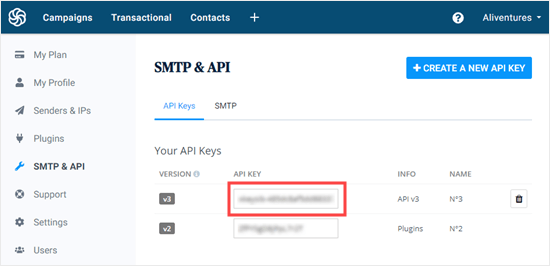
You’ll need go to your Sendinblue account to find your API key. Just click on the link below the ‘API Key’ box and your Sendinblue account dashboard will open up at the right place, in a new tab.

Copy the v3 API key from this page.

Getting the API from Sendinblue

Congratulations. You’ve now set everything up. The final step is to send a test email to make sure everything is working.

Go to the ‘Email Test’ tab of WP Mail SMTP and enter an email address to send an email to. This will default to the site’s admin email. Click ‘Send Email’.

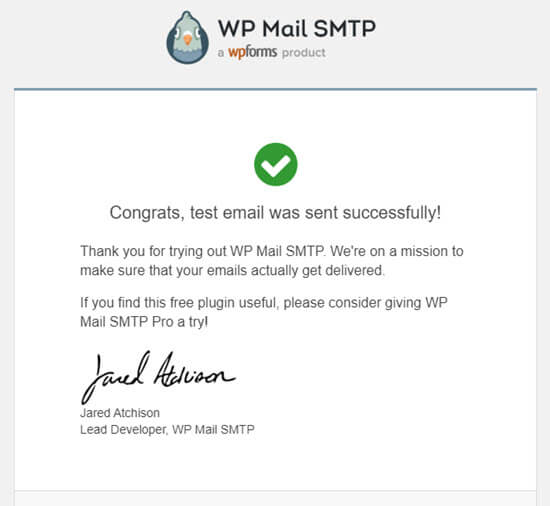
You should see the message ‘Test HTML email was sent successfully!’ Check your inbox to see whether it’s arrived. It’ll look like this:

The test email from WP Mail SMTP

Note: If your Sendinblue account isn’t yet activated, you’ll get the message: [permission_denied]: Unable to send email. Your SMTP account is not yet activated.

Alternative Ways to Fixing WordPress Email Issue

As you can see from the WP Mail SMTP plugin’s list of mailer options, you don’t have to use Sendinblue. While it’s our top free recommendation, there are other options that you can use including Office 365, Gmail / G Suite, Amazon SES, etc.

Using Gmail or G Suite with WP Mail SMTP to Fix WordPress Emails

If you have a Gmail or G Suite account, then you can use that to send your emails. You won’t need to enter your email login details in WordPress when you’re using the WP Mail SMTP plugin.

To use Gmail or G Suite, set up WP Mail SMTP as shown above, and then click the ‘Google’ option for your mailer.

You will need to check the ‘Return Path’ box.

After that you will be asked to enter a ‘Client ID’ and ‘Client Secret’. To get these details, you’ll need to create a web application in your Google account. Don’t worry if that sounds a bit daunting. You can find full instructions in this article on using Gmail to send your WordPress emails.

Note: You can use this process with a regular Gmail account, but your email deliverability will be much better if you are using G Suite. See our guide on how to setup a professional email address with Gmail and G Suite.

There are a couple of key drawbacks to using Gmail or G Suite, however.

One is that you may need to contact your web host to get them to install the right certificate to get it working.

Another is that if you change the email address in the future, you’ll need to go through the entire process again. This will include creating a new web application.

Using Office 365 / Outlook with WP Mail SMTP to Fix WordPress Emails

If you use Microsoft Office 365 or Outlook for your regular email account, then you can also use that to send out emails through WordPress. This isn’t a recommended option, though, because it’s less secure.

You’ll need to set up WP Mail SMTP as above, then click the ‘Other SMTP’ option. This will open up a form to complete. Fill it out using the following settings:

SMTP Host: smtp.office365.com
Encryption: TLS
SMTP Port: 587
Auto TLS: (leave switched on)
Authentication: (leave switched on)
SMTP Username: Your Office 365 account email address
SMTP Password: Your Office 365 account password

A key problem with this method is that it requires storing your password in plain text within WordPress. This isn’t secure and your password will be visible to any other administrators on your account. You can use the instructions in the WP Mail SMTP app to record it in your wp-config.php file instead.

For more details, see the detailed guide on how to setup Outlook with WP Mail SMTP.

Using Amazon SES with WP Mail SMTP to Fix WordPress Emails

Amazon AWS platform has a Simple Email Service (SES) that you can use to fix the WordPress email issue.

The best part about Amazon is that it lets you send up to 62,000 emails every month for free. The downside is that the setup is a bit more challenging for beginners which is why we don’t recommend it as our preferred option.

But as you can imagine, a lot of professionals and experts use Amazon SES for their WordPress email SMTP service, so we couldn’t write an article without mentioning it.

If you’r interested in setting up Amazon SES with WordPress, then see the full instructions on how to setup Amazon SES with WordPress.

Whatever mailer you decide to use, always remember to use the ‘Test Email’ tab to ensure that emails are being successfully sent.

You must make sure to check your inbox too, and confirm that you’ve received the test email.

We hope this article helped you learn how to fix WordPress not sending email issue. You may also want to see our list of the most common WordPress errors and how to fix them.

If you liked this article, then please subscribe to our YouTube Channel for WordPress video tutorials. You can also find us on Twitter and Facebook.

The post How to Fix WordPress Not Sending Email Issue appeared first on WPBeginner.