How to Add a PDF Viewer in WordPress

Do you want to add a PDF viewer in WordPress?

By embedding PDF files in your website, you can make sure those files always have the same layout, no matter what device the visitor is using. These files can also keep people on your website for longer and add value for your uses.

In this article, we will show you how to add a PDF viewer in WordPress.

How to add a PDF viewer in WordPress

Why Do You Need a PDF Viewer in WordPress?

Many websites use PDF files to share information about their services and products. For example, restaurant owners often publish their menu as an online PDF.

You can always upload a PDF to your website and then add a download link in WordPress.

However, this isn’t the best user experience for people who want to quickly look at a PDF document. For example, someone who is planning to visit your restaurant may prefer to read the PDF menu on your website rather than downloading a copy to their computer.

Instead, you can add a PDF viewer in WordPress and then show the PDFs directly on your website. This allows visitors to see the document without downloading it to their computer, which is often quicker and easier. This is particularly true for visitors who are using smartphones or tablets.

It also keeps visitors on your website, which may increase your pageviews and reduce your bounce rate.

With that being said, let’s see how you can easily add a PDF viewer to WordPress. Simply use the quick links to jump straight to the method you want to use.

Method 1. Add a PDF Viewer Using the Block Editor (Easy)

The easiest way to show PDFs on your WordPress website is by using the built-in File block.

This method doesn’t require a special plugin, but you can only customize the viewer in a few ways. If you want more advanced customizations and features, then we recommend using a plugin instead.

To get started, simply open the page or post where you want to add the PDF viewer in the content editor and then click on the ‘+’ button to add a new block.

After that, start typing in ‘File’ and select the right block when it appears.

The WordPress built-in File block

If you’ve already uploaded your PDF to the WordPress media library, then click on the ‘Media Library’ button. You can then select the PDF that you want to embed.

If you haven’t already uploaded the PDF, then click on ‘Upload’ and then choose a file from your computer.

Uploading a PDF file to WordPress

WordPress will automatically choose a size for the embedded PDF.

Note that the default view may not show the full document, but the ‘File’ block includes a toolbar that allows visitors to zoom in and out of the document. They can also scroll through the PDF to see more content.

How to add a PDF viewer in WordPress

If you prefer, then you can change the PDF viewer’s height to show more or less of the embedded document.

To do this, simply use the ‘Height in pixels’ slider in the right-hand menu.

Changing the height of an embedded PDF

Sometimes, visitors may want to download a PDF so they always have it close by. For example, customers may want to download the user manual for your most popular product or the programming schedule for an upcoming event or conference.

By default, WordPress shows a ‘Download’ icon in the toolbar and a button below the PDF.

How to allow visitors to download a PDF in WordPress

The ‘Download’ button beneath the PDF is useful for visitors who are unfamiliar with the different PDF toolbar icons. By showing a ‘Download’ button, visitors will immediately understand that this file is not tied to your site alone.

With that in mind, you may want to leave the ‘Download’ button enabled. However, if you don’t want to include this duplicate content then you can click to disable the ‘Show Download Button’ toggle.

Hiding the Download button in a PDF viewer

When you’re happy with how the PDF is set up, either click on ‘Update’ or ‘Publish’ to make your changes live.

Now if you visit your WordPress website you’ll see the PDF viewer in action.

A PDF viewer, created with the built-in WordPress File block

Method 2. Add a PDF Viewer in WordPress Using a Plugin (More Customizable)

The built-in WordPress File block should be a good fit for websites that simply want to embed a few PDFs. However, if you want more control over the viewer then it often makes sense to use a plugin instead.

PDF.js Viewer is one of the best PDF plugins for WordPress. It allows you to change the height and width of the PDF viewer, and remove buttons from the PDF toolbar.

It also comes with a fullscreen mode, which is perfect for showing longer documents such as ebooks and user manuals.

A PDF viewed in fullscreen mode

First, you’ll need to install and activate PDF.js Viewer. If you need help, then please see our guide on how to install a WordPress plugin.

Upon activation, go to Settings » PDFjs Viewer to configure the plugin’s settings.

The PDF.js Viewer plugin settings

Most of the time, you can override these default settings when embedding each PDF. For example, you can change an individual PDF’s settings for size or scale.

However, we still recommend changing the default settings to better match your own requirements, as this can save you a lot of time and effort.

By default, the plugin includes Download, Print, and Search buttons in the PDF toolbar. If you want to remove any of these buttons, then simply uncheck the box next to it.

Hiding buttons from the PDF viewer toolbar

You can also change the default embed height and width, and the ‘Viewer Scale.’

Out-of-the-box, PDF.js Viewer shows the PDF without any sidebar so visitors can see the full document when they arrive on the page. They can open the sidebar at any point by clicking on the ‘Toggle Sidebar’ button, as you can see in the following image.

Adding a sidebar to the PDF viewer in WordPress

If you plan to include longer documents or multi-page PDFs then it may be helpful to show the sidebar by default.

To do this, simply open the ‘Page Mode’ dropdown menu and select either Thumbs, Bookmarks, or Attachments.

Changing the mode in a PDF viewer

PDF.js Viewer allows visitors to open the PDF in fullscreen mode. By default, visitors can open this mode by clicking on a ‘View Fullscreen’ link above the embedded PDF.

To replace the text with your own custom messaging simply type into the ‘Fullscreen Link Text’ field.

Customizing the PDF's fullscreen mode

You can also choose whether the link opens in a new tab using the ‘Fullscreen Links in New Tabs’ box.

Launching a new tab will help to keep visitors on your website, but it can be annoying for mobile and tablet users.

Customizing the PDF viewer's fullscreen mode

Fullscreen mode makes it easier to read long documents so we recommend leaving this feature enabled. However, if you don’t want to use it then you can uncheck the box next to ‘Show Fullscreen Link.’

When you’re happy with how the plugin is set up, click on ‘Save Changes.’

You’re now ready to add a PDF viewer in WordPress. Simply open the page or post where you want to show the PDF and then click on the ‘+’ button.

You can now start typing in ‘Embed PDF.js Viewer’ and select the right block when it appears.

Adding a PDF to your WordPress website using a plugin

After that, click on ‘Choose PDF’ to open the WordPress media library.

You can now either choose a PDF from the library or upload a file from your computer.

Embedding a PDF on your WordPress website using a block

The plugin will use your default settings, but you can fine-tune how this PDF looks and acts using the settings in the right-hand menu.

Here, you can change the PDF’s height, width, and scale. You can also remove or customize the ‘View Fullscreen’ link.

Customizing the PDF embed block using a WordPress plugin

Finally, you can choose to remove or show the ‘Download’ and ‘Print’ buttons.

When you’re happy with how the PDF is set up, simply click on ‘Update’ or ‘Publish.’ You can now visit your WordPress blog or website to see the embedded PDF viewer.

A PDF, embedded directly on a WordPress blog or website

Bonus: How To Make Money From Your Embedded PDFs

If you have quality, useful PDFs then you can use them to make money online with WordPress.

After embedding a PDF document in your website, you can turn that page or post into exclusive members-only content. Visitors will then need to buy a membership to access that page or post, and see the embedded PDF.

The easiest way to turn WordPress into a membership site is by using MemberPress. It is the best WordPress membership plugin and allows you to turn any page or post into exclusive subscriber-only content, including embedded PDFs.

Make money by selling PDFs online

We have a complete guide on making a WordPress membership website with step-by-step instructions to help you get started.

We also suggest using Easy Digital Downloads to manage and sell PDFs on your website. You can sell all kinds of digital goods easily and embed PDFs in the product pages as previews, too.

We hope this article helped you add a PDF Viewer in WordPress. You may also want to take a look at our guide on how to create and sell online courses with WordPress or check out our list of the best email marketing services for small businesses.

If you liked this article, then please subscribe to our YouTube Channel for WordPress video tutorials. You can also find us on Twitter and Facebook.

The post How to Add a PDF Viewer in WordPress first appeared on WPBeginner.

How to Embed PDF, Spreadsheet, and others in WordPress Blog Posts

Do you want to embed PDF, spreadsheet, and other types of documents in your WordPress blog posts?

WordPress comes with a powerful content editor and allows you to easily embed videos, tweets, audio, and other media formats using the embed blocks.

You can also upload other type of files that users can download. However, it is not possible to embed files like PDF, spreadsheet, and other documents in your blog posts.

In this article, we’ll show you how to embed PDF, spreadsheet, powerpoint, and other documents in your WordPress blog posts.

Embedding PDF, Spreadsheet and Others in WordPress Blog Posts

To help you navigate this guide, we have created the table of contents here.

  1. Adding PDF in WordPress Blog Posts without Plugin
  2. Embedding PDF in WordPress Posts Using the PDF Viewer Plugin
  3. Embedding Spreadsheets, and Other Types of Documents in WordPress
  4. How to Embed SlideShare Presentations in WordPress Posts
  5. Embedding Google Docs, Sheets, and Others in WordPress Posts

Now, let’s get started with the guide.

Adding PDF in WordPress Blog Posts without Plugin

By default, WordPress doesn’t offer full embed option for PDF documents; however, you can add them as links in your blog posts.

This option is useful if you don’t want to add a plugin to your website.

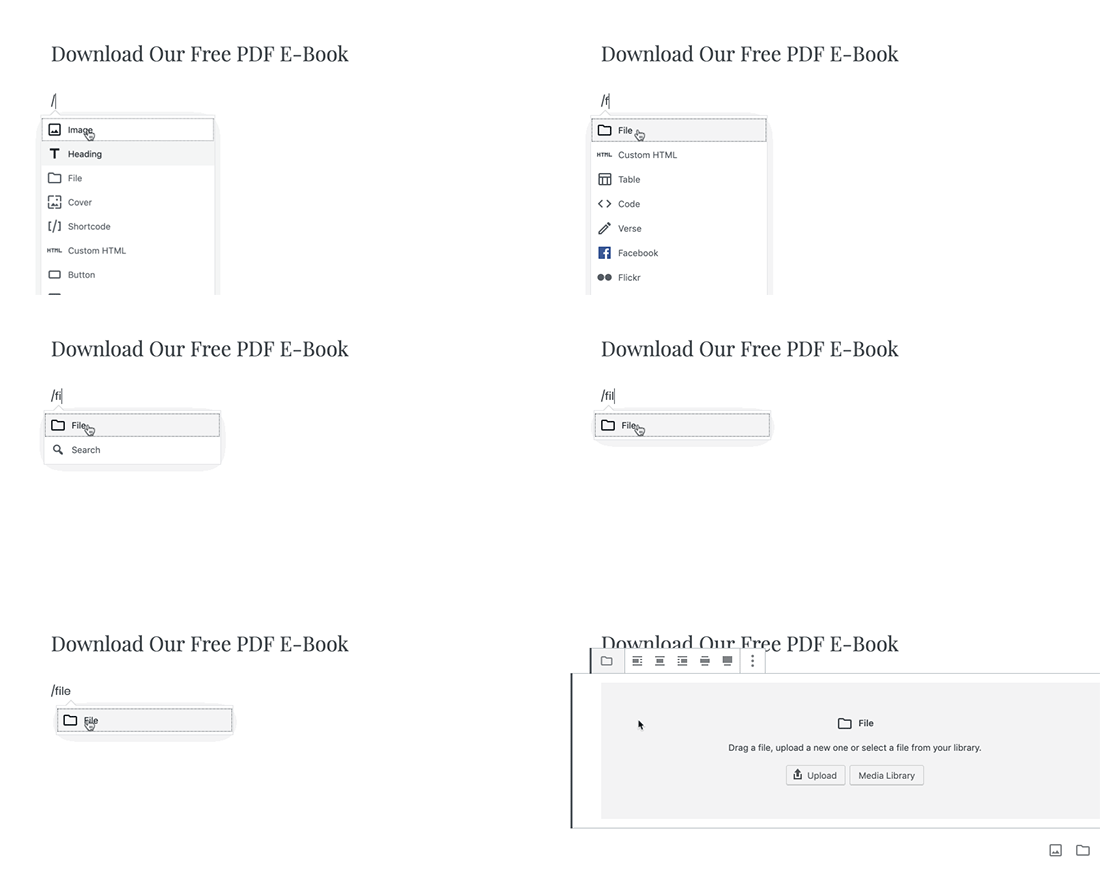
Simply add the File block to your WordPress post or page and then upload your PDF file.

Add file block

Once you have uploaded the PDF file, WordPress will display the file name with a download button. You can edit the file name and download button text.

Download PDF link

You also have the option to show or hide the download button and choose whether it links to the file itself or the attachment page.

You can use this method to upload Microsoft Word documents, Excel spreadsheets, and PowerPoint presentations to your website.

While this method is easier and straight-forward, it does not embed the documents which means users have to download the file to view it, and this may not be very user friendly depending on the use-case.

Let’s take a look at some other ways to embed documents in WordPress.

Embedding PDF in WordPress Posts Using Embed PDF Viewer Plugin

As shown above, displaying the PDF files as links will lead your website visitors away from your site.

In this method, we will cover how to easily embed the document in your WordPress posts and pages.

First, you need to install and activate the Embed PDF Viewer plugin. For detailed instructions, see our step by step guide on how to install a WordPress plugin.

Once the plugin is activated, simply create a new post or edit an existing one to embed a PDF document.

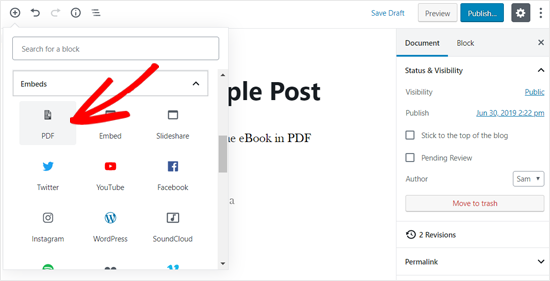
In the WordPress post edit screen, click on the Add New Block icon, and select the PDF block under Embeds section.

Choose PDF Embed Block in WordPress Post Editor

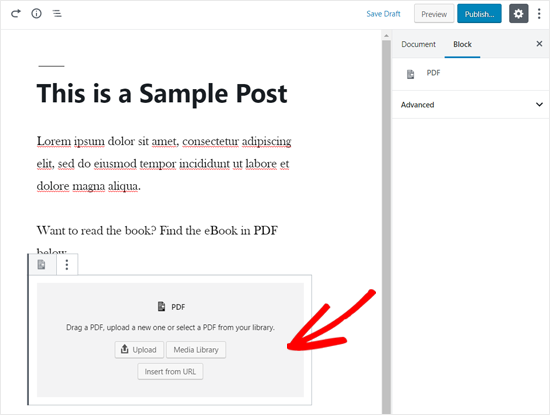
After that, you can upload a new PDF file to your post, select one from your media library or insert from URL.

PDF Block Added in WordPress Editor

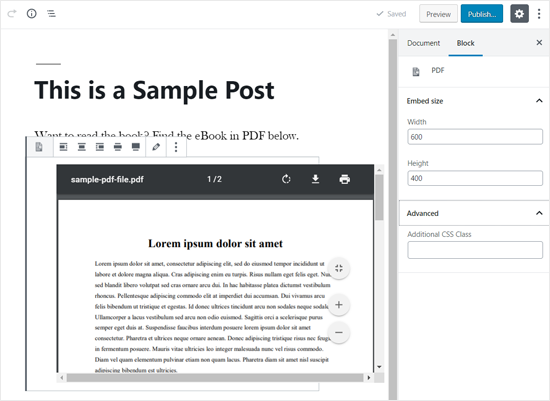
Once you select the file, you can see the PDF file embedded in your blog post. You can also resize the embed area and add additional CSS from the block options on the left side.

PDF Embedded in WordPress Post Editor

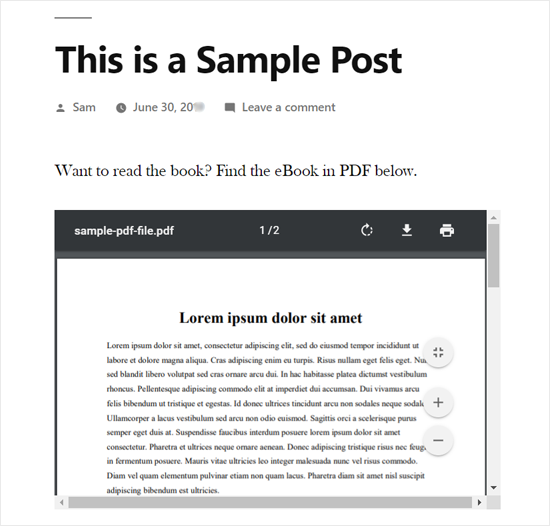
Once you’re done with customization, simply save your post and preview it on your live website. Here’s how it appeared on our demo website.

PDF Embedded in WordPress Post Preview

Embedding Microsoft Word, Spreadsheet, and Other Documents in WordPress

The plugin mentioned above only lets you embed PDF files into your WordPress site.

If you want to embed more document types like Microsoft Word, Excel spreadsheet, PowerPoint presentation, etc, then you need to use another plugin.

First, you need to install and activate the Embed Any Document plugin on your website.

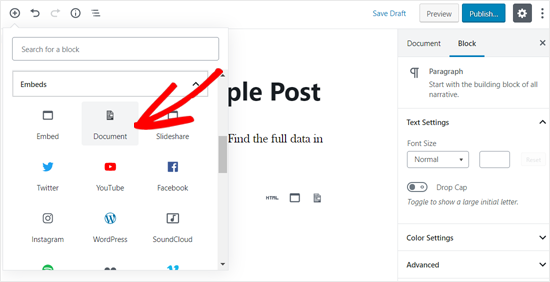
Next, create a new post or open an existing one to embed a document. Once done, add the Document block under the Embeds section.

Add Document Block in WordPress Editor

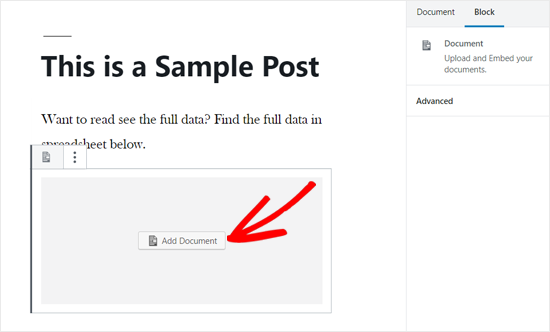
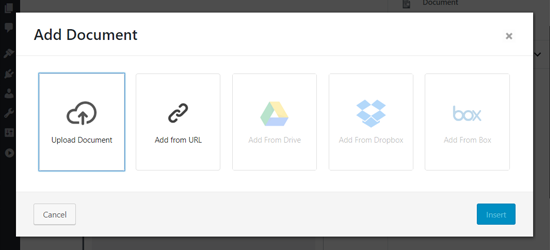
After that, you need to click on the Add Document button.

Add Document Option in WordPress Post Editor

Next, you can upload a document or add from a URL. The paid plugin users can also attach documents from Google Drive, Dropbox, and Box.

Add Document Options

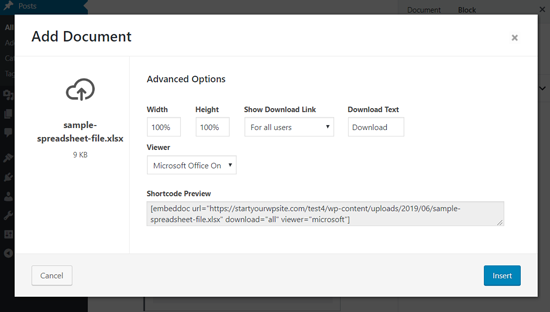
Once you choose the document to embed, you will see the options to customize the embed. You need to review them and click the Insert button.

Add Spreadsheet Advanced Options

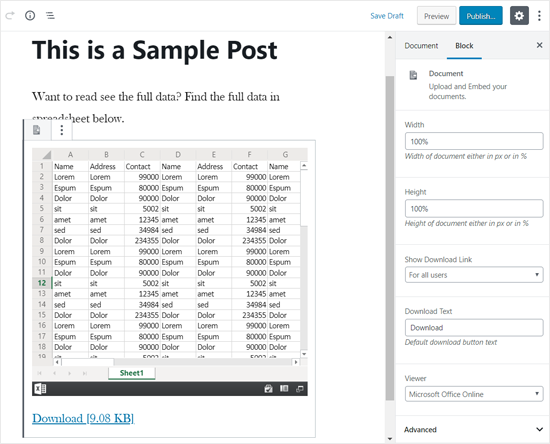
Once done, you can see the document embedded in your post. You can also review the document display options again from the block options panel on the left side.

Spreadsheet Embedded in WordPress Editor

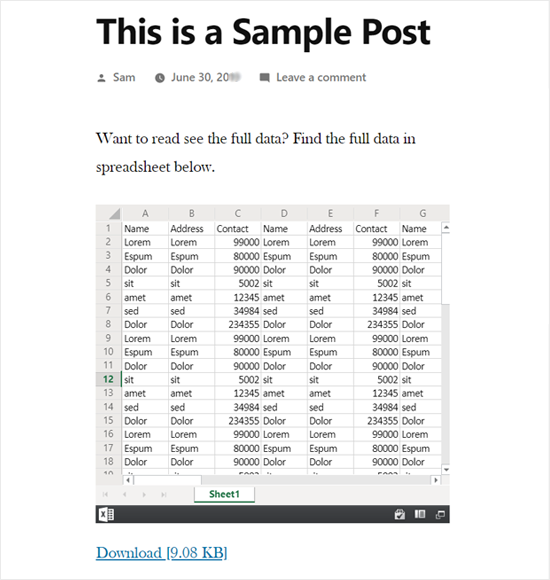
Save your post and preview it on your live website. Here’s how the embedded spreadsheet looked on our demo website.

Spreadsheet Embedded in WordPress Preview

Embedding SlideShare Presentations in WordPress Posts

Unlike PDF and other documents, WordPress allows you to easily embed content from third-party services into your website.

It has built-in embed options for YouTube videos, Tweets, Facebook updates, SlideShare presentations, and many more.

Best of all, the new WordPress block editor includes separate embed blocks for them.

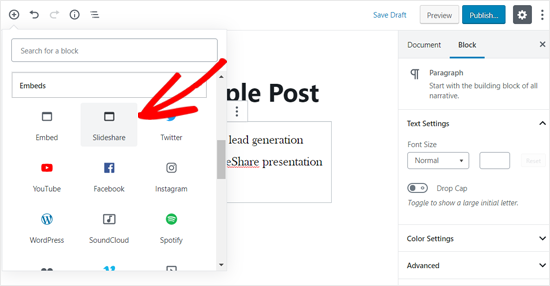
To embed a SlideShare presentation in your WordPress blog post, create a new post, or edit an existing one. Next, click on the Add New Block icon and add the SlideShare block in your post edit area.

Add SlideShare Embed Block in WordPress Post Editor

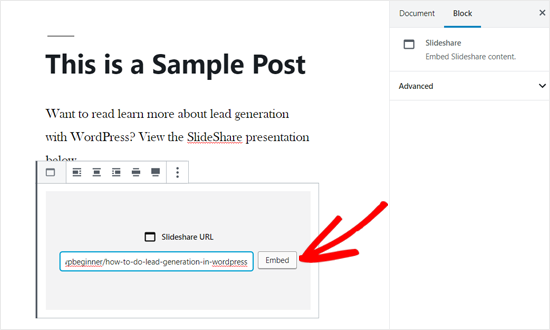
Next, you need to visit the SlideShare website and copy the link of a SlideShare presentation that you want to embed.

Once done, paste the link in the embed SlideShare block and click on the Embed button.

Embed SlideShare URL in WordPress Post

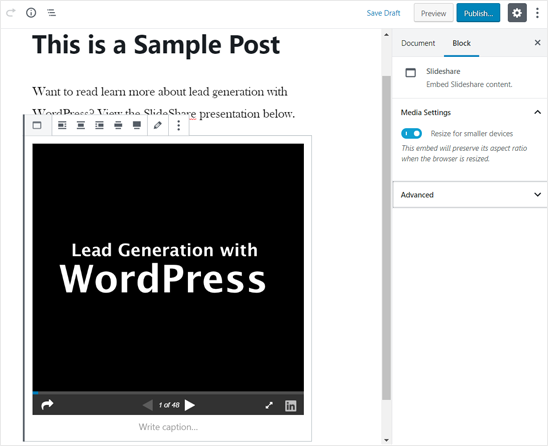
After that, you can see the SlideShare presentation embedded in your blog post. You can review the block options on the left side, and save your post.

SlideShare Presentation Added in WordPress Editor

Once done, you can preview the embedded SlideShare presentation live on your website. Here’s how it looked on our demo website.

SlideShare Presentation Added in WordPress - Preview

How to Embed Google Docs, Sheets, and Others in WordPress

In the above examples, we have covered how to add PDF and other documents from your local computer. However many users nowadays use Google Drive to create and store documents (specially small business owners).

Similar to Microsoft Word, Excel Sheets, and PowerPoint presentations, Google Drive also lets you create Docs, Sheets, Presentations, and other online documents.

If you have created documents in Google Drive, then you can easily embed these files in your WordPress posts by using the iFrame method.

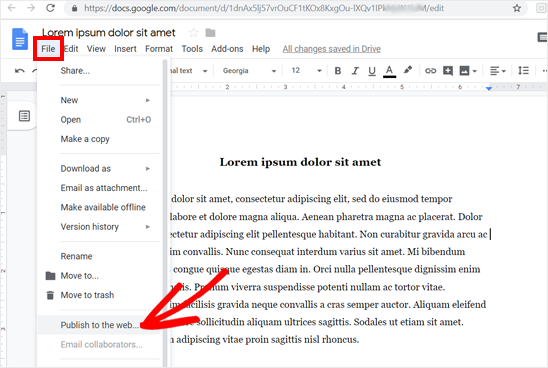
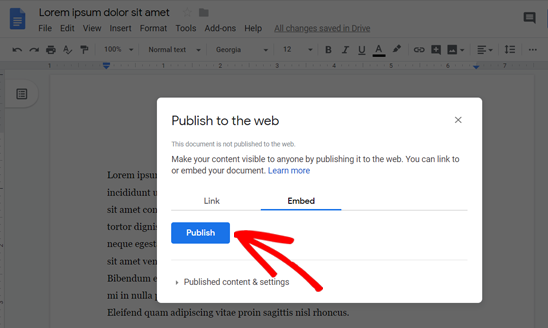
To embed a Google doc in WordPress, you need to open the document in your browser first. After that, go to the File menu and click on the “Publish to the web” option.

Publish to the Web Option in Google Doc

After that, a new popup window will appear. You need to select the Embed option and then click on the Publish button.

Click Publish to Find the Embed Code for Google Doc

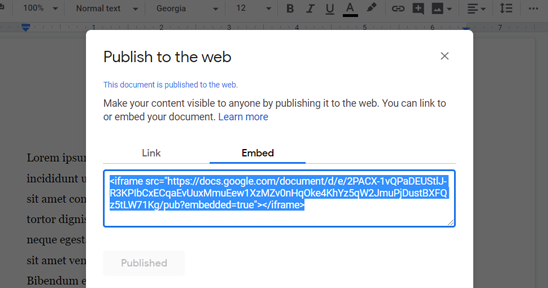
Once done, it will provide you an iFrame embed code. Go ahead and copy the code.

Embed a Google Doc Code

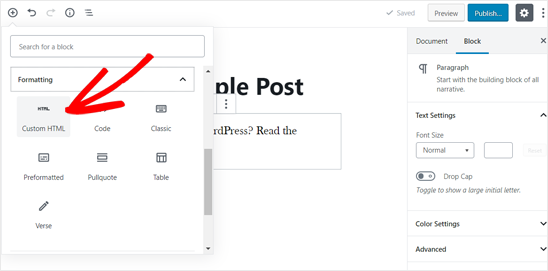
Next, you need to create a new post or edit an existing one to embed the Google doc. In your post editor, add the Custom HTML block to insert the embed code.

Add Custom HTML Block in WordPress Post

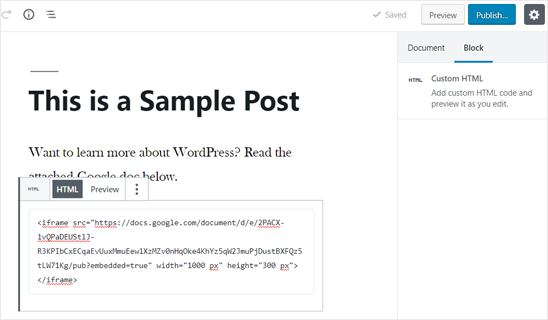
Once the Custom HTML block is added in your post edit area, paste the embed code that you copied before.

Google Doc Embed Code Added in WordPress Post

You may need to add height and width parameters to the embed code. Simply add the parameters to the iframe code like this:

<iframe src="https://docs.google.com/document/d/e/2PACX-1vQXyRM7bAOY2Em38yYkFKDlFwMp7tlofsdfdgeGDFg4lVkv_9HB_5WbGLwfMScaGQmDf34mIH/pub?embedded=true" width="550" height="600"></iframe>

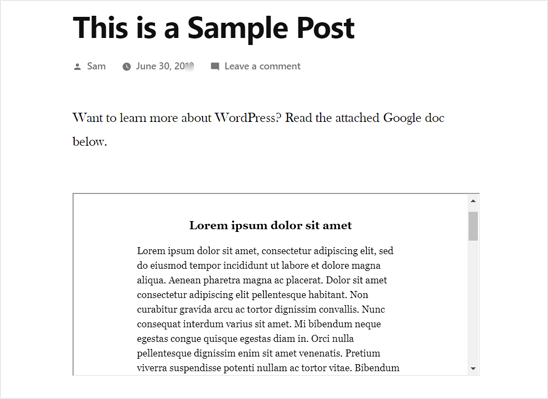
After that, you can save your post and then preview it on your live website. Here is how it appeared on our demo website.

Google Doc Embedded in WordPress Post -preview

You can now use this method to embed other documents from your Google Drive account to WordPress.

We hope this article helped you to learn how to embed PDF, spreadsheet, and other documents in WordPress posts. You may also want to see our guide on how to manage, track, and control file downloads in WordPress.

If you want to restrict files and content to logged in users only, then you need to use a WordPress membership plugin to create a membership website.

If you liked this article, then please subscribe to our YouTube Channel for WordPress video tutorials. You can also find us on Twitter and Facebook.

The post How to Embed PDF, Spreadsheet, and others in WordPress Blog Posts appeared first on WPBeginner.