I had the opportunity to meet with Karthik Ranganathan, Founder & CTO, Yugabyte during the Distributed SQL Summit in San Jose. Earlier in the week, they announced the general availability of Yugabyte DB 2.0, the 100% open-source, high-performance distributed SQL database for global, internet-scale applications.
Updates include PostgreSQL syntax and wire-protocol compatibility, high-performance benchmarks, Jepsen-tested correctness, and Oracle-to-Yugabyte migration utilities. With Yugabyte DB’s SQL API (YSQL) ready for production, organizations are able to move away from monolithic SQL systems like Oracle to a distributed SQL database that is both open source and cloud-native.
Chicks like GraphQL Java Examples with Spring Boot too!
GraphQL is a query language for APIs that allows clients to request limited data they need, making it possible for clients to gather data in a limited number of requests. GraphQL is a strongly-typed protocol and all data operations are validated against a GraphQL schema.
In this article, we will look at a GraphQL Java example and build a simple GraphQL server with Spring Boot.
Listen, I am no GraphQL expert but I do enjoy working with it. The way it exposes data to me as a front-end developer is pretty cool. It's like a menu of available data and I can ask for whatever I want. That's a massive improvement over REST and highly empowering for me as a front-end developer who desires to craft components with whatever data I think is best for a UI without having to make slew of calls for data or ask a back-end developer to help make me a new bespoke API for my new needs.
But... who builds that menu of data? Somebody does.
If that somebody is a person or team at your own company because you've built out your own GraphQL API for your own needs, that's great. Now you've got control over what goes in there (and when and how).
But sometimes GraphQL APIs are just handed to you. Perhaps that is how your CMS delivers its data. Still cool and useful, but that control is at the mercy of the CMS. You still have a menu of options, but the menu just is what it is. No substitutes, to continue the metaphor. If the menu doesn't have what you need, you can't go back into the kitchen and add extra sauerkraut to that reuben or have the steak fries come with fried mushrooms.
This came up in a discussion with Simen Skogsrud and Knut Melvær on an episode of ShopTalk. Their product, Sanity, is like cloud storage for JSON data, and a CMS if you need it. A modern product like this, you'd think a GraphQL API would be a no-brainer, and indeed, they have a beta for it.
But instead of GraphQL being the main first-class citizen way of querying for and mutating data, they have their own special language: GROQ. At first glance, I'm like: eeeeeesh, there's a way to shoot yourself in the foot. Invent some special language that people have to learn that's unique to your product instead of the emerging industry standard.
But Simen and Knut made a good point about some of the limitations of GraphQL in the context of a third-party handing you an API: you get what you get. Say a GraphQL API offers a way to retrieve authors. A generic API for that is probably designed something like this:
But what I actually want is just how many authors we have on the site. Perhaps I wish I could do this:
{
  allAuthors {
    count
  }
}
But that's not in the API I was given. Well, too bad. I guess I'll have to request all the authors and count them myself. I might not control the API.
This means that something like a CMS that offers a GraphQL endpoint needs to make a choice. They are either very strict and you just get-what-you-get. Or, they offer not only a GraphQL API but a way to control and augment what goes into that API.
In Santiy's case, rather than offer the later, they offer GROQ, which is a query language that is powerful enough you can get whatever you want out of the (JSON) data. And rather than making it this proprietary Sanity-only thing, they've open sourced it.
With GROQ, I don't need any permission or alterations to the API to ask how many authors there are. I'd do something like...
{ "totalAuthors": count(*[* in authors]) }
(I actually have no idea if the above code is accurate, and of course, it depends on the JSON it is querying, but it's just conceptual anyway.)
By giving someone a query language that is capable of selecting any possible data in the data store, it has a big benefit:
You can query for literally anything
You don't need a middle layer of configuration
But it comes at a cost:
Complexity of syntax
No middle layer means less opportunity for connecting multiple APIs, exposing only certain data based on permissions, etc.
GraphQL is a query language for APIs that is very empowering for front-end developers. As the GraphQL site explains it, you describe your data, ask for what you want, and get predictable results.
If you haven’t worked with it before, GraphQL might be a little confusing to grok at first glance. So, let’s build a multiplayer tic-tac-toe game using it in order to demonstrate how it’s used and what we can do with it.
First thing we need is a backend for our APIs. We’re going to use Hasura GraphQL Engine along with a custom GraphQL server for this tutorial. We’ll look at the queries and mutations that the client-side needs to build the game. You can implement this kind of thing in whatever framework you wish, but we’re going with use React and Apollo for this tutorial.
GraphQL is a query language for APIs; a language with a syntax that defines a way to fetch data from the server. It works with any kind of API that is backed by a strong system that makes your codebase resilient. Some of the primary characteristics of GraphQL are:
The client can ask the server for what queries it supports (check out introspection for more).
The client must ask the server for exactly what it wants. It can't ask for something like a wildcard (*) but rather exact fields. For example, to get a user's ID and name, the GraphQL query would be something like:
query {
  user {
    id
    name
  }
}
Every query is made to a single endpoint and every request is a POST request.
Given a query, the structure of the response is enforced. For example, for the above query to get the id and name of a user object, a successful response would be something like:
This series of articles is a great place to start if you want to know more about GraphQL.
Why are we using GraphQL, anyway?
We just discussed how GraphQL demands that the client must ask the server for exactly what it wants. That means there is no unnecessary data retrieved from the server, like in case of REST where you would receive a huge response even when you need one field. Getting what new need and only what we need optimizes responses so that they’re speedy and predictable.
The client can ask the server for its schema via introspection. This schema can be used to build queries dynamically using an API explorer like GraphiQL. It also enables linting and auto-completing because every query can be built with and cross-checked against the GraphQL schema. As a front-end developer, this greatly enhances the DX as there is much less human error involved.
Since there is a single endpoint and every request is a POST request, GraphQL can avoid a lot of boilerplate since it doesn't have to track endpoints, request payloads and response types. Response caching is much easier because every query response can be expected to be of a certain structure.
Furthermore, GraphQL has a well-defined spec for implementing real-time subscriptions. You do not have to come up with your own implementation details for building real-time servers. Build a server that complies with GraphQL’s real-time spec and any client can start consuming the real-time GraphQL APIs with ease.
GraphQL Terminology
I will be using some GraphQL terms in this post, so it’s worth covering a few of them here in advance.
Query: A GraphQL query is one that simply fetches data from the server.
Mutation: This is a GraphQL query that changes something on the server and fetches some data.
Subscription: This is a GraphQL query that subscribes the client to some changes on the server.
Query variables: These allow us to add parameters to a GraphQL query.
Getting back to the backend
Now that we have a cursory understanding of GraphQL, let’s start with modeling a backend. Our GraphQL backend would be a combination of Hasura GraphQL Engine and a custom GraphQL server. We will not go into the subtleties of code in this case.
Since Tic Tac Toe is a multiplayer game, there is a need to store state in the database. We will use Postgres as our database and Hasura GraphQL Engine as a GraphQL server that allows us to CRUD the data in Postgres over GraphQL.
Apart from CRUD on the database, we would also want to run some custom logic in the form of GraphQL mutations. We will use a custom GraphQL server for that.
Hasura describes itself quite nicely in its README file:
GraphQL Engine is a blazing-fast GraphQL server that gives you instant, realtime GraphQL APIs over Postgres, with webhook triggers on database events, and remote schemas for business logic.
Going a little deeper, Hasura GraphQL Engine is an open-source server that sits on top of a Postgres database and allows you to CRUD the data over real-time GraphQL. It works with both new and existing Postgres databases. It also has an access control layer that you can integrate with any auth provider. In this post though, we will not implement auth for the sake of brevity.
Let’s start by deploying an instance of Hasura GraphQL Engine to Heroku's free tier that comes with a fresh Postgres database. Go ahead, do it; it is free and you do not need to enter your credit card details :)
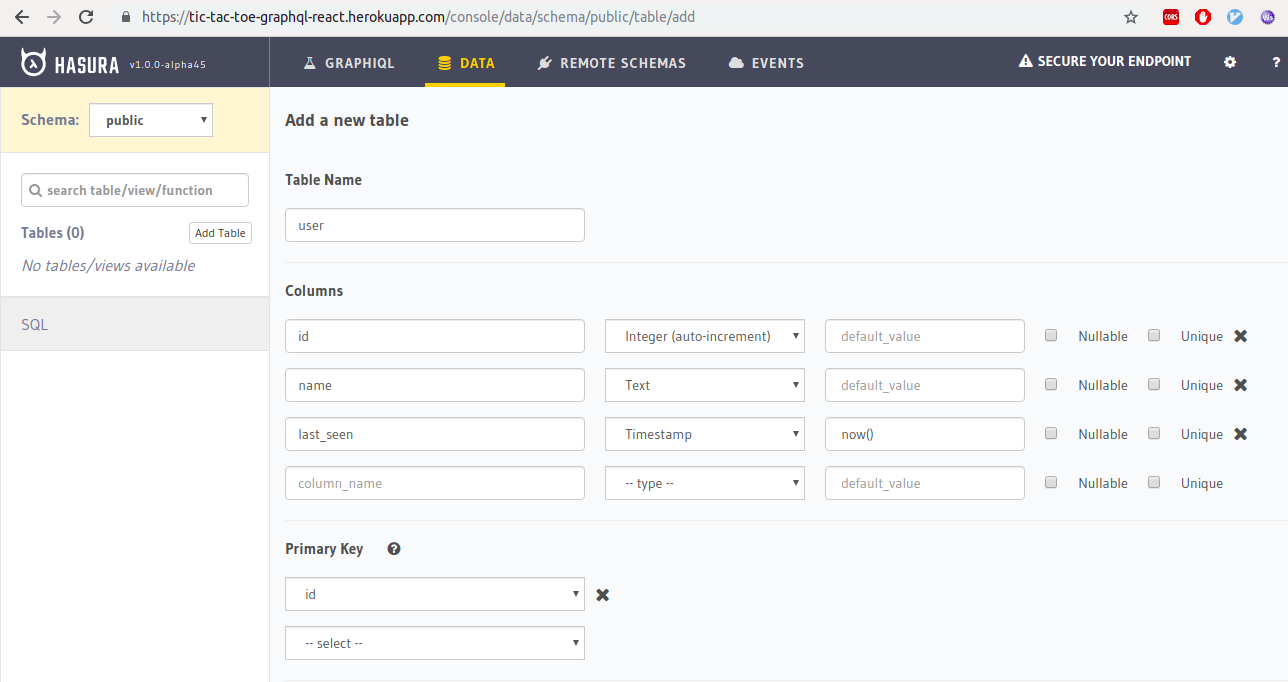
Once you deploy, you will land up on the Hasura console which is the admin UI to manage your backend. Note that the URL you are at, is your GraphQL Engine URL. Lets start with creating our required tables.
user
A user table will store our users. To create the table, go to the "Data" tab on top and click on the "Create Table" button.
This table has an id column which is the unique identifier of each user and a name column that stores the user’s name.
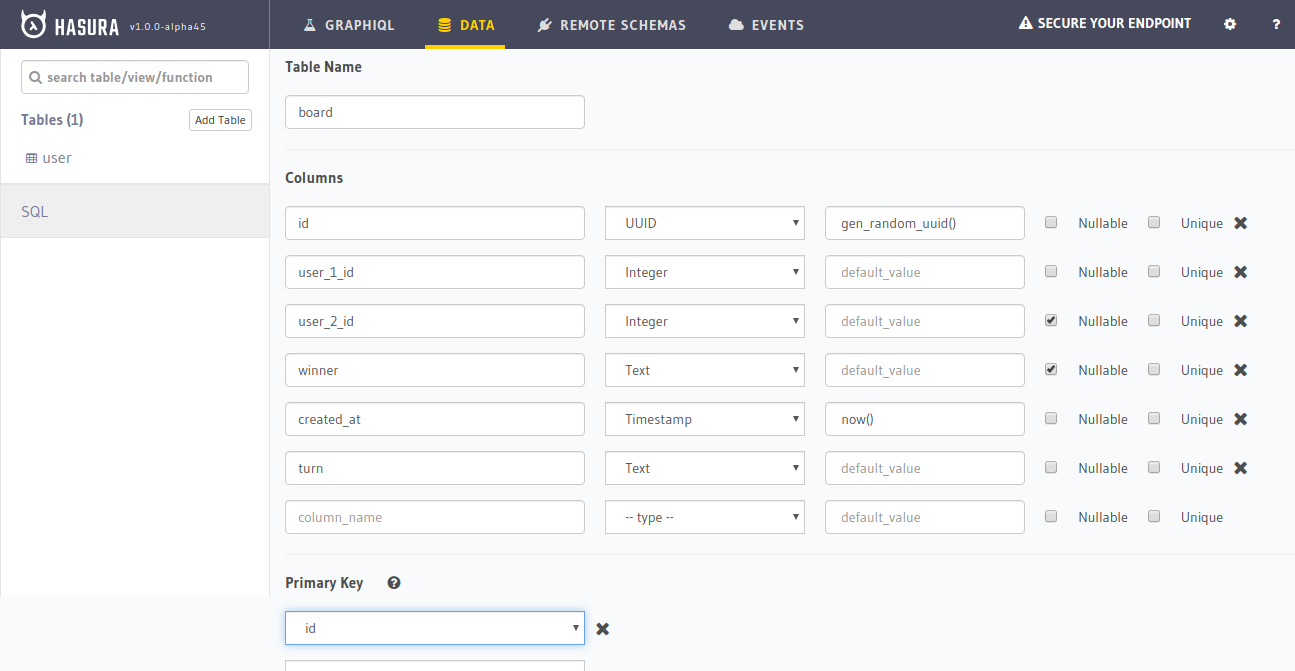
board
The board table will store the game boards where all the action happens. We’ll spin up a new board for each game that starts.
Lets look at the columns of this table:
id: A unique UUID for each board that is auto generated
user_1_id: The user_id of the first user. This user by default plays X in the game
user_2_id: The user_id of the second user. This user by default plays O.
winner: This is a text field that is set to X or O once the winner has been decided.
turn: This is a text field that can be X or O and it stores the current turn. It starts with X.
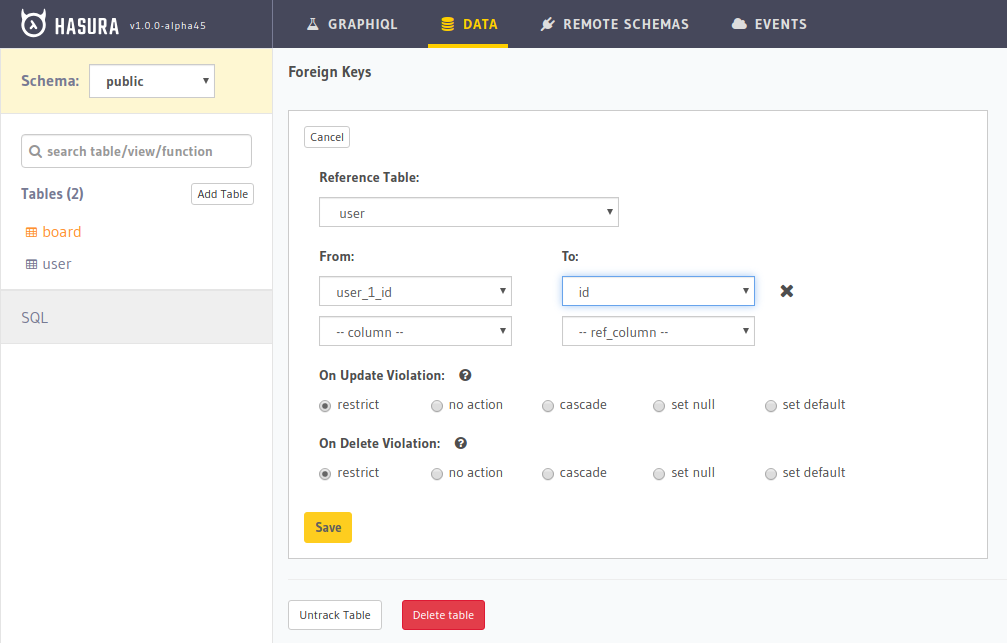
Since user_1_id and user_2_id store the user IDs, let’s add a constraint on the board table that ensures user_1_id and user_2_id to be present in table user.
Go to the "Modify" tab in the Hasura board table and add the foreign keys.
Adding the foreign key on user_1_id. We’ll need to add a new foreign key on user_2_id as well.
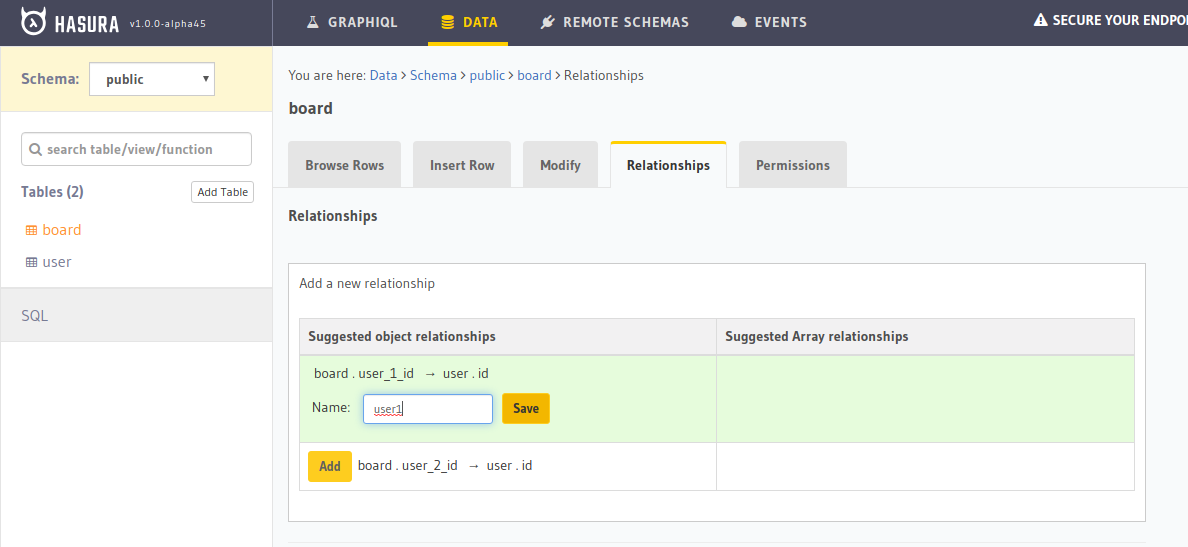
Now, based on these relationships, we need to create a connection between these tables so that we can query the user information while querying the board.
Go to the "Relationships" tab in Hasura and create relationships called user1 and user2 for user_1_id and user_2_id based suggested relations.
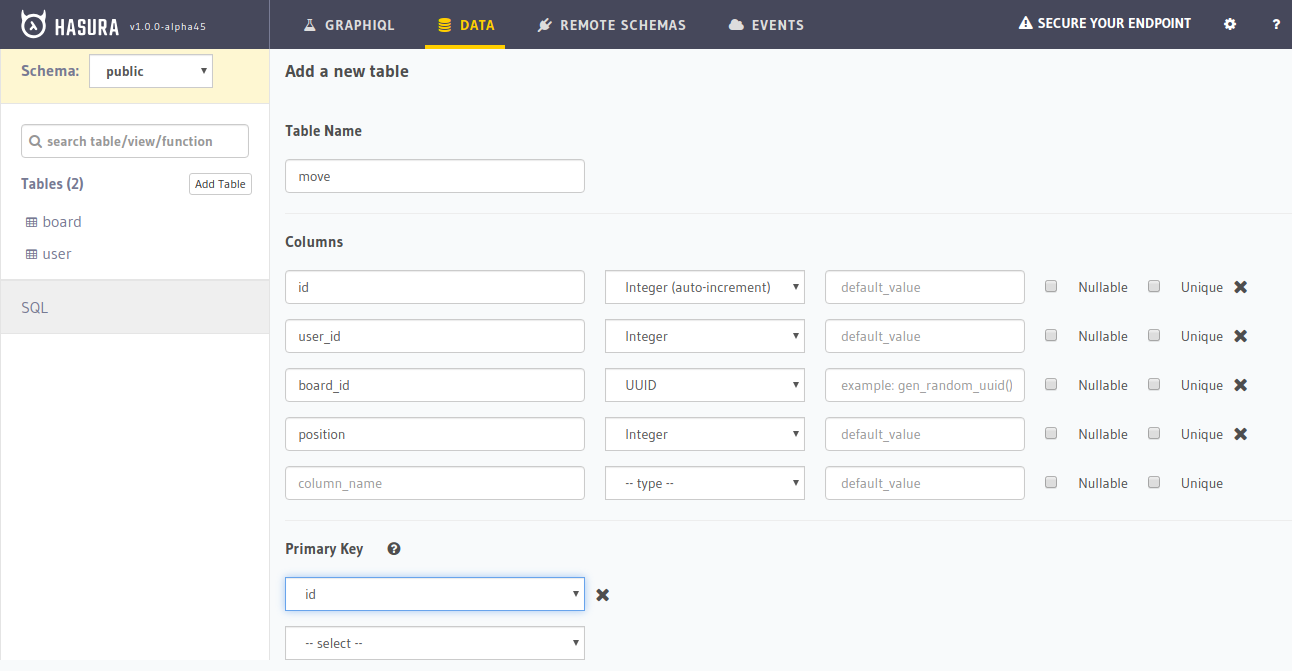
move
Finally, we need a move table that stores the moves made by users on a board.
Let’s look at the columns:
id: The unique identifier of each move that is auto generated
user_id: The ID of the user that made the move
board_id: The ID of the board that the move was made on
position: The position where the move was made (i.e. 1-9)
Since user_id and board_id are foreign keys to user and board table, respectively. We must create these foreign key constraints just like we did above. Next, create the relationships as user for the foreign key on user_id and board for the foreign key on board_id. Then, we’ll go back to the board table's "Relationship" tab and create the suggested relationship to move table. Call it moves.
We need a custom server
Apart from storing data in the database, we also want to perform custom logic. The logic? Whenever a user makes a move, the move must be validated, made before the turn must is switched.
In order to do that, we must run an SQL transaction on the database. I have written a GraphQL server that does exactly that that I’ve deployed on Glitch.
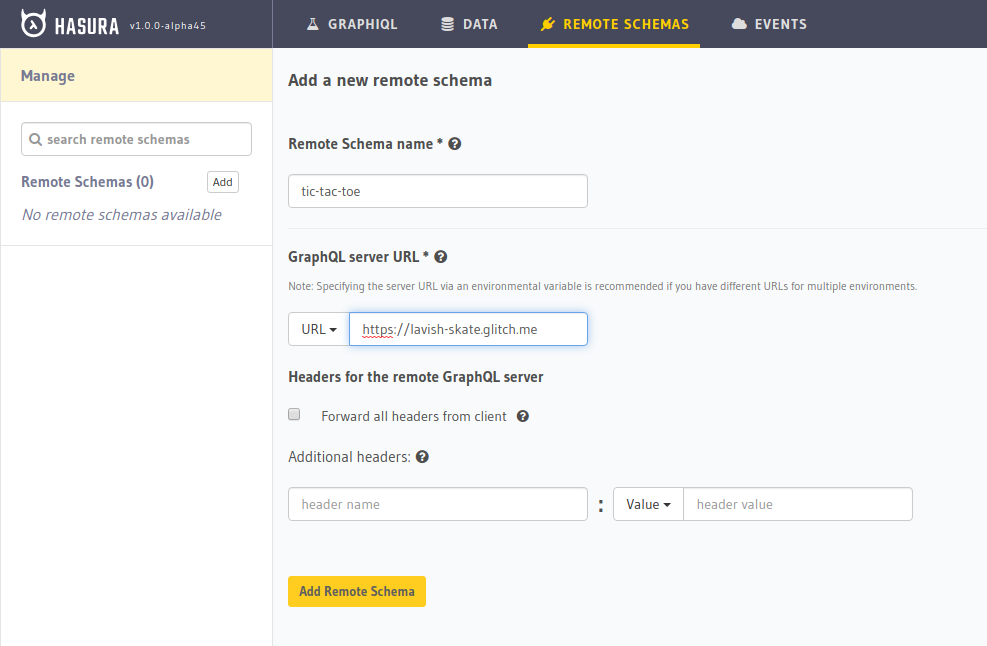
Now we have two GraphQL servers. But GraphQL spec enforces that there must be only one endpoint. For this purpose, Hasura supports remote schemas — i.e. you can provide an external GraphQL endpoint to Hasura and it will merge this GraphQL server with itself and serve the combined schema under a single endpoint. Let’s add this custom GraphQL server to our Hasura Engine instance:
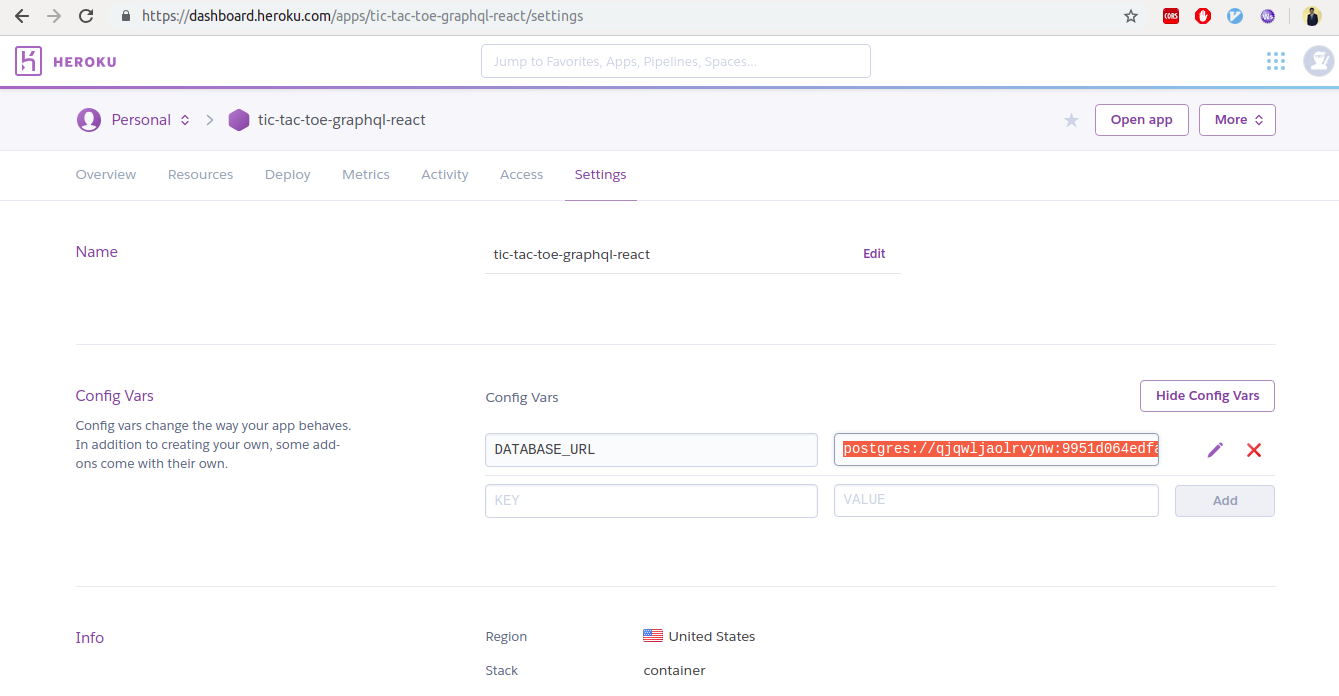
Add an environment variable that is the connection to your Postgres database. To do that, go to https://dashboard.heroku.com, choose your app, go to "Settings" and reveal config vars.
A few more steps from there:
Copy the value for the DATABASE_URL.
Go to the GraphQL server you forked and paste that value in the .env file (POSTGRES_CONNECTION_STRING=<value>).
Click on the "Show Live" button on top and copy the opened URL.
We’ll add this URL to GraphQL engine by adding it as a remote schema. Go to the "Remote Schemas" tab on top and click on the "Add" option.
We are done with setting up our backend!
Let’s work on the front end
I will not be going into the details of front-end implementation since y’all would choose to implement it in the framework of your choice. I’ll go ahead and provide all the required queries and mutations that you would need to build the game. Using these with the front-end framework of your choice will allow you to build a fully functional multiplayer Tic Tac Toe.
Setup
Apollo Client is the go-to library for client-side GraphQL. They have awesome abstractions for React, Vue, Angular, iOS, Android etc. It helps you save a lot of boilerplate and the DX is smooth. You might want to consider using Apollo client over doing everything from scratch.
Let’s discuss the queries and mutations that the client would need for this game.
Insert user
In the app that I built, I generated a random username for each user and inserted this name into the database whenever they open the app. I also stored the name and generated a user ID in local storage so that the same user does not have different usernames. The mutation I used is:
This mutation inserts an entry into the user table and returns the generated id. If you observe the mutation closely, it uses $name. This is called the query variable. When you send this mutation to the server along with the variables { "name": "bazooka"}, the GraphQL server would replace $name from the query variables, which in this case would be "bazooka."
If you wish, you can implement auth and insert into this table with the username or the nickname.
Load all boards
To load all the boards, we run a GraphQL subscription:
This subscription is a live query that returns the id, user1 along with their id and name (from the relationship), user_2_id, winner and created_at. We have set a where filter which fetches us only the boards without a valid winner and where user_2_id is null which means the board is is open for a player to join. Finally, we order these boards by their created_at timestamp.
Creating a board
Users can create boards for other people to join. To do that, they have to insert an entry into the boards table.
In the above GraphQL mutation, we are setting the user_2_id of a board to a user_id. We have also added additional checks such that this action succeeds only if the joining player is not the creator and the board is not already full. After the mutation, we ask for the number of affected rows.
In my app, after joining a board, I would redirect users to /play?board_id=<board_id>.
Subscribing to the board
When both users are in game, we need real-time updates about the moves of each player. So we must subscribe to the given board that is being played on and also the moves (through the relationship).
subscription($board_id: uuid!) {
  board: board_by_pk (id: $board_id) {
    id
    moves (order_by: { id: desc}) {
      id
      position
      user {
        id
        name
      }
      user_id
    }
    user1 {
      id
      name
    }
    user2 {
      id
      name
    }
    turn
    winner
  }
}
The above query subscribes the client to the board that is being played. Whenever a new move is played, the client will be updated with it.
Making a move
To make a move, we will be using the make_move mutation from our custom GraphQL server.
This mutation takes a board_id, position and user_id from query variables. It validates the move, makes the move and also switches the turn. In the end, it returns whether this transaction was successful or not.
Tic Tac Whoa!
And now you have a working game of Tic Tac Toe! You can implement any real-time multiplayer game with GraphQL subscriptions using the concepts we covered. Let me know if you have any questions and I would be happy to answer.
React Hooks, introduced in version 16.8.0, are reusable stateful logic functions. They aim to simplify the development of complex components by splitting them into small functional blocks that are easier to manage, test, and reuse.
Using hooks removes the need for many abstractions like Higher Order Components (HOC) and render props. They allow you to add functionality to the application without having to change the component hierarchy and or encapsulate components.
While understanding the importance of the APIF, we also recognize that good architectural practices and proper logical architecture of the application/services could be even more important than the service mesh. To support the integration strategy, CIBC has been developed Integration Pattern, which makes internal and external APIs the emerging standard for integration across the bank and beyond. This pattern transitions from existing legacy integration components and patterns to modern equivalents that embrace APIs and (micro)services by truly distributing all gateway and isolation layer functions.
The CIBC Integration Pattern is presented in the following diagram:
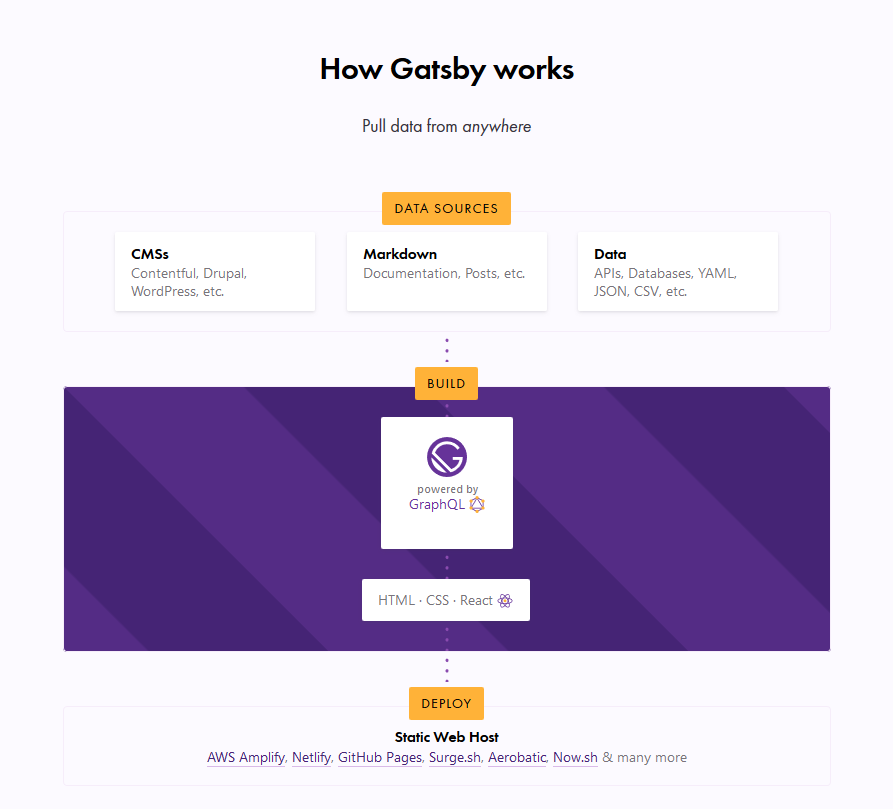
I’m assuming most of you have already heard about Gatsby, and at least loosely know that it’s basically a static site generator for React sites. It generally runs like this:
Data Sources → Pull data from anywhere.
Build → Generate your website with React and GraphQL.
Deploy → Send the site to any static site host.
What this typically means is that you can get your data from any recognizable data source — CMS, markdown, file systems and databases, to name a few — manage the data through GraphQL to build your website, and finally deploy your website to any static web host (such as Netlify or Zeit).
The Gatsby homepage illustration of the Gatsby workflow.
In this article, we are concerned with the build process, which is powered by GraphQL. This is the part where your data is managed. Unlike traditional REST APIs where you often need to send anonymous data to test your endpoints, GraphQL consolidates your APIs into a self-documenting IDE. Using this IDE, you can perform GraphQL operations such as queries, mutations, and subscriptions, as well as view your GraphQL schema, and documentation.
GraphQL has an IDE built right into it, but what if we want something a little more powerful? That’s where GraphQL Playground comes in and we’re going to walk through the steps to switch from the default over to GraphQL Playground so that it works with Gatsby.
GraphiQL and GraphQL Playground
GraphiQL is GraphQL’s default IDE for exploring GraphQL operations, but you could switch to something else, like GraphQL Playground. Both have their advantages. For example, GraphQL Playground is essentially a wrapper over GraphiQL but includes additional features such as:
Interactive, multi-column schema documentation
Automatic schema reloading
Support for GraphQL Subscriptions
Query history
Configuration of HTTP headers
Tabs
Extensibility (themes, etc.)
Choosing either GraphQL Playground or GraphiQL most likely depends on whether you need to use those additional features. There’s no strict rule that will make you write better GraphQL operations, or build a better website or app.
This post isn't meant to sway you toward one versus the other. We're looking at GraphQL Playground in this post specifically because it’s not the default IDE and there may be use cases where you need the additional features it provides and needs to set things up to work with Gatsby. So, let’s dig in and set up a new Gatsby project from scratch. We’ll integrate GraphQL Playground and configure it for the project.
Setting up a Gatsby Project
To set up a new Gatsby project, we first need to install the gatsby-cli. This will give us Gatsby-specific commands we can use in the Terminal.
npm install -g gatsby-cli
Now, let’s set up a new site. I’ve decided to call this example "gatsby-playground" but you can name it whatever you’d like.
gatsby new gatsby-playground
Let’s navigate to the directory where it was installed.
cd gatsby-playground
And, finally, flip on our development server.
gatsby develop
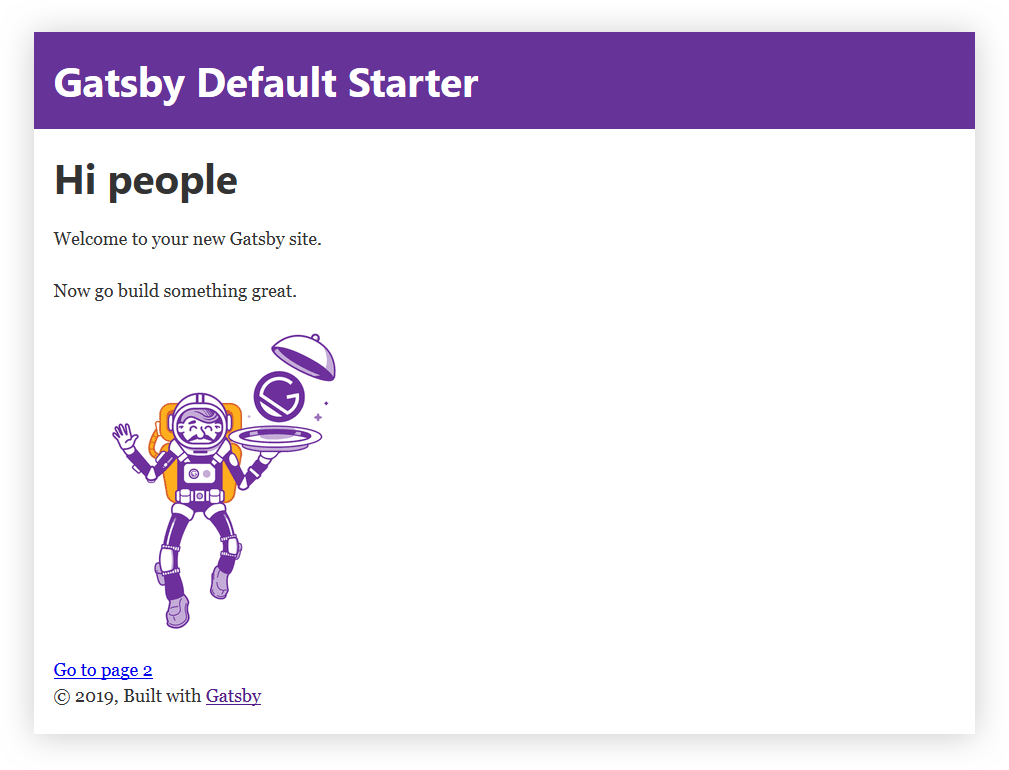
Head over to http://localhost:8000 in the browser for the opening page of the project. Your Gatsby GraphQL operations are going to be located at http://localhost:8000/___graphql.
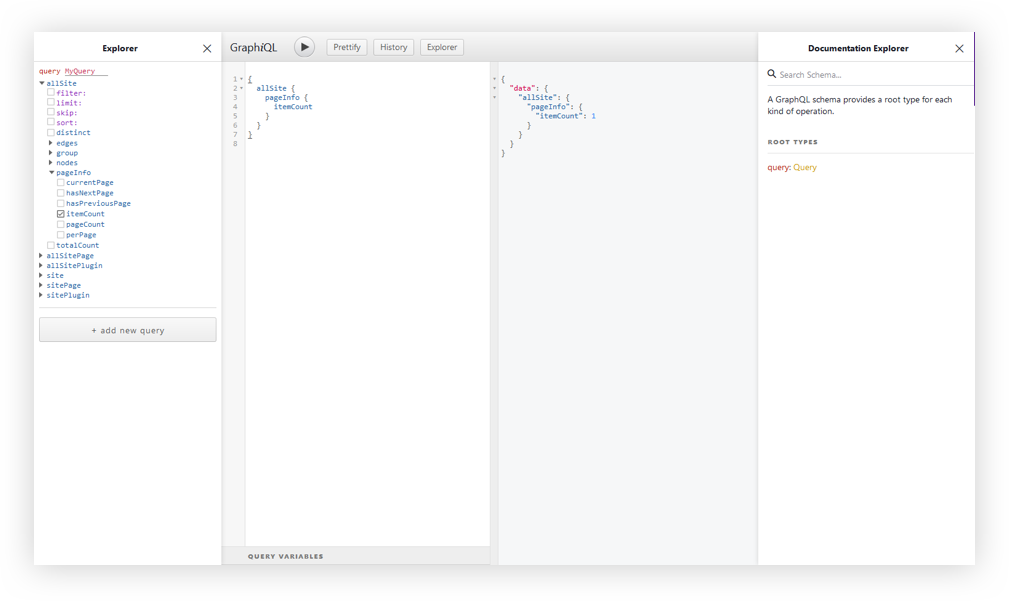
The GraphiQL interface.
At this point, I think it’s worth calling out that there is a desktop app for GraphQL Playground. You could just access your Gatsby GraphQL operations with the URL Endpoint localhost:8000/___graphql without going any further with this article. But, we want to get our hands dirty and have some fun under the hood!
Since we’re not going to be relying on the desktop app, we’ll need to do a little bit of Environmental Variable setup.
Environmental Variables are variables used specifically to customize the behavior of a website in different environments. These environments could be when the website is in active development, or perhaps when it is live in production and available for the world to see. We can have as many environments as we want, and define different Environmental Variables for each of the environments.
Gatsby supports two environments: development and production. To set a development environmental variable, we need to have a .env.development file at the root of the project. Same sort of deal for production, but it’s .env.production.
To swap out both environments, we’ll need to set an environment variable in a cross-platform compatible way. Let’s create a .env.development file at the root of the project. Here, we set a key/value pair for our variables. The key will be GATSBY_GRAPHQL_IDE, and the value will be playground, like so:
GATSBY_GRAPHQL_IDE=playground
Accessing Environment Variables in JavaScript
In Gatsby, our Environmental Variables are only available at build time, or when Node.JS is running (what we’ll call run time). Since the variables are loaded client-side at build time, we need to use them dynamically at run time. It is important that we restart our server or rebuild our website every time we modify any of these variables.
To load our environmental variables into our project, we need to install a package:
And that’s it! But, hey, remember to restart the server since we change the variable.
yarn start // npm run develop
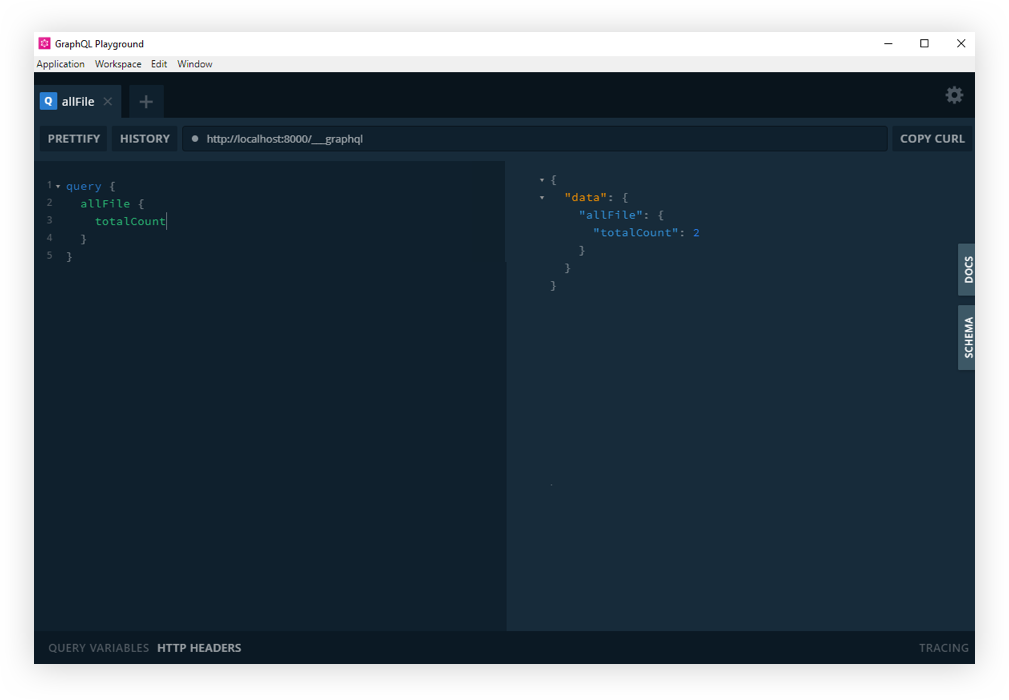
If you refresh the http://localhost:8000/___graphql in the browser, you should now see GraphQL playground. Cool? Cool!
GraphQL Playground with Gatsby.
And that’s how we get GraphQL Playground to work with Gatsby!
So that’s how we get from GraphQL’s default GraphiQL IDE to GraphQL Playground. Like we covered earlier, the decision of whether or not to make the switch at all comes down to whether the additional features offered in GraphQL Playground are required for your project. Again, we’re basically working with a GraphiQL wrapper that piles on more features.
Resources
Here are some additional articles around the web to get you started with Gatsby and more familiar with GraphiQL, GraphQL Playground, and Environment Variables.
Honeypot, a tech-focused job platform based in Europe, has produced a documentary that offers a fascinating look at the origins of GraphQL. The 28-minute video explores how quickly the project began to have an impact on the wider tech industry after Facebook publicly released it as an open source project.
GraphQL co-founder Nick Schrock, who was interviewed along with fellow co-creators Lee Byron and Dan Schafer, said the documentary “captured both the urgency and joy of the early months of the GraphQL.” It was filmed over two months in San Francisco and Berlin, where Honeypot runs the GraphQL Conf in cooperation with Prisma.
GraphQL began as an internal project at Facebook that was born out of necessity as the tech industry began to shift towards providing better mobile experiences for users. At that time, Facebook’s native apps were just a thin wrapper around the mobile website.
“The inability of a large technology company to adjust to a technology shift as big as the mobile shift is the type of thing that will consign a seemingly unstoppable empire to the grave in a matter of a few years,” Schrock said.
Facebook decided to re-write the Facebook iOS app but the APIs they had at that time were inadequate for creating the Newsfeed. A new Newsfeed API was written simultaneously to be used with the new mobile app. Facebook for iOS 5.0, released in 2012, was a native re-write of the app and also the first time GraphQL was deployed in the wild. Following that release, its use was expanded beyond just the Newsfeed to encompass most of the functionality offered in Facebook’s iOS app.
Facebook shared GraphQL with the world at React Europe 2015 and published the GraphQL spec later in 2015. They explained that their goal was to design what they thought was the ideal API for frontend developers and work backwards with the technology.
GraphQL’s creators were surprised at how fast the uptake was after making the project public. Engineers at Airbnb, Twitter, and Github were early adopters and their experiences are shared in the documentary with interviews from the community. The problems GraphQL’s creators encountered in scaling their mobile experience were not specific to Facebook. Other companies had similar problems and the demand for GraphQL in the industry was already there. Within six months, the team saw implementations of GraphQL in many of the major programming languages. They realized how important the project was to the industry after GitHub announced in 2016 that its public API would be a GraphQL API:
Using GraphQL on the frontend and backend eliminates the gap between what we release and what you can consume. We really look forward to making more of these simultaneous releases. GraphQL represents a massive leap forward for API development. Type safety, introspection, generated documentation, and predictable responses benefit both the maintainers and consumers of our platform.
The documentary tells the story of how GraphQL began the first three years as a solution to internal problems at Facebook but expanded to become a community tool that was initially adopted by hobbyists and then incorporated into the products of large tech companies. GraphQL co-founder Lee Byron predicts that the project is entering the next phase of its life and “heading towards becoming an industry standard and one that’s collaborative.”
There’s no way to measure the number of APIs that are being built around GraphQL, but the query language is now used in both internal and external APIs at major companies like Pinterest, Intuit, Coursera, Walmart, Shopify, PayPal, KLM, NBC News Digital, Credit Karma, Wayfair, and Yelp. Since it can be used in combination with REST APIs, GraphQL’s rapid adoption is not necessarily a good predictor for the end of REST architecture, but it’s a trend that is worth following. This widespread adoption began with just a handful of engineers who saw GraphQL’s promise at React Europe 2015, built tools to optimize development, and advocated for using GraphQL at their companies.
“I totally underestimated the power of these open source communities,” Schrock said. “We had to rely on this community of poeple to form spontaneously and then build implementations of this in different languages and then actually productionize it and build an entire tool ecosystem around it. I didn’t think that was ever going to work, and I was totally wrong. If an idea makes sense to people and it clicks with their mind and they can see the vision, they are actually willing to do a lot of work in order to see it executed and share their work, and it’s a pretty remarkable thing to see.”
The energy in the GraphQL documentary is inspiring and the story shares many parallels with other open source projects that have gained widespread adoption through passionate communities. Check out the full documentary below:
Šime posts regular content for web developers on webplatform.news.
Mozilla WebThings provides complete privacy for user data
If you, like many we surveyed, are also concerned about the security & privacy of you smart home check out @MozillaIoT's decentralized, open source solution for keeping your smarthome devices at bay—or learn more dropping by our Bay Area Maker Faire booth! https://t.co/rUcYpjBySH
Josephine Lau: Smart home companies require that users’ data goes through their servers, which means that people are giving up their privacy for the convenience of a smart home device (e.g., smart light bulb).
We’ve learned that people are concerned about the privacy of their smart home data. And yet, when there’s no alternative, they feel the need to trade away their privacy for convenience.
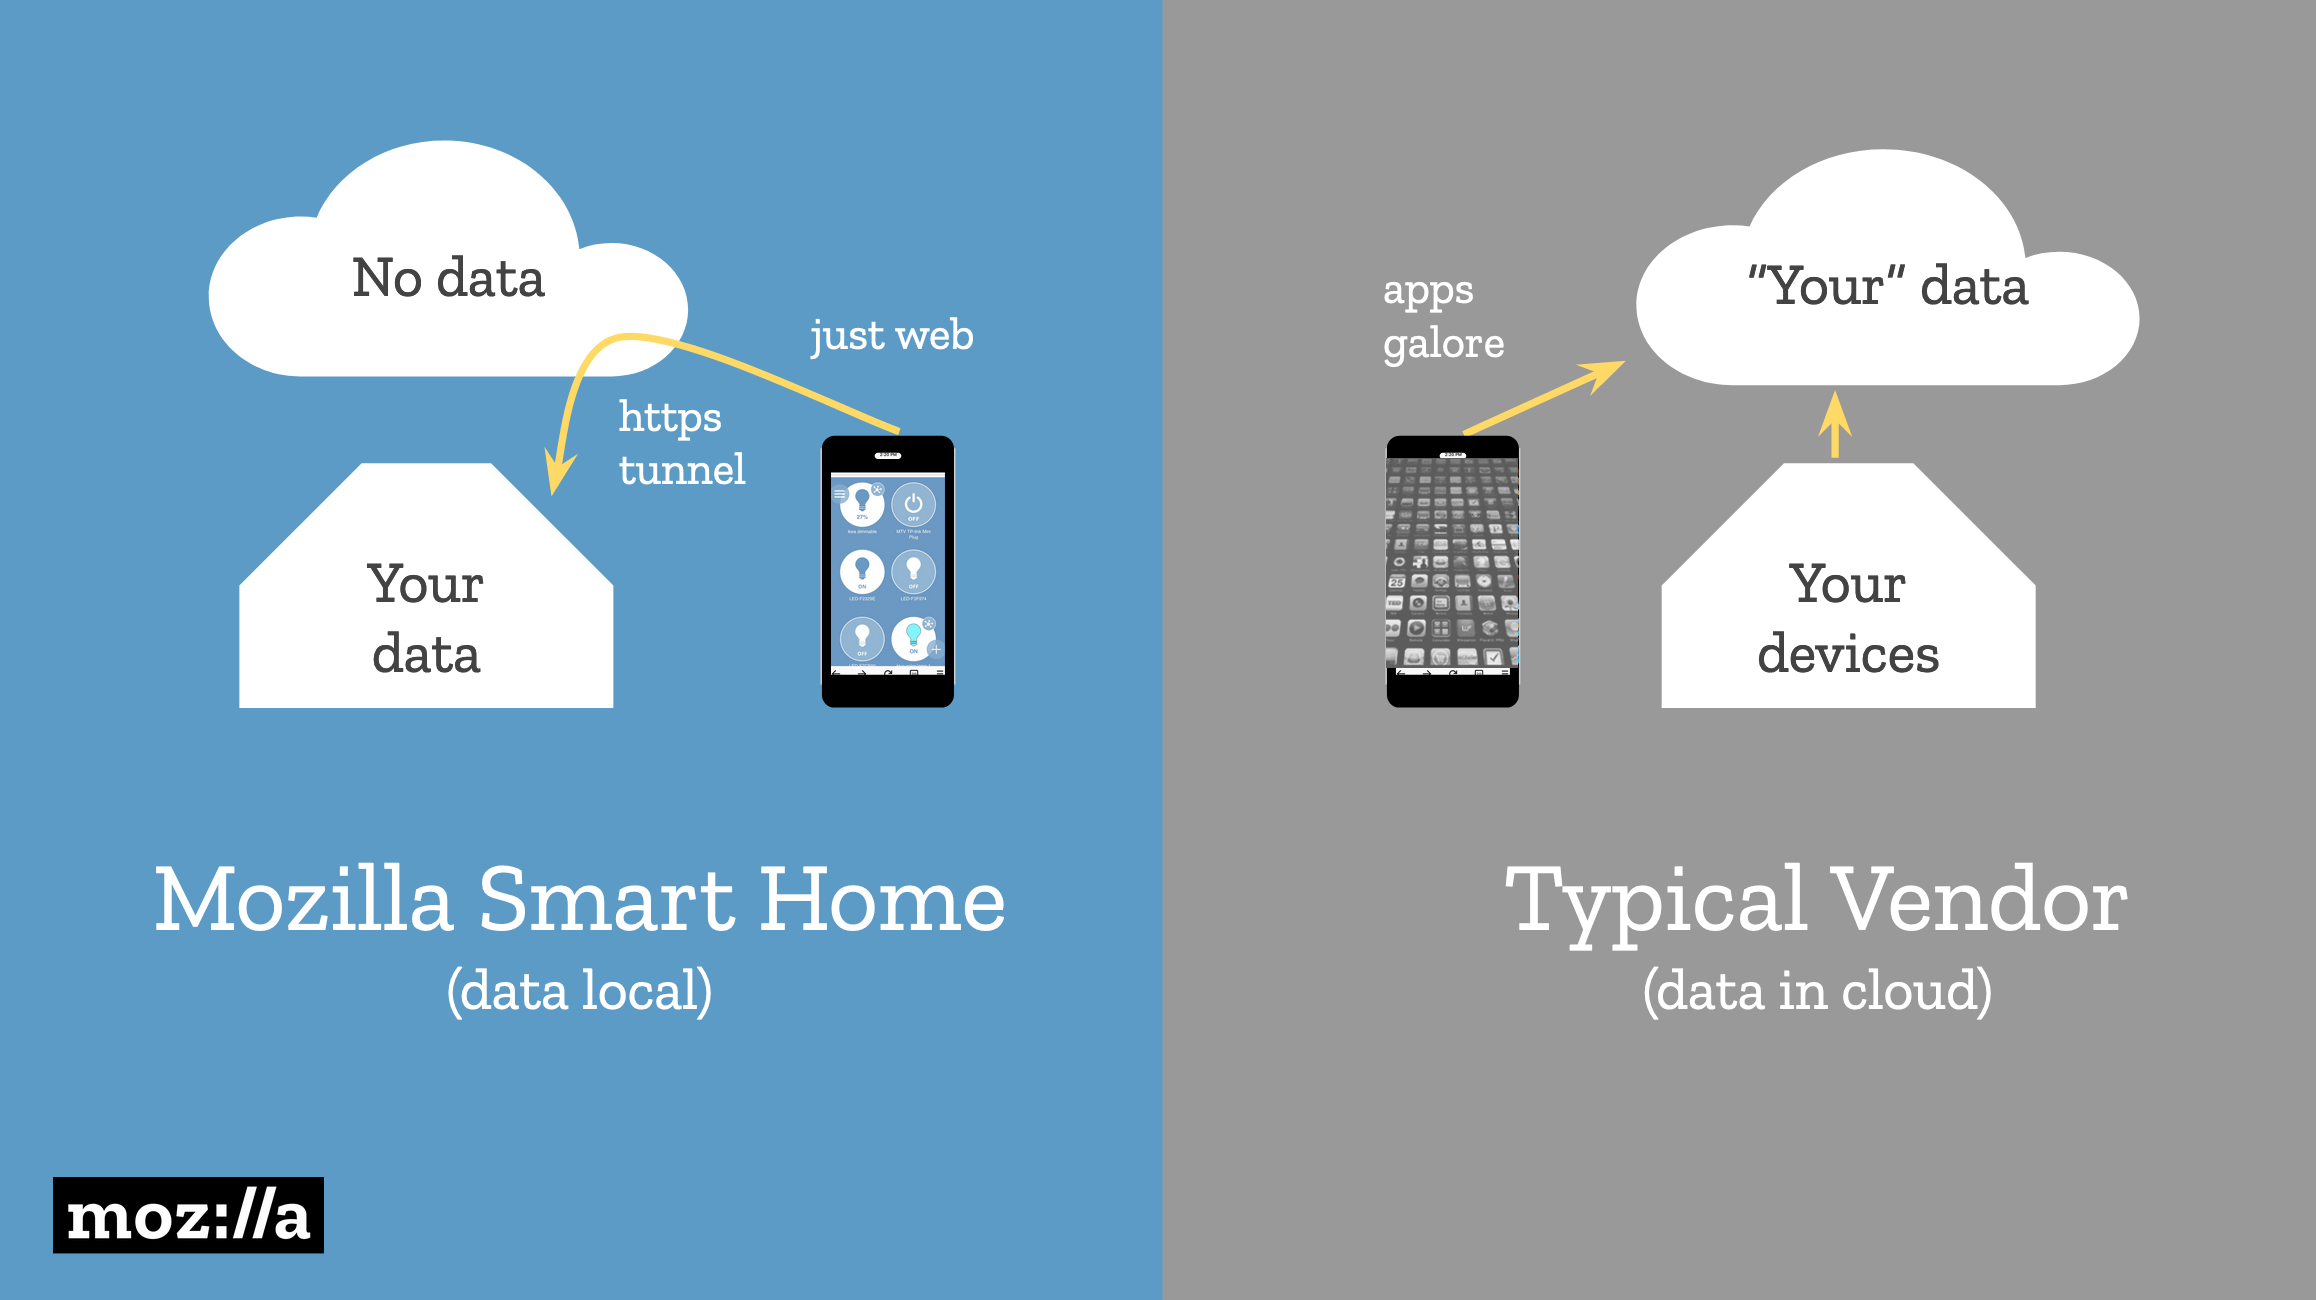
Mozilla WebThings is an alternative approach to the Internet of Things that stores user data in the user’s home. Devices can be controlled locally via a web interface, and the data is tunneled through a private HTTPS connection.
A diagram showing how Mozilla doesn’t store user data in the cloud, unlike smart home vendors.
An Internet Explorer mode is coming to Edge
Still have questions on the recently announced IE mode? Our very own Fred Pullen has all the answers. Check out his in-depth breakdown on how the new IE mode works, and the benefits it will bring to our enterprise community once it goes live.https://t.co/RgewXGC1G2
Fred Pullen: The next version of Edge will include an Internet Explorer mode for backward compatibility with legacy websites. Edge will also for the first time be available on older versions of Windows (including Windows 7 and 8.1).
By introducing Internet Explorer mode, we’re effectively blurring the lines between the browsers. From an end-user standpoint, it seems like a single browser. … You can use IE mode to limit the sites that instantiate Internet Explorer just to the sites that you approved.
Navigating from one page to another in a client-side web app provides no feedback by default in virtually all popular routing solutions across the client-side ecosystem.
Their goal is to make Ember’s router more accessible and screen reader friendly.
Read the last section ("Intrinsic and extrinsic sizing"). All three columns have the size 1fr but the middle one is wider because of its content. This can be prevented by using the size minmax(0, 1fr) instead.
Instead of loading from top to bottom, progressive images appear blurry at first and become sharper as more data loads.
The benefits of progressive rendering are unique to JPEG (supported in all browsers) and JPEG 2000 (supported in Safari). GIF and PNG have interlaced modes, but these modes come at a cost of worse compression. WebP doesn't even support progressive rendering at all. This creates a dilemma: WebP is usually 20%-30% smaller than a JPEG of equivalent quality, but progressive JPEG appears to load 50% faster.
GraphQL is an API that was invented and open sourced by Facebook as a better replacement for REST. It can be understood as Querby language for APIs, which enables declarative data fetching by exposing a single endpoint and responds to queries. In REST, there is always a dedicated endpoint for each type of request and can't be customized.
In GraphQL, the client decides what data they need and that's the reason the client sends a query (payload) to the server and the server sends the data back as per the query request. There is where they get the name GraphQL
When you talk about API design, the first thing that probably comes to mind is Representational State Transfer (REST). A standard for data retrieval from the server, it’s based on accessing data by URLs.
In 2000, when REST was developed, client applications were relatively simple, development pace wasn’t nearly where it is today, and, as a result, REST was a good fit for many applications. REST gave us important concepts for API design – stateless servers and structured access to resources. However, since that time APIs have gotten more complex and data-driven affected by the following factors:
GraphQL is becoming increasingly popular. The problem is that if you are a front-end developer, you are only half of the way there. GraphQL is not just a client technology. The server also has to be implemented according to the specification. This means that in order to implement GraphQL into your application, you need to learn not only GraphQL on the front end, but also GraphQL best practices, server-side development, and everything that goes along with it on the back end.
There will come a time when you will also have to deal with issues like scaling your server, complex authorization scenarios, malicious queries, and more issues that require more expertise and even deeper knowledge around what is traditionally categorized as back-end development.
Thankfully, we have an array of managed back-end service providers today that allow front-end developers to only worry about implementing features on the front end without having to deal with all of the traditional back-end work.
Services like Firebase (API) / AWS AppSync (database), Cloudinary (media), Algolia (search) and Auth0 (authentication) allow us to offload our complex infrastructure to a third-party provider and instead focus on delivering value to end users in the form of new features instead.
In this tutorial, we’ll learn how to take advantage of AWS AppSync, a managed GraphQL service, to build a full-stack application without writing a single line of back-end code.
While the framework we’re working in is React, the concepts and API calls we will be using are framework-agnostic and will work the same in Angular, Vue, React Native, Ionic or any other JavaScript framework or application.
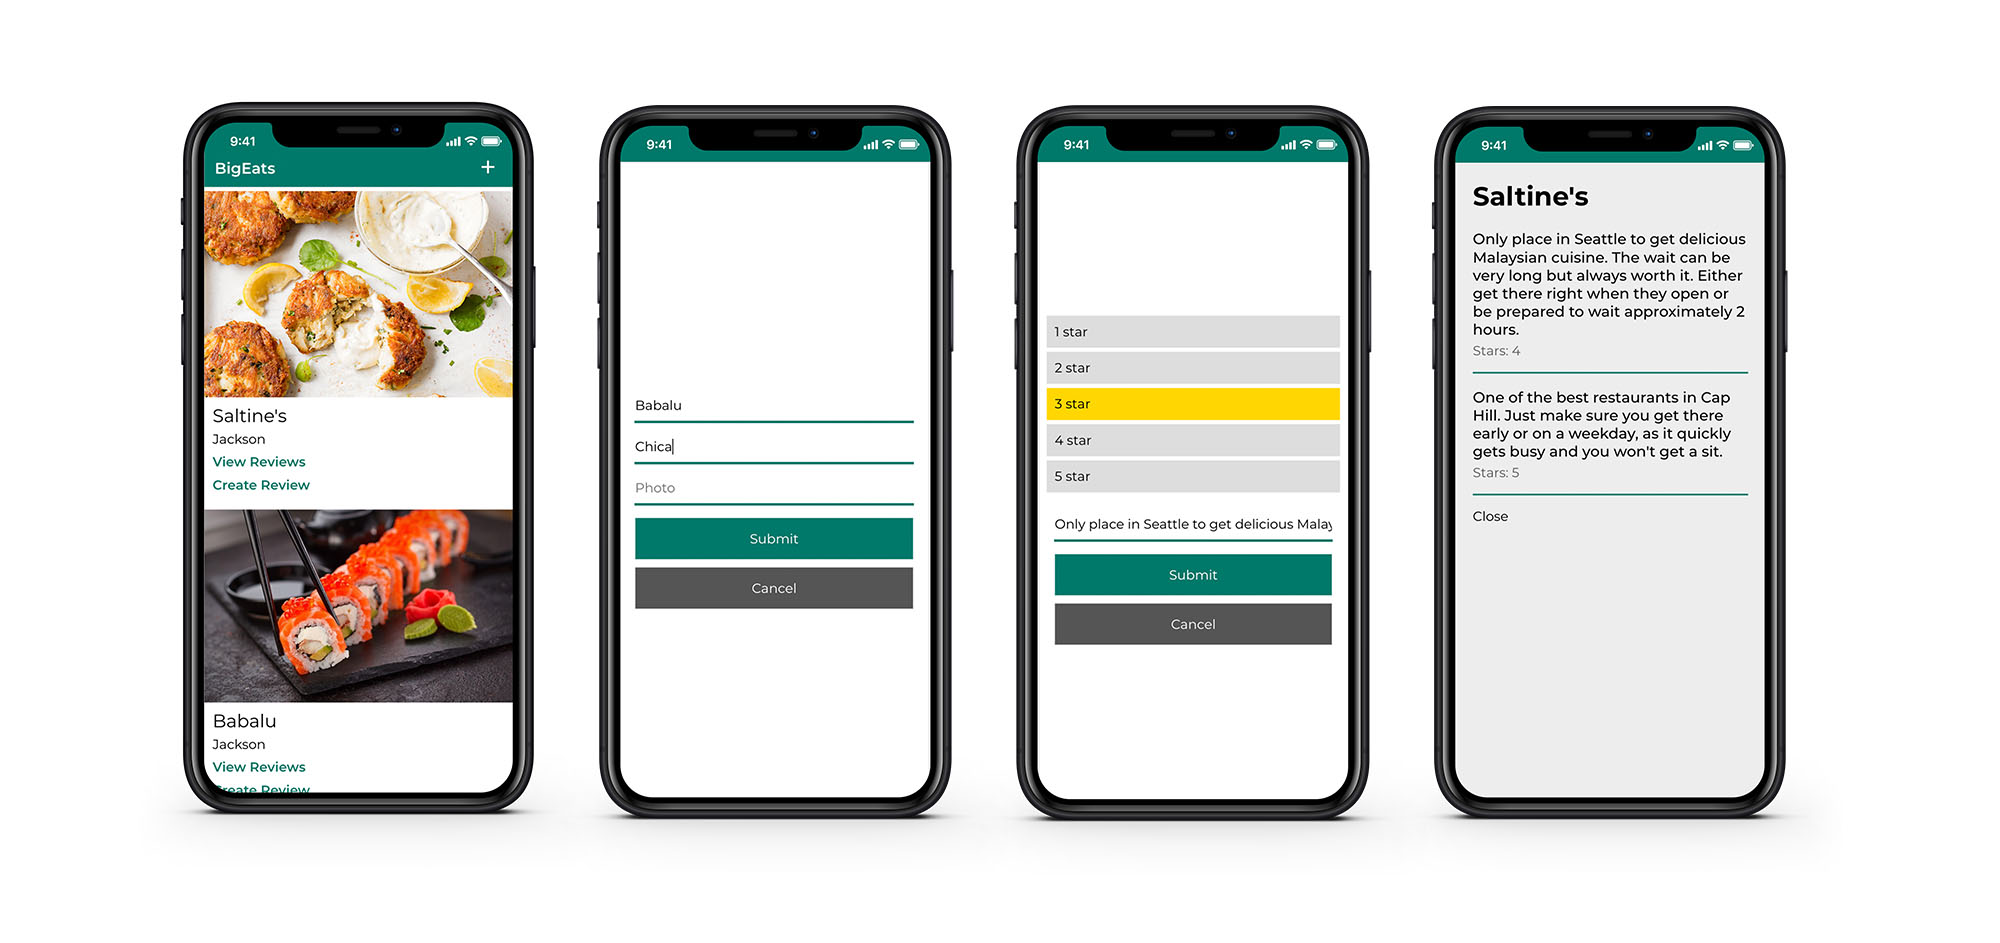
We will be building a restaurant review app. In this app, we will be able to create a restaurant, view restaurants, create a review for a restaurant, and view reviews for a restaurant.
The tools and frameworks that we will be using are React, AWS Amplify, and AWS AppSync.
AWS Amplify is a framework that allows us to create and connect to cloud services, like authentication, GraphQL APIs, and Lambda functions, among other things. AWS AppSync is a managed GraphQL service.
We’ll use Amplify to create and connect to an AppSync API, then write the client side React code to interact with the API.
The first thing we’ll do is create a React project and move into the new directory:
npx create-react-app ReactRestaurants

cd ReactRestaurants
Next, we’ll install the dependencies we’ll be using for this project. AWS Amplify is the JavaScript library we’ll be using to connect to the API, and we’ll use Glamor for styling.
yarn add aws-amplify glamor
The next thing we need to do to is install and configure the Amplify CLI:
npm install -g @aws-amplify/cli

amplify configure
Amplify’s configure will walk you through the steps needed to begin creating AWS services in your account. For a walkthrough of how to do this, check out this video.
Now that the app has been created and Amplify is ready to go, we can initialize a new Amplify project.
amplify init
Amplify init will walk you through the steps to initialize a new Amplify project. It will prompt you for your desired project name, environment name, and text editor of choice. The CLI will auto-detect your React environment and select smart defaults for the rest of the options.
Creating the GraphQL API
One we’ve initialized a new Amplify project, we can now add the Restaurant Review GraphQL API. To add a new service, we can run the amplify add command.
amplify add api
This will walk us through the following steps to help us set up the API:
? Please select from one of the below mentioned services GraphQL
? Provide API name bigeats
? Choose an authorization type for the API API key
? Do you have an annotated GraphQL schema? N
? Do you want a guided schema creation? Y
? What best describes your project: Single object with fields
? Do you want to edit the schema now? Y
The CLI should now open a basic schema in the text editor. This is going to be the schema for our GraphQL API.
In this schema, we’re creating two main types: Restaurant and Review. Notice that we have @model and @connection directives in our schema.
These directives are part of the GraphQL Transform tool built into the Amplify CLI. GraphQL Transform will take a base schema decorated with directives and transform our code into a fully functional API that implements the base data model.
If we were spinning up our own GraphQL API, then we’d have to do all of this manually:
Define the schema
Define the operations against the schema (queries, mutations, and subscriptions)
Create the data sources
Write resolvers that map between the schema operations and the data sources.
With the @model directive, the GraphQL Transform tool will scaffold out all schema operations, resolvers, and data sources so all we have to do is define the base schema (step 1). The @connection directive will let us model relationships between the models and scaffold out the appropriate resolvers for the relationships.
In our schema, we use @connection to define a relationship between Restaurant and Reviews. This will create a unique identifier for the restaurant ID for the review in the final generated schema.
Now that we’ve created our base schema, we can create the API in our account.
amplify push
? Are you sure you want to continue? Yes
? Do you want to generate code for your newly created GraphQL API Yes
? Choose the code generation language target javascript
? Enter the file name pattern of graphql queries, mutations and subscriptions src/graphql/**/*.js
? Do you want to generate/update all possible GraphQL operations - queries, mutations and subscriptions Yes
Because we’re creating a GraphQL application, we typically would need to write all of our local GraphQL queries, mutations and subscriptions from scratch. Instead, the CLI will be inspecting our GraphQL schema and then generating all of the definitions for us and saving them locally for us to use.
After this is complete, the back end has been created and we can begin accessing it from our React application.
If you’d like to view your AppSync API in the AWS dashboard, visit https://console.aws.amazon.com/appsync and click on your API. From the dashboard you can view the schema, data sources, and resolvers. You can also perform queries and mutations using the built-in GraphQL editor.
Building the React client
Now that the API is created and we can begin querying for and creating data in our API. There will be three operations we will be using to interact with our API:
Creating a new restaurant
Querying for restaurants and their reviews
Creating a review for a restaurant
Before we start building the app, let’s take a look at how these operations will look and work.
Interacting with the AppSync GraphQL API
When working with a GraphQL API, there are many GraphQL clients available.
We can use any GraphQL client we’d would like to interact with an AppSync GraphQL API, but there are two that are configured specifically to work most easily. These are the Amplify client (what we will use) and the AWS AppSync JS SDK (similar API to Apollo client).
The Amplify client is similar to the fetch API in that it is promise-based and easy to reason about. The Amplify client does not support offline out of the box. The AppSync SDK is more complex but does support offline out of the box.
To call the AppSync API with Amplify, we use the API category. Here’s an example of how to call a query:
import { API, graphqlOperation } from 'aws-amplify'
import * as queries from './graphql/queries'

const data = await API.graphql(graphqlOperation(queries.listRestaurants))
For a mutation, it is very similar. The only difference is we need to pass in a a second argument for the data we are sending in the mutation:
import { API, graphqlOperation } from 'aws-amplify'
import * as mutations from './graphql/mutations'

const restaurant = { name: "Babalu", city: "Jackson" }
const data = await API.graphql(graphqlOperation(
  mutations.createRestaurant,
  { input: restaurant }
))
We use the graphql method from the API category to call the operation, wrapping it in graphqlOperation, which parses GraphQL query strings into the standard GraphQL AST.
We’ll be using this API category for all of our GraphQL operation in the app.
The first thing we need to do in our app is configure it to recognize our Amplify credentials. When we created our API, the CLI created a new file called aws-exports.js in our src folder.
This file is created and updated for us by the CLI as we create, update and delete services. This file is what we’ll be using to configure the React application to know about our services.
To configure the app, open up src/index.js and add the following code:
import Amplify from 'aws-amplify'
import config from './aws-exports'
Amplify.configure(config)
Next, we will create the files we will need for our components. In the src directory, create the following files:
Header.js
Restaurant.js
Review.js
CreateRestaurant.js
CreateReview.js
Creating the components
While the styles are referenced in the code snippets below, the style definitions have been omitted to make the snippets less verbose. For style definitions, see the final project repo.
Next, we’ll create the Header component by updating src/Header.js.
Now that our Header is created, we’ll update src/App.js. This file will hold all of the interactions with the API, so it is pretty large. We’ll define the methods and pass them down as props to the components that will call them.
We first create some initial state to hold the restaurants array that we will be fetching from our API. We also create Booleans to control our UI and a selectedRestaurant object.
In componentDidMount, we query for the restaurants and update the state to hold the restaurants retrieved from the API.
In createRestaurant and createReview, we send mutations to the API. Also notice that we provide an optimistic update by updating the state immediately so that the UI gets updated before the response comes back in order to make our UI snappy.
This component is the main view of the app. We map over the list of restaurants and show the restaurant image, its name and location, and links that will open overlays to show reviews and create a new review.
Next, we’ll look at the Reviews component (src/Reviews.js). In this component, we map over the list of reviews for the chosen restaurant.
Next, we’ll take a look at the CreateRestaurant component (src/CreateRestaurant.js). This component holds a form that keeps up with the form state. The createRestaurant class method will call this.props.createRestaurant, passing in the form state.
Next, we’ll take a look at the CreateReview component (src/CreateReview.js). This component holds a form that keeps up with the form state. The createReview class method will call this.props.createReview, passing in the restaurant ID and the form state.
Now that we have built our back-end, configured the app and created our components, we’re ready to test it out:
npm start
Now, navigate to http://localhost:3000. Congratulations, you’ve just built a full-stack serverless GraphQL application!
Conclusion
The next logical step for many applications is to apply additional security features, like authentication, authorization and fine-grained access control. All of these things are baked into the service. To learn more about AWS AppSync security, check out the documentation.
If you’d like to add hosting and a Continuous Integration/Continuous Deployment pipeline for your app, check out the Amplify Console.
GraphQL is a query language for APIs. Generally, while making REST endpoints in our APIs, the normal trend is to make an endpoint for a requirement. Let's say your endpoint is returning a list of employees, and each employee has general properties, such as name, age, and address (suppose address is another model mapped to the employee in such a way that each employee has an address). Now, at one point in time, you require data only for their address i.e. a list of all addresses in the database (only country, city, and street). For this, you will require an all-new endpoint in your service.
Here comes the power of GraphQL, which lets you deal with only a single endpoint and that changes its output based on the body of the request. Each request will call the same endpoint but with a different RequestBody. It will receive only the result that it requires.
No other language manifests Edsger Djikstra's notion of brevity without jargon better than GraphQL. This is a querying language that has proven its worth by its simplicity and effortlessness in an application of what would otherwise be heavy and ugly in the domain of API calls and database querying. As I was exploring the capabilities of this querying language, I was quick to realize its potential in its main use as an API building tool. I also realized that its benefits are greatly underrated, and thus made it my aim with this piece to stress on the advantages of GraphQL as well as introduce its importance in the realm of serverless which is greatly aided by AWS AppSync.
AWS AppSync itself is a powerful application development service that allows you to create services using GraphQL. It truly does justice to the abilities of GraphQL and after personally using it to build a simple API, I can not imagine developing API’s with a serverless framework in any other way. Released in 2017, AppSync has several features that ease the use of GraphQL and again, I strongly feel that the value of these features is greatly underrated or simply not known due to the novelty of the service.
At WordCamp US 2018 I had the chance to sit down with Jason Bahl and Ryan Kanner, both engineers at Digital First Media in Denver, Colorado, and contributors to the WPGraphQL project. WPGraphQL is an open source plugin that provides an extendable GraphQL schema and API for any WordPress site.
Bahl, who created and maintains the project, also gave a lightning talk at WCUS on using GraphQL with Gutenberg to improve the performance of custom blocks, as well as the developer experience of building them.
In our interview, Bahl and Kanner offer a general overview of the differences between GraphQL and REST. They explained how Digital First Media improved performance for the company’s publications by switching from REST to GraphQL. We also discussed how Gutenberg is a great use case for GraphQL and whether the project is something that could someday be included in WordPress core.