How to Properly Use Heading Tags in WordPress (H1-H6 Explained)

Are you wondering about the proper way to use H1-H6 heading tags in WordPress?

When you use headings effectively in your posts and pages, you make your content more readable, improve user experience, and boost your website’s SEO.

In this article, we’ll show you how to properly use heading tags in WordPress.

How to Properly Use Heading Tags in WordPress (H1-H6 Explained)

What Are Heading Tags in WordPress?

Heading tags are HTML elements used to identify the title and headings on a webpage.

Both visitors and search engines will understand your content better when your posts and pages contain headings. When you add headings correctly, you can improve the post’s SEO, so it ranks higher on search engine results pages (SERPs).

You add a logical structure to your posts by using different heading levels. Post titles will use H1 tags, and you typically use H2 tags for the main headings and H3 tags for subheadings.

When viewing a webpage as HTML, heading tags look like this:

<h1>Post Title</h1>
<h2>Heading</h2>
<h3>Subheading</h3>
<h4>And so on</h4>

However, you can easily add heading tags to your WordPress posts and pages without using code.

We cover this step-by-step in our guide on how to change the font size in WordPress.

You Can Easily Add Heading Tags Without Code Using the WordPress Block Editor

The sizes and colors of the different heading styles are controlled by your theme’s stylesheet, and we’ll show you how to customize their appearance below.

With that being said, let’s take a look at how to properly use H1-H6 heading tags in WordPress. Here is a quick overview of what we’ll cover in this guide:

1. Use Headings and Subheadings to Structure Your Content

Headings help you create a logical structure for a post or page. They guide your readers through the article by briefly describing the main sections of the topic and how they relate to one another.

You can use up to six hierarchical heading levels to structure your content:

  • H1 tags are the most important and there should be only one H1 heading in a post. This tag is used for the post title, and you can learn how to add and optimize your titles in our guide on SEO titles and H1 post titles in WordPress.
  • H2 headings are the main headings and are used in the different sections of a post. If you need to split these sections up into subsections, then you can use H3 tags. Most themes will display H3 subheadings in a smaller font than H2 headings.
  • Most posts only need two or three levels of headings, so you may never use heading tags H4 to H6 on your WordPress website. However, they can be used to provide further structure in very long posts or academic articles.

Structuring your posts in this way helps both website visitors and search engine crawlers quickly grasp the context of your content. A well-structured post may be ranked higher on search engine results pages.

Tip: Make sure you use heading tags to structure your article, and not simply for formatting, such as making a block of text larger. For more on formatting text, see our guide on how to easily change the font size in WordPress.

2. Customize the Appearance of Headings to Grab Attention

Using headings in your content is a great way to grab user attention with a larger-size font. In most WordPress themes, headings are in a larger font than regular body text. They allow you to break your posts and pages into sections.

You can also customize the appearance of your headings, so they stand out even more. For example, you can attract attention to your headings by adding color, especially with H1, H2, and H3 headings.

Some themes offer preset font choices that will change the font on your entire website.

Change font in theme customizer

Besides that, you can also change fonts for individual elements on your theme. For example, you can use a different font for the body text and headings. There are even options to use separate fonts for each heading level.

For more details, see our guide on how to change fonts in your WordPress theme.

3. Use Headings to Improve Readability and User Experience

No one likes a wall of text. The easiest way to make your content more readable is by breaking it up using headings and short paragraphs.

This makes it easier to read and understand your content. It also helps your users scan through the article quickly and find the sections they want to read more thoroughly.

These factors will increase page views and reduce bounce rate, which is good for SEO.

Checking the Readability of Your Headings Using All in One SEO

The best way to check the readability of your post is by using All in One SEO (AIOSEO). It’s the best WordPress SEO plugin that allows you to easily optimize your WordPress website for search engines and social media platforms.

Note: The free version of AIOSEO will show you if your post contains enough headings, and also let you set a focus keyphrase as we cover below. However, the extra features of the premium version will get your site ranking even higher on search engines.

Once you have installed and configured All in One SEO, simply scroll down below the post content to the AIOSEO General Settings area.

You will find a ‘Page Analysis’ section that gives you a list of actionable tasks you can follow to make the post rank higher. It includes tabs for ‘Basic SEO,’ ‘Title,’ and ‘Readability,’ and each tab shows you how many errors you need to fix in that category.

The ‘Readability’ tab offers suggestions on how to improve readability, such as including images, shortening paragraphs and sentences, using transition words, adding subheadings, and more. Items marked with a red cross need more work.

AIOSEO's Action List for Improving Readability

Under ’Subheading distribution’, you will be given feedback on any steps you need to take to improve the headings in the post, such as:

  • ‘1 section of your text is longer than 300 words and is not separated by any subheadings. Add subheadings to improve readability.’
  • ‘You are not using any subheadings, but your text is short enough and probably doesn’t need them.’
  • ‘Great job!’

You should aim to get a green checkmark next to every item under the Page Analysis section to improve the post’s SEO.

4. Optimize Your Headings for SEO by Adding Appropriate Keywords

Adding headings to your blog posts is great for your site’s SEO. That’s because search engines give headings more weight than normal paragraph text. Google will try to use the content of your headings to better understand the topic you are writing about.

You can optimize your headings for SEO by adding appropriate keywords. These are the keywords users will search for when looking for your content. You can learn how to find them in our guide on how to do keyword research for your WordPress blog.

But it’s important that you don’t just add random keywords to your headings. Only use keywords when they make sense and clearly describe what that part of the post is about.

Checking Whether Your Headings are SEO Optimized Using All in One SEO

You can use All in One SEO‘s SEO Analysis feature to check whether you have used enough keywords in your headings.

First, you need to add a focus keyword to your post. Simply scroll to AIOSEO Settings under the post content, then type the post’s most important keyword next to ‘Focus Keyphrase.’

All in One SEO focus Keyphrase

The plugin will then analyze your content for the keyword, show you a score, and give suggestions on how to improve your ranking.

Among other things, All in One SEO will show you if your post has a healthy number of keyword-optimized H2 and H3 subheadings.

AIOSEO Will Recommend When You Should Use the Focus Keyphrase in More Subheadings

You can also use All in One SEO to optimize the post title. For more details, see our guide on how to use a headline analyzer in WordPress to improve SEO titles.

Besides adding keywords, we also recommend making your headline catchy and click-worthy. That’s because your organic click-through rate (CTR) plays an important role in SEO.

5. Automatically Create a Table of Contents From Headings

A table of contents is a clickable list of the headings contained in a post. They make it easier to jump between the sections of a long article, improving navigation through your content.

When your visitors click a link in the table of contents, they will be taken immediately to that heading in the article. This allows users to quickly move to the content they are interested in.

Anchor link preview

All in One SEO can save you time by automatically generating the table of contents based on your subheadings, while also making it completely customizable with editable links.

When editing your post, you’ll need to click the blue ‘+ ’ icon and locate the ‘AIOSEO – Table of Contents’ block. Simply drag the block onto the post or page where you wish the table of contents to appear.

Add an AIOSEO Table of Contents Block to the Post or Page

The plugin will automatically identify the headings on the page and add them to your table of contents. If you use different heading levels (say H2 and H3), then lower-level headings will be indented to show the structure of your content.

If you are still writing the contents of your post or page, then any headings added to the document will be automatically added to the table of contents. Also, any changes that you make to the headings themselves will be reflected in the ToC block.

For step-by-step instructions, see our guide on how to create a table of contents in WordPress posts and pages.

Organizing your heading tags well may help your content rank for Google featured snippets. These are highlighted results that are shown at the top of the search results page.

Tables of Contents Are Also Used in Featured Snippets

Google was able to pull the headings from the above post to create the number list you see on the search results page, earning this post a featured snippet.

This will help you get the maximum SEO traffic since a user is more likely to click on a featured snippet than a plain search result.

For tips on ranking for featured snippets, see our guide on how to get a Google Featured Snippet with your WordPress website.

FAQ: Frequently Asked Questions About Heading Tags in WordPress

Here are some of the most common questions our readers ask us about heading tags.

What is the difference between H1 and H2 in WordPress?

H1 is used for the post title, and this should be the only H1 heading in a post. H2 is used for the main headings throughout a post. For many blog posts, H1 and H2 are the only heading tags you will need.

What are the six types of headings in WordPress?

There are six types of heading tags in WordPress, and they are H1, H2, H3, H4, H5, and H6. The H1 tag is used for the title and H2-H6 can be used for different levels of headings and subheadings throughout the post.

You don’t need to use all six levels of headings in a post. However, you shouldn’t skip a level. For example, when you use H2 for headings, you should use H3 for subheadings, and not skip straight to H4.

What is the difference between H1 and TITLE in WordPress?

The title you type at the top of a post or page is an H1 heading. However, when search engines display the post in search results, they will use a different title identified by a TITLE tag rather than H1. This is known as the SEO title or meta title.

You can add a meta title to your post using an SEO plugin such as All in One SEO. You can learn more in our guide on the difference between SEO titles and H1 post titles in WordPress.

How do I create an H1 heading in WordPress?

When you create a new post or page in WordPress, you will see the words ‘Add title’ at the top of the page. Simply type the post title on this line to add an H1 heading.

While it is possible to create additional H1 headings using Heading blocks, we don’t recommend using more than one H1 tag.

How many H2 headings should a WordPress post have?

H2 headings are used to break up a long post and make it more readable, and there are no rules about how many you should use. In fact, if your post is only a few paragraphs long, then you may not need to add H2 headings at all.

The All in One SEO plugin has a Page Analysis feature that can check your blog post for readability. In general, if you have 300 words of text or more without a heading, it will recommend adding more headings or subheadings.

Do heading tags affect your WordPress website’s SEO?

Yes, the title of your blog post is extremely important for search engine optimization (SEO). A powerful title can get people to click on the link to visit your website, so we recommend you use a headline analyzer to create engaging titles that get more clicks.

H2-H6 headings can also impact SEO. They improve user experience, and this improves SEO. Adding appropriate keywords to your headings may also help your post rank higher.

We hope this tutorial helped you learn how to properly use H1-H6 heading tags in WordPress. You may also want to see our guide on how to create an email newsletter, or our expert pick on the best SEO plugins and tools.

If you liked this article, then please subscribe to our YouTube Channel for WordPress video tutorials. You can also find us on Twitter and Facebook.

The post How to Properly Use Heading Tags in WordPress (H1-H6 Explained) first appeared on WPBeginner.

14-Step Technical WordPress SEO Framework (Proven Checklist)

Do you need a technical search engine optimization (SEO) checklist?

Optimizing your site for search engines can be a challenge if you’re not sure what to look for. Many website owners will ensure basic SEO practices but overlook technical elements.

In this article, we will show a WordPress technical SEO framework and share a checklist you can use for your business.

WordPress technical SEO framework checklist

Why Do You Need a WordPress Technical SEO Framework?

Technical SEO is a key component of your WordPress SEO strategy. You could be creating the world’s best content, but if search engines can’t find and understand your content, then all your efforts are wasted.

That’s why it is important to have a WordPress technical SEO framework.

Our WordPress SEO framework checklist will ensure that search engines can easily crawl and index your content. Plus, you can also evaluate other technical aspects of your WordPress website that might be preventing you from achieving higher rankings.

For example, your website might be taking a long time to load. This would result in poor rankings since the page load time is a ranking factor.

Similarly, you might have mistakenly added nofollow tags and prevented search engines from crawling and indexing your content.

How to Evaluate Technical SEO in WordPress

There are many SEO tools that let you conduct SEO audits and find out if your site is technically optimized. However, not all tools will show details inside your WordPress dashboard.

The easiest way to evaluate technical SEO for your WordPress site is by using All in One SEO (AIOSEO). It is the best WordPress SEO plugin that helps you optimize your website for search engines.

It offers a free SEO Analysis tool that you can use to conduct a technical SEO audit. The tool is available in the AIOSEO Lite version, which you can use for free. There are also premium AIOSEO plans that offer more features like schema markups, sitemaps, redirection manager, and more.

First, you’ll need to install and activate the AIOSEO plugin. For more details, please see our guide on how to install a WordPress plugin.

Upon activation, you can go to All in One SEO » SEO Analysis from your WordPress admin panel. Under the ‘SEO Audit Checklist’, you’ll see an overall score for your website.

SEO analysis

Next, you can scroll down to the Advanced SEO and Performance sections.

Here, the plugin will evaluate the technical SEO aspects of your website based on different parameters and ranking signals. It will then highlight missing elements and critical issues that could stop your site from ranking higher.

View advanced SEO and performance

You can use AIOSEO to continuously monitor your site’s technical SEO and fix issues. Similarly, you can also perform a competitor analysis and see what they’re doing differently for their technical SEO optimization.

That said, let’s look at our WordPress SEO framework checklist that you can use to ensure higher rankings and organic traffic. You can click the links below to jump ahead to any section:

1. Ensure Your Website is Visible to Search Engines

The first thing you need to check is whether search engines are able to find your WordPress site.

You can simply enter site:example.com in the search engine and see if your website appears in the search results. Just replace ‘example.com’ with your own domain.

Perform site search

If your site isn’t showing up, then you can check the visibility settings in WordPress.

Go ahead and visit the Settings » Reading page from your WordPress admin panel. Next, scroll down to the Search engine visibility setting and be sure the ‘Discourage search engines from indexing this site’ option is unchecked.

Search Engine Visibility Setting in WordPress

This option is usually enabled if your website is under construction or is put in maintenance mode.

2. Uncover Crawling and Indexing Issues

If your website is visible to search engines, then it is important to check that your content is crawled and indexed.

Crawling is the process where Google, Bing, and other search engines discover and understand your website. Indexing is the process where search engines collect and store information about your website.

A simple way of checking crawling and indexing issues is using webmaster tools. For example, Google Search Console is a free tool by Google that shows your site’s performance on search results, helps uncover bugs, and allows you to submit your site to Google.

If you haven’t connected to the webmaster tool, then see our guide on how to add a WordPress site to Google Search Console.

In Google Search Console, you can head to the ‘Pages’ report. Here, you’ll see pages that are indexed and not indexed.

Page indexing in search console

Next, you can scroll down to the ‘Why pages aren’t indexed’ report.

Google Search Console will show you crawling and indexing errors on your website and which pages are affected by them. You can then resolve these issues, so your web pages can appear in Google search results.

Why pages are not indexed

Besides that, you can also check indexing and crawling issues for individual URLs.

Simply enter the page link in the URL inspection tool at the top. Google Search Console will then show you a report on whether the URL is indexed and on Google.

URL inspection tool

If it is not, then you’ll see a ‘URL is not on Google’ message. To fix this, you can click the ‘Request Indexing’ button so Google can crawl and index your page.

3. Make Sure Your Website is Secure with HTTPS

Another important thing to check from a technical SEO framework standpoint is whether your website is secure or not.

Google and other search engines will give preference to sites that use HTTPS over those that use HTTP. To secure your site, you will need an SSL certificate to encrypt the connection between your website server and the user’s browser.

You can check this by looking for the padlock sign in your browser’s search bar at the top.

Look for padlock sign

Most WordPress hosting companies now offer free SSL with all their plans. You can ask your host to see if they offer that.

For more details, please see our guide on how to move your WordPress site from HTTP to HTTPS.

Broken links are bad for your website’s SEO framework, and it negatively impacts your user experience. These are links that no longer exist and will return a 404 error.

Since search engine crawlers find different pages on your website by following internal links. A broken link can stop them from discovering new content. As a result, your page might not get indexed in the search results.

Similarly, if a visitor clicks on a link and is unable to find a page they’re looking for, then they might exit your website.

The MonsterInsights custom 404 error design

With All in One SEO (AIOSEO), you can easily find and fix broken links on your WordPress website.

It offers a powerful redirection manager that helps track 404 errors on your website and lets you set up permanent 301 redirects to fix broken links.

404 error logs in AIOSEO

To learn more, you can follow our detailed guide on how to find and fix broken links in WordPress.

5. Look for Duplicate Versions of Your Site

It is important that Google and other search engines only index one version of your website.

Your website can have different versions, but they should all point to one version. For example, you can have a site that has www and non-www version or HTTP and HTTPS version:

https://www.example.com
https://example.com
http://www.example.com
http://example.com

Whether you choose a www or non-www version, all the URLs should redirect to the primary WordPress URL. Otherwise, Google will consider each version as a different website.

This can negatively impact your overall SEO rankings. Search engines won’t know which version to index, and it could cause duplicate content issues.

You can check the primary URL for your site by going to Settings » General from the WordPress dashboard. Next, look at the web address in the ‘WordPress Address (URL)’ and ‘Site Address (URL)’ fields.

Look for primary URL

With AIOSEO, you can automatically set the proper canonical URL in your site header, so search engines will know your preference.

6. Use SEO-Friendly URL Structures

After setting a primary URL for search engines to index, you can now check the URL structure of your website.

URL structure plays an important role in your SEO. Having an SEO-friendly URL structure will help Google, Bing, and other search engines easily crawl your pages and understand your content.

Here’s an example of a bad URL structure:

https://www.example.com/category.php?id=42012

Instead, you should be using URLs that describe the content, like:

https://www.example.com/blog/how-to-start-a-wordpress-website

You can create SEO-friendly URLs by making sure that they are short and descriptive. Besides that, don’t forget to include a keyword in the permalinks, use hyphens to separate words, keep all the words in lowercase, and don’t use stop words.

Pro Tip: Don’t include numbers in your URL slugs, either. That way, you can update your content in the future

7. Ensure Your Site is Mobile Friendly

The next item in the technical SEO framework checklist is to ensure your WordPress site is mobile responsive.

With Google now going mobile-first, it will now index your site’s mobile version instead of the desktop version.

You can check your site’s mobile responsiveness by using the free Google Mobile-Friendly Test tool.

Mobile friendly test

Simply enter your website URL and click the ‘Test URL’ button.

The tool will then show results for your website. You can see if it is mobile-ready or not.

See mobile friendly test tool results

If your site is not mobile-friendly, then you can start by changing to a responsive WordPress theme.

You can also follow our guide on how to change your WordPress theme without losing any data or traffic.

8. Check Your Website Speed and Improve Performance

Your website speed is also a critical part of your WordPress technical SEO framework. Google uses page load speed as a ranking factor and will rank fast-loading sites higher compared to slow-performing websites.

You can check website load time by running a site speed test. For instance, you can use MonsterInsights, which is the best Google Analytics plugin that shows a site speed report inside your WordPress dashboard.

You’ll first need to install Google Analytics to your WordPress site using MonsterInsights.

After that, you can head to the Insights » Reports page from your WordPress admin panel. Next, you can go to the ‘Site Speed’ tab. Here, you’ll see an overall score for your website speed for desktop and mobile.

Site speed report

The report will also show other metrics that are important for measuring your website speed.

If you scroll down, then MonsterInsights offers recommendations and benchmark goals for each metric you should target.

Recommendations for improving speed

To improve website load time, you can see our ultimate guide to boost WordPress speed and performance.

A quick tip that you can use to improve your website speed is minifying your CSS and JavaScript files.

The term minified means reducing the size of website files by removing white spaces, lines, and unnecessary characters. When a user visits your website, different files are sent to the user’s browser, which includes CSS, HTML, and JavaScript files.

By reducing the file size, you can significantly improve website speed and performance. There are many WordPress plugins and hosting services that allow you to minify CSS and JavaScript files, like WP Rocket and SiteGround.

For more details, you can check out our guide on how to minify CSS and JavaScript files in WordPress.

9. Improve Your Internal Linking Structure and Remove Orphaned Pages

Internal links play an important role in your website’s technical SEO framework. Search engines reward websites that have a proper internal linking structure without too many orphaned pages.

AIOSEO has a powerful SEO Link Assistant feature that makes it easy for you to discover link opportunities and even automate the process for you.

It is the best internal linking plugin for WordPress that crawls the links on your WordPress website and provides a detailed report. You can see the number of internal links, outbound links, and affiliate links for each post and page.

AIOSEO Link assistant dashboard

You can see all the link suggestions in one place, and it can even automatically go back and add internal links in your older posts with a single click.

Find internal link opportunities and orphaned pages

10. Generate XML Sitemaps and Submit Them to Search Engines

Another important part of technical SEO framework is making it easier for search engines to find your content. One of the ways you can do that is by creating an XML sitemap.

It tells search engines about the important pages on your website. This way, search engine bots can crawl your site faster and index your content. While a sitemap won’t boost your rankings, it will improve the overall crawling and indexing process.

You can create and customize the sitemap using AIOSEO. The plugin will automatically generate a sitemap upon activation. Besides, it also lets you create a video sitemap, a news sitemap, an HTML sitemap, and an RSS sitemap.

AIOSEO sitemap options

Once you’ve created a sitemap, you can then submit it to different search engines using their webmaster tools.

For instance, Google Search Console gives the option to enter the sitemap URL and submit it to the search engine. To learn more, you can see our guide on how to submit your site to search engines.

Submit sitemap to Google

Similarly, you can also add your site to Bing Webmaster Tool and then submit an XML sitemap to improve crawling and indexing.

11. Use Schema Markup for Rich Snippets

The next technical SEO framework item you should check is schema markup. It helps search engines understand your content better and how it will appear on the search results.

You can use schema markup for recipes, reviews, events, organizations, FAQs, blog posts, product pages, multiple locations for local businesses, and more.

Search engines can use this information and display rich results. It also helps capture Google featured snippets, which can increase organic clicks and traffic.

For example, here’s how Google shows recipes, ingredients, ratings, cooking time, and other information for blog posts that use a recipe schema markup.

Recipe schema markup

You can easily add a schema markup in WordPress and WooCommerce using AIOSEO.

The plugin lets you choose the schema type depending on your content, and it takes care of the rest.

Schema markup settings in AIOSEO

With AIOSEO, you can also add completely custom schema markups based on your needs using the WordPress custom schema generator feature. This can help you get star ratings, and other rich snippets in Google.

AIOSEO Custom Schema Generator for WordPress

12. Optimize Your Robots.txt File for SEO

Robots.txt is a text file that specifies instructions for search engine bots on how to crawl your website. You can tell which pages to crawl and which pages to skip while crawling.

Here’s what a robots.txt file would look like for a WordPress site:

User-Agent: *
Allow: /wp-content/uploads/
Disallow: /wp-admin/
Disallow: /readme.html
Disallow: /refer/
 
Sitemap: http://www.example.com/post-sitemap.xml
Sitemap: http://www.example.com/page-sitemap.xml

Adding a robots.txt file helps save the crawl quota. A search engine crawler will crawl a certain number of pages during a session. If they don’t finish crawling all the pages on your site, they will resume crawling in the next session.

This can slow down the indexing of your content, and it will appear in search results after some delay. That’s why optimizing the robots.txt file is an important component of the technical SEO framework.

You can disallow pages unnecessary pages like the WordPress admin area, theme folder, plugin files, and more. This way, you get to save the crawl quota and allow search engine bots to crawl even more pages.

On the other hand, you can add sitemaps and other important pages to robots.txt. This way, search engines will crawl and index them as quickly as possible.

A simple way of optimizing the robots.txt file is by using AIOSEO. You can enable custom robots.txt using the plugin and add rules to allow or disallow search engines to crawl.

Optimize robots txt file

To learn more, please see our guide on how to optimize your WordPress robots.txt for SEO.

13. Make Sure Google Doesn’t Flag Your Site for Malware

Another important technical SEO checklist item is to ensure your site isn’t flagged by Google for malware or unwanted software.

If your website is a security risk for users, then Google will show the following warning message:

Google safe browsing malware warning

This can be really bad for your WordPress SEO. It will keep people away from visiting your website, and impact your rankings, and overall website traffic.

To scan for malicious files on your website, you can use a WordPress security scanner. At WPBeginner, we use Sucuri as it is the best WordPress firewall and security plugin. It checks for vulnerabilities like malware, spam injection, malicious code, and helps clean up the website.

You can also take a look at our guide on how to fix ‘this site ahead contains harmful programs’ error in WordPress, if Google flags your site for malware.

14. Use Server Side Rendering vs Client Side Rendering

Another technical SEO best practice is ensuring that your site’s JavaScript renders on the server side and not on the client side.

Server-side rendering is when the JavaScript files render on the website server. While client-side rendering is when the JavaScript files render in the user’s browser.

Client-side rendering is bad for your site’s user experience and SEO. All the burden of loading your site quickly falls on the visitor. Plus, search engine bots use JavaScript resources for crawling and indexing your content. This could result in JavaScript content being missed by crawlers and not included in the search engine index.

With server-side rendering, your website server ensures everything loads quickly. This way, you get a better user experience, faster page load speed, and reduce any risk of content being missed from indexing.

One way of ensuring that JavaScript is rendering on your site’s server is by running a site speed test. If your website speed is low, then it could be because of this issue. You can also look at crawled pages in Google Search Console and see if Google missed any content while crawling. If it did, then it could be because of JaveScript-related SEO issues.

That’s it. You’ve made it to the end of the list. You don’t need to go through each and every point in the technical SEO framework at once. Simply go one step at a time and work your way through the list.

We hope this article helped you learn about WordPress technical SEO framework. You may also want to see our comparison of the best keyword research tools, and our proven tips on how to increase your blog traffic.

If you liked this article, then please subscribe to our YouTube Channel for WordPress video tutorials. You can also find us on Twitter and Facebook.

The post 14-Step Technical WordPress SEO Framework (Proven Checklist) first appeared on WPBeginner.

How to Add Multiple Locations Schema for Local Business in WordPress

Are you managing a local business website that have multiple physical locations?

In that case, you would need to add local business schema markup for multiple locations on your site, so Google and other search engines can display detailed information about your various business locations.

In this article, we’ll show you how to properly add local business schema markup for multiple locations in WordPress to improve your SEO.

How to Create multiple locations with schema markup in WordPress

Why Create Local Business Schema Markup for Multiple Locations?

Schema markup or structured data is HTML code that provides more details about your content to search engines.

By adding schema markup to the source code of your WordPress website, search engines can easily find the extra information and display it in the search results as featured snippets. For instance, you can show FAQs in search results, add Google Maps in WordPress, display recipes, and more.

If you have multiple business locations like retail outlets, restaurants, or regional offices, then you can display them on Google and Bing search results through schema markup.

For example, if you search for McDonald’s locations in Florida, Google will show you a featured snippet with the different destinations and a map with pinned locations.

Multiple location map preview on Google

Creating multiple local business locations with schema markup helps improve your website SEO rankings.

Since the featured snippets are placed right at the top of the search results, it helps you to increase your click rate in search. That means more organic traffic and more conversions.

That being said, let’s take a look at how you can create local business schema for multiple business locations in WordPress.

Creating Multiple Locations Using Schema Markup

The easiest way of setting up local business schema markup in WordPress is by using the All in One SEO (AIOSEO) plugin. It’s the best SEO tool for WordPress that’s used by over 3 million website owners and professionals.

AIOSEO removes the need for any technical knowledge or hiring an expert to boost your search engine visibility.

For this tutorial, we’ll be using the AIOSEO Pro license because it includes the Local SEO addon which is what you need to dominate local business SEO. It also other powerful features like the redirection manager, advanced sitemap, link assistant, and more. If you’re on a budget, then you can use the free version of AIOSEO to get started with SEO optimization.

The first thing you’ll need to do is install and activate the AIOSEO plugin. For more details, please see our guide on how to install a WordPress plugin.

Upon activation, you’ll see the setup wizard. Go ahead and click the ‘Let’s Get Started’ button.

All in One SEO setup

After that, follow the onscreen instructions in the setup wizard to configure the plugin. If you need help, then please see our guide on how to properly setup AIOSEO in WordPress.

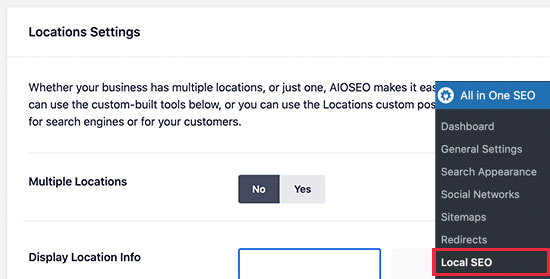
Next, you’ll need to head over to All in One SEO » Local SEO from your WordPress dashboard and click the ‘Activate Local SEO’ button.

Activate local SEO

Once the Local SEO addon is active, you’ll see different Location Settings.

Go ahead and click the ‘Multiple Locations’ toggle to enable the option. This will add a new menu in your WordPress admin panel called Locations.

Enable multiple locations

After that, you can scroll down to the ‘Advanced Settings’ section.

Here you can see the permalink AIOSEO will use to show your multiple business locations and location category. If you wish to use a custom link, then simply check the ‘Use custom slug’ box and enter your permalink url structure.

Next, you can also switch on the ‘Enhanced Search’ option, which will include your business locations in your WordPress site search results.

Advanced settings for local SEO

When you’re done, don’t forget to click the ‘Save Changes’ button.

More advanced settings

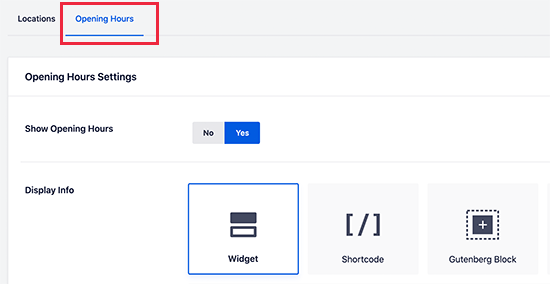
Next, you can go to the ‘Opening Hours’ tab and configure the times for your local businesses.

By default, the ‘Show Opening Hours’ option will be set to Yes. If you don’t want to show opening hours, then simply click the toggle to No.

Configure opening timings

After that, you can scroll down and change the labels for when your business is open or closed.

There are also options to change the opening and closing timings for specific days or set it to open 24/7.

Set opening and closing hours

Note: The opening hours will be used across all the locations you add in WordPress. However, you can disable them for specific locations in the content editor.

AIOSEO also lets you integrate Google Maps with your WordPress website which helps show your local business on Google Maps. For more details, you can see our guide on how to add Google Maps in WordPress.

Next, you’ll need to add your multiple business locations in WordPress.

Adding Multiple Business Locations in WordPress

When you enable the Multiple Locations option in AIOSEO, a new ‘Locations’ option will appear in your WordPress admin panel.

To add your local business locations, simply go to Locations » Add New from your WordPress dashboard.

Add a new location

Next, you’ll need to add your location details in the WordPress content editor. Here you can add a title for your business location, which can be the location name.

Under the title, you can add more details or description about your location. You can also create location categories from the settings panel on your right.

Add title and description for your location

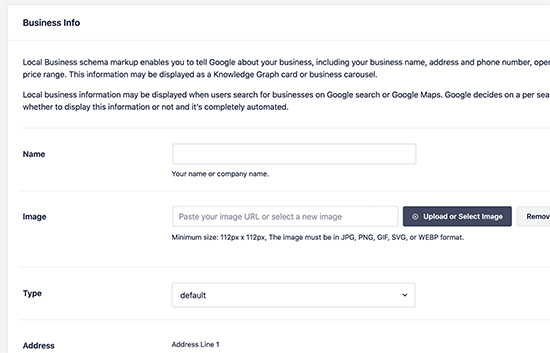
After that, simply scroll down to the AIOSEO Local Business metabox.

In the ‘Business Info’ section, you can add your business name, select a business type (industry), add an image, enter the address for your location, business phone, payment info, area served, and more.

Enter local business details

Next, you can switch to the ‘Opening Hours’ tab under the AIOSEO Local Business metabox.

AIOSEO will use the default settings automatically. However, you can disable the ‘Use Defaults’ option and then configure the opening and closing hours for your local business.

Disable default opening hours

Next, you can go to the ‘Maps’ tab and configure how your local business will appear on Google Maps.

For instance, you can change map style and upload a custom marker to pin your location on the map.

Add maps info

When you’re done, go ahead and publish your location page.

Now you can simply repeat this process for other locations you want to add to your WordPress website.

We hope this article helped you learn how to create multiple locations in WordPress with schema markup. You may also want to see our guide on must have WordPress plugins for business websites, and our comparison of the best email marketing services for small business.

If you liked this article, then please subscribe to our YouTube Channel for WordPress video tutorials. You can also find us on Twitter and Facebook.

The post How to Add Multiple Locations Schema for Local Business in WordPress first appeared on WPBeginner.

How to Get a Google Featured Snippet with Your WordPress Site

Do you want to get a Google featured snippet with your WordPress site?

Featured snippets are the highlighted results for a Google search. Users are more likely to click on a featured snippet than a plain search result.

In this article, we will show you how to get a Google featured snippet with your WordPress site without any technical knowledge.

how to get Google featured snippets for your WordPress website

Here is a quick overview of things we’ll cover in this article:

What are Google Featured Snippets?

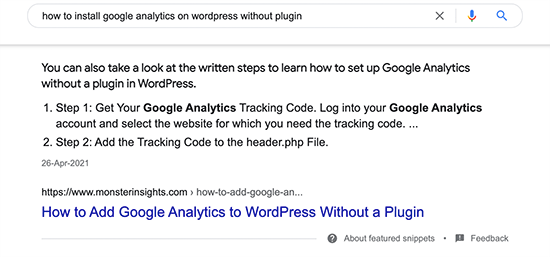
Google featured snippets are highlighted results that’s shown at the top of the page above position one that’s why they’re also known as position 0.

In the featured snippet, Google may display a search result in the Answer box or highlight it using microdata from your website.

For example, if Google thinks that your website will answers user’s question adequately, then it will appear on top with relevant text displayed as the description.

Answer box

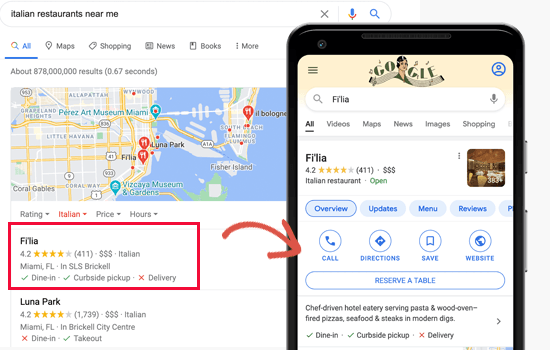
Similarly, Google also uses Schema.org metadata to fetch important information from websites and display them in search results at the top. For example, if you search for a local business, then their relevant business information will be at the top.

Local search results preview

Featured snippets can enhance product pages for your online store, better showcase your recipes, highlight your real estate listings, and more.

Product results with ratings and reviews

The enhanced search display of featured snippets improves your organic click-through rate and brings more free traffic to your website.

This is why all smart business owners optimize their website, so they can have maximum chances of appearing as featured snippets in Google search.

That being said, let’s take a look at how to get Google featured snippets for your WordPress posts and pages.

Getting Google Featured Snippet using All in One SEO

Google uses Schema.org metadata and their knowledge graph API to display different types of featured snippets.

Schema markup is a special vocabulary that you can use in your content’s HTML code to give search engines more context about your website and individual pages.

In the early days, this used to be hard for small businesses because it involved a lot of coding.

But that’s not the case anymore, thanks to plugins like All in One SEO for WordPress.

It is the best WordPress SEO plugin on the market that’s used by over 2 million websites. They help you easily optimize your website for higher search engine rankings.

AIOSEO automatically adds Schema.org support which helps you provide information for Google Knowledge Graph. It has full WooCommerce SEO support, local SEO, images, news, video optimization, and more.

First, you need to install and activate the All in One SEO for WordPress plugin. For more details, see our step by step guide on how to install a WordPress plugin.

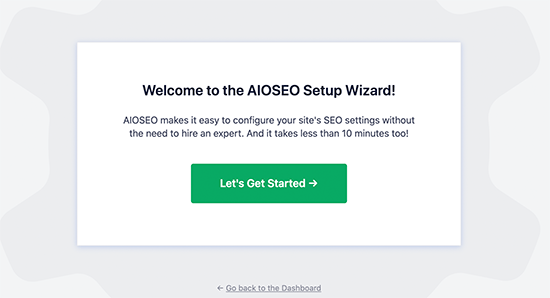
Upon activation, you’ll be asked to run the setup wizard. It is the easiest way to quickly select the best SEO settings for your website.

All in One SEO set up wizard

Need help with the setup? See our complete guide on how to install and set up All in One SEO for WordPress.

Now, if you have followed the setup wizard, the basic settings for your website to appear in featured snippets are already set.

But we’ll show you what they do and how to change them if you need to.

Setting up Knowledge Graph Information in WordPress

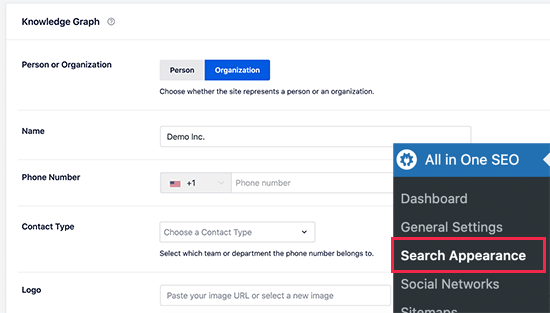
First, you need to visit All in One SEO » Search Appearance page and scroll down to the Knowledge Graph section.

Knowledge graph information

From here, you can tell the search engines who your website represents (i.e. An organization or an individual). After that, you can provide your business phone number, logo, and contact type information.

Don’t forget to click on the Save Changes button to store your settings.

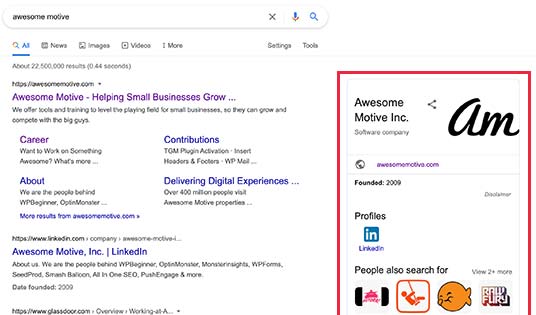
Knowledge Graph information is used by search engines to display knowledge panels. These panels appear when someone searches for an organization or individual person.

Knowledge panels in Google Search

Adding Local Business Information to Featured Snippets

More than 40% of all searches on the internet have a local intent. Majority of these searches lead to sales as users are looking for directions and things to buy near them.

Many businesses and organizations have retail locations and offices that customers can visit.

You can add this information using All in One SEO and let search engines automatically display it in featured snippets.

Local search results preview

First, go to the All in One SEO » Local SEO page and activate the Local SEO feature.

Choose single or multiple locations

Upon activation, you can choose if your organization or business has multiple locations. If you do, then you can go ahead and start adding those locations otherwise you can scroll down to add your business information.

Business information

After that, switch to the Opening Hours tab to add your business hours.

Opening hours for your business

For more details, check out our article on how to add business hours in WordPress.

Finally, you need to connect and verify your business using Google My Business website. This gives you more control over your business’s appearance in Google search results and improves your chances appearing more often in featured snippets.

Add SEO Schema Markup in WordPress Posts / Pages

All in One SEO automatically adds the correct Schema markup for your content. However, you can review these settings and change them if needed.

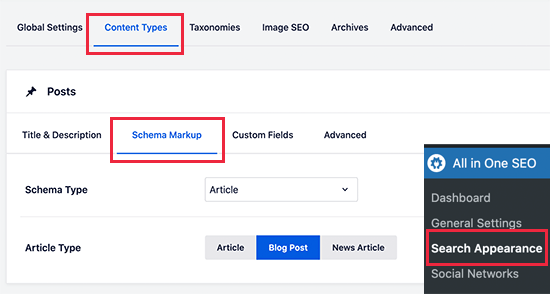
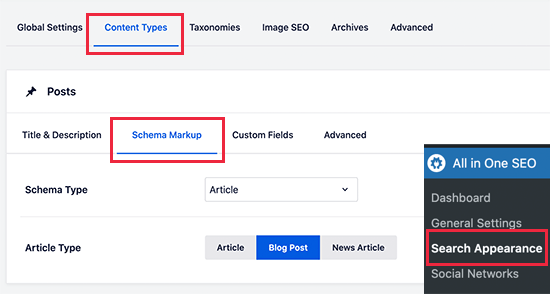
Simply go to All in One SEO » Search Appeaerance page and switch to the content types tab. From here, you’ll see all your post types listed (posts, pages, products).

You need to click on the ‘Schema’ for a post type to change its default settings.

Default schema settings

What if you didn’t want to change schema type for all posts? Well, AIOSEO let’s you change Schema markup for individual posts, pages, and other post types as well.

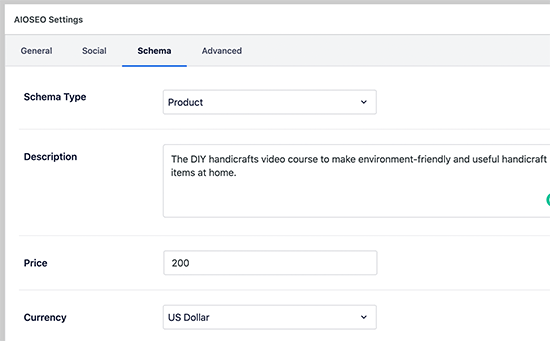
Simply edit the post or page you want to change and scroll down to the AIOSEO settings box below the post editor.

Default schema settings

This feature is particularly useful for businesses that use Pages to sell products with or without using an Ecommerce plugins. You can then simply edit your product landing page and change its schema type to Product.

Changing any page schema to a product in WordPress

Another way to turn your search listing into a more enhanced featured snippet is by using Breadcrumb navigation.

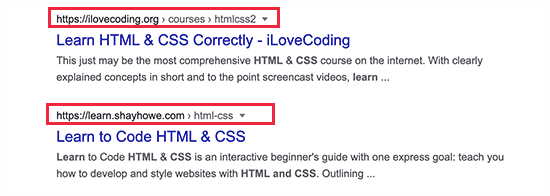
Breadcrumb navigation tells users where they are on a website relative to the homepage. It is then displayed as a trail of links and would also appear in search results.

Breadcrumb navigation in search results

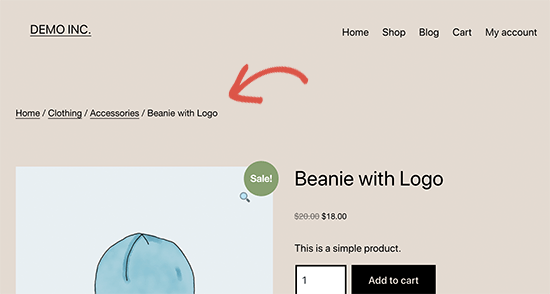
You can also display the breadcrumb navigation trail on your website. This allows users to go up and down, browse categories, and discover more products and content.

Breadcrumbs on a WooCommerce store product page

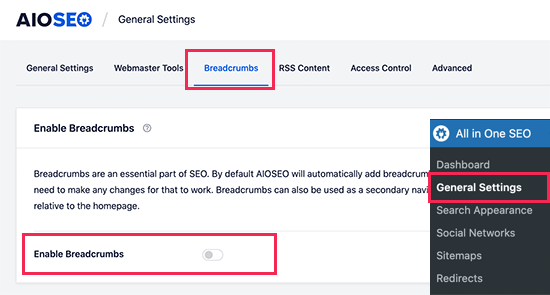
For search engines, All in One SEO automatically adds the required markup to your website’s HTML code. However, if you want to display breadcrumbs on your site too, then you can go to All in One SEO » General Settings page and switch to the Breadcrumbs tab.

Enable breadcrumbs display in All in One SEO

From here, you need to Enable Breadcrumbs and then use one of the available methods to display the links. For more details, check out our article on how to add breadcrumb navigation links in WordPress.

Get Site Links for WordPress in Google Search

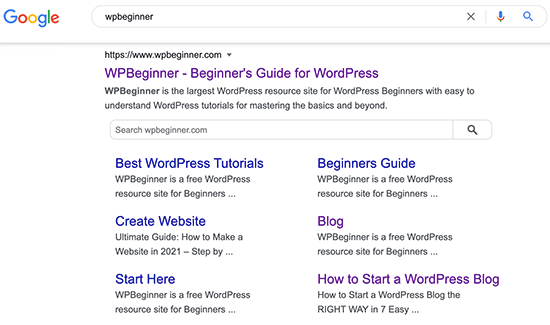
Site Links are the additional links that Google may show below a particular search term. They usually appear for brand and website names, but they may appear for other types of searches as well.

Site Links

To get site links, you need to add your website to Google Search Console and submit your XML sitemap.

Add sitemap to Google Search Console

You can increase your chances of getting site links by creating a proper website structure. This includes adding all the important pages for your website and use categories to properly organize your website structure.

Appear in The Answer Box for Google Search

What’s better than ranking #1 for a keyword?

Ranking #0 in the answer box.

Answer boxes are the search results that appear on the top and Google considers them to be answering user’s search intent.

Answer box

Answer boxes have an average click-through rate of 32% which makes them highly lucrative. Particularly for keywords with a purchase intent Answer boxes can lead to sales and boost conversions.

The only way to appear in the answer boxes is to improve the quality of your content. Make sure it is comprehensive and answers users’ questions from different angles.

See our detailed tutorial on how to appear in the Google Answer boxes with your WordPress posts and pages.

We hope this tutorial helped you get featured snippets with your WordPress site. You may also want to see our guide on how to get more traffic to your website with proven tips, and our comparison of the best email marketing services.

If you liked this article, then please subscribe to our YouTube Channel for WordPress video tutorials. You can also find us on Twitter and Facebook.

The post How to Get a Google Featured Snippet with Your WordPress Site appeared first on WPBeginner.