I’m always on the wrong branch. I’m either on master or main working on something that should be on a fix or feature branch. Or I’m on the last branch I was working on and should have cut a new branch. Oh well. It’s never that big of a deal. Basically means switching unstaged changes to a new branch. This is what I normally do:
Switching unstaged changes to a new branch with the Git CLI it looks like this
Here’s how I generally switch unstaged changes to a new branch in Git:
git status
git stash --include-untracked
git checkout master
git pull
git branch content/sharis
git checkout content/sharis
git stash pop
Yeah I commit jpgs right to git.
Switching unstaged changes to a new branch in Git Tower it looks like this
I think you could theoretically do each of those steps to switch unstaged changed to a new branch, one-by-one, in Git Tower, too, but the shortcut is that you can make the branch and double-click over to it.
Sorry, I’m just doing Git Tower but there are lots of other Git GUIs that probably have clever ways of doing this as well.
But there is a new fancy way!
This way of switching unstaged changes to a new branch is new to me anyway, and it was new to Wes when he tweeted this:
TIL about `git switch`, which allows you to move your unstaged changes to a new branch.
Seems fairly new. I used to `git stash`, new branch, and then `git stash apply` pic.twitter.com/6Rd0fCJOcV
In this third installment of our “Advanced Git” series, we’ll look at pull requests — a great feature which helps both small and larger teams of developers. Pull requests not only improve the review and the feedback process, but they also help tracking and discussing code changes. Last, but not least, pull requests are the ideal way to contribute to other repositories you don’t have write access to.
Part 3: Better Collaboration With Pull Requests You are here!
Part 4: Merge Conflicts Coming soon!
Part 5: Rebase vs. Merge
Part 6: Interactive Rebase
Part 7: Cherry-Picking Commits in Git
Part 8: Using the Reflog to Restore Lost Commits
What are pull requests?
First of all, it’s important to understand that pull requests are not a core Git feature. Instead, they are provided by the Git hosting platform you’re using: GitHub, GitLab, Bitbucket, AzureDevops and others all have such a functionality built into their platforms.
Why should I create a pull request?
Before we get into the details of how to create the perfect pull request, let’s talk about why you would want to use this feature at all.
Imagine you’ve just finished a new feature for your software. Maybe you’ve been working in a feature branch, so your next step would be merging it into the mainline branch (master or main). This is totally fine in some cases, for example, if you’re the only developer on the project or if you’re experienced enough and know for certain your team members will be happy about it.
By the way: If you want to know more about branches and typical branching workflows, have a look at our second article in our “Advanced Git” series: “Branching Strategies in Git.”
However, what if your changes are a bit more complex and you’d like someone else to look at your work? This is what pull requests were made for. With pull requests you can invite other people to review your work and give you feedback.
Once a pull request is open, you can discuss your code with other developers. Most Git hosting platforms allow other users to add comments and suggest changes during that process. After your reviewers have approved your work, it might be merged into another branch.
Having a reviewing workflow is not the only reason for pull requests, though. They come in handy if you want to contribute to other repositories you don’t have write access to. Think of all the open source projects out there: if you have an idea for a new feature, or if you want to submit a patch, pull requests are a great way to present your ideas without having to join the project and become a main contributor.
This brings us to a topic that’s tightly connected to pull requests: forks.
Working with forks
A fork is your personal copy of an existing Git repository. Going back to our Open Source example: your first step is to create a fork of the original repository. After that, you can change code in your own, personal copy.
After you’re done, you open a pull request to ask the owners of the original repository to include your changes. The owner or one of the other main contributors can review your code and then decide to include it (or not).
Important Note: Pull requests are always based on branches and not on individual commits! When you create a pull request, you base it on a certain branch and request that it gets included.
Making a reviewer’s life easier: How to create a great pull request
As mentioned earlier, pull requests are not a core Git feature. Instead, every Git platform has its own design and its own idea about how a pull request should work. They look different on GitLab, GitHub, Bitbucket, etc. Every platform has a slightly different workflow for tracking, discussing, and reviewing changes.
Desktop GUIs like the Tower Git client, for example, can make this easier: they provide a consistent user interface, no matter what code hosting service you’re using.
Having said that, the general workflow is always the same and includes the following steps:
If you don’t have write access to the repository in question, the first step is to create a fork, i.e. your personal version of the repository.
Create a new local branch in your forked repository. (Reminder: pull requests are based on branches, not on commits!)
Make some changes in your local branch and commit them.
Push the changes to your own remote repository.
Create a pull request with your changes and start the discussion with others.
Let’s look at the pull request itself and how to create one which makes another developer’s life easier. First of all, it should be short so it can be reviewed quickly. It’s harder to understand code when looking at 3,000 lines instead of 30 lines.
Also, make sure to add a good and self-explanatory title and a meaningful description. Try to describe what you changed, why you opened the pull request, and how your changes affect the project. Most platforms allow you to add a screenshot which can help to demonstrate the changes.
Approve, merge, or decline?
Once your changes have been approved, you (or someone with write access) can merge the forked branch into the main branch. But what if the reviewer doesn’t want to merge the pull request in its current state? Well, you can always add new commits, and after pushing that branch, the existing pull request is updated.
Alternatively, the owner or someone else with write access can decline the pull request when they don’t want to merge the changes.
Safety net for developers
As you can see, pull requests are a great way to communicate and collaborate with your fellow developers. By asking others to review your work, you make sure that only high-quality code enters your codebase.
If you want to dive deeper into advanced Git tools, feel free to check out my (free!) “Advanced Git Kit”: it’s a collection of short videos about topics like branching strategies, Interactive Rebase, Reflog, Submodules and much more.
Almost all version control systems (VCS) have some kind of support for branching. In a nutshell, branching means that you leave the main development line by creating a new, separate container for your work and continue to work there. This way you can experiment and try out new things without messing up the production code base. Git users know that Git’s branching model is special and incredibly powerful; it’s one of the coolest features of this VCS. It’s fast and lightweight, and switching back and forth between the branches is just as fast as creating or deleting them. You could say that Git encourages workflows that use a lot of branching and merging.
Git totally leaves it up to you how many branches you create and how often you merge them. Now, if you’re coding on your own, you can choose when to create a new branch and how many branches you want to keep. This changes when you’re working in a team, though. Git provides the tool, but you and your team are responsible for using it in the optimal way!
In this article, I’m going to talk about branching strategies and different types of Git branches. I’m also going to introduce you to two common branching workflows: Git Flow and GitHub Flow.
Part 3: Better Collaboration With Pull Requests Coming soon!
Part 4: Merge Conflicts
Part 5: Rebase vs. Merge
Part 6: Interactive Rebase
Part 7: Cherry-Picking Commits in Git
Part 8: Using the Reflog to Restore Lost Commits
Teamwork: Write down a convention
Before we explore different ways of structuring releases and integrating changes, let’s talk about conventions. If you work in a team, you need to agree on a common workflow and a branching strategy for your projects. It’s a good idea to put this down in writing to make it accessible to all team members.
Admittedly, not everyone likes writing documentation or guidelines, but putting best practise on record not only avoids mistakes and collisions, it also helps when onboarding new team members. A document explaining your branching strategies will help them to understand how you work and how your team handles software releases.
Here are a couple of examples from our own documentation:
master represents the current public release branch
next represents the next public release branch (this way we can commit hotfixes on master without pulling in unwanted changes)
feature branches are grouped under feature/
WIP branches are grouped under wip/ (these can be used to create “backups” of your personal WIP)
A different team might have a different opinion on these things (for example on “wip” or “feature” groups), which will certainly be reflected in their own documentation.
Integrating changes and structuring releases
When you think about how to work with branches in your Git repositories, you should probably start with thinking about how to integrate changes and how to structure releases. All those topics are tightly connected. To help you better understand your options, let’s look at two different strategies. The examples are meant to illustrate the extreme ends of the spectrum, which is why they should give you some ideas of how you can design your own branching workflow:
Mainline Development
State, Release, and Feature Branches
The first option could be described as “always be integrating” which basically comes down to: always integrate your own work with the work of the team. In the second strategy you gather your work and release a collection of it, i.e. multiple different types of branches enter the stage. Both approaches have their pros and cons, and both strategies can work for some teams, but not for others. Most development teams work somewhere in between those extremes.
Let’s start with the mainline development and explain how this strategy works.
Mainline Development
I said it earlier, but the motto of this approach is “always be integrating.” You have one single branch, and everyone contributes by committing to the mainline:
Remember that we’re simplifying for this example. I doubt that any team in the real world works with such a simple branching structure. However, it does help to understand the advantages and disadvantages of this model.
Firstly, you only have one branch which makes it easy to keep track of the changes in your project. Secondly, commits must be relatively small: you can’t risk big, bloated commits in an environment where things are constantly integrated into production code. As a result, your team’s testing and QA standards must be top notch! If you don’t have a high-quality testing environment, the mainline development approach won’t work for you.
State, Release and Feature branches
Let’s look at the opposite now and how to work with multiple different types of branches. They all have a different job: new features and experimental code are kept in their own branches, releases can be planned and managed in their own branches, and even various states in your development flow can be represented by branches:
Remember that this all depends on your team’s needs and your project’s requirements. While this approach may look complicated at first, it’s all a matter of practise and getting used to it.
Now, let’s explore two main types of branches in more detail: long-running branches and short-lived branches.
Long-running branches
Every Git repository contains at least one long-running branch which is typically called master or main. Of course, your team may have decided to have other long-running branches in a project, for example something like develop, production or staging. All of those branches have one thing in common: they exist during the entire lifetime of a project.
A mainline branch like master or main is one example for a long-running branch. Additionally, there are so-called integration branches, like develop or staging. These branches usually represent states in a project’s release or deployment process. If your code moves through different states in its development life cycle — e.g. from developing to staging to production — it makes sense to mirror this structure in your branches, too.
One last thing about long-running branches: most teams have a rule like “don’t commit directly to a long-running branch.” Instead, commits are usually integrated through a merge or rebase. There are two main reasons for such a convention:
Quality: No untested or unreviewed code should be added to a production environment.
Release bundling and scheduling: You might want to release new code in batches and even schedule the releases in advance.
Next up: short-lived branches, which are usually created for certain purposes and then deleted after the code has been integrated.
Short-lived branches
In contrast to long-running branches, short-lived branches are created for temporary purposes. Once they’ve fulfilled their duty and the code has been integrated into the mainline (or another long-lived branch), they are deleted. There are many different reasons for creating a short-lived branch, e.g. starting to work on a new and experimental feature, fixing a bug, refactoring your code, etc.
Typically, a short-lived branch is based on a long-running branch. Let’s say you start working on a new feature of your software. You might base the new feature on your long-running main branch. After several commits and some tests you decide the work is finished. The new feature can be integrated into the main branch, and after it has been merged or rebased, the feature branch can be deleted.
Two popular branching strategies
In the last section of this article, let’s look at two popular branching strategies: Git Flow and GitHub Flow. While you and your team may decide on something completely different, you can take them as inspiration for your own branching strategy.
Git Flow
One well-known branching strategy is called Git Flow. The main branch always reflects the current production state. There is a second long-running branch, typically called develop. All feature branches start from here and will be merged into develop. Also, it’s the starting point for new releases: developers open a new release branch, work on that, test it, and commit their bug fixes on such a release branch. Once everything works and you’re confident that it’s ready for production, you merge it back into main. As the last step, you add a tag for the release commit on main and delete the release branch.
Git Flow works pretty well for packaged software like (desktop) applications or libraries, but it seems like a bit of an overkill for website projects. Here, the difference between the main branch and the release branch is often not big enough to benefit from the distinction.
If you’re using a Git desktop GUI like Tower, you’ll find the possible actions in the interface and won’t have to memorize any new commands:
GitHub Flow
If you and your team follow the continuous delivery approach with short production cycles and frequent releases, I would suggest looking at GitHub Flow.
It’s extremely lean and simple: there is one long-running branch, the default main branch. Anything you’re actively working on has its own separate branch. It doesn’t matter if that’s a feature, a bug fix, or a refactoring.
What’s the “best” Git branching strategy?
If you ask 10 different teams how they’re using Git branches, you’ll probably get 10 different answers. There is no such thing as the “best” branching strategy and no perfect workflow that everyone should adopt. In order to find the best model for you and your team, you should sit down together, analyze your project, talk about your release strategy, and then decide on a branching workflow that supports you in the best possible way.
If you want to dive deeper into advanced Git tools, feel free to check out my (free!) “Advanced Git Kit”: it’s a collection of short videos about topics like branching strategies, Interactive Rebase, Reflog, Submodules and much more.
It can be a jumbled assortment of changes from all sorts of topics: some lines of code for a bugfix, a stab at rewriting an old module, and a couple of new files for a brand new feature.
Or, with a little bit of care, it can be something that helps us stay on top of things. It can be a container for related changes that belong to one and only one topic, and thereby make it easier for us to understand what happened.
In this post, we’re talking about what it takes to produce the latter type of commit or, in other words: the “perfect” commit.
Is it really necessary to compose commits in a careful, thoughtful way? Can’t we just treat Git as a boring backup system? Let’s revisit our example from above one more time.
If we follow the first path – where we just cram changes into commits whenever they happen – commits lose much of their value. The separation between one commit and the next becomes arbitrary: there seems to be no reason why changes were put into one and not the other commit. Looking at these commits later, e.g. when your colleagues try to make sense of what happened in that revision, is like going through the “everything drawer” that every household has: there’s everything in here that found no place elsewhere, from crayons to thumbtacks and cash slips. It’s terribly hard to find something in these drawers!
Following the second path – where we put only things (read: changes) that belong together into the same commit – requires a bit more planning and discipline. But in the end, you and your team are rewarded with something very valuable: a clean commit history! These commits help you understand what happened. They help explain the complex changes that were made in a digestible manner.
How do we go about creating better commits?
Composing better commits
One concept is central to composing better commits in Git: the Staging Area.
The Staging Area was made exactly for this purpose: to allow developers to select changes – in a very granular way – that should be part of the next commit. And, unlike other version control systems, Git forces you to make use of this Staging Area.
Unfortunately, however, it’s still easy to ignore the tidying effect of the Staging Area: a simple git add . will take all of our current local changes and mark them for the next commit.
It’s true that this can be a very helpful and valid approach sometimes. But many times, we would be better off stopping for a second and deciding if really all of our changes are actually about the same topic. Or if two or three separate commits might be a much better choice.
In most cases, it makes a lot of sense to keep commits rather smaller than larger. Focused on an individual topic (instead of two, three, or four), they tend to be much more readable.
The Staging Area allows us to carefully pick each change that should go into the next commit:
$ git add file1.ext file2.ext
This will only mark these two files for the next commit and leave the other changes for a future commit or further edits.
This simple act of pausing and deliberately choosing what should make it into the next commit goes a long way. But we can get even more precise than that. Because sometimes, even the changes in a single file belong to multiple topics.
Let’s look at a real-life example and take a look at the exact changes in our “index.html” file. We can either use the “git diff” command or a Git desktop GUI like Tower:
Now, we can add the -p option to git add:
$ git add -p index.html
We’re instructing Git to go through this file on a “patch” level: Git takes us by the hand and walks us through all of the changes in this file. And it asks us, for each chunk, if we want to add it to the Staging Area or not:
By typing [Y] (for “yes”) for the first chunk and [N] (for “no”) for the second chunk, we can include the first part of our changes in this file in the next commit, but leave the other changes for a later time or more edits.
The result? A more granular, more precise commit that’s focused on a single topic.
Testing your code
Since we’re talking about “the perfect commit” here, we cannot ignore the topic of testing. How exactly you “test” your code can certainly vary, but the notion that tests are important isn’t new. In fact, many teams refuse to consider a piece of code completed if it’s not properly tested.
If you’re still on the fence about whether you should test your code or not, let’s debunk a couple of myths about testing:
“Tests are overrated”: The fact is that tests help you find bugs more quickly. Most importantly, they help you find them before something goes into production – which is when mistakes hurt the most. And finding bugs early is, without exaggeration, priceless!
“Tests cost valuable time”: After some time you will find that well-written tests make you write code faster. You waste less time hunting bugs and find that, more often, a well-structured test primes your thinking for the actual implementation, too.
“Testing is complicated”: While this might have been an argument a couple of years ago, this is now untrue. Most professional programming frameworks and languages come with extensive support for setting up, writing, and managing tests.
All in all, adding tests to your development habits is almost guaranteed to make your code base more robust. And, at the same time, they help you become a better programmer.
A valuable commit message
Version control with Git is not a fancy way of backing up your code. And, as we’ve already discussed, commits are not a dump of arbitrary changes. Commits exist to help you and your teammates understand what happened in a project. And a good commit message goes a long way to ensure this.
But what makes a good commit message?
A brief and concise subject line that summarizes the changes
A descriptive message body that explains the most important facts (and as concisely as possible)
Let’s start with the subject line: the goal is to get a brief summary of what happened. Brevity, of course, is a relative term; but the general rule of thumb is to (ideally) keep the subject under 50 characters. By the way, if you find yourself struggling to come up with something brief, this might be an indicator that the commit tackles too many topics! It could be worthwhile to take another look and see if you have to split it into multiple, separate ones.
If you close the subject with a line break and an additional empty line, Git understands that the following text is the message’s “body.” Here, you have more space to describe what happened. It helps to keep the following questions in mind, which your body text should aim to answer:
What changed in your project with this commit?
What was the reason for making this change?
Is there anything special to watch out for? Anything someone else should know about these changes?
If you keep these questions in mind when writing your commit message body, you are very likely to produce a helpful description of what happened. And this, ultimately, benefits your colleagues (and after some time: you) when trying to understand this commit.
On top of the rules I just described about the content of commit messages, many teams also care about the format: agreeing on character limits, soft or hard line wraps, etc. all help to produce better commits within a team.
To make it easier to stick by such rules, we recently added some features to Tower, the Git desktop GUI that we make: you can now, for example, configure character counts or automatic line wraps just as you like.
A great codebase consists of great commits
Any developer will admit that they want a great code base. But there’s only one way to achieve this lofty goal: by consistently producing great commits! I hope I was able to demonstrate that (a) it’s absolutely worth pursuing this goal and (b) it’s not that hard to achieve.
If you want to dive deeper into advanced Git tools, feel free to check out my (free!) “Advanced Git Kit”: it’s a collection of short videos about topics like branching strategies, Interactive Rebase, Reflog, Submodules and much more.
Version control with Git has become a “commodity” by now: virtually every software project today uses Git, and virtually every developer knows Git to some extent. This explains why I sometimes hear the following question when I talk about what I do for a living: “A desktop client for Git? Why would I need that? I can do that on the command line!“
If I’m lucky, I have a computer next to me when that question hits me. And instead of producing a wordy answer, I do a couple of things in Tower, our desktop client for Git.
Anyone who’s ever performed an “Interactive Rebase” is amazed by how easy that is in Tower: you simply drag and drop to combine commits or reorder them. And anyone who hasn’t yet used “Interactive Rebase” – because it was too complicated and clunky to use on the command line – now understands that it’s a very valuable tool.
Or I might make a mistake: accidentally deleting a branch or messing up a merge in a terrible way. And I’ll simply hit CMD+Z, like I would in a text editor, to undo the mess I just made.
People then start to realize that the real question is not: “Can I get by using Git on the command line?” The more important questions are:
Can I use all of Git’s power? (Even the advanced features that might be hard to use, but that can be very valuable…)
Can I work with Git in a productive way? (Not having to look up parameters, not spending too much time on my workflows…)
Can I work with Git in an easy way? (Without having to think about it too much…)
We – a small team of just 9 people – have spent the last 10 years answering those questions by building Tower.
How to Undo Mistakes
One of Git’s greatest features is that it allows you to undo almost anything. However, it requires quite some experience to know how exactly to undo your particular kind of mess: a failed merge has to be cleaned up differently than a deleted branch!
After working on this for a long time, Tower now allows you to undo virtually anything – simply by pressing CMD+Z! (Note: the “Undo” feature is a quite recent addition and first available in the Mac version of Tower. It will soon come to Windows, too).
No matter if you messed up a merge, inadvertently deleted a branch, discarded a valuable local change, published a branch on a remote too soon, or simply committed something that you shouldn’t have – your lifesaver is as simple as “CMD+Z”, and it’s always available.
The Power of Interactive Rebase
Interactive Rebase is a wonderful example of Git’s more powerful features. It allows you to…
edit old commits (both their messages as well as their changesets!)
combine multiple commits into one
reorder commits
…and even delete commits you don’t need anymore!
All of these can help a lot to keep a code base clean and structured. But being a very powerful tool, Interactive Rebase is also an example of a Git feature that is quite complicated to use!
Many beginners are scared away by this complexity – meaning that, of course, they will miss out on the benefits of the feature! Many experienced developers know and use Interactive Rebase; but since the feature is hard to use, it costs them a lot of time and/or they make mistakes from time to time.
Knowing this, we had two goals for integrating Interactive Rebase into Tower: on the one hand, we wanted to reduce as much of its complexity as possible. And on the other hand, we wanted to make the feature easily accessible.
The result is that Interactive Rebase is now integrated right into the “Commit History” and accessible via simple drag & drop and menu options:
Countless developers that wouldn’t have used Interactive Rebase at all on the Command Line are now using it on a daily basis in Tower.
Quick Actions
Almost independent of its size, working in a code base means spending a lot of time searching: for example for a certain branch (out of lots of branches) or a certain file (out of lots of files).
Tower allows you to do most of your daily tasks without sifting through data – and even without taking your hands off the keyboard. The “Quick Action” dialog takes almost any input and allows you to simply act on it:
Give it a branch name and it will offer to do a checkout.
Give it a file name and it will offer to show it in the File History.
Give it a commit hash and it will offer to show that commit’s details.
Being able to perform many tasks right from the keyboard, without having to search and sift through loads of data, can make life as a developer a lot easier.
Solving Conflicts with Confidence
Everyone hates that moment when a merge (or rebase) stops and leaves you with a bunch of conflicts 😱 Multiple questions then quickly enter the poor programmer’s mind:
What are my changes? What are someone else’s?
What actually happened?
Why me?
While, admittedly, Tower cannot answer all of those questions, it offers a special “Conflict Wizard” that helps make the situation much more understandable:
You can easily see where changes came from and can solve the conflict simply by choosing which version to go with (or jump into a dedicated merge tool). It makes things a lot easier when merge conflicts are visualized in this way, instead of being an abstract mess.
Becoming More Productive
When building and improving Tower, we’re always striving to make things easier for our users – and to make them more productive. Let’s take some examples of where this shows in Tower:
No More Passwords, Tokens, SSH Keys: You can easily connect your GitHub / GitLab / Bitbucket / Azure DevOps accounts with Tower. Once connected, you never have to wrestle with passwords, authentication, tokens, usernames, and SSH Keys anymore. Cloning and interacting with a remote repository, then, is a matter of just a click.
Single-Line Staging & Discarding: There’s a golden rule in version control: when you make a commit, you should only include changes from a single topic (and not mix multiple topics in a commit, thereby making it extremely hard to understand what actually happened). With the ability to stage / unstage / discard individual chunks and lines from your changes, Tower enables you to create granular, precise commits.
A New Diff Viewer: In a very recent update, we gave our internal Diff Viewer a complete overhaul. It now highlights inline changes, allows you to show/hide whitespace changes, can display the complete file, and is completely customizable with themes!
Automations for the Boring Stuff: Tower takes care of much of the grunt work around Git. To take just two examples: neither do you have to regularly fetch new updates from the remote, nor do you have to remember to stage uncommitted changes before pulling/switching branches/merging… Tower does that automatically for you.
When I think about the favorite applications I use myself, they all have some things in common: they make life easier for me, they make me more productive, and they enable me to do advanced stuff that I’d have a hard time doing without them. I’m glad and grateful that many of our users consider Tower to be one of their favorite apps!
If you want to give Tower a try, just download it from our website and test it 30 days for free. And if you are a student or teacher, you can use Tower for free!
The world of software development offers an infinite amount of ways to mess up: deleting the wrong things, coding into dead ends, littering commit messages with typos, are a mere few of the plentitude.
Fortunately, however, we have a wonderful safety net under our feet in the form of Git when we’re working with version control. Not that you and I need a safety net, of course, because we never make mistakes, right? Sure, sure. But for the benefit of everyone else, let's take a tour of some of the "undo" tools in Git that can save us from ourselves.
Fixing the last commit
Messing up a commit is all too easy. Classic case in point: making a typo in a commit message. Another? Forgetting to add a change to the staging area. And in many cases, we instantly realize our mistake — right after hitting the Enter key, naturally.
Luckily, Git makes it ridiculously easy to fix the very last commit. Let's say we had just hit Enter on the following command:
git commit -m "Massage full of typohs"
And (as if this orthographic mess wasn't bad enough) let's say we also forgot to add another changed file to the staging area. We can correct both of our mistakes with the following two commands:
git add forgotten-changes.js
git commit --amend -m "A sensible message"
The magic ingredient is the --amend flag: when using it on a commit, Git will correct the very last commit — with any staged changes and the new message.
A short word of warning, though: only use --amend on commits that haven't been pushed to a remote repository, yet. The reason is that Git replaces the original, bad commit with the amended version. Afterwards, it looks as if the original commit never happened. Yeah, that’s good for concealing mistakes, but only if we haven't already published this mistake on the remote server.
Undoing local changes
Everyone’s had days like this: spend all morning hacking away, only to admit to yourself that the last few hours were a waste of time. Gotta start over and undo much (or all) of that work.
But this is one of the reasons for using Git in the first place — to be able to try out things without the fear that we might break something.
Let's take stock in an example situation:
Now, let's assume that this is one of the wasted hacking days described above. We ought to have kept our hands off of about.html and not deleted imprint.html. What we now want is to discard our current changes in these files — while keeping the brilliant work done in index.html. The git checkout command can help in this case. Instead, we’ve gotta get more specific with which files to check out, like this:
git checkout HEAD about.html imprint.html
This command restores both about.html and imprint.html to their last committed states. Phew, we got away from a black eye!
We could take this one step further and discard specific individual lines in a changed file instead of tossing out the entire thing! I’ll admit, it’s rather complicated to make it happen on the command line, but using a desktop Git client like Tower is a great way to go about it:
For those really bad days, we might want to bring out the big guns in the form of:
git reset --hard HEAD
While we only restored specific files with checkout, this command resets our whole working copy. In other words, reset restores the complete project at its last committed state. Similar to --amend, there's something to keep in mind when using checkout and reset: discarding local changes with these commands cannot be undone! They have never been committed to the repository, so it's only logical that they cannot be restored. Better be sure that you really want to get rid of them because there’s no turning back!
Undoing and reverting an older commit
In many cases, we only realize a mistake much later, after it has long been committed to the repository.
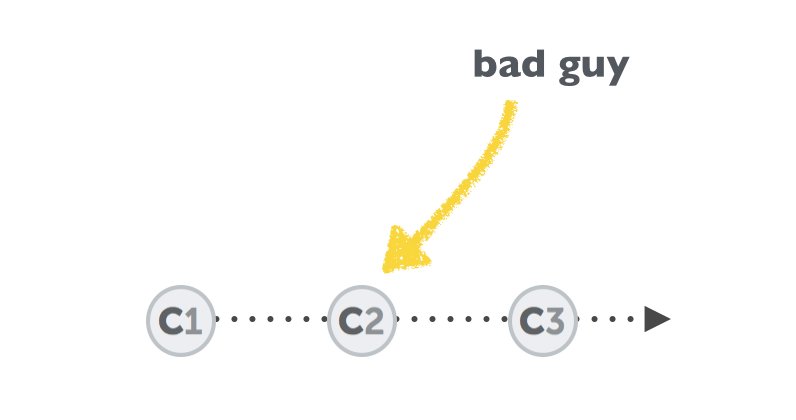
How can we get rid of that one bad commit? Well, the answer is that we shouldn't… at least in most cases. Even when "undoing" things, Git normally doesn't actually delete data. It corrects it by adding new data. Let's see how this works using our "bad guy" example:
git revert 2b504bee
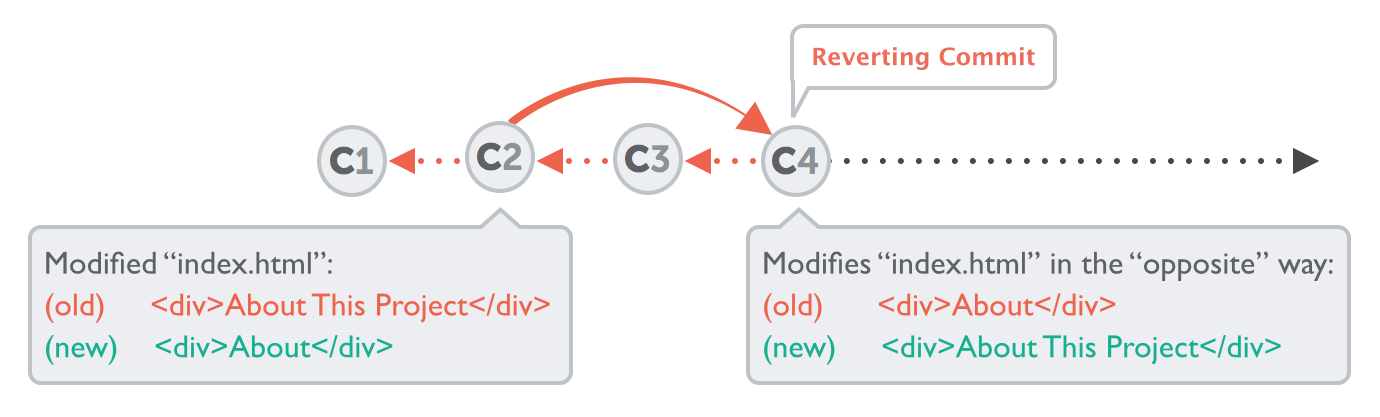
By using git revert on that bad commit, we haven't deleted anything. Quite the contrary:
Git automatically created a new commit with changes that reverts the effects of the "bad" commit. So, really, if we started with three commits and were trying to correct the middle one, now we have four total commits, with a new one added that corrects the one we targeted with revert.
Restoring a previous version of a project
A different use case is when we want to restore a previous version of our project. Instead of simply undoing or reverting a specific revision somewhere in our commit history, we might really want to turn back time and return to a specific revision.
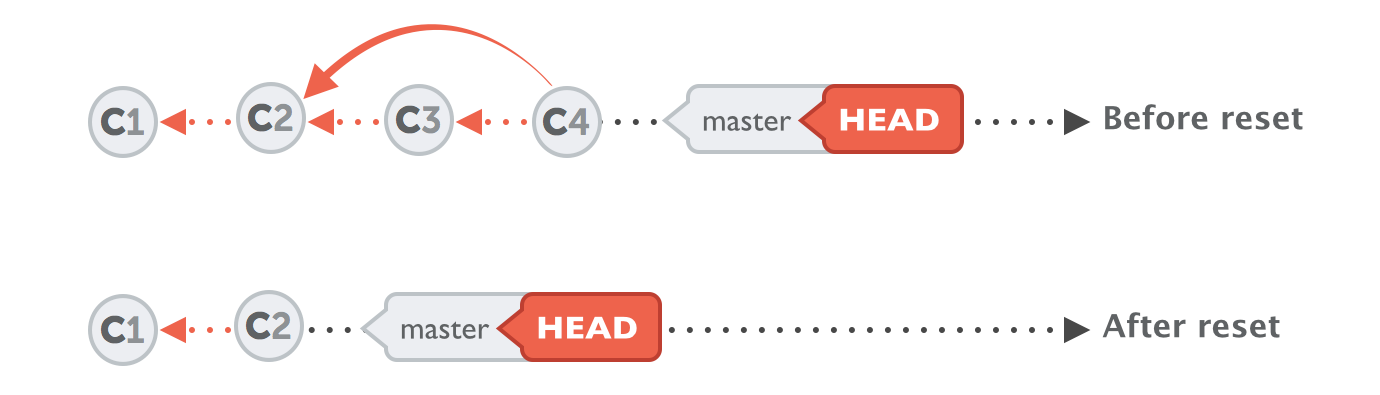
In the following example scenario, we would declare all the commits that came after "C2" as unwanted. What we want is to return to the state of commit "C2" and forget everything that came after it in the process:
The command that's necessary is already (at least partly) familiar to you based on what we’ve already covered:
git reset --hard 2b504bee
This tells git reset the SHA-1 hash of the commit we want to return to. Commits C3 and C4 then disappear from the project's history.
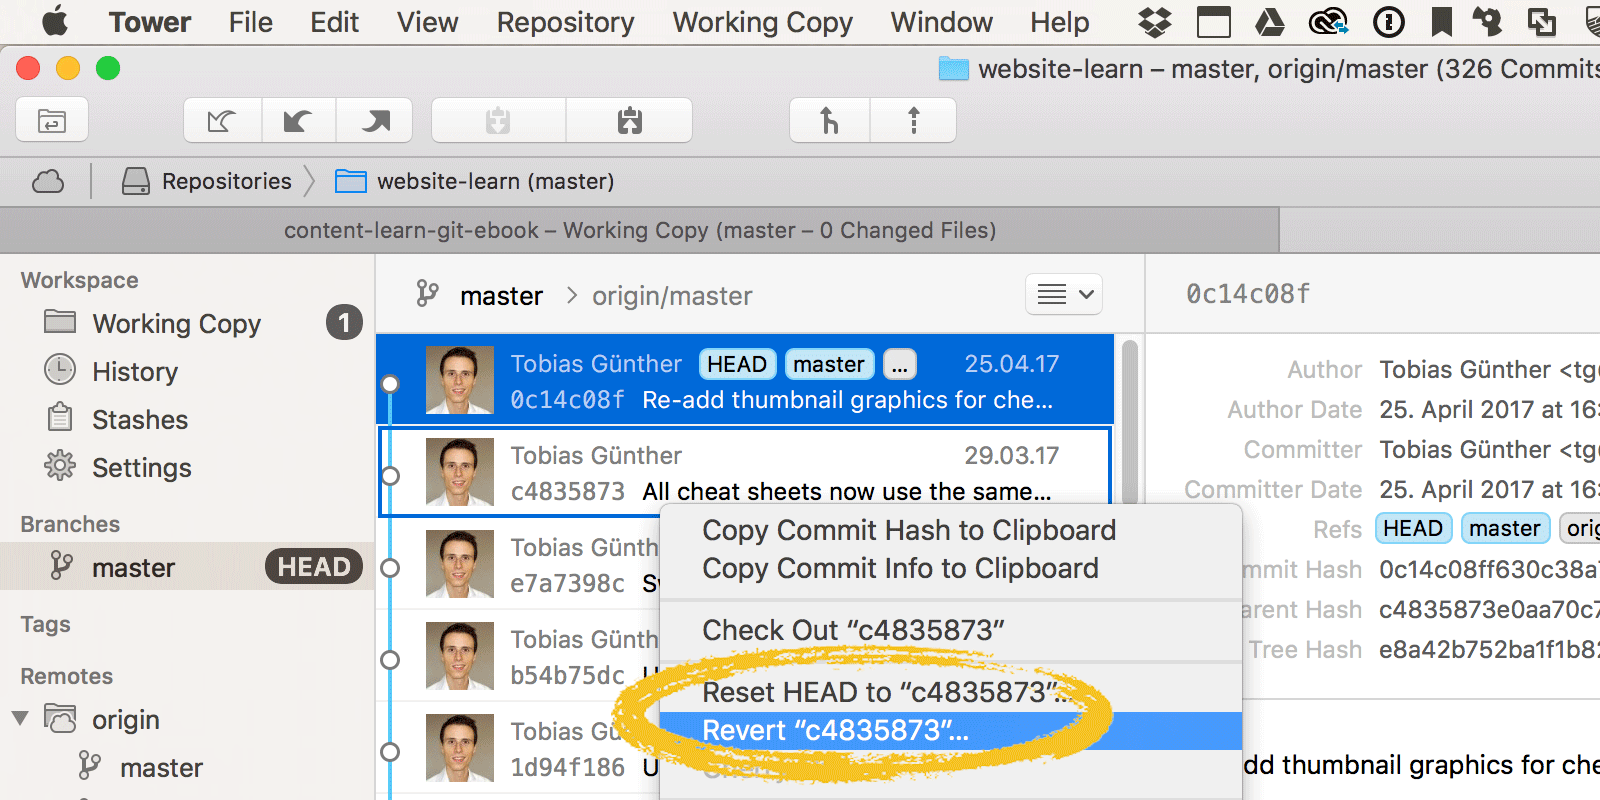
If you're working in a Git client, like Tower, both git revert and git reset are available from the contextual menu of a commit item:
Deleting commits, restoring deleted branches, dealing with conflicts, etc. etc. etc.
Of course, there are many other ways to mess up things in a software project. But luckily, Git also offers many more tools for undoing the mess.
Have a look at the "First Aid Kit for Git" project that I and other folks on the Tower team have created if you want to learn more about the scenarios we covered in this post, or about other topics, like how to move commits between branches, delete old commits, restore deleted branches or gracefully deal with merge conflicts. It’s a totally free guide that includes 17 videos and a handy cheat sheet you can download and keep next to your machine.