Would you like to display a map on your website’s contact form?
You can use geolocation to pre-fill a user’s address and indicate their location by placing a pin on a map. This makes filling in the form easier and faster thus leading to better completion rate.
In this article, we’ll show you how to embed a Google Map in contact forms with a map pin.
Why Embed a Google Map in Your Contact Form?
When you created your WordPress website, chances are that you added a contact form so that visitors can easily get in touch with you about your products and services.
And if your business has a physical location, then you probably also added a Google Map of your own location to encourage people to visit your store.
What many business owners don’t know is that you can use geolocation to automatically fill in the address field on your contact form and display the user’s location on a map. This improves the overall user experience and helps reduces form abandonment.
Knowing your users’ locations also lets you use geolocation targeting to show personalized content and boost conversion rates.
With that being said, let’s take a look at how to embed a Google Map in contact forms.
How to Embed a Google Map in a Contact Form
For this tutorial, we’ll be using WPForms, the best contact form plugin for WordPress. It lets you easily create any type of form with a simple drag and drop form builder.
There is a free version of WPForms available with all the features you need to create a basic contact form. For this tutorial, however, we’ll use WPForms Pro since it include the Google Map addon.
Upon activation, you need to visit the WPForms » Settings page to enter your license key. You can find this information in your WPForms account area. Make sure you click the ‘Verify Key’ button to activate your license.
Next, you need to navigate to WPForms » Addons and find the Geolocation Addon. You can use the search option at the top of the screen, or simply scroll through the available addons.
Once you’ve found it, you should install the add-on by clicking the ‘Install Addon’ button.
Now that the Geolocation addon is activated, you will need to configure its settings. To do that, navigate to WPForms » Settings and click on the Geolocation tab.
On this page, you need to select a geolocation provider. For this article, we’ll choose the Google Places API.
You should also click the ‘Current Location’ checkbox. This will detect and autocomplete the address when users fill in the contact form, saving time and improving accuracy.
Next, you need to scroll down to the Google Places API settings. You will be asked to fill in your Google API key. You can get your key from Google and then paste it into the field. We’ll show you how to do that in the next section.
Generating a Google Places API Key
You can obtain an API key for Google Places by going to the Google Cloud Console website.
You’ll be asked to select your country from a drop down menu and agree to the terms of service. In some countries, you may also be offered the chance to sign up for a mailing list.
When you’re ready to move to the next step, click on ‘Agree and Continue’.
Next, you’ll need to select a project for the API key. Simply click on ‘Select a project’ and click on the project you want to use from the list.
If you haven’t created a project before, or this is a new website you have not yet added to Google, then you should click ‘New Project’ to set one up.
Note: Google will require you to enable billing for that project in order to use the Google Places API. They offer the first $300 for free, which is plenty to cover a simple map embed like we’re creating in this tutorial. Smaller traffic sites won’t need to pay anything, and they’ll ask your permission to upgrade before charging any fees.
You should now be on the ‘APIs & Services’ page where you can enable the APIs needed for displaying Google Maps on your site. You’ll need to click the ‘+ Enable APIs and Services’ button at the top of the page.
This will take you to Google’s API Library where you will need to enable three different mapping APIs.
You can find them by using the search function at the top of the page or by clicking the ‘View All’ link next to the Maps section.
First you need to find and enable the Places API. Once you locate it, you will need to click it. On the next page, you should to click the ‘Enable’ button.
After that, you should do the same thing for the Maps JavaScript API and Geocoding API.
Now that you have enabled the three APIs, you can create an API key.
In the menu on the left, you need to navigate to APIs & Services » Credentials.
From here you will be able to click the ‘+ Create Credentials’ button at the top of the screen and then select the ‘API key’ option.
Your API key will be created and displayed on a popup window.
Later in this tutorial, you’ll need to copy that key into WPForm’s settings. For now, let’s take a look at how to place some restrictions on the use of the API key.
Restricting Your Google Places API Key
Overuse of the API key may move you out of the free plan and cost more than you expect. We recommend that you restrict the key to prevent unauthorized or unexpected use.
To do that, you need to click the ‘Restrict Key’ link at the bottom of the ‘API key created’ popup in the screenshot above.
On the next page, you can set up a number of different restrictions. The first of these is ‘Application restrictions’. In this section, you should click on the ‘HTTP referrers (web sites) option. Then the key will only be used on websites.
Next, you should make sure it is only used on your own website. To do that, you should scroll down to the ‘Website restrictions’ section and then click the ‘Add an Item’ button.
Now you should type your website domain name into the ‘New item’ field using the pattern *example.com/*.
If you will be using Google Maps on more than one website, then you can click the ‘Add an Item’ button and add as many domains as you need.
Now that you’ve restricted the API key to only your own websites, you can also restrict it to work with only the Google APIs that you added above.
You need to scroll down to the ‘API restrictions’ section of the page and select the ‘Restrict key’ option. This will reveal a drop down where you should check the ‘Geocaching API’, ‘Maps JavaScript API’ and ‘Places API’ boxes.
Once you’ve done that, you should click the ‘OK’ link to store your settings. Finally, make sure you click the ‘Save’ button at the bottom of the page to activate all of the restrictions you have chosen.
Note that it may take up to 5 minutes for the settings to take effect.
Adding the Google API Key to WPForms Settings
You’ll now see the API key listed with any others you have available. You should click the Copy icon so you can add the key to the WPForms Geolocation settings page.
Note that if you ever need to change any of the API’s settings or restrictions, then you can click the Edit icon on the right
Now you need to return to your website which should still be on the WPForms » Settings » Geolocation page.
Once there, paste the key into the Google Places API field in the WPForms settings. Once you’ve done that, make sure you click the ‘Save Settings’ button.
Note: Google Places requires you to have an SSL certificate for your site. To learn how to get one, check out our beginner’s guide on how to get a free SSL certificate.
Creating a Contact Form With Embedded Google Map in WordPress
Now that you have configured WPForms and Google Places, you are ready to create a contact form in WordPress. You can get started by following our guide on how to create a contact form in WordPress.
Once you’ve made a basic form, you need to add an address field. You can use either an Address block or Single Line Text field. For this tutorial, we’ll use a Single Line Text field.
Simply drag the Single Line Text block onto the form.
Next, we’ll customize the field’s settings. To do that, you need to click on the field to display the Single Line Text settings.
First, you should change the field’s label to ‘Address’. This will make it clear to your users what they should type in the field.
After that, you need to change the field’s settings so that it displays a map on the form. To do that, you’ll need to click on the Advanced tab.
Once there, you should look for the ‘Enable Address Autocomplete’ option at the bottom of the settings and toggle it to the ‘On’ position. You will then see another option, ‘Display Map’, which you should also enable. You can choose to display the map above or below the field.
Adding the Contact Form to Your Website
The simplest way to add the contact form to your website is to click the ‘Embed’ button. You’ll find it next to the ‘Save’ button at the top of the form editor screen.
You’ll be asked whether to add the form to an existing form or create a new page.
For this tutorial, we’ll click the ‘Create New Page’ button.
Next, you should give the page a name and then click the ‘Let’s Go!’ button.
A new page with that name will be created, and your contact form will be added automatically.
All you need to do is click the ‘Publish’ button to push the form live.
Viewing the Google Map in Contact Form
When a user visits your contact form, they will be asked whether they wish to allow your website to access your location.
If they click the ‘Allow’ button, then their current location will be entered into the address field, and a pin of that location will be added to the map.
This autocomplete feature will save your visitors time by making it faster and easier to type their addresses.
If they need to change the address, then they can simply type a new one or drag the pin to a different location on the map.
How to View User Location Data on a Form
Once you enable geolocation, WPForms will also record each user’s location when they fill in your form. Knowing the location of your users may help you find better leads.
You’ll need to navigate to WPForms » Entries and then click on your contact form.
You will now see a list of entries filled in by your users for that form.
To view a particular entry, simply click the ‘View’ link on the right.
You will now see the form data filled in by the user such as their name, business email, business phone number, along with some location data.
This includes a pin on Google Maps, the user’s location, zip code, and country, as well as their approximate latitude and longitude.
Of course, if the user didn’t grant permission for the form to know their location, then no location data will be displayed.
We hope this tutorial helped you learn how to embed a Google Map in contact forms. You may also want to learn how to run a giveaway or contest, or check out our expert pick of the best WordPress plugins for all business websites.
If you liked this article, then please subscribe to our YouTube Channel for WordPress video tutorials. You can also find us on Twitter and Facebook.
You can always traceroute an IP address in Fedora using the standard traceroute command. However, if you are looking to find out more about each hop’s geolocation information inside the trace, you should consider using the IP2Trace command tool.
In addition to the geolocation information, such as country, region, city, latitude, and longitude, IP2Trace also provides you with the ZIP code, time zone, ISP, domain name, area code, weather, mobile information, elevation, and usage type of an IP address. The type of data returned will depend on the IP2Location BIN data that you are using for the lookup, which can be downloaded for free.
An IP Address is used as a unique identifier for network-connected hardware such as computers and smartphones. These contain four sets of numbers that differentiate each device when it accesses network services such as the internet. This information can be very useful for businesses with websites, as they can verify their user’s various IP Addresses to gather important client-specific and audience information for various purposes.
Some of the most important usages for IP Addresses is threat tracking and user data such as identifying Tor servers and providing location information that can assist with security and user-experience needs. The following four APIs are centered around these functions and can be used separately or in tandem. This will allow you to ensure the security of your site, as well as providing data that can help optimize your platforms for users.
Natural disasters and disease epidemics create a tsunami of knowledge gaps, fake or inaccurate news, with more opinions rather than actual facts and analysis. Much of this is underpinned with feelings of helplessness and fear. In response, two French expats based in Taiwan have created an app to track the coronavirus in real-time.
Kevin Basset and Maxime Michel spent an initial on coronavirus.app with the goal of informing people about the epidemic. I spoke to Kevin who explained, "We realized that although the coronavirus was all over the news, there wasn't an easy way to track the toll. We thought we could build something useful, so we went ahead and developed the app.
In this post, we will learn, how to implement Geolocation in a React Native application
Geolocation will find your current location and Geocoding gives your address (like City Name, Street Name, etc) by Coordinates (Latitude and Longitude).
Geolocation Lookup Using Symfony 4 and IP2Location BIN Database
This demo is only supported for Symfony 4.
In this tutorial, we’ll show you how to display the IP information from a visitor’s IP using Symfony 4 platform and IP2Location BIN database. This tutorial uses the IP2Location module, available at https://www.ip2location.com/developers/php, to query IP information from BIN database. Free BIN databases are available for download at IP2Location LITE database.
My first smartphone was an iPhone 4s. I remember the excitement of exploring its capabilities at a time when it was the coolest thing around. Eventually, of course, I replaced it with a newer model and the old iPhone, still in mint condition, gathered dust for two years. What a waste!
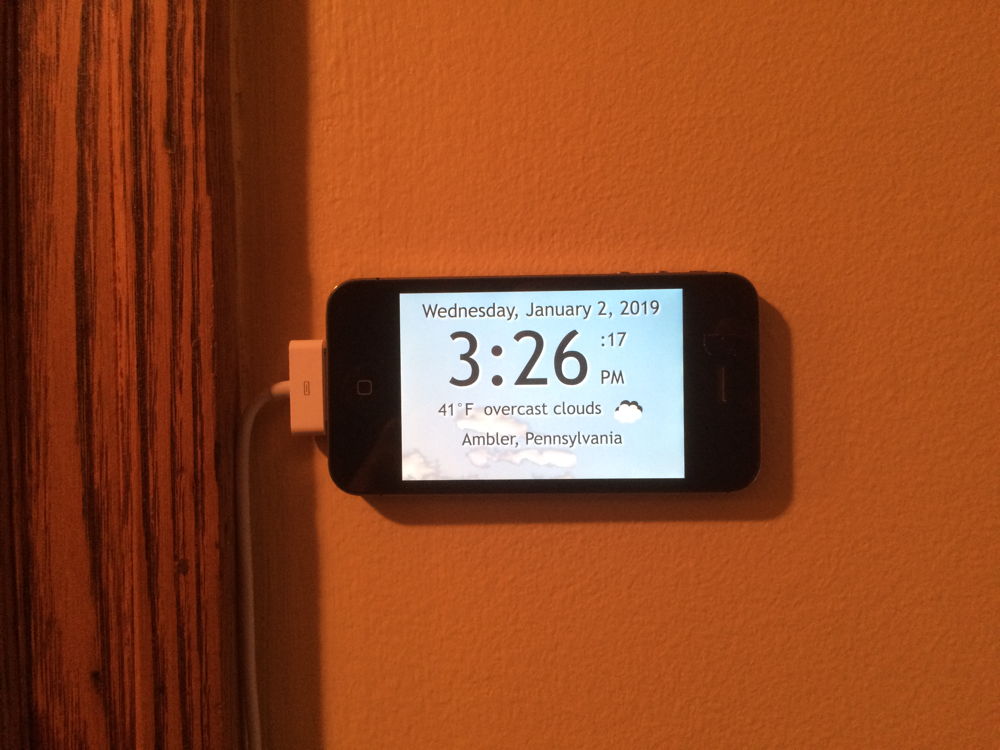
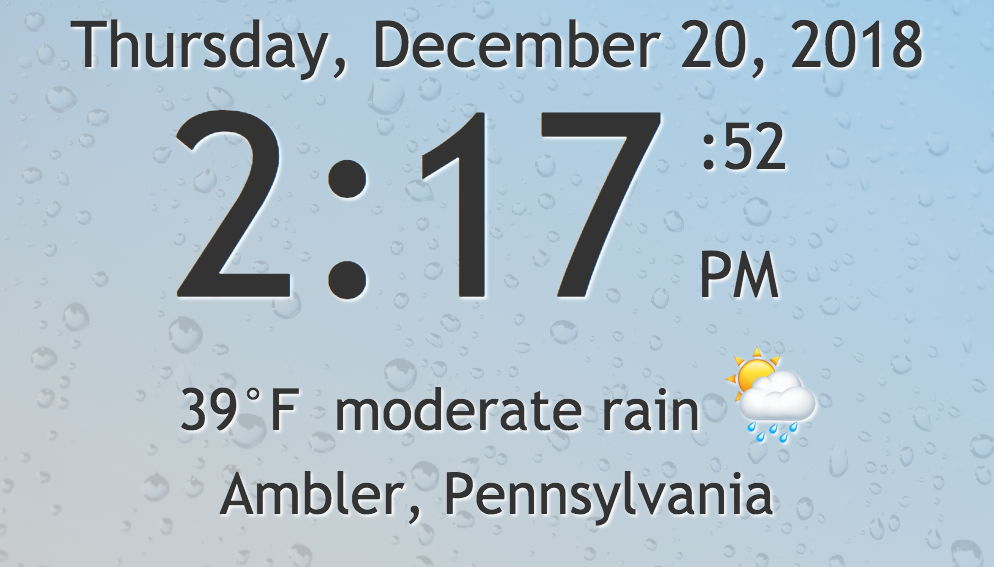
But was it? It occurred to me that I could repurpose the old iPhone to create a useful weather clock for our hallway.
Who needs Nest anyway?
In the process, I discovered that reusing an old device is not only fun and economical, it can also deepen your understanding of web standards. In this tutorial, I will show how I created a small web page to display the date, time, and current weather conditions based on the current GPS location. Together, we’ll retrieve weather data from a public API and hide an API key in a PHP file for security. Finally, we’ll look at adding a manifest file and meta tags so that users can save the page to a device’s home screen and then launch it as a standalone app, including a custom icon for it.
The HTML for the clock has some placeholder text that we will eventually replace. All we really need at this moment is a centered <main> container element and a couple of semantic <time> elements for the date and time. The <span> tag within the second <time> element will be styled specially to display the running seconds and the meridian. The datetime attribute within the <time> elements will be updated dynamically with JavaScript.
A little responsive design is key here. We want this to fit nicely on an iPhone 4s screen or any other small-ish smartphone in both portrait and landscape modes. We also want it to work well on a desktop web browser, of course. We can’t use any bleeding-edge CSS or JavaScript, however, because older devices like my iPhone 4s won’t understand it.
I wound up taking things up a notch by creating styles specific for the time of day and we’ll definitely get to that as well. We could even leverage a media query to darken the daytime style for Mac users who have dark mode turned on in the latest MacOS.
The <span> tag with the running seconds and meridian will wrap nicely based on a width of 2em which is just large enough to accommodate two capital letters (i.e. AM and PM). The final CSS that’s needed is a media query to bump up font sizes when the clock is in landscape mode, or really any device with a viewport wider than 480px.
Here are the base styles we’re looking at, with the more decorative styles in the final app removed for brevity:
For the JavaScript, I chose ES5 because many features of ES6 don’t work on the mobile Safari browser in iOS 9.35, which is the final iOS that runs on the iPhone 4s. Fortunately, ES5 is more than up to the task and the app runs properly on newer devices as well.
We need variables for the current date and time (now), the element that will display the date (dd), the element that will display the time (td) and the names of the months and days. Once the page is loaded, an init function is called to update the time every second (1000 milliseconds). The getClockStrings() function updates the value in the now Date object and returns an object containing HTML strings for the date and time. Then the updateTime() function updates the HTML to show the time. One lesser-used feature here is the inclusion of the toISOString() method of the Date object which adds a machine-readable date string to the datetime attribute of the two <time> elements.
Here’s what that boils dow to, using the JavaScript from the demo:
// NOTE: ES5 chosen instead of ES6 for compatibility with older mobile devices
var now, dd, td;
var months = ["January","February","March","April","May","June","July","August","September","October","November","December"];
var days = ["Sunday","Monday","Tuesday","Wednesday","Thursday","Friday","Saturday"];

document.addEventListener("DOMContentLoaded", init, false);
function init() {
  dd = document.getElementById("date");
  td = document.getElementById("time");
  updateTime();
  setInterval(updateTime,1000);
}

function updateTime() {
  var clockdata = getClockStrings();
  dd.innerHTML = clockdata.datehtml;
  td.innerHTML = clockdata.timehtml;
  dd.dateTime = now.toISOString();
  td.dateTime = now.toISOString();
}

function getClockStrings() {
  now = new Date();
  var year = now.getFullYear();
  var month = months[now.getMonth()];
  var date = now.getDate();
  var day = days[now.getDay()];
  var hour = now.getHours();
  var minutes = now.getMinutes();
  var seconds = now.getSeconds();
  var meridian = hour < 12 ? "AM" : "PM";
  var clockhour = hour > 12 ? hour - 12 : hour;
  if (hour === 0) {clockhour = 12;}
  var clockminutes = minutes < 10 ? "0" + minutes : minutes;
  var clockseconds = seconds < 10 ? "0" + seconds : seconds;
  var datehtml = day + ", " + month + " " + date + ", " + year;
  var timehtml = clockhour + ":" + clockminutes + "<span>:" + clockseconds + " " + meridian + "</span>";
  return {"datehtml":datehtml,"timehtml":timehtml};
}
The Geolocation API is an easy way to get the user’s accurate location. We can do that when the page loads, but good manners and Chrome’s best practices audit dictate that we ask the user to initiate the location feature. So, we must add a button and a <div> to the HTML to display the GPS information we receive.
These new items require their own styles — mine can be seen in the embedded Pen above. The important thing is to add the class selector rule for the infotext class as well as the two ID selector rules for the gpsbutton.
Finally, we’ll need to add the modified infotext class selector rule within the media query.
Again, the basic styles minus decorative styling for brevity:
/* The geolocation coordinates upon clicking GPS button */
.infotext {
  font-size: 1.3rem;
  line-height: 1.4;
  padding: 0 5px 0 5px;
  width: auto;
}

/* The button itself */
#gpsbutton {
  -webkit-appearance: none;
  -moz-appearance: none;
  display: block;
  margin: 0 auto;
  width: auto;
  cursor: pointer;
}

#gpsbutton:hover {
  /* Styles for the hover state */
}

@media (min-width: 480px){
  /* Add the rule below to the end of the media query */
  .infotext {font-size: 1.8rem;}
}
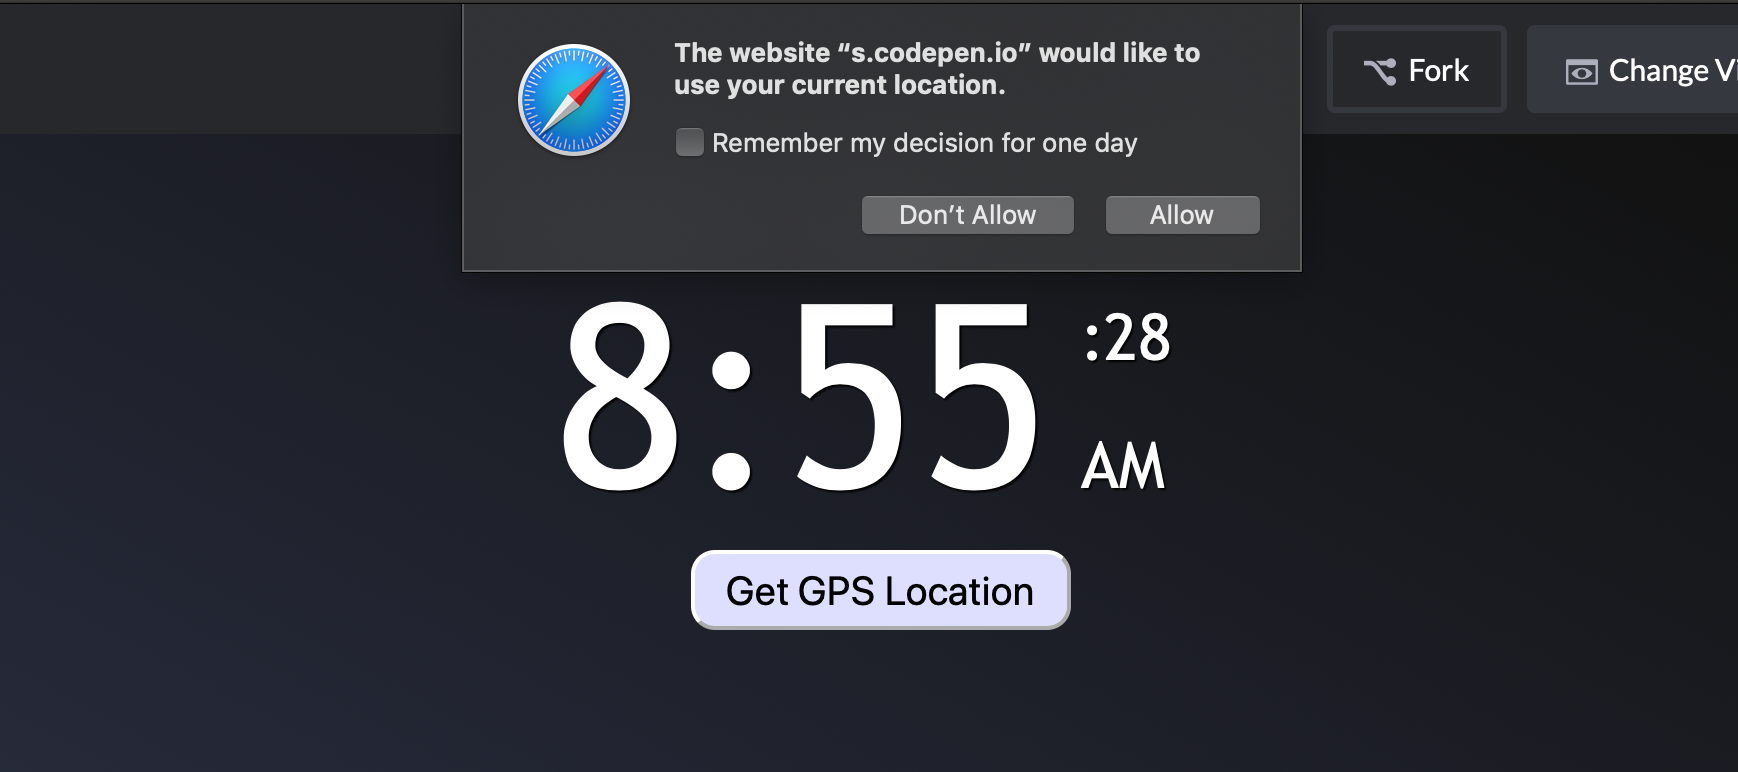
The JavaScript requires a few new variables for the latitude, longitude, GPS <div>, and GPS <button>. When clicked, the GPS button calls the getLocation() function which tests for the availability of geolocation support in the browser. If it finds such support, it calls the getCurrentPosition method of the navigator.geolocation object and passes a reference to a success callback function named showPosition and an error callback function named geoError.
At this point, the browser will ask the user for permission to obtain their GPS location. If the visitor refuses, an appropriate message is displayed. If the user approves, the showPosition() function then displays the latitude and longitude and hides the GPS button.
Here’s the Javascript we get based on what we’ve covered in this section:
// ...
var lat, lon, gd, gpsbutton;
// ...
function init(){
// ...
gd = document.getElementById("gps");
gpsbutton = document.getElementById("gpsbutton");
gpsbutton.addEventListener("click",getLocation,false);
// ...
}
function updateTime(){
// ...
var sec = now.getSeconds();
var minutes = now.getMinutes();
if (sec === 0){
if (minutes % 5 === 0){
getLocation(); // Get location every 5 minutes while the app is running
}
}
}
function getClockStrings(){
// ...
}
function getLocation() {
if (navigator.geolocation) {
navigator.geolocation.getCurrentPosition(showPosition,geoError);
}else{
gd.innerHTML = "location unknown";
}
}
function geoError(){
gd.innerHTML = "location detection disabled";
}
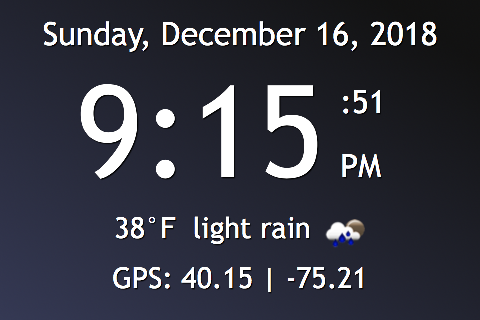
function showPosition(position) {
gpsbutton.style.display = "none";
lat = position.coords.latitude;
lon = position.coords.longitude;
gd.innerHTML = "GPS: " + lat.toFixed(2) + " | " + lon.toFixed(2);
}
Step 3: How’s the weather?
Adding current weather conditions to this clock is a useful feature. Fortunately, the good folks at OpenWeatherMap.org allow access to basic weather information for free. Sign up for a free account there and you will be given an API key you can use in your web development. The free account provides current conditions and 5-day forecasts for any valid GPS location you throw at it. Just be sure to call the API no more than 60 times per minute or you will be prodded to upgrade to a paid account. Once you have an API key, substitute it for the words YOUR_API_KEY_HERE in this code sample and then paste the code into the browser’s location bar. You will receive a JSON object containing the weather for my location here in Pennsylvania. Experiment with different latitudes and longitudes. You can find coordinates for any major city at LatLong.net where the coordinates are given in the decimal format you need.
The CSS needs styles for the new weather <div> and the icon image. Note that the icon is set to 0 opacity initially. That will be changed in the JavaScript code once valid weather information is retrieved.
#weather {
  display: block;
  width: auto;
}

#icon {
  display: inline-block;
  opacity: 0;
  vertical-align: top;
  width: 50px;
  height: 50px;
}

@media (min-width: 480px){
  /* Add the rule below to the end of the media query */
  #weather {display: inline-block;}
}
Add the JavaScript
We need to add variables to reference the weather URL, the weather <div> (wd), and the weather icon. We also need to decide on Fahrenheit or Celsius. The Boolean value for usephp should be set to false for now. We will discuss hiding your API key in a PHP document a little later. The locationRequested Boolean value will help us avoid calling the weather and geolocation APIs before the user has requested them. The sunset and sunrise time variables will allow us to change the appearance of the clock based on the time of day. The iconurl value provides the stem of the URL we need to retrieve weather icons. We also need a random number between 0 and 14 to use in our updateTime function so that all our users don’t request weather at the same minute each quarter hour. If you have your own set of icons, you can change the URL value for iconurl . The file names for the PNG icons are available at OpenWeatherMap.org.
// ...
var weatherurl, wd, icon, weatherminute;
var temperaturescale = "F"; // Set to F or C (fahrenheit or celsius)
var usephp = false; // Set to true to use a PHP document to hide your api key
var locationRequested = false;
var sunsettime = 0;
var sunrisetime = 0;
var iconurl = "https://openweathermap.org/img/w/";

// ...
function init(){
  //... Add these lines before the updateTime call at the end of the function
  wd = document.getElementById("weather");
  icon = document.getElementById("icon");
  weatherminute = randRange(0,14);
  // ...
}

// Random number utility function
function randRange(min, max) {
  return Math.floor(Math.random()*(max-min+1))+min;
}
Next we will modify the final if block of the updateTime() function. We wish to avoid unnecessary calls to the weather and geolocation APIs so it is important to test for sec === 0 to be sure we don't call either API 60 times in a given minute. We also wish to call the APIs only if the user has approved the browser’s geolocation request.
function updateTime(){
  //...
  if (locationRequested && sec === 0){
    checkForSunset(); // Checks for sunset once each minute
    if (minutes % 15 === weatherminute){
        getWeather(); // Get weather every 15 minutes while the app is running
        // weatherminute is a random number between 0 and 14 to ensure
        // that users don't all hit the API at the same minute
    }
    if (minutes % 5 === 0){
      getLocation(); // Get location every 5 minutes while the app is running
    }
  }
}
In the showPosition() function, the URL to request the weather data will be either a relative path to the PHP file or a full HTTPS URL pointing to the OpenWeatherMap.org service. In both cases, we will be passing the latitude and longitude in the query string of the URL. For the APPID, please substitute your own API Key for the words YOUR_API_KEY_HERE unless you are using the PHP solution discussed in Step 4 below.
function showPosition(position) {
  //...
  if (usephp){
    weatherurl = "clock.php?lat=" + lat + "&lon=" + lon;
  }else{
    weatherurl = "https://api.openweathermap.org/data/2.5/weather?";
    weatherurl += "lat=" + lat + "&lon=" + lon + "&APPID=";
    weatherurl += "YOUR_API_KEY_HERE";
  }
  if (!locationRequested){
    getWeather();
    locationRequested = true;
  }
}
The showPosition() function then calls getWeather() which updates the weather <div> to let the user know something is happening while the weather data is being retrieved. I opted to use the older XMLHttpRequest standard because fetch is not supported on old devices like the iPhone 4s. If the weather data request is being channeled through a PHP document, the response type will be "document" rather than plain text so we have to test for that. If that is the case, the JSON object we need will be in the textContent property of the body of the response. Otherwise, we only need the plain text found in the responseText property. The data is then parsed as a JSON object and sent to the processWeather() function.
function getWeather() {
  wd.innerHTML = "getting weather";
  var xhttp = new XMLHttpRequest();
  xhttp.responseType = usephp ? "document" : "text";
  // The PHP file returns a document rather than plain text
  xhttp.onreadystatechange = function() {
    if (this.readyState === 4 && this.status === 200) {
      // When using PHP as a data source we need the `textContent`
      // of the body of the returned document
      var data = usephp ? xhttp.response.body.textContent : xhttp.responseText;
      processWeather(JSON.parse(data));
    }
  };
  xhttp.open("GET", weatherurl, true);
  xhttp.send();
}
The JSON object sent to processWeather() will look something like this:
From this JSON data, we need to grab the weather property that contains the description of the current conditions and the filename for the weather icon. The <img> tag in the html that has the ID of "icon" is then updated with a new src property value to load the icon image. The temperature is part of the main property but it has to be converted to Fahrenheit or Celsius (most humans don’t think in Kelvin). When that is done, the current conditions can be assigned to the innerHTML property of the weather <div>. The times for sunrise and sunset are found in the sys property of the data. Once we have those, we can call the checkForSunset() function and modify the style to match the time of day.
function processWeather(data){
  var weather = data["weather"][0];
  icon.src = iconurl + weather.icon + ".png";
  icon.style.opacity = 1;
  var localtemperature = convertTemperature(data["main"].temp).toFixed(0);
  var weatherstring = localtemperature + "°" + temperaturescale + "  " + weather.description;
  wd.innerHTML = weatherstring;
  sunsettime = Number(data["sys"].sunset);
  sunrisetime = Number(data["sys"].sunrise);
  checkForSunset();
}

function checkForSunset(){
  var nowtime = now.getTime()/1000;
  // Changes the presentation style if the time of day is after sunset
  // or before the next day's sunrise
  var isDark = nowtime > sunsettime || nowtime < sunrisetime;
  document.getElementById("container").className = isDark ? "nightmode":"daymode";
}

function convertTemperature(kelvin){
  // Converts temps in kelvin to celsius or fahrenheit
  var celsius = (kelvin - 273.15);
  return temperaturescale === "F" ? celsius * 1.8 + 32 : celsius;
}
Step 4: Do I really have to show you my API key?
I used a disposable API key to create a working demo. Generally, however, putting an API key in plain text within the code of a front-end web application seems like a bad idea. Others might copy it and use up your API access quota. If you have access to a typical web server (CodePen doesn’t do PHP), you can hide the API key in a PHP file. Here is some sample code. Substitute the API key and upload the file as clock.php into the same directory as the main HTML file. The PHP file serves as a sort of proxy to the OpenWeatherMap API that we’re using to fetch data in the demo. If it has any problem retrieving weather data, it simply returns an appropriately structured object with "Weather Unavailable" as a description and a temperature that converts to 0° Fahrenheit. The API key is never transferred from the server to the browser so there is nothing for prying eyes to see.
I would be interested to hear from readers if you know of a secure, serverless solution to hiding an API key (Netlify or Docker perhaps?) because it’d be nice not to have to spin up our own server to store and hit the data. Chime in if you have some thoughts.
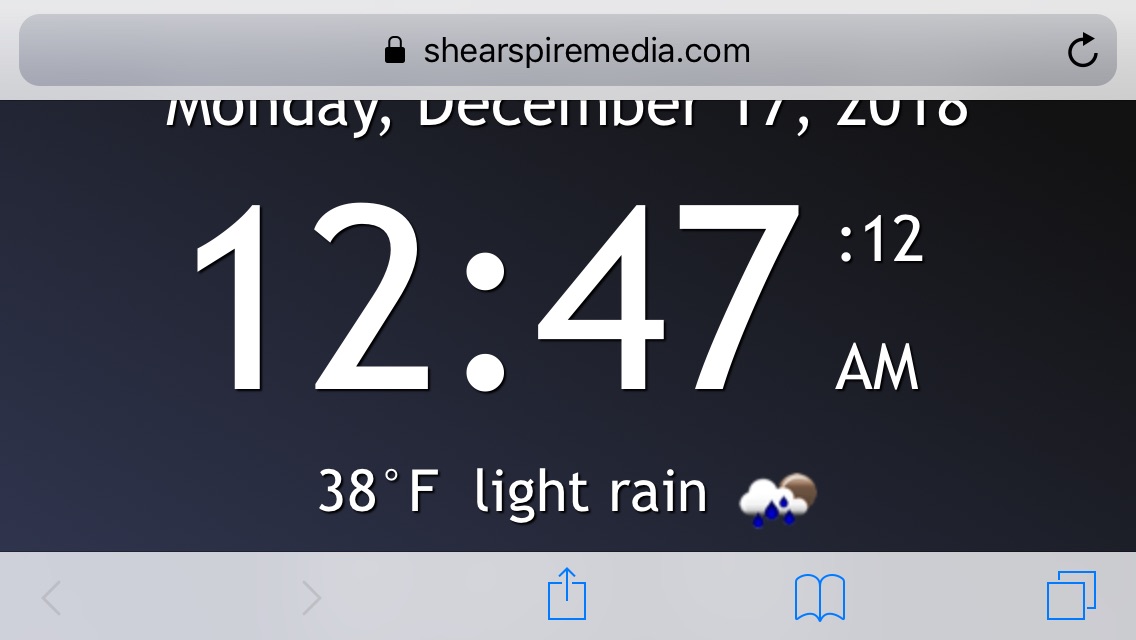
If anyone else tries to use this PHP file from another domain, the browser should throw an error like the one in the following example. I loaded a copy of the weather clock on my makepages.com domain and tried to access the PHP file on my shearspiremedia.com domain. These days, the same-origin policy is in place by default on typical commercial web server installations. You might need to confirm that is the case on the server you are using.
[Error] Origin https://makepages.com is not allowed by Access-Control-Allow-Origin.
[Error] XMLHttpRequest cannot load https://shearspiremedia.com/demos/clock/clock.php?lat=40.14616446413611&lon=-75.20946717104738 due to access control checks.
Next, update the usephp variable in the JavaScript file and test:
var usephp = true; // Set to true to use a PHP document to hide your api key
Step 5: Can I please go full screen?
Once the app is up and working, it can load on any smartphone browser. The iPhone, however, is forced to endure the presence of the location bar and footer. Yuck!
It would be lovely to be able to view it full screen instead. To do that, we need a manifest file to tell the device that we wish to view the clock as a standalone app and to tell Android devices where the app icons are located. Here is my manifest file which I saved as manifest.json in the same directory as the HTML file. You can create your own manifest file using the Web App Manifest Generator. Be sure to adjust the icon file names in your own manifest file and in the link tags in the HTML as we see here:
We also need a set of square PNG images at 192px, 152px, 128px, 96px, and 48px for the home screen icon. Save these into an icons folder within the same folder as your HTML file. Use the file names found in the manifest. The Web App Manifest Generator will create icons in all the required sizes other than 48px by uploading a single 512 x 512 pixel image. Here is the simple icon I made:
Home screen icon for my Weather Clock.
Finally, we need to add a bunch of meta and link tags in the head of the HTML file to make this all work. Here is the completed index.html file code including all the head tags you can’t see on CodePen.
The visitor can now tap the share button on the iPhone and choose “Add to Home Screen.” An icon will appear that will launch the clock as a full-screen standalone app. Enjoy!
If the user’s exact location isn’t a requirement, we could avoid the Geolocation API entirely and get the approximate location using any of several IP address services. In the demo above, a JSON object is received from extreme-ip-lookup.com to get the approximate GPS location of the user. That displays the city and region values found in the JSON instead of the GPS coordinates. It should be clear to the user in this case that the weather location is a neighboring town.
Since IP information is part of the normal request for a web page, an argument could be made that there is no ethical problem with displaying IP location information without user permission. That eliminates the need for the GPS button altogether. I actually switched the final app to use the IP address location feature with geolocation only as a fallback in the event the IP location service is down. I also added more weather information, custom background images, and custom weather icons to correspond to current weather conditions. The custom icons are available at this Pen. The final app is available here on my ShearSpireMedia.com site. I also created a Pen that generates a starry sky for night mode that can be used to make a night background.
That’s a wrap!
We covered a lot of ground in this article, but hopefully it gives you an idea that:
We can teach an old device new tricks.
The Geolocation API isn’t all that scary.
Fetching and using data from an external API is useful.
Using a small PHP file is one easy way to hide your API key from prying eyes.
Working with user permissions is a good (and often required) practice.
Like I mentioned earlier, a serverless solution for storing data would be ideal here, so if you have any thoughts on that — or really any ideas or questions at all — please let me know in the comments!