How I Made a Pure CSS Puzzle Game

I recently discovered the joy of creating CSS-only games. It’s always fascinating how HTML and CSS are capable of handling the logic of an entire online game, so I had to try it! Such games usually rely on the ol’ Checkbox Hack where we combine the checked/unchecked state of a HTML input with the :checked pseudo-class in CSS. We can do a lot of magic with that one combination!

In fact, I challenged myself to build an entire game without Checkbox. I wasn’t sure if it would be possible, but it definitely is, and I’m going to show you how.

In addition to the puzzle game we will study in this article, I have made a collection of pure CSS games, most of them without the Checkbox Hack. (They are also available on CodePen.)

Want to play before we start?

I personally prefer playing the game in full screen mode, but you can play it below or open it up over here.

Cool right? I know, it’s not the Best Puzzle Game You Ever Saw™ but it’s also not bad at all for something that only uses CSS and a few lines of HTML. You can easily adjust the size of the grid, change the number of cells to control the difficulty level, and use whatever image you want!

We’re going to remake that demo together, then put a little extra sparkle in it at the end for some kicks.

The drag and drop functionality

While the structure of the puzzle is fairly straightforward with CSS Grid, the ability to drag and drop puzzle pieces is a bit trickier. I had to relying on a combination of transitions, hover effects, and sibling selectors to get it done.

If you hover over the empty box in that demo, the image moves inside of it and stays there even if you move the cursor out of the box. The trick is to add a big transition duration and delay — so big that the image takes lots of time to return to its initial position.

img {
  transform: translate(200%);
  transition: 999s 999s; /* very slow move on mouseout */
}
.box:hover img {
  transform: translate(0);
  transition: 0s; /* instant move on hover */
}

Specifying only the transition-delay is enough, but using big values on both the delay and the duration decreases the chance that a player ever sees the image move back. If you wait for 999s + 999s — which is approximately 30 minutes — then you will see the image move. But you won’t, right? I mean, no one’s going to take that long between turns unless they walk away from the game. So, I consider this a good trick for switching between two states.

Did you notice that hovering the image also triggers the changes? That’s because the image is part of the box element, which is not good for us. We can fix this by adding pointer-events: none to the image but we won’t be able to drag it later.

That means we have to introduce another element inside the .box:

That extra div (we’re using a class of .a) will take the same area as the image (thanks to CSS Grid and grid-area: 1 / 1) and will be the element that triggers the hover effect. And that is where the sibling selector comes into play:

.a {
  grid-area: 1 / 1;
}
img {
  grid-area: 1 / 1;
  transform: translate(200%);
  transition: 999s 999s;
}
.a:hover + img {
  transform: translate(0);
  transition: 0s;
}

Hovering on the .a element moves the image, and since it is taking up all space inside the box, it’s like we are hovering over the box instead! Hovering the image is no longer a problem!

Let’s drag and drop our image inside the box and see the result:

Did you see that? You first grab the image and move it to the box, nothing fancy. But once you release the image you trigger the hover effect that moves the image, and then we simulate a drag and drop feature. If you release the mouse outside the box, nothing happens.

Hmm, your simulation isn’t perfect because we can also hover the box and get the same effect.

True and we will rectify this. We need to disable the hover effect and allow it only if we release the image inside the box. We will play with the dimension of our .a element to make that happen.

Now, hovering the box does nothing. But if you start dragging the image, the .a element appears, and once released inside the box, we can trigger the hover effect and move the image.

Let’s dissect the code:

.a {
  width: 0%;
  transition: 0s .2s; /* add a small delay to make sure we catch the hover effect */
}
.box:active .a { /* on :active increase the width */
  width: 100%;
  transition: 0s; /* instant change */
}
img {
  transform: translate(200%);
  transition: 999s 999s;
}
.a:hover + img {
  transform: translate(0);
  transition: 0s;
}

Clicking on the image fires the :active pseudo-class that makes the .a element full-width (it is initially equal to 0). The active state will remain active until we release the image. If we release the image inside the box, the .a element goes back to width: 0, but we will trigger the hover effect before it happens and the image will fall inside the box! If you release it outside the box, nothing happens.

There is a little quirk: clicking the empty box also moves the image and breaks our feature. Currently, :active is linked to the .box element, so clicking on it or any of its children will activate it; and by doing this, we end up showing the .a element and triggering the hover effect.

We can fix that by playing with pointer-events. It allows us to disable any interaction with the .box while maintaining the interactions with the child elements.

.box {
  pointer-events: none;
}
.box * {
  pointer-events: initial;
}

Now our drag and drop feature is perfect. Unless you can find how to hack it, the only way to move the image is to drag it and drop it inside the box.

Building the puzzle grid

Putting the puzzle together is going to feel easy peasy compared to what we just did for the drag and drop feature. We are going to rely on CSS grid and background tricks to create the puzzle.

Here’s our grid, written in Pug for convenience:

- let n = 4; /* number of columns/rows */
- let image = "https://picsum.photos/id/1015/800/800";

g(style=`--i:url(${image})`)
  - for(let i = 0; i < n*n; i++)
    z
      a
      b(draggable="true") 

The code may look strange but it compiles into plain HTML:

<g style="--i: url(https://picsum.photos/id/1015/800/800)">
 <z>
   <a></a>
   <b draggable="true"></b>
 </z>
 <z>
   <a></a>
   <b draggable="true"></b>
 </z>
 <z>
   <a></a>
   <b draggable="true"></b>
 </z>
  <!-- etc. -->
</g>

I bet you’re wondering what’s up with those tags. None of these elements have any special meaning — I just find that the code is much easier to write using <z> than a bunch of <div class="z"> or whatever.

This is how I’ve mapped them out:

  • <g> is our grid container that contains N*N <z> elements.
  • <z> represents our grid items. It plays the role of the .box element we saw in the previous section.
  • <a> triggers the hover effect.
  • <b> represents a portion of our image. We apply the draggable attribute on it because it cannot be dragged by default.

Alright, let’s register our grid container on <g>. This is in Sass instead of CSS:

$n : 4; /* number of columns/rows */

g {
  --s: 300px; /* size of the puzzle */

  display: grid;
  max-width: var(--s);
  border: 1px solid;
  margin: auto;
  grid-template-columns: repeat($n, 1fr);
}

We’re actually going to make our grid children — the <z> elements — grids as well and have both <a> and <b> within the same grid area:

z {
  aspect-ratio: 1;
  display: grid;
  outline: 1px dashed;
}
a {
  grid-area: 1/1;
}
b {
  grid-area: 1/1;
}

As you can see, nothing fancy — we created a grid with a specific size. The rest of the CSS we need is for the drag and drop feature, which requires us to randomly place the pieces around the board. I’m going to turn to Sass for this, again for the convenience of being able to loop through and style all the puzzle pieces with a function:

b {
  background: var(--i) 0/var(--s) var(--s);
}

@for $i from 1 to ($n * $n + 1) {
  $r: (random(180));
  $x: (($i - 1)%$n);
  $y: floor(($i - 0.001) / $n);
  z:nth-of-type(#{$i}) b{
    background-position: ($x / ($n - 1)) * 100% ($y / ($n - 1)) * 100%;
    transform: 
      translate((($n - 1) / 2 - $x) * 100%, (($n - 1)/2 - $y) * 100%) 
      rotate($r * 1deg) 
      translate((random(100)*1% + ($n - 1) * 100%)) 
      rotate((random(20) - 10 - $r) * 1deg)
   }
}

You may have noticed that I’m using the Sass random() function. That’s how we get the randomized positions for the puzzle pieces. Remember that we will disable that position when hovering over the <a> element after dragging and dropping its corresponding <b> element inside the grid cell.

z a:hover ~ b {
  transform: translate(0);
  transition: 0s;
}

In that same loop, I am also defining the background configuration for each piece of the puzzle. All of them will logically share the same image as the background, and its size should be equal to the size of the whole grid (defined with the --s variable). Using the same background-image and some math, we update the background-position to show only a piece of the image.

That’s it! Our CSS-only puzzle game is technically done!

But we can always do better, right? I showed you how to make a grid of puzzle piece shapes in another article. Let’s take that same idea and apply it here, shall we?

Puzzle piece shapes

Here’s our new puzzle game. Same functionality but with more realistic shapes!

This is an illustration of the shapes on the grid:

If you look closely you’ll notice that we have nine different puzzle-piece shapes: the four corners, the four edges, and one for everything else.

The grid of puzzle pieces I made in the other article I referred to is a little more straightforward:

We can use the same technique that combines CSS masks and gradients to create the different shapes. In case you are unfamiliar with mask and gradients, I highly recommend checking that simplified case to better understand the technique before moving to the next part.

First, we need to use specific selectors to target each group of elements that shares the same shape. We have nine groups, so we will use eight selectors, plus a default selector that selects all of them.

z  /* 0 */

z:first-child  /* 1 */

z:nth-child(-n + 4):not(:first-child) /* 2 */

z:nth-child(5) /* 3 */

z:nth-child(5n + 1):not(:first-child):not(:nth-last-child(5)) /* 4 */

z:nth-last-child(5)  /* 5 */

z:nth-child(5n):not(:nth-child(5)):not(:last-child) /* 6 */

z:last-child /* 7 */

z:nth-last-child(-n + 4):not(:last-child) /* 8 */

Here is a figure that shows how that maps to our grid:

Now let’s tackle the shapes. Let’s focus on learning just one or two of the shapes because they all use the same technique — and that way, you have some homework to keep learning!

For the puzzle pieces in the center of the grid, 0:

mask: 
  radial-gradient(var(--r) at calc(50% - var(--r) / 2) 0, #0000 98%, #000) var(--r)  
    0 / 100% var(--r) no-repeat,
  radial-gradient(var(--r) at calc(100% - var(--r)) calc(50% - var(--r) / 2), #0000 98%, #000) 
    var(--r) 50% / 100% calc(100% - 2 * var(--r)) no-repeat,
  radial-gradient(var(--r) at var(--r) calc(50% - var(--r) / 2), #000 98%, #0000),
  radial-gradient(var(--r) at calc(50% + var(--r) / 2) calc(100% - var(--r)), #000 98%, #0000);

The code may look complex, but let’s focus on one gradient at a time to see what’s happening:

Two gradients create two circles (marked green and purple in the demo), and two other gradients create the slots that other pieces connect to (the one marked blue fills up most of the shape while the one marked red fills the top portion). A CSS variable, --r, sets the radius of the circular shapes.

The shape of the puzzle pieces in the center (marked 0 in the illustration) is the hardest to make as it uses four gradients and has four curvatures. All the others pieces juggle fewer gradients.

For example, the puzzle pieces along the top edge of the puzzle (marked 2 in the illustration) uses three gradients instead of four:

mask: 
  radial-gradient(var(--r) at calc(100% - var(--r)) calc(50% + var(--r) / 2), #0000 98%, #000) var(--r) calc(-1 * var(--r)) no-repeat,
  radial-gradient(var(--r) at var(--r) calc(50% - var(--r) / 2), #000 98%, #0000),
  radial-gradient(var(--r) at calc(50% + var(--r) / 2) calc(100% - var(--r)), #000 98%, #0000);

We removed the first (top) gradient and adjusted the values of the second gradient so that it covers the space left behind. You won’t notice a big difference in the code if you compare the two examples. It should be noted that we can find different background configurations to create the same shape. If you start playing with gradients you will for sure come up with something different than what I did. You may even write something that’s more concise — if so, share it in the comments!

In addition to creating the shapes, you will also find that I am increasing the width and/or the height of the elements like below:

height: calc(100% + var(--r));
width: calc(100% + var(--r));

The pieces of the puzzle need to overflow their grid cell to connect.

Final demo

Here is the full demo again. If you compare it with the first version you will see the same code structure to create the grid and the drag-and-drop feature, plus the code to create the shapes.

Possible enhancements

The article ends here but we could keep enhancing our puzzle with even more features! How about a a timer? Or maybe some sort of congratulations when the player finishes the puzzle?

I may consider all these features in a future version, so keep an eye on my GitHub repo.

Wrapping up

And CSS isn’t a programming language, they say. Ha!

I’m not trying to spark some #HotDrama by that. I say it because we did some really tricky logic stuff and covered a lot of CSS properties and techniques along the way. We played with CSS Grid, transitions, masking, gradients, selectors, and background properties. Not to mention the few Sass tricks we used to make our code easy to adjust.

The goal was not to build the game, but to explore CSS and discover new properties and tricks that you can use in other projects. Creating an online game in CSS is a challenge that pushes you to explore CSS features in great detail and learn how to use them. Plus, it’s just a lot of fun that we get something to play with when all is said and done.

Whether CSS is a programming language or not, doesn’t change the fact that we always learn by building and creating innovative stuff.


How I Made a Pure CSS Puzzle Game originally published on CSS-Tricks, which is part of the DigitalOcean family. You should get the newsletter.

How to Add More Fun to a Game: Extending “The Aviator”

If you like cute little games you will love Karim Maaloul’s “The Aviator” — as a pilot you steer your aircraft across a round little ocean world, evading red “enemies” and collecting blue energy tokens to avoid crashing into the water. It runs entirely in the browser so make sure to quickly play a round to better understand what we are about to do in this tutorial.

By the way, Karim co-founded the Belgian creative agency Epic. His style is unique in its adorableness and his animation craftmanship is astonishing as you can also see in his series of WebGL experiments.

Karim thankfully wrote about the making of and open sourced the code and while it is a fun little game there is still a lot of potential to get even more out of it. In this article we will explore some hands-on changes on how to bring the most fun based on the foundation we have here, a small browser game using Three.js.

This tutorial requires some knowledge of JavaScript and Three.js.

What makes a game fun?

While there obviously is no definitive recipe there are a few key mechanics that will maximize your chances of generating fun. There is a great compilation on gamedesigning.org, so let’s see which items apply already:

✅ Great controls
✅ An interesting theme and visual style
🚫 Excellent sound and music
🚫 Captivating worlds
🤔 Fun gameplay
🚫 Solid level design
🚫 An entertaining story & memorable characters
🤔 Good balance of challenge and reward
✅ Something different

We can see there’s lots to do, too much for a single article of course, so we will get to the general game layout, story, characters and balance later. Now we will improve the gameplay and add sounds — let’s go!

Adding weapons

Guns are always fun! Some games like Space Invaders consist entirely of shooting and it is a great mechanic to add visual excitement, cool sound effects and an extra dimension to the skill requirement so we not only have the up and down movement of the aircraft.

Let’s try some simple gun designs:

The “Simple gun” (top) and the “Better gun” (bottom).

These 3D models consist of only 2–3 cylinders of shiny metal material:

const metalMaterial = new THREE.MeshStandardMaterial({
    color: 0x222222,
    flatShading: true,
    roughness: 0.5,
    metalness: 1.0
})

class SimpleGun {
    static createMesh() {
        const BODY_RADIUS = 3
        const BODY_LENGTH = 20

        const full = new THREE.Group()
        const body = new THREE.Mesh(
            new THREE.CylinderGeometry(BODY_RADIUS, BODY_RADIUS, BODY_LENGTH),
            metalMaterial,
        )
        body.rotation.z = Math.PI/2
        full.add(body)

        const barrel = new THREE.Mesh(
            new THREE.CylinderGeometry(BODY_RADIUS/2, BODY_RADIUS/2, BODY_LENGTH),
            metalMaterial,
        )
        barrel.rotation.z = Math.PI/2
        barrel.position.x = BODY_LENGTH
        full.add(barrel)

        return full
    }
}

We will have 3 guns: A SimpleGun, then the DoubleGun as just two of those and then the BetterGun which has just a bit different proportions and another cylinder at the tip.

Guns mounted to the airplane

Positioning the guns on the plane was done by simply experimenting with the positional x/y/z values.

The shooting mechanic itself is straight forward:

class SimpleGun {
  downtime() {
    return 0.1
  }

  damage() {
    return 1
  }

  shoot(direction) {
    const BULLET_SPEED = 0.5
    const RECOIL_DISTANCE = 4
    const RECOIL_DURATION = this.downtime() / 1.5

    const position = new THREE.Vector3()
    this.mesh.getWorldPosition(position)
    position.add(new THREE.Vector3(5, 0, 0))
    spawnProjectile(this.damage(), position, direction, BULLET_SPEED, 0.3, 3)

    // Little explosion at exhaust
    spawnParticles(position.clone().add(new THREE.Vector3(2,0,0)), 1, Colors.orange, 0.2)

    // Recoil of gun
    const initialX = this.mesh.position.x
    TweenMax.to(this.mesh.position, {
      duration: RECOIL_DURATION,
      x: initialX - RECOIL_DISTANCE,
      onComplete: () => {
        TweenMax.to(this.mesh.position, {
          duration: RECOIL_DURATION,
          x: initialX,
        })
      },
    })
  }
}

class Airplane {
  shoot() {
    if (!this.weapon) {
      return
    }

    // rate-limit shooting
    const nowTime = new Date().getTime() / 1000
    if (nowTime-this.lastShot < this.weapon.downtime()) {
      return
    }
    this.lastShot = nowTime

    // fire the shot
    let direction = new THREE.Vector3(10, 0, 0)
    direction.applyEuler(airplane.mesh.rotation)
    this.weapon.shoot(direction)

    // recoil airplane
    const recoilForce = this.weapon.damage()
    TweenMax.to(this.mesh.position, {
      duration: 0.05,
      x: this.mesh.position.x - recoilForce,
    })
  }
}

// in the main loop
if (mouseDown[0] || keysDown['Space']) {
  airplane.shoot()
}

Now the collision detection with the enemies, we just check whether the enemy’s bounding box intersects with the bullet’s box:

class Enemy {
	tick(deltaTime) {
		...
		const thisAabb = new THREE.Box3().setFromObject(this.mesh)
		for (const projectile of allProjectiles) {
			const projectileAabb = new THREE.Box3().setFromObject(projectile.mesh)
			if (thisAabb.intersectsBox(projectileAabb)) {
				spawnParticles(projectile.mesh.position.clone(), 5, Colors.brownDark, 1)
				projectile.remove()
				this.hitpoints -= projectile.damage
			}
		}
		if (this.hitpoints <= 0) {
			this.explode()
		}
	}

	explode() {
		spawnParticles(this.mesh.position.clone(), 15, Colors.red, 3)
		sceneManager.remove(this)
	}
}

Et voilá, we can shoot with different weapons and it’s super fun!

Changing the energy system to lives and coins

Currently the game features an energy/fuel bar that slowly drains over time and fills up when collecting the blue pills. I feel like this makes sense but a more conventional system of having lives as health, symbolized by hearts, and coins as goodies is clearer to players and will allow for more flexibility in the gameplay.

In the code the change from blue pills to golden coins is easy: We changed the color and then the geometry from THREE.TetrahedronGeometry(5,0) to THREE.CylinderGeometry(4, 4, 1, 10).

The new logic now is: We start out with three lives and whenever our airplane crashes into an enemy we lose one. The amount of collected coins show in the interface. The coins don’t yet have real impact on the gameplay but they are great for the score board and we can easily add some mechanics later: For example that the player can buy accessoires for the airplane with their coins, having a lifetime coin counter or we could design a game mode where the task is to not miss a single coin on the map.

Adding sounds

This is an obvious improvement and conceptually simple — we just need to find fitting, free sound bites and integrate them.

Luckily on https://freesound.org and https://www.zapsplat.com/ we can search for sound effects and use them freely, just make sure to attribute where required.

Example of a gun shot sound: https://freesound.org/people/LeMudCrab/sounds/163456/.

We load all 24 sound files at the start of the game and then to play a sound we code a simple audioManager.play(‘shot-soft’). Repetitively playing the same sound can get boring for the ears when shooting for a few seconds or when collecting a few coins in a row, so we make sure to have several different sounds for those and just select randomly which one to play.

Be aware though that browsers require a page interaction, so basically a mouse click, before they allow a website to play sound. This is to prevent websites from annoyingly auto-playing sounds directly after loading. We can simply require a click on a “Start” button after page load to work around this.

Adding collectibles

How do we get the weapons or new lives to the player? We will spawn “collectibles” for that, which is the item (a heart or gun) floating in a bubble that the player can catch.

We already have the spawning logic in the game, for coins and enemies, so we can adopt that easily.

class Collectible {
	constructor(mesh, onApply) {
		this.mesh = new THREE.Object3D()
		const bubble = new THREE.Mesh(
			new THREE.SphereGeometry(10, 100, 100),
			new THREE.MeshPhongMaterial({
				color: COLOR_COLLECTIBLE_BUBBLE,
				transparent: true,
				opacity: .4,
				flatShading: true,
			})
		)
		this.mesh.add(bubble)
		this.mesh.add(mesh)
		...
	}


	tick(deltaTime) {
		rotateAroundSea(this, deltaTime, world.collectiblesSpeed)

		// rotate collectible for visual effect
		this.mesh.rotation.y += deltaTime * 0.002 * Math.random()
		this.mesh.rotation.z += deltaTime * 0.002 * Math.random()

		// collision?
		if (utils.collide(airplane.mesh, this.mesh, world.collectibleDistanceTolerance)) {
			this.onApply()
			this.explode()
		}
		// passed-by?
		else if (this.angle > Math.PI) {
			sceneManager.remove(this)
		}
	}


	explode() {
		spawnParticles(this.mesh.position.clone(), 15, COLOR_COLLECTIBLE_BUBBLE, 3)
		sceneManager.remove(this)
		audioManager.play('bubble')

		// animation to make it very obvious that we collected this item
		TweenMax.to(...)
	}
}


function spawnSimpleGunCollectible() {
	const gun = SimpleGun.createMesh()
	gun.scale.set(0.25, 0.25, 0.25)
	gun.position.x = -2

	new Collectible(gun, () => {
		airplane.equipWeapon(new SimpleGun())
	})
}

And that’s it, we have our collectibles:

The only problem is that I couldn’t for the life of me create a heart model from the three.js primitives so I resorted to a free, low-poly 3D model from the platform cgtrader.

Defining the spawn-logic on the map in a way to have a good balance of challenge and reward requires sensible refining so after some experimenting this felt nice: Spawn the three weapons after a distance of 550, 1150 and 1750 respectively and spawn a life a short while after losing one.

Some more polish

  • The ocean’s color gets darker as we progress through the levels
  • Show more prominently when we enter a new level
  • Show an end game screen after 5 levels
  • Adjusted the code for a newer version of the Three.js library
  • Tweaked the color theme

More, more, more fun!

We went from a simple fly-up-and-down gameplay to being able to collect guns and shoot the enemies. The sounds add to the atmosphere and the coins mechanics sets us up for new features later on.

Make sure to play our result here! Collect the weapons, have fun with the guns and try to survive until the end of level 5.

If you are interested in the source code, you find it here on GitHub.

How to proceed from here? We improved on some key mechanics and have a proper basis but this is not quite a finalized, polished game yet.

As a next step we plan to dive more into game design theory. We will look at several of the most popular games of the endless runner genre to get insights into their structure and mechanics and how they keep their players engaged. The aim would be to learn more about the advanced concepts and build them into The Aviator.

Subway Surfer, the most successful “endless runner” game.

Stay tuned, so long!

The post How to Add More Fun to a Game: Extending “The Aviator” appeared first on Codrops.

Generating (and Solving!) Sudokus in CSS

I love to make CSS do stuff it shouldn’t. It’s the type of problem-solving brain training you’d get building a calculator in Minecraft, except you probably won’t get a job working with Minecraft Redstone no matter how good you get at that, whereas CSS skills are worth actual money, and many generalist programmers are scared of CSS, so studying it can be a way to stand out from the pack. Also, when you’ve done the impossible with CSS, all normal CSS tasks seem easy.

I’ve read interesting discussions on the web about whether CSS is a Turing complete language and whether CSS and HTML qualify as programming languages. I haven’t decided, but I can say that in the quest to support common UI patterns in a standard way, some of the newer CSS features blur the line between styling and functionality.

Challenging ourselves to solve logical problems with only CSS and HTML can force us to spend quality time with some of the newish, programing-like features of CSS, such as custom properties and logical functions. It still wasn’t clear how these could be used to build a Sudoku solver using only CSS, but as crazy as the idea sounded, the constraint-based logic of Sudoku seemed like it might be compatible with the declarative nature of CSS, so I wasn’t shocked to find someone else claimed to have built a “CSS3 Sudoku solution solver.” As it turned out, this was more like a sudoku validator in CSS than a solver. It also used a tiny bit of JavaScript to work with textboxes.

After days of valiantly trying to build a full Sudoku solver and generator app in pure CSS, I learned three things.

  1. You can unit test Sass functions and mixins, which is awesome. If you’re heavily using and reusing these Sass features, which is what they are meant for, they become as mission-critical and as scary to change as any other part of your codebase. They deserve tests around them.
  2. Chrome DevTools shows an infinite spinner of death when you throw 50MB of Sass-generated CSS at it.
  3. Maybe it’s impossible to translate something like this Python script into pure CSS. Maybe.

However, we can achieve a Sudoku solver and generator app for 16-square Sudoku which you can play with below, then we’ll break down how its features work. Where is your god now, simple puzzle intended for young children?

The value selector

Since we’re experimenting with CSS, we are contractually obligated to include something visually interesting, though nothing too over-the-top as Sudoku players seem to appreciate a UI that stays out of the way. In my opinion, the way you select numbers on some of the Sudoku apps could be more intuitive, so I decided to apply the radial menu UI pattern, which dates all the way back to days of black and white Macintosh and is still popular in modern video games. Someone actually built a nice pure CSS library for radial menus, but I got a crush on React Planet as I love the way it captures both selecting an item with the circle around it, and how it attractively displays the available actions. I wanted to see if I could build a similar effect with just CSS.

I took some of the dashed circle code from this Pen and then made the numbers out of labels using the old border-radius: 50% trick, then I used absolute positioning to make the numbers “stick” to the correct point on the dashed circle even when the animation makes it change size.

.context .number.top {
  background: green;
  margin-left: auto;
  margin-right: auto;
  left: 0;
  right: 0;
  top: -12.5px;
}

.context .number.left {
  background: orange;
  margin-top: auto;
  margin-bottom: auto;
  top: 0;
  bottom: 0;
  left: -12.5px;
}

The animation fades the number picker in while making its z-index higher so it becomes clickable. We are also animating the top and left margin from 50% to zero so the circle expands from the center to fill the available space.

@keyframes bounce-out {
  0% {
    z-index: -1;
    width: 35%;
    height: 35%;
    margin-left: 50%;
    margin-top: 50%;
    opacity: 0;
  }
  100% {
    z-index: 2;
    opacity: 1;
    width: var(--circle-radius);
    height: var(--circle-radius);
  }
}

Then, to simulate bouncy physics similar to React Planet, I use a cubic-bezier() function on the animation. The website easings.net was a big help in making easing functions easy.

.context {
  animation: bounce-out cubic-bezier(.68,-0.6,.32, 2.5) .5s forwards;        
}

Both the selection of values and the behavior of opening the value selector for the selected square operate using radio button hacks, to remember which values were selected and achieve mutual exclusivity. CSS-Tricks has an excellent article on checkbox and radio button hacks, so I won’t repeat that information here, but I will show how we set CSS variables at the level of the Sudoku CSS grid based on checkboxes, as it’s central to the way this experiment works.

As we are using variables, we can get the same behavior when a value is set, regardless of whether it’s the user checking a box to specify a value, or the puzzle generator setting that same value for the square. There are many combinations of squares and values, so we are using Sass rather than writing all the combinations out by hand. We are also creating separate bit values for each value-square combination, and another custom property to tell us whether the square is unsolved. That’s because CSS gives us limited ability to compare one value to another (it’s possible but can be tricky). We are defining these values in a way that might look a bit odd at first, but will make life easier for us when it comes to validating whether a set of Sudoku square values is solvable or not.

@for $i from 1 through 16 {
  @for $j from 1 through 4 {
    #select-#{$j}-value-square-#{$i}:checked ~ .sudoku  {
       --square-#{$i}-unsolved: 0; 
       --square-#{$i}-equals-#{$j}: 1;
    }
  }
}

Validating the grid

Doctor Google tells us that even with only 16 squares, there are four billion possible combinations of four numbers. But a program that brute forces all these combinations and outputs the ones that are valid according to the rules of Sudoku shows that there are only 288 valid solutions in 4×4 Sudoku, which is a big difference from the number of possible valid solutions in a 9×9 grid. With only 288 possible solutions, this is where Sass can really come into its own. I’m still not sure if CSS is a Turing complete language, but Sass is, and it gives us some proper data structures, such as lists. With a bit of regex magic we can transform the list of valid 4×4 puzzles linked above into a Sass-powered two-dimensional list!

$solutions: ((1,2,3,4,3,4,1,2,2,1,4,3,4,3,2,1),(3,1,2,4,2,4,1,3,1,3,4,2,4,2,3,1),(1,2,3,4,3,4,1,2,2,3,4,1,4,1,2,3),/*...many lines later...*/(2,4,3,1,3,1,4,2,4,2,1,3,1,3,2,4),(4,3,2,1,2,1,4,3,3,4,1,2,1,2,3,4));

Sweet! If our CSS hack were a multi-tier application, this would be our database. Validation could have used the same approach of checking row and column values like the 9×9 validator we saw in the introduction, but since we know the answer it seems like we shouldn’t need to bother checking blocks and columns and rows. Instead, we can check whether the entered numbers could still be a valid puzzle or not. In pseudocode this might look something like:

foreach (s in squares) 
{
  if (solutionsContains(s.value, s.index) or s.isUnsolved())
  {
    showValidationError();
  } 
} 

Remember we created those weird variables whenever a square value is selected?

--square-#{$i}-unsolved: 0;        
--square-#{$i}-equals-#{$j}: 1;

So now we have answers to both questions in the condition in line 3 of the pseudocode above, but how can we do a logical OR operator in CSS? There’s a great article on CSS-Tricks about using calc() to simulate logic operators in CSS, and I’m not sure I would have even thought of some of the code in my Sudoku solver without it, but some of the formulas explained in that article get a bit unwieldy, especially if you want to do nested ANDs and ORs with more than two operands. For example, we need the CSS equivalent of this pseudocode:

if ((squareOneEqualsOne and squareTwoEqualsTwo /*...*/ and squareSixteenEqualsOne) or (squareOneEqualsOne and squareTwoEqualsThree /*...*/ and squareSixteenEqualsOne))
  {
    sudokuIsValid();
  } 
}

Well, that article showing how to do logic using calc() was written in 2019. Nowadays, in addition to calc(), we have the well-supported min() and max() math functions which meet our needs even better. If you Google “CSS min, max and clamp” (the last of which is just convenient sugar for a combination of min() and max()), you’ll find many examples are showing how they can be used to simplify fluid typography. That’s one compelling use case, but you can use these math functions anywhere you’d use a number, which adds a lot of power to CSS. For example, if you pass bit flag variables to CSS min(), that’s equivalent to AND. If you pass the same flags to CSS max(), that’s equivalent to OR. We can prove this using the following truth tables.

ABA AND Bmin(A, B)
0000
1000
0100
1111
ABA OR Bmax(A, B)
0000
1011
0111
1111

We can get pretty sophisticated with that, especially when you add the helpful fact that we are allowed to do anything calc() can do within min() and max(). CSS just took a step closer to being its own weird scripting language. Now we can implement the condition in our validation pseudocode above in CSS. (In practice, we generate this from Sass since it’s very repetitive.)

.sudoku { 
  --square-1-matches-puzzle-1: max(var(--square-1-unsolved), var(--square-1-equals-1, 0));
  --square-2-matches-puzzle-1: max(var(--square-2-unsolved), var(--square-2-equals-2, 0));
  /*...*/
  --square-16-matches-puzzle-1: max(var(--square-16-unsolved), var(--square-16-equals-1, 0));
  --puzzle-1-found: min(var(--square-1-matches-puzzle-1), 
  /*...*/ 
  var(--square-16-matches-puzzle-1));
  --solution-found: max(var(--puzzle-1-found), /*...*/ var(--puzzle-288-found));
}

By checking if each square is either unsolved or has a value that exists in the same position in one of our pre-calculated solutions from the Sass 2D list, we can produce a variable that tells us whether the currently defined squares exist in a valid 4×4 sudoku puzzle. Now as long as we can find something numeric that will drive a behavior in CSS, we can base that CSS behavior on --solution-found. For example, to make our grid turn red when it’s invalid we can put this in each square:

.square {
  color: rgb(calc(255 * (1 - var(--solution-found))), 0, 0);
}

Not every CSS property can be driven by a number, but many can, and both z-index and opacity are especially versatile CSS properties for this usage. Other behaviors can be trickier but often achievable. For example, I was a bit stuck thinking about how to trigger the shake animation for an invalid grid with just a numeric bit flag property so that the grid would shake any time it became invalid, but this is a great example of how hacking CSS forces you to read the specs and understand the edge cases for each property. I found my solution on this page about animation-duration.

A value of 0s, which is the default value, indicates that no animation should occur.

So we can base animation duration of the shake animation on --solution-found and remove the animation each time a number is clicked using the :active pseudo-class to make the animation replay any time the solution becomes invalid, and do nothing otherwise.

#select-#{$j}-value-square-#{$i}:active  { 
  animation: none;
}

 #select-#{$j}-value-square-#{$i}:checked ~ .sudoku {
  animation: shake cubic-bezier(.36,.07,.19,.97) calc((clamp(0, 1 - var(--solution-found), 1)) * 1s) forwards;
}

A pure CSS Sudoku app would probably be impossible if we didn’t have CSS custom properties, and they are more powerful than they may seem at first glance. The way they get reevaluated and update the UI whenever a property they depend on changes is like a simpler version of the reactivity you get from a fancy JavaScript framework like Vue. It’s fair to say reactivity is built right into the browser in the form of CSS variables!

Now that we have this approach for validation and our stylesheet knows the solution in its subconscious any time we set valid values in our Sudoku, we are close to implementing the solver!

Solving every 4×4 Sudoku

Remember when we introduced these intermediate variables?

.sudoku { 
  --puzzle-1-found: min(var(--square-1-matches-puzzle-1), 
  /*...*/ 
  var(--square-16-matches-puzzle-1));
}

That wasn’t only to make the validation code easier to write and understand. Knowing which of the 288 possible puzzle(s) are matched allows us to write the solver!

#no-solution {
  z-index: 1;
  color: red;
}
@for $solution-index from 1 through 288 {
label[for=solution-#{$solution-index}] {
  cursor: pointer;
  z-index: calc(var(--puzzle-#{$solution-index}-found) * #{$solution-index});
}

#solution-#{$solution-index}:checked ~ .sudoku  {
  @for $square from 1 through 16 {
    --square-#{$square}-solution:"#{nth(nth($solutions, $solution-index), $square)}";
    --square-#{$square}-color: grey;
    --auto-#{$square}: 1;
  }

I put the optional plural in the word “puzzle(s)” above because, if the user hasn’t filled out many squares, it’s possible there are multiple valid solutions. I dig solvers like this JavaScript one that can quickly produce a solution even if you haven’t specified enough values for a human to be able to solve it without guessing.

The trick in my CSS solver is that while the “solve” button looks like a single button, it’s actually 288 radio button labels stacked one on top of the other — but all of them look the same. Imagine a stack of cards: they all have the same design on the back, but different values on the front. The solver logic is putting the card with the solution on the top of the pile with z-index, so if you pick it up and read the other side of it, you will always have the correct solution. It still works if there are multiple correct solutions, because the solution that comes later in our list of valid answers will be placed on top, since we calculate the z-index by multiplying the flag by $solution-index. If no solutions are matched, the z-index of all the solve buttons will be zero and, since the disabled version of the button with the “invalid puzzle” message has z-index of one, it will appear on top. If puzzle number one is the solution, we will still see the puzzle one button, since the invalid button comes earlier in the HTML.

Stacking context can behave unexpectedly if you haven’t read up on it, so this is is a nice illustration of one of the non-obvious stacking behaviors.

Generating puzzles

We can think of the generating puzzles as another version of the solver with extra requirements.

  1. Some random squares need to be left unsolved when the puzzle generator button is pressed.
  2. The combination of randomly unsolved squares and a correct solution should be different each time the generator button is pressed.
  3. Pressing the solve button should reveal the complete solution.
  4. If the user manually solves the generated puzzle, we’d like to reward them with a victory screen that gives feedback about how fast they solved it.

CSS has no random() function (though Sass does), so it might not be obvious how we can get a different behavior each time we push the same button. But the solver explanation above was a bit of a spoiler as it already does something similar with a button that looks like a single element but is actually different depending on the current valid solution.

The question with the “generate” button is how we can get an unpredictable result each time we click. Full credit to Alvaro Montoro for his article on CSS-Tricks about how to generate seemingly random values with just CSS. The combination of radio button hacks and animating the stacking order seems to work nicely. I tried hard to see if I could do it without extra markup, but I concluded that this approach is the best and the simplest. To reuse the deck of cards analogy from the solver explanation, it’s like the deck of puzzle cards is invisibly shuffling all the time so that whenever you take a card, you discover it has a different face.

We can combine this pseudo randomness with the actual randomness offered by the Sass random() function to give our Sudoku game replay value.

@for $j from 0 through 287 {
  label[for=generate#{$j}] { 
    animation-delay: #{$j * .35s}; 
  }
  label[for=generate#{$j}]:active:after {
    z-index: 300;
    width: 100%;
  }
  #generate#{$j}:checked ~ .sudoku { 
    $blockCounts: (1: 2, 2: 2, 3: 3, 4: 2);
    $shuffleSquares: (1, 2, 3, 4, 5, 6, 7, 8, 9, 10, 11, 12, 13, 14, 15, 16);

     @for $square from 1 through 16 {
       $index1: random(16);
       $index2: random(16);

       $temp: nth($shuffleSquares, $index1);
       $shuffleSquares: set-nth($shuffleSquares, $index1, nth($shuffleSquares, $index2));
       $shuffleSquares: set-nth($shuffleSquares, $index2, $temp);
     }

     @each $square in $shuffleSquares {
       $row: ceil($square/4);
      $column: 1 + ($square - 1) % 4;

       $block: if($row &lt; 3, 1, 3) + if($column < 3, 0, 1);
       $count: map-get($blockCounts, $block);
       $val: nth(nth($solutions, $j + 1), $square);

       --square-#{$square}-solution-#{$val}: 1;

       @if ($count > 0) {
         $blockCounts: map-merge($blockCounts, ($block: $count - 1));
        --square-#{$square}-unsolved: 0; 
        --square-#{$square}-equals-#{$val}: 1;

        @for $other-value from 1 through 4 {
          @if ($other-value != $val) {
            --square-#{$square}-equals-#{$other-value}: 0;   
          }
        }

        --square-#{$square}-color: grey;
        --auto-#{$square}: 1;
      }
    } 
  }
}

For each “block” (that’s Sudoku-speak for those 4×4 sections of the Sudoku grid with the thick border around them), we use Sass to randomly choose two out of four squares to solve, except for one “gimme” square which only has one unsolved square. Since the validation logic and solver logic uses the variables rather than being directly based on which values were checked using the value selector, the validation and solving logic both behave the same way. That means generated values are treated the same as if the user had individually selected each value.

The solving timer

Here’s the timer ticking through the first eleven seconds.

We’ll dive into the CSS for the solving timer in a moment, but let’s first show what one of the digits looks like without CSS overflow set to hidden, and with a green border around the element to show the part that would be visible to the user at each step of the animation.

We are using an infinitely repeating keyframes animation to shift the list of possible digits one character to the left at a desired interval (we use a monospaced font so that we can be sure each character will occupy the same exact width). The seconds digit will go from zero up to nine, and the next digit should only go up to five, increasing once per ten seconds before both digits of the seconds need to reset to zero.

Each digit is animating using the same technique you can use to animate a spritesheet in CSS, except instead of animatedly shifting an image background to achieve an animation effect, we are shifting a pseudo element containing the possible digits.

As with many tasks in CSS, there is more than one way to make an animated counter in CSS. But some don’t work cross-browser and really demand a preprocessor to keep the code succinct. I like my approach because it’s fairly short. CSS does the heavy lifting to figure out when and how to move to the next digit. All the markup needs to do is create a placeholder where each digit goes, giving us some freedom for how we present our timer.

Here’s the markup:

<div class="stopwatch">  
  <div class="symbol"></div>
  <div class="symbol">:</div>
  <div class="symbol"></div>
  <div class="symbol"></div>
</div>

…and the CSS:

.stopwatch {
  text-align: center;
  font-family: monospace;
  margin-bottom: 10px;
}

.symbol {
  width: 1ch;
  overflow: hidden;
  display: inline-flex;
  font-size: 5ch;
}

.symbol:nth-child(1)::after {
  animation: tens 3600s steps(6, end) infinite;
  content: '012345';
}

.symbol:nth-child(2)::after {
  animation: units 600s steps(10, end) infinite;
  content: '0123456789';
}

.symbol:nth-child(4)::after {
  animation: tens 60s steps(6, end) infinite;
  content: '012345';
}

.symbol:nth-child(5)::after {
  animation: units 10s steps(10, end) infinite;
  content: '0123456789';
}

@keyframes units {
  to {
    transform: translateX(-10ch);
  }
}

@keyframes tens {
  to {
    transform: translateX(-6ch);
  }
}

You might notice that the counter starts again from the beginning after an hour. That’s because all of the iteration counts are set to infinite . We could fix it, but I figure if someone spends an hour solving one of these, they have bigger problems than a children’s Sudoku puzzle. 😛

What would be unfair, though, is if we allowed the same timer to just keep ticking even when the user generates a fresh puzzle. Can we make it reset? It turns out we’ve solved that problem already in the first step in this article, where we removed, and conditionally re-added, the animation for our number selector using the :active pseudo-class. This time, it’s actually simpler because every time we hit the “generate” button, we want to remove the animation on all the digits to take them back to zero. Then the animation will start again when the radio button is no longer active. So, it’s only one line of CSS we need to make the timer reset each time we generate!

input[name=generate]:active ~ .stopwatch .symbol::after {
  animation: none;
}

Sudokumeter™️

Even when the puzzle is solved, I want to offer replay value by giving the player visual feedback on their time performance and challenging them to solve puzzles faster. I also want to reward you for making it this far through the article by giving you a minimalist circular gauge you could reuse in your own projects. Here’s a standalone Pen with the circular gauge for you to experiment:

We’re applying the same principles used in the win screen from the game except, in this Pen, the rating displayed is controlled with radio button hacks, whereas in the game it’s controlled by animation that slowly moves to a lower rating as time passes. The gauge in the game is hidden using zero opacity and is only displayed (and paused) when we detect that the puzzle has been manually solved.

Let’s explain how we create the illusion of a semi-circle that’s divided into two sides by color. It’s actually a full CSS circle with its bottom half hidden using overflow: hidden.

We apply the two colors using a pseudo-element that fills half of the <div>.

Then we cut a hole in the middle to make a donut, using another circle filled with the game’s background color, and center that inside the larger circle using flexbox.

Next, hide half of it by making the size of the container half as tall as the full circle and, again, using overflow: hidden.

Now, if we rotate our donut, it looks like the gauge is filling up with green or losing green, depending on whether we rotate our donut by negative or positive degrees!

We’d like to put labels on both ends of the gauge and a description in between them, and it turns out flexbox is an elegant solution:

#rating {
  font-size: 30px;
  display: flex;
  width: 300px;
  justify-content: space-between;
}

Here’s the markup:

<div id="rating">
  <div id="turtle">🐢</div>
  <div id="feedback"></div>
  <div id="rabbit">🐇</div>
</div>

That’s all we need to position our labels. If the rating <div> is the width of the diameter of our circle, flexbox will position the emoji labels at the ends and the description in the center of the circle!

As for controlling what the description says, it’s similar to the trick we used for our timer, except this time we do it vertically rather than horizontally since the feedback descriptions are of variable length. But they are always the same height.

Conclusion

I opened this article with questions about whether CSS is a programming language. It’s hard to argue the logic we were able to implement using just CSS wasn’t programming, but some of it is unusual usage of CSS to say the least. As with many things in the tech world, the answer seems to be “it depends,” and as much as we learned about CSS through this experiment, we’ve also illustrated that programming is as much about the mindset as the tech.

No CSS hacking article is complete without the disclaimer that although we’ve shown we can implement sophisticated logic in CSS and learn a lot in the process, most of the time we probably shouldn’t do this in production, because of maintainability, accessibility, and some other words ending with “ility.”

But we also saw that some things — such as what I think of as the built-in reactivity you get with CSS variables — are quite convenient in CSS but might require us to go through hoops in JavaScript, and probably use a framework. By pushing the limits of CSS we ended up creating a circular gauge that I believe could reasonably be used in a production app, and might even be the right thing compared to reaching for some JavaScript widget that might be heavy and do more than we really need.

On my wishlist for the CSS Sudoku app is a reset button. Currently, if you want to start a new Sudoku game, you have to refresh the page. That’s an inherent limitation of radio button hacks which makes CSS hacking different to conventional programming. At one stage, I believed I found a solution when I thought animations could be used to set CSS variables — but it turns out that is part of CSS Houdini and only supported in Chromium-based browsers. If and when that’s supported everywhere, it will open a Pandora’s box of hacks and be a lot of fun. In a future article, I may even explore why this innocuous feature we have in Chrome is a game changer for CSS hacking.

The jury is still out on whether a full 81-square Sudoku solver is possible in CSS, but if you’re curious to find out, leave your feedback in the comments. If enough people want it, we may go down that rabbit hole together and see what dark corners of CSS we can illuminate in the process.


The post Generating (and Solving!) Sudokus in CSS appeared first on CSS-Tricks.

You can support CSS-Tricks by being an MVP Supporter.

Recreating Game Elements for the Web: The Among Us Card Swipe

As a web developer, I pay close attention to the design of video games. From the HUD in Overwatch to the catch screen in Pokemon Go to hunting in Oregon Trail, games often have interesting mechanics and satisfying interactions, many of which inspire my own coding games at Codepip.

Beyond that, implementing small slices of these game designs on a web stack is a fun, effective way to broaden your skills. By focusing on a specific element, your time is spent working on an interesting part without having to build out a whole game with everything that entails. And even in this limited scope, you often get exposed to new technologies and techniques that push on the boundaries of your dev knowledge.

As a case study for this idea, I’ll walk you through my recreation of the card swipe from Among Us. For anyone in the dark, Among Us is a popular multiplayer game. Aboard a spaceship, crewmates have to deduce who among them is an imposter. All the while, they complete mundane maintenance tasks and avoid being offed by the imposter.

The card swipe is the most infamous of the maintenance tasks. Despite being simple, so many players have struggled with it that it’s become the stuff of streams and memes.

Here’s my demo

This is my rendition of the card swipe task:

Next, I’ll walk you through some of the techniques I used to create this demo.

Swiping with mouse and touch events

After quickly wireframing the major components in code, I had to make the card draggable. In the game, when you start dragging the card, it follows your pointer’s position horizontally, but stays aligned with the card reader vertically. The card has a limit in how far past the reader it can be dragged to its left or right. Lastly, when you lift your mouse or finger, the card returns to its original position.

All of this is accomplished by assigning functions to mouse and touch events. Three functions are all that‘s needed to handle mouse down, mouse move, and mouse up (or touch start, touch move, and touch end if you‘re on a touchscreen device). Here’s the skeleton of that JavaScript code:

const card = document.getElementById('card');
const reader = document.getElementById('reader');
let active = false;
let initialX;

// set event handlers
document.addEventListener('mousedown', dragStart);
document.addEventListener('mousemove', drag);
document.addEventListener('mouseup', dragEnd);
document.addEventListener('touchstart', dragStart);
document.addEventListener('touchmove', drag);
document.addEventListener('touchend', dragEnd);

function dragStart(e) {
  // continue only if drag started on card
  if (e.target !== card) return;

  // get initial pointer position
  if (e.type === 'touchstart') {
    initialX = e.touches[0].clientX;
  } else {
    initialX = e.clientX;
  }

  active = true;
}

function drag(e) {
  // continue only if drag started on card
  if (!active) return;

  e.preventDefault();
  
  let x;

  // get current pointer position
  if (e.type === 'touchmove') {
    x = e.touches[0].clientX - initialX;
  } else {
    x = e.clientX - initialX;
  }

  // update card position
  setTranslate(x);
}

function dragEnd(e) {
  // continue only if drag started on card
  if (!active) return;

  e.preventDefault();
  
  let x;

  // get final pointer position
  if (e.type === 'touchend') {
    x = e.touches[0].clientX - initialX;
  } else {
    x = e.clientX - initialX;
  }

  active = false;
  
  // reset card position
  setTranslate(0);
}

function setTranslate(x) {
  // don't let card move too far left or right
  if (x < 0) {
    x = 0;
  } else if (x > reader.offsetWidth) {
    x = reader.offsetWidth;
  }

  // set card position on center instead of left edge
  x -= (card.offsetWidth / 2);
  
  card.style.transform = 'translateX(' + x + 'px)';
}

Setting status with performance.now()

Next, I had to determine whether the card swipe was valid or invalid. For it to be valid, you must drag the card across the reader at just the right speed. Didn’t drag it far enough? Invalid. Too fast? Invalid. Too slow? Invalid.

To find if the card has been swiped far enough, I checked the card’s position relative to the right edge of the card reader in the function dragEnd:

let status;

// check if card wasn't swiped all the way
if (x < reader.offsetWidth) {
  status = 'invalid';
}

setStatus(status);

To measure the duration of the card swipe, I set start and end timestamps in dragStart and dragEnd respectively, using performance.now().

function setStatus(status) {

  // status is only set for incomplete swipes so far
  if (typeof status === 'undefined') {

    // timestamps taken at drag start and end using performance.now()
    let duration = timeEnd - timeStart;

    if (duration > 700) {
      status = 'slow';
    } else if (duration < 400) {
      status = 'fast';
    } else {
      status = 'valid';
    }
  }

  // set [data-status] attribute on reader
  reader.dataset.status = status;
}

Based on each condition, a different value is set on the reader’s data-status attribute. CSS is used to display the relevant message and illuminate either a red or green light.

#message:after {
  content: "Please swipe card";
}

[data-status="invalid"] #message:after {
  content: "Bad read. Try again.";
}

[data-status="slow"] #message:after {
  content: "Too slow. Try again.";
}

[data-status="fast"] #message:after {
  content: "Too fast. Try again.";
}

[data-status="valid"] #message:after {
  content: "Accepted. Thank you.";
}

.red {
  background-color: #f52818;
  filter: saturate(0.6) brightness(0.7);
}

.green {
  background-color: #3dd022;
  filter: saturate(0.6) brightness(0.7);
}

[data-status="invalid"] .red,
[data-status="slow"] .red,
[data-status="fast"] .red,
[data-status="valid"] .green {
  filter: none;
}

Final touches with fonts, animations, and audio

With the core functionality complete, I added a few more touches to get the project looking even more like Among Us.

First, I used a free custom font called DSEG to imitate the segmented type from old LCDs. All it took was hosting the files and declaring the font face in CSS.

@font-face {
  font-family: 'DSEG14Classic';
  src: url('../fonts/DSEG14-Classic/DSEG14Classic-Regular.woff2') format('woff2'),
       url('../fonts/DSEG14-Classic/DSEG14Classic-Regular.woff') format('woff'),
       url('../fonts/DSEG14-Classic/DSEG14Classic-Regular.ttf') format('truetype');
}

Next, I copied the jitter animation of the text in the original. Game developers often add subtle animations to breath life into an element, like making a background drift or a character, well, breathe. To achieve the jitter, I defined a CSS animation:

@keyframes jitter {
  from {
    transform: translateX(0);
  }
  to {
    transform: translateX(5px);
  }
}

At this point, the text glides smoothly back and forth. Instead, what I want is for it to jump back and forth five pixels at a time. Enter the steps() function:

#message {
  animation: jitter 3s infinite steps(2);
}

Finally, I added the same audio feedback as used in Among Us.

let soundAccepted = new Audio('./audio/CardAccepted.mp3');
let soundDenied = new Audio('./audio/CardDenied.mp3');

if (status === 'valid') {
  soundAccepted.play();
} else {
  soundDenied.play();
}

Sound effects are often frowned upon in the web development world. A project like this an opportunity to run wild with audio.

And with that, the we’re done! Here’s that demo again:

Try your own

Given how standardized the web has become in look and feel, this approach of pulling an element from a game and implementing it for the web is a good way to break out of your comfort zone and try something new.

Take this Among Us card swipe. In a small, simple demo, I tinkered with web fonts and animations in CSS. I monkeyed with input events and audio in JavaScript. I dabbled with an unconventional visual style.

Now it’s time for you to survey interesting mechanics from your favorite games and try your hand at replicating them. You might be surprised what you learn.


The post Recreating Game Elements for the Web: The Among Us Card Swipe appeared first on CSS-Tricks.

You can support CSS-Tricks by being an MVP Supporter.

Whack-a-Mole: The CSS Edition

We’ve seen the checkbox hack and how it can be used to build a complete state machine in CSS. Today, we’ll take that line of thought a step further and build a simple game of Whack-A-Mole, where the player needs to react quickly to win … all without a touch of JavaScript.

This might seem a little silly in a language that doesn’t have any notion of timers or intervals, but the secret is that CSS does — it’s just packaged in a little feature called CSS Animations.

Take a look at this double-click handler. Note that CSS doesn’t know what a click is, much less a double click:

How does it work? Here’s a recording of the important elements, recolored and slowed down:

The idea is that when you click on the button for the first time, it moves the double-click element in place under the cursor, but it also causes a masking element to start moving up to cover it.

  • If the second click comes quickly enough after the first (as on the left side of the recording), it happens on the double-click (blue) element.
  • Otherwise (as on the right side of the recording), it happens on the masking (yellow) element, which has the effect of a single-click element.

(For an in-depth explanation, take a look at my write-up on the pure-CSS double-click handler here.)

There are two ideas in play here:

  1. Animations can be used to manage states according to a set pattern. (I’m using the term “state” loosely.)
  2. By changing an element’s position, we can change whether or not an user is allowed to take an action.

That’s all we need!

Now, instead of having our target scroll into view, we could instead use animation-timing-function: step-end to have it pop in and out, sort of like a mole in a hole:

I tried a few different options for moving the mole out of the way, and changing its absolute position — here left — seems to work the best. Using a translation would be convenient, but unfortunately leaves Firefox thinking the cursor is on the wrong element because changing transform in the Gecko layout engine doesn’t trigger a re-layout. (Normally, this would be a good thing for performance reasons, but not so much for our little demo!)

With a bit of styling, we can make it look more like a game element:

The “mole” here is basically a restyled CSS label that triggers the checkbox hack. So is the hole. When the mole’s animation takes it over the hole, clicking in the region triggers the mole’s radio input; when the mole is out of the way, clicking triggers the hole’s radio input.

The next step is to put a couple of holes next to each other and have the moles bounce around among them, each on a different negative animation-delay. With a state machine reading off which of the moles have been hit and which of the holes have been collapsed, it turns into a neat little game.

I used short Python scripts to generate both the state machine selectors and the mole keyframes. It gets a bit unwieldy for hand-coding otherwise. This is mostly because CSS also has no concept of random numbers, which leaves us no choice but to hardcode the “random” mole behavior.

There we have it: a complete reaction-based game, entirely in HTML and CSS.


The post Whack-a-Mole: The CSS Edition appeared first on CSS-Tricks.

You can support CSS-Tricks by being an MVP Supporter.

Multiplayer Tic Tac Toe with GraphQL

GraphQL is a query language for APIs that is very empowering for front-end developers. As the GraphQL site explains it, you describe your data, ask for what you want, and get predictable results.

If you haven’t worked with it before, GraphQL might be a little confusing to grok at first glance. So, let’s build a multiplayer tic-tac-toe game using it in order to demonstrate how it’s used and what we can do with it.

First thing we need is a backend for our APIs. We’re going to use Hasura GraphQL Engine along with a custom GraphQL server for this tutorial. We’ll look at the queries and mutations that the client-side needs to build the game. You can implement this kind of thing in whatever framework you wish, but we’re going with use React and Apollo for this tutorial.

Here’s what we’re making:

GitHub Repo

A brief GraphQL primer

GraphQL is a query language for APIs; a language with a syntax that defines a way to fetch data from the server. It works with any kind of API that is backed by a strong system that makes your codebase resilient. Some of the primary characteristics of GraphQL are:

  • The client can ask the server for what queries it supports (check out introspection for more).
  • The client must ask the server for exactly what it wants. It can't ask for something like a wildcard (*) but rather exact fields. For example, to get a user's ID and name, the GraphQL query would be something like:
    query {
      user {
        id
        name
      }
    }
  • Every query is made to a single endpoint and every request is a POST request.
  • Given a query, the structure of the response is enforced. For example, for the above query to get the id and name of a user object, a successful response would be something like:
    {
      "data": {
        "user": {
          "id": "AUTH:482919",
          "name": "Jon Doe"
        }
      }
    }

This series of articles is a great place to start if you want to know more about GraphQL.

Why are we using GraphQL, anyway?

We just discussed how GraphQL demands that the client must ask the server for exactly what it wants. That means there is no unnecessary data retrieved from the server, like in case of REST where you would receive a huge response even when you need one field. Getting what new need and only what we need optimizes responses so that they’re speedy and predictable.

The client can ask the server for its schema via introspection. This schema can be used to build queries dynamically using an API explorer like GraphiQL. It also enables linting and auto-completing because every query can be built with and cross-checked against the GraphQL schema. As a front-end developer, this greatly enhances the DX as there is much less human error involved.

Since there is a single endpoint and every request is a POST request, GraphQL can avoid a lot of boilerplate since it doesn't have to track endpoints, request payloads and response types. Response caching is much easier because every query response can be expected to be of a certain structure.

Furthermore, GraphQL has a well-defined spec for implementing real-time subscriptions. You do not have to come up with your own implementation details for building real-time servers. Build a server that complies with GraphQL’s real-time spec and any client can start consuming the real-time GraphQL APIs with ease.

GraphQL Terminology

I will be using some GraphQL terms in this post, so it’s worth covering a few of them here in advance.

  • Query: A GraphQL query is one that simply fetches data from the server.
  • Mutation: This is a GraphQL query that changes something on the server and fetches some data.
  • Subscription: This is a GraphQL query that subscribes the client to some changes on the server.
  • Query variables: These allow us to add parameters to a GraphQL query.

Getting back to the backend

Now that we have a cursory understanding of GraphQL, let’s start with modeling a backend. Our GraphQL backend would be a combination of Hasura GraphQL Engine and a custom GraphQL server. We will not go into the subtleties of code in this case.

Since Tic Tac Toe is a multiplayer game, there is a need to store state in the database. We will use Postgres as our database and Hasura GraphQL Engine as a GraphQL server that allows us to CRUD the data in Postgres over GraphQL.

Apart from CRUD on the database, we would also want to run some custom logic in the form of GraphQL mutations. We will use a custom GraphQL server for that.

Hasura describes itself quite nicely in its README file:

GraphQL Engine is a blazing-fast GraphQL server that gives you instant, realtime GraphQL APIs over Postgres, with webhook triggers on database events, and remote schemas for business logic.

Going a little deeper, Hasura GraphQL Engine is an open-source server that sits on top of a Postgres database and allows you to CRUD the data over real-time GraphQL. It works with both new and existing Postgres databases. It also has an access control layer that you can integrate with any auth provider. In this post though, we will not implement auth for the sake of brevity.

Let’s start by deploying an instance of Hasura GraphQL Engine to Heroku's free tier that comes with a fresh Postgres database. Go ahead, do it; it is free and you do not need to enter your credit card details :)

Once you deploy, you will land up on the Hasura console which is the admin UI to manage your backend. Note that the URL you are at, is your GraphQL Engine URL. Lets start with creating our required tables.

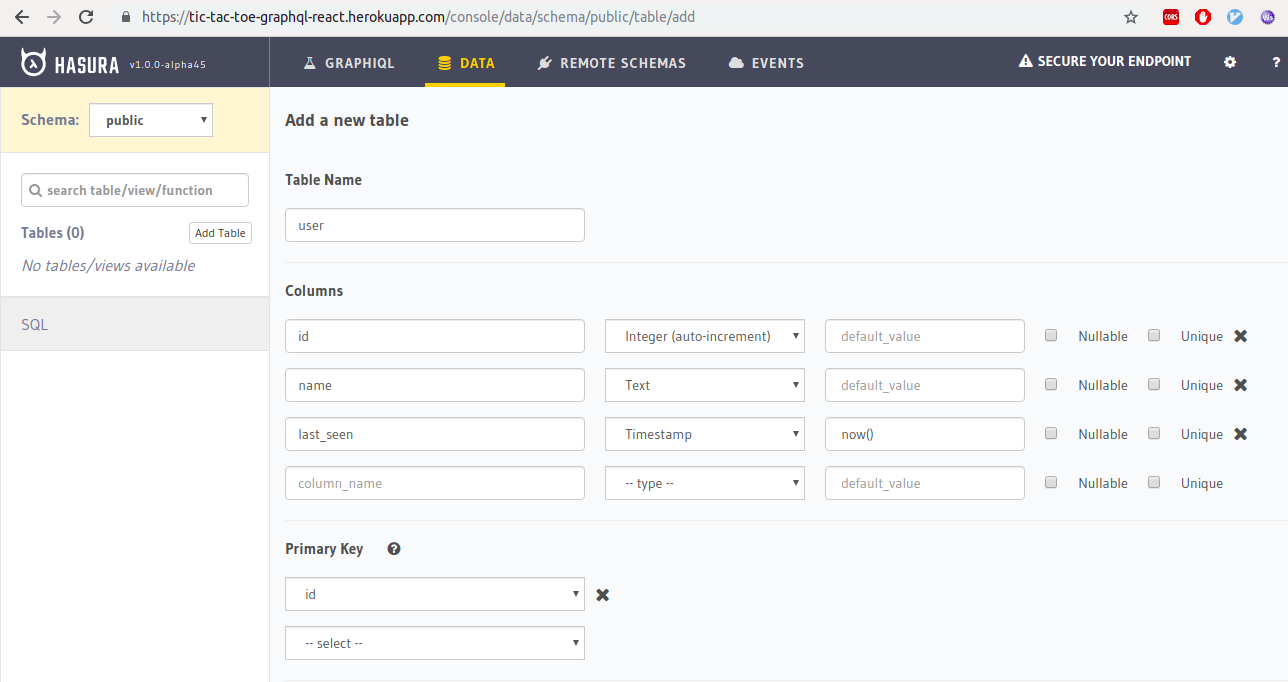
user

A user table will store our users. To create the table, go to the "Data" tab on top and click on the "Create Table" button.

This table has an id column which is the unique identifier of each user and a name column that stores the user’s name.

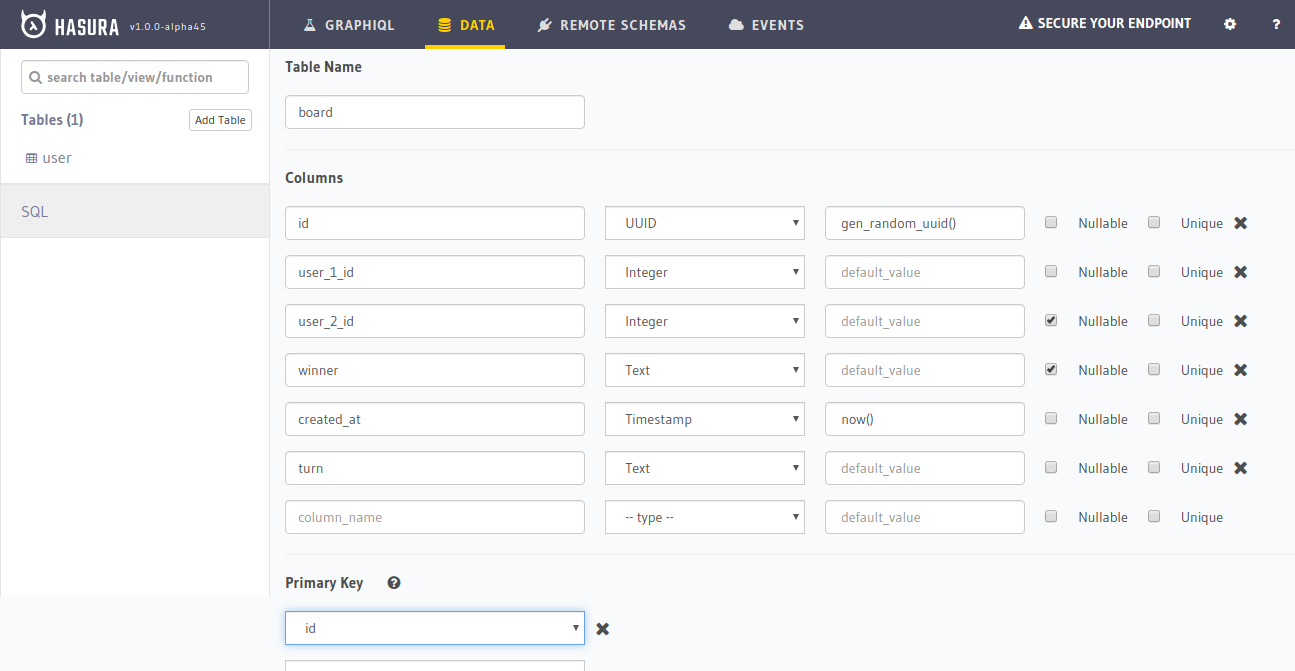
board

The board table will store the game boards where all the action happens. We’ll spin up a new board for each game that starts.

Lets look at the columns of this table:

  • id: A unique UUID for each board that is auto generated
  • user_1_id: The user_id of the first user. This user by default plays X in the game
  • user_2_id: The user_id of the second user. This user by default plays O.
  • winner: This is a text field that is set to X or O once the winner has been decided.
  • turn: This is a text field that can be X or O and it stores the current turn. It starts with X.

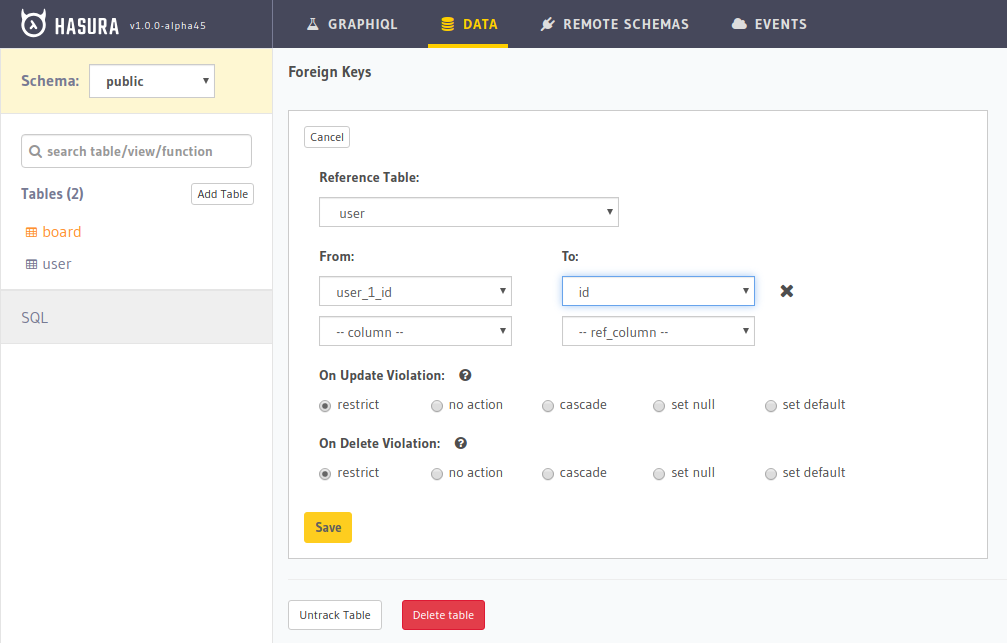
Since user_1_id and user_2_id store the user IDs, let’s add a constraint on the board table that ensures user_1_id and user_2_id to be present in table user.

Go to the "Modify" tab in the Hasura board table and add the foreign keys.

Adding the foreign key on user_1_id. We’ll need to add a new foreign key on user_2_id as well.

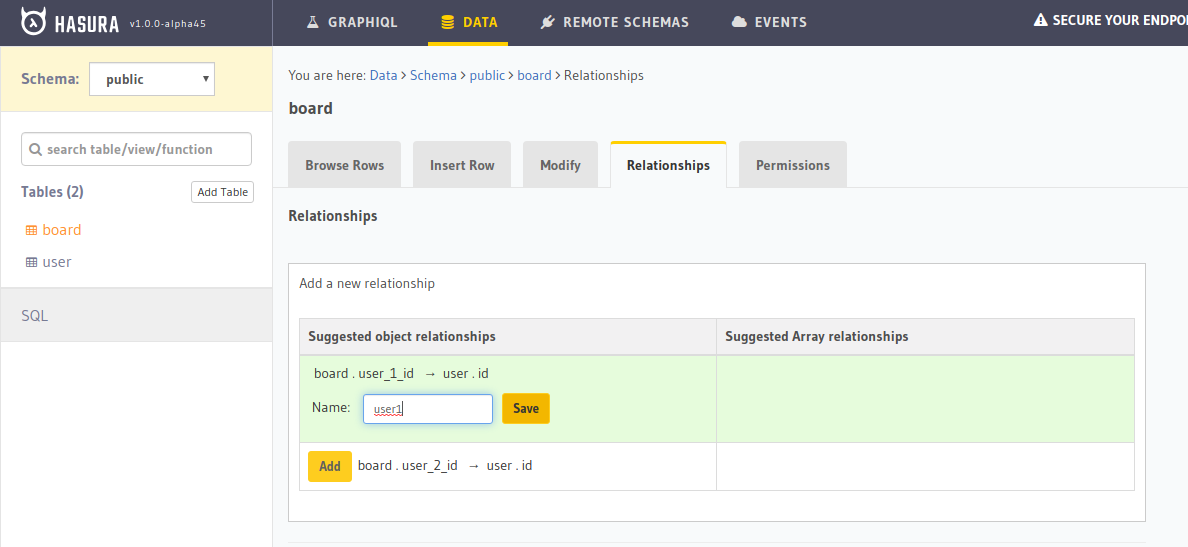
Now, based on these relationships, we need to create a connection between these tables so that we can query the user information while querying the board.

Go to the "Relationships" tab in Hasura and create relationships called user1 and user2 for user_1_id and user_2_id based suggested relations.

move

Finally, we need a move table that stores the moves made by users on a board.

Let’s look at the columns:

  • id: The unique identifier of each move that is auto generated
  • user_id: The ID of the user that made the move
  • board_id: The ID of the board that the move was made on
  • position: The position where the move was made (i.e. 1-9)

Since user_id and board_id are foreign keys to user and board table, respectively. We must create these foreign key constraints just like we did above. Next, create the relationships as user for the foreign key on user_id and board for the foreign key on board_id. Then, we’ll go back to the board table's "Relationship" tab and create the suggested relationship to move table. Call it moves.

We need a custom server

Apart from storing data in the database, we also want to perform custom logic. The logic? Whenever a user makes a move, the move must be validated, made before the turn must is switched.

In order to do that, we must run an SQL transaction on the database. I have written a GraphQL server that does exactly that that I’ve deployed on Glitch.

Now we have two GraphQL servers. But GraphQL spec enforces that there must be only one endpoint. For this purpose, Hasura supports remote schemas — i.e. you can provide an external GraphQL endpoint to Hasura and it will merge this GraphQL server with itself and serve the combined schema under a single endpoint. Let’s add this custom GraphQL server to our Hasura Engine instance:

  1. Fork the GraphQL server.
  2. Add an environment variable that is the connection to your Postgres database. To do that, go to https://dashboard.heroku.com, choose your app, go to "Settings" and reveal config vars.

A few more steps from there:

  1. Copy the value for the DATABASE_URL.
  2. Go to the GraphQL server you forked and paste that value in the .env file (POSTGRES_CONNECTION_STRING=<value>).
  3. Click on the "Show Live" button on top and copy the opened URL.

We’ll add this URL to GraphQL engine by adding it as a remote schema. Go to the "Remote Schemas" tab on top and click on the "Add" option.

We are done with setting up our backend!

Let’s work on the front end

I will not be going into the details of front-end implementation since y’all would choose to implement it in the framework of your choice. I’ll go ahead and provide all the required queries and mutations that you would need to build the game. Using these with the front-end framework of your choice will allow you to build a fully functional multiplayer Tic Tac Toe.

Setup

Apollo Client is the go-to library for client-side GraphQL. They have awesome abstractions for React, Vue, Angular, iOS, Android etc. It helps you save a lot of boilerplate and the DX is smooth. You might want to consider using Apollo client over doing everything from scratch.

Let’s discuss the queries and mutations that the client would need for this game.

Insert user

In the app that I built, I generated a random username for each user and inserted this name into the database whenever they open the app. I also stored the name and generated a user ID in local storage so that the same user does not have different usernames. The mutation I used is:

mutation ($name:String) {
  insert_user (
    objects: {
      name: $name
    }
  ) {
    returning {
      id
    }
  }
}

This mutation inserts an entry into the user table and returns the generated id. If you observe the mutation closely, it uses $name. This is called the query variable. When you send this mutation to the server along with the variables { "name": "bazooka"}, the GraphQL server would replace $name from the query variables, which in this case would be "bazooka."

If you wish, you can implement auth and insert into this table with the username or the nickname.

Load all boards

To load all the boards, we run a GraphQL subscription:

subscription {
  board (
    where: {
      _and: {
        winner: {
          _is_null: true
        },
        user_2_id: {
          _is_null: true
        }
      }
    }
    order_by: {
      created_at: asc }
  ) {
    id
    user1 {
      id
      name
    }
    user_2_id
    created_at
    winner
  }
}

This subscription is a live query that returns the id, user1 along with their id and name (from the relationship), user_2_id, winner and created_at. We have set a where filter which fetches us only the boards without a valid winner and where user_2_id is null which means the board is is open for a player to join. Finally, we order these boards by their created_at timestamp.

Creating a board

Users can create boards for other people to join. To do that, they have to insert an entry into the boards table.

mutation ($user_id: Int) {
  insert_board (
    objects: [{
      user_1_id: $user_id,
      turn: "x",
    }]
  ) {
    returning {
      id
    }
  }
}

Joining a board

To join a board, a user needs to update the user_2_id of the board with their own user_id. The mutation looks like:

mutation ($user_id: Int, $board_id: uuid!) {
  update_board (
    _set: {
      user_2_id: $user_id
    },
    where: {
      _and: {
        id: {
          _eq: $board_id
        },
        user_2_id: {
          _is_null: true
        },
        user_1_id: {
          _neq: $user_id
        }
      }
    }
  ) {
    affected_rows
    returning {
      id
    }
  }
}

In the above GraphQL mutation, we are setting the user_2_id of a board to a user_id. We have also added additional checks such that this action succeeds only if the joining player is not the creator and the board is not already full. After the mutation, we ask for the number of affected rows.

In my app, after joining a board, I would redirect users to /play?board_id=<board_id>.

Subscribing to the board

When both users are in game, we need real-time updates about the moves of each player. So we must subscribe to the given board that is being played on and also the moves (through the relationship).

subscription($board_id: uuid!) {
  board: board_by_pk (id: $board_id) {
    id
    moves (order_by: { id: desc}) {
      id
      position
      user {
        id
        name
      }
      user_id
    }
    user1 {
      id
      name
    }
    user2 {
      id
      name
    }
    turn
    winner
  }
}

The above query subscribes the client to the board that is being played. Whenever a new move is played, the client will be updated with it.

Making a move

To make a move, we will be using the make_move mutation from our custom GraphQL server.

mutation (
  $board_id: String!,
  $position: Int!,
  $user_id: Int!
) {
  make_move (
    board_id: $board_id,
    position: $position,
    user_id: $user_id
  ) {
    success
  }
}

This mutation takes a board_id, position and user_id from query variables. It validates the move, makes the move and also switches the turn. In the end, it returns whether this transaction was successful or not.

Tic Tac Whoa!

And now you have a working game of Tic Tac Toe! You can implement any real-time multiplayer game with GraphQL subscriptions using the concepts we covered. Let me know if you have any questions and I would be happy to answer.

The post Multiplayer Tic Tac Toe with GraphQL appeared first on CSS-Tricks.

Adapt and Evolve to Scrum

Over the centuries, humans have managed to adapt to many situations and evolve to become what we are today. History shows that we have an innate ability to adapt and evolve.

This remains valid as part of a change in business, such as the adoption of Scrum.

Awesome Demos from 2018

Demos2018_featured

Today we’d like to share a collection of our favorite demos and experiments from 2018. This is just a small number compared to all the fantastic stuff that was made and shared in 2018, but we hope you enjoy this little selection of our favorite picks.

Please note that a lot of these demos are experimental and will require a modern browser to work.

Simplex Flower Generator by Jack Rugile

Simplex-Flower-Generator

Jelly by Adam Brooks

jelly

Repellers by Johan Karlsson

Repellers

2018.makemepulse.com by the team of Makemepulse

2018.makemepulse.com

Only CSS: Infinite Steps by Yusuke Nakaya

Only-CSS-Infinite-Steps

This alter world by Gerard Ferrandez

This-alter-world

CSS Space Shooter by Michael Bromley

CSS-Space-Shooter

Psychedelic waves by Karim Maaloul

Psychedelic-waves

Stinkmoji by Stink Studios

Stinkmoji

Song Maker by the Chrome Music Lab

chrome

The Chameleon from Null Island by kittons

The-Chameleon-from-Null-Island

Neural Drum Machine by Tero Parviainen

Neural-Drum-Machine

Toon Shading by Misaki Nakano

Toon-Shading

Wiggly Squiggly by Steve Gardner

Wiggly-Squiggly

Skin and Eye Rendering by David Lenaerts

Skin-and-Eye-Rendering

Perlin Noise by yasaisai

Perlin-Noise

Only CSS: 404 Rolling Box by Yusuke Nakaya

Only-CSS-404-Rolling-Box

Lost Without You by Jack Rugile and Nicolle Witte

Lost-Without-You

VHS Effects (regl) by halvves

VHS-Effects-(regl)

Pure CSS 4 Designers by Julia Muzafarova

Pure-CSS-4-Designers

Pure CSS Francine by Diana Smith

Pure-CSS-Francine

Pin Screen by Johan Karlsson

Pin-Screen

Pure CSS watch animation by Grzegorz Witczak

Pure-CSS-watch-animation

Line Lisa by Nikita Dubko

Line-Lisa

Going Home by 302 chanwoo

Going-Home

Heraclos by students of GOBELINS Paris

Heraclos

Solids by Dave DeSandro

Solids

Thank You by Liam Egan

Thank-You

Tenori-off by Monica Dinculescu

Tenori-off

Ghost Mouse by Liam Egan

Ghost-Mouse

Track by Little Workshop

Track

Isometric eCommerce CSSGrid by Andy Barefoot

Isometric-eCommerce-CSSGrid

Halftone Effect by Misaki Nakano

Halftone-Effect

Zippity Zappity (SVG) by Steve Gardner

Zippity-Zappity-(SVG)

Pure CSS Stack by Ben Szabo

Pure-CSS-Stack

Little Big City by Yi Shen

Little-Big-City

Pure CSS Moustached Nanny by Julia Muzafarova

Pure-CSS-Moustached-Nanny

Dot Menu Animations by Tamino Martinius

Dot-Menu-Animations

Fake 3D effect with depth map by Robin Delaporte

Fake-3D-effect-with-depth-map

CSS Snake & Ladders by Alvaro Montoro

CSS-Snake-&-Ladders

Perlin Noise by Victor Vergara

Perlin-Noise-(2)

Pure CSS The Carlton Dance by Grzegorz Witczak

Pure-CSS-The-Carlton-Dance

Exoplanet Explorer by Thomas Van Glabeke

Exoplanet-Explorer

How Many Steps Does It Take To Get From Me To You? by Jase Smith

steps

Bellwoods by Matt DesLauriers

Bellwoods

HyperMorph 3000™ by Andreas Borgen

HyperMorph-3000™

Interplanetary Postal Service by Sebastian Macke

Interplanetary-Postal-Service

Ripple Mouse (with plasma) by Liam Egan

Ripple-Mouse-(with-plasma)

Lissajous Table – Pannable by Jacob Foster
Lissajous-Table—Pannable

Falling by Yuan Chuan
Falling

Dragon Snake by Thomas Hooper

Dragon-Snake

Color Changing Chameleon by Cassie Evans

Color-Changing-Chameleon

#codevember – 1 – Infinity by Johan Karlsson
#codevember—1—Infinity

Have you ever been lonely? by Gerard Ferrandez and Angelo Plessas

Have-you-ever-been-lonely-

Layerscape by André Mattos

Layerscape

Fashion concept by Jesper Landberg

Fashion-concept

Jellyfish by Rafael Castro Couto

Jellyfish

My journey had lasted seven hours by Gerard Ferrandez

My-journey-had-lasted-seven-hours

#codevember – 15 – Flame by Liam Egan

#codevember—15—Flame

Laser Bag Pipe by Lars Berg

Laser-Bag-Pipe

Flameout by Rye Terrell

flameout

#codevember — bread by Noel Delgado

bread

Canvas Proximity Mask by Ricardo Mendieta

Canvas-Proximity-Mask

Astray 2 by Rye Terrell

Astray-2

Electricity by Vicente Lucendo

Electricity

Dreamsynth by odbol

Dreamsynth

Happy Shopper by Lars Berg

Happy-Shopper

Tiny Explorer by Rachel Richardson

Tiny-Explorer

Pure CSS Pink by Diana Smith

Pure-CSS-Pink

Mikuboard by Daniwell

Mikuboard

Under by Weston C. Beecroft

Under

Choir by David Li

Choir

Retro Pixel by Misaki Nakano

Retro-Pixel

Glimmer by Nicolas Riciotti

Glimmer

Spotify Wrapped Animation using GSAP by Peter Barr

Spotify-Wrapped-Animation-using-GSAP

Sandspiel by Max Bittker

Sandspiel

HyperSpace Jump by Ricardo Mendieta

HyperSpace-Jump

Magic sketchpad by Monica Dinculescu

Magic-sketchpad

Flame in the wind by Blake Bowen
Flame-in-the-wind

Infinite Gift by Jaume Sanchez Elias

InfiniteGift

Awesome Demos from 2018 was written by Mary Lou and published on Codrops.