Do you want to use a free SMTP server to send WordPress emails?
By default, WordPress uses the PHP mail function, which is unreliable and often marks your emails as spam. Using an SMTP server is the best way to make sure that your WordPress emails actually get delivered.
In this article, we will show you how to use a free SMTP server to send WordPress emails.

Why Use an SMTP Server to Send WordPress Emails?
Often website owners complain about the WordPress not sending email issue.
By default, WordPress sends emails through the PHP mail function. Unfortunately, not all WordPress hosting servers are correctly configured to use PHP mail.
Even when the emails are sent successfully, they may get incorrectly identified as spam. This means they could be automatically deleted without ever being seen.
The best way to ensure deliverability for your WordPress emails is by using an SMTP server. It is the standard protocol to send emails on the internet.
SMTP servers use proper authentication to make sure that the email is sent by an authorized sender. This improves deliverability, and your emails safely land in users’ inboxes.
Now, you need a plugin to connect your WordPress site to your SMTP server. We will be using the WP Mail SMTP plugin, which is the best SMTP plugin for WordPress.
Luckily, there is a free version of WP Mail SMTP available as well.
That being said, let’s take a look at how to set up WP Mail SMTP and then how to connect it to popular free SMTP servers.
Installing the WP Mail SMTP Plugin for WordPress
The first step is to install and activate the WP Mail SMTP plugin. For more details, see our step-by-step guide on how to install a WordPress plugin.
Upon activation, you will see the WP Mail SMTP setup wizard. You can skip the wizard because we will show you how to set up the plugin manually.

Just click the ‘Go back to the Dashboard’ link at the bottom.
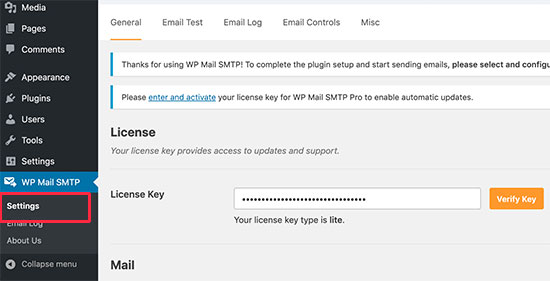
You should now see the WP Mail SMTP » Settings page, where you can configure the plugin.
If you purchased a Pro license, then you will need to paste the license key and click the ‘Verify Key’ button. You can find the license key in your account area on the WP Mail SMTP website.

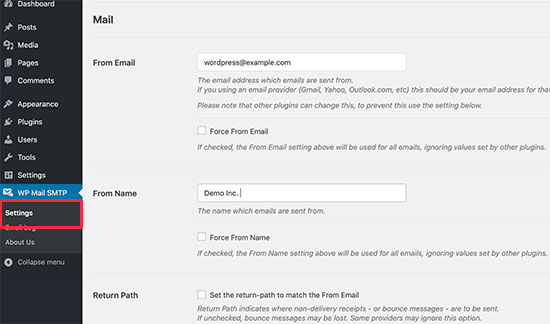
You need to start by entering your From Email and From Name. WordPress emails will be sent from this email address and name.
You should leave the ‘Force From Email’ box checked. This ensures that all emails from your WordPress site are sent from that email address through your SMTP server.

Tip: Make sure you check the ‘Force From Name’ option so that all emails come from the same name, regardless of any settings in plugins such as WPForms.
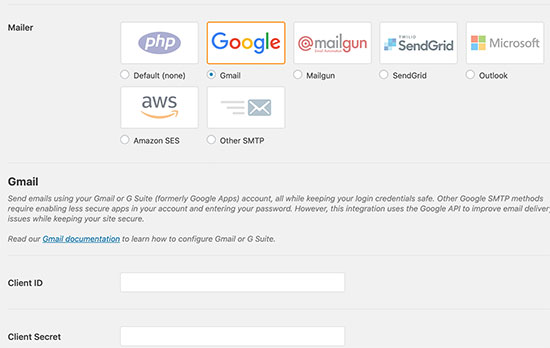
Next, you should scroll down to the Mailer section, where you can choose an SMTP mailing service. Simply click on the one that you want to use.

The next steps depend on which service you choose.
We will cover how to set up a number of free SMTP servers step by step. You need to keep your WP Mail SMTP settings tab open and then follow the instructions for your chosen SMTP server:
Note: If you don’t feel very confident with technical things, then we recommend upgrading to WP Mail SMTP’s Elite account. They have a fantastic White Glove Setup service that will help you through the setup process.
1. Sending WordPress Emails Using Gmail SMTP Server
You can use a free Gmail account to send SMTP emails. If you don’t already have a Gmail account, then you need to create one before following the rest of these instructions.
With a free Gmail account, you can send up to 500 emails per day. However, if you have access to a paid Google Workspace account, then that limit is increased to 2000 emails per day.
First, log in to your WordPress admin, where you should already have installed WP Mail SMTP. On the WP Mail SMTP » Settings page, you must select ‘Google / Gmail’ as your mailer.
Now, connecting WordPress plugins to Gmail and other Google services can be a lot of work. The good news is that the Pro version of WP Mail SMTP offers a one-click setup that is quick and simple. We strongly recommend this.
To get started, simply toggle the ‘One-Click Setup’ option to the on position.

You will see a notice that you need to save settings before you can proceed, so make sure you click the ‘Save Settings’ button at the bottom of the page.
When you scroll back down the page, you will see that there is now a ‘Sign in with Google’ button. You need to click that button to authorize the plugin.

You will be asked to select a Google account, agree to the terms of service, and click an ‘Allow’ button to allow WP Mail SMTP to send email.
Congratulations, you have successfully linked the current site with Google. You can start sending emails through Gmail.
But first, you should go ahead and test that your email is working.
2. Sending WordPress Emails Using Brevo (Sendinblue) SMTP Server
Brevo (formerly Sendinblue) lets you send up to 300 free emails daily from your website.
To use Brevo, make sure you select ‘Sendinblue’ on the WP Mail SMTP » Settings page in the screenshot above.
Next, you need to create an account on the Brevo website. After confirming your email address, you will be asked to fill in some information about your business. You will also receive a text message with a confirmation code to enter.
Next, you’ll be asked to choose a Brevo pricing plan.

Simply click on the ‘Continue with a Free plan’ button.
You will now see your Brevo dashboard.

Creating a New Subdomain for Your Email
Before going further, you need to create a subdomain on your website, such as mail1.yourdomain.com.
To do this, log in to your web hosting or domain registrar account, and then follow their instructions for adding a subdomain.
If you are using Bluehost, then you need to click on the Hosting tab on the left. You can open the control panel by clicking the ‘cPanel’ button at the bottom of the page.

This will launch the cPanel dashboard for your website.
You can scroll down to the Domains section and then click the ‘Domains’ option.

You will now see a page that lists your existing domains and subdomains.
To create a new subdomain, you will need to click the ‘Create A New Domain’ button.

On the next page, you will need to enter the subdomain you would like to create followed by your domain name, such as ‘mail1.startawpsite.com’.
Next, you need to click the ‘Submit’ button to continue. Bluehost will add the subdomain to your hosting.

After creating the subdomain, you need to add it to your Brevo account.
Adding Your Subdomain to Brevo
In your Brevo account, you need to go to the Settings page. On this page, scroll to the ‘Your Senders and Domains’ section and click the ‘Configure’ button below it.

Next, you need to click ‘Domains’ from the menu that is displayed, and then click the ‘Add a domain’ button.
Go ahead and enter your whole subdomain, such as mail1.yoursite.com. You also need to choose your email domain provider from the dropdown menu. If your provider is not on the list, simply choose ‘Other’.

Make sure you click the ‘Save this email domain’ button when you are finished.
Once the email domain is saved, you will need to verify that it belongs to you. You will need to add 2 codes to your DNS settings. The first will verify that you own the domain, and the second will improve email deliverability.

Tip: Don’t worry if you close this popup by mistake. You can get back to it by clicking the ‘Verify This Domain’ link next to your subdomain.
Next, you need to open the DNS settings for your domain in your web hosting account. Your web host should have instructions for this. Make sure you leave the tab with the Brevo website open so you can copy the settings.
For example, in Bluehost, you need to go to the Domains tab and click the ‘Settings’ button next to your website’s domain name.

After that, you will see different domain settings in Bluehost.
Simply scroll down and click on the ‘Advanced Tools’ option.

Here, Bluehost will show the nameservers for your domain and other records.
To manage DNS records, you can click the ‘Manage’ button next to Advanced DNS Records.

Next, Bluehost will display a warning message that only advanced users should change the DNS records because, with the wrong settings, you can lose access to your email and website.
You can simply click the ‘Continue’ button.

This will take you to a screen where you can manage your WordPress site’s DNS records.
You need to click the ‘Add Record’ button and then add the Brevo code record using the information on the Brevo website. Then, you should do the same to add the DKIM record.

Once you have added both TXT records to your domain’s DNS settings, you need to go back to the Brevo website.
From here, you need to click the button labeled ‘Authenticate this email domain’. You should be taken to a new page, where you can see a success message that it is authenticated.
Tip: DNS changes can take as long as 24-48 hours to propagate across the internet. If the verification fails, then just try again in a few hours.
Enabling Brevo in WP Mail SMTP
Now, you just need to finish enabling Brevo on your WordPress site. Simply go back to the WP Mail SMTP Settings page that you opened up earlier and find the API key box.
Then, click the ‘Get v3 API Key’ link.

This link will open up the correct page of your Brevo account in a new tab.
Here, you just need to copy the SMTP key value.

Once you’ve copied it, return to WP Mail SMTP and paste in the API key.
You will also need to fill in the sending domain that you entered in Brevo earlier, such as mail1.yoursite.com.

Make sure you click the ‘Save Settings’ button after doing so.
Congratulations, you have successfully set up Brevo. You just need to wait for them to activate your account.
Now, it’s time to go ahead and test that your email is working.
3. Sending WordPress Emails Using SendGrid SMTP Server
SendGrid offers a free plan that lets you send up to 100 free daily emails.
First, you need to visit the SendGrid website and click the ‘Start For Free’ button to create your free account.
After creating your account, a verification process will be triggered. Your account will be placed temporarily on hold while they ask you some questions via email. They do this to make sure you will use the service in a way that aligns with their policies and values.
Once your application is approved, you can sign in to your SendGrid dashboard.
Creating a Sender Identity
Your first step is to create a sender identity, which is the ‘from’ address used for your emails. To do this, you need to click on ‘Sender Authentication’ in the Settings section at the bottom of the dashboard menu.

This will take you to the SendGrid Sender Authentication page.
You should scroll down to the Single Sender Verification section and then click the ‘Get Started’ button under ‘Verify an Address’.

This will display a form where you can create a sender.
Then, simply enter the name, email address, and mailing address you want to use for your emails. When you are finished, you can click the ‘Create’ button to store your sender details.

Important: This ‘Reply To’ email address needs to be the same as the one you entered as your ‘From’ address in the WP Mail SMTP settings.
You will receive a confirmation email in your inbox to verify this business email address.
Make sure you click the link in the message to complete the single sender identity setup.

Once you’ve verified your email address, go ahead and return to your SendGrid dashboard by clicking the Dashboard link in the sidebar.
Generating an API Key
The next step is to generate an API key so you can connect your website to your SendGrid account and start sending emails.
Using the SendGrid dashboard menu, you need to find the Email API section and click ‘Integration Guide’.

On the next page, you will be asked to choose an integration method.
Inside the SMTP Relay box, go ahead and click the ‘Choose’ button.

You need to give the API key a name that will remind you what you are using it for in the future.
In this example, we named it ‘WP Mail SMTP’.

Now, you can click the ‘Create Key’ button to generate the API key.
You should see a message confirming that it was successfully created, and the API key will be displayed underneath.
You will need this key in the next section, so leave the SendGrid tab open in your browser.
Connecting WP Mail SMTP to Your SendGrid Account
Next, return to your WordPress admin browser tab and go to WP Mail SMTP » Settings. You should have already selected SendGrid for your mailer. If not, select it now.
At the bottom of the screen, you will see a box for entering your SendGrid API key. Simply copy and paste it here, then click the ‘Save Settings’ button.

Next, you need to verify that your integration is working.
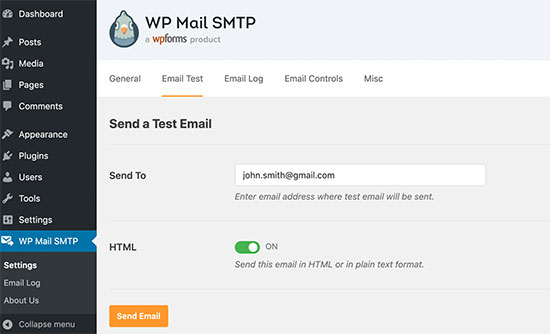
First, go to the Email Test tab in your WP Mail SMTP settings. Then, enter your email address and click the ‘Send Email’ button.

You should see a message that the test email was sent successfully. You can confirm this by going to your inbox and checking the email is there.
Now that your test email has been sent successfully, go back to the tab with your SendGrid API page. You need to go ahead and check the ‘I’ve updated my settings’ box. Then, click the ‘Next: Verify Integration’ button.

On the next screen, you must click the ‘Verify Integration’ button.
You should then see a message confirming that SendGrid received your email and your setup is complete.

Authenticating a Subdomain in SendGrid
To finish setting up SendGrid, you should create and authenticate a subdomain to help improve your email deliverability.
Tip: If you aren’t able to create and authenticate your subdomain, then the emails from your website will still go out. However, there is a possibility that some emails may not be delivered to their recipients.
Now, you need to create a subdomain on your website, such as sg.yourdomain.com. You can do this by logging in to your web hosting account and following their instructions for adding a subdomain.
If you are using Bluehost, then you need to log in to your web host account and click on the Hosting tab on the left. You can open the control panel by clicking the ‘cPanel’ button at the bottom of the page.

This will launch the cPanel dashboard for your website.
You can scroll down to the Domains section and then click the ‘Domains’ option.

You will now see a page that lists your existing domains and subdomains.
To create a new subdomain, you will need to click the ‘Create A New Domain’ button.

On the next page, you must enter the subdomain you would like to create.
We suggest using sg.yourdomain.com for your subdomain. Make sure you click the ‘Submit’ button to store your new subdomain.

After creating the subdomain, you need to add it to your SendGrid account.
To do this, you need to go back to the Settings » Sender Authentication page in your SendGrid account. Under ‘Domain Authentication’ you need to click the ‘Get Started’ button.

Now, you should select your DNS host. This is your website host, such as Bluehost or SiteGround, unless your domain name is registered with a different company.
In the second step, select the ‘Yes’ option for ‘Would you also like to brand the links for this domain?’ This means that your emails will be shown as coming from your domain, not SendGrid’s.

Then, simply click the ‘Next’ button.
Now, you need to enter your domain in the ‘Domain You Send From’ box. Below this, click the ‘Advanced Settings’ link to open up some additional options.
From here, you can uncheck the ‘Use automated security’ box and check the ‘Use custom return path’ box. Then, type the first part of your subdomain for the ‘Return Path’.
For instance, if your subdomain is sg.example.com, then type in sg.

Once you’ve done this, you must click the ‘Next’ button.
Next, you will see some DNS records that you need to add to your domain. You can consult your web host’s documentation or refer to our Brevo method for help doing this.

After you’ve added the records, go ahead and click the ‘Verify’ button at the bottom of the screen. You should then see a success message.
Finally, test your SMTP email again to be sure that emails are being sent correctly.
Testing That Your SMTP Mail is Working
The final step for all these methods is to send a test email to make sure everything is working as it should.
First, go to the ‘Email Test’ tab in the WP Mail SMTP settings. Then, enter the email address where you want the test email to be sent if it’s different from the default.
Simply click the ‘Send Email button, and your email will be sent.

You should see a message to let you know that the email was sent successfully.
Next, go ahead and check your inbox to make sure that the test email has arrived.

Other Free SMTP Mailer Options
There are other free SMTP mailer options you could use instead of the ones we have covered:
- Outlook: This involves a longer setup process than other methods, but the advantage is that you can send many emails (up to 5,000 per day).
- Amazon SES: This service is only recommended if you are confident with technology, as the setup is quite complex. It is free for your first year.
- SMTP.com: This is a robust and reliable option. The drawback is that it is only free for your first 30 days, then you have to pay to use it.
For all these, you can get instructions by selecting the mailer on your WP Mail SMTP settings page and then clicking the documentation link. This will open up the instructions in a new tab.

We hope this article helped you learn how to use a free SMTP server to send WordPress emails. You might also like to check out our articles on the best email marketing services and our comparison of the best virtual business phone number apps (with free options).
If you liked this article, then please subscribe to our YouTube Channel for WordPress video tutorials. You can also find us on Twitter and Facebook.
The post How to Use Free SMTP Server to Send WordPress Emails (3 Methods) first appeared on WPBeginner.


