How to Bulk Edit Featured Images in WordPress

Do you want to bulk edit featured images in WordPress?

It’s easy to add, change, and remove featured images from your WordPress posts and pages. However, changing the featured images for multiple pages can take a lot of time and effort.

In this article, we will show you how you can save time by bulk editing featured images in WordPress.

How to bulk edit featured images in WordPress

Why You Might Need to Bulk Edit Featured Images in WordPress

Featured images, also known as post thumbnails, are an important part of many websites.

Almost all modern WordPress themes come with built-in support for featured images and display them across different areas of your WordPress website including your blog archives.

As an important part of your WordPress blog or website, you’ll want to make sure your featured images look good and represent your brand.

With that in mind, at some point you may need to bulk edit your featured images in WordPress. For example, you might install a new WordPress theme and decide to design new featured images that better compliment your new theme.

You can change the featured image for an individual page or post in the standard WordPress editor. However, changing the featured image for lots of different pages and posts can be frustrating and time-consuming.

With that in mind, let’s see how you can bulk edit featured images in WordPress.

How to Bulk Edit Featured Images in WordPress

The easiest way to bulk edit featured images in WordPress is by using the Quick Featured Images plugin.

This plugin makes it easy to change every single featured image across your website. It also has detailed filters that allow you to change the featured images for specific categories, tags, post types, and more.

Before you start using the Quick Featured Images plugin, just be aware that this plugin doesn’t allow you to undo your bulk edits. This can cause problems if you change your featured images and are unhappy with the results.

With this in mind, it’s a good idea to backup your WordPress website before using this plugin. If you don’t already have a backup solution, then there are several great WordPress backup plugins that allow you to automatically backup your website.

After creating a backup, you’ll need to install and activate the Quick Featured Images plugin. If you need help, then please see our guide on how to install a WordPress plugin.

Upon activation, go to Featured Images » Overview in the left-hand menu. On this screen, click on the following link: ‘Bulk set, replace and remove featured images for existing posts.’

How to bulk edit featured images in WordPress

This screen allows you to bulk edit your featured images in a few different ways.

Your first option is the ‘Set the selected image as a new featured image’ radio button.

This setting finds all of the posts and pages that don’t currently have a featured image. You can then choose a new featured image and apply it to all of these pages and posts.

Bulk editing WordPress featured images

Another option is ‘Replace featured images by the selected image.’ You can use this to replace any existing featured images with a new image.

Next up is ‘Remove the selected image as featured image.’ This lets you choose a specific image, and then remove that featured image wherever it appears on your website. This is perfect for removing an outdated featured image, such as any image that features your site’s old logo.

After selecting one of these radio buttons, click on the Choose Image button.

Choosing a bulk edit action for your WordPress featured images

You can now choose the image that you want to use in the bulk edit. You can either select an image from your WordPress media library or upload a new file.

Once you’ve done that, scroll to the bottom of the screen and click on the ‘Next’ button.

Bulk editing featured images in WordPress

On this screen, you’ll be able to configure how WordPress performs the bulk edit.

The options you see may vary depending on whether you’re adding, changing, or removing a featured image. For example, if you selected the ‘Set the selected image as new featured image’ radio button then you can choose whether to override all existing featured images, or ignore them.

Override featured images in WordPress

To select which posts your bulk changes will apply to, scroll to the ‘Add a filter’ section.

By default, Quick Featured Images will apply its bulk edit to all pages and posts, across all of your site’s categories and tags.

If you don’t want to bulk edit every page and post, then you can create filters. These filters let you bulk edit featured images that meet a specific criteria.

Creating a filter for bulk editing featured images in WordPress

You can check more than one box. For example, you might check the ‘Post Type Filter’ and ‘Tag Filter’ boxes if you want to bulk edit posts that have a specific tag.

After checking one or more boxes, go ahead and click on the ‘Next’ button.

You will now see some settings that you can use to create your filter. For example, if you checked the ‘Post Type Filter’ box then you can choose between the ‘Posts’ or ‘Pages’ box.

The Quick Featured Images WordPress plugin

If you checked either the ‘Category Filter’ or ‘Tag Filter’ box, then you’ll have access to a dropdown menu.

You can open this dropdown and then choose the category or tag where you want to make the bulk edit.

Bulk editing WordPress featured images using filters

When you’re happy with how your filter is set up, scroll to the bottom of the screen.

You can then go ahead and click on the ‘Preview filtering’ button.

The Quick Featured Images plugin will now show a preview of all the pages and posts that will be affected by the bulk edit.

Previewing a bulk edit action

If you’re happy with the preview, then you can go ahead and click on the ‘Apply’ button.

Quick Featured Images will now bulk edit all of the relevant featured images across your WordPress website.

How to Set Multiple Images Randomly as Featured Images

When you bulk edit featured images in WordPress, you can sometimes end up using the same featured image for lots of different posts. These duplicate images can make your website look boring and repetitive.

With that in mind, you may want to set your featured images at random. You can use the Quick Featured Images plugin to select different images from your WordPress media library. The plugin will then add these featured images to your pages and posts at random.

In this way, you can bulk edit your images without creating lots of duplicate featured images.

To set your featured images at random, go to Featured Images » Overview and again click on ‘Bulk set, replace and remove featured images for existing posts’.

Once you’re here, click on ‘Set multiple images randomly as featured images.’

You can then click on the ‘Choose Images’ button to open the WordPress media library.

Replacing WordPress featured images at random

Here, hold down the Shift key and then click all the images that you want to randomly use as your featured images.

Once you’ve done that, click on the ‘Choose Images’ button. Then, scroll to the bottom of the screen and click on ‘Next.’

Bulk replacing multiple featured images in WordPress

By default, Quick Featured Images will apply these images to all your WordPress pages and posts at random.

Do you just want to use these images for certain content types, categories, or tags? Then you can create a filter by following the same process described above.

After adding a filter, Quick Featured Images will show a preview of all the pages and posts that it plans to update. You can check the thumbnail to see which image the plugin has randomly assigned to each page or post.

Replacing WordPress features images at random

If you’re happy with the preview, go ahead and click on ‘Apply.’ Quick Featured Images will now add the new images to your pages and posts.

How to Bulk Remove Featured Images in WordPress

Sometimes you may prefer not to use featured images on your website. For example, you might be trying to speed up your WordPress performance, or you may be using a theme that simply doesn’t look good with featured images.

You can use Quick Featured Images to easily remove all the featured images from your pages and posts.

You can also use filters to remove the featured images from pages, posts, or content that has a particular tag or category.

To bulk remove featured images in WordPress, simply click on the ‘Remove all featured images without existing image files’ radio button. You can then go ahead and click on ‘Next.’

Removing featured images from WordPress in bulk

Now, you can apply filters by following the instructions above.

Once you’ve created one or more filters, go ahead and click on the ‘Next’ button.

Building a bulk editor feature in WordPress

As always, the plugin will show a preview of all the pages and posts that it will change as part of this bulk edit. Since you’re deleting the featured image, it will show ‘No image set’ in the ‘Future Featured Image’ column, rather than a thumbnail preview.

If you’re happy to go ahead and remove the featured image for these pages and posts, then just click on the ‘Apply’ button.

Applying the bulk edit to your featured image in WordPress

We hope this article helped you learn how to bulk edit featured images in WordPress. You may also want to see our guide on the best Instagram WordPress plugins, and how to create automated workflows in WordPress to save time.

If you liked this article, then please subscribe to our YouTube Channel for WordPress video tutorials. You can also find us on Twitter and Facebook.

The post How to Bulk Edit Featured Images in WordPress first appeared on WPBeginner.

Where Does WordPress Store Images on Your Site?

Are you wondering where does WordPress store images on your website?

Many WordPress beginners have asked us how does WordPress store images, and what they can to do to organize their media library more efficiently.

In this article, we’ll explain how WordPress stores images on your website. We’ll also share tools and plugins that you can use to organize your images more efficiently.

Where does WordPress store image files (Explained)

How Does WordPress Store Images?

WordPress comes with a built-in system to manage media uploads like images, videos, audio, and documents on your WordPress website.

This system allows you to easily upload images and other media to a specific folder on your WordPress hosting server.

These files are then displayed in your WordPress media library. You can view all your uploads under Media » Library page. From here, you can also edit these files, manipulate them, or even delete them.

WordPress media library

The specific folder where the image files are stored in WordPress is called the uploads folder located inside the /wp-content/ folder.

Uploads folder in WordPress

Inside the uploads folder, your media files are stored by year and month folders. Additionally, you’ll also see folders created by your WordPress plugins to save other uploads.

For instance, all your media files uploaded in June 2022 will be stored in:

/wp-content/uploads/2022/06/

You can view these files and folders by connecting to your WordPress hosting account using an FTP client or via the File Manager app under your hosting account control panel.

Media uploads organized in year and monthly folders

You’ll notice that there are several copies of each image that uploaded on your server. These image sizes are generated automatically by WordPress when you upload an image.

Multiple image sizes

By default, you may see a thumbnail, medium, and large size of the image along with the original upload.

Apart from that, your WordPress theme or plugins may also generate additional image sizes for them to use.

Now you may be wondering how does WordPress display information about these files inside the media library?

To do that, WordPress also stores information about your image uploads in the database as an attachment post type under the posts table.

Apart from that, WordPress also saves information in the posts meta table when you insert images into posts/pages or any other custom post type.

Meta data for images stored in WordPress database

For instance, when you set a featured image, WordPress saves this information as a meta key _thumbnail_id and stores it in the postmeta table of your database.

Image meta data stored in WordPress database

The information inside your database tells WordPress the location of the file on your hosting server. Now if you delete a file from your server using FTP, then WordPress will show those images as broken.

Broken image in WordPress

Similarly, if you delete the reference to an image from your WordPress database, the file will still be intact on your hosting server but not appear in your media library.

Changing How WordPress Stores Images and Media Uploads

By default, WordPress does not allow you to change the uploads location from the WordPress admin area. The only change you can make is to disable the month and year based folders by visiting Settings » Media page.

Media settings in WordPress

From here, you can also adjust the maximum dimensions in pixels for your image uploads.

Advanced WordPress users can follow our tutorial on how to manually change the default WordPress uploads folder.

Organizing Your Images in WordPress

For most users, the default WordPress media library would work just fine.

However, if images play a more significant role in your WordPress blog, then you may need additional tools to organize your uploads.

For instance, if you run a photography website, then you may want to organize your content in Albums or tags.

For that, you will need a plugin like Envira Gallery. It is a WordPress image gallery plugin that allows you to organize your images in albums, tags, and galleries.

Envira Gallery provides albums and tags functionality for images

Allowing Users to Upload Images in WordPress

By default, WordPress allows any users who can write posts on your website to upload images. This includes users with the Administrator, Author, Editor, and Contributor user roles.

But what if you wanted other users to upload images on your website without logging into the admin area?

To do that, you’ll need the WPForms plugin. It is the best WordPress form builder plugin and allows you to easily create any kind of forms for your website.

It also comes with a file upload field that allows users to easily upload images, documents, and other files without creating a user account or accessing the WordPress admin area.

First, you need to install and activate the WPForms plugin. For more details, see our step by step guide on how to install a WordPress plugin.

Upon activation, you need to visit the WPForms » Settings page to enter your license key. You can find this information under your account on WPForms website.

Entering your WPForms license key

Next, you need to visit WPForms » Add New page to create your image upload form.

First, you need to provide a title for your form. After that, you can look for File Upload Form template to get started.

File upload form

WPForms will now load the form builder interface and automatically load form fields from the File Upload Form template.

File upload form editing

The form will include a file upload field by default. You can add or remove fields to your form, change their labels, or move them up or down.

You can click on the File Upload field to change its settings. From here, you can set which file types and how many files a user can upload. You can also set a maximum file size limit.

File upload settings

Once you are finished, you can save your form and exit the form builder.

Next, you need to create a new post or page or edit an existing one. On the post edit screen, go ahead and add WPForms block to your content area.

Add form to your WordPress website

From the WPForms block settings, click on the drop-down menu to select the form you created earlier.

You can now save your changes and preview your post or page to see your file upload form in action.

File upload form

You can view files uploaded by users by visiting WPForms » Entries page and clicking on your File upload form. From here you can view an entry to see the files uploaded.

User entry

For more details, see our complete guide on how to allow users to upload images in WordPress.

Optimizing WordPress Images for Performance

Images are highly engaging thus they make your content more interesting for users. However, they also take more time to load than just plain text.

This means if you have multiple large images on a page, then your webpage will load slower. This slow page speed affects user experience as well as SEO.

Luckily, there are tons of tools to easily optimize your images for the web before uploading them to WordPress.

For instance, you can use a WordPress image compression plugin to automatically optimize each image that you upload to your website.

You can further boost performance by using a CDN (content delivery network). This allows you to load images from a global network of servers instead of your hosting server.

We recommend using Bunny.net which is the best CDN service on the market. It is super easy and comes with its own WordPress plugin for quicker setup.

We hope this article helped you learn where WordPress stores images on your site. You may also want to see our guide on how to find royalty free images for your WordPress blog, or see our beginner guide on how WordPress actually work behind the scenes.

If you liked this article, then please subscribe to our YouTube Channel for WordPress video tutorials. You can also find us on Twitter and Facebook.

The post Where Does WordPress Store Images on Your Site? first appeared on WPBeginner.

Cover Image vs. Featured Image in WordPress Block Editor (Beginner’s Guide)

WordPress 5.0 was released with the brand new Gutenberg block editor and a host of cool features. One of them is the Cover block, which lets you add cover images to your posts and pages.

This feature has confused some users because it may seem similar to the Featured Image option which has been in WordPress since WordPress 2.9.

In this article, we’ll explain the differences between cover image vs. featured image in WordPress block editor.

Cover Image vs Featured Image - WordPress Block Editor

What is a Cover Image?

A cover image is usually a wide image used as a cover photo for a new section in a blog post or page. It is part of the overall article. You can use a cover image when you’re starting a new section or a new story within your article.

With the Cover block in WordPress, you can add text and color overlay on your cover image.

Cover block in WordPress block editor

By adding an appropriate color overlay that matches your theme color or content’s mood, you can make your article more engaging.

Similarly, adding text overlay helps your users easily identify where a new section starts in your article and what’s it about.

Traditionally bloggers use heading text to separate sections in a blog post. With cover images, you now have options to separate sections in a more visually appealing way.

What is a Featured Image?

A featured image (also known as post thumbnail) is the main article image which represents the content. They’re prominently displayed on your website on single posts, blog archive pages, as well as on the homepage of news, magazine, and blog websites.

Aside from that, featured images are also displayed on social media feeds when an article is shared.

Featured images are designed carefully to make them look attractive. Such images give users a quick glimpse of your content and prompt them to the entire article.

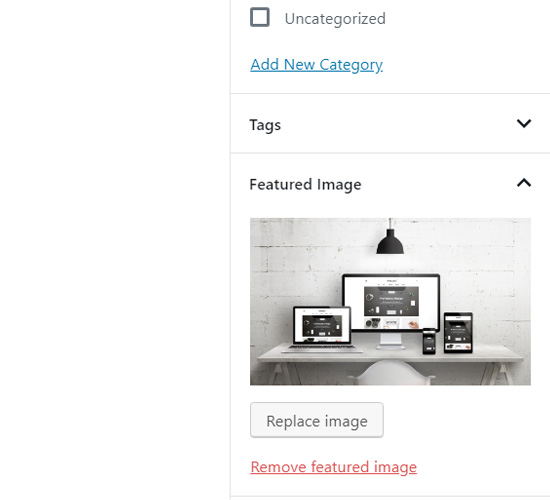
You’ll find a meta box in your post edit screen for adding a featured image because almost all WordPress themes support featured images by default.

Featured image in WordPress

Where and how featured images are displayed is controlled entirely by your WordPress theme.

For advanced featured image options, you can check these best WordPress featured image plugins.

How to Add a Cover Image in WordPress?

The new WordPress block editor (Gutenberg) comes with a Cover block to allow you to add a cover image in WordPress.

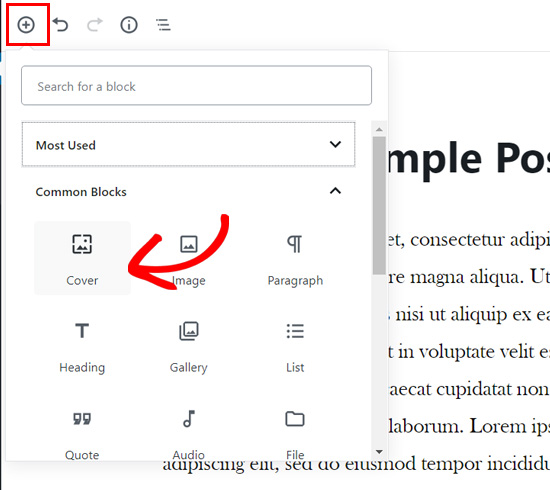
First, you need to create a new post or edit an existing one. On the post edit screen, click on the add new block button and then choose Cover block.

Add cover block in WordPress block editor

You can find the Cover block inside the Common Blocks tab.

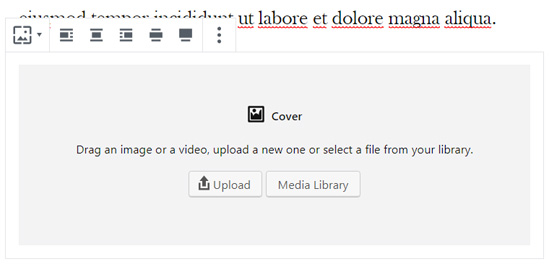
Upon clicking on the block, you’ll see the Cover block added to your content editor with options to add your new cover image.

Cover block with options to upload image

You can simply drag and drop an image or video in the block area to upload a new cover image. Alternatively, you can click the Upload button, choose an image in your computer, and open to upload.

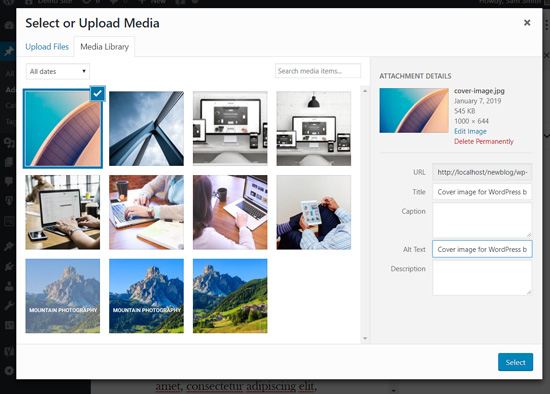
If you want to add an image already uploaded to your media library, you can click the Media Library button and select an image from your media gallery.

Upload cover image in WordPress block editor

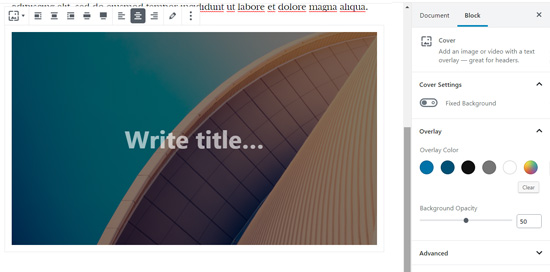
Once your cover image is added, you can easily customize it by clicking on the cover image.

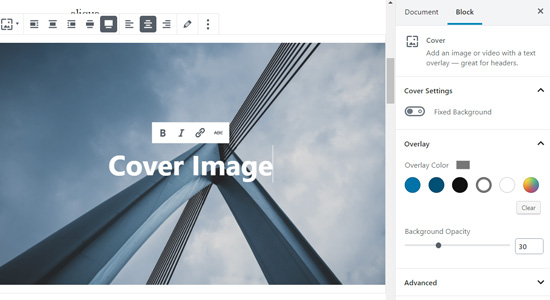
This will show you a toolbar with customization options above the image, Write title… field in the center of the image, and block settings including color overlay in the panel on the right side.

Cover block options

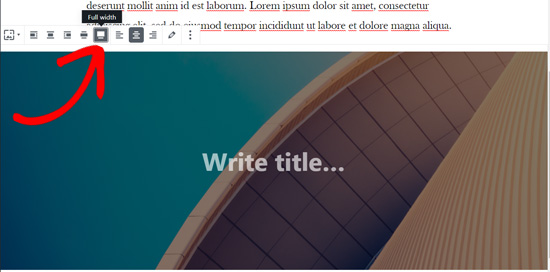
Aside from alignment option, the cover image block gives you the two width choices: Wide width and Full width.

The wide width option makes the image look as wide as your content. The full-width option makes your image cover the whole window screen.

 Full width cover image in WordPress block editor

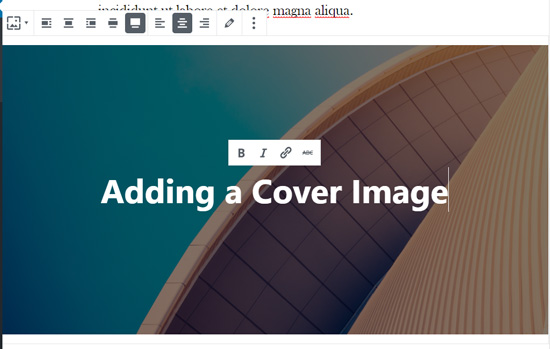
Next, you can add a title for your cover image. When you click on the cover image, you will see the “Write title…” field in the center of your cover image.

Simply click on that area to add text. You can write your cover image title and format it using the formatting options that appear on top of the text or on top of the cover image.

Add text on your cover image in WordPress block editor

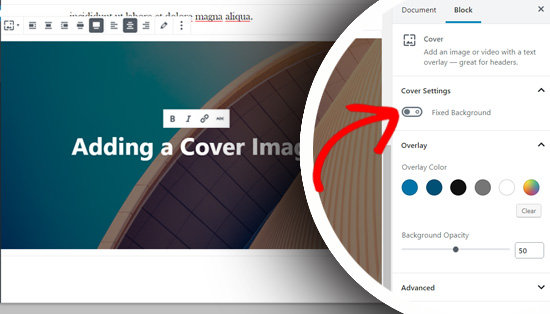
Finally, there are cover block settings on the right side panel. You can enable Fixed Background to create a parallax effect for when users scroll down the page.

Fixed background option in cover block in Gutenberg

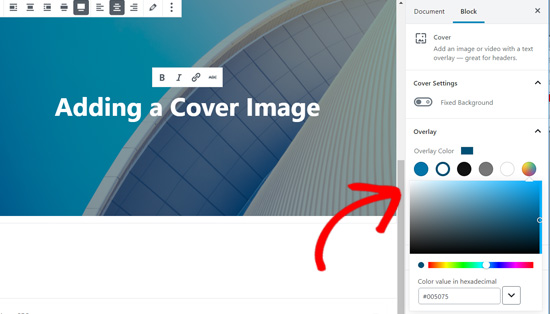
Below that, there’re color overlay options. By default, it adds your theme’s color as overlay color with 50% transparency, but you can change the overlay color and also change the opacity by moving the point.

Cover block color overlay options

Lastly, you can add CSS code and add more styles to your cover image by clicking the Advanced option.

That’s it!

You can repeat this step to add multiple cover images in a single article if needed.

How to Add a Featured Image in WordPress?

The process of adding a featured image is the same as it was before. If you’ve had a WordPress blog for a while, then you already know how a featured image is added.

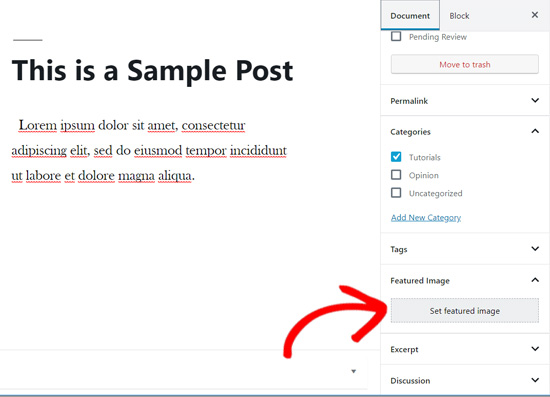
To add a featured image, you’ll need to open a post edit screen firs and then navigate to the Featured Image meta box on the right-hand side of the screen.

You will need to click the Set featured image option.

Featured image meta box in WordPress

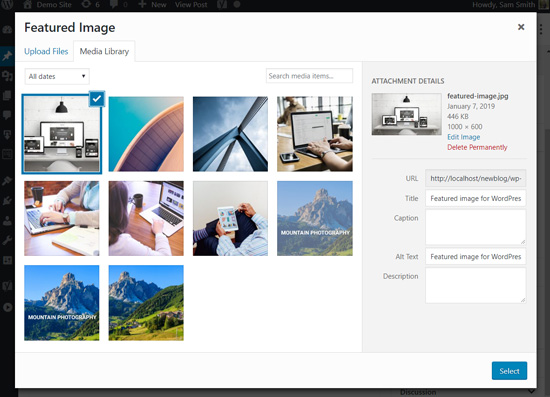
Next, you can upload a new image by either using the drag and drop uploader or selecting an image one from your existing media library.

After that you can add title and alt text for your featured image, and then click the Select option.

Upload featured image in WordPress

You have successfully added a featured image to your article.

If you want more detailed instructions, then you can read our beginner’s guide to adding featured images in WordPress.

Once you’ve added your featured image, you can preview your post and see how it looks.

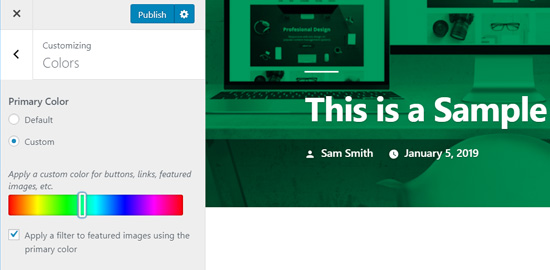
If you’re using the new default theme Twenty Nineteen or other modern themes, then you may see a color overlay on your featured images as well.

You can remove it or change the color by going to the WordPress customizer.
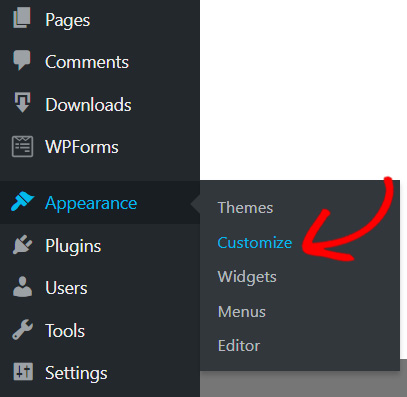
Simply click on the Appearance » Customize button in your WordPress menu.

Customize option WordPress

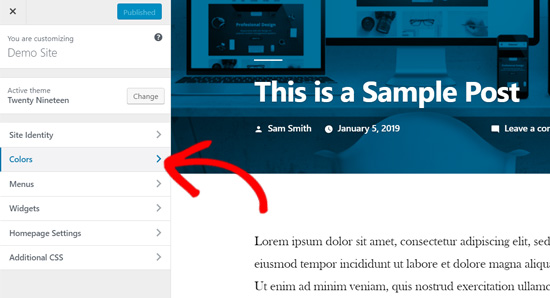
Once on the Customize panel, you need to click the Colors option on the left.

Customize colors WordPress twenty nineteen theme

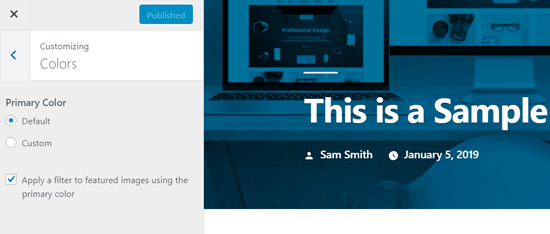
On this tab, you will see your theme’s primary color option and the option to enable or disable the image filter.
Color options in twenty nineteen theme

You can change your theme’s primary color by selecting the Custom option and choosing a color.
Change primary color in Twenty Nineteen theme

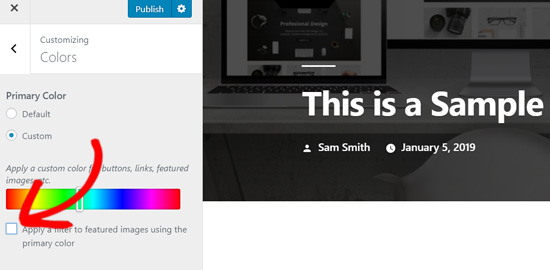
If you want to disable the color filter on your featured images, then you can simply remove the check on “Apply a filter to featured images using the primary color” option.

Disable color filter on featured images in Twenty Nineteen theme

Please note that featured images are managed by WordPress themes, so you may not find this option in your theme if it doesn’t support image filters.

Conclusion – Cover Image vs. Featured Image in WordPress

Now that you know how to add a cover image and a featured image, let’s take a look at some best practices.

Featured images have been popularly used by WordPress blogs, online magazines, news, and entertainment websites as post thumbnails or main article images.

Well-designed featured images help attract more users to open an article. They’re great for making your website look attractive and visually interactive.

Cover images are actually parts of your article. A user sees your cover image after they open your article to read. Thus, they make your articles more engaging and fun to read.

The best use of cover images is to add beautiful transition between sections inside a long article.

Cover images are unique from regular post images because they have the full-width option and you have the ability to add text overlay on them.

By properly adding cover images, you can improve user engagement on your posts.

We hope this article helped you to understand the difference between a cover image and a featured image in new WordPress block editor. You may also like to read our article on how to update your old WordPress posts with Gutenberg block editor.

If you liked this article, then please subscribe to our YouTube Channel for WordPress video tutorials. You can also find us on Twitter and Facebook.

The post Cover Image vs. Featured Image in WordPress Block Editor (Beginner’s Guide) appeared first on WPBeginner.