How to Bulk Edit Featured Images in WordPress

Do you want to bulk edit featured images in WordPress?

It’s easy to add, change, and remove featured images from your WordPress posts and pages. However, changing the featured images for multiple pages can take a lot of time and effort.

In this article, we will show you how you can save time by bulk editing featured images in WordPress.

How to bulk edit featured images in WordPress

Why You Might Need to Bulk Edit Featured Images in WordPress

Featured images, also known as post thumbnails, are an important part of many websites.

Almost all modern WordPress themes come with built-in support for featured images and display them across different areas of your WordPress website including your blog archives.

As an important part of your WordPress blog or website, you’ll want to make sure your featured images look good and represent your brand.

With that in mind, at some point you may need to bulk edit your featured images in WordPress. For example, you might install a new WordPress theme and decide to design new featured images that better compliment your new theme.

You can change the featured image for an individual page or post in the standard WordPress editor. However, changing the featured image for lots of different pages and posts can be frustrating and time-consuming.

With that in mind, let’s see how you can bulk edit featured images in WordPress.

How to Bulk Edit Featured Images in WordPress

The easiest way to bulk edit featured images in WordPress is by using the Quick Featured Images plugin.

This plugin makes it easy to change every single featured image across your website. It also has detailed filters that allow you to change the featured images for specific categories, tags, post types, and more.

Before you start using the Quick Featured Images plugin, just be aware that this plugin doesn’t allow you to undo your bulk edits. This can cause problems if you change your featured images and are unhappy with the results.

With this in mind, it’s a good idea to backup your WordPress website before using this plugin. If you don’t already have a backup solution, then there are several great WordPress backup plugins that allow you to automatically backup your website.

After creating a backup, you’ll need to install and activate the Quick Featured Images plugin. If you need help, then please see our guide on how to install a WordPress plugin.

Upon activation, go to Featured Images » Overview in the left-hand menu. On this screen, click on the following link: ‘Bulk set, replace and remove featured images for existing posts.’

How to bulk edit featured images in WordPress

This screen allows you to bulk edit your featured images in a few different ways.

Your first option is the ‘Set the selected image as a new featured image’ radio button.

This setting finds all of the posts and pages that don’t currently have a featured image. You can then choose a new featured image and apply it to all of these pages and posts.

Bulk editing WordPress featured images

Another option is ‘Replace featured images by the selected image.’ You can use this to replace any existing featured images with a new image.

Next up is ‘Remove the selected image as featured image.’ This lets you choose a specific image, and then remove that featured image wherever it appears on your website. This is perfect for removing an outdated featured image, such as any image that features your site’s old logo.

After selecting one of these radio buttons, click on the Choose Image button.

Choosing a bulk edit action for your WordPress featured images

You can now choose the image that you want to use in the bulk edit. You can either select an image from your WordPress media library or upload a new file.

Once you’ve done that, scroll to the bottom of the screen and click on the ‘Next’ button.

Bulk editing featured images in WordPress

On this screen, you’ll be able to configure how WordPress performs the bulk edit.

The options you see may vary depending on whether you’re adding, changing, or removing a featured image. For example, if you selected the ‘Set the selected image as new featured image’ radio button then you can choose whether to override all existing featured images, or ignore them.

Override featured images in WordPress

To select which posts your bulk changes will apply to, scroll to the ‘Add a filter’ section.

By default, Quick Featured Images will apply its bulk edit to all pages and posts, across all of your site’s categories and tags.

If you don’t want to bulk edit every page and post, then you can create filters. These filters let you bulk edit featured images that meet a specific criteria.

Creating a filter for bulk editing featured images in WordPress

You can check more than one box. For example, you might check the ‘Post Type Filter’ and ‘Tag Filter’ boxes if you want to bulk edit posts that have a specific tag.

After checking one or more boxes, go ahead and click on the ‘Next’ button.

You will now see some settings that you can use to create your filter. For example, if you checked the ‘Post Type Filter’ box then you can choose between the ‘Posts’ or ‘Pages’ box.

The Quick Featured Images WordPress plugin

If you checked either the ‘Category Filter’ or ‘Tag Filter’ box, then you’ll have access to a dropdown menu.

You can open this dropdown and then choose the category or tag where you want to make the bulk edit.

Bulk editing WordPress featured images using filters

When you’re happy with how your filter is set up, scroll to the bottom of the screen.

You can then go ahead and click on the ‘Preview filtering’ button.

The Quick Featured Images plugin will now show a preview of all the pages and posts that will be affected by the bulk edit.

Previewing a bulk edit action

If you’re happy with the preview, then you can go ahead and click on the ‘Apply’ button.

Quick Featured Images will now bulk edit all of the relevant featured images across your WordPress website.

How to Set Multiple Images Randomly as Featured Images

When you bulk edit featured images in WordPress, you can sometimes end up using the same featured image for lots of different posts. These duplicate images can make your website look boring and repetitive.

With that in mind, you may want to set your featured images at random. You can use the Quick Featured Images plugin to select different images from your WordPress media library. The plugin will then add these featured images to your pages and posts at random.

In this way, you can bulk edit your images without creating lots of duplicate featured images.

To set your featured images at random, go to Featured Images » Overview and again click on ‘Bulk set, replace and remove featured images for existing posts’.

Once you’re here, click on ‘Set multiple images randomly as featured images.’

You can then click on the ‘Choose Images’ button to open the WordPress media library.

Replacing WordPress featured images at random

Here, hold down the Shift key and then click all the images that you want to randomly use as your featured images.

Once you’ve done that, click on the ‘Choose Images’ button. Then, scroll to the bottom of the screen and click on ‘Next.’

Bulk replacing multiple featured images in WordPress

By default, Quick Featured Images will apply these images to all your WordPress pages and posts at random.

Do you just want to use these images for certain content types, categories, or tags? Then you can create a filter by following the same process described above.

After adding a filter, Quick Featured Images will show a preview of all the pages and posts that it plans to update. You can check the thumbnail to see which image the plugin has randomly assigned to each page or post.

Replacing WordPress features images at random

If you’re happy with the preview, go ahead and click on ‘Apply.’ Quick Featured Images will now add the new images to your pages and posts.

How to Bulk Remove Featured Images in WordPress

Sometimes you may prefer not to use featured images on your website. For example, you might be trying to speed up your WordPress performance, or you may be using a theme that simply doesn’t look good with featured images.

You can use Quick Featured Images to easily remove all the featured images from your pages and posts.

You can also use filters to remove the featured images from pages, posts, or content that has a particular tag or category.

To bulk remove featured images in WordPress, simply click on the ‘Remove all featured images without existing image files’ radio button. You can then go ahead and click on ‘Next.’

Removing featured images from WordPress in bulk

Now, you can apply filters by following the instructions above.

Once you’ve created one or more filters, go ahead and click on the ‘Next’ button.

Building a bulk editor feature in WordPress

As always, the plugin will show a preview of all the pages and posts that it will change as part of this bulk edit. Since you’re deleting the featured image, it will show ‘No image set’ in the ‘Future Featured Image’ column, rather than a thumbnail preview.

If you’re happy to go ahead and remove the featured image for these pages and posts, then just click on the ‘Apply’ button.

Applying the bulk edit to your featured image in WordPress

We hope this article helped you learn how to bulk edit featured images in WordPress. You may also want to see our guide on the best Instagram WordPress plugins, and how to create automated workflows in WordPress to save time.

If you liked this article, then please subscribe to our YouTube Channel for WordPress video tutorials. You can also find us on Twitter and Facebook.

The post How to Bulk Edit Featured Images in WordPress first appeared on WPBeginner.

How to Use AI to Generate Images in WordPress

Do you want to use artificial intelligence tools like DALL.E to generate images in WordPress?

AI-generated images can be a good alternative to create images for your WordPress blog posts without worrying about copyright.

In this article, we will show you how to use AI to generate images in WordPress.

Using AI tools like DALL.E to make images for WordPress websites

Why Use AI Tools to Generate Images for Your WordPress Website?

There are a ton of paid stock image websites offering images to use on your WordPress website for a small fee.

However, the cost of these images is an extra expense. Most bloggers and small businesses don’t have the budget for that.

There are certainly many websites that offer royalty-free images like Unsplash or Shutterstock‘s limited free library.

But those images are highly overused and often too generic.

Now, the best way to create images for your website is by making your own images or using your own photographs. But not everyone is a professional photographer or digital artist.

This is where artificial intelligence comes in.

AI tools like DALL.E can generate unique artwork from text descriptions provided by the users.

These images are not only unique but highly creative and artistic.

For instance, here is an image of an office desk with a sunset backdrop generated by DALL.E 2. It mimics the style of generic stock image photos that you can find on hundreds of websites.

DALL.E 2 mimicking generic stock photo style

Now, take a look at this example of an artwork created by DALLE.2.

This one is artistic, more colorful, and in a comic book style.

DALL.E comic book style artwork

You can see the variety of styles, topics, and ideas you can use on the DALL.E homepage.

The best part is that you are free to use these images for your blog posts, articles, and even landing pages.

That being said, let’s take a look at how to easily use AI-generated images in WordPress.

We will be showing you three methods using three different AI tools; you can choose one that works best for you by clicking on the quick links below:

1. Generate AI Images for WordPress with DALL.E 2

DALL.E 2 is an artificial intelligence tool made by OpenAI. It is quite popular for its artistic rendering, surrealism, creativity, and versatility.

Built on the GPT-3, it is a text-to-image model using deep learning technologies to generate images from natural language descriptions.

It is similar to ChatGPT, which also uses GPT-3 but responds in text. In the generative AI industry, these descriptions are called prompts.

You can create AI images on the DALL.E 2 website and download them to your computer. After that, you can upload those images to your WordPress website.

First, you need to visit the DALL.E 2 website and sign up for a free account, which gives you 50 credits for your first month.

Upon signing up, you’ll see the DALL.E dashboard with a prompt field and some recent artworks generated by DALL.E.

DALL-E dashboard

In the prompt field, type a text description of the image you want to generate. You can be as descriptive and creative as you like.

Click on the ‘Surprise Me’ button to see some examples of prompts you can generate.

Once you click on the ‘Generate’ button, the AI will generate images based on the prompt you provided and show you four results.

Images generated using the prompt

You can download all of them to your computer if you want. You can also click on any of the generated images to edit them.

The image editor in DALL.E allows you to expand the frame or pan in. You can also erase or retouch an area of the image.

Edit image in DALL.E 2

Click on the ‘Generate’ button again for AI to regenerate the image based on your changes.

Once you have downloaded the images to your computer, you can switch back to the admin area of your WordPress website.

You can now upload the image to your WordPress media library by visiting the Media » Add New page.

Upload image to WordPress media library

You can also add an image directly to your WordPress posts and pages. Simply edit the post or page where you want to display the image.

On the post edit screen, add the Image block and then upload the image from your computer.

Adding image to WordPress post and pages

Automatically Generate AI Images in WordPress with DALL.E and Uncanny Automator

If you are looking for a plugin to integrate DALL.E 2 directly with your WordPress website, then you can use Uncanny Automator.

Uncanny Automator is one of the best WordPress automation tools on the market. It offers support for OpenAI’s GPT and DALL-E models to easily generate AI text content and images in WordPress.

You can use the simple recipe builder to create an automation that uses a WPForms submission form to send text and image prompts to GPT and DALL-E.

Send OpenAI text and image prompts using a submission form with Uncanny Automator

Then, you can create a new post in WordPress using Uncanny Automator’s tokens to automatically pull the data from the text and image generation.

For example, you can use a response token to set the featured image as the AI image you created:

Use Uncanny Automator action token to set featured image as AI generated image

This will turn the text and image prompts from your submission form into a new blog post in just a few clicks.

Uncanny Automator even adds the DALL-E image directly to your WordPress media library, so you don’t need to do it manually.

AI generated blog text and featured image using Uncanny Automator

For more details, see our guide on how to create automated workflows in WordPress with Uncanny Automator.

What is the License Used for Images Generated by DALL.E 2?

You retain the copyright for the images generated by the prompt you provided to DALL.E 2.

You can use the images anywhere you want, including your WordPress website, YouTube videos, eBooks, magazines, and more.

2. Use SeedProd to Generate AI Images in WordPress (Premium Plugin)

For the first method, we will use SeedProd to easily generate AI images in WordPress.

SeedProd is the best drag-and-drop theme builder for WordPress. It allows you to create custom WordPress themes, page layouts, and landing pages without coding.

It also comes with a powerful AI Assistant that uses DALL-E to help you generate AI images in just a few clicks.

To get started, you need to install and activate the SeedProd plugin. If you need help, see our guide on how to install a WordPress plugin.

Note: There is a free version of SeedProd available. However, you need to buy the premium version of SeedProd to access the AI Assistant. You’ll also need to buy AI credits by clicking the link in your SeedProd account dashboard.

Once the plugin is activated, you can use the drag-and-drop builder to create a custom WordPress theme or landing page. For step-by-step instructions, you can follow our tutorials:

Then, you can use the AI Assistant to generate original images for your website pages.

Simply edit the page, drag an Image block from the panel on the left-hand side, and drop it into the live preview area on the right.

Add an Image block in SeedProd

Next, click on the Image block to open up the block settings panel on the left side of the screen.

Then, click on the ‘Add with AI’ button.

Click the Add with AI button

This will open the image prompt panel. Here, you can type a description of the image you want to create for your site or use one of the suggested prompts.

After that, click on the ‘Generate Image’ button.

Type a description of the image you want to generate

SeedProd will take a few seconds to generate the image.

When it’s done, you’ll see a preview of the image, and you can click the ‘Insert’ button to add it to your page.

Insert the AI image generated by SeedProd

After the image has been added to your page, you can also edit the AI image and generate variations of the same image.

Just click on the generated image from the SeedProd builder and select ‘Edit with AI’ in the block settings panel.

Edit image with AI

Next, you’ll see the different editing options that are available.

First, click on the ‘Variations’ button.

Options for editing AI generated images with SeedProd

From there, hit the ‘Generate Variations’ button.

This will tell the AI Assistant to create multiple variations of the image.

Click the Generate Variations button

If you like one of the variations better than the original AI-generated image, you can click the ‘Insert’ button to add it to your page.

Otherwise, you can select the ‘Back’ button to keep the original image and return to the edit options screen.

SeedProd will create multiple variations of your AI image

The ‘Edit Image’ option allows you to use a brush tool to edit specific areas of the image. Simply erase the area that you want to edit and alter your original prompt to describe the changes you want to make.

Then, click the ‘Generate new image’ button.

Erase an area of the AI image and edit it with a new prompt

After a few seconds, SeedProd’s AI Assistant will show you two variations of the image with the changes you described.

You can click on the ‘Insert’ button underneath the variation you like the most to add it to your page.

Insert edited AI image

Once you are happy with the image, just hit the ‘Save’ and ‘Publish’ buttons.

You can find them in the top right corner of the SeedProd builder.

Save and publish your changes

Now, your AI-generated image will be displayed on your WordPress website.

Here’s how it looked on our demo site:

Example of AI generated image created with SeedProd

What is the License Used for Images Generated by SeedProd?

You own the images you create with SeedProd’s AI Assistant.

You’re free to use the AI-generated images anywhere on your WordPress site.

3. Use Imajinn to Generate AI Images in WordPress (Free Plugin)

For this method, we will use Imajinn AI to generate images in WordPress.

Imajinn AI is similar to tools like DALL.E 2, Midjourney, and Stable Diffusion. It generates images using artificial intelligence based on the prompt you provide.

First, you need to install and activate the Imajinn plugin. For more details, see our step-by-step guide on how to install a WordPress plugin.

Note: The base plugin is free and gives you 10 credits. After that, you can buy more credits from the plugin’s website.

Upon activation, you need to visit the Media » Imajinn AI to configure plugin settings and generate images.

First, you need to sign up by providing an email address and password to create your account.

Register free account

After that, you will be able to start generating images using Imajin AI.

Simply provide a detailed prompt describing the image that you want to generate.

You can also choose from a list of styles, artist style, style modifier filters, and aspect ratio to further customize your prompt.

Image prompt

Below that you can choose to click on the ‘Summon’ button to launch the Prompt Genie tool.

The tool will suggest further prompt ideas based on the prompt description you provided to generate the best possible image.

Prompt genie

You can click on the ‘Generate’ button to use a suggested prompt, or continue writing your own prompt by copying ideas from the suggestions.

Once you are satisfied, click on the ‘Generate’ button to continue.

The plugin will now start generating images using the AI tool running on the cloud. Once finished, it will display four variations of images for you to choose from.

Imajinn generated images

Below each image, you’ll find options to share the image, repair faces (The AI is not great at generating human faces), or touch up the image.

You can also just click on the ‘Save’ button to store an image in your WordPress media library.

image toolbar

To use the image in your WordPress posts and pages, simply edit the post or page where you want to add the image.

On the post-edit screen, add the Image block where you want to display the image and then click on Media Library.

Adding image to your post and pages

Next, you need to select the image you saved earlier from your Media Library and provide an alt text for the image.

After that, go ahead and click on the ‘Select’ button to insert the image.

Image added to WordPress post

The plugin also comes with an Imajinn block that you can add to your posts or pages.

It allows you to generate an image inside the block editor.

Imajinn block

What is the License Used for Images Generated by Imajinn AI?

All images generated by Imajinn AI are provided under the free domain or CC0 license.

You are free to use them on your website as you see fit.

Bonus Resources:

AI can be used to help you write content, create images, and more. Here are some more resources to upgrade your AI skills:

We hope this article helped you learn how to use Artificial Intelligence to generate images for your WordPress website. You may also want to see our ultimate image SEO guide and these easy tips to optimize images for speed.

If you liked this article, then please subscribe to our YouTube Channel for WordPress video tutorials. You can also find us on Twitter and Facebook.

The post How to Use AI to Generate Images in WordPress first appeared on WPBeginner.

Where Does WordPress Store Images on Your Site?

Are you wondering where does WordPress store images on your website?

Many WordPress beginners have asked us how does WordPress store images, and what they can to do to organize their media library more efficiently.

In this article, we’ll explain how WordPress stores images on your website. We’ll also share tools and plugins that you can use to organize your images more efficiently.

Where does WordPress store image files (Explained)

How Does WordPress Store Images?

WordPress comes with a built-in system to manage media uploads like images, videos, audio, and documents on your WordPress website.

This system allows you to easily upload images and other media to a specific folder on your WordPress hosting server.

These files are then displayed in your WordPress media library. You can view all your uploads under Media » Library page. From here, you can also edit these files, manipulate them, or even delete them.

WordPress media library

The specific folder where the image files are stored in WordPress is called the uploads folder located inside the /wp-content/ folder.

Uploads folder in WordPress

Inside the uploads folder, your media files are stored by year and month folders. Additionally, you’ll also see folders created by your WordPress plugins to save other uploads.

For instance, all your media files uploaded in June 2022 will be stored in:

/wp-content/uploads/2022/06/

You can view these files and folders by connecting to your WordPress hosting account using an FTP client or via the File Manager app under your hosting account control panel.

Media uploads organized in year and monthly folders

You’ll notice that there are several copies of each image that uploaded on your server. These image sizes are generated automatically by WordPress when you upload an image.

Multiple image sizes

By default, you may see a thumbnail, medium, and large size of the image along with the original upload.

Apart from that, your WordPress theme or plugins may also generate additional image sizes for them to use.

Now you may be wondering how does WordPress display information about these files inside the media library?

To do that, WordPress also stores information about your image uploads in the database as an attachment post type under the posts table.

Apart from that, WordPress also saves information in the posts meta table when you insert images into posts/pages or any other custom post type.

Meta data for images stored in WordPress database

For instance, when you set a featured image, WordPress saves this information as a meta key _thumbnail_id and stores it in the postmeta table of your database.

Image meta data stored in WordPress database

The information inside your database tells WordPress the location of the file on your hosting server. Now if you delete a file from your server using FTP, then WordPress will show those images as broken.

Broken image in WordPress

Similarly, if you delete the reference to an image from your WordPress database, the file will still be intact on your hosting server but not appear in your media library.

Changing How WordPress Stores Images and Media Uploads

By default, WordPress does not allow you to change the uploads location from the WordPress admin area. The only change you can make is to disable the month and year based folders by visiting Settings » Media page.

Media settings in WordPress

From here, you can also adjust the maximum dimensions in pixels for your image uploads.

Advanced WordPress users can follow our tutorial on how to manually change the default WordPress uploads folder.

Organizing Your Images in WordPress

For most users, the default WordPress media library would work just fine.

However, if images play a more significant role in your WordPress blog, then you may need additional tools to organize your uploads.

For instance, if you run a photography website, then you may want to organize your content in Albums or tags.

For that, you will need a plugin like Envira Gallery. It is a WordPress image gallery plugin that allows you to organize your images in albums, tags, and galleries.

Envira Gallery provides albums and tags functionality for images

Allowing Users to Upload Images in WordPress

By default, WordPress allows any users who can write posts on your website to upload images. This includes users with the Administrator, Author, Editor, and Contributor user roles.

But what if you wanted other users to upload images on your website without logging into the admin area?

To do that, you’ll need the WPForms plugin. It is the best WordPress form builder plugin and allows you to easily create any kind of forms for your website.

It also comes with a file upload field that allows users to easily upload images, documents, and other files without creating a user account or accessing the WordPress admin area.

First, you need to install and activate the WPForms plugin. For more details, see our step by step guide on how to install a WordPress plugin.

Upon activation, you need to visit the WPForms » Settings page to enter your license key. You can find this information under your account on WPForms website.

Entering your WPForms license key

Next, you need to visit WPForms » Add New page to create your image upload form.

First, you need to provide a title for your form. After that, you can look for File Upload Form template to get started.

File upload form

WPForms will now load the form builder interface and automatically load form fields from the File Upload Form template.

File upload form editing

The form will include a file upload field by default. You can add or remove fields to your form, change their labels, or move them up or down.

You can click on the File Upload field to change its settings. From here, you can set which file types and how many files a user can upload. You can also set a maximum file size limit.

File upload settings

Once you are finished, you can save your form and exit the form builder.

Next, you need to create a new post or page or edit an existing one. On the post edit screen, go ahead and add WPForms block to your content area.

Add form to your WordPress website

From the WPForms block settings, click on the drop-down menu to select the form you created earlier.

You can now save your changes and preview your post or page to see your file upload form in action.

File upload form

You can view files uploaded by users by visiting WPForms » Entries page and clicking on your File upload form. From here you can view an entry to see the files uploaded.

User entry

For more details, see our complete guide on how to allow users to upload images in WordPress.

Optimizing WordPress Images for Performance

Images are highly engaging thus they make your content more interesting for users. However, they also take more time to load than just plain text.

This means if you have multiple large images on a page, then your webpage will load slower. This slow page speed affects user experience as well as SEO.

Luckily, there are tons of tools to easily optimize your images for the web before uploading them to WordPress.

For instance, you can use a WordPress image compression plugin to automatically optimize each image that you upload to your website.

You can further boost performance by using a CDN (content delivery network). This allows you to load images from a global network of servers instead of your hosting server.

We recommend using Bunny.net which is the best CDN service on the market. It is super easy and comes with its own WordPress plugin for quicker setup.

We hope this article helped you learn where WordPress stores images on your site. You may also want to see our guide on how to find royalty free images for your WordPress blog, or see our beginner guide on how WordPress actually work behind the scenes.

If you liked this article, then please subscribe to our YouTube Channel for WordPress video tutorials. You can also find us on Twitter and Facebook.

The post Where Does WordPress Store Images on Your Site? first appeared on WPBeginner.

How to Hide Featured Images on Individual Posts in WordPress

Do you want to hide the featured images on individual posts in WordPress?

There may be times when you have a featured image for a post, but instead of deleting it, you just want to hide it from your visitors.

In this article, we’ll show you how to hide featured images on individual posts in WordPress.

How to hide featured images on individual posts in WordPress

When and Why is Hiding Featured Images in WordPress Useful?

Almost every WordPress theme comes with built in support for displaying featured images in different areas of your website.

Some themes will even automatically use post attachments as the featured image if no image is specified. This means that it will still show a featured image even if you don’t set one.

However, you may find yourself wanting to hide the featured image in certain situations. 

For example, you might have a WordPress blog post that looks cluttered with the featured image. But, you still want the featured image to display when listed on your separate blog page.

In this case, you’ll want to hide it on your individual blog post without deleting or removing the image entirely. 

With that said, let’s show you how to hide the featured image on individual posts in WordPress, step by step.

Hiding Featured Image from Individual WordPress Posts

To easily hide featured images from WordPress posts, we recommend using the Conditionally Display Featured Image plugin. It gives you the option to hide individual featured images on WordPress posts. 

First thing you need to do is install and activate the plugin. For more details, see our step by step guide on how to install a WordPress plugin.

After that, the plugin works right out of the box, and there are no plugin settings for you to configure.

Simply go to Posts » All Posts and click on the post that you want to open.

Go to WordPress post dashboard and open post

Then, on the post edit screen, you’ll see a box that says ‘Display featured image in posts lists only, hide on singular views’ directly under the featured image.

To hide the featured image, simply check this box and then click the ‘Update’ button to save your changes. 

Check box to hide post featured image

After that, you can view your post, and you’ll notice the featured image is hidden. Even if there’s a featured image assigned to the post, it won’t display.

This plugin does not delete or unset the feature image. It only hides it on the front end of your WordPress website. If you ever want to show the featured image again, simply edit the post and uncheck the hide featured image box. 

If you happen to be using custom post types with featured image support, the plugin will let you hide those featured images too.

We hope this article helped you learn how to hide featured images on individual posts in WordPress. You may also want to see our step by step guide on how to create an email newsletter and our expert picks of the best AI chatbots software for your website.

If you liked this article, then please subscribe to our YouTube Channel for WordPress video tutorials. You can also find us on Twitter and Facebook.

The post How to Hide Featured Images on Individual Posts in WordPress first appeared on WPBeginner.

How to Add Featured Images or Post Thumbnails in WordPress

Featured images also known as post thumbnails are a well-known WordPress feature supported by most themes.

They are the primary image for your blog posts, and they often appear next to the heading on your home page and social media. All popular WordPress themes come with built-in support for featured images.

In this article, we’ll show you how to easily add featured images or post thumbnails in WordPress.

Adding featured images in WordPress

Beginners Guide to Featured Images in WordPress

Featured images are a WordPress theme feature. Almost all WordPress themes come with built-in support for featured images and display them beautifully across different areas of your WordPress website.

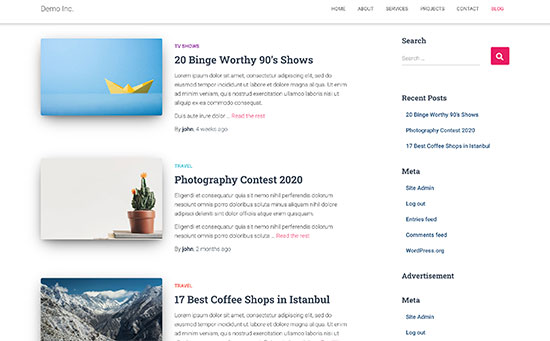
Featured images preview on a typical WordPress blog

As humans, we find visual elements more engaging than plain text. Featured images help you make your blog pages look more appealing.

They also help you build user engagement and increase page views. Search engines and social media websites may also use these images and display them in search results and social media news feed.

Mostly featured images are used for blog posts, but you can also set featured images for pages and custom post types.

Note: Featured images are not the same as cover image. See the difference between cover image vs featured image in WordPress.

That being said, let’s take a look a how to easily add featured images in WordPress.

Adding Post Thumbnail or Featured Image in WordPress

To add a featured image in a WordPress post, simply edit or create a new blog post.

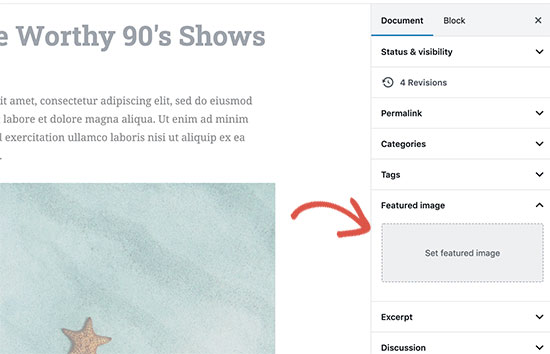
In the content editor, you’ll find the featured image tab in the right column.

Featured image section on post edit screen

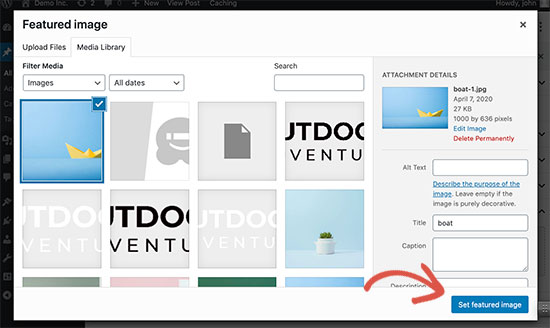
You need to click on the ‘Set Featured Image’ area, and this will bring up the WordPress media uploader popup.

From here, you can upload an image from your computer or use an existing image from your media library. Once you select the image, simply click on the Set Featured Image button.

Setting a featured image

WordPress will now show a preview of the featured image in the right column. However, the actual featured image would look different depending on your WordPress theme.

You can now save or publish your post and preview it to see how the featured image will appear on your live website.

Depending on settings defined by your theme developer, your featured image will automatically appear with your posts.

How to Find and Effectively Use Featured Images?

Now, the next big question that most beginners come across is where to find images to use as featured images?

You cannot just use Google image search and use any image from the internet. Those images are protected by copyright laws and using them without proper permission can cause legal trouble.

Luckily, there are several resources available that you can use to find free images for your blog posts.

Our top favorites are:

  • Shutterstock – They have a few free images, but the real value comes from their paid plans which give you access to tons of high quality photos, illustrations, drawings, videos, and more. This is what we use for WPBeginner site.
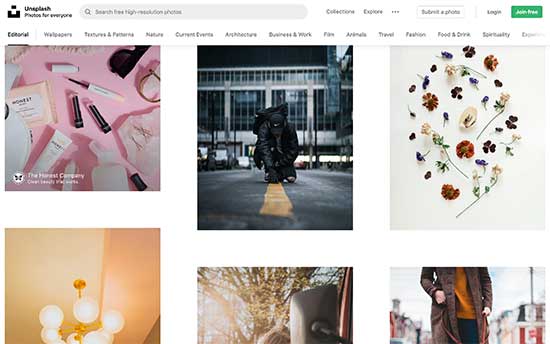
  • Unsplash – A popular online resource publishing high-resolution images that you can use on your website and other projects.
  • Negative Space – A well-organized collection of copyright-free images.
  • New Old Stock – A collection of vintage photographs from public archives.
  • Unsplash is a popular free image resource for bloggers

    Note: All these sources provide high-resolution images, which means they are large in filesize and dimensions. You’ll need to optimize images for the web before using them as featured images.

    Featured images are handled by your WordPress theme. In order to change how your theme displays featured images, you’ll need some basic CSS or WordPress coding skills.

    If you are comfortable with coding, then continue reading for more tips.

    Theme Developers Guide to Featured Image and Post Thumbnails in WordPress

    The featured image is a popular feature supported by almost all WordPress themes. In rare situations, you may come across a theme that does not support featured images, or you may not like how they handle feature images.

    In that case, you can add featured image support to your theme or change how it appears.

    If you are comfortable editing WordPress theme files and know your way around a little custom CSS, then you can do it yourself.

    If your theme does not support featured images, then you’ll not see the option to add a featured image in the content editor.

    To add featured image support in a WordPress theme, you need to add this line of code in your theme’s functions.php file:

    add_theme_support( 'post-thumbnails' );
    

    This code will enable featured image support for posts and pages. You can now go to posts or page block editor, and you will see the featured image option enabled.

    However, when you set a featured image, it will not automatically display in your WordPress theme. To display featured images in your theme, you need to edit your templates and add this line of code where you want to display the featured image:

    <?php the_post_thumbnail(); ?>
    

    The files you add the above code in will vary based on your theme. You will want to add the code inside your post loop.

    Related: See WordPress theme hierarchy cheat sheet to better understand how themes work.

    The above code is the basic function that you need to add featured image support and display featured images in your theme. To set image size for featured images you upload, you need to add this line of code to your functions.php file.

    set_post_thumbnail_size( 50, 50);
    

    The parameters for set_post_thumbnail_size are in this order: width, height.

    You can also set additional image sizes to use with the_post_thumbnail() function. For example:

    // Image size for single posts
    add_image_size( 'single-post-thumbnail', 590, 180 );
    

    In this example we have added a new image size called single-post-thumbnail with 590px with and 180px height.

    To use this image size in our theme, we will still need to add it to the appropriate theme file.

    Checkout our guide on adding additional image sizes in WordPress for more details.

    If you have previously uploaded featured images, but they are still appearing in some other size, then you need to regenerate thumbnails and image sizes for older posts.

    Below is an example of the featured image function with specific image size.

    <?php the_post_thumbnail( 'single-post-thumbnail' ); ?>
    

    This is the broken-down version of the full functionality. There are many other things you can do with featured images.

    FAQs About Featured Images in WordPress

    As a beginner, you may come across questions or issues when using featured images on your blog. Following are just some of the most frequently asked questions about featured images.

    1. Why featured image is appearing twice on my posts?

    Sometimes beginner add a featured image and then add the same image inside the content part of the post editor.

    All you have to do is remove the image from the content area and only use featured image metabox to add featured image. For more on this topic, see our article on how to fix featured image appearing twice in WordPress.

    2. What is the difference between the cover image and featured image?

    Cover images are used in the content area of your posts or pages. They are normally used to separate different sections of a lengthy page or post.

    Featured image is the representative image of an article. It does appear before or alongside the content but not inside the actual article.

    For more on this topic, see our guide on the difference between cover image and featured image in WordPress.

    3. How to display featured images next to recent blog posts?

    The WordPress block editor comes with a ‘Latest Posts’ block which allows you to display recent posts with post thumbnails.

    You can also display recent posts with thumbnails in sidebar widgets using Recent Posts Widget Extended plugin. For more details, see our article on how to display recent posts in WordPress.

    4. How to remind authors to add featured image in WordPress?

    Featured images are prominently displayed on your homepage, blog page, and other archive pages.

    If you or another author on your blog forgot to set one and published the post then it will appear without a featured image. This will look bad and inconsistent, which is not good for user experience.

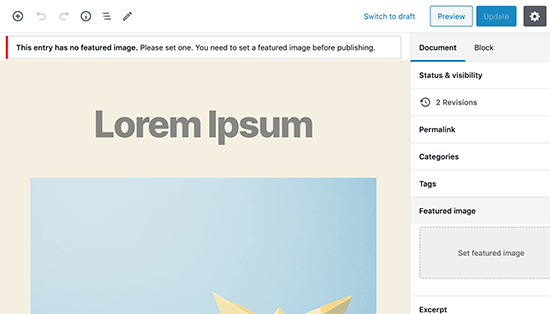
    You can install and activate the Require Featured Image plugin, which will show a notification when anyone tries to publish a post without featured image.

    Require featured image

    For more details, see our article on how to require featured images in WordPress.

    We hope that this article helped you learn how to add featured images or post thumbnails in WordPress. You may also want to check out our beginner’s guide to image SEO which shows how to optimize your WordPress images for search engines.

    If you liked this article, then please subscribe to our YouTube Channel for WordPress video tutorials. You can also find us on Twitter and Facebook.

    The post How to Add Featured Images or Post Thumbnails in WordPress appeared first on WPBeginner.

How to Optimize Images for Web Performance without Losing Quality

Did you know that optimizing your images before uploading to WordPress can have a huge impact on your website speed?

When starting a new blog, many beginners simply upload images without optimizing them for the web. These large image files make your website slower.

You can fix this by using image optimization best practices as part of your regular blogging routine.

In this article, we will show you how to optimize your images for faster web performance without losing quality. We will also share automatic image optimization plugins for WordPress that can make your life easy.

How to Easily Optimize Images for the Web (Without Losing Quality)

Since this is a comprehensive guide on image optimization for the web, we have created an easy-to-follow table of content:

What Is Image Optimization?

Image optimization is a process of saving and delivering images in the smallest possible file size without reducing the overall image quality.

While the process sounds complex, it’s actually quite easy these days. You can use one of the many image optimization plugins and tools to automatically compress images by up to 80% without any visible loss in image quality.

Here’s an example of an optimized vs unoptimized image:

Optimized vs Unoptimized Images in WordPress

As you can see, when optimized properly the same image can be up to 80% smaller than the original without any loss in quality. In this example, the image is 52% smaller.

How Does Image Optimization Work?

In simple terms, image optimization works by using compression technology.

Compression can be ‘lossy’ or ‘lossless’.

Lossless compression reduces the overall file size with absolutely no loss of image quality. With lossy compression, there may be a minor loss in quality, but ideally, it won’t be noticeable to your visitors.

What Does It Mean to Optimize Images?

You may have received a recommendation to optimize images from your WordPress hosting support or a speed test tool and wonder what you need to do.

You will need to reduce the file size of your images by optimizing them for the web. We’ll show you how to do that step-by-step.

What Are the Benefits of Image Optimization?

While there are many benefits to optimizing your images, here are the top ones that you should know:

  • Faster website speed
  • Improved SEO rankings
  • Higher overall conversion rate for sales and leads
  • Less storage and bandwidth (which can reduce hosting and CDN costs)
  • Faster website backups (which can reduce the cost of backup storage)

Images are the second heaviest item on a web page after video. According to the HTTP archive, images make up 21% of an average webpage’s total weight.

Since we know fast websites rank higher in search engines (SEO) and have better conversions, image optimization is something that every business website must do if they want to succeed online.

Now you might be wondering how big a difference image optimization can really make.

According to a Strangeloop study, a one-second delay in website load time can cost you 7% of sales, 11% fewer pageviews, and a 16% decrease in customer satisfaction.

Strangeloop case study

If these aren’t enough reasons to speed up your website, then you should know that search engines like Google also give preferential SEO treatment to faster-loading websites.

This means that by optimizing your images for the web, you can both improve website speed and boost WordPress SEO rankings.

Video Tutorial

If you’d prefer written instructions, then just keep reading.

How to Save and Optimize Images for Web Performance

The key to successful image optimization for web performance is to find the perfect balance between the lowest file size and acceptable image quality.

The three things that play a huge role in image optimization are:

  • Image file format (JPEG vs PNG vs GIF)
  • Compression (higher compression = smaller file size)
  • Image dimensions (height and width)

By choosing the right combination of the three, you can reduce your image size by up to 80%.

Let’s take a look at each of these in more detail.

1. Image File Format

For most website owners, the only three image file formats that really matter are JPEG, PNG, and GIF. Choosing the right file type plays an important role in image optimization.

To keep things simple, you want to use JPEGs for photos or images with lots of colors, PNGs for simple images or when you need transparent images, and GIFs for animated images only.

For those who don’t know the difference between each file type, the PNG image format is uncompressed which means it is a higher-quality image. The downside is that file sizes are much larger.

On the other hand, JPEG is a compressed file format that slightly reduces image quality in order to provide a significantly smaller file size.

Whereas GIF only uses 256 colors along with lossless compression which makes it the best choice for animated images.

On WPBeginner, we use all three image formats based on the type of image.

2. Compression

The next thing is image compression which plays a huge role in image optimization.

There are different types and levels of image compression available. The settings for each will vary depending on the image compression tool you use.

Most image editing tools like Adobe Photoshop, ON1 Photo, GIMP, Affinity Photo, and others come with built-in image compression features.

You can also save images normally and then use a web tool like TinyPNG or JPEGmini for easier image compression.

Although they require some manual effort, these two methods allow you to compress images before uploading them to WordPress, and this is what we do on WPBeginner.

There are also several popular WordPress plugins like Optimole and EWWW Image Optimizer that can automatically compress images when you first upload them. This is convenient, and many beginners and even large corporations prefer to use these image optimization plugins.

We will share more about using WordPress plugins later in the article.

3. Image Dimensions

Normally, when you import a photo from your phone or a digital camera, it has a very high resolution and large file dimensions (height and width).

Typically, these photos have a resolution of 300 DPI and dimensions starting from 2000 pixels and more. While high-quality photos are well-suited for print or desktop publishing, their large size makes them unsuitable for websites.

Reducing the image dimensions to something more reasonable can significantly decrease image file size. You can simply resize images using image editing software on your computer.

For example, we optimized a photo with a resolution of 300 DPI and image dimensions of 4900×3200 pixels. The original file size was 1.8 MB.

We chose the JPEG format for higher compression and changed the dimensions to 1200×795 pixels. The file size was reduced to just 103 KB. That’s 94% smaller than the original file size.

Now that you know the three important factors in image optimization, let’s take a look at various image optimization tools for website owners.

Best Image Optimization Tools and Programs

As we mentioned earlier, most image editing software comes with image optimization and compression settings.

Outside of the image editing software, there are also several powerful free image optimization tools that you can use to optimize images for the web (with just a few clicks).

We recommend using these tools to optimize images before you upload them to WordPress, especially if you are a perfectionist.

This method helps you save disk space on your WordPress hosting account, and it guarantees the fastest image with the best quality since you manually review each image.

Adobe Photoshop

Adobe Photoshop is a premium image editing application that lets you export images with a smaller file size for the web.

Export image for the web

Using the export dialog, you can choose an image file format (JPG, PNG, GIF) that gives you the smallest file size.

You can also reduce image quality, colors, and other options to further decrease file size.

Optimize image before saving

GIMP

GIMP is a free and open-source alternative to Adobe Photoshop. It can be used to optimize your images for the web. The downside is that it is not as easy to use as some other solutions on this list.

First, you need to open your image in GIMP and then select the File » Export As… option. This will bring up the Export Image dialog box where you can give your file a new name. Next, you need to click the ‘Export’ button.

You will now see the image export options. For JPEG files, you can use the ‘Quality’ slider to select the compression level and reduce file size.

Exporting an Image in GIMP

Finally, you should click on the ‘Export’ button to save the optimized image file.

TinyPNG

TinyPNG is a free web app that uses a smart lossy compression technique to reduce the size of your PNG and JPEG files. All you have to do is go to their website and upload your images using simple drag and drop.

Optimize Your Images

They will compress the image and give you a download link.

They also have an extension for Adobe Photoshop which is what we use as part of our image editing process because it lets you access TinyPNG from inside Photoshop.

For developers, they have an API to convert images automatically, and for beginners, they have a WordPress plugin that will do it for you. More on this later.

JPEGmini

JPEGmini uses a lossless compression technology that significantly reduces the size of images without affecting their perceptual quality. You can also compare the quality of your original image and the compressed image.

JPEGMini online image compression tool

You can use their web version for free, or purchase the program for your computer. They also have a paid API to automate the process for your server.

ImageOptim

ImageOptim is a Mac utility that allows you to compress images without losing any quality by finding the best compression parameters and removing unnecessary color profiles.

Optimizing Images Using ImageOptim

A Windows alternative to this is Trimage.

Best Image Optimization Plugins for WordPress

We believe that the best way to optimize your images is by doing it before uploading them to WordPress. However, if you run a multi-author site or need an automated solution, then you can try a WordPress image compression plugin.

Here is our list of the best WordPress image compression plugins:

  1. Optimole, a popular plugin by the team behind ThemeIsle
  2. EWWW Image Optimizer
  3. JPEG, PNG & WebP Image Compression, a plugin by the TinyPNG team mentioned above
  4. Imagify, a plugin by the popular WP Rocket team
  5. ShortPixel Image Optimizer
  6. Smush
  7. reSmush.it

These WordPress image optimization plugins will help you speed up your website.

Final Thoughts and Best Practices for Image Optimization

If you’re not saving images optimized for the web, then you need to start doing so now. It will make a huge difference in your site speed, and your users will thank you for it.

Not to mention, faster websites are great for SEO, and you will likely see an increase in your search engine rankings.

Outside of image optimization, the two things that will significantly help you speed up your website are using a WordPress caching plugin and using a WordPress CDN.

Alternatively, you can use a managed WordPress hosting company because they often offer both caching and CDN as part of the platform.

We hope this article helped you learn how to optimize your images in WordPress. You may also want to see our guide on how to improve your WordPress security and the best WordPress plugins for business websites.

If you liked this article, then please subscribe to our YouTube Channel for WordPress video tutorials. You can also find us on Twitter and Facebook.

The post How to Optimize Images for Web Performance without Losing Quality first appeared on WPBeginner.