There’s a design trend I’ve seen popping up all over the place. Maybe you’ve seen it too. It’s this sort of thing where text is repeated over and over. A good example is the price comparison website, GoCompare, who used it in a major multi-channel advertising campaign.
Nike has used it as well, like in this advertisement:
I couldn’t help but wonder how I would implement this sort of design for the web. I mean, we could obviously just repeat the text in markup. We could also export the design as an image using something like Photoshop, but putting text in images is bad for both SEO and accessibility. Then there's the fact that, even if we did use actual text, it’s not like we’d want a screen reader speak it out.
Versatility Versatility Versatility Versatility
OK, stop already!
These considerations make it seem unrealistic to do something like this on the web. Then I found myself pining for the long-existing, yet badly supported, element() feature in CSS. It enables the use of any HTML element as a background image, whether it be a single button element, or an entire <div> full of content.
The element() function only reproduces the appearance of the referenced element, not the actual content and its structure. Authors should only use this for decorative purposes.
For our purposes, we’d be referencing a text element to get that repeating effect.
Let’s define an ID we can apply to the text element we want to repeat. Let’s call it #thingy. Note that when we use #thingy, we’ve got to prefix the element() value with -moz-. While element() has been supported in Firefox since 2010, it sadly hasn’t landed in any other browser since.
Here’s a somewhat loose recreation of the Nike advertisement we saw earlier. Again, Firefox is required to see the demo as intended.
See how that works conceptually? I placed an element (#versatility) on the page, hid it by giving it zero height, set it as the background-image on the body, then used the background-repeat property to duplicate it vertically down the page.
The element() background is live. That means the background-image appearance on the thing using it will change if the referenced HTML element changes. It’s the same sort of deal when working with custom properties: change the variable and it updates everywhere it’s used.
There are, of course, other use cases for this property. Check out how Preethi used it to make in-page scrolling navigation for an article. You could also use a HTML canvas element as a background if you want to get fancy. One way I’ve used it is to show screenshots of pages in a table of contents. Vincent De Oliveira, has documented some wildly creative examples. Here's an image-reflection effect, if you’re into retro web design:
Pretty neat, right? Again, I wish I could say this is a production-ready approach to get that neat design effect, but things are what they are at the moment. Actually, that’s a good reminder to make your voice heard for features you’d like to see implemented in browsers. There are open tickets in WebKit and Chromium where you can do that. Hopefully we’ll eventually get this feature in Safari-world and Chrome-world browsers.
W3C’s CSS Working Group often gives us brilliant CSS features to experiment with. Sometimes we come across something so cool that sticks a grin on our face, but it vanishes right away because we think, “that’s great, but what do I do with it?” The element() function was like that for me. It’s a CSS function that takes an element on the page and presents it as an image to be displayed on screen. Impressive, but quixotic.
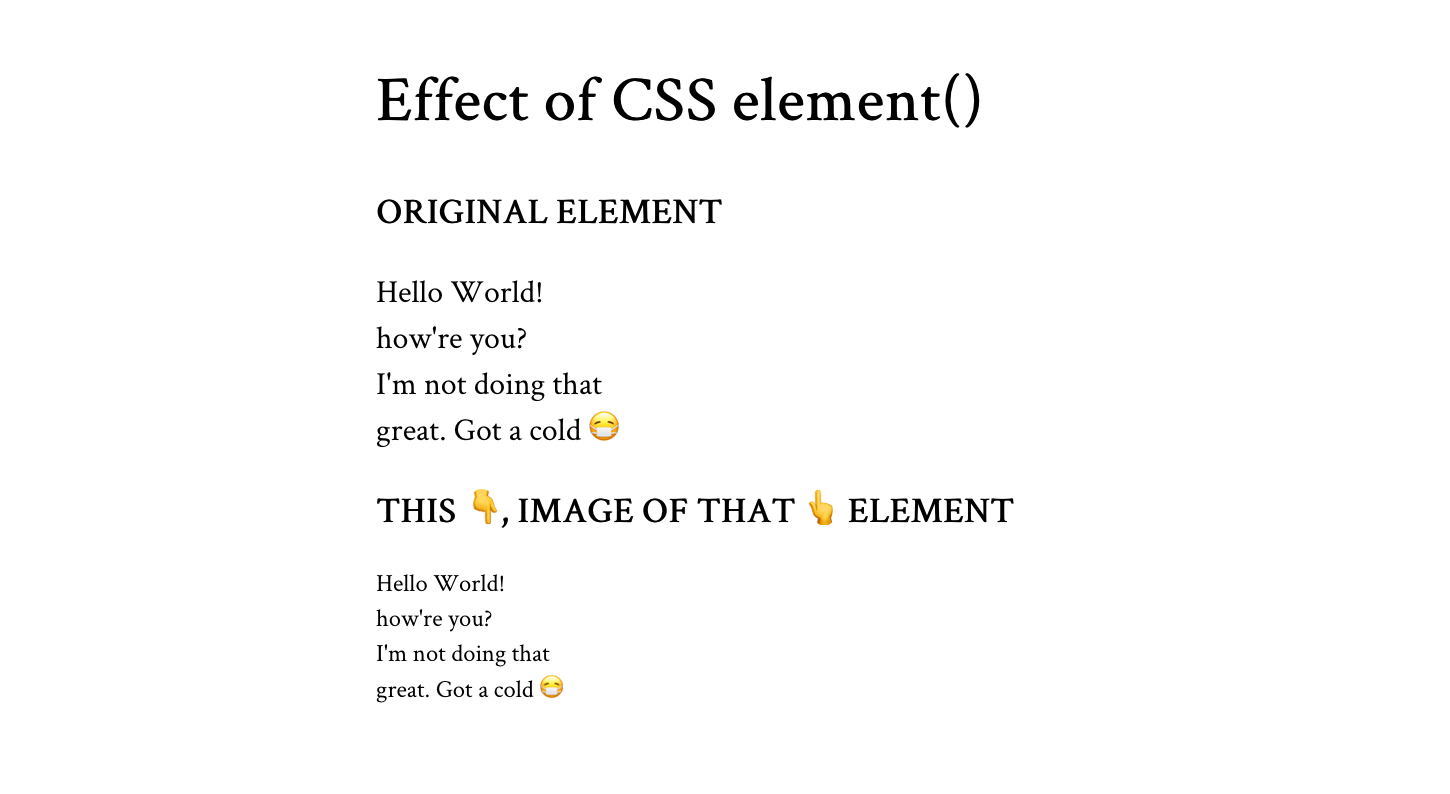
Below is a simple example of how it works. It’s currently only supported in Firefox, which I know is a bummer. But stick with me and see how useful it can be.
<div id="ele">
<p>Hello World! how're you?<br>I'm not doing that<br>great. Got a cold 😷</p>
</div>
<div id="eleImg"></div>
The element() function (with browser prefix) takes the id value of the element it’ll translate into an image. The output looks identical to the appearance of the given element on screen.
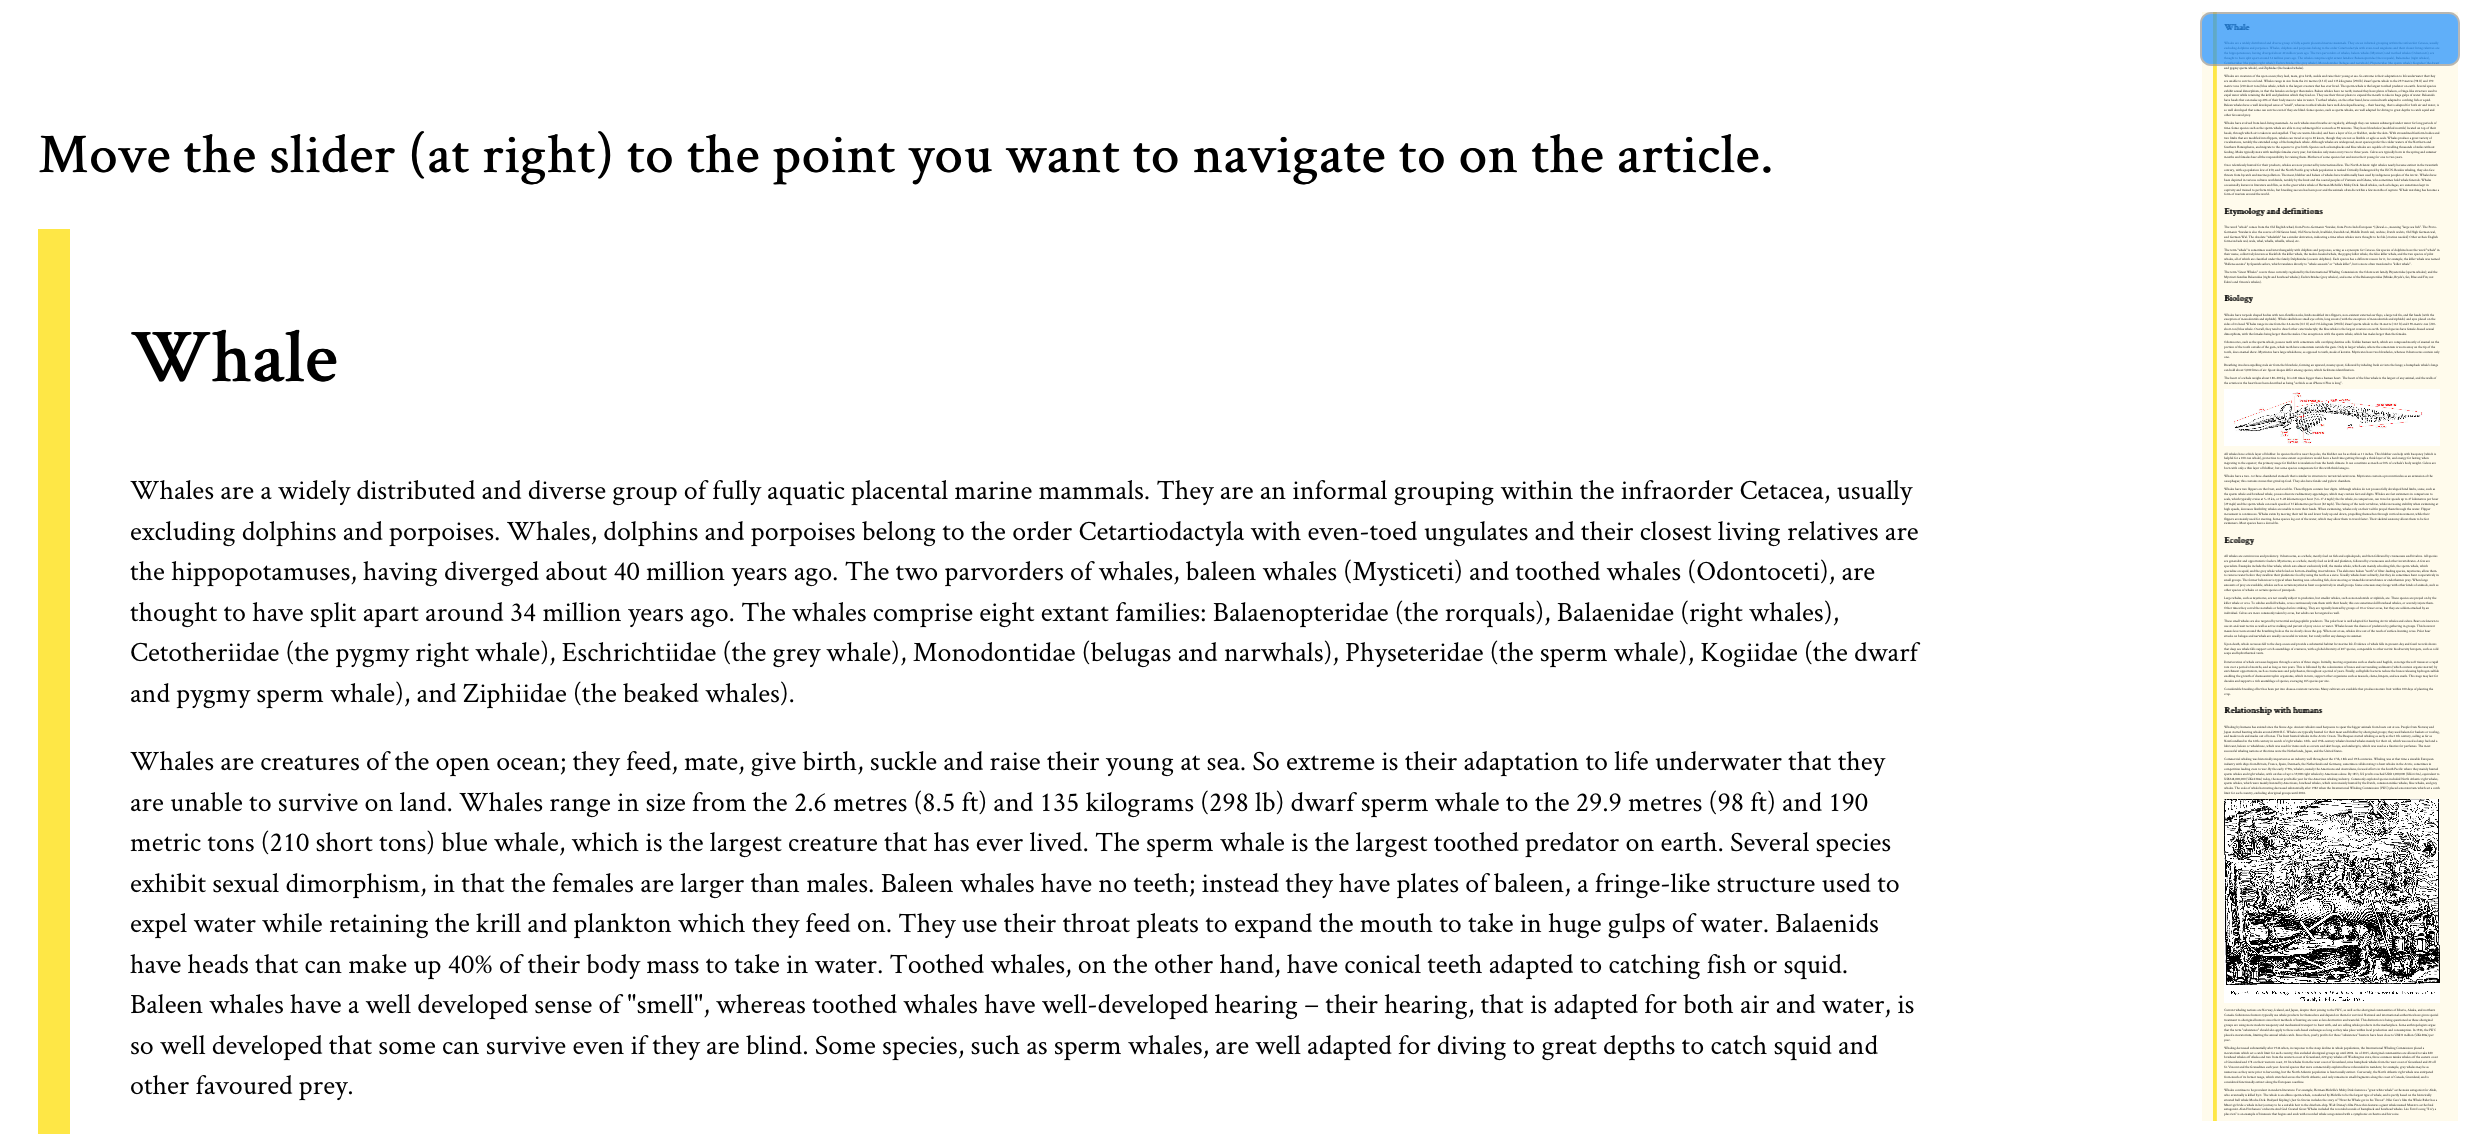
When I think of element()’s output, I think of the word preview. I think that’s the type of use case that gets the most out of it: where we can preview an element before it’s shown on the page. For example, the next slide in a slideshow, the hidden tab, or the next photo in a gallery. Or... a minimap!
A minimap is a mini-sized preview of a long document or page, usually shown at on one side of the screen or another and used to navigate to a corresponding point on that document.
You might have seen it in code editors like Sublime Text.
The minimap is there on the right.
CSS element() is useful in making the “preview” part of the minimap.
Down below is the demo for the minimap, and we will walk through its code after that. However, I recommend you see the full-page demo because minimaps are really useful for long documents on large screens.
If you’re using a smartphone, remember that, according to the theory of relativity, minimaps will get super mini in mini screens; and no, that’s not really what the theory of relativity actually says, but you get my point.
If you’re designing the minimap for the whole page, like for a single page website, you can use the document body element for the image. Otherwise, targeting the main content element, like the article in my demo, also works.
#minimap {
  background: rgba(254,213,70,.1) -moz-element(#article) no-repeat center / contain;
  position: fixed; right: 10px; top: 10px; /* more style */
}
For the minimap’s background image, we feed the id of the article as the parameter of element() and, like with most background images, it’s styled to not repeat (no-repeat) and fit inside (contain) and at center of the box (center) where it’s displayed.
The minimap is also fixed to the screen at top right of the viewport.
Once the background is ready, we can add a slider on top of it and it will serve to operate the minimap scrolling. For the slider, I went with input: range, the original, uncomplicated, and plain HTML slider.
#minimap-range {
  /* Rotating the default horizontal slider to vertical */
  transform: translateY(-100%) rotate(90deg);
  transform-origin: bottom left;
  background-color: transparent;  /* more style */
}

#minimap-range::-moz-range-thumb {
  background-color: dodgerblue;
  cursor: pointer; /* more style */
}

#minimap-range::-moz-range-track{
  background-color: transparent;
}
Not entirely uncomplicated because it did need some tweaking. I turned the slider upright, to match the minimap, and applied some style to its pseudo elements (specifically, the thumb and track) to replace their default styles. Again, we’re only concerned about Firefox at the moment since we’re dealing with limited support.
All that’s left is to couple the slider’s value to a corresponding scroll point on the page when the value is changed by the user. That takes a sprinkle of JavaScript, which looks like this:
onload = () => {
  const minimapRange = document.querySelector("#minimap-range");
  const minimap = document.querySelector("#minimap");
  const article = document.querySelector("#article");
  const $ = getComputedStyle.bind();

  // Get the minimap range width multiplied by the article height, then divide by the article width, all in pixels.
  minimapRange.style.width = minimap.style.height =
    parseInt($(minimapRange).width) * parseInt($(article).height) / parseInt($(article).width) + "px";

  // When the range changes, scroll to the relative percentage of the article height
  minimapRange.onchange = evt =>
    scrollTo(0, parseInt($(article).height) * (evt.target.value / 100));
};
The dollar sign ($) is merely an alias for getComputedStyle(), which is the method to get the CSS values of an element.
It’s worth noting that the width of the minimap is already set in the CSS, so we really only need to calculate its height. So, we‘re dealing with the height of the minimap and the width of the slider because, remember, the slider is actually rotated up.
Here’s how the equation in the script was determined, starting with the variables:
x1 = height of minimap (as well as the width of the slider inside it)
y1 = width of minimap
x2 = height of article
y2 = width of article
x1/y1 = x2/y2
x1 = y1 * x2/y2

height of minimap = width of minimap * height of article / width of article
And, when the value of the slider changes (minimapRange.onchange), that’s when the ScrollTo() method is called to scroll the page to its corresponding value on the article. 💥
Fallbacks! We need fallbacks!
Obviously, there are going to be plenty of times when element() is not supported if we were to use this at the moment, so we might want to hide the minimap in those cases.