Are you looking for a spin a wheel coupon plugin for WooCommerce?
Spin to win wheel is a gamification technique that helps you generate leads and boost overall sales conversion.
In this article, we will share the best WooCommerce spin a wheel coupon plugins that you can use to grow your sales.
Why Do You Need a Spin a Wheel Coupon Plugin?
The hardest part of running a WooCommerce store is keeping your visitors engaged and converting them into customers.
A simple way of doing this is by using a spin a wheel discount popup. It uses gamification techniques by rewarding users when they interact with your discount wheel.
For example, when someone enters their email address to spin the wheel, you can offer different incentives such as free shipping, discount coupons, recommend products, and much more.
This helps you build loyal customers and increase your sales on your WooCommerce store.
That being said, let’s take a look at the best WooCommerce spin a wheel coupon plugins for your online store.
Using its drag and drop builder, you can customize the spin a wheel optin the way you want. It also offers many options for customization.
You can add block elements like buttons, countdown timer, images, text, videos, and more. Other options include changing the display settings, showing the optin as full screen or page slide, and adding custom colors.
OptinMonster also provides extensive display rules for WooCommerce. You can show your spin to win wheel when visitors view a specific product or have a specific number of items in their cart.
In addition, you can display your optins when a user spends a certain amount of time on the page, target specific geographic location, or you can use the powerful Exit-Intent technology to convert abandoning visitors into customers.
It is very easy to use and offers a drag and drop builder. This allows you to customize your spin to win wheels, add or remove new sections, change their positions, and more.
Another advantage of using Discount Win-Wheel for WooCommerce is that all of its popups are mobile responsive. This way your optins will work smoothly on any device.
There are also different trigger options to display your discount wheel. You can set up triggers to show the popup upon exit, on icon clicks, on specific pages, and also edit the display timings.
Pricing: Discount Win-Wheel for WooCommerce prices start from $39.
WP Optin Wheel is a free WordPress plugin for creating spin the wheel coupon optin forms for your WooCommerce site. It helps you increase user engagement and conversions using gamification.
The plugin is user friendly, offers predefined themes, and the ability to customize all 12 slices in the wheel.
You can add a discount, a link to your product page, or a losing slice. Similarly, it allows you to change the colors, text, buttons, and more in your discount wheel.
WP Optin Wheel is also GDPR ready and easily integrates with MailChimp, so you can collect emails from your customers.
Wheel of Popups is a premium WordPress plugin and it makes it super easy to add a WooCommerce spin a wheel popup to your eCommerce store.
Other than WooCommerce, the plugin also works on other platforms like Shopify, Magento, and Squarespace.
Wheel of Popups offers a desktop editor and there are lots of options for customization. You can select the type of promotion you want to run, such as a website popup, standalone popup, or embed widget.
The plugin also lets you edit your spin the wheel optin. You can choose from multiple layouts, edit the color theme, add your own brand logo, and more.
That being said, it even allows you to set up different triggers to show the popup on your WooCommerce store. For instance, you can display them based on the user’s device, target page URL, time spent on-page, and on exit.
Pricing: Wheel of Popups prices start from $19 per month.
Spin Wheel for WooCommerce is a paid extension that helps you convert visitors into customers through spinning wheel popups.
The discount wheel is fully customizable, as you have full control over changing its colors to editing the text message.
Like many other plugins on our list, this WooCommerce extension also allows you to change each slice in the wheel. You can add unlimited slices you want and use the instant preview to view your changes.
Other than that, Spin Wheel for WooCommerce offers different options to display your spin to win popups.
Pricing: Spin Wheel for WooCommerce is available for $49 per year.
Which is the Best WooCommerce Spin a Wheel Coupon Plugin? (Expert Pick)
We believe that OptinMonster is the best WooCommerce spin a wheel coupon plugin in the market. It offers a lot of powerful targeting and personalization options that are simply not available in other solutions.
However, if you are interested in a free plugin that offers basic design features, then give WP Optin Wheel a try.
We hope this article helped you find the best WooCommerce spin a wheel coupon plugin. You may also want to take a look at our guide on best live chat software to boost sales, and the best WordPress page builders to create custom landing pages.
If you liked this article, then please subscribe to our YouTube Channel for WordPress video tutorials. You can also find us on Twitter and Facebook.
A lot of people are confused about what JAMstack is. The acronym stands for JavaScript, APIs, and Markup, but truly, JAMstack doesn’t have to include all three. What defines JAMstack is that it’s served without web servers. If you consider the history of computing, this type of abstraction isn’t unnatural; rather it’s the inevitable progression this industry has been moving towards.
So, if JAMstack tends to be static by definition, it can’t have dynamic functionality, server-side events, or use a JavaScript framework, right? Thankfully, not so. In this tutorial, we’ll set up a JAMstack e-commerce app and add some serverless functionality with Netlify Functions (which abstract AWS Lambda, and are super dope in my opinion).
I'll show more directly how the Nuxt/Vue part was set up in a follow-up post, but for now we're going to focus on the Stripe serverless function. I'll show you how I set this one up, and we'll even talk about how to connect to other static site generators such as Gatsby.
This site and repo should get you started if you’d like to set something like this up yourself:
The very first step is to set up our app. This one is built with Nuxt to create a Vue app, but you can replace these commands with your tech stack of choice:
I am using yarn, hub (which allows me to create repos from the command line) and Nuxt. You may need to install these tools locally or globally before proceeding.
With these few commands, following the prompts, we can set up an entirely new Nuxt project as well as the repo.
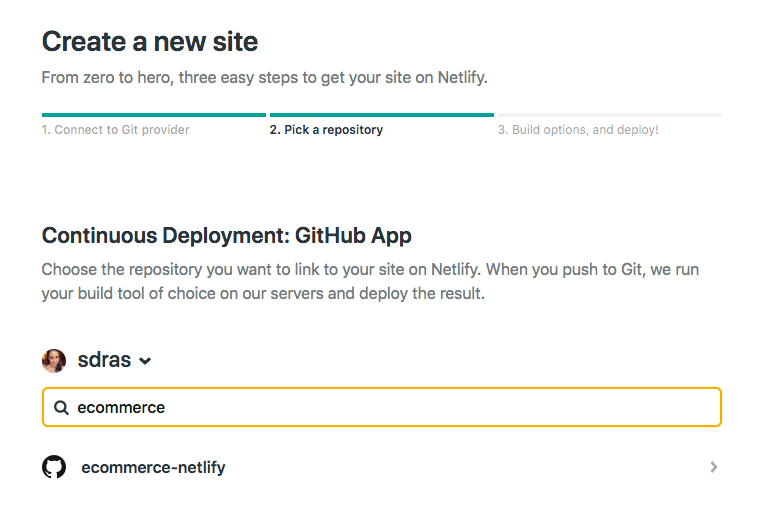
If we log into Netlify and authenticate, it will ask us to pick a repo:
I'll use yarn generate to create the project. With that, I can add in the site settings for Nuxt in the dist directory and hit feploy! That's all it takes to set up CI/CD and deploy the site! Now every time I push to the master branch, not only will I deploy, but I'll be given a unique link for that particular deploy as well. So awesome.
A basic serverless function with Netlify
So here's the exciting part, because the setup for this kind of functionality is so quick! If you’re unfamiliar with Serverless, you can think of it like the same JavaScript functions you know and love, but executed on the server. Serverless functions are event-driven logic and their pricing is extremely low (not just on Netlify, but industry-wide) and scales with your usage. And yes, we have to add the qualifier here: serverless still uses servers, but babysitting them is no longer your job. Let’s get started.
Our very basic function looks like this. I stored mine in a folder named functions, and just called it index.js. You can truly call the folder and function what you want.
We’ll also need to create a netlify.toml file at the root of the project and let it know which directory to find the function in, which in this case, is "functions."
// netlify.toml
[build]
  functions = "functions"
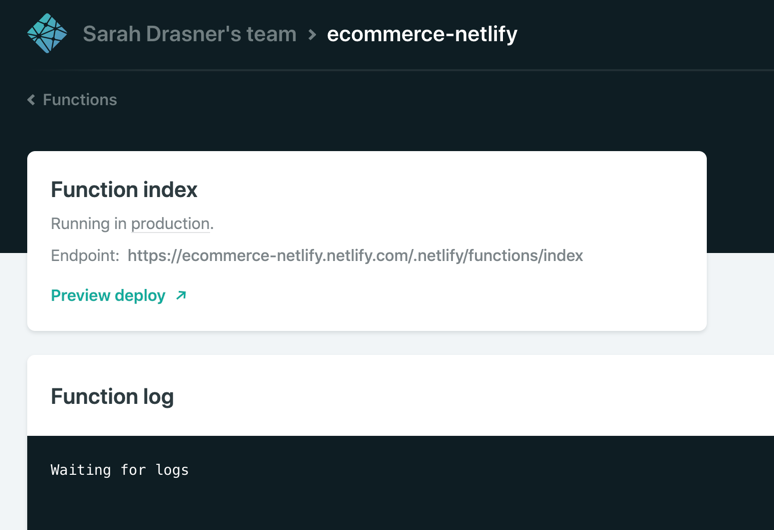
If we push to master and go into the dashboard, you can see it pick up the function!
If you look at the endpoint listed above it’s stored here: https://ecommerce-netlify.netlify.com/.netlify/functions/index
Really, for any site you give it, the URL will follow this pattern: https:/<yoursiteurlhere>/.netlify/functions/<functionname>
When we hit that endpoint, it provides us with the message we passed in, as well as all the event data we logged as well:
I love how few steps that is! This small bit of code gives us infinite power and capabilities for rich, dynamic functionality on our sites.
Hook up Stripe
Pairing with Stripe is extremely fun because it's easy to use, sophisticated, has great docs, and works well with serverless functions. I have other tutorials where I used Stripe because I enjoy using their service so much.
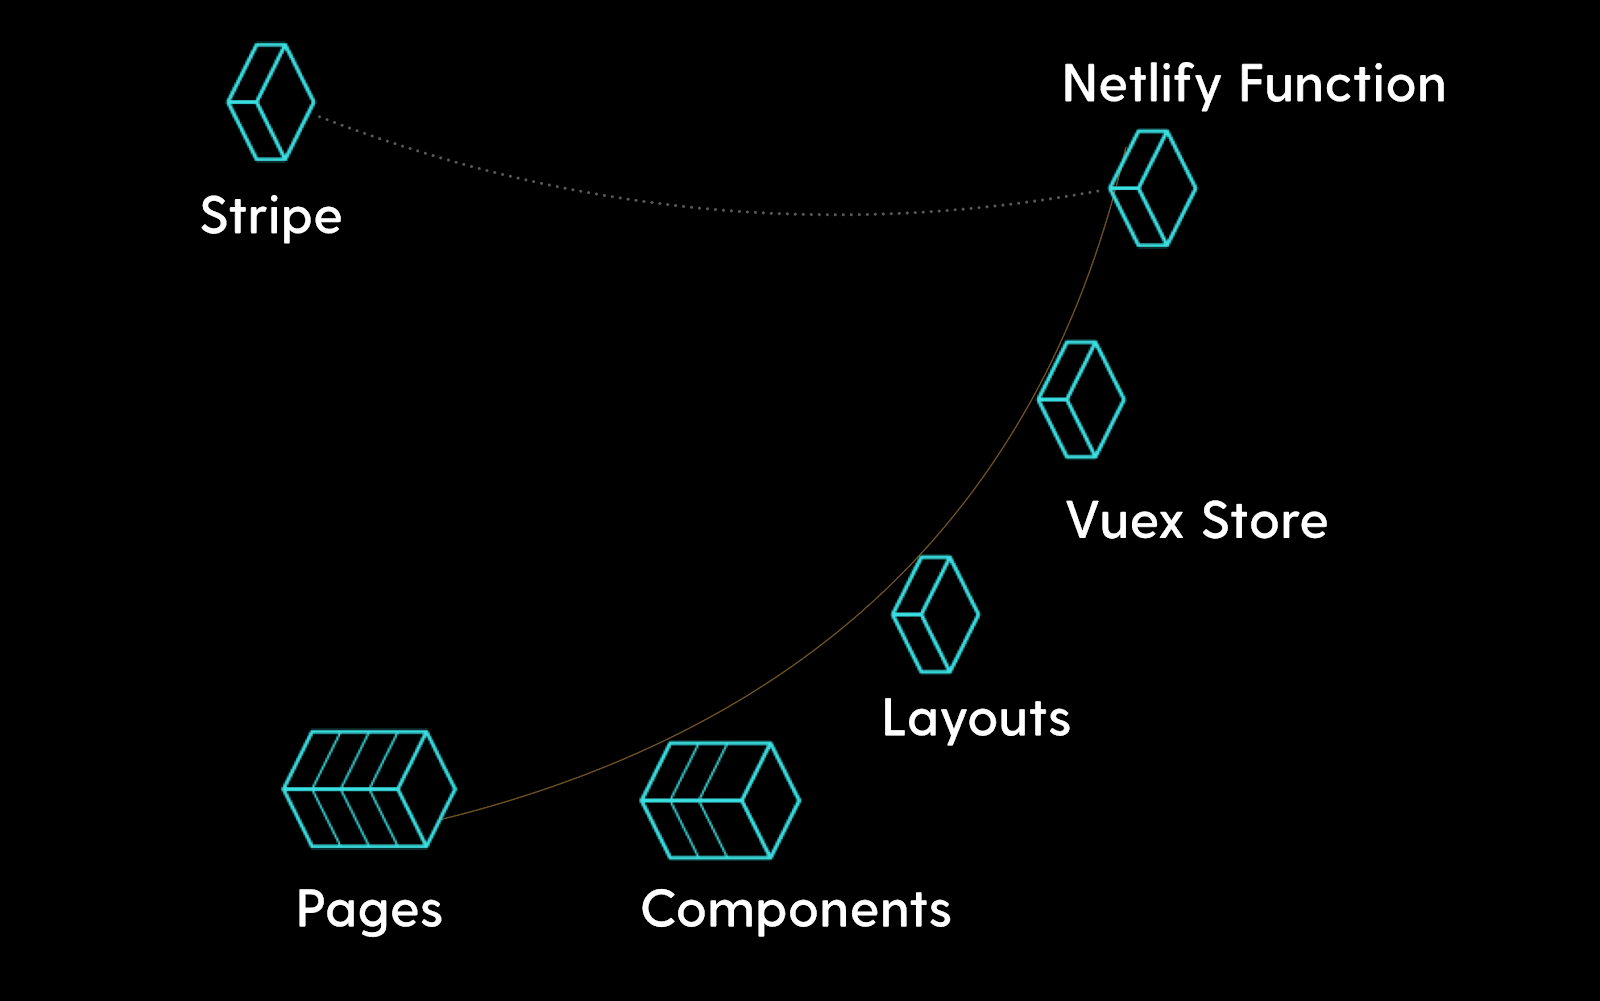
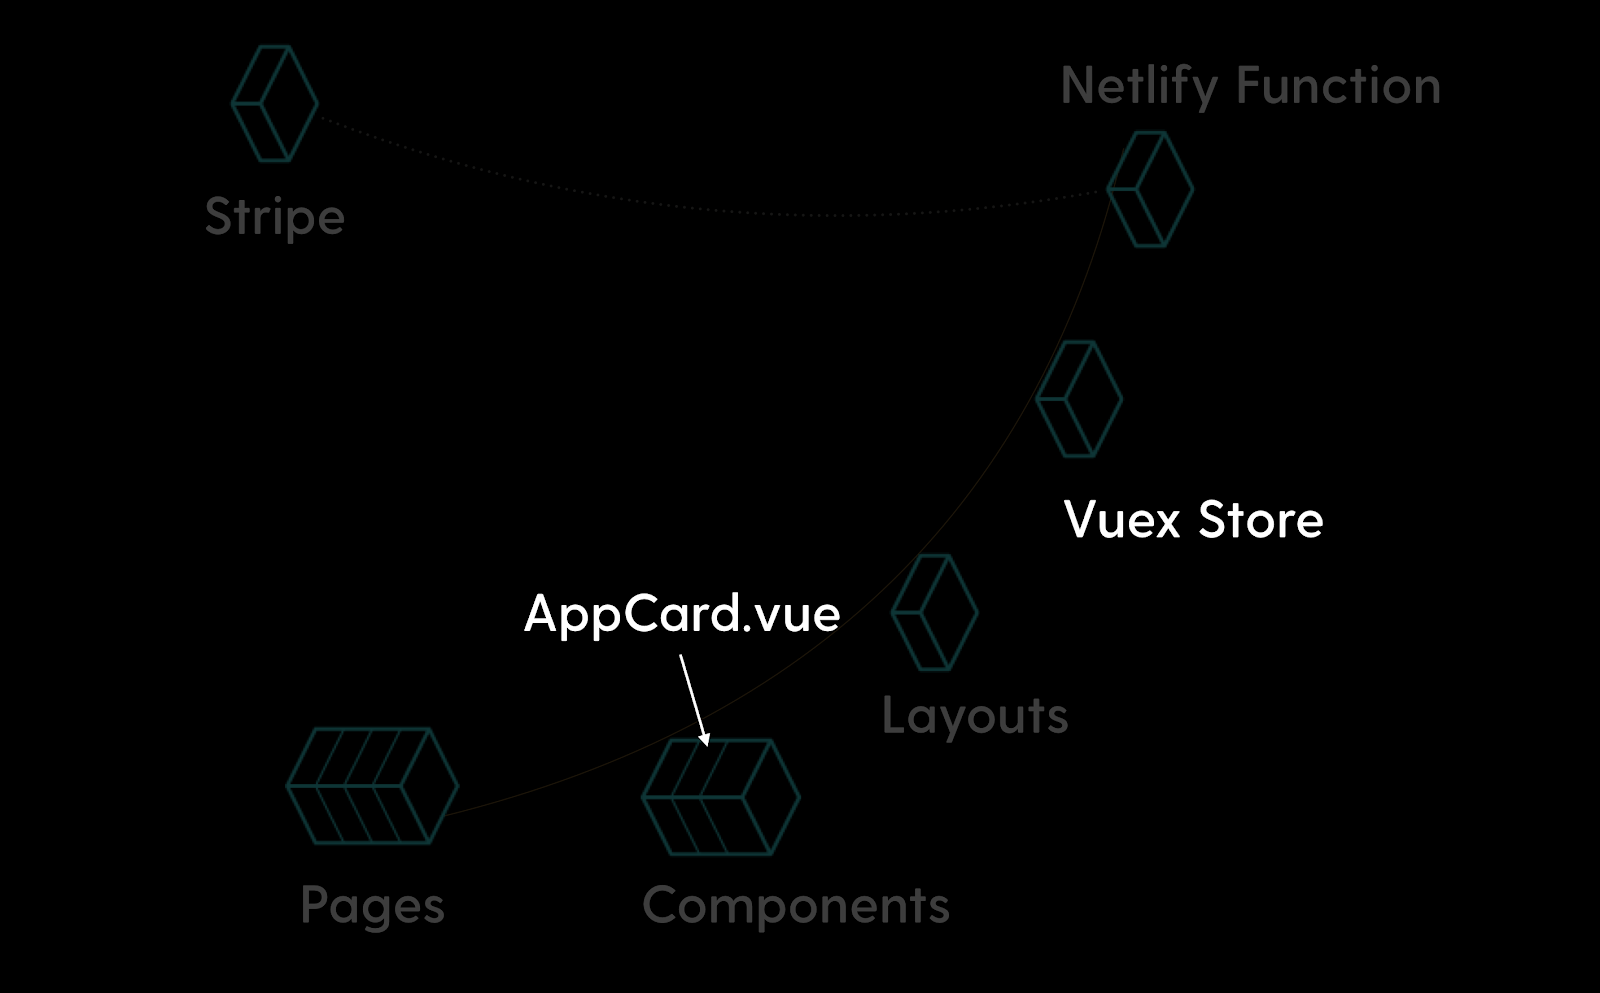
Here’s a bird’s eye view of the app we’ll be building:
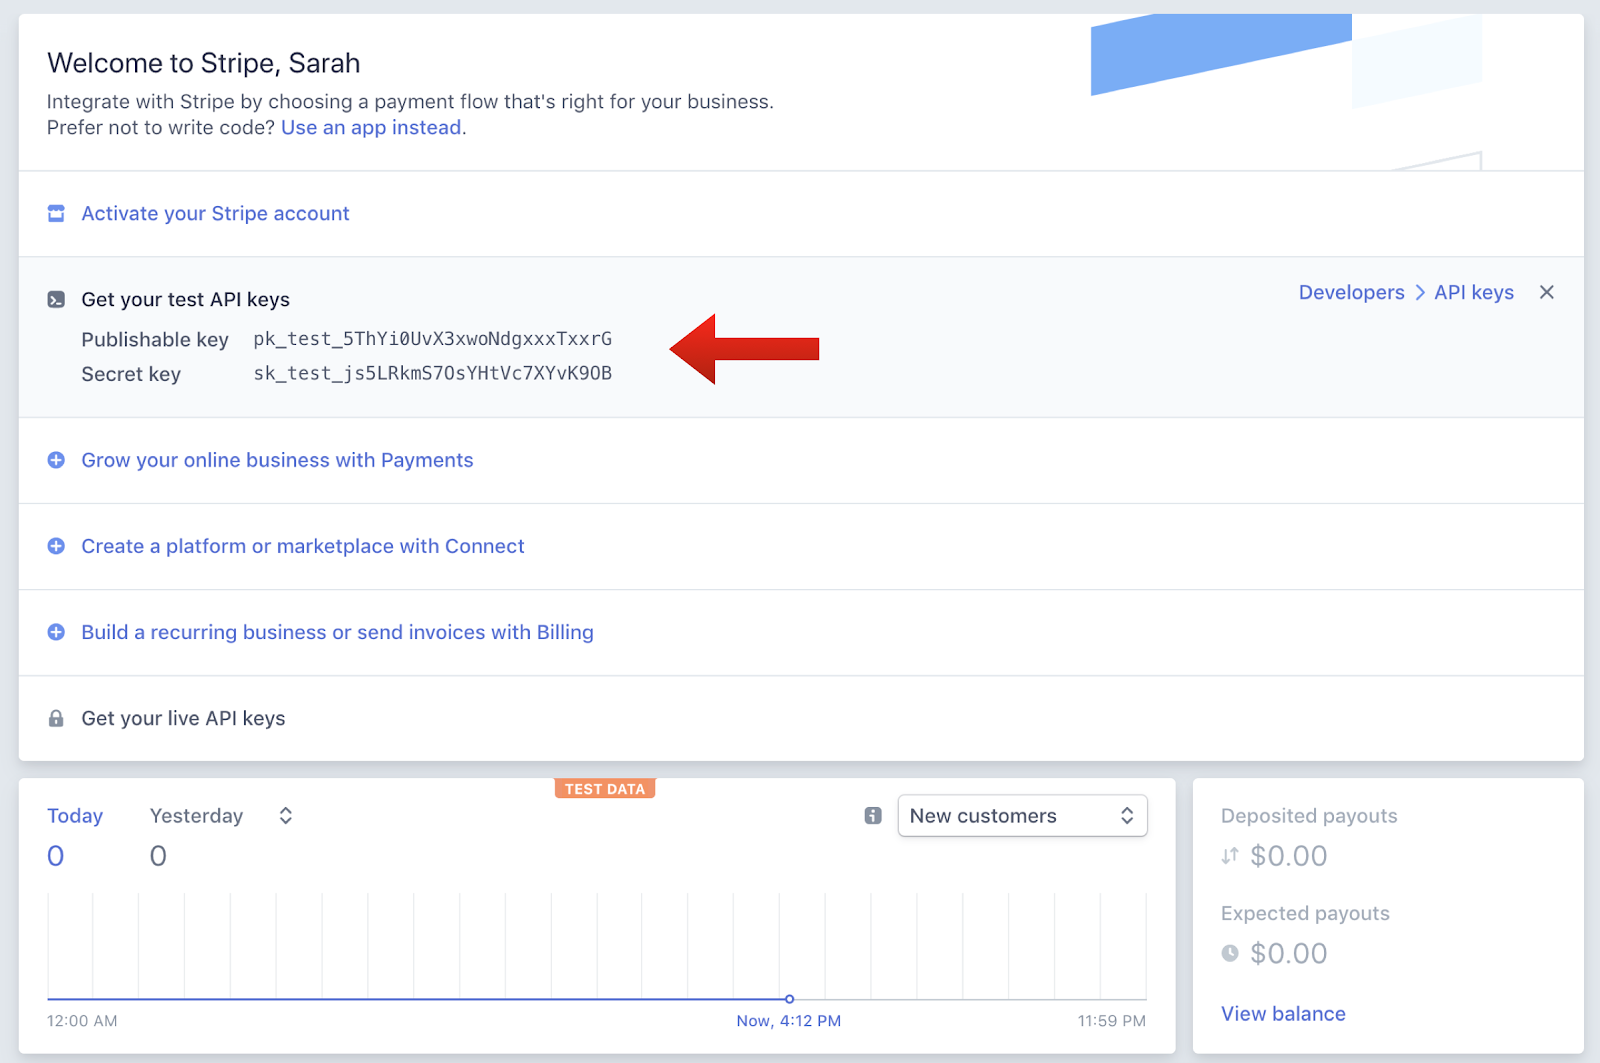
First we’ll go to the Stripe dashboard and get our keys. For anyone totally scandalized right now, it's OK, these are testing keys. You can use them, too, but you’ll learn more if you set them up on your own. (It’s two clicks and I promise it’s not hard to follow along from here.)
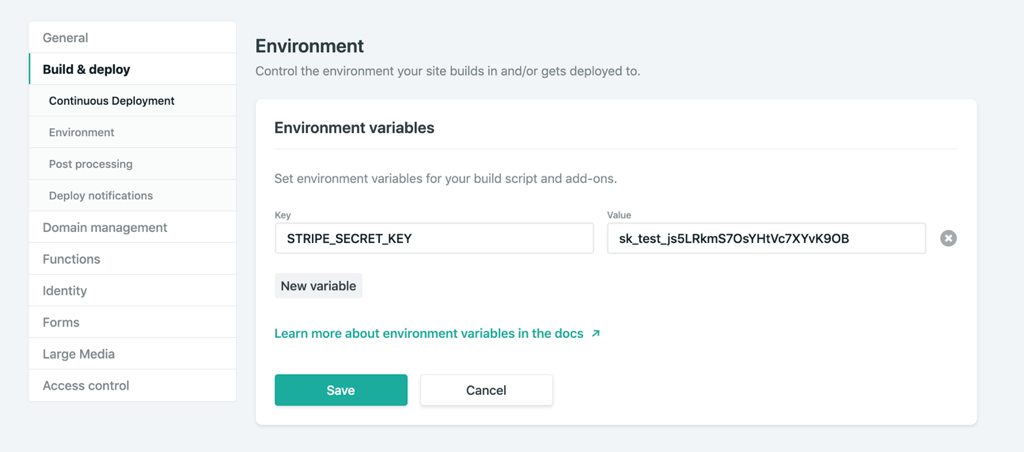
We’ll install a package called dotenv which will help us store our key and test it locally. Then, we’ll store our Stripe secret key to a Stripe variable. (You can call it anything, but here I’ve called it STRIPE_SECRET_KEY, and that’s pretty much industry standard.)
In the Netlify dashboard, we’ll go to "Build & deploy," then "Environment" to add in Environment variables, where the STRIPE_SECRET_KEY is key, and the value will be the key that starts with sk.
We’ll also add in some headers so we don’t run into CORS issues. We’ll use these headers throughout the function we’re going to build.
So, now we’ll create the functionality for talking to Stripe. We’ll make sure we’ll handle the cases that it’s not the HTTP method we’re expecting, and also that we’re getting the information we expect.
You can already see here, what data we’re going to be needing to send to stripe by what we check for. We’ll need the token, the total amount, and an idempotency key.
If you're unfamiliar with idempotency keys, they are unique values that are generated by a client and sent to an API along with a request in case the connection is disrupted. If the server receives a call that it realizes is a duplicate, it ignores the request and responds with a successful status code. Oh, and it's an impossible word to pronounce.
Now, we’ll kick off the Stripe payment processing! We’ll create a Stripe customer using the email and token, do a little logging, and then create the Stripe charge. We’ll specify the currency, amount, email, customer ID, and give a description while we're at it. Finally, we’ll provide the idempotency key (pronounced eye-dem-po-ten-see), and log that it was successful.
(While it's not shown here, we’ll also do some error handling.)
If we look back at our application, you can see we have pages and components that live inside the pages. The Vuex store is like the brain of our application. It will hold the state of the app, and that's what will communicate with Stripe. However, we still need to communicate with our user via the client. We'll collect the credit card data in a component called AppCard.vue that will live on the cart page.
First, we'll install a package called vue-stripe-elements-plus, that gives us some Stripe form elements that allow us to collect credit card data, and even sets us up with a pay method that allows us to create tokens for stripe payment processing. We'll also add a library called uuid that will allow us to generate unique keys, which we'll use for the idempotency key.
yarn add vue-stripe-elements-plus uuid
The default setup they give us to work with vue-stripe-elements-plus looks like this:
<template>
  <div id='app'>
    <h1>Please give us your payment details:</h1>
    <card class='stripe-card'
      :class='{ complete }'
      stripe='pk_test_XXXXXXXXXXXXXXXXXXXXXXXX'
      :options='stripeOptions'
      @change='complete = $event.complete'
    />
    <button class='pay-with-stripe' @click='pay' :disabled='!complete'>Pay with credit card</button>
  </div>
</template>
<script>
import { stripeKey, stripeOptions } from './stripeConfig.json'
import { Card, createToken } from 'vue-stripe-elements-plus'

export default {
  data () {
    return {
      complete: false,
      stripeOptions: {
        // see https://stripe.com/docs/stripe.js#element-options for details
      }
    }
  },

  components: { Card },

  methods: {
    pay () {
      // createToken returns a Promise which resolves in a result object with
      // either a token or an error key.
      // See https://stripe.com/docs/api#tokens for the token object.
      // See https://stripe.com/docs/api#errors for the error object.
      // More general https://stripe.com/docs/stripe.js#stripe-create-token.
      createToken().then(data => console.log(data.token))
    }
  }
}
</script>
So here's what we're going to do. We're going to update the form to store the customer email, and update the pay method to send that and the token or error key to the Vuex store. We'll dispatch an action to do so.
That postStripeFunction action we dispatched looks like this:
// Vuex store
export const actions = {
  async postStripeFunction({ getters, commit }, payload) {
    commit("updateCartUI", "loading")

    try {
      await axios
        .post(
          "https://ecommerce-netlify.netlify.com/.netlify/functions/index",
          {
            stripeEmail: payload.stripeEmail,
            stripeAmt: Math.floor(getters.cartTotal * 100), //it expects the price in cents
            stripeToken: "tok_visa", //testing token, later we would use payload.data.token
            stripeIdempotency: uuidv1() //we use this library to create a unique id
          },
          {
            headers: {
              "Content-Type": "application/json"
            }
          }
        )
        .then(res => {
          if (res.status === 200) {
            commit("updateCartUI", "success")
            setTimeout(() => commit("clearCart"), 3000)
            …
We're going to update the UI state to loading while we're processing. Then we'll use axios to post to our function endpoint (the URL you saw earlier in the post when we set up our function). We'll send over the email, the amt, the token and the unique key that we built the function to expect.
Then if it was successful, we'll update the UI state to reflect that.
One last note I'll give is that I store the UI state in a string, rather than a boolean. I usually start it with something like "idle" and, in this case, I'll also have "loading," "success," and "failure." I don't use boolean states because I've rarely encountered a situation where UI state only has two states. When you work with booleans for this purpose, you tend to need to break it out into more and more states, and checking for all of them can get increasingly complicated.
As it stands, I can reflect changes in the UI on the cart page with legible conditionals, like this:
<section v-if="cartUIStatus === 'idle'">
  <app-cart-display />
</section>

<section v-else-if="cartUIStatus === 'loading'" class="loader">
  <app-loader />
</section>

<section v-else-if="cartUIStatus === 'success'" class="success">
  <h2>Success!</h2>
  <p>Thank you for your purchase. You'll be receiving your items in 4 business days.</p>
  <p>Forgot something?</p>

  <button class="pay-with-stripe">
    <nuxt-link exact to="/">Back to Home</nuxt-link>
  </button>
</section>

<section v-else-if="cartUIStatus === 'failure'">
  <p>Oops, something went wrong. Redirecting you to your cart to try again.</p>
</section>
And there you have it! We’re all set up and running to accept payments with stripe on a Nuxt, Vue site with a Netlify function, and it wasn’t even that complicated to set up!
Gatsby Applications
We used Nuxt in this instance but if you wanted to set up the same kind of functionality with something that uses React such as Gatsby, there's a plugin for that. (Everything is plugin in Gatsby. ☺️)
You would install it with this command:
yarn add gatsby-plugin-netlify-functions
...and add the plugin to your application like this:
The serverless function used in this demo is straight up JavaScript, so it's also portable to React applications. There's a plugin to add the Stripe script to your Gatsby app (again, everything is a plugin). Fair warning: this adds the script to every page on the site. To collect the credit card information on the client, you would use React Stripe Elements, which is similar to the Vue one we used above.
Just make sure that you're collecting from the client and passing all the information the function is expecting:
With such a low barrier to entry, you can see how you can make really dynamic experiences with JAMstack applications. It's amazing how much you can accomplish without any maintenance costs from servers. Stripe and Netlify Functions make setting up payment processing in a static application such a smooth developer experience!