Where Is php.ini in WordPress? (& How to Edit This File)

Are you wondering where the php.ini file is located on your website?

Php.ini is a critical file in your WordPress installation. You’ll often need to edit it for better functionality and performance of your website. However, many website owners don’t know where it is located.

In this article, we’ll show you where is php.ini in WordPress and how to edit this file.

Where is php.ini in WordPress and how to edit it

To help you navigate the post, you can click the links below to jump to any section you’re interested in.

What is php.ini file in WordPress?

The php.ini file is a default configuration file for PHP on your WordPress site. PHP is a scripting and programming language on which WordPress is written.

It’s used on the server side of things, which means it runs on your web hosting server. Through PHP, WordPress is able to display your blog posts, products, media content, and more.

The php.ini file configures how PHP works and can have a huge impact on your website’s functionality. Whenever PHP runs on your site, it will look for this file.

That said, let’s see why and when you’ll need to edit the file on your website.

Why Do You Need to Edit php.ini File in WordPress?

The php.ini file is very important for your site’s performance and functionality. This means you can edit it to ensure your website works smoothly or resolve any errors.

For instance, editing the php.ini file allows you to increase the maximum file upload size and resource limits.

If you have a photography website or a site that requires a lot of videos and images, then you might encounter an error ‘uploaded file exceeds the upload_max_filesize’ message.

Increasing the upload size in the php.ini file will help resolve this error and allow you to easily upload larger media files. Plus, you can also increase the available memory to accommodate long blog posts with lots of images.

Check current file upload size limit

Similarly, the php.ini file lets you edit the file timeout settings. If a file takes longer to process, then your site can timeout and stop processing the request. To prevent this from happening, you can increase the number of seconds before timeout through the php.ini file.

Lastly, you’ll also be able to enable or disable file extensions in PHP by editing the file. This is really useful if you see a ‘Your PHP installation appears to be missing the MySQL extension’ error on your site. It helps fix this error and resolve issues when establishing a database connection.

Now, let’s look at where the php.ini file is located in WordPress.

Finding the php.ini File Location in WordPress

There are several ways you can locate and view the php.ini file.

You can use your hosting service’s cPanel, a plugin, or an FTP client to access your website files and folders.

1. Use cPanel to Locate the php.ini File

You can use the cPanel provided by your WordPress hosting provider and access the File Manager to locate the file. This method is pretty straightforward, and you don’t need to edit any code.

For this tutorial, we will use Bluehost to access the cPanel. If you’re using another hosting service, then the steps may vary.

First, you’ll need to log in to your Bluehost account. From here, simply click the ‘Advanced’ option in the left panel.

Open advanced settings in Bluehost

On the next screen, you’ll see the cPanel of your website.

Simply scroll down to the Files section and click the File Manager option.

Open file manager in cpanel

After that, you’ll see all the folders and files of your WordPress website.

From the left panel, you can navigate to the ‘public_html’ folder. Next, you should see files in the folder on your right. You can scroll down and locate the ‘php.ini’ file.

Locate php.ini file

To download the file for editing, you can simply right-click the php.ini file and save it on your computer.

2. Locate the php.ini File using a File Manager Plugin

Another way of finding out where is the php.ini file in WordPress is by using a plugin like WP File Manager.

It is a free WordPress plugin that lets you edit, download, delete, and organize your files and folders directly from the WordPress dashboard. You don’t have to use an FTP client or cPanel to access your site’s files.

First, you’ll need to install and activate the WP File Manager plugin. If you need help, then please see our guide on how to install a WordPress plugin.

Upon activation, you can head to WP File Manager from your WordPress admin panel.

Next, you’ll need to select the ‘public_html’ folder from the panel on the left. After that, you can scroll down and navigate to the ‘php.ini’ file.

View php.ini file in file manager plugin

Once you’ve located the file, simply right-click to download it onto your computer.

3. Finding php.ini Path in WordPress using the phpinfo.php File

You can also find the php.ini file by creating a phpinfo.php file and placing it in the root directory of your WordPress installation.

This is a slightly advanced method and is recommended for people who know how to use an FTP client and access the root directory of a website.

First, you’ll need to create a new text editor file. You can use Notepad, Bracket, Sublime Text, or any similar software to create one. In the file, ensure that you enter the following code:

<?PHP phpinfo(); ?>

Next, you’ll need to save the file and name it phpinfo.php. You can use any other name, but make sure that there is ‘.php’ at the end.

After that, you will need to use an FTP client to access the root directory of your website and upload the file. Simply drag the phpinfo.php file from the left panel and drop it into your site’s root directory.

Upload php info file

If you need help, then please see our guide on how to use FTP to upload files to WordPress.

Next, you will need to enter the following web address in your browser:

www.example.com/phpinfo.php

Just make sure that you replace the ‘example.com’ with your domain name.

From here, you’ll see details about PHP installation on your site and the path for locating the php.ini file.

View php installation details

To find the path of the file, you can look for the ‘Configuration File Path’ or ‘Loaded Configuration File’ fields.

You’ll see the path for the php.ini file in either one of the fields.

View path of php ini file

Once you know the path, you can access your site’s files using an FTP client.

From there, simply go to the path you just discovered and download the php.ini file.

Access path of php ini file and download it

Editing the php.ini File in WordPress

Now that you know the location of the php.ini file, the next step is to download and edit it.

Go ahead and open the file in Notepad or any other text editor.

Edit php ini file

Next, you can edit the file to improve your site’s performance. Here are a few common configurations you can make in the php.ini file:

  • max_execution_time – This is the time needed to run commands and execute scripts. You can increase the default time of 60 to a higher number if you’re uploading large files to the server.
  • memory_limit – It relates to the memory needed to upload files and execute commands. Editing the memory limit will help you accommodate long content and lots of images. By default, it is set to 256M, but you can increase the memory limit.
  • upload_max_filesize – Editing this option allows you to upload large media files and increase the limit.
  • post_max_size – If your blog posts contain a lot of images and videos, then the size of the post will increase. To avoid any errors, you can increase the post_max_size to accommodate more extensive articles.

Once you’ve made these changes to the php.ini file, you can simply upload it back to your server in the same location using the cPanel, an FTP client, or the file manager plugin.

We hope this article helped you learn where is php.ini in WordPress and how to edit it. You may also want to see our guide on the most common WordPress errors and the best WordPress plugins.

If you liked this article, then please subscribe to our YouTube Channel for WordPress video tutorials. You can also find us on Twitter and Facebook.

The post Where Is php.ini in WordPress? (& How to Edit This File) first appeared on WPBeginner.

How to Backup Your WordPress Site (4 Easy Ways)

Are you looking for ways to backup your WordPress site?

Creating a backup is a great way to safeguard your website data from security threats and human errors. You can easily restore a saved version of your site in case anything goes wrong.

In this article, we’ll show you how to backup your WordPress site.

How to backup your WordPress site

Why Backup Your WordPress Website?

As a WordPress website owner, you need to protect your data from unexpected events. Creating a website backup is one of the ways to protect your crucial data.

There are many security threats that can compromise your site and lead to data loss. For example, hackers, malware, and phishing attacks can leave your site’s data vulnerable.

Similarly, human errors, conflicts between WordPress plugins, themes, or server failures can break your site. If you’re unable to troubleshoot the issue, then it can be very difficult to recover your website.

A WordPress backup saves a copy of your site’s important files, folders, and databases. This includes your content, plugins, themes, images, videos, settings, and other information. You can easily use the backup to restore your website in case you get locked out of your website due to an error or cyberattack.

Do note that WordPress doesn’t offer a built-in option to automatically back up your WordPress site on a regular basis. You’d have to manually back up your site using the hosting service’s cPanel or an FTP client.

An easier way is to use a plugin, as you’ll have more control over which content to save. Plus, it is a beginner-friendly method, as accessing the cPanel or FTP client can be overwhelming for new users.

That said, let’s see how you can create a WordPress backup using different methods. You can click the links to jump ahead to your preferred method:

Method 1: Backup a WordPress Site Using a Plugin (Recommended)

The easiest way to create backups is by using a plugin like Duplicator. It is the best WordPress backup plugin that’s used by over 1,500,000 professionals. Duplicator is beginner friendly plugin that makes it very easy to back up, migrate, and clone your website.

For this tutorial, we’ll be using the Duplicator Pro plugin because it includes more features like scheduled backups, recovery points, cloud storage integration, migration tool, and more. There is also a free version of Duplicator you can use to get started.

First, you’ll need to install and activate the Duplicator Pro plugin. If you need help, then please see our guide on how to install a WordPress plugin.

Upon activation, you can go to Duplicator Pro » Settings from your WordPress admin panel and switch to the ‘Licensing’ tab. Go ahead and enter the license key, which you can find in the account area.

Enter your Duplicator license

Next, you’ll need to head to the Duplicator Pro » Packages page from the WordPress dashboard.

From here, simply click the ‘Create New’ button in the top corner.

Create a new package in Duplicator

On the next screen, you will need to enter a name for your backup.

This will help you find the package when you’d need to restore a website.

Enter name for backup package

Under the Storage section, you can add another storage location for your package. The plugin will use the default location to save your backup files.

For this tutorial, we will use the default location. However, you can click the ‘Add Storage’ link and add a new location like Dropbox or Google Drive.

You can now scroll down to the Archive section to customize your backup. For instance, the plugin lets you only backup the database, filter files, folders and extensions, and more.

Archive settings for backup

If you want a complete backup of your site, then we recommend keeping the default settings and don’t select anything under the Archive section.

Next, you can scroll down to the Installer section. These are optional settings that are filled in at the time of installing the backup.

You can simply click the ‘Next’ button and leave this section as it is.

Installer settings

The plugin will now perform a scan and make sure everything is in order to create a backup of your site.

It will show a ‘Good’ evaluation if everything checks out or show a warning so you can quickly fix the issue before backing up the website.

Next, you can click the ‘Build’ button at the bottom.

View scan of your package

Duplicator will now start building a package.

Once it’s done, you can go to Duplicator Pro » Packages from your dashboard to view the backup.

Download your package file

Go ahead and click the ‘Download’ option and then select the ‘Both Files’ option.

This will download the zip file and the installer file onto your computer. You can then use these files as backup and easily restore your site in case of a cyberattack or a critical error.

Create a Recovery Point to Restore Your Website

Another advantage of using Duplicator is that it lets you set up a recovery point for your website. Recovery points help restore your backup if there is a massive website failure. This way, you can easily return to the last functioning version of your website.

To start, you can go to Duplicator Pro » Packages from your WordPress admin panel and click the arrow in the corner to expand the package details.

Create a recovery point

After that, simply click the ‘Recovery Point’ option.

A new window will now open. Go ahead and click the ‘Set Recovery Point’ option.

Click set to recovery point option

Next, you will need to click the recovery arrow icon to copy the recovery URL.

You can save this URL in a secure location and use it to easily restore your site in case of a failure or security vulnerability.

Copy the recovery URL

All you have to do is enter the recovery URL in the browser. This will automatically launch the recovery wizard. You can then follow the steps to restore your site from the backup.

Automatically Scheduling WordPress Website Backups

With Duplicator Pro, you can also automatically schedule backups for your website. This way, you will always have the latest website backup to work with. Plus, it helps save time as you don’t have to manually create a backup.

To start, you’ll need to go to Duplicator Pro » Schedules from the WordPress dashboard and click the ‘Add New’ button.

Create a backup schedule

After that, you can enter a name for your backup schedule.

The plugin will also let you select a package template, where you get to customize your backup and choose which files to back up. If you want a full backup, then we recommend leaving the package template setting to default.

Add a name for schedule and template

Next, you can scroll down and select the storage location for your scheduled backups. The plugin will use the default location, but you can add another location, like Dropbox, OneDrive, or Google Drive.

There is also an option to select the frequency of backups. For instance, you can set up automatic backups on an hourly, daily, weekly, or monthly basis. We’ve set the backup repeats to weekly for this tutorial.

Choose storage location and backup time

After that, you can select a start time for your backup.

You’ll also need to ensure that the ‘Enable This Schedule’ checkbox is selected.

Select a time and enable the schedule backup
Once that’s done, simply click the ‘Save Schedule’ button.

Duplicator will now automatically back up your WordPress site on the set day and time. This way, you’ll have a fresh backup to restore if anything goes wrong.

Method 2: Manually Backup a WordPress Site Using cPanel

You can also manually back up your WordPress website by using the cPanel of your WordPress hosting service.

For this tutorial, we will be using Bluehost. Do note that the settings may vary depending on the hosting service you’re using.

First, you’ll need to log in to the cPanel of your hosting provider. From here, go the the ‘Advanced’ tab from the menu on your left and then click the File Manager option under the Files section.

Open file manager in Bluehost

In a new tab or window, the file manager will now open.

Next, you need to select the public_html folder from the menu on the left and click the ‘+’ button to expand it.

Go to public_html folder

From here, simply select the folder with your website name and click the ‘Compress’ option at the top.

A new window will now pop up. Go ahead and select the ‘ Zip Archive’ option and click the ‘Compress Files’ button.

Select zip archive and compress

Your website files now start to compress into a zip file.

The hosting service will also show a compression result. You can simply click the ‘Close’ button.

Close the compression results

Next, you’ll need to select the zip file that you just created. It will be located in the public_html folder.

After selecting the file, simply click the ‘Download’ option at the top.

Download the compression file

Next, you can save the compression file in a secure location.

Now whenever your site goes down due to an error or security issues, you can use the compressed file as a backup and easily restore your content.

Method 3: Manually Backup WordPress Databases

Using your WordPress hosting services’ cPanel, you can also back up different WordPress databases. However, this is a time-consuming process because you’ll need to import multiple tables manually.

First, you will need to log in to the cPanel of your hosting service. We will be using Bluehost for this tutorial.

Next, head to the ‘Advanced’ tab from the menu on your left and scroll down to the Databases section. From here, simply click the ‘phpMyAdmin’ option.

Launch phpMyAdmin From Your Control Panel

Once the phpMyAdmin opens, you can select a database from the menu on your left.

After that, simply select the tables you’d like to backup and click the Export button at the top.

Export database tables

On the next screen, you can keep the ‘Export method’ as Quick. For the ‘Format’, you’d want to select SQL.

Once that’s done, go ahead and click the ‘Go’ button.

Export database as SQL

You can now save the SQL file on your computer in a secure location as a backup.

To restore a database, you’ll just need to import the SQL file into the phpMyAdmin panel.

Method 4: Manually Backup a WordPress Site Using FTP

If you don’t want to use a backup plugin or access the cPanel, then you can back up a WordPress site using an FTP client.

There are many FTP clients you can use for Mac and Windows. For this tutorial, we will use FileZilla.

First, you’ll need to connect to your site using the FTP software. You can see our guide on what is FTP and how to use it for more details.

Once you’re connected, simply head to the root directory of your website from the panel on your right. This is where you’ll find folders like wp-content, wp-admin, and other important files like wp-config and .htaccess.

View the root directory in FTP

Next, you can right-click any folder or file you want to backup

After that, simply click the ‘Download’ option.

Downloading the WordPress .htaccess file

You can save the files and folders from a live website to your local host or computer as backups.

This way, you can easily recover your website by uploading the saved files using the FTP client.

Restoring a WordPress Site from Backup

Now that you’ve created a WordPress site backup, the next step is to restore it in case you encounter a critical error, or your site is compromised.

First, you’ll need to clean your site and delete all the WordPress files. You can do that by connecting an FTP client and removing all the folders and files. After that, you will need to install WordPress again and log in to your site.

Next, you’re now ready to restore your WordPress backups.

If you’re using the Duplicator Pro plugin, then it is very easy to upload the backup package. Simply head to Duplicator Pro » Import from your WordPress dashboard and drag and drop the package file.

Import backup package

From here, simply follow the steps in the import wizard to recover your website. You can see our step-by-step guide on how to restore WordPress from a backup to learn more.

We hope this article helped you learn how to back up your WordPress site. You may also want to see our guide on WordPress security and the most common WordPress errors and how to fix them.

If you liked this article, then please subscribe to our YouTube Channel for WordPress video tutorials. You can also find us on Twitter and Facebook.

The post How to Backup Your WordPress Site (4 Easy Ways) first appeared on WPBeginner.

How to Move WordPress From Local Server to Live Site (2 Methods)

One way to speed up your website development is to build your website locally on your own computer using a software like WAMP (for Windows) or MAMP (for Mac).

Once you’re finished perfecting your website, the next step is to move it from your computer to a live site and share your creation with the world. In this article, we will show you how to easily move WordPress from local server to a live site.

Move WordPress From Local Server to Live Site

We will cover two different methods to move WordPress from local server to your live website (step by step).

The first method uses a WordPress migration plugin and is recommended for beginners. In the second method, we will show you how to manually move WordPress from local server to a live site.

You can choose the method that best suits you:

Before You Begin

In order for you to migrate WordPress from localhost to live server, you need to have a few things in place.

First, we’re assuming that you have a WordPress site running on local server (also called localhost) on your computer, and you have full access to it.

Next, you’ll need to have a domain name and web hosting. We have a list of the best WordPress hosting companies that you can choose from.

To speed it up, you can use Bluehost. They’re an official WordPress recommended hosting provider, and they are offering our users an exclusive 60% off discount + a free domain.

If you need help setting up your website, follow our step by step guide on how to make a website.

Finally, you will need to have a FTP program and know how to use FTP, so you can upload your content to the live site.

Ready? Let’s begin migrating your WordPress site.

Method 1. Transfer WordPress from Local Server to Live Site Using a Migration Plugin

This method is easier and recommended for beginners. We’ll be using a WordPress migration plugin to move WordPress from localhost to a live site.

Step 1. Install and Setup Duplicator Plugin

First, thing you need to do is install and activate the Duplicator plugin on your local site. For more details, see our step by step guide on how to install a WordPress plugin.

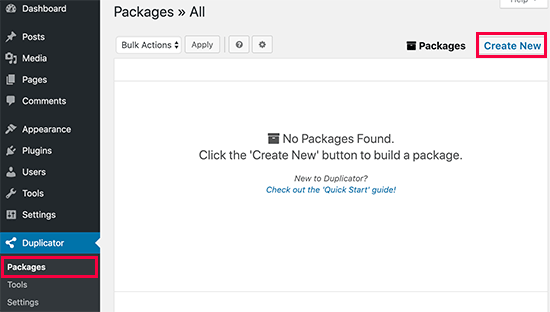
Upon activation, you need to go to Duplicator » Packages page and click on the ‘Create New’ button.

Creating a new Duplicator package

After that, click on the next button to continue.

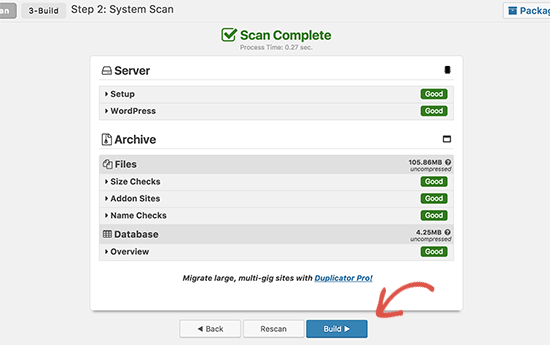
Duplicator will now run some tests to see if everything is in order. If all items are marked ‘Good’ then click on the ‘Build’ button.
Build package

This process may take a few minutes depending on the size of your website. You need to leave this tab open until the process is complete.

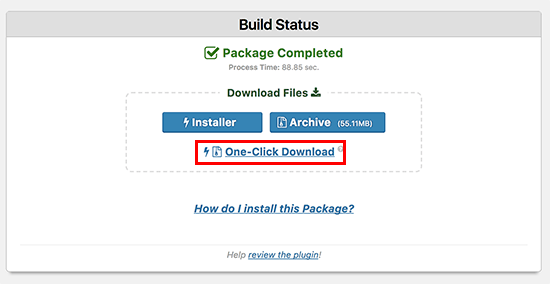
Once finished, you’ll see download options for Installer and the Archive package. You need to click on the ‘One click download’ link to download both files to your computer.
Download package

So what are these files?

Well, the archive file is a copy of your complete WordPress website. It includes all WordPress core files as well as your images, uploads, themes, plugins, and a backup of your WordPress database.
The installer file is a script that will automate the migration by unpacking the archive file.

Step 2. Create a Database for Your Live Site

Before you can run the installer or upload the WordPress website from localhost to your hosting server, you will need to create a MySQL database for your live website.

If you have already created a MySQL database, then you can skip this step.

To create a database you need to visit your hosting account’s cPanel dashboard. Scroll down to the Databases section and then click on the MySQL Databases icon.

Database icon in cPanel

On the next screen, you’ll see a field to create a new database. Simply provide a name for your database and click on the ‘Create Database’ button.

Create new database

cPanel will now create a new database for you. After that, you need to scroll down to the MySQL Users section.

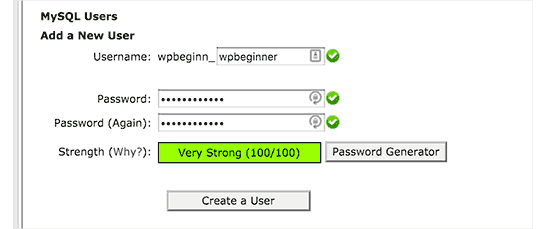
Next, provide a username and password for your new user and click on the ‘Create a user’ button.

Add a MySQL user

The new user you just created, still does not have permission to work on the database. Let’s change that.

Scroll down to the ‘Add User to Database’ section. Simply select the database user you created from the dropdown menu next to the ‘User’ field, then select the database, and click on the add button.

Save user to the database

Your database is now ready to be used with your WordPress site. Make sure to note down the database name, username, and password. You’ll need this information in the next step.

Step 3. Upload Files from Local Server to Live Site

Now you need to upload the archive and installer files from your local site to your hosting account.

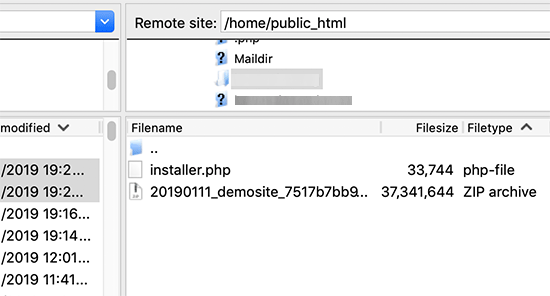
First, connect to your live site using an FTP client. Once connected, make sure that the root directory of your website is completely empty.

Normally, root directory is the /home/public_html/ folder.

Some WordPress hosting companies automatically install WordPress when you sign up. If you have WordPress files there, then you need to delete them.

After that, you can upload the archive and installer files from Duplicator to your empty root directory.

Migration files in the root directory

Step 4. Runing The Migration Script

After you have uploaded the migration files, you need to visit the following URL in your browser:

http://example.com/installer.php

Don’t forget to replace example.com with your own domain name.

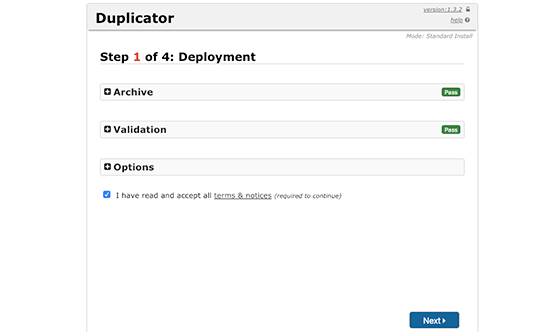
This will launch the Duplicator migration wizard.

Duplicator intialized

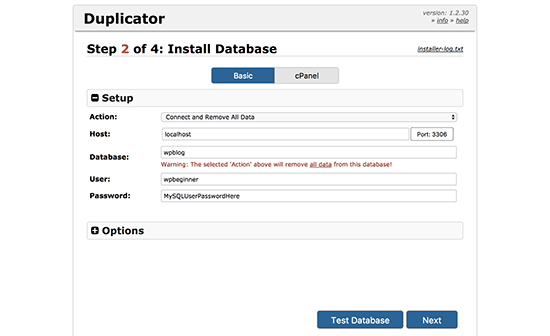
The installer will automatically scan for the archive file and run a validation test. You need to check the terms & conditions checkbox and continue by clicking on the Next button.

On the next screen, it will ask you to enter your WordPress database information.

Your host will likely be localhost. After that, you will enter the details of the database you created in the earlier step.

Connect your database

Click on the next button to continue.

Duplicator will now import your WordPress database backup from the archive into your new database.

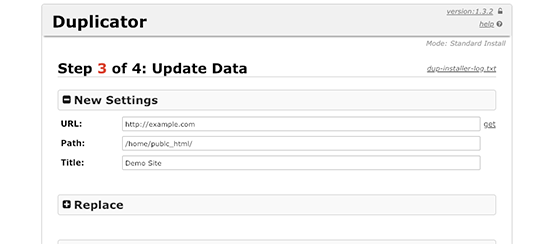
Next, it will ask you to update site URL or Path. You shouldn’t have to change anything since it automatically detects the URL of your live website, and its path.

Update site URL

Click on the next button to continue.

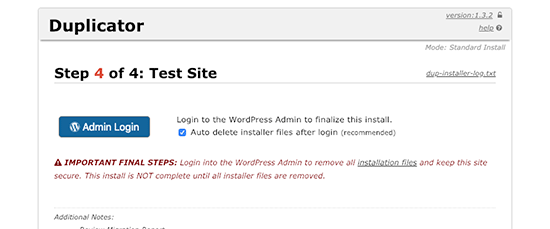
Duplicator will now finish the migration and will show you a success screen. You can now click on the ‘Admin Login’ button to enter the WordPress admin area of your live site.

Successfully moved

Once you login to your live site, Duplicator will automatically clean up the installation files.

That’s all, you have successfully moved WordPress from local server to your live site.

Method 2. Manually Transfer WordPress from Local Server to Live Site

In this method, we will show you how to manually move WordPress from local server to your live site. It will come in handy if the first method doesn’t work or you prefer to do it manually.

Step 1: Export Local WordPress Database

The first thing you need to do is export your local WordPress database. We’ll be using phpMyAdmin to do that. If you are unfamiliar with it, then you might want to take a look at our guide to WordPress database management using phpMyAdmin.

Simply go to http://localhost/phpmyadmin/ and click on your WordPress database. Next, click on the Export button from the top menu bar.

Export from localhost

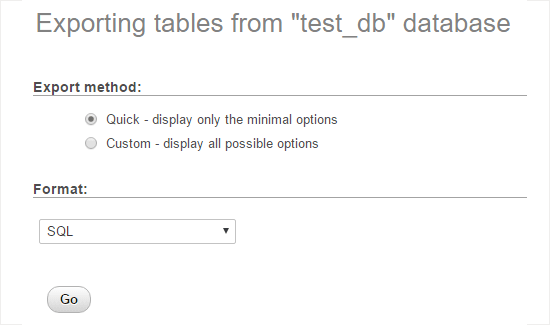
In the Export Method option, you can choose “Quick” or “Custom”. Custom will provide you with more options to export your database.

We recommend choosing Quick, and then click the Go button to download your database.

Export WordPress database using phpMyAdmin

Step 2: Upload WordPress Files to Live Site

Now we’ll need to move all your website files to the live site.

To get started, go ahead and open your FTP client and connect to your web hosting account.

Once you’re connected to your live site, make sure you upload the files in the right directory. For example, if you want the site to be hosted on yoursite.com, then you would want to upload all the files in your public_html directory.

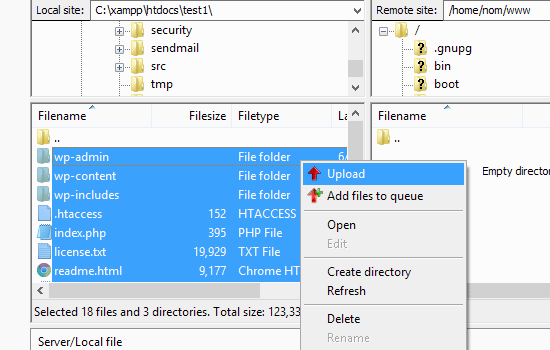
Now select your local WordPress files and upload them to your live server.

Uploading WordPress from localhost to live site

Step 3: Create MySQL Database on Live Site

While your FTP client is uploading your WordPress files, you can start importing your database to the live server. Most WordPress hosting providers offer cPanel to manage your hosting account, so we’ll show you how to create a database using cPanel.

First, you need to log in to your cPanel dashboard and click on the MySQL Databases icon which can be found in the databases section.

Database section in cpanel

On the next screen, create a database by entering a name for your database and clicking the Create Database button.

New database

After creating your database, scroll down to the MySQL Users section and create or add an existing user to the database.

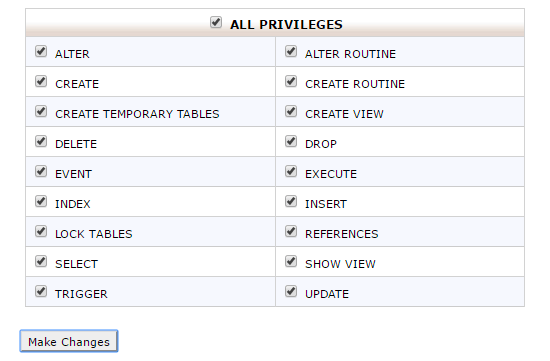
After adding the user, cPanel will take you to set MySQL privileges for that user. Simply grant all privileges to the user by making sure every box is checked, and then click the Make Changes button.

grant all privileges to database user

Step 4: Import WordPress Database on Live Site

The next step in the process is to import your WordPress database.

Go to your cPanel dashboard, scroll down to the databases section and click on phpMyAdmin.

This will take you to phpMyAdmin where you want to click on the database you created in Step 3. PhpMyAdmin will show your new database with no tables.

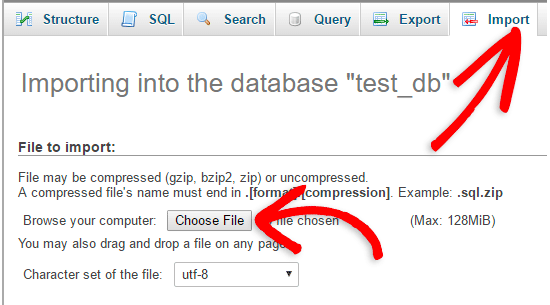
Click on the Import tab in the top menu. On the import page, click on Choose File button and then select the database file you saved in Step 1.

Lastly, press the Go button at the bottom of the page. PhpMyadmin will now import your WordPress database.

Import database via phpMyAdmin

Step 5: Change the Site URL

Now you need to change the site URL in your database, so that it will connect with your live WordPress site.

In phpMyAdmin, look for the wp_options table in your database that we just imported in step 4. If you changed your database prefix, then instead of wp_options it might be {prefix}_options.

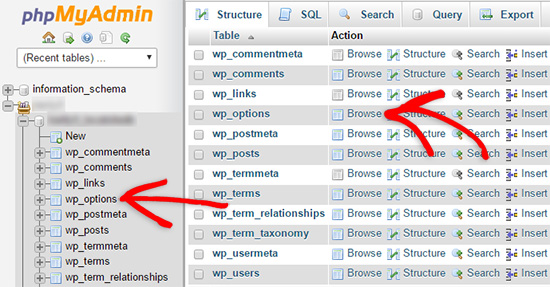
Click on the Browse button next to wp_options or the link that you see in the sidebar to open the page with a list of fields within the wp_options table. See screenshot below:

Browse the wp options table

Under the field options_name, you need to look for siteurl. Click the Edit Field icon which can be found at the far left at the beginning of the row.

Edit siteurl in phpMyAdmin

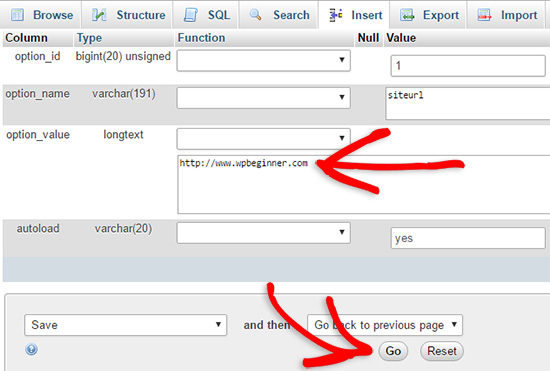
When you click the edit field, an edit field window will appear. In the input box for option_value, you will see the URL of your local install probably something like: http://localhost/test. Carefully insert your new site url in this field, for example: https://www.wpbeginner.com

Save the field by clicking the Go button.

edit the siteurl field

Next, you need to replicate this step for the option name: home. The wp_options page can be a few pages long, so simply find the home tab.

Usually it is on the second page which you can navigate to by clicking on the pagination arrows in phpMyAdmin.

Update the home url to be the same as your siteurl.

Step 6: Setup Your Live Site

Now that we have imported the database and all of our content should be uploaded, it’s time to configure WordPress.

At this time, your site should be showing an Error Establishing Database Connection error.

To fix this, connect to your website using an FTP client and edit wp-config.php file.

You will need to provide the database name, user and password you created earlier in Step 3.

Next, save the wp-config.php file and upload it back to your server.

You can now visit your website, and it should be live now.

Next, you need to login to your WordPress admin panel and go to Settings » General. Without changing anything, scroll to the bottom and click the Save Changes button.

This will ensure that the site URL is corrected anywhere else that it needs to be.

After that go to Settings » Permalink and click Save Changes to ensure that all post links are working fine.

Step 7: Fix Images and Broken Links by Updating Paths

Whenever you are moving a WordPress site from one domain to another, or from local server to a live site, you’ll face broken links and missing images.

You can either use the SQL query or use the Velvet Blues WordPress plugin.

For those who want to do it via SQL, here is a simple SQL query that should solve this problem:

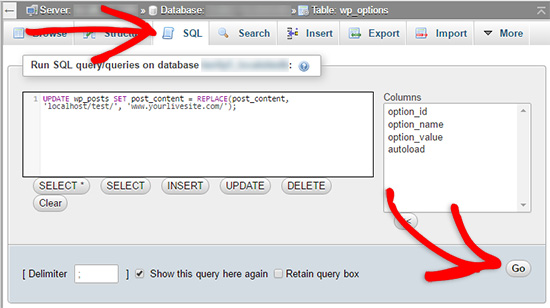
UPDATE wp_posts SET post_content = REPLACE(post_content, 'localhost/test/', 'www.yourlivesite.com/');

Simply go to phpMyAdmin, click on your database and then click on SQL from top menu. Write this query, but don’t forget to change it with your own local site and live site URLs.

Fixing WordPress images and broken URLs after moving to live site

That’s all, you have successfully migrated WordPress from localserver to a live site!

Hopefully now your live website is up and running smoothly. Be sure to check out your website to make sure that everything is working as expected. If you notice any errors, you can check out our guide to common WordPress errors for help troubleshooting.

If you liked this article, then please subscribe to our YouTube Channel for WordPress video tutorials. You can also find us on Twitter and Facebook.

The post How to Move WordPress From Local Server to Live Site (2 Methods) appeared first on WPBeginner.