How to Display WordPress Form Entries on Your Site

Do you want to show your WordPress form entries on the front end of your site?

Displaying form entries on the front end allows you to show important information to your visitors. You can use it to show positive reviews, create directories, display event calendars, and more.

In this article, we’ll show you how to display WordPress form entries on your site.

How to Display WordPress form entries on your site

Why Display WordPress Form Entries on the Frontend?

Forms are great for keeping in touch with your visitors, getting feedback and suggestions, helping users resolve their issues, and more. Displaying form entries on your WordPress website for your visitors can be helpful in certain situations.

For example, you can display testimonials and product reviews that users submit through an online form. This way, you can leverage social proof to build brand trust and boost conversions.

You can also display form entries to create a business directory, display user-submitted events on a calendar, display statistics, and show other important information collected through online forms on your website.

However, by default, when users submit a form on your WordPress website, their entries are kept private. Only the WordPress admin and other users who have permission can view the form entries.

Let’s see how you can show form entries on the front end of your WordPress website using Formidable Forms and WPForms. You can click the links below to jump ahead to your preferred section.

Displaying WordPress Form Entries by Using Formidable Forms

The easiest way of showing form entries in WordPress is using Formidable Forms. It is a popular WordPress contact form plugin and offers an all-in-one form builder with lots of features for customization.

You can create all kinds of forms like surveys, quizzes, payment forms, and advanced forms like event calendars, directories, and calculators.

First, you’ll need to install and activate the Formidable Forms plugin on your site. If you need help, then please see our guide on how to install a WordPress plugin.

For this tutorial, we’ll be using the Formidable Forms Pro version because it includes the Visual Views addon.

Upon activation, you can go to Formidable » Forms and click the ‘+ Add New’ button at the top.

Add a new form

After that, a popup will appear that will ask you to select a form type, like a contact us form, user registration form, survey, and more.

Go ahead and select your preferred form type. For the sake of this tutorial, we’ll create a contact form to collect testimonials from users.

Select your form type

Next, you’ll need to enter a form name and description.

When you’re done, simply click the ‘Create’ button.

Enter form name and description

Now you can use the form builder to customize your form.

Formidable offers a drag and drop builder which is super easy to use. Simply select any form field you would like to add to your form from the options on your left and place them in the form template.

Build your form

After customizing your contact form, go ahead and embed it anywhere on your website.

The plugin offers multiple options to add your form. The easiest way is to click the ‘Embed’ button in the form builder at the top and then select an existing page or create a new page to add your form.

Embed your form in a new page

Alternatively, you can also use a Formidable Forms block or a shortcode block in the WordPress content editor to embed your forms.

Next, you can give a name to your page and preview it.

When you’re satisfied with its appearance, go ahead and publish your page.

Preview and publish your form

After your form is live, and you start to get entries, then you’ll need to install and activate the Visual Views addon in Formidable Forms.

To do that, simply go to Formidable » Add-Ons from your WordPress dashboard. Next, scroll down to the ‘Visual Views’ addon and click the ‘Install’ button.

Install visual views addon

Once the addon is active, you can go to Formidable » Views from your WordPress dashboard.

After that, simply click the ‘+ Add New’ button at the top.

Add a new view

Next, a popup window will appear where you’ll need to select a view type. The plugin offers a grid, table, calendar, and classic view that you can use.

For this tutorial, we’ll use the ‘Grid’ view to show form entries.

Select a view type

After that, you will have to select a data source for your view.

Go ahead and click on the ‘Use Entries from Form’ dropdown menu and select your form. There’s also an option to enter a view name.

After selecting your data source, simply click the ‘Create a view’ button.

Select data source

This will launch the view builder in Formidable Forms.

To get started, go ahead and click the ‘Layout Builder’ button.

Select a layout builder

Next, you’ll need to select a layout to display your form entries.

Simply choose a layout from the given options at the top. You can add multiple layouts to show form entries.

Build your layout

After selecting a layout, go ahead and click the ‘Save layout’ button.

Next, you can add content to the view builder by clicking the ‘+’ button. There are options to customize the layout of the form entries and add content before and after the form entries.

The plugin also gives options to change the typography, background color, border, and more under the Grid Style Settings panel on your left.

You’ll also see a shortcode under the View Name field, which you’ll need when showing form entries on your site.

Add content to the view

There are more advanced options in the Grid Style Settings panel. In the advanced settings, you can limit the number of entries, page size, and more.

When you’ve customized the view, don’t forget to click the ‘Update’ button at the top.

Next, you’ll need to display your form entries on your WordPress website. To do that, copy the shortcode given under the View Name.

The shortcode will look like this:

[display-frm-data id=2410]

After that, go to any post or page where you’d like to display form entries. Once you’re in the content editor, simply add a ‘Shortcode’ block.

Select shortcode block

Now, enter the shortcode you copied earlier in the shortcode block.

After that, you can preview the page and publish it.

Enter the shortcode

You can now visit your website to see the form entries in action.

Here’s what they look like on our demo website:

Form entries preview

Displaying WordPress Form Entries by Using WPForms

Another way of displaying form entries on the front end of your WordPress website is through WPForms. However, this method requires editing code and is recommended for advanced users who have knowledge about coding.

WPForms is the best contact form plugin for WordPress and lets you create different types of forms using a drag and drop form builder.

Just note that if you want to see your form entries in the WordPress dashboard, then you’ll need the WPForms Pro version. There is also a WPForms Lite version that you can use for free, which sends email notifications of all your form entries.

First, you’ll need to install and activate the WPForms plugin. For more details, please see our guide on how to install a WordPress plugin.

Next, you will need to create an online form using WPForms. You can check out our step-by-step guide on how to create a contact form in WordPress.

Once you start to get form entries, you’ll need to enter the following code into your theme’s functions.php file or in a site-specific plugin. Please see our guide on how to easily add custom code in WordPress for more information.

/**
 * Custom shortcode to display WPForms form entries in table view.
 *
 * Basic usage: [wpforms_entries_table id="FORMID"].
 * 
 * Possible shortcode attributes:
 * id (required)  Form ID of which to show entries.
 * user           User ID, or "current" to default to current logged in user.
 * fields         Comma separated list of form field IDs.
 * number         Number of entries to show, defaults to 30.
 * 
 * @link https://wpforms.com/developers/how-to-display-form-entries/
 *
 * Realtime counts could be delayed due to any caching setup on the site
 *
 * @param array $atts Shortcode attributes.
 * 
 * @return string
 */
 
function wpf_entries_table( $atts ) {
 
    // Pull ID shortcode attributes.
    $atts = shortcode_atts(
        [
            'id'     => '',
            'user'   => '',
            'fields' => '',
            'number' => '',
                        'type' => 'all' // all, unread, read, or starred.
        ],
        $atts
    );
 
    // Check for an ID attribute (required) and that WPForms is in fact
    // installed and activated.
    if ( empty( $atts['id'] ) || ! function_exists( 'wpforms' ) ) {
        return;
    }
 
    // Get the form, from the ID provided in the shortcode.
    $form = wpforms()->form->get( absint( $atts['id'] ) );
 
    // If the form doesn't exists, abort.
    if ( empty( $form ) ) {
        return;
    }
 
    // Pull and format the form data out of the form object.
    $form_data = ! empty( $form->post_content ) ? wpforms_decode( $form->post_content ) : '';
 
    // Check to see if we are showing all allowed fields, or only specific ones.
    $form_field_ids = isset( $atts['fields'] ) && $atts['fields'] !== '' ? explode( ',', str_replace( ' ', '', $atts['fields'] ) ) : [];
 
    // Setup the form fields.
    if ( empty( $form_field_ids ) ) {
        $form_fields = $form_data['fields'];
    } else {
        $form_fields = [];
        foreach ( $form_field_ids as $field_id ) {
            if ( isset( $form_data['fields'][ $field_id ] ) ) {
                $form_fields[ $field_id ] = $form_data['fields'][ $field_id ];
            }
        }
    }
 
    if ( empty( $form_fields ) ) {
        return;
    }
 
    // Here we define what the types of form fields we do NOT want to include,
    // instead they should be ignored entirely.
    $form_fields_disallow = apply_filters( 'wpforms_frontend_entries_table_disallow', [ 'divider', 'html', 'pagebreak', 'captcha' ] );
 
    // Loop through all form fields and remove any field types not allowed.
    foreach ( $form_fields as $field_id => $form_field ) {
        if ( in_array( $form_field['type'], $form_fields_disallow, true ) ) {
            unset( $form_fields[ $field_id ] );
        }
    }
 
    $entries_args = [
        'form_id' => absint( $atts['id'] ),
    ];
 
    // Narrow entries by user if user_id shortcode attribute was used.
    if ( ! empty( $atts['user'] ) ) {
        if ( $atts['user'] === 'current' && is_user_logged_in() ) {
            $entries_args['user_id'] = get_current_user_id();
        } else {
            $entries_args['user_id'] = absint( $atts['user'] );
        }
    }
 
    // Number of entries to show. If empty, defaults to 30.
    if ( ! empty( $atts['number'] ) ) {
        $entries_args['number'] = absint( $atts['number'] );
    }
 
// Filter the type of entries all, unread, read, or starred
    if ( $atts['type'] === 'unread' ) {
        $entries_args['viewed'] = '0';
    } elseif( $atts['type'] === 'read' ) {
        $entries_args['viewed'] = '1';
    } elseif ( $atts['type'] === 'starred' ) {
        $entries_args['starred'] = '1';
    }
 
    // Get all entries for the form, according to arguments defined.
    // There are many options available to query entries. To see more, check out
    // the get_entries() function inside class-entry.php (https://a.cl.ly/bLuGnkGx).
    $entries = wpforms()->entry->get_entries( $entries_args );
 
    if ( empty( $entries ) ) {
        return '<p>No entries found.</p>';
    }
 
    ob_start();
 
    echo '<table class="wpforms-frontend-entries">';
 
        echo '<thead><tr>';
 
            // Loop through the form data so we can output form field names in
            // the table header.
            foreach ( $form_fields as $form_field ) {
 
                // Output the form field name/label.
                echo '<th>';
                    echo esc_html( sanitize_text_field( $form_field['label'] ) );
                echo '</th>';
            }
 
        echo '</tr></thead>';
 
        echo '<tbody>';
 
            // Now, loop through all the form entries.
            foreach ( $entries as $entry ) {
 
                echo '<tr>';
 
                // Entry field values are in JSON, so we need to decode.
                $entry_fields = json_decode( $entry->fields, true );
 
                foreach ( $form_fields as $form_field ) {
 
                    echo '<td>';
 
                        foreach ( $entry_fields as $entry_field ) {
                            if ( absint( $entry_field['id'] ) === absint( $form_field['id'] ) ) {
                                echo apply_filters( 'wpforms_html_field_value', wp_strip_all_tags( $entry_field['value'] ), $entry_field, $form_data, 'entry-frontend-table' );
                                break;
                            }
                        }
 
                    echo '</td>';
                }
 
                echo '</tr>';
            }
 
        echo '</tbody>';
 
    echo '</table>';
 
    $output = ob_get_clean();
 
    return $output;
}
add_shortcode( 'wpforms_entries_table', 'wpf_entries_table' );

After adding the custom code to your website, you’ll need to enter the following shortcode to any page or post to show form entries.

[wpforms_entries_table id="FORMID"]

Just replace the FORMID with your form’s ID.

You can find the form ID by going to WPForms » All Forms and then looking at the Shortcode column.

Find WPForms form ID

To add a shortcode, simply create a new page or edit an existing one.

Next, go ahead and add a ‘Shortcode’ block.

Select shortcode block

After adding the block, simply enter your shortcode.

Now preview your WordPress page and click the ‘Publish’ button at the top.

Enter shortcode to show form entries

Here’s what the preview of our form entries looked like on the front-end:

Display WPForms Entries on Front End

You can further customize the display using custom CSS styles as needed.

We hope that this article helped you learn how to display WordPress form entries on your site. You may also want to see our guide on how to create a custom WordPress theme, or our expert comparison of the best live chat software for small business.

If you liked this article, then please subscribe to our YouTube Channel for WordPress video tutorials. You can also find us on Twitter and Facebook.

The post How to Display WordPress Form Entries on Your Site first appeared on WPBeginner.

What is a Paperless Business Form? (+ How to Make One)

Do you want to create digital forms for your business to reduce paper use?

Paperless business forms are digital forms that help save money and time. You can reach a larger audience with online forms and waste less paper.

In this article, we’ll show you what is a paperless business form and how to make it.

What is paperless business form

What are Paperless Business Forms?

A paperless business form is a digital form that your users can fill out on your WordPress website. Users can use their computers, smartphones, or tablets to fill out the form at anytime and from anywhere.

Business these days are ditching the use of paper forms and instead opting for digital forms. This helps them create a paperless environment.

Going paperless has many benefits:

  • Reach a Larger Audience: Digital forms can help you reach audiences from different locations. There are no geographic restrictions or delays in getting responses from people in different countries.
  • Easy to Access: People can access your paperless business form using any device and fill out the details from anywhere.
  • Get Instant Responses & Save Time: Paperless forms help you save time and you get to see instant responses. Unlike paper forms where you’d have to wait for responses to arrive by mail, digital forms make the process faster.
  • Cost Saving: Using digital forms also helps you save tons of money on paper, printing equipment, and mailing fees.
  • Good for the Environment: Going paperless has a positive impact on the environment. You can help conserve trees, prevent deforestation, and reduce waste.

Now, what are some of the ways you use paperless forms?

When Can You Use Paperless Forms for Your Business?

There are multiple ways you can turn your paper based forms into digital forms.

If you need to get in touch with your consumers, then you can create an online contact form and add it to your website. This way, you can get suggestions, feedback, and resolve your users’ queries.

Another way to use paperless business forms is by accepting job applications online. Instead of asking applicants to submit physical copies of their resumes, they can simply upload them using your digital form. It also helps in streamlining your hiring process and removes unnecessary paperwork.

If you’re running an online store, then you can create paperless order forms. Customers can fill out the details in the order form, place their orders, and pay online.

You can also create digital registration forms for an upcoming event like a webinar or conference.

That said, let’s look at how you can easily create a paperless digital form in WordPress.

Creating a Paperless Business Form in WordPress

The best way to add paperless forms business forms in WordPress is by using WPForms. It’s the best contact form plugin for WordPress and used by over 5 million professionals.

With WPForms, you get a drag and drop form builder that makes it super easy to customize your form. Plus, the plugin offers different templates so you can quickly get started and create all kinds of forms.

For this tutorial, let’s create a digital conference registration form. We’ll be using the WPForms Lite version because it’s 100% free. There is also WPForms Pro version that offers more customization options, templates, and powerful addons.

First, you’ll need to install and activate the WPForms plugin. If you need help, then please see our guide on how to install a WordPress plugin.

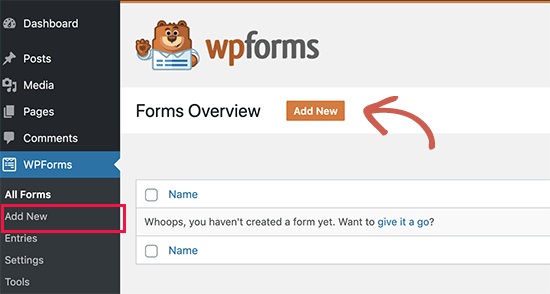
Upon activation, you can head over to WPForms from the WordPress admin panel and then click the ‘Add New’ button.

Add a new form

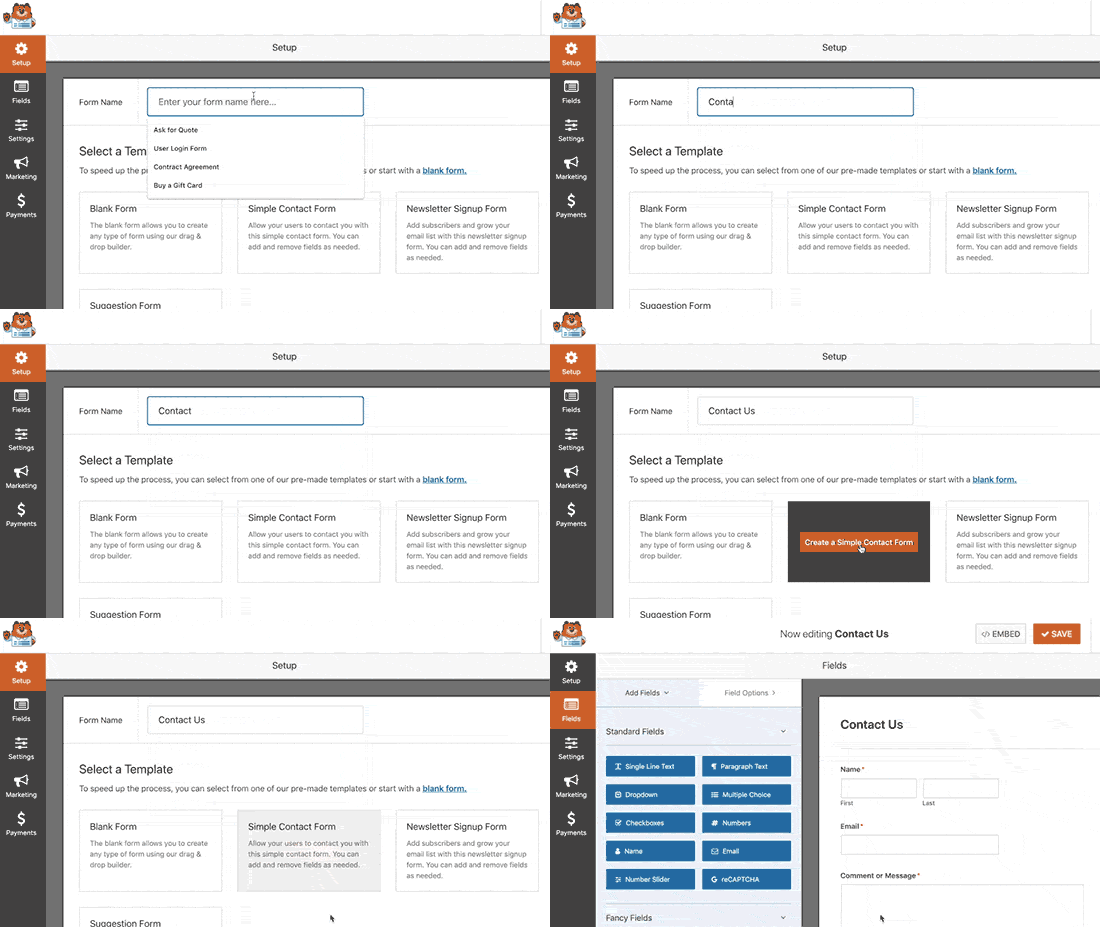
On the next screen, you’ll see the form builder.

To start, go ahead and enter a name for your form at the top.

Enter a name for your form

After that, scroll down and select the ‘Conference Registration Form’ template.

Simply hover over the template and click the ‘Use Template’ button.

Choose conference registration form template

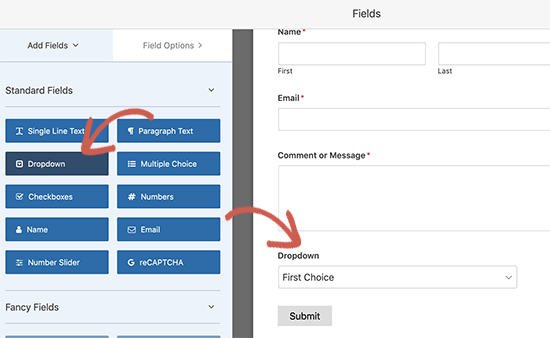
Next, you can customize your form using the drag and drop builder. WPForms offers different fields that you can add to your form.

Simply drag a field from the given options on your left and drop them where you’d like to add it to the form.

Add fields to your form

In the Lite version, you get can add line text, paragraph text, dropdown menu, multiple choice, checkboxes, and more.

However, if you require fancy fields like phone number, password, address, or a file upload option, then we recommend using the WPForms Pro version.

Besides that, you can further customize existing fields in the template. For example, if you click the ‘Name’ field, you’ll see more options in the menu on your left. For instance, you can edit the label, format, and more.

Edit each field in the form

Next, you can go to the ‘Settings’ tab from the menu.

Here, you can change the settings for your form. Under the General settings, you can edit the form name, add a description, change the submit button text, and more.

Change general settings

After that, you can go to the Notifications settings and edit the send to email address on which you’ll receive an email when someone submits a form.

There are also settings for changing the subject line, from name, from email, and more.

Edit email notifications

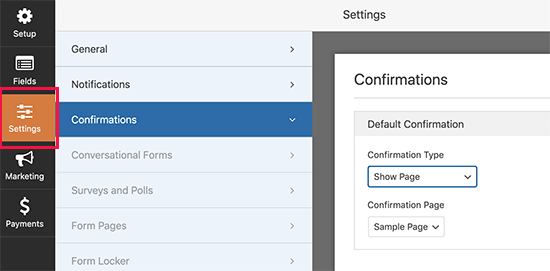
Lastly, you can also change the Confirmation settings in WPForms. This is the message that people will see when they submit a form.

You can show a message, show a landing page, or direct users to another URL.

Change confirmation settings

For more details, check out our guide on how to send confirmation emails after WordPress form submission.

Optionally, you can also click on the Marketing tab on the left to connect your form to different marketing services, such as your email service provider.

WPForms Marketing tab

You can even integrate your form with meeting or webinar software such as Zoom, or create other automated workflows to save time.

Once you’re done with the settings, don’t forget to click the ‘Save’ button at the top and exit the form builder.

Next, you can add your form to any WordPress post or page.

To start, simply edit or add a new page or post. When you’re in the WordPress content editor, click the ‘+’ button and add the ‘WPForms’ block.

Add WPForms block

After that, you’ll see a dropdown menu in the WPForms block.

Here you can select your conference registration form.

Choose your form

Now, publish or update your page.

Then you can visit your website to see the paperless conference registration form in action.

Conference registration form preview

We hope this article helped you learn what is a paperless business form and how to make it. You may also want to see our guide on how much it costs to build a WordPress website, or our expert pick of the best HR payroll software for small business.

If you liked this article, then please subscribe to our YouTube Channel for WordPress video tutorials. You can also find us on Twitter and Facebook.

The post What is a Paperless Business Form? (+ How to Make One) first appeared on WPBeginner.

How to Send Confirmation Emails after WordPress Form Submission

Are you looking to send confirmation emails after a user submits a form on your website?

Confirmation emails can be a great way to let users know that you received their message, and that you’ll be in touch soon.

In this tutorial, we’ll show you how to send confirmation emails to your users after a WordPress form submission (step by step).

How to send confirmation emails after WordPress form submission

Why Set Up Automated Confirmation Emails in WordPress?

Confirmation emails are sent when a user fills out a contact form or another form on your WordPress site.

Sending an automated confirmation email is a nice gesture. Plus, it lets your users know you’ve received their information. This also lets your users double-check their entries to see if any errors were made.

There are a lot of good reasons to set up WordPress form confirmation emails:

  • Allows you to open a line of communication with your subscribers
  • Can provide valuable follow-up information, like links and tutorials
  • Let’s you confirm the email is a real email
  • Can confirm email newsletter subscription and start an autoresponder sequence
  • If you’re selling something, this gives you a chance to offer an upsell or cross-sell
  • It’s great for your email deliverability

The best part is that setting up a WordPress form submit email is easy to do.

Setting Up Confirmation Emails after WordPress Form Submission

For this tutorial, we’ll be using the WPForms plugin to send a WordPress confirmation email. It is the best contact form plugin for WordPress used by over 4 million websites.

If you’re on a budget, you can use the free version called WPForms Lite, which allows you to set up email confirmations.

However, the Pro version will give you access to even more features like conditional logic forms, additional templates, order forms, integration with email marketing tools, and much more.

The first thing you’ll need to do is install and activate the WPForms plugin. For more details on installing a plugin, see our step by step guide on how to install a WordPress plugin.

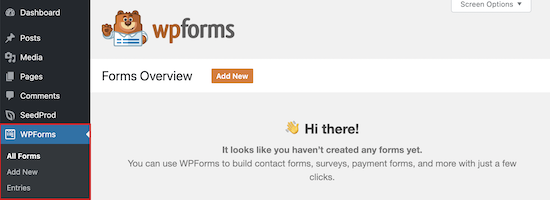
Once you’ve installed and activated the form builder plugin, you’ll have a new WPForms tab on the left-hand side of your WordPress dashboard.

WPForms plugin install menu

If you don’t already have a form on your site, then you’ll need to create one. We have a detailed tutorial on how to create a WordPress contact form that you can use as a guide to get started.

Next, it’s time to set up a WordPress confirmation email. This email will send out automatically and lets your users know their form submission was successfully received.

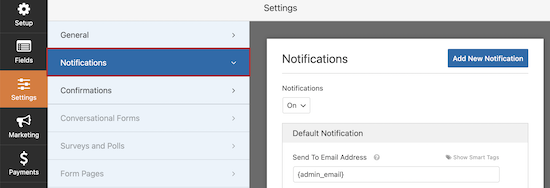
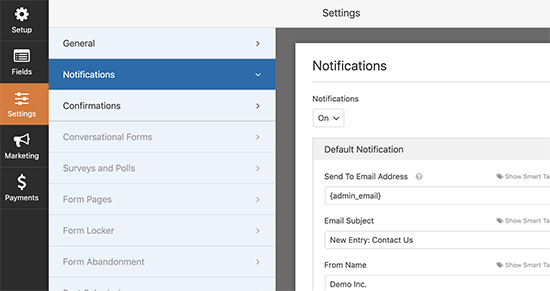
To do this, head over to WPForms » Settings » Notifications.

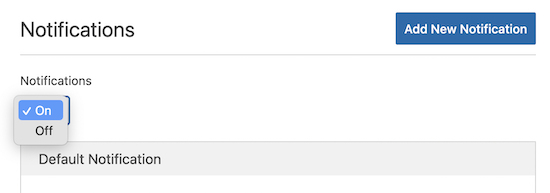
You’ll notice that email notifications are already on.

If you don’t want to turn on notifications, then you can toggle this option off.

Leave notifications toggle on

If you want to send an automated confirmation email, then you’ll need to leave this setting turned on.

Next, we’re going to choose who we want our emails to send to by customizing the form fields.

The default setting will use the admin email Smart Tag {admin_email}. This is the email you used to set up up your WordPress blog. This will deliver all form submissions directly to your inbox.

To make sure that form responses also get delivered to your users, you’ll need to add new email address to the email field. This is similar to how blind carbon copy (BCC) works in standard emails.

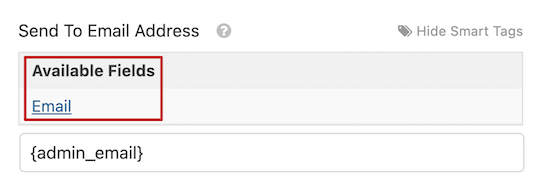
To do this, simply click on the ‘Show Smart Tags’ option that’s directly to the right of the ‘Send to Email Address’ field.

Send to email address field

You need to select ‘Email’ from the drop-down menu.

This tags your user’s email address that they enter into your WordPress form. The plugin will use this email address to send the confirmation email.

Note, that you’ll need a comma between the two Smart Tags.

Send to user and admin email address

Next, it’s time to change the subject line of your email.

The default email subject line is “New Entry”. You’ll want to change this to something that makes sense for your user.

Default email subject line

For example, if you have a simple contact form, you can change the subject line to something like, “Thanks for Reaching Out!”. Or, if it’s an order confirmation email, “Thank You for Your Order!”.

To change it, delete the existing text that’s in the box beneath ‘Email Subject’ and add your new subject line.

Change email subject line

Now, you’re ready to change the email from name.

It makes sense to use your company or website name here.

To do this simply change the text in the ‘From Name’ box.

Change email from name

Next, you have the ‘From Email’ field.

You can leave this as is, and the email will be the same as your admin email.

Admin from email

After that, you’ll want to change the ‘Reply-To’ field, so your users can respond to your automated email.

If you leave this blank, then the email will be the same as the default admin email.

Reply to email

It’s not necessary to change it, but there are some situations where you’ll want the Reply-To email to be different than your standard email address.

For example, if you have a photography website, and you have a form for new clients to request a quote, then you may want these emails to go to a different email address.

The final step is customizing your email message.

In the ‘Message’ box you can write out the email that will send to everyone who submits the form. You can also change the appearance of your plain text emails by adding HTML.

Custom email message

You can also include the {all_fields} Smart Tag which will add on the user-submitted information to the email.

Custom email message with all fields

Congratulations, you’ve successfully installed and set up WPForms, added a form to your site, and set up an automated email confirmation message.

Troubleshooting WordPress not Sending Email Issue

One big issue that a lot of WordPress users experience is where your website will stop sending your WordPress emails.

WordPress uses PHP to send emails, which can be falsely flagged as spam. If this happens to your emails, then they will never reach your user’s inbox, or they’ll end up in the spam folder.

This is why we recommend everyone use SMTP for sending emails in WordPress. An SMTP plugin adds another level of verification and sends emails via an official mail server.

We recommend using WP Mail SMTP. It perfectly integrates with WPForms and is the best SMTP WordPress plugin.

We hoped this article helped you learn how to send confirmation emails after a WordPress form submission. You may also want to see our guide on creating a contact form with multiple recipients, and our expert pick on 24 must-have WordPress plugins for business websites.

If you liked this article, then please subscribe to our YouTube Channel for WordPress video tutorials. You can also find us on Twitter and Facebook.

The post How to Send Confirmation Emails after WordPress Form Submission appeared first on WPBeginner.

How to Create a Contact Form in WordPress (Step by Step)

Are you looking to add a contact form on your WordPress site?

Every website needs a contact form, so visitors can easily contact you about your products and services. By default, WordPress does not come with a built-in contact form, but there is an easy way to add contact forms to your site.

In this WordPress tutorial, we’ll show you how to easily create a contact form in WordPress (step by step) without touching a single line of code.

Easily add a contact form in WordPress

Why Do You Need a Contact form?

You might be wondering why do I need a contact form? Can’t I just add my email address on my website, so people can email me?

That’s a very common question from beginners because they are afraid that adding a contact form requires code knowledge.

The truth is you don’t need to know any code. This step by step guide to adding a contact form is written for absolute beginners.

Below are the top 3 reasons why a contact form is better than pasting your email address on a page.

  • Spam Protection – Spam bots regularly scrape websites for the mailto: email address tag. When you post your email address on the website, you will start to receive a lot of spam emails. On the other hand, when you use a contact form, you can get rid of almost all spam emails.
  • Consistent Information – When emailing, people don’t always send you all the information that you need. With a contact form, you can tell the user exactly what information you’re looking for (such as their phone number, budget, etc).
  • Saves Time – Contact forms help you save time in more ways than you can imagine. Aside from consistent information that we mentioned above, you can also use form confirmations to tell the user what are the next steps. Such as watch a video or wait up to 24 hours to get a response, so they don’t send you multiple inquires.

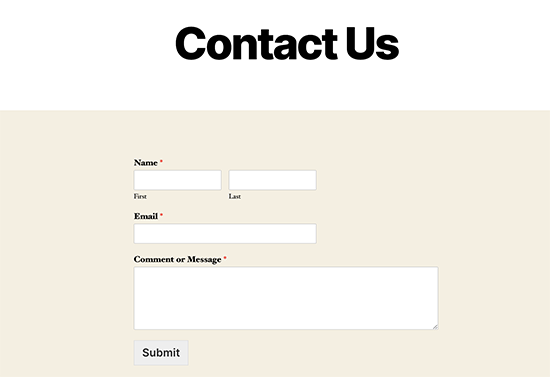
Below is an example of a WordPress contact form that we will create in this tutorial.

Contact page preview

After creating the form above, we will also show you how you can easily add it on your contact page, or in your site’s sidebar using a WordPress contact form widget.

Sounds good? Ok so let’s get started.

Video Tutorial

If you prefer written instructions, then please continue reading.

Step 1. Choosing the Best Contact Form Plugin

The first thing you need to do is choose a WordPress contact form plugin.

While there are several free and paid WordPress contact form plugins you can choose from, we use WPForms on our site and believe it’s the best option in the market.

Below are the three reasons why we think WPForms is the best:

  1. It is the most beginner friendly contact form plugin available. You can use the drag & drop builder to easily create a contact form in just a few clicks.
  2. WPForms Lite is 100% free, and you can use it to create a simple contact form (over 3 million sites use it).
  3. When you are ready for more powerful features, then you can upgrade to WPForms Pro.

Now that we have decided on the contact form plugin, let’s go ahead and install it on your site.

Step 2. Install a Contact Form Plugin in WordPress

For this contact form tutorial, we will use WPForms Lite because it’s free and easy to use.

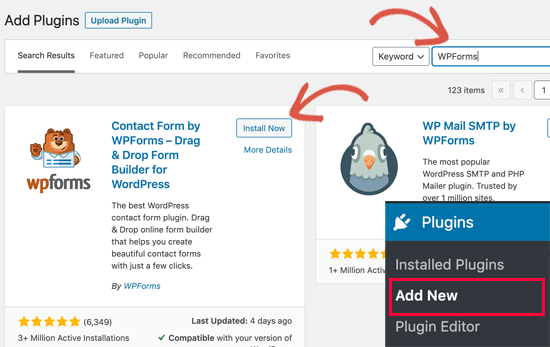
You can install this plugin on your site by logging into your WordPress dashboard and going to Plugins » Add New.

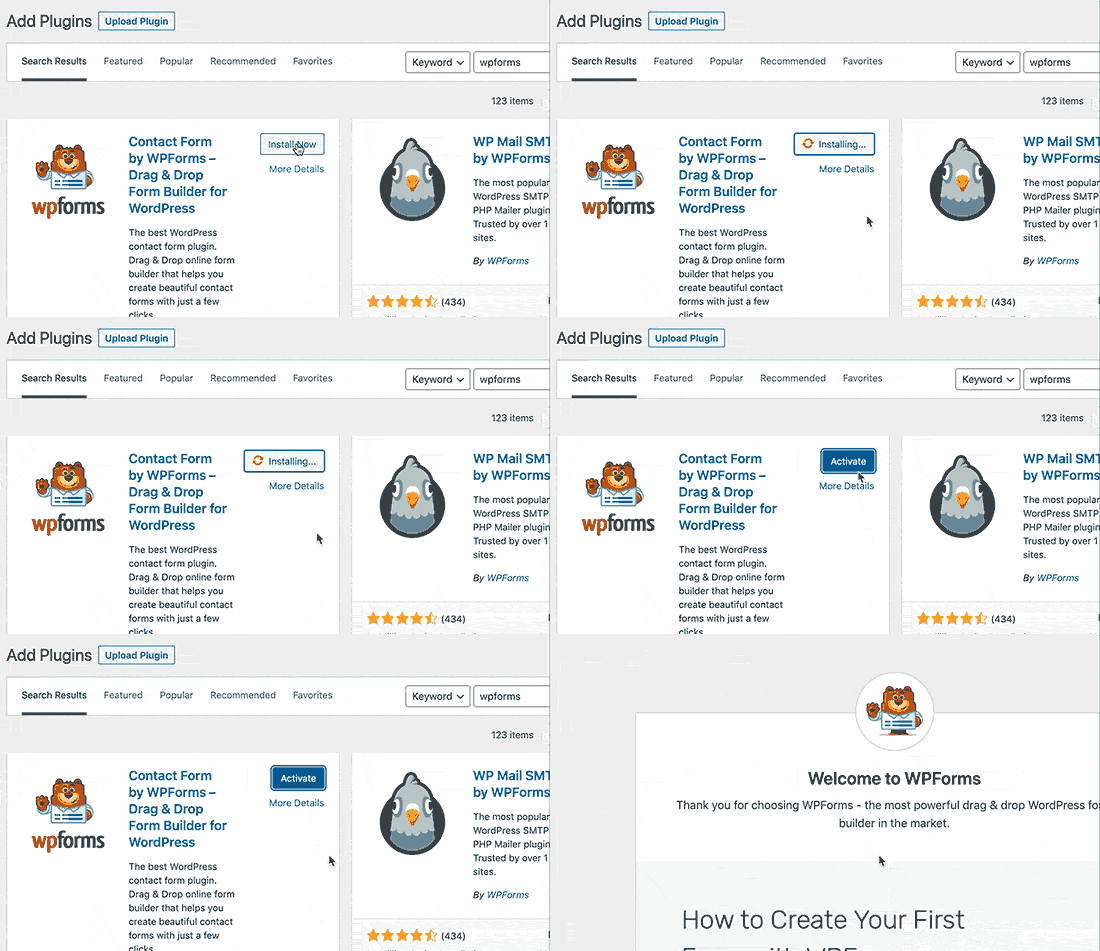
In the search field, type WPForms and then click on the Install Now button.

Install WPForms

After the plugin is installed, make sure you activate the plugin.

Activate WPForms

If you don’t see the plugins menu or want more detailed instructions, then please refer to our step by step guide on how to install a WordPress plugin.

Step 3. Create a Contact Form in WordPress

Now that you have activated WPForms, you are ready to create a contact form in WordPress.

In your WordPress dashboard, click on the WPForms menu and go to Add New.

Add new form

This will open the WPForms drag and drop form builder. Start by giving your contact form a name and then select your contact form template.

WPForms Lite only comes pre-built form templates such as Blank, Simple Contact Form, etc. You can use these to create just about any type of contact form you like.

For the sake of this example, we will go ahead and select Simple Contact Form. It will add the Name, Email, and Message fields.

Creating a new form in WordPress with WPForms

You can click on the fields to edit them. You can also use your mouse to drag and drop the field order.

If you want to add a new field, simply select from the available fields on the left sidebar.

Adding new field to your contact form

When you’re done click on the Save button.

Step 4. Configuring Form Notification and Confirmations

Now that you have created your WordPress form, it’s important that you properly configure the form notification and form confirmation.

Form confirmation is what your website visitor sees after they submit the form. It could be a thank you message, or you can redirect them to a special page.

Form notification is the email you get after someone submits the contact form on your WordPress site.

You can customize both of those by going to the Settings tab inside the WPForms form builder.

We usually leave the form confirmation as default Thank You message. However, you can change it to redirect to a specific page if you like.

Setting up form confirmation

The best part about WPForms is that the default settings are ideal for beginners. When you go to the notification settings, all fields will be pre-filled dynamically.

Setting up form notifications

The notifications by default are sent to the Admin Email that you have set up on your site.

If you want to send it to a custom email address, then you can change that. If you want to send the notification to multiple emails, then just separate each email address by a comma.

The email subject is pre-filled with your form name. The from name field is automatically populated with your user’s name. When you reply to the inquiry, it will go to the email that your user filled in the contact form.

We have a detailed guide on how to setup custom form notifications, so you can send forms to multiple recipients or different departments.

Step 5. Adding WordPress Contact Form in a Page

Now that you are done configuring your WordPress contact form, it’s time to add it to a page.

The first thing you need to do is either create a new page in WordPress or edit an existing page where you want to add the contact form.

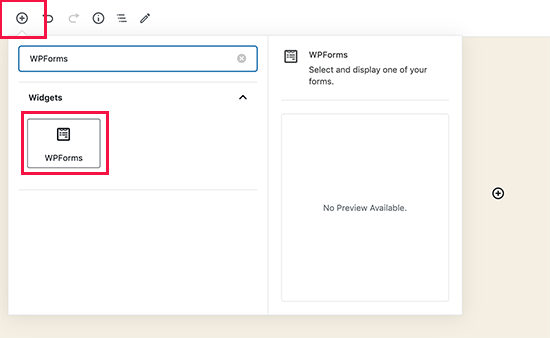
We will be using the WPForms block to add the form in a page. Simply click on the add new block button to look for WPForm and then click to add it to your page.

Add WPForms contact form block to your page

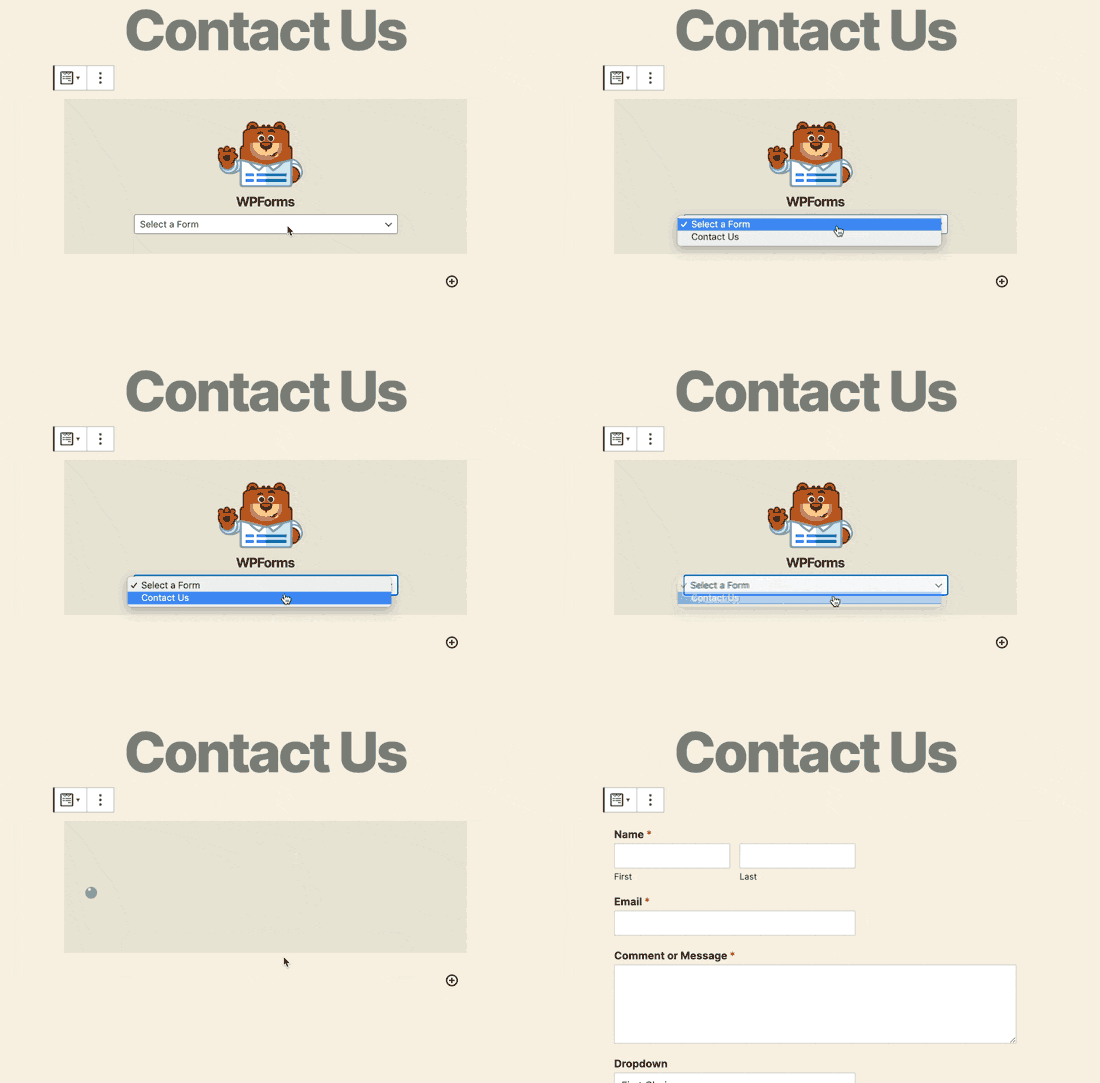
WPForm block will now appear in the content area of your page. You need to click on the drop down menu to select the form you created earlier.

Select your contact form in WPForms block

WPForms will load your contact form preview inside the editor. You can now save or publish your page and visit your website to see it in action.

Here’s what the form would look like on a sample WordPress page:

Contact page preview

If you only wanted to add the contact form on page, then you’re done here. Congratulations.

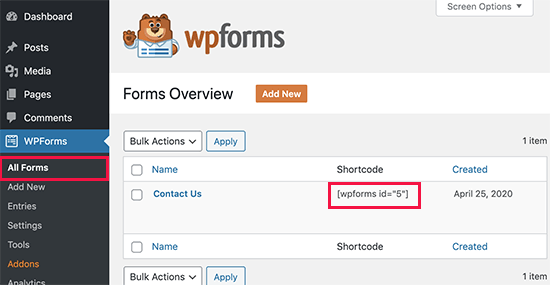
WPForms also comes with a WordPress contact form shortcode. You can copy the contact form shortcode by visiting WPForms » All Forms page and then paste it in any WordPress post or page.

WordPress contact form shortcode to use in post and pages

If you want to add a contact form on a sidebar or another widget ready area, then go to step 6.

Step 6. Adding WordPress Contact Form in a Sidebar

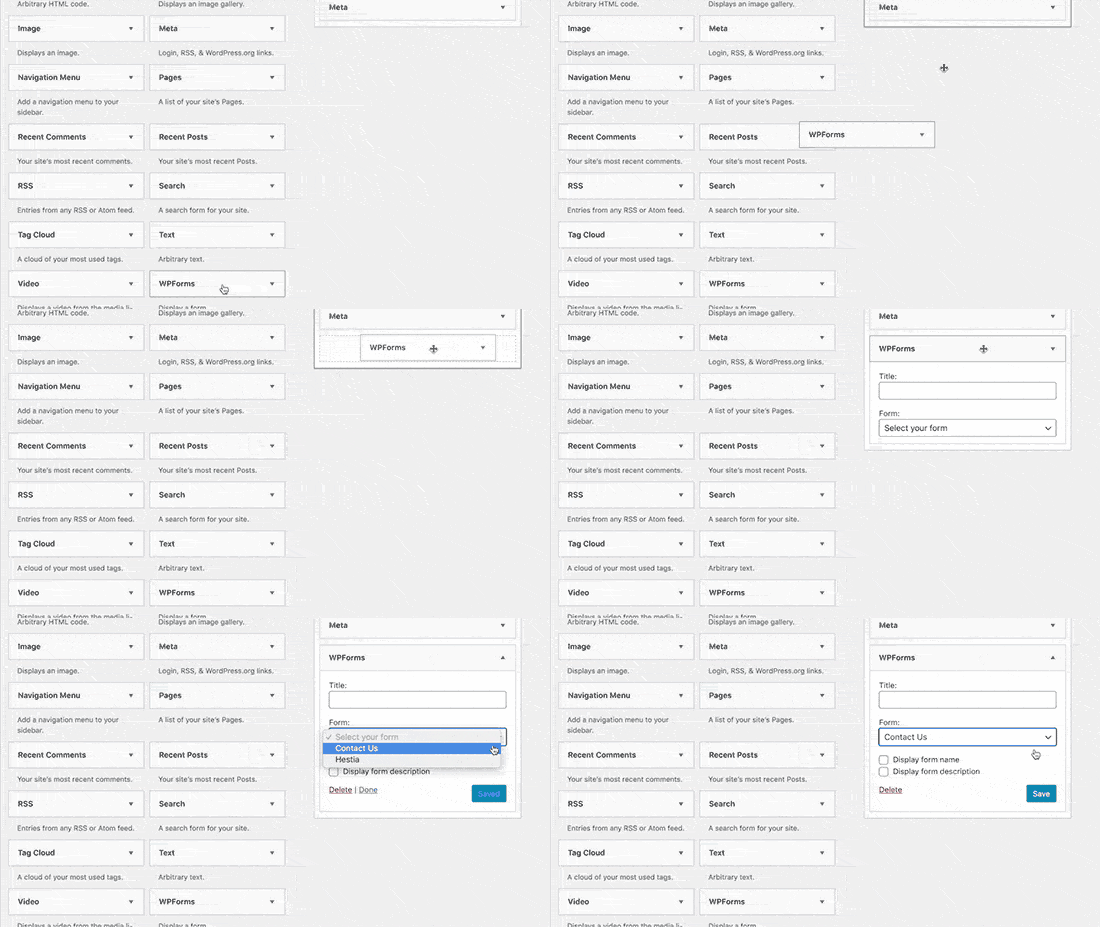
WPForms come with a WordPress contact form widget that you can use to add your contact form in a sidebar or basically any other widget-ready area in your theme.

In your WordPress admin area, go to Appearance » Widgets. You will see a WPForms widget that you can easily drag into any widget-ready areas of your theme.

Add form using a sidebar widget

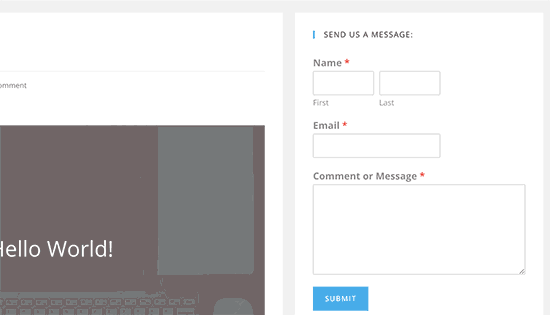
Next, add the title for your widget and select the form you want to display. Save the settings, and visit your website for the preview.

Sidebar contact form

We hope this article helped you create a simple contact form in WordPress. You may also want to check out our comparison of the best WordPress backup plugins and our guide on how to fix WordPress not sending email issue.

If you liked this article, then please subscribe to our YouTube Channel for WordPress video tutorials. You can also find us on Twitter and Facebook.

The post How to Create a Contact Form in WordPress (Step by Step) appeared first on WPBeginner.