Varnish Cache is a powerful tool used by websites to accelerate content delivery by caching HTTP responses. However, like any software, it’s not immune to errors. One such error that Varnish administrators may encounter is...
My previous post was a broad overview of SvelteKit where we saw what a great tool it is for web development. This post will fork off what we did there and dive into every developer’s favorite topic: caching. So, be sure to give my last post a read if you haven’t already. The code for this post is available on GitHub, as well as a live demo.
This post is all about data handling. We’ll add some rudimentary search functionality that will modify the page’s query string (using built-in SvelteKit features), and re-trigger the page’s loader. But, rather than just re-query our (imaginary) database, we’ll add some caching so re-searching prior searches (or using the back button) will show previously retrieved data, quickly, from cache. We’ll look at how to control the length of time the cached data stays valid and, more importantly, how to manually invalidate all cached values. As icing on the cake, we’ll look at how we can manually update the data on the current screen, client-side, after a mutation, while still purging the cache.
This will be a longer, more difficult post than most of what I usually write since we’re covering harder topics. This post will essentially show you how to implement common features of popular data utilities like react-query; but instead of pulling in an external library, we’ll only be using the web platform and SvelteKit features.
Unfortunately, the web platform’s features are a bit lower level, so we’ll be doing a bit more work than you might be used to. The upside is we won’t need any external libraries, which will help keep bundle sizes nice and small. Please don’t use the approaches I’m going to show you unless you have a good reason to. Caching is easy to get wrong, and as you’ll see, there’s a bit of complexity that’ll result in your application code. Hopefully your data store is fast, and your UI is fine allowing SvelteKit to just always request the data it needs for any given page. If it is, leave it alone. Enjoy the simplicity. But this post will show you some tricks for when that stops being the case.
Speaking of react-query, it was just released for Svelte! So if you find yourself leaning on manual caching techniques a lot, be sure to check that project out, and see if it might help.
Setting up
Before we start, let’s make a few small changes to the code we had before. This will give us an excuse to see some other SvelteKit features and, more importantly, set us up for success.
First, let’s move our data loading from our loader in +page.server.js to an API route. We’ll create a +server.js file in routes/api/todos, and then add a GET function. This means we’ll now be able to fetch (using the default GET verb) to the /api/todos path. We’ll add the same data loading code as before.
import { json } from "@sveltejs/kit";
import { getTodos } from "$lib/data/todoData";

export async function GET({ url, setHeaders, request }) {
  const search = url.searchParams.get("search") || "";

  const todos = await getTodos(search);

  return json(todos);
}
Next, let’s take the page loader we had, and simply rename the file from +page.server.js to +page.js (or .ts if you’ve scaffolded your project to use TypeScript). This changes our loader to be a “universal” loader rather than a server loader. The SvelteKit docs explain the difference, but a universal loader runs on both the server and also the client. One advantage for us is that the fetch call into our new endpoint will run right from our browser (after the initial load), using the browser’s native fetch function. We’ll add standard HTTP caching in a bit, but for now, all we’ll do is call the endpoint.
Yep, forms can target directly to our normal page loaders. Now we can add a search term in the search box, hit Enter, and a “search” term will be appended to the URL’s query string, which will re-run our loader and search our to-do items.
Let’s also increase the delay in our todoData.js file in /lib/data. This will make it easy to see when data are and are not cached as we work through this post.
We’ll look at manual invalidation shortly, but all this function says is to cache these API calls for 60 seconds. Set this to whatever you want, and depending on your use case, stale-while-revalidate might also be worth looking into.
And just like that, our queries are caching.
Note make sure you un-check the checkbox that disables caching in dev tools.
Remember, if your initial navigation on the app is the list page, those search results will be cached internally to SvelteKit, so don’t expect to see anything in DevTools when returning to that search.
What is cached, and where
Our very first, server-rendered load of our app (assuming we start at the /list page) will be fetched on the server. SvelteKit will serialize and send this data down to our client. What’s more, it will observe the Cache-Control header on the response, and will know to use this cached data for that endpoint call within the cache window (which we set to 60 seconds in put example).
After that initial load, when you start searching on the page, you should see network requests from your browser to the /api/todos list. As you search for things you’ve already searched for (within the last 60 seconds), the responses should load immediately since they’re cached.
What’s especially cool with this approach is that, since this is caching via the browser’s native caching, these calls could (depending on how you manage the cache busting we’ll be looking at) continue to cache even if you reload the page (unlike the initial server-side load, which always calls the endpoint fresh, even if it did it within the last 60 seconds).
Obviously data can change anytime, so we need a way to purge this cache manually, which we’ll look at next.
Cache invalidation
Right now, data will be cached for 60 seconds. No matter what, after a minute, fresh data will be pulled from our datastore. You might want a shorter or longer time period, but what happens if you mutate some data and want to clear your cache immediately so your next query will be up to date? We’ll solve this by adding a query-busting value to the URL we send to our new /todos endpoint.
Let’s store this cache busting value in a cookie. That value can be set on the server but still read on the client. Let’s look at some sample code.
We can create a +layout.server.js file at the very root of our routes folder. This will run on application startup, and is a perfect place to set an initial cookie value.
You may have noticed the isDataRequest value. Remember, layouts will re-run anytime client code calls invalidate(), or anytime we run a server action (assuming we don’t turn off default behavior). isDataRequest indicates those re-runs, and so we only set the cookie if that’s false; otherwise, we send along what’s already there.
The httpOnly: false flag is also significant. This allows our client code to read these cookie values in document.cookie. This would normally be a security concern, but in our case these are meaningless numbers that allow us to cache or cache bust.
Reading cache values
Our universal loader is what calls our /todos endpoint. This runs on the server or the client, and we need to read that cache value we just set up no matter where we are. It’s relatively easy if we’re on the server: we can call await parent() to get the data from parent layouts. But on the client, we’ll need to use some gross code to parse document.cookie:
export function getCookieLookup() {
  if (typeof document !== "object") {
    return {};
  }

  return document.cookie.split("; ").reduce((lookup, v) => {
    const parts = v.split("=");
    lookup[parts[0]] = parts[1];

    return lookup;
  }, {});
}

const getCurrentCookieValue = name => {
  const cookies = getCookieLookup();
  return cookies[name] ?? "";
};
Fortunately, we only need it once.
Sending out the cache value
But now we need to send this value to our /todos endpoint.
getCurrentCookieValue('todos-cache') has a check in it to see if we’re on the client (by checking the type of document), and returns nothing if we are, at which point we know we’re on the server. Then it uses the value from our layout.
Busting the cache
But how do we actually update that cache busting value when we need to? Since it’s stored in a cookie, we can call it like this from any server action:
It’s all downhill from here; we’ve done the hard work. We’ve covered the various web platform primitives we need, as well as where they go. Now let’s have some fun and write application code to tie it all together.
For reasons that’ll become clear in a bit, let’s start by adding an editing functionality to our /list page. We’ll add this second table row for each todo:
And, of course, we’ll need to add a form action for our /list page. Actions can only go in .server pages, so we’ll add a +page.server.js in our /list folder. (Yes, a +page.server.js file can co-exist next to a +page.js file.)
We’re grabbing the form data, forcing a delay, updating our todo, and then, most importantly, clearing our cache bust cookie.
Let’s give this a shot. Reload your page, then edit one of the to-do items. You should see the table value update after a moment. If you look in the Network tab in DevToold, you’ll see a fetch to the /todos endpoint, which returns your new data. Simple, and works by default.
Immediate updates
What if we want to avoid that fetch that happens after we update our to-do item, and instead, update the modified item right on the screen?
This isn’t just a matter of performance. If you search for “post” and then remove the word “post” from any of the to-do items in the list, they’ll vanish from the list after the edit since they’re no longer in that page’s search results. You could make the UX better with some tasteful animation for the exiting to-do, but let’s say we wanted to not re-run that page’s load function but still clear the cache and update the modified to-do so the user can see the edit. SvelteKit makes that possible — let’s see how!
First, let’s make one little change to our loader. Instead of returning our to-do items, let’s return a writeable store containing our to-dos.
return {
  todos: writable(todos),
};
Before, we were accessing our to-dos on the data prop, which we do not own and cannot update. But Svelte lets us return our data in their own store (assuming we’re using a universal loader, which we are). We just need to make one more tweak to our /list page.
Instead of this:
{#each todos as t}
…we need to do this since todos is itself now a store.:
{#each $todos as t}
Now our data loads as before. But since todos is a writeable store, we can update it.
First, let’s provide a function to our use:enhance attribute:
This will run before a submit. Let’s write that next:
function executeSave({ data }) {
  const id = data.get("id");
  const title = data.get("title");

  return async () => {
    todos.update(list =>
      list.map(todo => {
        if (todo.id == id) {
          return Object.assign({}, todo, { title });
        } else {
          return todo;
        }
      })
    );
  };
}
This function provides a data object with our form data. We return an async function that will run after our edit is done. The docs explain all of this, but by doing this, we shut off SvelteKit’s default form handling that would have re-run our loader. This is exactly what we want! (We could easily get that default behavior back, as the docs explain.)
We now call update on our todos array since it’s a store. And that’s that. After editing a to-do item, our changes show up immediately and our cache is cleared (as before, since we set a new cookie value in our editTodo form action). So, if we search and then navigate back to this page, we’ll get fresh data from our loader, which will correctly exclude any updated to-do items that were updated.
We can set cookies in any server load function (or server action), not just the root layout. So, if some data are only used underneath a single layout, or even a single page, you could set that cookie value there. Moreoever, if you’re not doing the trick I just showed manually updating on-screen data, and instead want your loader to re-run after a mutation, then you could always set a new cookie value right in that load function without any check against isDataRequest. It’ll set initially, and then anytime you run a server action that page layout will automatically invalidate and re-call your loader, re-setting the cache bust string before your universal loader is called.
Writing a reload function
Let’s wrap-up by building one last feature: a reload button. Let’s give users a button that will clear cache and then reload the current query.
In a real project you probably wouldn’t copy/paste the same code to set the same cookie in the same way in multiple places, but for this post we’ll optimize for simplicity and readability.
We could call this done and move on, but let’s improve this solution a bit. Specifically, let’s provide feedback on the page to tell the user the reload is happening. Also, by default, SvelteKit actions invalidate everything. Every layout, page, etc. in the current page’s hierarchy would reload. There might be some data that’s loaded once in the root layout that we don’t need to invalidate or re-load.
So, let’s focus things a bit, and only reload our to-dos when we call this function.
We’re setting a new reloading variable to true at the start of this action. And then, in order to override the default behavior of invalidating everything, we return an async function. This function will run when our server action is finished (which just sets a new cookie).
Without this async function returned, SvelteKit would invalidate everything. Since we’re providing this function, it will invalidate nothing, so it’s up to us to tell it what to reload. We do this with the invalidate function. We call it with a value of reload:todos. This function returns a promise, which resolves when the invalidation is complete, at which point we set reloading back to false.
Lastly, we need to sync our loader up with this new reload:todos invalidation value. We do that in our loader with the depends function:
export async function load({ fetch, url, setHeaders, depends }) {
    depends('reload:todos');

  // rest is the same
And that’s that. depends and invalidate are incredibly useful functions. What’s cool is that invalidate doesn’t just take arbitrary values we provide like we did. We can also provide a URL, which SvelteKit will track, and invalidate any loaders that depend on that URL. To that end, if you’re wondering whether we could skip the call to depends and invalidate our /api/todos endpoint altogether, you can, but you have to provide the exact URL, including the search term (and our cache value). So, you could either put together the URL for the current search, or match on the path name, like this:
invalidate(url => url.pathname == "/api/todos");
Personally, I find the solution that uses depends more explicit and simple. But see the docs for more info, of course, and decide for yourself.
If you’d like to see the reload button in action, the code for it is in this branch of the repo.
Parting thoughts
This was a long post, but hopefully not overwhelming. We dove into various ways we can cache data when using SvelteKit. Much of this was just a matter of using web platform primitives to add the correct cache, and cookie values, knowledge of which will serve you in web development in general, beyond just SvelteKit.
Moreover, this is something you absolutely do not need all the time. Arguably, you should only reach for these sort of advanced features when you actually need them. If your datastore is serving up data quickly and efficiently, and you’re not dealing with any kind of scaling problems, there’s no sense in bloating your application code with needless complexity doing the things we talked about here.
As always, write clear, clean, simple code, and optimize when necessary. The purpose of this post was to provide you those optimization tools for when you truly need them. I hope you enjoyed it!
Running Presto with Alluxio is gaining popularity in the community. It avoids long latency reading data from remote storage by utilizing SSD or memory to cache hot datasets close to Presto workers. Presto supports hash-based soft affinity scheduling to enforce that only one or two copies of the same data are cached in the entire cluster, which improves cache efficiency by allowing more hot data cached locally. The current hashing algorithm used, however, does not work well when cluster size changes. This article introduces a new hashing algorithm for soft affinity scheduling, consistent hashing, to address this problem.
Soft Affinity Scheduling
Presto uses a scheduling strategy called soft affinity scheduling to schedule a split (smallest unit of data processing) to the same Presto worker (preferred node). The mapping from a split and a Presto worker is computed by a hashing function on the split, making sure the same split will always be hashed to the same worker. The first time a split is processed, data will be cached on the preferred worker node. When subsequent queries process the same split, these requests will be scheduled to the same worker node again. Since data is already cached locally, no remote read will be necessary.
Red Hat Data Grid is a distributed, cloud-based datastore offering very fast response times as an in-memory database. The latest version features cross-site replication with more observability, two new types of SQL cache stores for scaling applications with large datasets, improved security, support for Helm charts, and a better command-line interface (CLI).
This article is an overview of new features and enhancements in this latest version of Red Hat Data Grid.
NoSQL data sets arose in the latter part of the 2000s as the expense of storage drastically diminished. The days of expecting to create a complicated, hard to-oversee data model to avoid data replication were long gone and the primary expense of programming and development was now focused on the developers themselves, and hence NoSQL databases were brought into the picture to enhance their productivity.
As storage costs quickly diminished, the measure of data that applications expected to store increased, and the query expanded as well. This data was received in all shapes and sizes — organized, semi-organized, and polymorphic — and characterizing the schema ahead of time turned out to be almost incomprehensible. NoSQL databases permitted the developers to store colossal measures of unstructured data, providing them with a ton of flexibility.
JCS is a distributed caching system written in Java. It is intended to speed up applications by providing a means to manage cached data of various dynamic natures. Like any caching system, JCS is most useful for high read, low put applications. Latency times drop sharply and bottlenecks move away from the database in an effectively cached system.
An in-memory database is not a new concept. However, it is associated too closely with terms like "cache" and "non-persistent". In this article, I want to challenge these ideas. In-memory solutions have much wider use cases and offer higher reliability than it would seem at a first glance.
I want to talk about the architectural principles of in-memory databases, and how to take the best of the "in-memory world"— incredible performance — without losing the benefits of disk-based relational systems. First of all, how to ensure data safety.
In this article, I am going to look at Redis versus Tarantool. At a first glance, they are quite alike — in-memory, NoSQL, key value. But we are going to look deeper. My goal is to find meaningful similarities and differences, I am not going to claim that one is better than the other.
How to start CI build faster by loading Ruby gems from cache on Github Actions? You can start running your tests for a Ruby on Rails project quicker if you manage to set up all dependencies in a short amount of time. Caching can be helpful with that. Ruby gems needed for your project can be cached by Github Actions and thanks to that they can be loaded much faster when you run a new CI build.
You will learn how to configure Github Actions using:
Here’s Ashley Rich at Delicious Brains writing about all the layers of caching that are relevant to a WordPress site. I think we all know that caching is complicated, but jeez, it’s a journey to understand all the caches at work here. The point of cache being speed and reducing burden on the worst bottlenecks and slowest/busiest parts of a web stack.
Here’s my own understanding:
Files can be cached by the browser. This is the fastest possible cache as no network request happens at all. Assets like images, CSS, and JavaScript are often cached this way because they don’t change terribly frequently, but you have to make sure you’re telling browsers that it’s OK to do this and have a mechanism in place to break that cache if you need to (e.g. by changing file names). You very rarely cache the HTML this way, as it changes the most and file-name-cache-busting of HTML seems more tricky than it’s worth.
Files can be cached at the CDN level. This is great because even though network traffic is happening, CDN servers are very fast and likely geographically closer to users than your origin server. If users get files from here, they never even trouble your origin server. You’ll need a way to break this cache as well, which again is probably through changing file names. You might cache HTML at this level even without changing file names if you have a mechanism to clear that cache globally when content changes.
The origin server might cache built HTML pages. On a WordPress site, the pages are built with PHP which probably triggers MySQL queries. If the server can save the result of the things that have already executed, that means it can serve a “static” file as a response, which it can do much faster than having to run the PHP and MySQL. That’ll work for logged out users, who all get the same response, but not for logged in users who have dynamic content on the page (like the WordPress admin bar).
The database has its own special caching. After a MySQL query is executed, the results can be saved in an Object Cache, meaning the same request can come from that cache instead of having to run the query again. You get that automatically to some degree, but ideally it gets wired up to a more persistent store, which you do not get automatically
Phew. It gets a little easier with Jamstack since your pages are prebuilt and CDN-hosted already, and in the case of Netlify, you don’t even have to worry about cache busting.
But even as complex as this is, I don’t worry about it all that much. This WordPress site uses Flywheel for hosting which deals with the database and server-level caching, I have Cloudflare in front of it with special WordPress optimization for the CDN caching, and roll-my-own file-name cache busting (I wish this part was easier). I’d certainly trust SpinupWP to get it right too, given Ashley’s great writeup I’m linking to here.
Site performance is potentially the most important metric. The better the performance, the better chance that users stay on a page, read content, make purchases, or just about whatever they need to do. A 2017 study by Akamai says as much when it found that even a 100ms delay in page load can decrease conversions by 7% and lose 1% of their sales for every 100ms it takes for their site to load which, at the time of the study, was equivalent to $1.6 billion if the site slowed down by just one second. Google’s industry benchmarks from 2018 also provide a striking breakdown of how each second of loading affects bounce rates.
On the flip side, Firefox made their webpages load 2.2 seconds faster on average and it drove 60 million more Firefox downloads per year. Speed is also something Google considers when ranking your website placement on mobile. Having a slow site might leave you on page 452 of search results, regardless of any other metric.
This is a very basic site made with simple HTML, CSS, and JavaScript. I’ve intentionally tried to keep this as simple as possible, meaning the reason it is slow has nothing to do with the complexity of the site itself, or because of some framework it uses. About the most complex part are some social media buttons for people to share the page.
Here’s the thing: performance is more than a one-off task. It’s inherently tied to everything we build and develop. So, while it’s tempting to solve everything in one fell swoop, the best approach to improving performance might be an iterative one. Determine if there’s any low-hanging fruit, and figure out what might be bigger or long-term efforts. In other words, incremental improvements are a great way to score performance wins. Again, every millisecond counts.
In that spirit, what we’re looking at in this article is focused more on the incremental wins and less on providing an exhaustive list or checklist of performance strategies.
Lighthouse
We’re going to be working with Lighthouse. Many of you may already be super familiar with it. It’s even been covered a bunch right here on CSS-Tricks. It’s is a Google service that audit things performance, accessibility, SEO, and best practices. I’m going to audit the performance of my slow site before and after the things we tackle in this article. The Lighthouse reports can be accessed directly in Chrome’s DevTools.
Go ahead, briefly look at the things that Lighthouse says are wrong with the website. It’s good to know what needs to be solved before diving right in.
On the bright side, we’re one-third of the way to our goal!
We can totally fix this, so let’s get started!
Improvement #1: Redirects
Before we do anything else, let’s see what happens when we first hit the website. It gets redirected. The site used to be at one URL and now it lives at another. That means any link that references the old URL is going to redirect to the new URL.
Redirects are often pretty light in terms of the latency that they add to a website, but they are an easy first thing to check, and they can generally be removed with little effort.
We can try to remove them by updating wherever we use the previous URL of the site, and point it to the updated URL so users are taken there directly instead of redirected. Using a network request inspector, I’m going to see if there’s anything we can remove via the Network panel in DevTools. We could also use a tool, like Postman if we need to, but we’ll limit our work to DevTools as much as possible for the sake of simplicity.
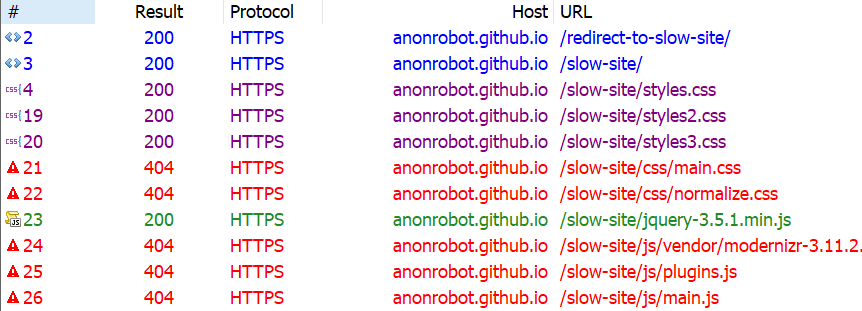
First, let’s see if there are any HTTP or HTML redirects. I like using Fiddler, and when I inspect the network requests I see that there are indeed some old URLs and redirects floating around.
It looks like the first request we hit is https://anonrobot.github.io/redirect-to-slow-site/ before it HTML redirects to https://anonrobot.github.io/slow-site/. We can repoint all our redirect-to-slow-site URLs to the updated URL. In DevTools, the Network inspector helps us see what the first webpage is doing too. From my view in Fiddler it looks like this:
This tell us that the site is using an HTML redirect to the next site. I’m going to update my referenced URL to the new site to help decrease latency that adds drag to the initial page load.
Improvement #2: The Critical Render Path
Next, I’m going to profile the sit with the Performance panel in DevTools. I am most interested in unblocking the site from rendering content as fast as it can. This is the process of turning HTML, CSS and JavaScript into a fully fleshed out, interactive website.
It begins with retrieving the HTML from the server and converting this into the Document Object Model (DOM). We’ll run any inline JavaScript as we see it, or download it if it’s an external asset as we go line-by-line parsing the HTML. We’ll also build the CSS into the CSS Object Model (CSSOM). The CSSOM and the DOM combine to make the render tree. From there, we run the layout which places everything on the screen in the correct place before finally running paint.
This process can be “blocked” if it has to wait for resources to load before it runs. That’s what we call the Critical Render Path, and the things that block the path are critical resources.
The most common critical resources are:
A <script> tag that is in the <head> and doesn’t contain an async, or defer, or module attribute.
A <link rel="stylesheet"> that doesn’t have the disabled attribute to inform the browser to not download the CSS and doesn’t have a media attribute that matches the user’s device.
There’s a few more types of resources that might block the Critical Render Path, like fonts, but the two above are by far the most common. These resources block rendering because the browser thinks the page is “unfinished” and has no idea what resources it needs or has. For all the browser knows, the site could download something that expects the browser to do even more work, like styling or color changes; hence, the site is incomplete to the browser, so it assumes the worst and blocks rendering.
An example CSS file that wouldn’t block rendering would be:
The "media="print" attribute only downloads the stylesheet when the user prints the webpage (because perhaps you want to style things differently in print), meaning the file itself isn’t blocking anything from rendering before it.
As Chris likes to say, a front-end developer is aware. And being aware of what a page needs to download before rendering begins is vitally important for improving performance audit scores.
Improvement #3: Unblock parsing
Blocking the render path is one thing we can immediately speed up, and we can also block parsing if we aren’t careful with our JavaScript. Parsing is what makes HTML elements part of the DOM, and whenever we encounter JavaScript that needs to run now, we block that HTML parsing from happening.
Some of the JavaScript in my slow webpage doesn’t need to block parsing. In other words, we can download the scripts asynchronously and continue parsing the HTML into the DOM without delay.
The <async> tag is what allows the browser to download the JavaScript asset asynchronously. The <defer> tag only runs the JavaScript once the page construction is complete.
There’s a trade off here between inlining JavaScript (so running it doesn’t require a network request) versus placing it into it’s own JavaScript file (for modularity and code-reuse). Feel free to make your own judgement call here as the best route is going to depend on the use case. The actual performance of applying CSS and JavaScript to a webpage will be the same whether it’s an external asset or inlined, once it has arrived. The only thing we are removing when we inline is the network request time to get the external assets (which sometimes makes a big difference).
The main thing we’re aiming for is to do as little as we can. We want to defer loading assets and make those assets as small as possible at the same time. All of this will translate into a better performance outcome.
My slow site is chaining multiple critical requests, where the browser has to read the next line of HTML, wait, then read the next on to check for another asset, then wait. The size of the assets, when they get downloaded, and whether they block are all going to play hugely into how fast our webpage can load.
I approached this by profiling the site in the DevTools Performance panel, which is simply records the way the site loads over time. I briefly scanned my HTML and what it was downloading, then added <async> to any external JavaScript script that was blocking things (like the social media <script>, which isn’t necessary to load before rendering).
Profiling the slow site reveals what assets are loading, how big they are, where they are located, and how much time it takes to load them.
It’s interesting that Chrome has a browser limit where it can only deal with six inflight HTTP connections per domain name, and will wait for an asset to return before requesting another once those six are in-flight. That makes requesting multiple critical assets even worse for HTML parsing. Allowing the browser to continue parsing will speed up the time it takes to show something to the user, and improve our performance audit.
Improvement #4: Reduce the payload size
The total size of a site is a huge determining factor as to how fast it will load. According to web.dev, sites should aim to be below 1,600 KB interactive under 10 seconds. Large payloads are strongly correlated with long times to load. You can even consider a large payload as an expense to the end user, as large downloads may require larger data plans that cost more money.
At this exact point in time, my slow site is a whopping 9,701 KB — more than six times the ideal size. Let’s trim that down.
Identifying unused dependencies
At the beginning of my development, I thought I might need certain assets or frameworks. I downloaded them onto my page and now can’t even remember which ones are actually being used. I definitely have some assets that are doing nothing but wasting time and space.
Using the Network inspector in DevTools (or a tool you feel comfortable with), we can see some things that can definitely be removed from the site without changing its underlying behavior. I found a lot of value in the Coverage panel in DevTools because it will show just how much code is being used after everything’s downloaded.
As we’ve already discussed, there is always a fine balance when it comes to inlining CSS and JavaScript versus using an external asset. But, at this very moment, it certainly appears that the site is downloading far too much than it really needs.
Another quick way to trim things down is to find whether any of the assets the site is trying to load 404s. Those requests can definitely be removed without any negative impact to the site since they aren’t loading anyway. Here’s what Fiddler shows me:
Looking again at the Coverage report, we know there are things that are downloaded but have a significant amount of unused code still making its way to the page. In other words, these assets are doing something, but are also ready to do things we don’t even need them to do. That includes React, jQuery and Vue, so those can be removed from my slow site with no real impact.
Why so many JavaScript libraries? Well, we know there are real-life scenarios where we reach for something because it meets our requirements; but then those requirements change and we need to reach for something else. Again, we’ve got to be aware as front-end developers, and continually keeping an eye on what resources are relevant to site is part of that overall awareness.
Compressing, minifying and caching assets
Just because we need to serve an asset doesn’t mean we have to serve it as its full size, or even re-serve that asset the next time the user visits the site. We can compress our assets, minify our styles and scripts, and cache things responsibly so we’re serving what the user needs in the most efficient way possible.
Compressing means we optimize a file, such as an image, to its smallest size without impacting its visual quality. For example, gzip is a common compression algorithm that makes assets smaller.
Minification improves the size of text-based assets, like external script files, by removing cruft from the code, like comments and whitespace, for the sake of sending fewer bytes over the wire.
Caching allows us to store an asset in the browser’s memory for an amount of time so that it is immediately available for users on subsequent page loads. So, load it once, enjoy it many times.
Let’s look at three different types of assets and how to crunch them with these tactics.
Text-based assets
These include text files, like HTML, CSS and JavaScript. We want to do everything in our power to make these as lightweight as possible, so we compress, minify, and cache them where possible.
At a very high level, gzip works by finding common, repeated parts in the content, stores these sequences once, then removes them from the source text. It keeps a dictionary-like look-up so it can quickly reference the saved pieces and place them back in place where they belong, in a process known as gunzipping. Check out this gzipped examples a file containing poetry.
The text in-between the curly braces is text that has been matched multiple times and is removed from the source text by gzip to make the file smaller. There are still unique parts of the string that gzip is unable to abstract to its dictionary, but things like { a }, for example, can be removed from wherever it appears and can be added back once it is received. (View the full example)
We’re doing this to make any text-based downloads as small as we can. We are already making use of gzip. I checked using this tool by GIDNetwork. It shows that the slow site’s content is 59.9% compressed. That probably means there are more opportunities to make things even smaller.
I decided to consolidate the multiple CSS files into one single file called styles.css. This way, we’re limiting the number of network requests necessary. Besides, if we crack open the three files, each one contained such a tiny amount of CSS that the three network requests are simply unjustified.
And, while doing this, it gave me the opportunity to remove unnecessary CSS selectors that weren’t being applied in the DOM anywhere, again reducing the number of bytes sent to the user.
We are also able to optimize the images on the slow site. As reports consistently show, images are the most common asset request. In fact, the median data transfer for images is 948.1 KB for desktops and 902 KB for mobile devices from 2016 to 2021. That already more than half of the ideal 1,600KB size for an entire page load.
My slow site doesn’t serve that many images, but the images it does serve can be smaller. I ran the images through an online tool called Squoosh, and achieved a 40% savings (18.6 KB to 11.2 KB). That’s a win! Of course, this is something you can do either before upload using a desktop application, like ImageOptim, or even as part of your build process.
I couldn’t see any visual differences between the original images and the optimized versions (which is great!) and I was even able to reduce the size further by resizing the actual file, reducing the quality of the image, and even changing the color palette. But those are things I did in image editing software. Ideally, that’s something you or a designer would do when initially making the assets.
Caching
We’ve touched on minification and compression and what we can do to try and use these to our advantage. The final thing we can check is caching.
I have been requesting the slow site over and over and, so far, I can see it always looks like it’s requested fresh every time without any caching whatsoever. I looked through the HTML and saw caching was disabling here:
I removed that line, so browser caching should now be able to take place, helping serve the content even faster.
Improvement #5: Use a CDN
Another big improvement we can make on any website is serving as much as you can from a Content Delivery Network (CDN). David Attard has a super thorough piece on how to add and leverage a CDN. The traditional path of delivering content is to hit the server, request data, and wait for it to return. But if the user is requesting data from way across the other side of the world from where your data is served, well, that adds time. Making the bytes travel further in the response from the server can add up to large losses of speed, even if everything else is lightning quick.
A CDN is a set of distributed servers around the world that are capable of intelligently delivering content closer to the user because it has multiple locations it choose to serve it from.
We discussed earlier how I was making the user download jQuery when it doesn’t actually make use of the downloaded code, and we removed it. One easy fix here, if I did actually need jQuery, is to request the asset from a CDN. Why?
A user may have already downloaded the asset from visiting another site, so we can serve a cached response for the CDN. 75.49% of the top one million sites still use jQuery, after all.
It doesn’t have to travel as far from the user requesting the data.
We can do something as simple as grabbing jQuery from Google’s CDN, which they make available for anyone to reference in their own sites:
That serves jQuery significantly faster than a standard request from my server, that’s for sure.
Are things better?
If you have implemented along with me so far, or just read, it’s time to re-profile and see if any improvements has been made on what we’ve done so far.
Recall where we started:
After our changes:
I hope this has been a helpful and encourages you to search for incremental performance wins on your own site. By optimally requesting assets, deferring some assets from loading, and reducing the overall size of the site size will get a functional, fully interactive site in front of the user as fast as possible.
Want to keep the conversation going? I share my writing on Twitter if you want to see more or connect.
Caching facilitates faster access to data that is repeatedly being asked for. The data might have to be fetched from a database or have to be accessed over a network call or have to be calculated by an expensive computation. We can avoid multiple calls for these repeated data-asks by storing the data closer to the application (generally, in memory or local disc). Of course, all of this comes at a cost. We need to consider the following factors when cache has to be implemented:
Additional memory is needed for applications to cache the data.
What if the cached data is updated? How do you invalidate the cache? (Needless to say, now that caching works well, when the data is cached it does not need to be changed often.)
We need to have Eviction Policies (LRU, LFU etc.) in place to delete the entries when cache grows bigger.
Caching becomes more complicated when we think of distributed systems. Let us assume we have our application deployed in a 3-node cluster:
There are many ways to configure the cache in a microservices system. As a rule of thumb, you should use caching only in one place; for example, you should not use the cache in both the HTTP and application layers. Distributed caching both increases cloud-native application performance and minimizes the overhead of creating new microservices.
Infinispan is an open-source, in-memory data grid that can run as a distributed cache or a NoSQL datastore. You could use it as a cache, such as for session clustering, or as a data grid in front of the database. Red Hat Data Grid builds on Infinispan with additional features and support for enterprise production environments.
EclipseLink has two types of caches: the shared cache (L2) maintains objects read from database; and the isolated cache (L1) holds objects for various operations during the lifecycle of a transaction. L2 lifecycle is tied to a particular JVM and spans multiple transactions. Cache coordination between different JVMs is off by default. EclipseLink provides a distributed cache coordination feature that you can enable to ensure data in distributed applications remains current. Both L1 and L2 cache store domain objects.
“Redis is an open source (BSD licensed), in-memory data structure store, used as a database, cache, and message broker. Redis provides data structures such as strings, hashes, lists, sets, sorted sets with range queries, bitmaps, hyperloglogs, geospatial indexes, and streams.” — redis.io
In back-end development, storage is a common part of the job. Application data is stored in databases, files in object storage, transient data in caches… there are seemingly endless possibilities for storing any sort of data. But data storage isn’t limited only to the back end. The front end (the browser) is equipped with many options to store data as well. We can boost our application performance, save user preferences, keep the application state across multiple sessions, or even different computers, by utilizing this storage.
In this article, we will go through the different possibilities to store data in the browser. We will cover three use cases for each method to grasp the pros and cons. In the end, you will be able to decide what storage is the best fit for your use case. So let’s start!
The localStorage API
localStorage is one of the most popular storage options in the browser and the go-to for many developers. The data is stored across sessions, never shared with the server, and is available for all pages under the same protocol and domain. Storage is limited to ~5MB.
Surprisingly, the Google Chrome team doesn’t recommend using this option as it blocks the main thread and is not accessible to web workers and service workers. They launched an experiment, KV Storage, as a better version, but it was just a trial that doesn’t seem to have gone anywhere just yet.
The localStorage API is available as window.localStorage and can save only UTF-16 strings. We must make sure to convert data to strings before saving it into localStorage. The main three functions are:
setItem('key','value')
getItem('key')
removeItem('key')
They’re all synchronous, which makes it simple to work with, but they block the main thread.
It’s worth mentioning that localStorage has a twin called sessionStorage. The only difference is that data stored in sessionStorage will last only for the current session, but the API is the same.
Let’s see it in action. The first example demonstrates how to use localStorage for storing the user’s preferences. In our case, it’s a boolean property that turns on or off the dark theme of our site.
You can check the checkbox and refresh the page to see that the state is saved across sessions. Take a look at the save and load functions to see how I convert the value to string and how I parse it. It’s important to remember that we can store only strings.
This second example loads Pokémon names from the PokéAPI.
We send a GET request using fetch and list all the names in a ul element. Upon getting the response, we cache it in the localStorage so our next visit can be much faster or even work offline. We have to use JSON.stringify to convert the data to string and JSON.parse to read it from the cache.
In this last example, I demonstrate a use case where the user can browse through different Pokémon pages, and the current page is saved for the next visits.
The issue with localStorage, in this case, is that the state is saved locally. This behavior doesn’t allow us to share the desired page with our friends. Later, we will see how to overcome this issue.
We will use these three examples in the next storage options as well. I forked the Pens and just changed the relevant functions. The overall skeleton is the same for all methods.
The IndexedDB API
IndexedDB is a modern storage solution in the browser. It can store a significant amount of structured data — even files, and blobs. Like every database, IndexedDB indexes the data for running queries efficiently. It’s more complex to use IndexedDB. We have to create a database, tables, and use transactions.
Compared to localStorage , IndexedDB requires a lot more code. In the examples, I use the native API with a Promise wrapper, but I highly recommend using third-party libraries to help you out. My recommendation is localForage because it uses the same localStorage API but implements it in a progressive enhancement manner, meaning if your browser supports IndexedDB, it will use it; and if not, it will fall back to localStorage.
Let’s code, and head over to our user preferences example!
idb is the Promise wrapper that we use instead of working with a low-level events-based API. They’re almost identical, so don’t worry. The first thing to notice is that every access to the database is async, meaning we don’t block the main thread. Compared to localStorage, this is a major advantage.
We need to open a connection to our database so it will be available throughout the app for reading and writing. We give our database a name, my-db, a schema version, 1, and an update function to apply changes between versions. This is very similar to database migrations. Our database schema is simple: only one object store, preferences. An object store is the equivalent of an SQL table. To write or read from the database, we must use transactions. This is the tedious part of using IndexedDB. Have a look at the new save and load functions in the demo.
No doubt that IndexedDB has much more overhead and the learning curve is steeper compared to localStorage. For the key value cases, it might make more sense to use localStorage or a third-party library that will help us be more productive.
Application data, such as in our Pokémon example, is the forte of IndexedDB. You can store hundreds of megabytes and even more in this database. You can store all the Pokémon in IndexedDB and have them available offline and even indexed! This is definitely the one to choose for storing app data.
I skipped the implementation of the third example, as IndexedDB doesn’t introduce any difference in this case compared to localStorage. Even with IndexedDB, the user will still not share the selected page with others or bookmark it for future use. They’re both not the right fit for this use case.
Cookies
Using cookies is a unique storage option. It’s the only storage that is also shared with the server. Cookies are sent as part of every request. It can be when the user browses through pages in our app or when the user sends Ajax requests. This allows us to create a shared state between the client and the server, and also share state between multiple applications in different subdomains. This is not possible by other storage options that are described in this article. One caveat: cookies are sent with every request, which means that we have to keep our cookies small to maintain a decent request size.
The most common use for cookies is authentication, which is out of the scope of this article. Just like the localStorage, cookies can store only strings. The cookies are concatenated into one semicolon-separated string, and they are sent in the cookie header of the request. You can set many attributes for every cookie, such as expiration, allowed domains, allowed pages, and many more.
In the examples, I show how to manipulate the cookies through the client-side, but it’s also possible to change them in your server-side application.
Saving the user’s preferences in a cookie can be a good fit if the server can utilize it somehow. For example, in the theme use case, the server can deliver the relevant CSS file and reduce potential bundle size (in case we’re doing server-side-rendering). Another use case might be to share these preferences across multiple subdomain apps without a database.
Reading and writing cookies with JavaScript is not as straightforward as you might think. To save a new cookie, you need to set document.cookie — check out the save function in the example above. I set the dark_theme cookie and add it a max-age attribute to make sure it will not expire when the tab is closed. Also, I add the SameSite and Secure attributes. These are necessary because CodePen uses iframe to run the examples, but you will not need them in most cases. Reading a cookie requires parsing the cookie string.
A cookie string looks like this:
key1=value1;key2=value2;key3=value3
So, first, we have to split the string by semicolon. Now, we have an array of cookies in the form of key1=value1, so we need to find the right element in the array. In the end, we split by the equal sign and get the last element in the new array. A bit tedious, but once you implement the getCookie function (or copy it from my example :P) you can forget it.
Saving application data in a cookie can be a bad idea! It will drastically increase the request size and will reduce application performance. Also, the server cannot benefit from this information as it’s a stale version of the information it already has in its database. If you use cookies, make sure to keep them small.
The pagination example is also not a good fit for cookies, just like localStorage and IndexedDB. The current page is a temporary state that we would like to share with others, and any of these methods do not achieve it.
URL storage
URL is not a storage, per se, but it’s a great way to create a shareable state. In practice, it means adding query parameters to the current URL that can be used to recreate the current state. The best example would be search queries and filters. If we search the term flexbox on CSS-Tricks, the URL will be updated to https://css-tricks.com/?s=flexbox. See how easy it is to share a search query once we use the URL? Another advantage is that you can simply hit the refresh button to get newer results of your query or even bookmark it.
We can save only strings in the URL, and its maximum length is limited, so we don’t have so much space. We will have to keep our state small. No one likes long and intimidating URLs.
Again, CodePen uses iframe to run the examples, so you cannot see the URL actually changing. Worry not, because all the bits and pieces are there so you can use it wherever you want.
We can access the query string through window.location.search and, lucky us, it can be parsed using the URLSearchParams class. No need to apply any complex string parsing anymore. When we want to read the current value, we can use the get function. When we want to write, we can use set. It’s not enough to only set the value; we also need to update the URL. This can be done using history.pushState or history.replaceState, depending on the behavior we want to accomplish.
I wouldn’t recommend saving a user’s preferences in the URL as we will have to add this state to every URL the user visits, and we cannot guarantee it; for example, if the user clicks on a link from Google Search.
Just like cookies, we cannot save application data in the URL as we have minimal space. And even if we did manage to store it, the URL will be long and not inviting to click. Might look like a phishing attack of sorts.
Just like our pagination example, the temporary application state is the best fit for the URL query string. Again, you cannot see the URL changes, but the URL updates with the ?page=x query parameter every time you click on a page. When the web page loads, it looks for this query parameter and fetches the right page accordingly. Now we can share this URL with our friends so they can enjoy our favorite Pokémon.
Cache API
Cache API is a storage for the network level. It is used to cache network requests and their responses. The Cache API fits perfectly with service workers. A service worker can intercept every network request, and using the Cache API, it can easily cache both the requests. The service worker can also return an existing cache item as a network response instead of fetching it from the server. By doing so, you can reduce network load times and make your application work even when offline. Originally, it was created for service workers but in modern browsers the Cache API is available also in window, iframe, and worker contexts as-well. It’s a very powerful API that can improve drastically the application user experience.
Just like IndexedDB the Cache API storage is not limited and you can store hundreds of megabytes and even more if you need to. The API is asynchronous so it will not block your main thread. And it’s accessible through the global property caches.
If you build a browser extension, you have another option to store your data. I discovered it while working on my extension, daily.dev. It’s available via chrome.storage or browser.storage, if you use Mozilla’s polyfill. Make sure to request a storage permission in your manifest to get access.
There are two types of storage options, local and sync. The local storage is self-explanatory; it means it isn’t shared and kept locally. The sync storage is synced as part of the Google account and anywhere you install the extension with the same account this storage will be synced. Pretty cool feature if you ask me. Both have the same API so it’s super easy to switch back-and-forth, if needed. It’s async storage so it doesn’t block the main thread like localStorage. Unfortunately, I cannot create a demo for this storage option as it requires a browser extension but it’s pretty simple to use, and almost like localStorage. For more information about the exact implementation, refer to Chrome docs.
Conclusion
The browser has many options we can utilize to store our data. Following the Chrome team’s advice, our go-to storage should be IndexedDB. It’s async storage with enough space to store anything we want. localStorage is not encouraged, but is easier to use than IndexedDB. Cookies are a great way to share the client state with the server but are mostly used for authentication.
If you want to create pages with a shareable state such as a search page, use the URL’s query string to store this information. Lastly, if you build an extension, make sure to read about chrome.storage.
According to our calculations, Integer.valueOf(127) == Integer.valueOf(127) is true.
In an interview, one of my friends was asked: If we have two Integer objects, Integer a = 127; Integer b = 127; Why does a == b evaluate to true when both are holding two separate objects? In this article, I will try to answer this question and explain the answer.
The short answer to this question is, direct assignment of an int literal to an Integer reference is an example of auto-boxing concept where the literal value to object conversion code is handled by the compiler, so during compilation phase compiler converts Integer a = 127; to Integer a = Integer.valueOf(127);.