How to Add Expires Headers in WordPress (2 Methods)

Do you want to learn how to add expires headers in WordPress?

Expires headers are rules that let web browsers know whether to load a web page resource like images from the visitor’s browser cache or from your server. These can help improve the performance of your site.

In this article, we’ll show you two ways to add expires headers in WordPress.

How to Add Expires Headers in WordPress

How Are Expires Headers Used in WordPress?

The first time someone visits a web page on your WordPress site, all of the files are loaded one by one. All of these requests between the browser and your WordPress hosting server increase the web page loading time.

Browser caching stores some or all of those files on the visitor’s computer. That means that the next time they visit the page, the files can be loaded from their own computer, boosting your WordPress performance.

Now you might be wondering, how do the browsers know which files to save, and how long to keep them?

That’s where expires headers come in.

The rules about which files to save and how long to save them are set using either expires headers or cache-control headers. In this article, we’ll focus on expires headers because they’re simpler to set up for most users.

Expires headers set an expiration date for each type of file stored in the browser cache. After that date, the files will be reloaded from your server to give visitors the most recent version of the page.

We’ll show you how to add expires headers using two different methods. The first method is easier and recommended for most users. You can click the links below to jump ahead to your preferred section:

Method 1: Add Expires Headers with WP Rocket WordPress Plugin

WP Rocket is the most beginner-friendly WordPress caching plugin in the market. Once enabled, it works immediately to speed up your site without having to mess with complicated configuration settings like many other caching plugins.

WP Rocket is a premium plugin, but the best part is that all features are included in their lowest plan.

HP Rocket

The first thing you need to do is install and activate the WP Rocket plugin. For more details, see our step by step guide on how to install a WordPress plugin.

Once installed and activated, WP Rocket will automatically turn on browser caching. By default, it add expires headers and cache-control headers with the best settings to speed up your WordPress site.

That’s all you need to do. If you want to learn more about the plugin, then see our guide on how to properly install and setup WP Rocket in WordPress.

If you’d prefer to use a free caching plugin to add expires headers to your website, then we recommend you take a look at W3 Total Cache.

W3 Total Cache offers some of the same features as WP Rocket, but it’s not as beginner-friendly. You’d have to manually enable expires headers, since it doesn’t enable them automatically.

Method 2: Add Expires Headers in WordPress Using Code

The second method to add expires headers in WordPress involves adding code to your WordPress files. We don’t recommend it for beginners, since a mistake in the code could cause serious errors and break your site.

Before making these changes, we recommend that you first back up your WordPress site. For more details, see our guide on how to backup and restore your WordPress site.

With that said, let’s take a look at how to add expires headers by adding code to WordPress.

Determine if Your Website is Running Apache or Nginx

First, you need to figure out whether your website is using Apache or Nginx servers. To do this, browse to your website and right click the page, then select the ‘Inspect’ option.

Right Click the Inspect Option

Next, you need to click the ‘Network’ tab at the top of the page. You may need to refresh the page for the results to load.

Click the Network Tab

After that, you can click your domain name at the top of the ‘Name’ column. Then you should scroll down to the ‘Response Headers’ section and check for an item called ‘server’.

Check the Response Headers Section

This will show you which web server is being used. In this case, the site is running on an Nginx server.

Now that you know which web server your site is using, use then links below to jump ahead:

How to Add Expires Headers in Apache

To add expires headers to an Apache server, you need to add code to your .htaccess file.

To edit this file, you need to connect to your WordPress hosting account with an FTP client or your host’s file manager tool. You’ll find your .htaccess file in your website’s root folder.

Find .htaccess in the Root Folder

Sometimes the .htaccess file can be hidden. If you need help finding it, then see our guide on why you can’t find .htaccess file on your WordPress site.

Next, you need to add expires headers to turn on browser caching. This tells the web browser how long it should store your website resources before they are deleted.

You can add the following code near the top of your .htaccess file to add expire headers:

## EXPIRES HEADER CACHING ##
<IfModule mod_expires.c>
ExpiresActive On
ExpiresByType image/jpg "access 1 year"
ExpiresByType image/jpeg "access 1 year"
ExpiresByType image/gif "access 1 year"
ExpiresByType image/png "access 1 year"
ExpiresByType image/svg "access 1 year"
ExpiresByType text/css "access 1 month"
ExpiresByType application/pdf "access 1 month"
ExpiresByType application/javascript "access 1 month"
ExpiresByType application/x-javascript "access 1 month"
ExpiresByType application/x-shockwave-flash "access 1 month"
ExpiresByType image/x-icon "access 1 year"
ExpiresDefault "access 3 days"
</IfModule>
## EXPIRES HEADER CACHING ##

These values should work fine for most sites, but you can adjust the time periods if your needs are different.

Notice that the code sets different cache expiration dates based on the type of file. Images are cached longer than HTML, CSS, Javascript, and other file types because they usually stay the same.

How to Add Expires Headers in Nginx

If you’re using an Nginx server to host your WordPress blog, then you need to edit the server configuration file to add expires headers.

How you edit and access this file depends on your host, so you can reach out to your hosting provider if you need help accessing the file.

Then, you need to add the following code to add expires headers:

location ~* \.(jpg|jpeg|gif|png|svg)$ {
  expires 365d;
}
 
location ~* \.(pdf|css|html|js|swf)$ {
  expires 3d;
}

This code will set the expiration times for the different file types. Notice again that images are cached longer than HTML, CSS, JS, and other file types since images usually stay the same.

We hope this tutorial helped you learn how to add expires headers in WordPress. You may also want to see our ultimate WordPress security guide to improve your website security, and see our comparison of the best email marketing services to grow your traffic.

If you liked this article, then please subscribe to our YouTube Channel for WordPress video tutorials. You can also find us on Twitter and Facebook.

The post How to Add Expires Headers in WordPress (2 Methods) appeared first on WPBeginner.

How to Clear Your Browser Cache in All Major Browsers (Fast Way)

When fixing common WordPress errors, one common piece of advice that you would often receive is to “clear your browser cache”.

Since you don’t need to clear browser cache for day to day internet use, most non-techy users are not familiar with the process.

In this beginner’s guide, we will show you how to quickly clear your browser cache in all major browsers, step by step. We will also explain what is browser cache and how browser caching works.

How to clear browser cache in all top browsers

What is Browser Cache?

Browser cache is a technology used by most popular web browsers to save visited website’s data on a user’s computer. This allows the browser to quickly display a webpage on your next visit.

The logic behind it is that downloading static files from a WordPress hosting server located far away will take more time than reusing the resources from the user’s computer. This reduces the overall page load time and makes your online experience faster.

Typically browsers will not cache complete web pages unless the web developers specifically tell them to do it (via code). Instead browsers focus on static content like stylesheets, images, and JavaScript.

Why browsers cache static content?

Browser cache static content because it does not change as often as dynamic content.

For example, if you visit a WordPress website then the content of your posts and pages is more likely to change than your WordPress theme.

A typical website template includes several stylesheets, JavaScript files, and images. These files remain the same on each page, so downloading a fresh copy on every page load is simply inefficient.

This is why browsers keep a copy of these static files in a temporary storage folder on your computer, so they use that copy on your next website visit.

If you are using a WordPress caching plugin, then it may add guidelines for browsers to cache your static content along with expiration instructions for each resource type.

This improves user experience and makes the internet faster for everyone.

Why and when you need to clear browser cache?

Most popular browsers are smart about deciding which content to store in cache.

However, sometimes they are unable to figure out that the website you are viewing has changed. In that case, browsers will still load the cached version of files from local storage.

This leads you to see an outdated version of a web page, and the website may not work as intended. If you have made some changes to your website, then you may not see them appear on the live site.

This is when you need to force reload that page in other words clear your browser cache.

Forcing Browsers to Hard Refresh / Reload a Page

Before you clear your browser cache, you may want to try this step because it’s much faster and easier (this is what the Pros do).

Basically, when you click on the refresh button in your browser, it will load static content from browser cache. However by using a keyboard shortcut, you can force the browser to bypass cache and download a fresh version of the web page.

Simply press the following keys to force a hard refresh in your web browser.

  • Google Chrome on Mac: Command + Shift + R
  • Google Chrome on Windows & Linux: CTRL + F5
  • Firefox on Mac: Command + Shift + R
  • Firefox on Windows & Linux: CTRL + F5
  • Safari: Command + Option + R
  • Opera on Mac: Command + Alt + R
  • Opera on Windows: Shift + F5

Normally forcing a hard refresh will solve your problem. However if it dose not, then you need to clear your browser cache to make sure that you are seeing the live version of a web page.

Clearing Browser Cache in Google Chrome

Google Chrome is the most popular browser in the world right now. Here is how to clean the browser cache in Google Chrome.

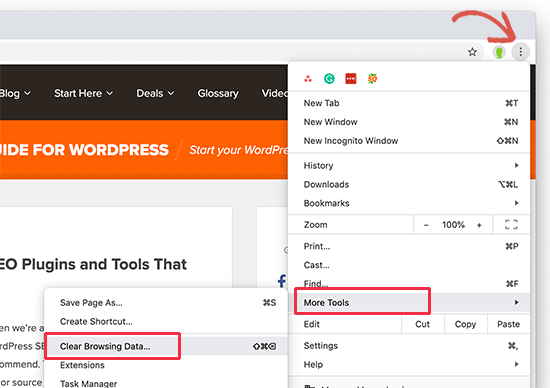
Simply launch the Google Chrome web browser on your computer and then click on the three-dot menu in the top right corner. From the menu, you need to go to More Tools » Clear Browsing Data.

Chrome clear cache tool

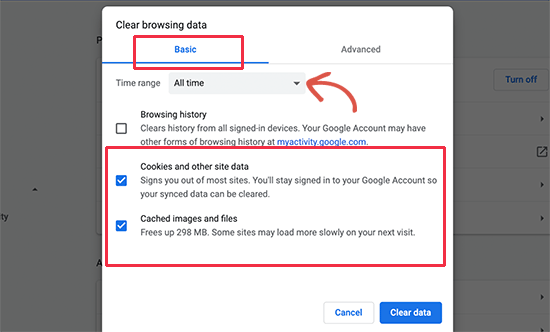
This will launch the Chrome Settings page with ‘Clear Browsing Data’ popup displayed on the screen. You need to switch to the Basic settings and then select ‘All time’ next to time-range option.

Below that, you need to check the box next to the ‘Cached images and files’ option.

You can also select ‘Clear cookies and other site data’ option. It will delete all cookies stored in your browser storage. Doing so will also log you out from all websites and end other sessions.

Next, click on the ‘Clear data’ button and Google Chrome will clear the browser cache.

Clearing Browser cache in Firefox

If you are using Mozilla Firefox, then this is how you can clear your browser cache.

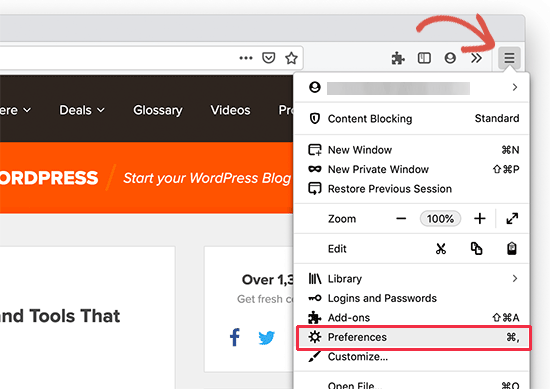
First, you need to launch the Firefox web browser on your computer. After that, you need to click on the hamburger menu on the top-right corner of the screen and select the ‘Preferences’ option.

Firefox preferences

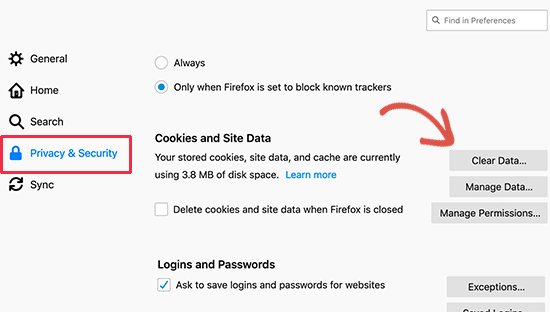
This will bring up the Firefox settings page. From here, you need to switch to the ‘Privacy and Security’ tab, and then click on the ‘Clear Data’ button.

Clear cookies and site data in Firefox

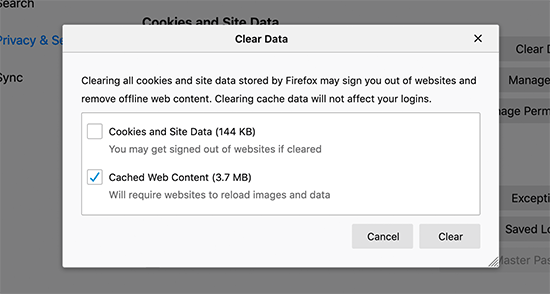
Firefox will now ask what data do you want to clear. You need to select ‘Cached Web Content’ and click on the clear button.

 Delete cached content in Firefox

Firefox will now delete cached web content from your browser storage.

Clearing Browser Cache in Internet Explorer

Internet Explorer was the default web browser on Windows computers until it was replaced by the new Microsoft Edge browser.

However, many users still use it. If you are one of those users, then this is how you’ll clear browser cache in Internet Explorer.

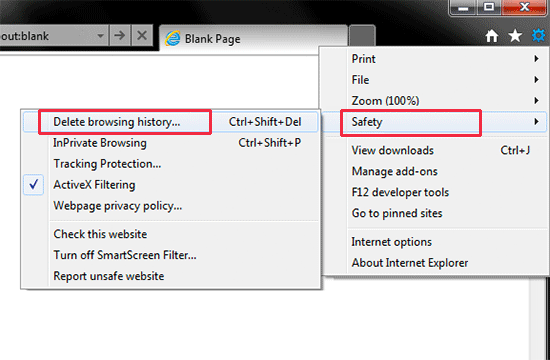
First, you need to launch the Internet Explorer on your computer. After, that you need to click on the gear icon at the top right corner and then select Safety » Delete browsing history….

Clear browsing data in Internet Explorer

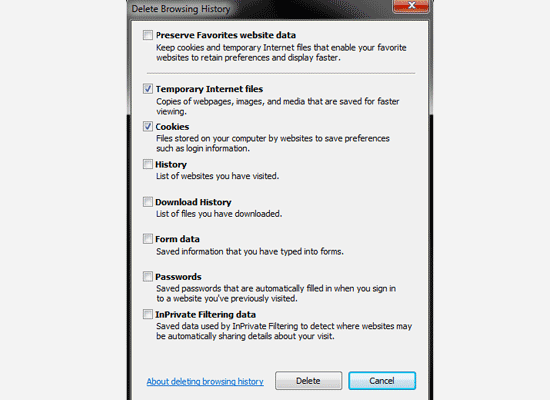
Next, you need to uncheck the option to ‘Preserve Favorites website data’, check ‘Temporary internet files’, and optionally check the ‘Cookies’ option.

Clear cache in the Internet Explorer

Click on the Delete button to continue, and Internet Explorer will empty your browser cache.

Clearing Browser cache in Edge

Edge is the default browser on Windows 10 computers. Here is how you will clear browser cache in Microsoft Edge.

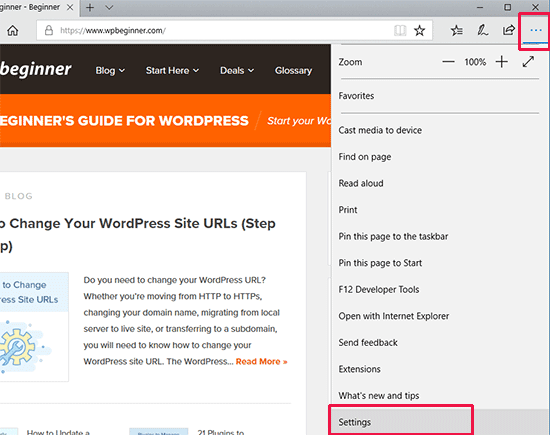
First, you need to open the Edge browser on your computer. After that, you need to click on the three-dot menu at the top-right corner of the screen and select ‘Settings’ option.

Open Microsoft Edge settings

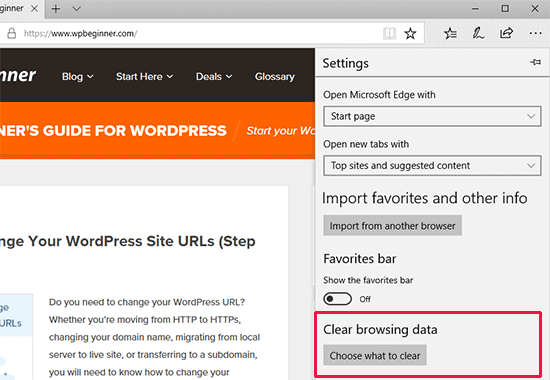
Next, you need to click on the ‘Choose what to clear’ button under the ‘Clear browsing data’ section.

Clear browsing data in Microsoft Edge

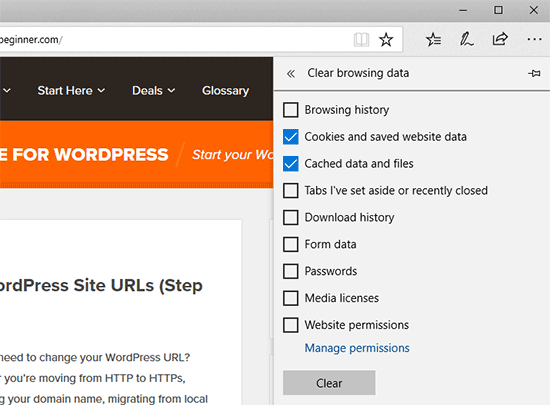
This will bring up the ‘Clear browsing data’ panel. From here, you need to select ‘Cached data and files’ and ‘Cookies and website data’ options.

Clear cache in Microsoft Edge

Click on the ‘Clear’ button and Microsoft Edge will now clear browser cache.

Clearing Browser Cache in Safari

Safari is the default browser on the Mac operating system. Here is how to clear browser cache in Safari.

First, you need to open the Safari web browser on your computer. After that. click on the History » Clear History… option from the top menu.

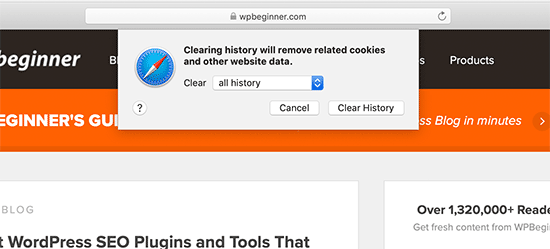
Clearing history in Safari

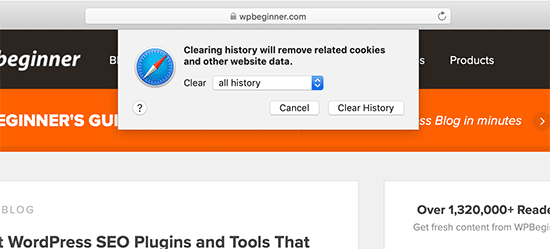
Safari will now ask you to select a time range. Select ‘All history’ from the ‘Clear’ dropdown menu and then click on the ‘Clear History’ button.

Clear all data in Safari

Safari will now delete all temporary data including cache, cookies, and all temporary website data.

If you want to empty the Safari cache without deleting cookies and other data, then you will need to enable the ‘Developer’ menu.

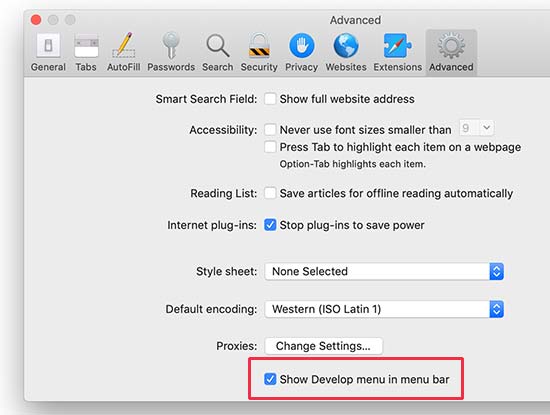
Simply click on the Safari » Preferences from the top menu. This will bring up the settings dialog box where you need to switch to the ‘Advanced’ tab.

Enable Develop menu in Safari

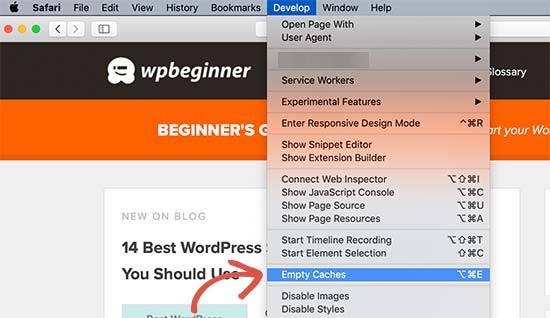
This will add the ‘Develop’ menu in your web browser’s top bar. Next, you need to click on the Develop menu and select ‘Empty Caches’ option.

Safari emptying cache in the developer mode

Safari will now only empty the browser cache without deleting cookies and other temporary data.

Clearing Browser Cache in Opera

If you are using Opera web browser, then here is how to clear your browser cache in Opera.

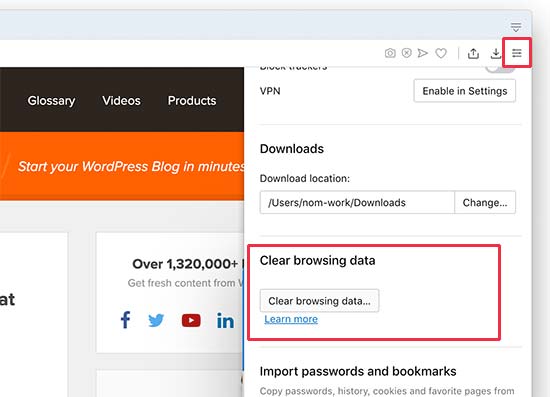
Fist, open the Opera web browser on your computer. After that, click on the menu icon on the top right corner of the screen and then click on the ‘Clear browsing data’ button.

Opera clear browsing data

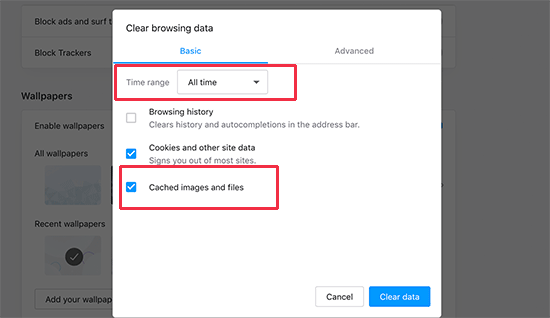
This will bring up a popup on the screen. From here, first you need to select ‘All time’ next to the time range dropdown menu. After that, check the box next to the ‘Cached images and files’ option.

Clearing browser cache in Opera web browser

You can now click on the ‘Clear data’ button, and Opera will empty your browser cache.

What to Do When Clearing Browser Cache Doesn’t Work?

It depends on what you are trying to do at the moment. Let’s take a look at some common scenarios.

1. Can’t see changes you made to your website appear on the live site

The most common culprit for this usually a WordPress caching plugin. Normally, if you are logged in to WordPress, then your caching plugin would show you a non-cached version of your website.

However, due to a plugin misconfiguration, you may end up seeing a cached version of your website.

You’ll need to empty WordPress cache to see the live version. We have a detailed guide on how to clear cache in WordPress with step by step instructions.

2. I cannot log in to my WordPress website

If you are unable to log in to your WordPress website and the login page keeps refreshing, then most likely it is a WordPress settings issue.

See our detailed guide on how to fix WordPress login page refresh and redirecting issue.

3. A third party website is not updating

If you are seeing an outdated version of a third-party website while other users can see the changes, then this could happen due to a lot of reasons.

For example, the website may be temporarily down, and their CDN server is showing a cached copy of the website. It is also possible that their website firewall is not working properly, and it’s serving the cached versions to specific geographic locations.

In that case, you can try using a VPN service. This will allow you to change your IP address and visit the website from a different geographic location.

This will help you further troubleshoot and get to the bottom of the issue.

We hope this article helped you learn how to quickly clear your browser cache in all top browsers. You may also want to see our WordPress troubleshooting tips and the complete WordPress security guide to keep your website secure.

If you liked this article, then please subscribe to our YouTube Channel for WordPress video tutorials. You can also find us on Twitter and Facebook.

The post How to Clear Your Browser Cache in All Major Browsers (Fast Way) appeared first on WPBeginner.