How to Fix a Slow Loading WordPress Dashboard (Step by Step)

Is your WordPress dashboard loading too slow?

Having a slow loading WordPress dashboard is annoying, and it hurts overall productivity when it comes to creating content and managing your website. Also the underlying cause of a slow WordPress dashboard can also impact your website conversions.

In this article, we’ll show you how to easily fix a slow loading WordPress dashboard, step by step.

Fixing a slow loading WordPress admin area

What Causes a Slow Loading WordPress Dashboard?

A slow loading WordPress dashboard can be caused by a number of reasons, but the most common one is limited server resources.

Most WordPress hosting providers offer a set number of resources for each hosting plan. These resources are enough to run most websites.

However, as your WordPress website grows, you may notice slight performance degradation or slower loading across the board. That’s because more people are now accessing your website and consuming server resources.

For the front end section of your website which is what your visitors likely see, you can easily install a WordPress caching plugin to overcome WordPress speed and performance issues.

However, the WordPress admin area is uncached, so it requires more resources to run at the optimal level.

If your WordPress dashboard has become annoyingly slow, then this means a WordPress plugin, a default setting, or something else on the site is consuming too many resources.

That being said, let’s take a look at how to troubleshoot and fix the slow loading WordPress admin dashboard.

Here is an overview of the steps we’ll cover in this article.

1. How to Test Performance of WordPress admin area

Before making any changes, it’s important to measure the speed of your WordPress admin area, so you can get an objective measurement of any improvement.

Normally, you can use website speed test tools to check your website’s speed and performance.

However, the WordPress admin area is behind a login screen, so you cannot use the same tools to test it.

Luckily, many modern desktop browsers come with built-in tools to test the performance of any web page you want.

For example, if you’re using Google Chrome, then you can simply go to the WordPress dashboard and open the Inspect tool by right-clicking anywhere on the page.

Lighthouse to test performance

This will split your browser screen and you will see the Inspect area in the other window either at the bottom or side of your browser window.

Inside the Inspect tool, switch to the Lighthouse tab and click on the Generate Report button.

This will generate a report similar to the Web Vitals report generated by Page Speed Insights.

Performance results

From here, you can see what’s slowing down your WordPress admin area. For instance, you can see which JavaScript files are taking up more resources and affecting your server’s initial response time.

2. Install WordPress Updates

The core WordPress team works hard on improving performance with each WordPress release.

For instance, the block editor team tests and improves performance in each release. The performance team works on improving speed and performance across the board.

If you are not installing WordPress updates, then you are missing out on these performance improvements.

Similarly, all top WordPress themes and plugins release updates that not only fix bugs but also address performance issues.

To install updates, simply go to Dashboard » Updates page to install any available updates.

WordPress updates

For more details, see our guide on how to properly update WordPress (infographic).

3. Update the PHP Version Used by Your Hosting Company

WordPress is developed using an open-source programming language called PHP. At the time of writing this article, WordPress requires at least PHP version 7.4 or greater. The current stable version available for PHP is 8.1.6.

Most WordPress hosting companies maintain the minimum requirements to run WordPress, which means they may not be using the latest PHP version out of the box.

Now, just like WordPress, PHP also releases new versions with significant performance improvements. By using an older version, you are missing that performance boost.

You can view which PHP version is used by your hosting provider by visiting the Tools » Site Health page from your WordPress dashboard and switching to the ‘Info’ tab.

Check PHP version

Luckily, all reliable WordPress hosting providers offer an easy way for customers to upgrade their PHP version.

For instance, if you are on Bluehost, then you can simply login to your hosting control panel and click on the Advanced tab in the left column.

Multi PHP in Bluehost

From here, you need to click on the MultiPHP Manager icon under the Software section.

On the next page, you need to select your WordPress blog and then select the PHP version that you want to use.

Change PHP version

For other hosting companies, see our complete guide on how to update your PHP version in WordPress.

4. Increase PHP Memory Limit

Your web hosting server is like any other computer. It needs memory to efficiently run multiple applications at the same time.

If there is not enough memory available for PHP on your server, then it would slow down your website and may even cause it to crash.

You can check the PHP memory limit by visiting Tools » Site Health page and switching to the Info tab.

Check PHP memory limit

You’ll find PHP memory limit under the Server section. If it is less than 500M, then you need to increase it.

You can increase PHP memory limit by simply entering the following line in your wp-config.php file.

define( 'WP_MEMORY_LIMIT', '512M' );

For more details, see our article on increasing the PHP memory limit in WordPress.

5. Monitor WordPress Plugins for Performance

Some WordPress plugins may run inside the WordPress admin area. If plugin authors are not careful, their plugins can easily consume too many resources and slow down your WordPress admin area.

One way to find out about such plugins is by installing and activating the Query Monitor plugin. For more details, see our step by step guide on how to install a WordPress plugin.

Upon activation, the plugin will add a new menu item to your WordPress toolbar.

Query Monitor tab

Clicking on it will show performance results for the page you are currently viewing on your website.

This will bring up the Query Monitor console.

Here you need to switch to ‘Queries by Component’ tab on the left side. From here, you can see the performance impact of plugins and find out which one is taking up too many resources.

Query Monitor results

You can now temporarily disable the slow plugins and see if that improves performance.

If it does, then you can reach out to plugin author and seek support or find an alternative plugin.

6. Install a WordPress Caching Plugin

WordPress caching plugins not only improve your website speed, but they can also help you fix a slow loading admin dashboard.

A good WordPress caching plugin helps you optimize page load speed, CSS and JavaScript delivery, your WordPress database, and more.

This frees up resources on your WordPress hosting server that your WordPress admin area can utilize for improved performance.

We recommend using WP Rocket. It is the best WordPress caching plugin on the market. It works out of the box and makes it super easy to optimize your WordPress performance.

WP Rocket dashboard

For more details, see our guide on how to properly install and setup WP Rocket in WordPress.

7. Tweak Admin Screens & Disable WordPress Dashboard Widgets

WordPress automatically loads some widgets on the dashboard screen. This includes Quick Draft, Events and News, Site Health, and more.

Some WordPress plugins add their own widgets to the dashboard screen as well. If you have a lot of these widgets loading on your dashboard, it could slow things down.

You can turn off these widgets by simply clicking on the Screen Options button and unchecking the box next to the widgets.

Screen Options to remove unnecessary widgets

Similarly, you can use the Screen Options menu to show and hide sections on different admin screens.

For instance, you can choose the columns you want to see on the posts screen.

Clean up posts screen

8. Fix Slow WooCommerce Admin Dashboard

If you run an online store using WooCommerce, then there are some specific WooCommerce features that can affect the performance of your WordPress admin area.

For instance, you can turn off the WooCommerce dashboard widget by clicking on the Screen Options menu.

Similarly, you can change the information displayed on the Products page.

Products page

After a while, your WooCommerce store may add unnecessary data to your WordPress database.

If you are already using WP Rocket, then you can simply switch to the Database tab under plugin settings. From here, you can delete transients and optimize your WordPress database with a click.

Database optimize

9. Lock WordPress Admin Area and Login Pages

Random hackers and DDoS attacks are common internet nuisances that can affect WordPress websites.

These automated scripts access WordPress login pages and attempt to login hundreds of times in a short amount of time.

They may not be able to gain access to your WordPress website, but they would still be able to slow it down.

One easy way to block these scripts is by locking your WordPress admin directory and login pages.

If you are on Bluehost, then you can simply go to your hosting control panel and switch to the Advanced Tab. From here, you need to click on the Directory Privacy icon.

Directory Privacy

Next, you need to locate wp-admin directory (usually found inside public_html folder).

Then simply click on the Edit button next to it.

WordPress admin folder

Next, you will be asked to provide a name for your protected directory.

Name folder

Click on the Save button to continue. The control panel will save your options and you’ll need to click on the Go Back button to continue.

After that, you will need to create username and password for the protected folder.

Create username and password

Now, when you visit your WordPress admin area, you will be prompted to enter username and password.

Login prompt

For more details, see our tutorial on how to password protect the WordPress admin directory.

Password Protect WordPress Login Page

Next, you would want to block access to WordPress login page. For this, you’ll need to manually edit .htaccess file on your website and generate a password file.

First, connect to your WordPress website using an FTP client or the File Manager app inside your hosting control panel.

After that, go to the root folder of your website (the root folder is where you can see the wp-admin, wp-includes, and wp-content folders).

Here you need to create a new file and name it .htpasswd.

Create htpasswd file

Next, you need to visit this online tool to generate a .htpasswd string.

You need to use the same username and password that you used for the WordPress admin directory.

Then click on the Generate button.

Generate password

The tool will generate a username and password string under the output box.

You need to copy and paste this string inside the .htpasswd file you created earlier.

Next, you need to edit the .htaccess file and copy and paste the following code inside it.

### BEGIN BASIC BLOCK
<Files wp-login.php>
AuthType Basic
AuthName "Protected Folder"
AuthUserFile /home/username/public_html/yourwebsite/.htpasswd
Require user jsmith
Satisfy All
</Files>
### END BASIC BLOCK

Don’t forget to replace jsmith with your own username and change AuthUserFile value with the path to your .htpasswd file. You can find it inside the File Manager app.

You can now visit your WordPress login page to see the password protection in action.

10. Manage WordPress Autosave Intervals

The WordPress block editor comes with built-in autosave feature. It allows you to easily restore your content in case you close the editor without saving your changes.

However, if multiple users are working on your website during peak traffic, then all those autosave requests will slow down WordPress admin area.

Now autosave is a crucial feature and we don’t recommend turning it off. However, you can slow it down to reduce the performance impact.

Simply add the following line to your wp-config.php file.

define( 'AUTOSAVE_INTERVAL', 120 )

This line simply tells WordPress to run autosave once every 2 minutes (120 seconds) instead of 1.

Reduce Heartbeat API Calls

WordPress uses something called the heartbeat API to send Ajax calls to a server without reloading a page. This allows WordPress to show other authors that a post is being edited by another user, and it enables plugin developers to show you notifications in real-time.

By default, the API pings back every 60 seconds. If multiple authors are working on your website at the same time, then these server calls can become resource-intensive.

If you are already using WP Rocket, then it will automatically reduce heartbeat API activity to pingback every 120 seconds.

Reduce Heartbeat API activity using WP Rocket

Alternately, you can also use their standalone plugin called Heartbeat Control to reduce Heartbeat API calls.

We recommend reducing them to at least 120 seconds or more.

Heartbeat API calls

11. Upgrade or Switch to Better WordPress Hosting

All WordPress performance issues depend on the infrastructure provided by your WordPress hosting providers.

This limits your ability to improve performance to the resources offered by your hosting provider.

The above tips will certainly help you reduce load on your WordPress server, but it may not be enough for your hosting environment.

To improve performance even more, you can move your WordPress site to a new host and sign up with a different hosting provider.

We recommend using Bluehost, as one of the top WordPress hosting companies. Their shared hosting plans come with built-in caching which improves WordPress performance.

Bluehost Coupon Code

However, as your website grows you may need to upgrade your hosting plan.

High traffic sites would benefit from moving to a managed WordPress hosting platform like WP Engine or SiteGround.

At WPBeginner, we use SiteGround to host our website.

We hope this article helped you learn how to fix a slow loading WordPress dashboard. You may also want to see our complete WordPress security handbook or see our pick of the best WordPress plugins to grow your business.

If you liked this article, then please subscribe to our YouTube Channel for WordPress video tutorials. You can also find us on Twitter and Facebook.

The post How to Fix a Slow Loading WordPress Dashboard (Step by Step) first appeared on WPBeginner.

How Fast PHP & MySQL Can Boost Website Speed (Beginner’s Guide)

Ever wondered what’s the impact of PHP and MySQL on your website speed?

WordPress is written in PHP programming language and uses MySQL as the database. Both programs run on your web server thus impacting overall performance.

In this article, we’ll discuss how fast PHP and MySQL can boost website speed. We’ll also talk about how to enable it for your website.

Improving website speed with fast PHP and MySQL

How Faster PHP + MySQL Affects WordPress Performance

WordPress is mainly written in PHP, a programming language that runs on your web server. It stores your website content in a MySQL database.

Both PHP and MySQL run on your web server as an application. When more users visit your website, PHP and MySQL take up more server resources.

Most websites address this by using a WordPress caching plugin. However, processes like .htaccess rules, PHP extensions, and SQL queries can still increase server load.

Faster PHP and MySQL optimize these regular processes to improve their performance and speed. The more traffic your website gets, the more of a performance improvement you’ll see.

This is where Ultrafast PHP can help.

What is Ultrafast PHP?

Ultrafast PHP is an optimized version of PHP which is built by the team at SiteGround. Since WPBeginner is hosted on SiteGround’s Enterprise hosting plan, we were one of the first websites to try it and see the speed benefits.

Now SiteGround is making this feature available to all their customers on their GrowBig, GoGeek and Cloud hosting plans.

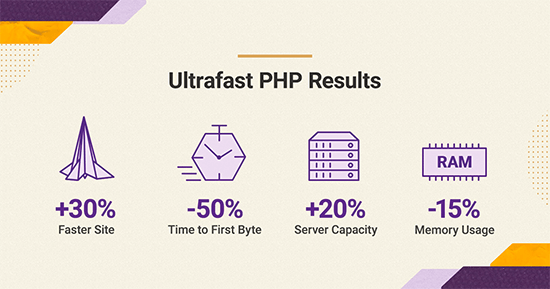
For high-traffic websites, Ultrafast PHP can increase performance by up to 30% and reduce TTFB (time to first byte) by 50%.

Ultrafast PHP stats by SiteGround

Your server load will also be reduced, and it will be able to run up to 20-30% more processes while consuming 15% less memory (RAM).

SiteGround is one of the best WordPress hosting companies on the market. They are also an officially recommended WordPress hosting provider.

Since they use Google Cloud Platform for their servers, this allowed them the flexibility to work on an optimized PHP setup (Ultrafast PHP) that is optimized for their customers’ needs.

Who Needs Ultrafast PHP?

If you have a medium sized WordPress website or an online store, then you need Ultrafast PHP to help you boost performance.

Ultrafast PHP is currently available to users on the GrowBig, GoGeek, and Cloud plans. Usually, these are the users with busier websites that often end up hitting server resource limitations.

This feature is not available to users using the old control panel on SiteGround. However if your hosting account dashboard is using SiteGround’s new client area and Site Tools control panel, then you can turn on Ultrafast PHP. We’ll show you how below.

SiteGround new client area and dashboard

If your website is super small, then you may not notice much difference. We recommend that you use a caching plugin like WP Rocket or SiteGround’s own SG Optimizer plugin.

If you have a small business website or new blog with not much traffic yet, then you may not need Ultrafast PHP because the latest version of PHP is already optimized for performance. So make sure you are using the latest PHP version for your website.

How to Enable Ultrafast PHP on SiteGround

It is super-easy to enable Ultrafast PHP for your WordPress website on SiteGround. Your hosting account should meet the following criteria:

  • Your sites are hosted on SiteGround’s GrowBig, GoGeek or Cloud plans
  • Your account is using the new client area and site tools control panel

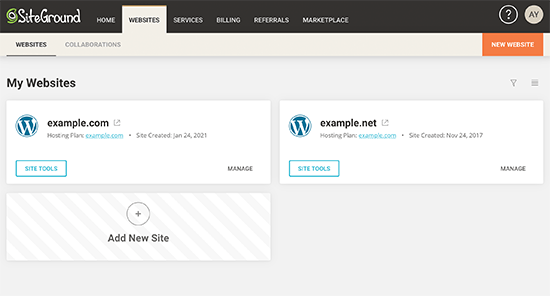
Simply log in to your account and click on the ‘Websites’ menu on the top. After that, click on the Site Tools button next to the website where you want to enable Ultrafast PHP.

SiteGround Site Tools

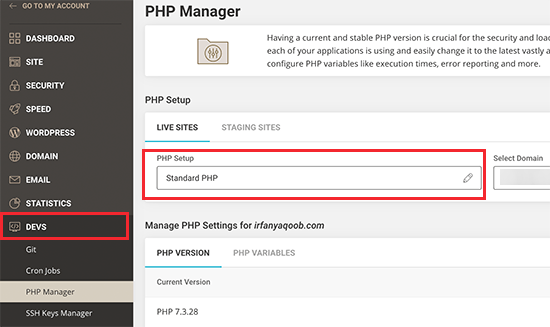
From here, you need to click on the PHP Manager menu located under the Dev tab in the left column.

PHP Manager in SiteGround

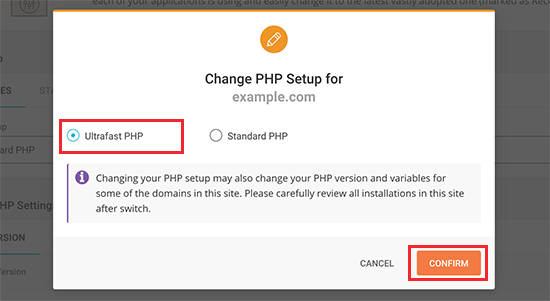
Now, you need to click on the Standard PHP option to change it. This will bring up a popup where you can switch to Ultrafast PHP.

Select Ultrafast PHP

Click on the Confirm button to continue.

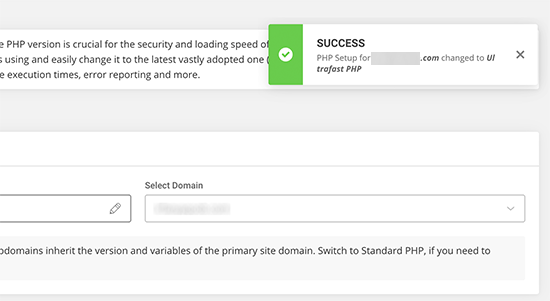
You will now see a success message informing you that Ultrafast PHP is now enabled for your website.

Ultrafast PHP enabled

Testing Your Website Speed after Enabling Ultrafast PHP

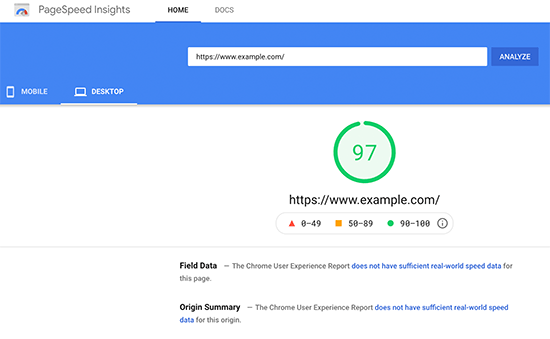
You can use Google Pagespeed Insights or any other website speed testing tool to test your performance.

Pagespeed Insights

Take a look at metrics like server response time and time to first byte to gauge the performance of your website.

We hope this article helped you learn how fast PHP and MySQL can boost website speed. You may also want to see our complete WordPress performance optimization guide for more tips to speed up your website, and check out the best email marketing services for small business.

If you liked this article, then please subscribe to our YouTube Channel for WordPress video tutorials. You can also find us on Twitter and Facebook.

The post How Fast PHP & MySQL Can Boost Website Speed (Beginner’s Guide) appeared first on WPBeginner.
13 Crucial WordPress Maintenance Tasks to Perform Regularly

Ever wondered which important maintenance tasks you should perform regularly on your WordPress site?

Routine WordPress maintenance tasks take very little time, but they ensure that your site is secure, safe, and running at peak performance.

In this article, we will share the most crucial WordPress maintenance tasks to perform regularly, and how to do each one of them.

Crucial maintenance tasks to perform on your WordPress site regularly

Why and When to Perform WordPress Maintenance Tasks

Your WordPress site is a powerful system made of several parts. This includes your WordPress hosting, the WordPress software itself, plugins, and themes.

On top of that, you add your own content with text and images. Together, all of these make a website that is loved by your visitors and customers.

After starting a blog or website, many website owners do not perform maintenance checks unless something breaks.

However, if you want optimal performance, then you need to perform simple maintenance tasks on a regular basis. These maintenance tasks ensure that your website is always in the best shape.

How often should you perform WordPress maintenance tasks?

If you run a busy website with a lot of traffic, then you should go through this maintenance checklist every three months. For smaller websites with low traffic and content, you need to do these maintenance tasks every six months.

Let’s take a look at the essential WordPress maintenance tasks you need to perform and how to do them. You can use these quick links to jump straight to each task.

  1. Change All Your WordPress Passwords
  2. Create a Complete Backup of Your Website
  3. Check and Update All WordPress Files
  4. Check and Delete Spam Comments
  5. Test All Your WordPress Forms
  6. Optimize Your WordPress Database
  7. Run Performance Tests
  8. Find and Fix 404 Errors
  9. Find and Fix Broken Links
  10. Perform a Thorough Content and SEO Audit
  11. Optimize Images on Your WordPress Site
  12. Review WordPress Security Logs
  13. Troubleshoot Maintenance Tasks

1. Change All Your WordPress Passwords

Change all your passwords regularly

Passwords are your first defense against unauthorized access to your website. You should always use strong unique passwords for all your online accounts. These include your WordPress website, FTP accounts, and database.

However, even if you are using strong passwords, they could be compromised without you even knowing.

That’s why WordPress security experts recommend changing your WordPress passwords regularly. This includes passwords for your WordPress admin area, FTP or SSH accounts, and your WordPress database password.

For more help, check out out our beginner’s guide to changing your password in WordPress.

The problem with strong passwords is that they are harder to remember. This is why we recommend using password manager apps like LastPass to securely store and easily fill passwords without having to type them.

For details, see our guide on the best ways to manage WordPress passwords.

2. Create a Complete Backup of Your Website

Create manual backup

Backups are one of the most important WordPress plugins in your arsenal.

There are plenty of great WordPress backup plugins like UpdraftPlus or BackupBuddy. These can help you completely automate the WordPress backup process.

However, sometimes your backup solution may suddenly stop working without you even noticing.

Once in a while, you need to manually run your backup plugin to create a complete backup of your website. After running the backup, check that your backup files are properly stored at the remote location of your choice (Dropbox, Google Drive, etc).

3. Check and Update All WordPress Files

Check and update all WordPress files

WordPress comes with a built-in system to manage updates for WordPress core, plugins, and themes. You should always update WordPress to use the latest version as well as keeping all your plugins and themes updated.

With that said, there are some situations when you may miss an update. For example, when a premium plugin or theme’s license expires, it may fail to check for an update.

Go to the WordPress Updates page to manually check for updates. Review all your installed plugins and themes to make sure that they are running the latest version. If they’re not, then make sure to document a reason why you’re choosing not to update.

4. Check and Delete Spam Comments

Review spam comments

Many website owners use Akismet to combat comment spam in WordPress. It automatically keeps spam away from your comment moderation queue.

However, sometimes Akismet may end up marking a legitimate comment as spam. Once in a while, you need to take a quick look at the spam comments to ensure that there are no real comments incorrectly marked as spam.

Once you are done, you can safely delete all spam comments from your website. If you have thousands of spam comments, then you should batch delete all spam comments in WordPress.

It will not necessarily improve performance, but it will ensure that you don’t miss genuine comments.

5. Test All Your WordPress Forms

Test all your WordPress forms

WordPress form builder plugins like WPForms make it super easy to create beautiful forms on your website.

However due to misconfiguration on your WordPress hosting server or your email service provider, sometimes these forms may suddenly stop sending emails.

You need to check all forms on your website to make sure that they are working properly. If a form is not working, then see our guide on fixing the WordPress not sending email issue.

As a best practice, we recommend using WP Mail SMTP plugin because it has email logging, and it will alert you when an email fails to send.

6. Optimize Your WordPress Database

Optimize your WordPress database

WordPress stores most data in your WordPress database. It contains all your content, comments, users, and settings.

Over time, your database may gather a lot of unnecessary data. This increases your WordPress backup sizes which may affect uploading, downloading, and restoring backups.

Optimizing your WordPress database allows you to clean up clutter, defragment tables, and improve database performance.

For step by step instructions, see our guide on how to optimize your WordPress database with one click.

7. Run Performance Tests

Run performance tests

Many users optimize their WordPress performance when they first start their website, and then forget about it.

As time goes by, you add new content, install new plugins, or may even change the theme. All of these items may affect the performance of your WordPress site.

Faster websites are not just good for user experience, but they also improve your SEO rankings. This is why you need to regularly do a thorough performance review of your website.

When reviewing your site’s performance, don’t just limit it to improving your homepage. Also test your most popular content and all your important pages.

For best results, follow our step by step guide to boost WordPress speed and performance.

8. Find and Fix 404 Errors

Fix 404 errors

When a user requests a page that doesn’t exist on your website, then WordPress will show them a 404 error page.

404 errors that occur because a user mistyped an address are normal and nothing to be worried about. However, 404 errors that occur because a page is no longer available are frustrating for users and create a bad user experience.

If you are not already tracking 404 error pages, then see our guide on how to easily track 404 error pages in WordPress and redirect them.

Find and fix broken links in WordPress

As your website grows, you will realize that some external websites that you linked to in your older articles do not exist anymore. Some may have moved to new locations, while others may just disappear.

The broken links issue is not just limited to external links. You might accidentally add broken images, poorly formatted links, or misspell your own links. This can be frustrating for your visitors and harms your site’s user engagement.

You need to check your website for broken links as part of your WordPress maintenance routine. For instructions, see our guide on how to find and fix broken links in WordPress.

10. Perform a Thorough Content and SEO Audit

SEO Audit

The next thing you need to include in your regular maintenance tasks is a thorough in-depth review of your content. This is where the data from Google Search Console and Google Analytics comes in.

Google Analytics shows you where your visitors are coming from and what they are doing on your website. This data allows you to discover content on your website where you have lots of traffic but your conversion rate is low.

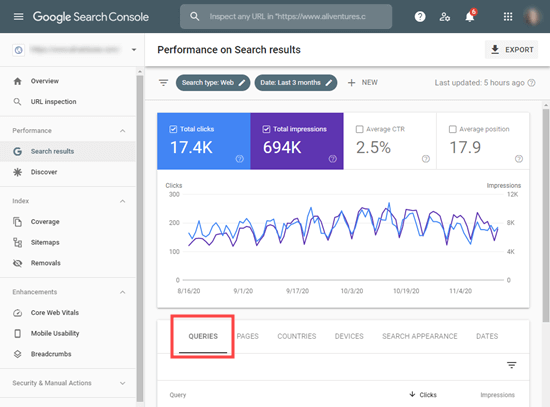
Google Search Console’s Search Performance page can help you find search keywords where your site appears in the results. You can sort it to show you keywords where your site can easily rank higher by updating those articles.

The Queries tab in Google Search Console

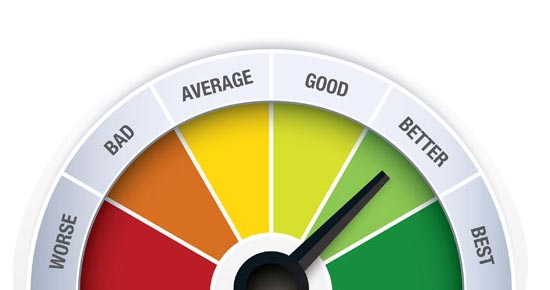
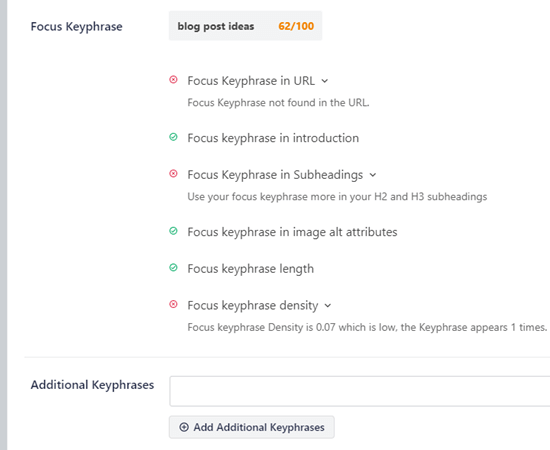
If you are using All in One SEO, then you can set a particular keyword as your focus keyphrase. All in One SEO will give you a True SEO Score plus specific optimization tips.

The Focus Keyphrase score in All in One SEO

Even with an excellent SEO score, you can still further improve your content. Try adding new information, adding images, and linking to it from other pages on your website.

For more SEO tips, follow our ultimate step by step WordPress SEO guide for beginners.

Pro Tip: You can use a tool like SEMRush to run automatic website audits. This is what we use on WPBeginner.

11. Optimize Images on Your WordPress Site

Optimize images and media library

Images take longer to load than text. This means they decrease your page load speed. You will discover some overly large images during the performance checkup of your site.

However, you will likely miss those in your less popular articles. If you run a multi-author WordPress site, then some of your authors may not be as careful about image sizes as you are.

Reviewing your images and media library allows you to stay on top of the issue. You can perform this check to find images that can be reduced in size or images that are just too large.

For more information, see our guide on how to save images optimized for the Web.

12. Review WordPress Security Logs

WordPress security review

Some WordPress users don’t realize that their site is under attack until it slows down or their search rankings drop.

We have already mentioned some security precautions like changing passwords, and creating manual backups as proactive measures. You also need to review your site’s access and error logs to see if there is any unusual activity on your site.

Another good option is to add a security audit plugin to your site.

We also recommend using Sucuri. It is a website security company that offers a website firewall to protect your website against common threats.

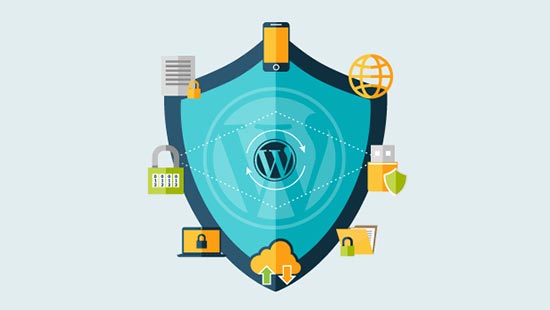
For a complete security audit of your WordPress site, follow the instructions in our step by step ultimate WordPress security guide.

13. Troubleshoot Maintenance Tasks

Troubleshooting issues caused by maintenance tasks themselves

Most WordPress website maintenance tasks are quite harmless and will not affect your website’s normal functioning. However, some may slow down your site, like checking for broken links or running an image optimizer plugin.

If you run a staging site, then you can perform your maintenance tasks on your staging site and then push them live.

However, most WordPress users don’t run a staging site. In that case, you will have to expect a temporary slow site and some unexpected errors.

One way to deal with this is by putting your WordPress site in maintenance mode. Alternatively, you can perform these tasks during your low traffic hours.

If you run across an issue, then see our guide on how to fix common WordPress errors. If the error you are seeing is not listed there, then follow the steps in our WordPress troubleshooting guide. It will help you locate the problem and find a solution.

We hope this article helped you learn crucial WordPress maintenance tasks to perform regularly on your website. You may also want to see our tips on how to increase your blog traffic and our comparison of best WordPress page builders to create custom design layouts without any code.

If you liked this article, then please subscribe to our YouTube Channel for WordPress video tutorials. You can also find us on Twitter and Facebook.

The post 13 Crucial WordPress Maintenance Tasks to Perform Regularly appeared first on WPBeginner.
The Ultimate Guide to Boost WordPress Speed & Performance

Do you want to speed up your WordPress site?

Fast-loading pages improve the user experience, increase your pageviews, and can even help with your WordPress SEO.

In this article, we will share the most useful WordPress speed optimization tips to boost WordPress performance and speed up your website.

Boost WordPress speed and performance

Unlike other “X best WordPress caching plugin” lists or generic “X tips to speed up WordPress” tutorials, this article is a comprehensive guide to WordPress performance optimization.

We tried to cover everything from why speed is important to what slows down your WordPress site and actionable steps that you can take to improve your WordPress speed immediately.

To make it easy, we have created a table of contents to help you navigate through our ultimate guide to speeding up your WordPress site.

Table of Contents

Basics of WordPress Performance

Speeding Up WordPress in Easy Steps (No Coding)

WordPress Performance Optimization Best Practices

Fine-Tuning WordPress for Speed (Advanced)

Why Speed Is Important for Your WordPress Site

Studies show that from 2000 to 2016, the average human attention span dropped from 12 seconds to 8 seconds. Today, it sits at around 8.25 seconds on average.

What does this mean for you as a website owner?

It means that you have very little time to show users your content and convince them to stay on your WordPress website.

A slow website means users will potentially leave your page before it even loads.

According to a StrangeLoop case study that involved Amazon, Google, and other larger sites, a 1 second delay in page load time can lead to a 7% loss in conversions, 11% fewer page views, and a 16% decrease in customer satisfaction.

Strangeloop speed study

On top of that, Google and other search engines have already started penalizing slower websites by pushing them down in the search results, which means lower traffic for slow websites.

To sum it all up, if you want more traffic, subscribers, and revenue from your website, then you must make your WordPress website FAST!

How to Check Your WordPress Website Speed

Often beginners think that their website is OK just because it doesn’t feel slow on their computer. That’s a HUGE mistake.

Since you frequently visit your own website, modern browsers like Chrome store your website in the cache and automatically prefetch it as soon as you start typing an address. This makes your website load almost instantly.

However, a normal user who is visiting your website for the first time may not have the same experience. In fact, users in different geographical locations will have a completely different experience.

This is why we recommend that you test your website speed using a tool like IsItWP’s WordPress speed test.

It is a free online tool that allows you to test your website’s speed.

For more recommendations, you can see our guide on how to properly run a website speed test.

After you run your website speed test, you might be wondering what website speed you should aim for.

A good page load time is under 2 seconds.

However, the faster you can make it, the better. A few milliseconds of improvements here and there can add up to shaving off half or even a full second from your load time.

[Back to Top ↑]

What Slows Down Your WordPress Website?

Your speed test report will likely have multiple recommendations for improvement. However, most of that is technical jargon that is hard for beginners to understand.

Learning what slows down your website is the key to improving performance and making smarter long-term decisions.

The primary causes for a slow WordPress website are:

  • Web Hosting – When your web hosting server is not properly configured, it can hurt your website speed.
  • WordPress Configuration – If your WordPress site is not serving cached pages, then it will overload your server and cause your website to be slow or crash entirely.
  • Page Size – Pages load slowly if you use images that aren’t optimized for the web.
  • Bad Plugins – If you are using a poorly coded plugin, then it can significantly slow down your website.
  • External scripts – External scripts such as ads, font loaders, and so on can also have a huge impact on your website performance.

Now that you know what slows down your WordPress website, let’s take a look at how to speed up your WordPress website.

Pro Tip: Want to reduce the number of plugins on your site? Start using WPCode, which is a powerful code snippet management plugin for WordPress. It will easily help you reduce at least 5 plugins.

Importance of Good WordPress Hosting

Your WordPress hosting service plays an important role in website performance. A good shared hosting provider like Bluehost or SiteGround takes extra measures to optimize your website for performance.

However, on shared hosting, you share the server resources with many other customers. This means that if your neighboring site gets a lot of traffic, then it can impact the entire server performance, which, in turn, will slow down your website.

On the other hand, using a managed WordPress hosting service gives you the most optimized server configurations to run WordPress. Managed WordPress hosting companies also offer automatic backups, automatic WordPress updates, and more advanced security configurations to protect your website.

We recommend WP Engine as our preferred managed WordPress hosting provider. They are also the most popular provider in the industry. (See our special WP Engine coupon.)

[Back to Top ↑]


Speeding Up WordPress in a Few Easy Steps (No Coding)

We know that making changes to your website configuration can be a terrifying thought for beginners, especially if you are not a tech geek.

But don’t worry, you are not alone. We have helped thousands of WordPress users improve their WordPress performance.

We will show you how you can speed up your WordPress site with just a few clicks (no coding required).

If you can point and click, then you can do this!

Install a WordPress Caching Plugin

WordPress pages are dynamic. This means they are built on the fly every time someone visits a post or page on your website.

To build your pages, WordPress has to run a process to find the required information, put it all together, and then display it to your user.

This process involves a lot of steps, and it can really slow down your website when you have multiple people visiting it at once.

That’s why we recommend every WordPress site use a caching plugin. Caching can make your WordPress site anywhere from 2x to 5x faster.

Here’s how it works.

Instead of going through the whole page generation process every time, your caching plugin makes a copy of the page after the first load and then serves that cached version to every subsequent user.

How caching works

As you can see in the graphic above, when a user visits your WordPress site, your server retrieves information from a MySQL database and your PHP files. It then puts it all together into HTML content, which is served to the user.

It’s a long process, but you can skip a lot of it when you use caching instead.

There are a lot of good WordPress caching plugins available, but we recommend using either WP Rocket (premium) or WP Super Cache (free).

Check out our step-by-step guide on how to install and set up WP Super Cache on your WordPress site. It’s not difficult to set up, and your visitors will notice the difference.

Also, many WordPress hosting companies like Bluehost and SiteGround offer caching solutions.

SiteGround SG Optimizer

If you are using SiteGround, then your WordPress site will come pre-installed with their SG Optimizer. This plugin has all the powerful features that you’d get with a premium WordPress caching plugin like WP Rocket.

SG Optimizer

The best part is that it’s specially optimized for the SiteGround Google Cloud servers to give you superior performance results.

Aside from caching, you also get various other performance settings, WebP image conversion in WordPress, database optimization, CSS minification, GZIP compression, and more.

It also has dynamic caching features to help you speed up your eCommerce website.

Bluehost Caching

If you are using Bluehost, then you can go to the Websites » Speed section to adjust your caching settings.

Bluehost caching levels

If you are using a managed WordPress hosting provider, then you don’t need a caching plugin because it is built-in and turned on by default.

Bonus: You can combine caching plugins with a web application firewall like CloudFlare or Sucuri for maximum performance boost.

[Back to Top ↑]

Optimize Images for Speed

Optimized vs Unoptimized Images in WordPress

Images bring life to your content and help boost engagement. Researchers have found that using colored visuals makes people 80% more likely to read your content.

However, if your images aren’t optimized, then they could be hurting more than helping. In fact, non-optimized images are one of the most common speed issues that we see on beginner websites.

Before you upload a photo directly from your phone or camera, we recommend that you use photo editing software to optimize your images for the web.

In their original formats, these photos can have huge file sizes. But based on the image file format and the compression you choose in your editing software, you can decrease your image size by up to 5x.

At WPBeginner, we only use two image formats: JPEG and PNG.

Now you might be wondering: what’s the difference?

Well, the PNG image format is uncompressed. When you compress an image it loses some information, so an uncompressed image will be higher quality with more detail. The downside is that it’s a larger file size, so it takes longer to load.

JPEG, on the other hand, is a compressed file format that slightly reduces image quality, but it’s significantly smaller in size.

So how do we decide which image format to choose?

  • If our photo or image has a lot of different colors, then we use JPEG.
  • If it’s a simpler image or we need a transparent image, then we use PNG.

Below is a comparison chart of the file sizes achieved by different compression tools on one particular image.

Image Compression Comparison Table

As you can see in the chart, the image format you use can make a HUGE difference in file size, and this will affect your website performance.

For details on exactly how to optimize your images using Photoshop and other popular editing tools, without sacrificing quality, see our step-by-step guide on how to optimize images for web performance without losing quality.

[Back to Top ↑]


WordPress Performance Optimization Best Practices

After installing a caching plugin and optimizing your images, you’ll notice that your site will start loading a lot faster.

But if you really want to keep your website as fast as possible, then you’ll need to use the best practices listed below.

These tips aren’t too technical, so you don’t need to know any code to implement them. But using them will prevent common problems that will slow down your website.

Keep Your WordPress Site Updated

Updating WordPress Core From the Dashboard

As a well-maintained, open-source project, WordPress is updated frequently. Each update will not only offer new features but it will also fix security issues and bugs. Your WordPress theme and plugins may have regular updates, too.

As a website owner, it’s your responsibility to keep your WordPress site, theme, and plugins updated to the latest versions. Not doing so may make your site slow and unreliable, and make you vulnerable to security threats.

For more details on the importance of updates, see our article on why you should always use the latest WordPress version.

[Back to Top ↑]

Optimize Background Processes

Background processes in WordPress are scheduled tasks that run in the background of your WordPress site. The following are some examples of background tasks that run on a WordPress site:

  • WordPress backup plugin tasks
  • WordPress cron jobs to publish scheduled posts
  • WordPress cron jobs to check for updates
  • Search engines and other crawlers trying to fetch content

Tasks like cron jobs for scheduled posts and updates have minimal impact on website performance.

However, other background processes like backup plugins and excessive crawling by search engines can slow down a website.

You need to make sure that your WordPress backup plugin only runs during low-traffic times on your website. You also need to adjust the frequency of backups and data that needs to be backed up.

For example, if you are creating a complete daily backup while you only publish new content twice a week, then you need to adjust that.

If you want more frequent backups such as real-time backups, then we recommend using a SaaS solution like BlogVault so you are not taxing your server.

As for crawling, you need to keep an eye on your crawl reports in the Google Search Console. Frequent crawls that result in errors can cause your website to slow down or become unresponsive.

See our complete Google Search Console guide to learn how to adjust the crawl rate.

[Back to Top ↑]

Use Excerpts on Homepage and Archives

Preview summary on WPBeginner

By default, WordPress displays the full content of each article on your homepage and archives. This means your homepage, categories, tags, and other archive pages will all load slower.

Another disadvantage of showing full articles on these pages is that users don’t feel the need to visit the actual article. This can reduce your pageviews and the time your users spend on your site.

In order to speed up your loading times for archive pages, you can set your site to display excerpts instead of the full content.

You can navigate to Settings » Reading and select ‘Excerpt’ instead of ‘Full text’ next to the setting about what should be shown for each article in a feed.

RSS Feeds Can Contain Full Text or an Excerpt of Each Post

For more details on the pros and cons of displaying summaries, see our article on full post vs summary (excerpt) in your WordPress archive pages.

[Back to Top ↑]

Split Comments Into Pages

Paginate comments

Getting lots of comments on your blog posts? Congratulations! That’s a great indicator of an engaged audience.

But the downside is that loading all those comments can impact your site’s speed.

WordPress comes with a built-in solution for that. Simply go to Settings » Discussion and check the box next to the ‘Break comments into pages’ option.

Break comments in pages

For more detailed instructions, see our guide on how to paginate comments in WordPress.

[Back to Top ↑]

Use a Content Delivery Network (CDN)

Remember how we mentioned above that users in different geographical locations may experience different loading times on your site?

That’s because the location of your web hosting servers can have an impact on your site speed.

For example, let’s say your web hosting company has its servers in the United States. A visitor who is also in the United States will generally see faster loading times than a visitor in India.

Using a Content Delivery Network (CDN) can help to speed up loading times for all of your visitors.

A CDN is a network made up of servers all around the world. Each server will store static files used to make up your website.

These static files include unchanging files such as images, CSS, and JavaScript, unlike your WordPress pages which are dynamic as explained above.

When you use a CDN, every time a user visits your website they are served those static files from whichever server is closest to them. Your own web hosting server will also be faster since the CDN is doing a lot of the work.

You can see how it works in this infographic.

What Is a CDN Infographic

We recommend using Sucuri, Bunny CDN, or Cloudflare (free).

A CDN works well with WordPress websites and compliments your existing WordPress caching plugins for even faster loading times.

[Back to Top ↑]

Don’t Upload Audio or Video Files Directly to WordPress

YouTube

You can directly upload audio and video files to your WordPress site, and it will automatically display them in an HTML5 player…

But you should NEVER do that!

Hosting audio and videos will cost you bandwidth. You could be charged overage fees by your web hosting company, or they may even shut down your site altogether, even if your plan includes ‘unlimited’ bandwidth.

Hosting large media files also increases your backup sizes tremendously, and makes it difficult for you to restore WordPress from backup.

Instead, you should use an audio and video hosting service like YouTube, Vimeo, DailyMotion, or SoundCloud, and let them take care of the hard work. They have the bandwidth for it!

WordPress has a built-in video embed feature, so you can copy and paste your video’s URL directly into your post and it will embed automatically.

Find out more details on how it works in our guide on embedding videos in WordPress.

If you are making a podcast website with WordPress, then we recommend the podcast hosting service Blubrry for the best performance.

[Back to Top ↑]

Use a Theme Optimized for Speed

The WordPress.org theme directory

When selecting a theme for your website, it’s important to pay special attention to speed optimization. Some beautiful and impressive-looking themes are actually poorly coded and can slow your site way down.

It’s usually better to go with a simpler theme than to choose a theme that’s bloated with complex layouts, flashy animations, and other unnecessary features. You can always add those features using quality WordPress plugins.

Premium WordPress theme shops like StudioPress, Themify, CSSIgniter, and Astra offer themes that are well-coded and optimized for speed. You can also check out our article on selecting the perfect WordPress theme for advice on what to look for.

Before you activate your new theme, see our guide on how to properly switch your WordPress theme for a smooth transition.

[Back to Top ↑]

Use Faster Plugins

Poorly coded WordPress plugins often add a lot of bloat, whether your site actually needs the plugin or not. This increases your page load speed and slows down your site.

To help you choose the best plugins, we often publish our expert picks of the best WordPress plugin showcases. We pay special attention to ease of use, user experience, and most importantly performance.

The following are some of our top picks for the most common WordPress plugin categories:

  • WPForms – Fastest and most beginner-friendly contact form plugin for WordPress.
  • All in One SEO – Powerful WordPress SEO plugin that emphasizes website performance to help you get higher SEO rankings.
  • MonsterInsights – Best Google Analytics plugin for WordPress that doesn’t slow down your site. It even includes options to load gtag.js locally to speed up your Google Core Web Vitals scores.
  • Shared Counts – Many social media plugins load additional scripts and not so gracefully. Shared Counts is one of the fastest social media plugins for WordPress.
  • SeedProd – A drag & drop WordPress landing page plugin that helps you build blazing-fast landing pages and even design an entire theme from scratch.

Apart from our own recommendations, you also can run your own tests. Simply run speed tests before and after installing a plugin to compare its impact on performance.

For more details, see our guide on how to run a WordPress speed test.

[Back to Top ↑]


Fine-Tuning WordPress for Speed (Advanced)

By using the WordPress optimization best practices and basic speed tips listed above, you should see a big improvement in your site’s loading times.

But every fraction of a second counts. If you want to get the very fastest speed possible, then you’ll want to make a few more changes.

The following tips are a little more technical, with some requiring you to modify your site files or have a basic understanding of PHP.

You’ll also want to make sure to back up your site first just in case.

Split Long Posts into Pages

Page Break Preview

Readers tend to love blog posts that are longer and more in-depth. Longer posts even often rank higher in search engines.

But if you are publishing long-form articles with lots of images, then they could be hurting your page loading times.

Instead, consider splitting up your longer posts into multiple pages.

WordPress comes with built-in functionality to do that. Simply add a Page Break block in your article where you want to start a new page.

Adding a Page Break Block

For more detailed instructions, see our tutorial on post pagination – how to split WordPress posts into multiple pages.

[Back to Top ↑]

Reduce External HTTP Requests

Reduce cross-domain HTTP requests

Many WordPress plugins and themes load all kinds of files from other websites. These files can include scripts, stylesheets, and images from external resources like Google, Facebook, analytics services, and so on.

It’s ok to use a few of these. Many of these files are optimized to load as quickly as possible, so it’s faster than hosting them on your own website.

But if your plugins are making a lot of these requests, then it could slow down your website significantly.

You can reduce all these external HTTP requests by disabling scripts and styles or merging them into one file. Here’s a tutorial on how to disable your plugins’ CSS files and JavaScript.

[Back to Top ↑]

Reduce Database Calls

Unfortunately, there are a lot of poorly coded WordPress themes out there. They ignore WordPress standard practices and end up making direct database calls, or too many unnecessary requests to the database.

This can really slow down your server by giving it too much work to do.

Even well-coded themes can have code that makes database calls just to get your blog’s basic information.

Note: This step is a little more technical and will require basic knowledge of PHP and WordPress template files.

In this example, every time you see <?php, that’s the start of a new database call:

<html xmlns="http://www.w3.org/1999/xhtml" dir="<?php language_attributes(); ?>">
<head profile="http://gmpg.org/xfn/11">
<meta http-equiv="Content-Type" content="<?php bloginfo('html_type'); ?>
charset=<?php bloginfo('charset'); ?>" />

You can’t blame theme developers for that. They simply have no other way to find out what language your site is in.

But if you are customizing your site using a child theme, then you can replace these database calls with specific information instead. This will reduce all those database calls.

<html xmlns="http://www.w3.org/1999/xhtml" dir="ltr">
<head profile="http://gmpg.org/xfn/11">
<meta http-equiv="Content-Type" content="text/html; charset=UTF-8" />

You can review your parent theme for instances like this that can be easily replaced with static information.

[Back to Top ↑]

Optimize WordPress Database

After using WordPress for a while, your database will have lots of information that you probably don’t need anymore. For improved performance, you can optimize your database to get rid of all that unnecessary information.

This can be easily managed with the WP-Sweep plugin or the WP-Optimize plugin. Both tools allow you to clean your WordPress database by deleting things like trashed posts, revisions, unused tags, etc. These plugins will also optimize your database’s structure with just a click.

See our guide on how to optimize your WordPress database for improved performance.

[Back to Top ↑]

Limit Post Revisions

Changes highlighted in revision history

Post revisions take up space in your WordPress database. Some users believe that revisions can also affect some database queries run by plugins. If the plugin doesn’t specifically exclude post revisions, then it might slow down your site by searching through them unnecessarily.

You can easily limit the number of revisions WordPress keeps for each article. Simply add this line of code to your wp-config.php file:

define( 'WP_POST_REVISIONS', 4 );

This code will limit WordPress to only save your last 4 revisions of each post or page, and discard older revisions automatically.

[Back to Top ↑]

Disable Hotlinking and Leaching of Your Content

If you are creating quality content on your WordPress site, then the sad truth is that it will probably get stolen sooner or later.

One way this happens is when other websites serve your images directly from their URLs on your website, instead of uploading them to their own servers. In effect, they are stealing your web hosting bandwidth, and you don’t get any traffic to show for it.

Simply add this code to your .htaccess file to block the hotlinking of images from your site:

#disable hotlinking of images with forbidden or custom image option
RewriteEngine on
RewriteCond %{HTTP_REFERER} !^$
RewriteCond %{HTTP_REFERER} !^http(s)?://(www\.)?wpbeginner.com [NC]
RewriteCond %{HTTP_REFERER} !^http(s)?://(www\.)?google.com [NC]
RewriteRule \.(jpg|jpeg|png|gif)$ – [NC,F,L]

Don’t forget to change wpbeginner.com with your own domain.

You may also want to check our article showing how to prevent image theft in WordPress.

Some content scraping websites automatically create posts by stealing your content from your RSS feed. You can check out our guide on preventing blog content scraping in WordPress for ways to deal with automated content theft.

[Back to Top ↑]

Use Lazy Loading if Needed

WP Rocket's lazy loading features

If you add many images, multiple video embeds, and photo galleries to your blog posts, then your site can benefit from lazy loading.

Instead of loading all your images and videos at once, lazy loading downloads only those that will be visible on the user’s screen. It replaces all other images and video embeds with a placeholder image.

As a user scrolls down, your website loads images that are now visible in the browser’s viewing area. You can lazy load images, videos, and even WordPress comments and gravatars.

You can learn more in our guide on how to easily lazy load images in WordPress where we cover how to do this using the WP Rocket and Optimole plugins.

For WordPress comments, see our guide on how to lazy load comments in WordPress.

[Back to Top ↑]

Use DNS-Level Website Firewall

How website firewall blocks attacks

A WordPress firewall plugin helps you block brute force attacks, hacking attempts, and malware. However, not all firewall plugins are the same.

Some of them run on your website, which means attackers are already able to reach your web server before they get blocked. This is still effective for security, but not optimal for performance.

This is why we recommend using a DNS-level firewall like Cloudflare or Sucuri. These firewalls block malicious requests before they even reach your website.

[Back to Top ↑]

Fix HTTPS/SSL Errors Without Plugin

Fix HTTPS/SSL Errors Manually

If you are switching your site to HTTPS/SSL, then it is likely that you may run across mixed content errors.

The easiest way to fix this is by installing a plugin like Really Simple SSL. However, the problem is that this plugin catches all URLs first, then changes them to HTTPS before sending them to the users’ browsers.

This has a small but noticeable performance impact. You can reduce this by manually fixing all URLs. For more details see our article on how to fix common SSL issues in WordPress.

[Back to Top ↑]

Use the Latest PHP Version

WordPress is mainly written in the PHP programming language. It is a server-side language, which means it is installed and runs on your hosting server.

All good WordPress hosting companies use the most stable PHP version on their servers. However, your hosting company may be running a slightly older PHP version.

The newer PHP 8.3 is 42% faster than its predecessors. That’s a huge performance boost that your website must take advantage of.

You can see which PHP version your site is using by using the Version Info plugin.

Upon activation, the plugin will show your PHP version in the footer area of your WordPress admin dashboard.

PHP version in WordPress admin dashboard

If your website is using a version lower than PHP 7, then ask your hosting provider to update it for you. If they are unable to do so, then it is time to find a new WordPress hosting company.

[Back to Top ↑]

That’s it! We hope this article helped you learn how to improve WordPress speed and performance.

Go ahead and try out these techniques. Don’t forget to test your website speed before and after implementing these best practices. You’ll be surprised these changes will boost your WordPress performance.

You may also want to see our ultimate WordPress SEO guide to improve your SEO rankings, and our expert pick of the best business phone services for small businesses.

If you liked this article, then please subscribe to our YouTube Channel for WordPress video tutorials. You can also find us on Twitter and Facebook.

The post The Ultimate Guide to Boost WordPress Speed & Performance first appeared on WPBeginner.